In EMQX 5.0, the nodes in the EMQX cluster can be divided into two roles: core (Core) node and replication (Replicant) node. The Core node is responsible for all write operations in the cluster, and serves as the real data source of the EMQX database Mria(opens new window) to store data such as routing tables, sessions, configurations, alarms, and Dashboard user information. The Replicant node is designed to be stateless and does not participate in the writing of data. Adding or deleting Replicant nodes will not change the redundancy of the cluster data. Therefore, in EMQX CRD, we only support the persistence of Core nodes.
EMQX CRD supports configuration of EMQX cluster Core node persistence through .spec.coreTemplate.spec.volumeClaimTemplates field. The semantics and configuration of .spec.coreTemplate.spec.volumeClaimTemplates field are consistent with PersistentVolumeClaimSpec of Kubernetes, and its configuration can refer to the document: PersistentVolumeClaimSpec(opens new window).
When the user configures the .spec.coreTemplate.spec.volumeClaimTemplates field, EMQX Operator will create a fixed PVC (PersistentVolumeClaim) for each Core node in the EMQX cluster to represent the user's request for persistence. When a Pod is deleted, its corresponding PVC is not automatically cleared. When a Pod is rebuilt, it will automatically match the existing PVC. If you no longer want to use the data of the old cluster, you need to manually clean up the PVC.
PVC expresses the user's request for persistence, and what is responsible for storage is the persistent volume (PersistentVolume(opens new window), PV), PVC and PV are bound one-to-one through PVC Name. PV is a piece of storage in the cluster, which can be manually prepared according to requirements, or can be dynamically created using storage classes (StorageClass(opens new window)) preparation. When a user is no longer using a PV resource, the PVC object can be manually deleted, allowing the PV resource to be recycled. Currently, there are two recycling strategies for PV: Retained (retained) and Deleted (deleted). For details of the recycling strategy, please refer to the document: Reclaiming(opens new window).
EMQX Operator uses PV to persist the data in the /opt/emqx/data directory of the Core node of the EMQX cluster. The data stored in the /opt/emqx/data directory of the EMQX Core node mainly includes: routing table, session, configuration, alarm, Dashboard user information and other data.
NOTE: The storageClassName field indicates the name of the StorageClass. You can use the command kubectl get storageclass to get the StorageClass that already exists in the Kubernetes cluster, or you can create a StorageClass according to your own needs. The accessModes field indicates the access mode of the PV. Currently, By default the ReadWriteOnce mode is used. For more access modes, please refer to the document: AccessModes(opens new window). The .spec.dashboardServiceTemplate field configures the way the EMQX cluster exposes services to the outside world: NodePort, and specifies that the nodePort corresponding to port 18083 of the EMQX Dashboard service is 32016 (the value range of nodePort is: 30000-32767).
EMQX CRD supports configuring EMQX cluster persistence through the .spec.persistent field. The semantics and configuration of the .spec.persistent field are consistent with PersistentVolumeClaimSpec of Kubernetes, and its configuration can refer to the document: PersistentVolumeClaimSpec(opens new window).
When the user configures the .spec.persistent field, EMQX Operator will create a fixed PVC (PersistentVolumeClaim) for each Pod in the EMQX cluster to represent the user's request for persistence. When a Pod is deleted, its corresponding PVC is not automatically cleared. When a Pod is rebuilt, it will automatically match the existing PVC. If you no longer want to use the data of the old cluster, you need to manually clean up the PVC.
PVC expresses the user's request for persistence, and what is responsible for storage is the persistent volume (PersistentVolume(opens new window), PV), PVC and PV are bound one-to-one through PVC Name. PV is a piece of storage in the cluster, which can be manually prepared according to requirements, or can be dynamically created using storage classes (StorageClass(opens new window)) preparation. When a user is no longer using a PV resource, the PVC object can be manually deleted, allowing the PV resource to be recycled. Currently, there are two recycling strategies for PV: Retained (retained) and Deleted (deleted). For details of the recycling strategy, please refer to the document: Reclaiming(opens new window).
EMQX Operator uses PV to persist the data in the /opt/emqx/data directory of the EMQX node. The data stored in the /opt/emqx/data directory of the EMQX node mainly includes: loaded_plugins (loaded plug-in information), loaded_modules (loaded module information), mnesia database data (storing EMQX’s own operating data, such as alarm records, rules resources and rules created by the engine, Dashboard user information and other data).
NOTE: The storageClassName field indicates the name of the StorageClass. You can use the command kubectl get storageclass to get the StorageClass that already exists in the Kubernetes cluster, or you can create a StorageClass according to your own needs. The accessModes field indicates the access mode of the PV. Currently, By default the ReadWriteOnce mode is used. For more access modes, please refer to the document: AccessModes(opens new window). The .spec.emqxTemplate.serviceTemplate field configures the way the EMQX cluster exposes services to the outside world: NodePort, and specifies that the nodePort corresponding to port 18083 of the EMQX Dashboard service is 32016 (the value range of nodePort is: 30000-32767).
Save the above content as: emqx-persistent.yaml, execute the following command to deploy the EMQX cluster:
kubectl apply -f emqx-persistent.yaml
1
The output is similar to:
emqx.apps.emqx.io/emqx created
1
Check whether the EMQX cluster is ready
kubectl get emqx emqx -o json | jq ".status.emqxNodes"
NOTE: node represents the unique identifier of the EMQX node in the cluster. node_status indicates the status of the EMQX node. otp_release indicates the version of Erlang used by EMQX. role represents the EMQX node role type. version indicates the EMQX version. EMQX Operator creates an EMQX cluster with three core nodes and three replicant nodes by default, so when the cluster is running normally, you can see information about three running core nodes and three replicant nodes. If you configure the .spec.coreTemplate.spec.replicas field, when the cluster is running normally, the number of running core nodes displayed in the output should be equal to the value of this replicas. If you configure the .spec.replicantTemplate.spec.replicas field, when the cluster is running normally, the number of running replicant nodes displayed in the output should be equal to the replicas value.
kubectl get emqxenterprise emqx-ee -o json | jq ".status.emqxNodes"
NOTE: node represents the unique identifier of the EMQX node in the cluster. node_status indicates the status of the EMQX node. otp_release indicates the version of Erlang used by EMQX. version indicates the EMQX version. EMQX Operator will pull up the EMQX cluster with three nodes by default, so when the cluster is running normally, you can see the information of the three running nodes. If you configure the .spec.replicas field, when the cluster is running normally, the number of running nodes displayed in the output should be equal to the value of replicas.
# Verify whether the EMQX cluster persistence is in effect
Verification scheme: 1) Create a test rule through the Dashboard in the old EMQX cluster; 2) Delete the old cluster; 3) Recreate the EMQX cluster, and check whether the previously created rule exists through the Dashboard.
Create test rules through Dashboard
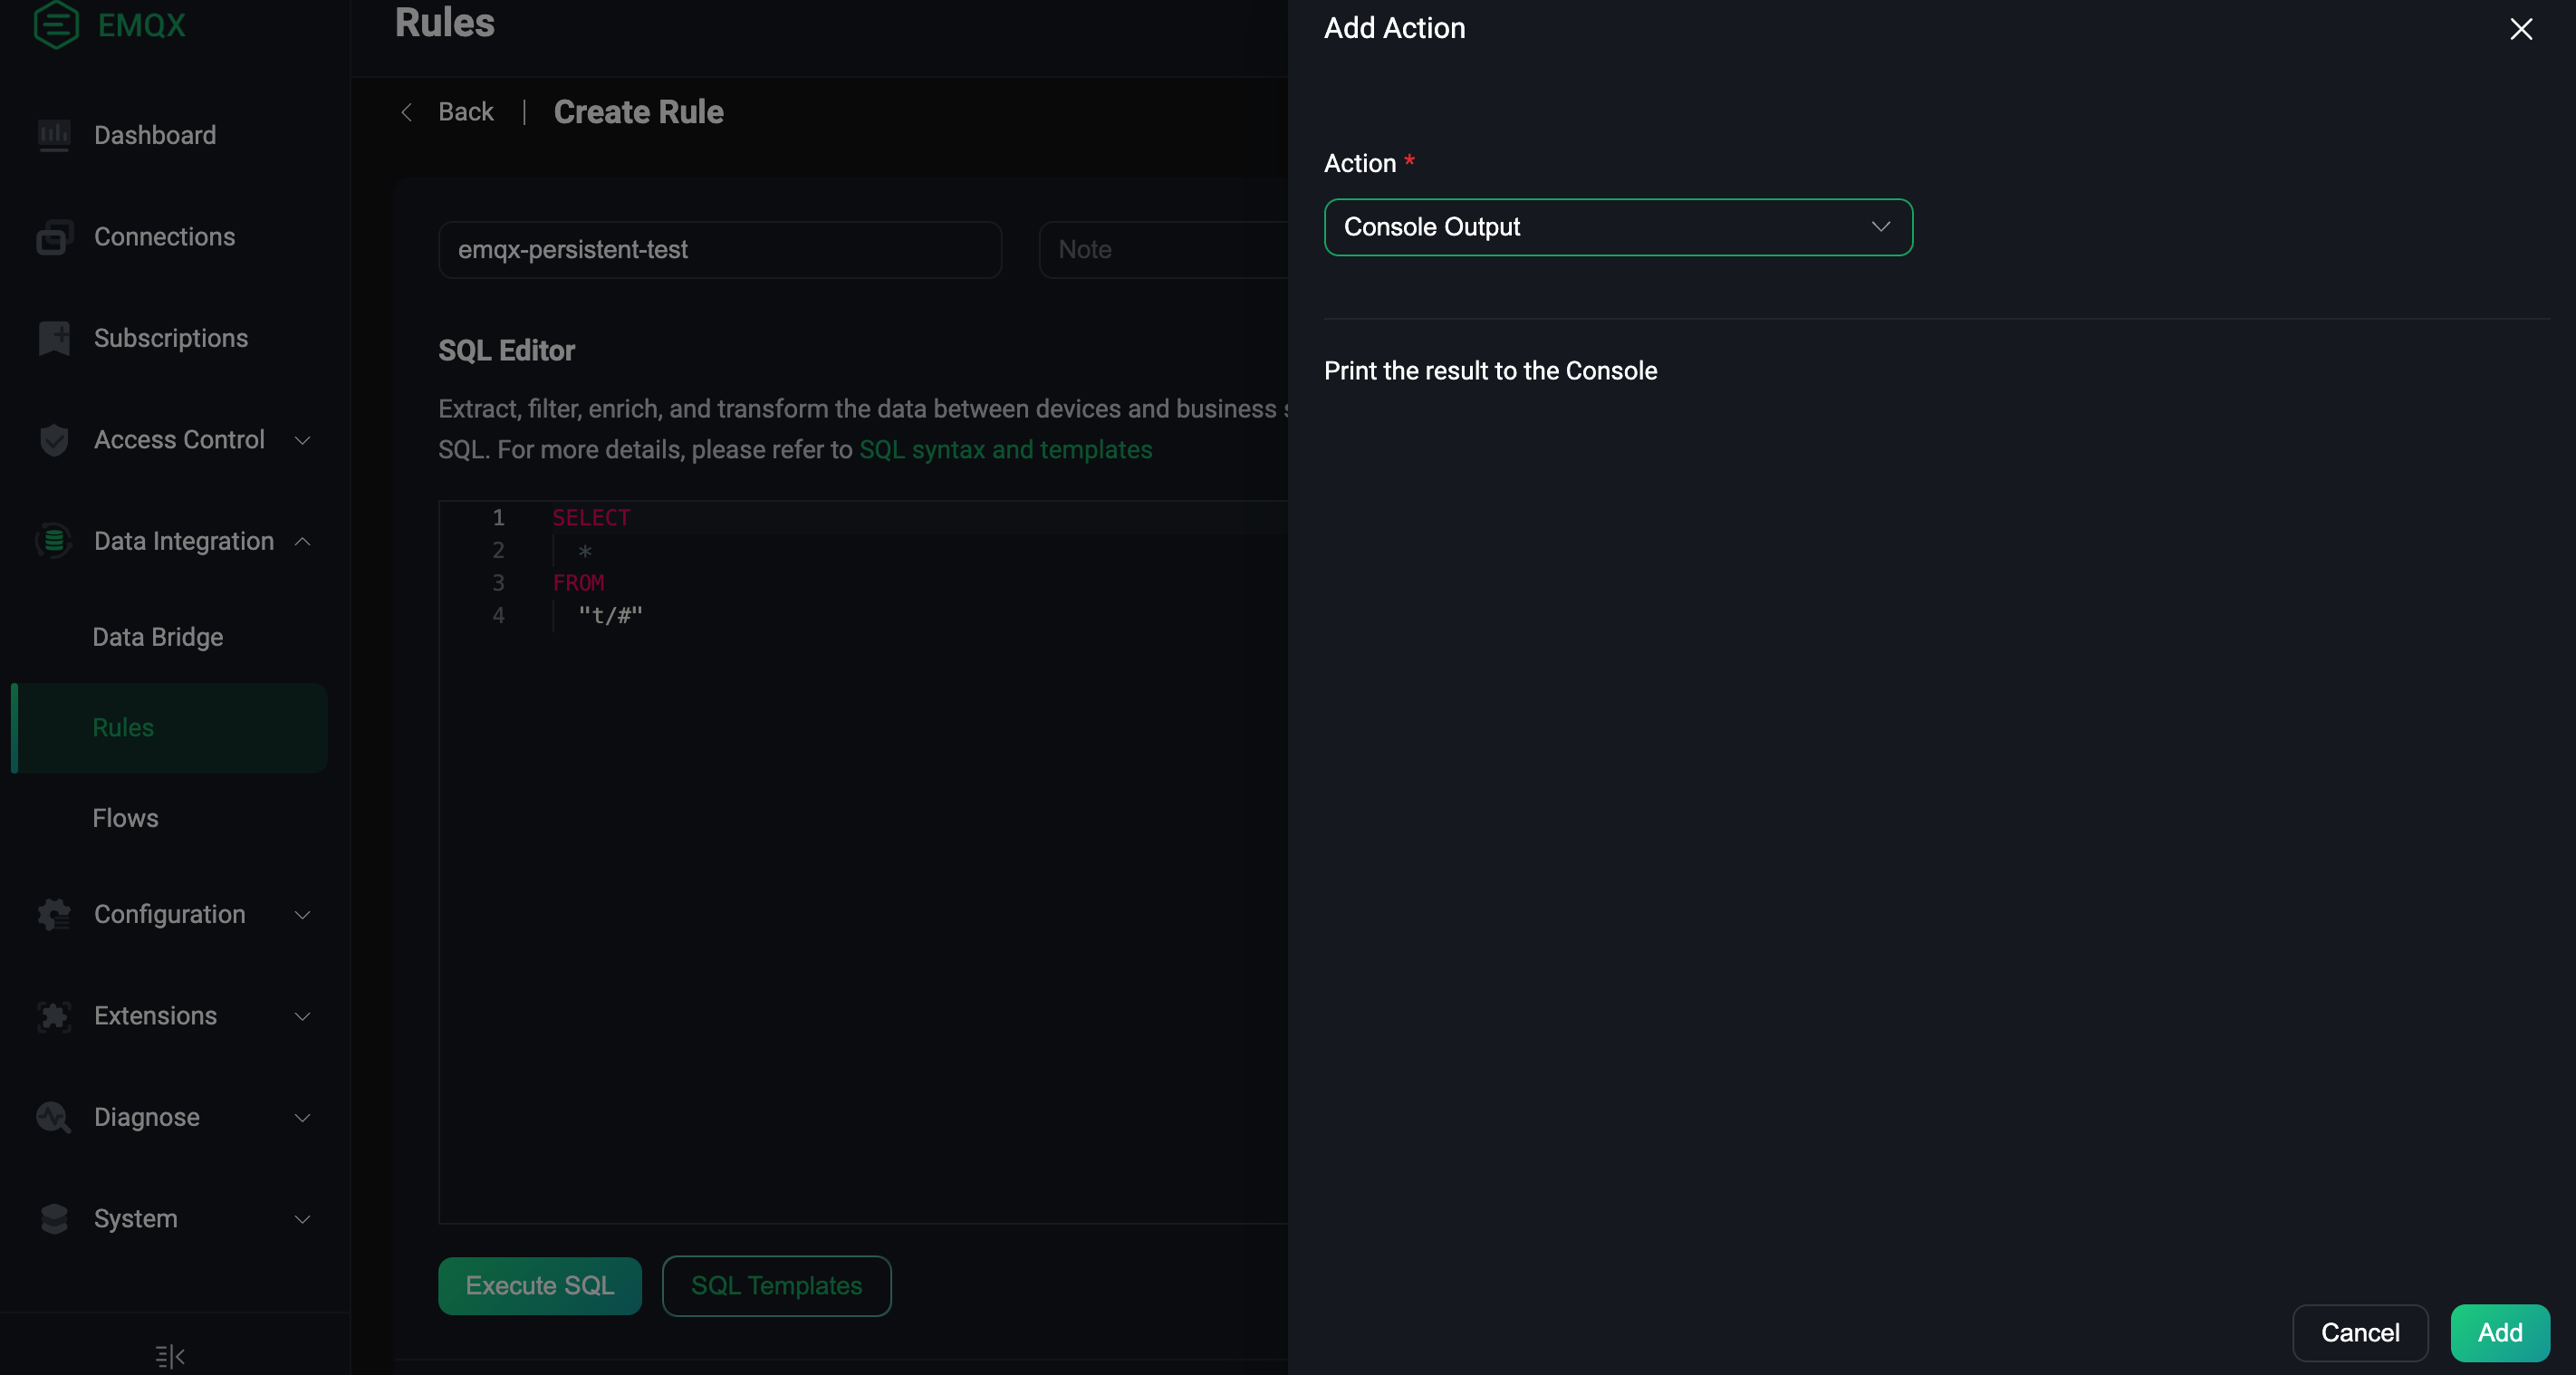
Open the browser, enter the IP of the host where the EMQX Pod is located and the port 32016 to log in to the EMQX cluster Dashboard (Dashboard default username: admin, default password: public), enter the Dashboard and click Data Integration → Rules to enter the creation rule page, we first click the Add Action button to add a response action for this rule, and then click Create to generate a rule, as shown in the following figure:
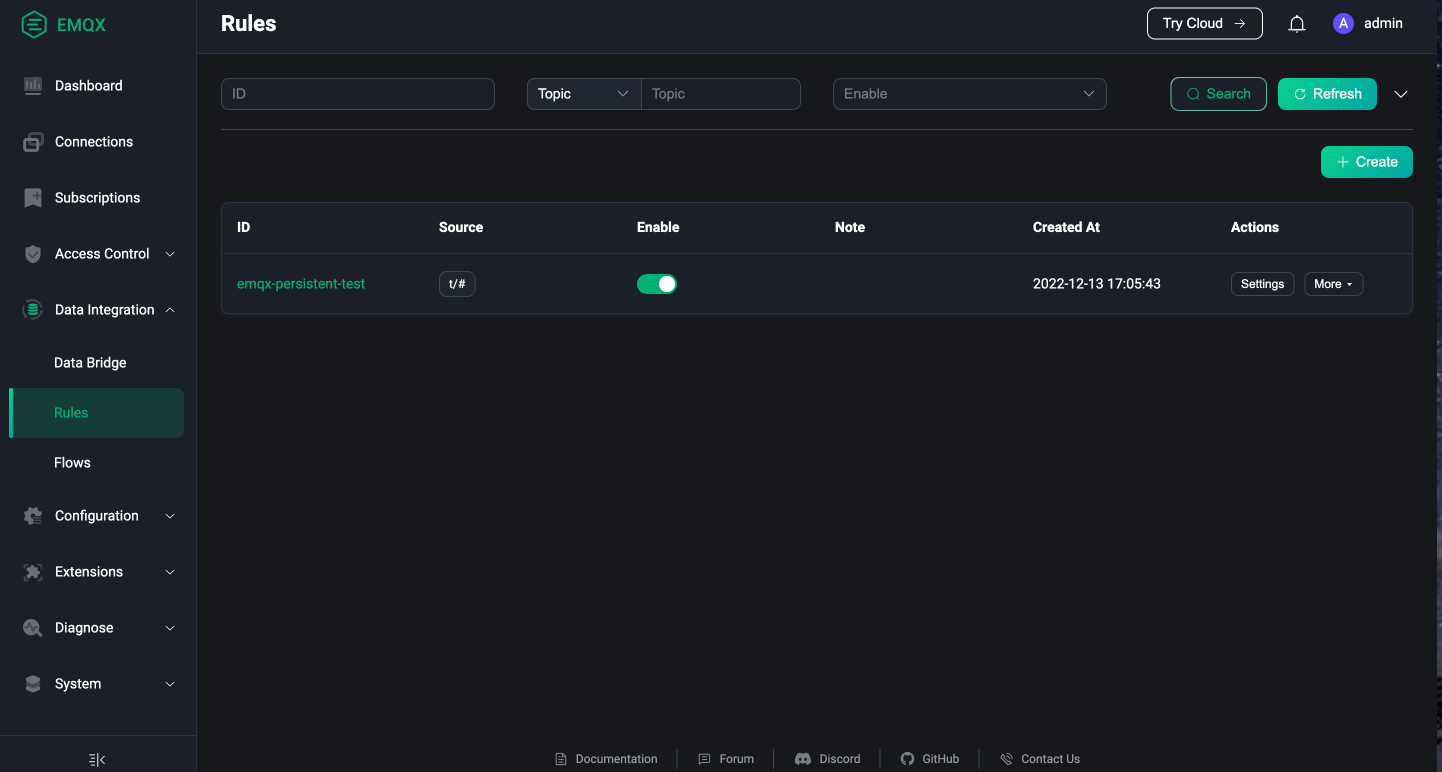
When our rule is successfully created, a rule record will appear on the page with the rule ID: emqx-persistent-test, as shown in the figure below:
Delete the old EMQX cluster
Execute the following command to delete the EMQX cluster:
kubectl delete -f emqx-persistent.yaml
1
NOTE: emqx-persistent.yaml is the YAML file used for the first deployment of the EMQX cluster in this article. This file does not need to be changed.
The output is similar to:
emqx.apps.emqx.io "emqx" deleted
1
Execute the following command to check whether the EMQX cluster is deleted:
kubectl get emqx emqx -o json | jq ".status.emqxNodes"
1
The output is similar to:
Error from server (NotFound): emqxes.apps.emqx.io "emqx" not found
1
Recreate the EMQX cluster
Execute the following command to recreate the EMQX cluster:
kubectl apply -f emqx-persistent.yaml
1
The output is similar to:
emqx.apps.emqx.io/emqx created
1
Next, execute the following command to check whether the EMQX cluster is ready:
kubectl get emqx emqx -o json | jq ".status.emqxNodes"
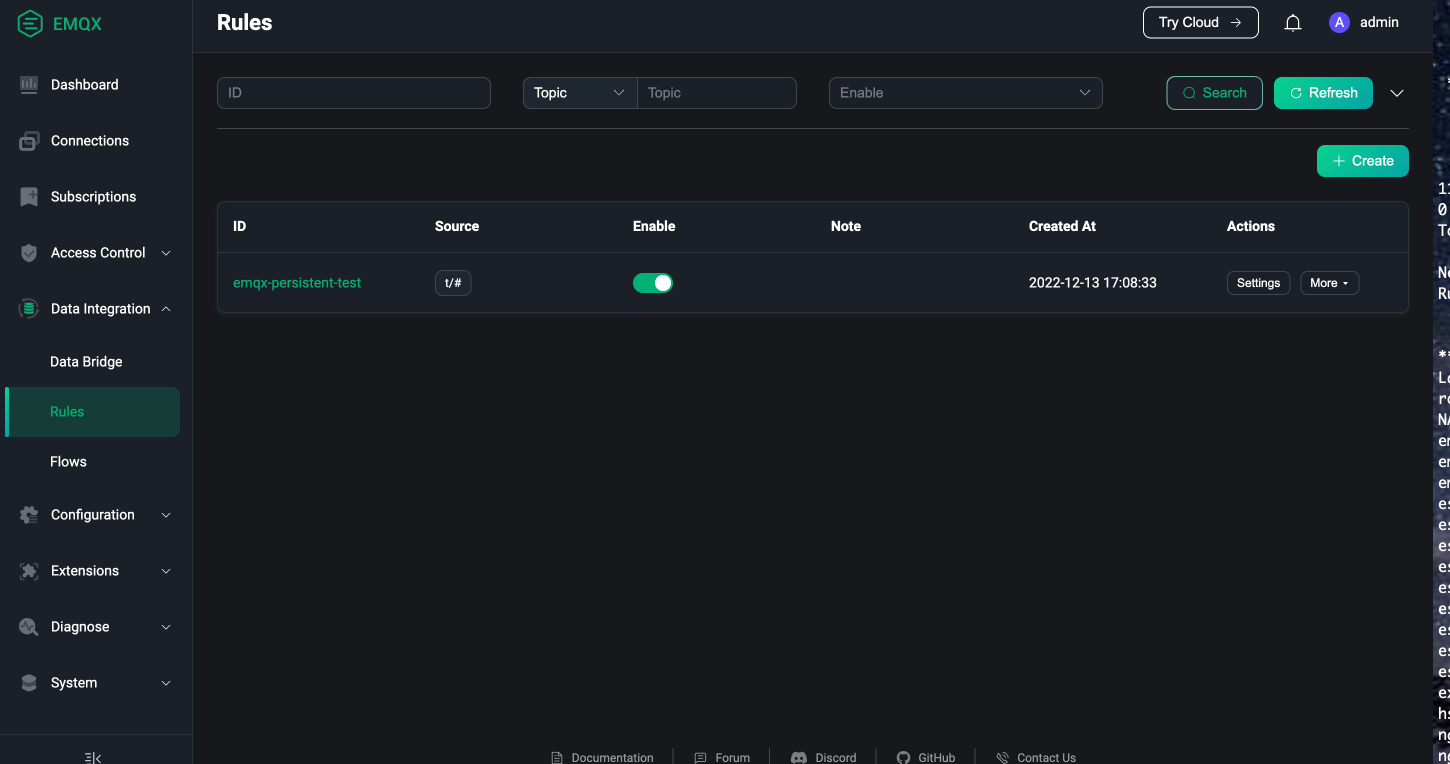
Finally, visit the EMQX Dashboard through the browser to check whether the previously created rules exist, as shown in the following figure:
It can be seen from the figure that the rule emqx-persistent-test created in the old cluster still exists in the new cluster, which means that the persistence we configured is in effect.