Quick Start: Experience Namespaces
This section guides you through using the MQTTX client to connect to EMQX and quickly experience the core capabilities of the namespace feature: tenant identification, client and topic isolation, and ACL isolation.
Enable a Namespace Source (Generate the tns Attribute)
By configuring a namespace source, EMQX can identify the namespace from client connection information and automatically create the corresponding namespace when the client connects.
Enable via Configuration File
Add the following configuration to base.hocon to extract the namespace identifier from the username:
mqtt.client_attrs_init = [
  { expression = "nth(1, tokens(username, '-'))", set_as_attr = tns }
]
Example
If a client connects with the username tenantA-user1, EMQX extracts tenantA as the namespace identifier.
Enable via Dashboard
You can also configure the namespace source in the Dashboard:
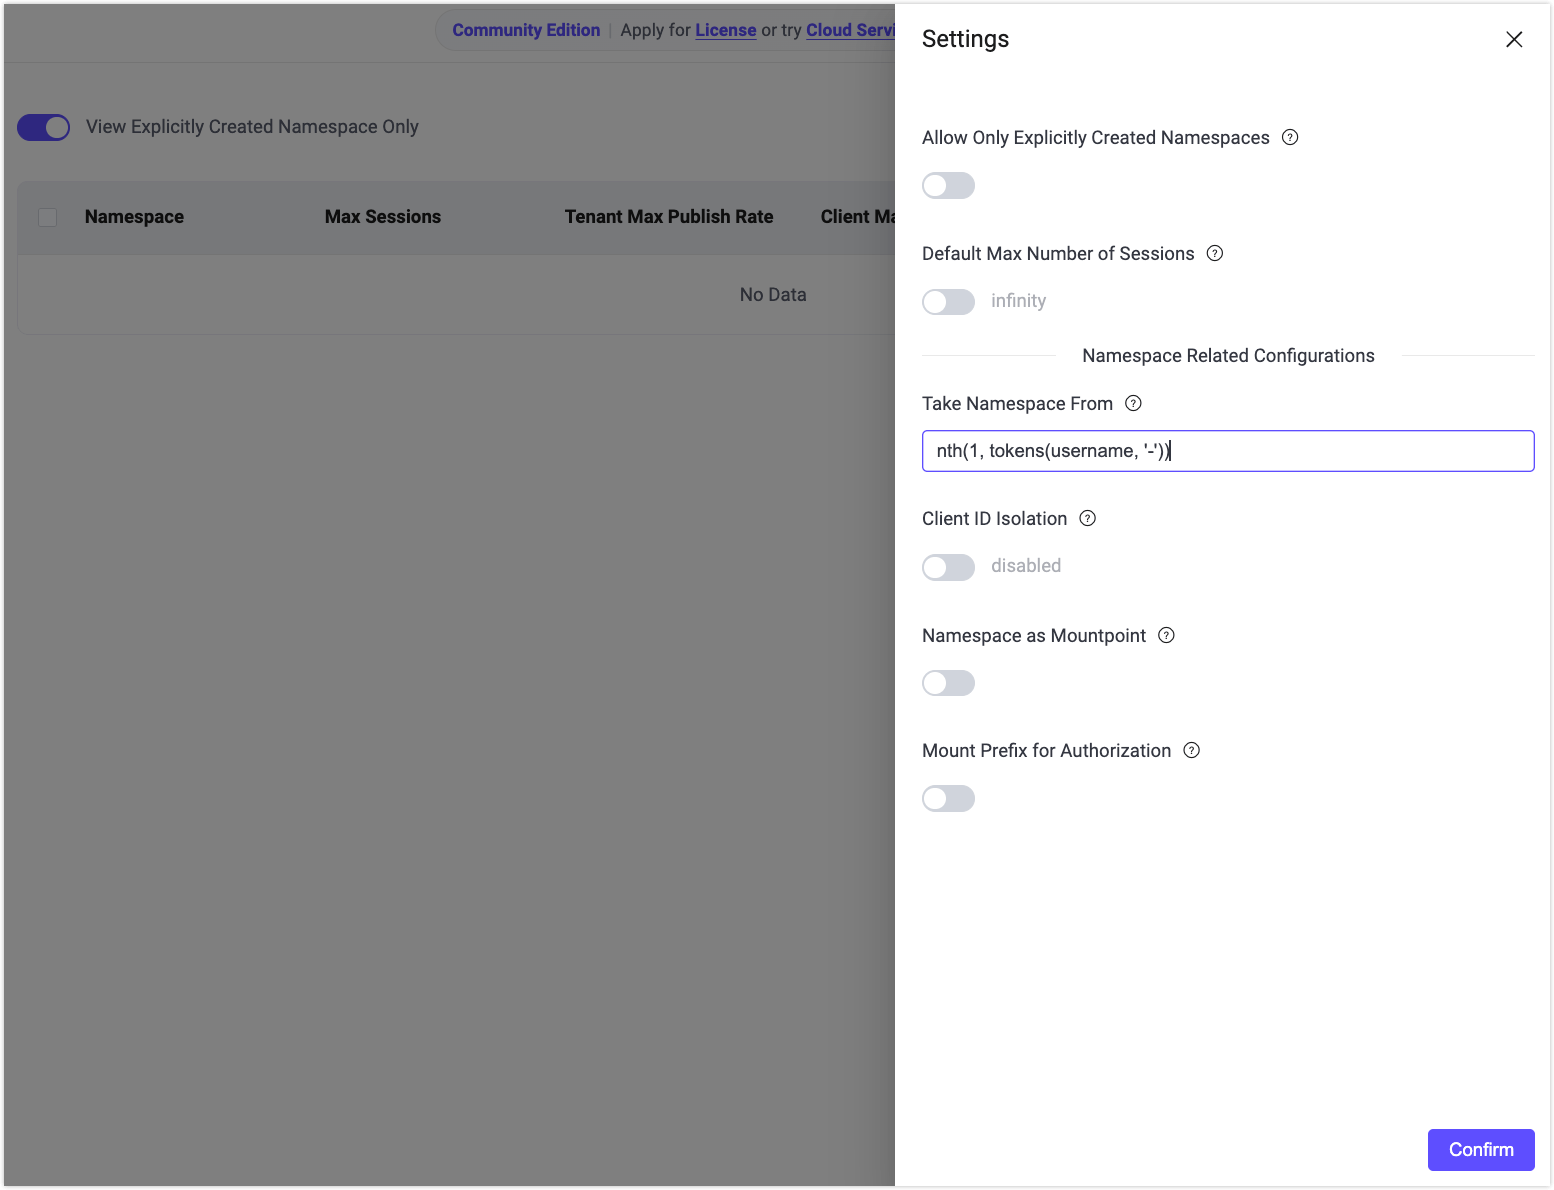
Navigate to Management -> Namespace -> Settings.
In Take Namespace From, enter the expression:
nth(1, tokens(username, '-'))Click Confirm to save the configuration.
Verify Automatic Namespace Creation
Use MQTTX to create an MQTT client connection simulating tenant
tenantA:- Username:
tenantA-user1 - Connect to EMQX.
- Username:
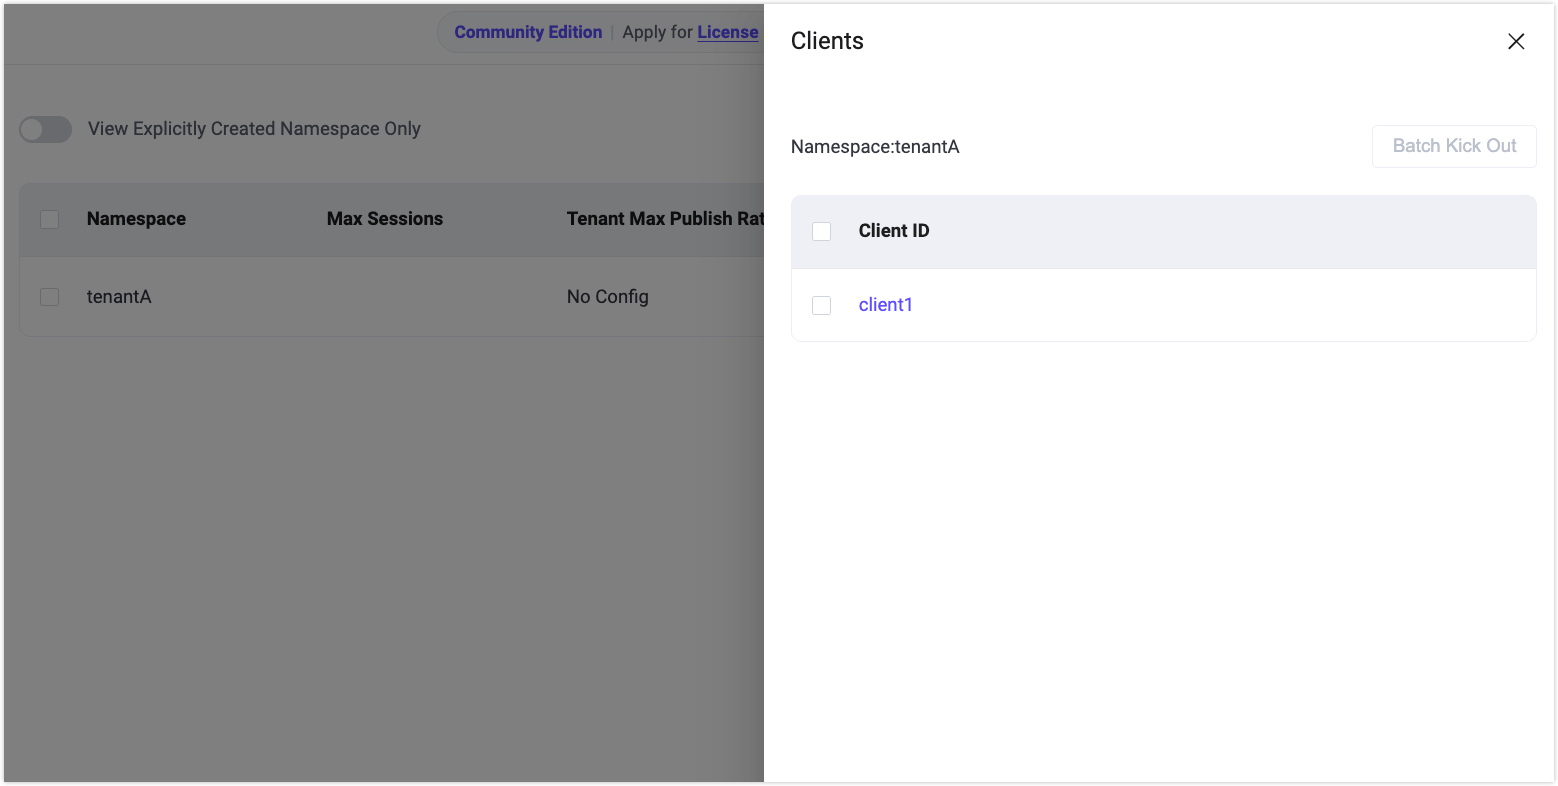
On the Namespace page, disable View Explicitly Created Namespaces Only.
Verify that the namespace
tenantAis automatically created.In the Actions column, click Clients to view clients connected to this namespace.
Configure and Verify Namespace Isolation
Enable Client ID and Topic Isolation
To isolate client IDs and topics across different namespaces, you need to enable the relevant options in the global namespace settings.
Enable via Configuration File
Add the following configuration to base.hocon:
mqtt.clientid_override = "concat([client_attrs.tns, '-', clientid])"
mqtt.namespace_as_mountpoint = true
These settings will:
- Automatically add a namespace prefix to client IDs, preventing client ID conflicts across namespaces.
- Automatically add a
{namespace}/prefix to topics internally in the broker, enabling namespace-level topic isolation.
Enable via Dashboard
- In the Dashboard, navigate to Management -> Namespace -> Settings.
- Enable the following options:
- Client ID Isolation, with default value as
concat([client_attrs.tns, '-', clientid]). - Namespace as Mountpoint
- Client ID Isolation, with default value as
- Click Confirm to save the settings.
Verify Client and Topic Isolation
Use MQTTX to create two MQTT client connections to simulate two tenants:
tenantAandtenantB.Client A (Tenant: tenantA):
Parameter Value Client ID client1Username tenantA-user1Subscribe test/topicClient B (Tenant: tenantB):
Parameter Value Client ID client1Username tenantB-user2Publish test/topicUse Client B to publish a message. Verify the result in MQTTX and the EMQX Dashboard:
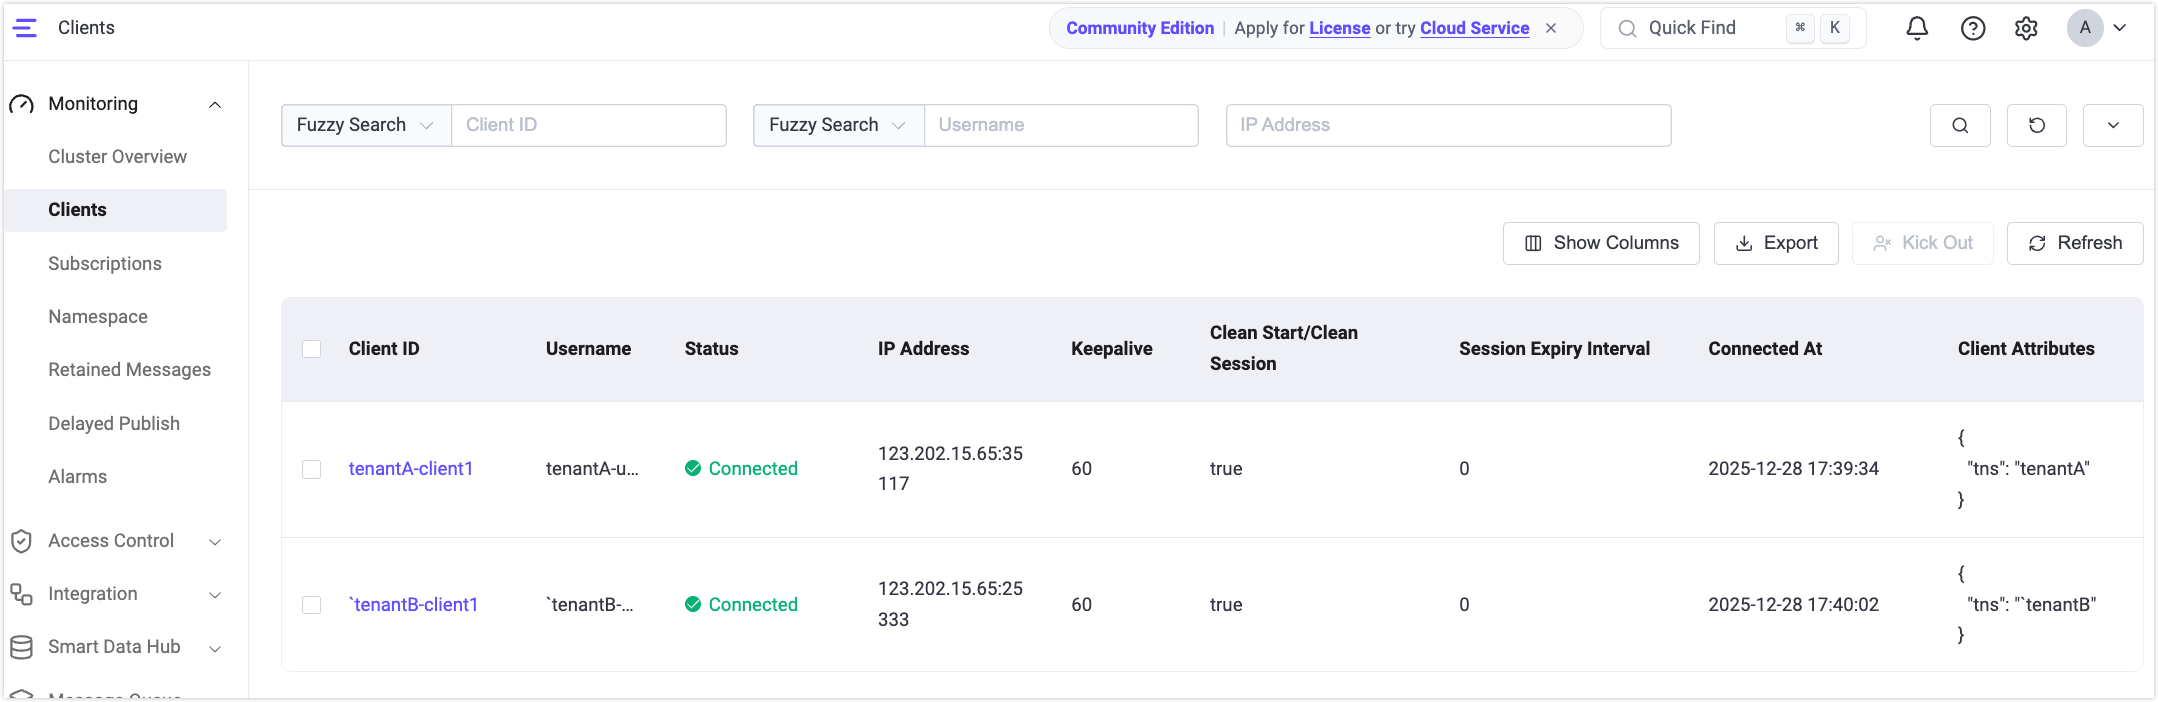
- Although both clients use the same client ID (
client1), due to the prefix rule, they connect astenantA-client1andtenantB-client1, avoiding conflicts. - Even though both clients use the same topic (
test/topic), Client A will not receive messages published by Client B because they are isolated by namespace.
- Although both clients use the same client ID (
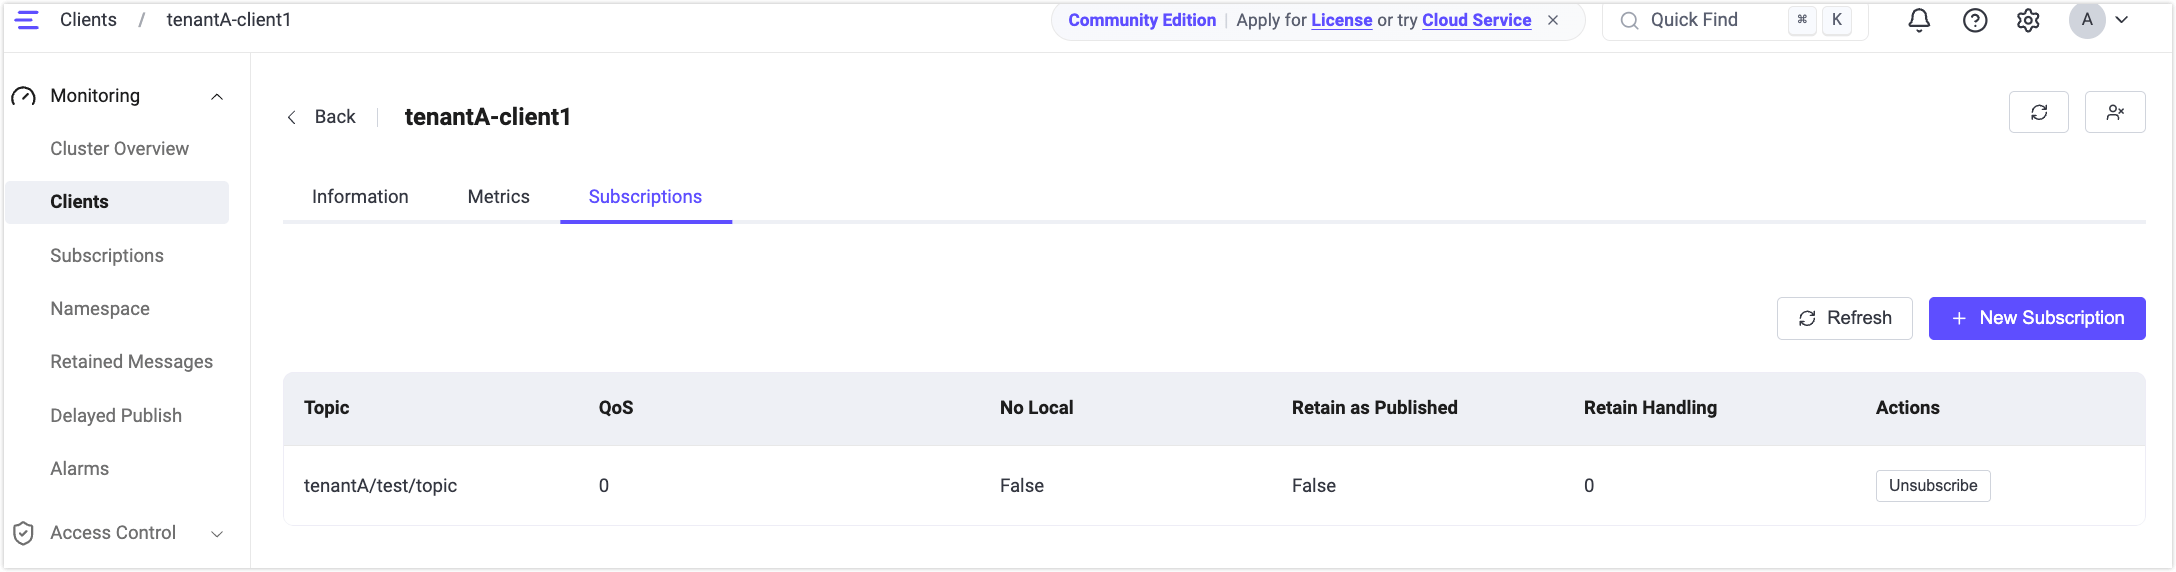
Go to the Monitoring -> Clients page to view:
- Client A's subscribed topic appears as
tenantA/test/topic. - Client B's published topic appears as
tenantB/test/topic.
- Client A's subscribed topic appears as
Enable Mountpoint-Based ACL Checks
By default, to maintain backward compatibility, authorization (ACL) checks do not include the topic prefix (mountpoint). This means that authorization rules are matched against the original topic name (for example, test/topic) rather than the namespaced topic (for example, tenantA/test/topic).
Starting from EMQX 6.1, you can enable authorization checks that include the topic prefix to enforce namespace-level ACL isolation.
Enable via Configuration File
Add the following configuration to base.hocon:
authorization.include_mountpoint = trueEnable via Dashboard
- In the Dashboard, navigate to Management -> Namespace -> Settings, or Access Control -> Client Authorization -> Settings.
- Enable Mount Prefix for Authorization.
- Save the settings.
Note
When authorization.include_mountpoint = true is enabled, all authorization rules must include the topic prefix in their topic matching patterns.
For example, if a client connects through a listener with the topic prefix tenantA/ and wants to subscribe to test/topic, the corresponding authorization rule must be configured as tenantA/test/topic.