# GCP IoT Core Device
EMQX is one of the alternatives for the MQTT service of Google Cloud IoT Core (opens new window) which will be retired soon. To facilitate the migration of your current MQTT devices from Google Cloud IoT Core (referred to as GCP IoT Core) to EMQX, a compatibility layer is offered in EMQX with the following functions:
- Importing device configuration and authentication data from GCP IoT Core.
- Providing device configuration and MQTT authentication in GCP IoT Core compatible format.
The EMQX compatibility layer is implemented through a GCP IoT Core Device module which requires minimal changes to your device code. You can add this module to EMQX Dashboard and import your device configuration and authentication data.
This page provides a comprehensive guide for migrating your devices in GCP IoT Core to EMQX, including how to export the device credentials from Google Cloud IoT Core and import them into EMQX and switch the endpoint in the actual devices to the EMQX. The migration process can be executed through the command line and REST API, or conveniently through the EMQX Dashboard. Both methods are demonstrated in detail on this page.
# Migrate from GCP IoT Core to EMQX
The device migration consists of the following two tasks:
- Export device data from GCP IoT Core
- Import device data into EMQX
# Export Device Data from GCP IoT Core
For export, you can use a script utilizing the Google Cloud IoT Core REST API (opens new window).
Run the following command in the same
emqx-gcp-iot-migratefolder you cloned in Connect Devices to MQTT Endpoint:python gcp-export.py --project iot-export --region europe-west1 --registry my-registry > gcp-data.jsonCopied!1The
gcp-data.jsonfile now contains the data ready for being imported into EMQX.Start EMQX using Docker. This is the easiest way to start EMQX locally.
8883 is the MQTT port (over TLS), 18083 is the HTTP API port.
docker run -d --name emqx -p 8883:8883 -p 18083:18083 emqx/emqx:4.4.18Copied!1Enable the GCP compatibility module in EMQX.
curl -s -u 'admin:public' -X POST 'http://127.0.0.1:18083/api/v4/modules/' -H "Content-Type: application/json" --data-raw '{"type": "gcp_device", "config": {}}'Copied!1TIP
You can also enable the GCP compatibility module by adding it via the EMQX Dashboard. For more information, see Add Module via Dashboard.
# Import Device Data into EMQX
Use the REST API to import data into EMQX. admin:public is the default username and password for EMQX.
curl -s -v -u 'admin:public' -X POST 'http://127.0.0.1:18083/api/v4/gcp_devices' --data @gcp-data.json ... {"data":{"imported":14,"errors":0},"code":0}Copied!
2
3
You can see that 14 devices were imported.
# Manage Device Data via API
After the device data are exported to EMQX from GCP IoT Core, EMQX provides some additional API calls to manage EMQX data using "device" terminology.
# Manage Individual Device Configuration
To get the configuration for the device c2-ec-x509:
>curl -s -u 'admin:public' -X GET 'http://127.0.0.1:18083/api/v4/gcp_devices/c2-ec-x509' | jq { "data": { "registry": "my-registry", "project": "iot-export", "location": "europe-west1", "keys": [ { "key_type": "ES256_X509_PEM", "key": "...", "expires_at": 0 } ], "deviceid": "c2-ec-x509", "created_at": 1685477382, "config": "AAECAwQFBgcICQoLDA0ODxAREhMUFRYXGBkaGxwdHh8gISIjJCUmJygpKissLS4vMDEyMzQ1Njc4OTo7PD0+P0BBQkNERUZHSElKS0xNTk9QUVJTVFVWV1hZWltcXV5fYGFiY2RlZmdoaWprbG1ub3BxcnN0dXZ3eHl6e3x9fn+AgYKDhIWGh4iJiouMjY6PkJGSk5SVlpeYmZqbnJ2en6ChoqOkpaanqKmqq6ytrq+wsbKztLW2t7i5uru8vb6/wMHCw8TFxsfIycrLzM3Oz9DR0tPU1dbX2Nna29zd3t/g4eLj5OXm5+jp6uvs7e7v8PHy8/T19vf4+fr7/P3+/w==" }, "code": 0 }Copied!
2
3
4
5
6
7
8
9
10
11
12
13
14
15
16
17
18
19
To update the configuration for the device c2-ec-x509 (save the configuration to a file c2-ec-x509.json for convenience and change the config field):
>cat c2-ec-x509.json { "registry": "my-registry", "project": "iot-export", "location": "europe-west1", "keys": [ { "key_type": "ES256_X509_PEM", "key": "...", "expires_at": 0 } ], "config": "bmV3Y29uZmlnCg==" } >curl -s -u 'admin:public' -X PUT 'http://127.0.0.1:18083/api/v4/gcp_devices/c2-ec-x509' -H "Content-Type: application/json" -d @c2-ec-x509.json {"data":{},"code":0}Copied!
2
3
4
5
6
7
8
9
10
11
12
13
14
15
16
17
To delete the configuration for the device c2-ec-x509:
>curl -s -u 'admin:public' -X DELETE 'http://127.0.0.1:18083/api/v4/gcp_devices/c2-ec-x509' {"data":{},"code":0} >curl -s -u 'admin:public' -X GET 'http://127.0.0.1:18083/api/v4/gcp_devices/c2-ec-x509' | jq { "message": "device not found" }Copied!
2
3
4
5
6
# List Devices
To list all devices:
>curl -s -u 'admin:public' -X GET 'http://127.0.0.1:18083/api/v4/gcp_devices' | jq { "meta": { "page": 1, "limit": 10000, "hasnext": false, "count": 13 }, "data": [ { "registry": "my-registry", "project": "iot-export", "location": "europe-west1", "keys": [ { "key_type": "RSA_X509_PEM", "key": "...", "expires_at": 0 } ], "deviceid": "2820826361193805", "created_at": 1685477382, "config": "" }, ...Copied!
2
3
4
5
6
7
8
9
10
11
12
13
14
15
16
17
18
19
20
21
22
23
24
25
The query allows pagination: _limit and _page parameters:
>curl -s -u 'admin:public' -X GET 'http://127.0.0.1:18083/api/v4/gcp_devices?_page=2&_limit=2' | jqCopied!
# Migrate and Manage Device Data via Dashboard
The GCP IoT Core Device module in EMQX Dashboard provides you with a visualized way to do the device data migration and management.
# Add GCP IoT Core Device Module
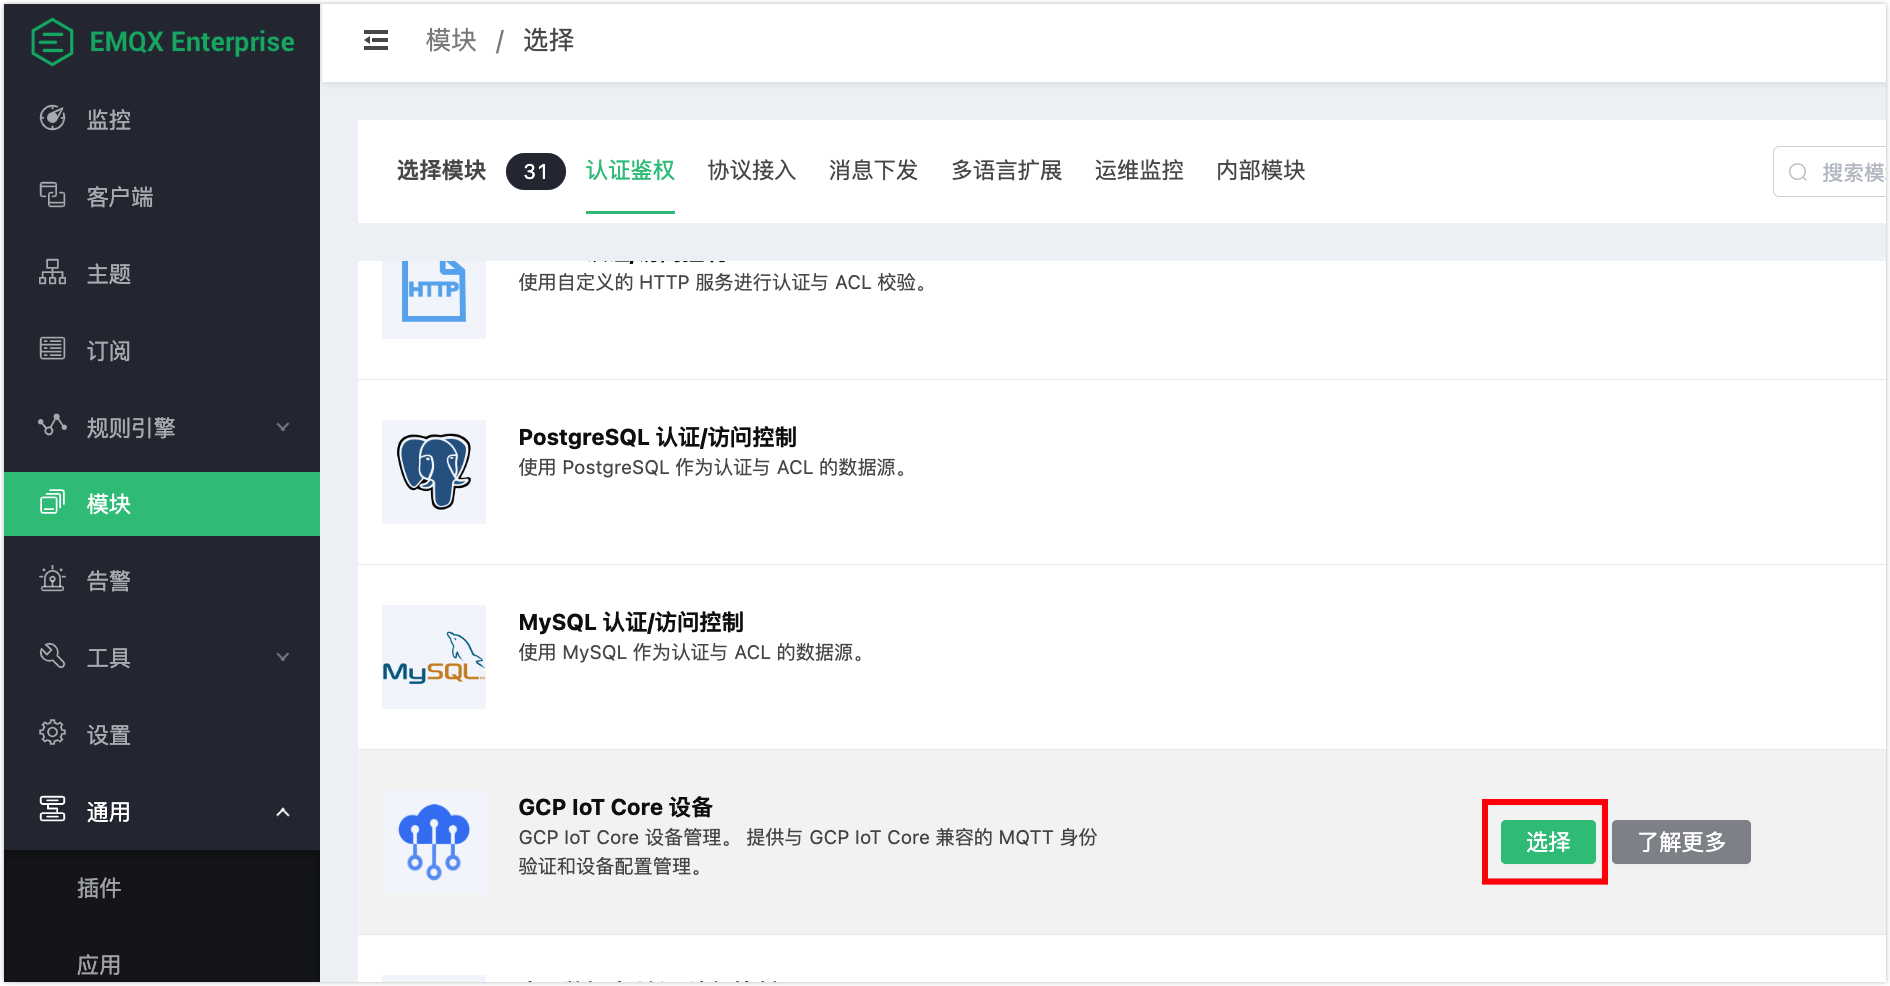
Go to EMQX Dashboard. Click Modules from the left navigation menu.
On the Modules page, click Add Module. In the Module Select area, click Authentication.
Locate the GCP IoT Core Device and click Select.
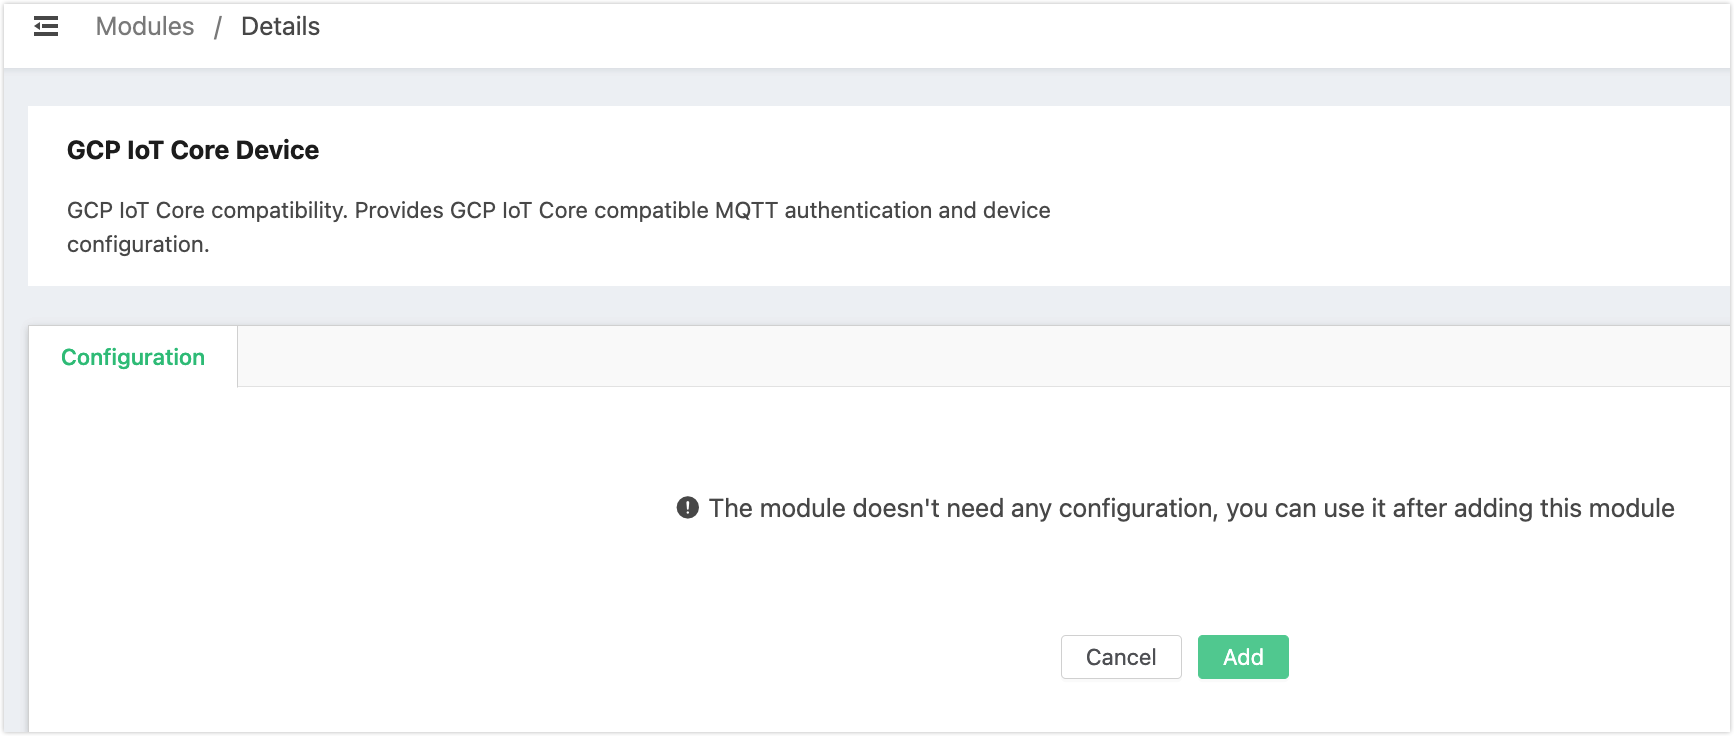
Click Add on the page to enable the module.
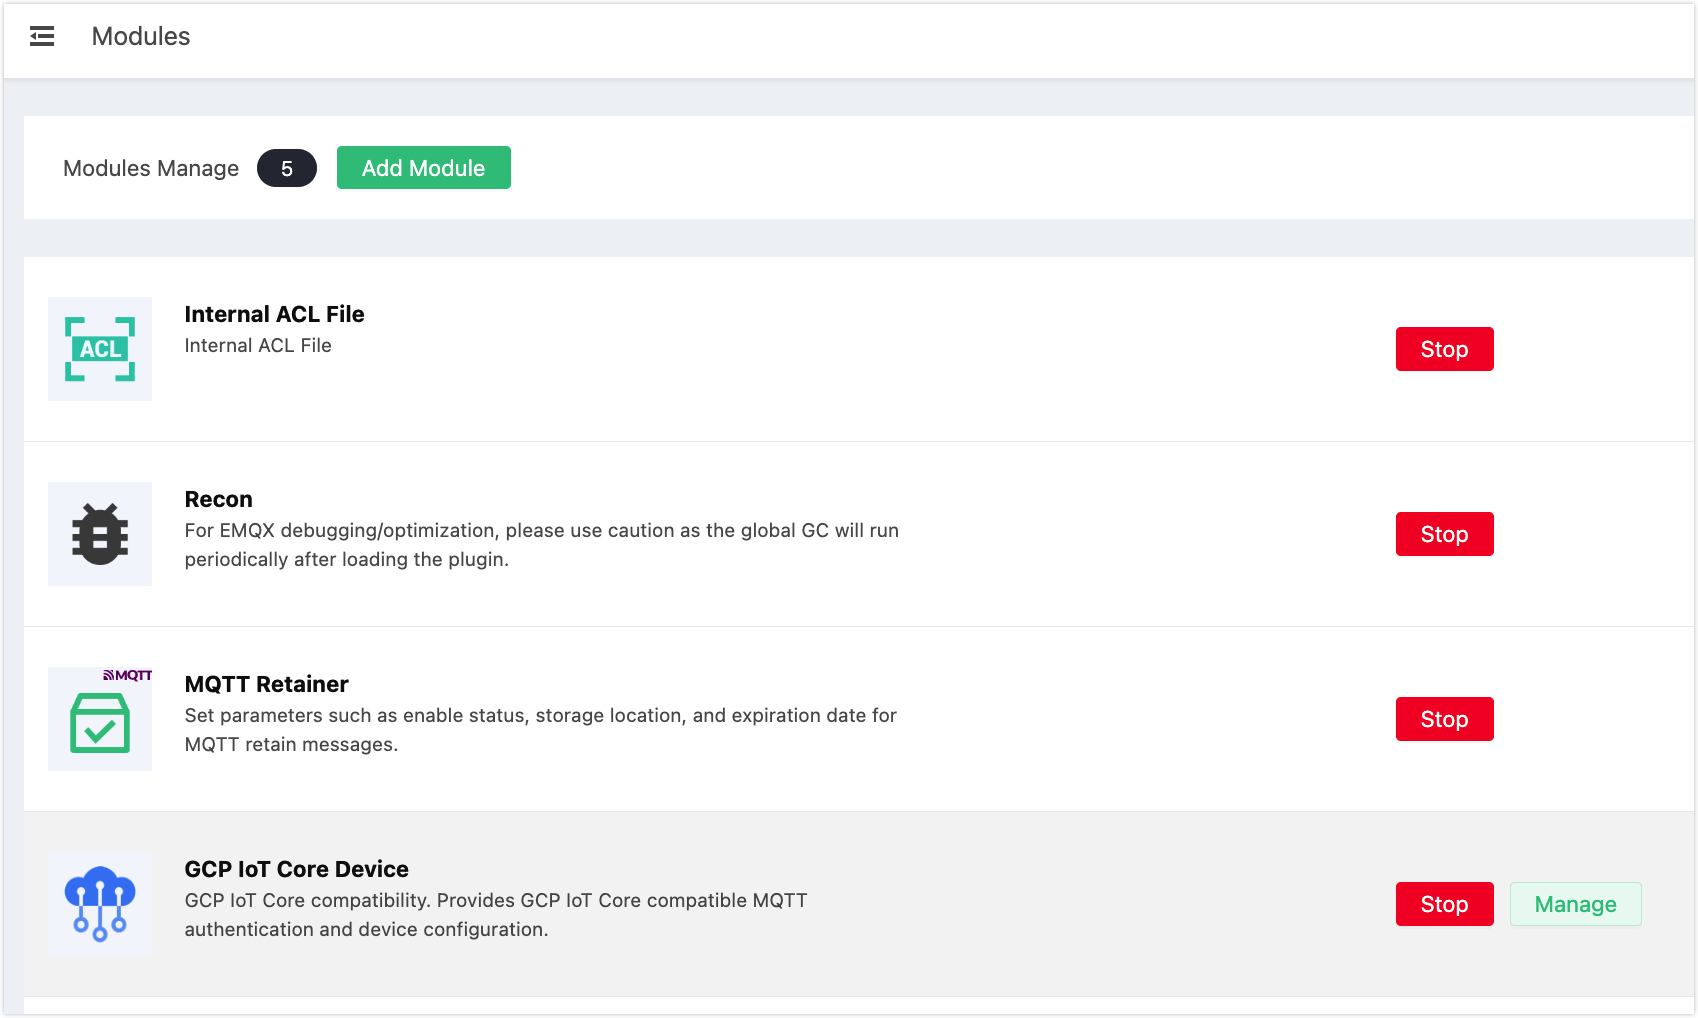
Now you can see the GCP IoT Core Device is listed on the Modules page.
# Import Device Data
On the Modules page, click the Manage button for the GCP IoT Core Device module.
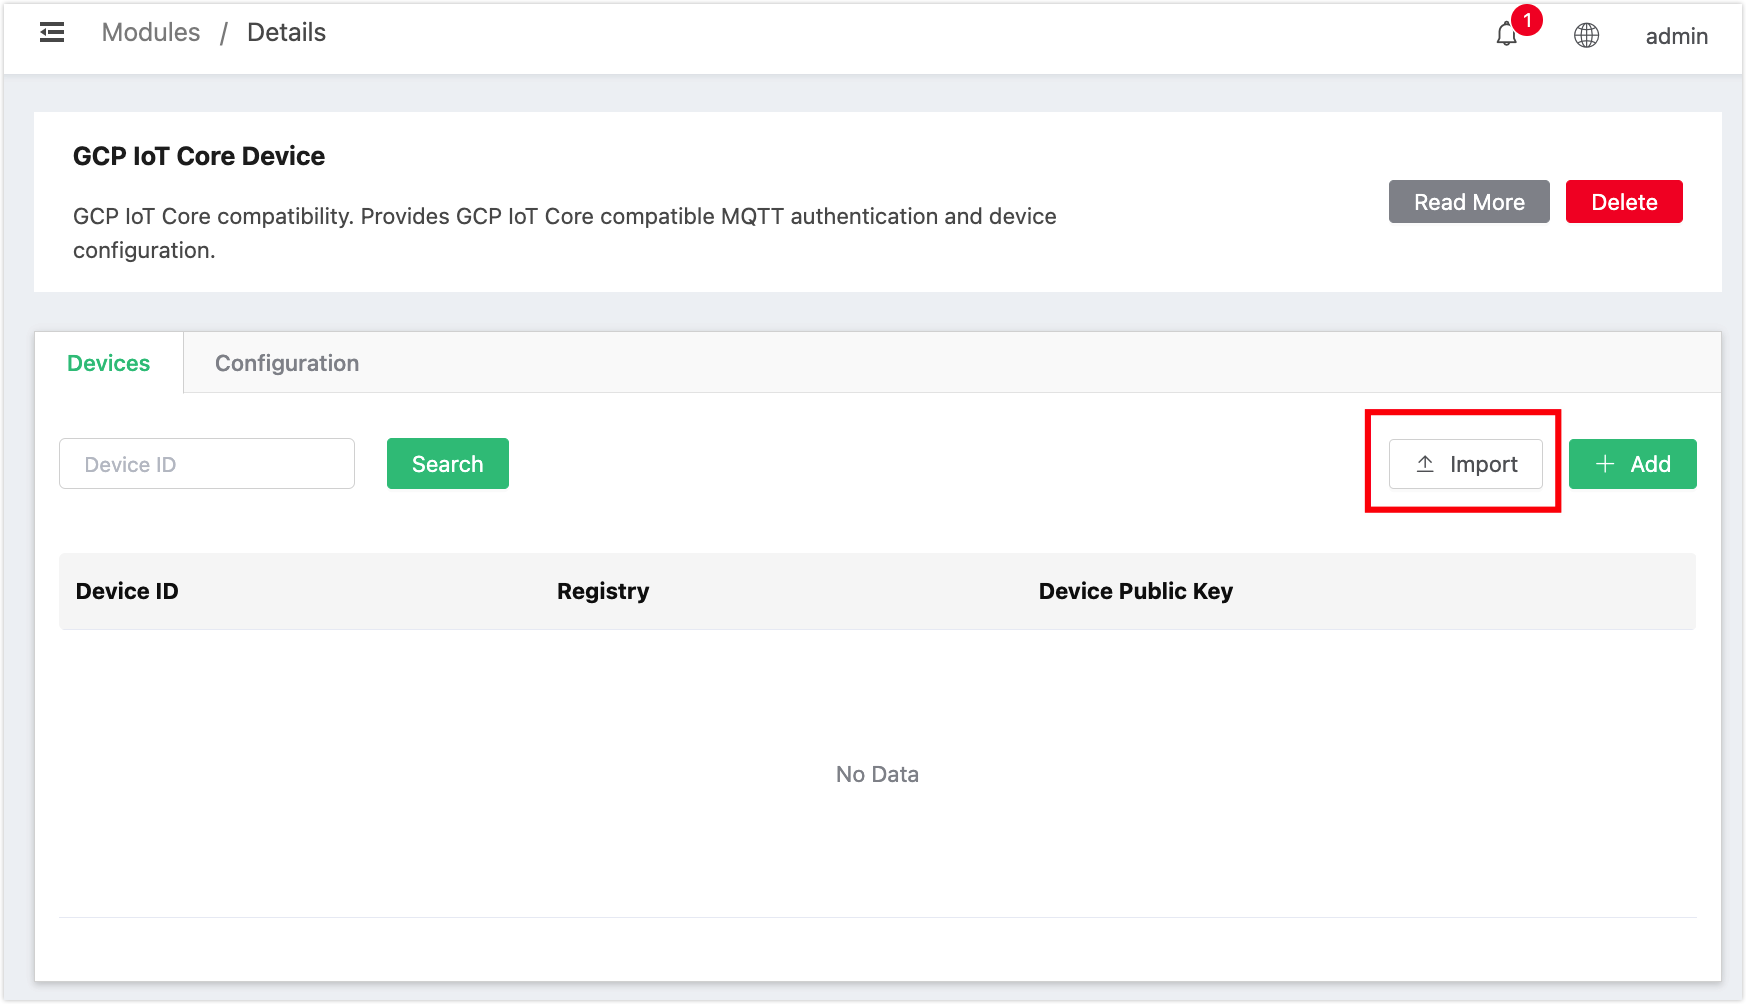
On the Devices tab of the details page, click Import to import a batch of device data or Add to manually add your device data.
If you click Import, a dialogue pops up for you to import the json file you have exported from the GCP IoT Core. Select the file and click Open.
If you click Add, a dialogue pops up for you to input the
device IDand add the public key. Click Add to select the public key format from the drop-down list. Select the key file or enter the content, set the expirateion date and click Confirm.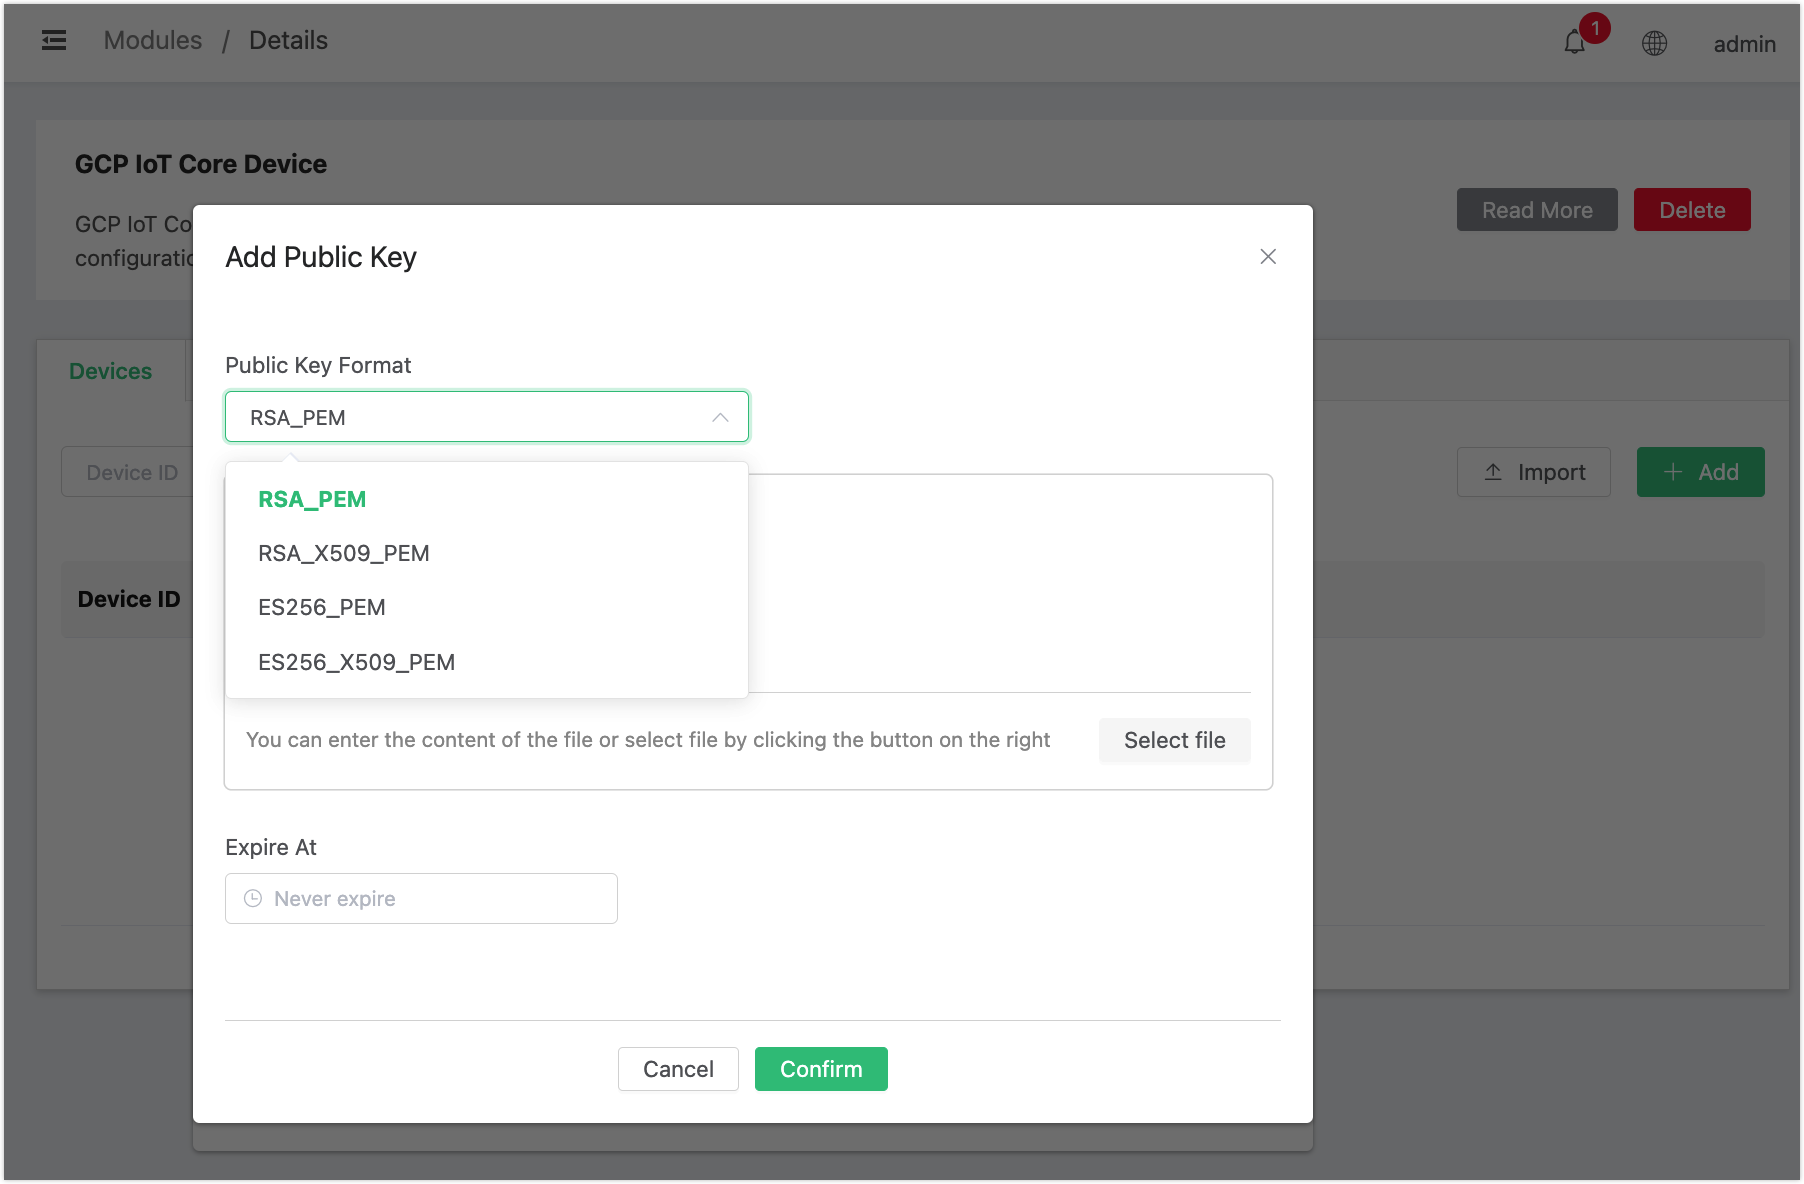
You can see the devices are imported.
# Simulate How Things Work with Google Cloud IoT Core
The following demonstrations are provided to simulate the real situation of how an actual device, for example, a client interacts with the MQTT endpoint of GCP IoT Core. So that you can test GCP IoT Core device modules in EMQX.
# Initial Setup
You need the following components for the initial setup:
- A project and activated Google Cloud IoT Core service:
>gcloud projects list PROJECT_ID NAME PROJECT_NUMBER iot-export IoT Export 283634501352 >gcloud services list NAME TITLE ... cloudiot.googleapis.com Cloud IoT API ...Copied!
2
3
4
5
6
7
8
- An IoT registry named
my-registry:
>gcloud iot registries list --region europe-west1 --project iot-export ID LOCATION MQTT_ENABLED my-registry europe-west1 MQTT_ENABLEDCopied!
2
3
Some devices in the registry, with public keys assigned, for example:
TIP
The device description includes
configandcredentialsfields along with other device-specific information.
>gcloud iot devices describe c2-ec-x509 --region europe-west1 --registry my-registry --project iot-export config: binaryData: AAECAwQFBgcICQoLDA0ODxAREhMUFRYXGBkaGxwdHh8gISIjJCUmJygpKissLS4vMDEyMzQ1Njc4OTo7PD0-P0BBQkNERUZHSElKS0xNTk9QUVJTVFVWV1hZWltcXV5fYGFiY2RlZmdoaWprbG1ub3BxcnN0dXZ3eHl6e3x9fn-AgYKDhIWGh4iJiouMjY6PkJGSk5SVlpeYmZqbnJ2en6ChoqOkpaanqKmqq6ytrq-wsbKztLW2t7i5uru8vb6_wMHCw8TFxsfIycrLzM3Oz9DR0tPU1dbX2Nna29zd3t_g4eLj5OXm5-jp6uvs7e7v8PHy8_T19vf4-fr7_P3-_w== cloudUpdateTime: '2023-04-12T14:01:34.862851Z' deviceAckTime: '2023-04-19T09:15:53.458746Z' version: '2' credentials: - expirationTime: '1970-01-01T00:00:00Z' publicKey: format: ES256_X509_PEM key: | -----BEGIN CERTIFICATE----- MIIBEjCBuAIJAPKVZoroXatKMAoGCCqGSM49BAMCMBExDzANBgNVBAMMBnVudXNl ZDAeFw0yMzA0MTIxMzQ2NTJaFw0yMzA1MTIxMzQ2NTJaMBExDzANBgNVBAMMBnVu dXNlZDBZMBMGByqGSM49AgEGCCqGSM49AwEHA0IABAugsuay/y2SpGEVDKfiVw9q VHGdZHvLXDqxj9XndUi6LEpA209ZfaC1eJ+mZiW3zBC94AdqVu+QLzS7rPT72jkw CgYIKoZIzj0EAwIDSQAwRgIhAMBp+1S5w0UJDuylI1TJS8vXjWOhgluUdZfFtxES E85SAiEAvKIAhjRhuIxanhqyv3HwOAL/zRAcv6iHsPMKYBt1dOs= -----END CERTIFICATE----- gatewayConfig: {} id: c2-ec-x509 lastConfigAckTime: '2023-04-19T09:15:53.450757285Z' lastConfigSendTime: '2023-04-19T09:15:53.450839281Z' lastErrorStatus: code: 9 message: 'mqtt: The connection broke or was closed by the client.' lastErrorTime: '2023-04-19T08:50:38.285599550Z' lastEventTime: '1970-01-01T00:00:00Z' lastHeartbeatTime: '1970-01-01T00:00:00Z' name: projects/iot-export/locations/europe-west1/registries/my-registry/devices/2928540609735937 numId: '2928540609735937'Copied!
2
3
4
5
6
7
8
9
10
11
12
13
14
15
16
17
18
19
20
21
22
23
24
25
26
27
28
29
30
31
# Connect Devices to MQTT Endpoint
Prepare a test script for connecting to the endpoint, authenticating with the private key, and obtaining configurations. Name the script as
client-demo.py.TIP
The code is a slightly modified version of the official code examples (opens new window) for Python.
import argparse import datetime import logging import ssl import jwt import paho.mqtt.client as mqtt def create_jwt(project, private_key, algorithm): token = { "iat": datetime.datetime.now(tz=datetime.timezone.utc), "exp": datetime.datetime.now(tz=datetime.timezone.utc) + datetime.timedelta(minutes=20), "aud": project, } return jwt.encode(token, private_key, algorithm) def on_message(_unused_client, _unused_userdata, message): print( "Received message", message.payload, "on topic", message.topic, "with qos", message.qos, ) def on_connect(unused_client, unused_userdata, unused_flags, rc): print("on_connect", mqtt.connack_string(rc)) def main(): parser = argparse.ArgumentParser( description=("Example Google Cloud IoT Core MQTT client") ) parser.add_argument( "--algorithm", choices=("RS256", "ES256"), required=True, help="Which encryption algorithm to use to generate the JWT", ) parser.add_argument( "--ca-certs", required=True, help="CA root (e.g. from https://pki.google.com/roots.pem)", ) parser.add_argument("--region", required=True, help="GCP region") parser.add_argument("--device", required=True, help="Cloud IoT Core device id") parser.add_argument( "--hostname", required=True, help="MQTT host", ) parser.add_argument( "--port", default=8883, type=int, help="MQTT port", ) parser.add_argument( "--private-key-file", type=argparse.FileType("r"), required=False, help="Path to private key file", ) parser.add_argument( "--project", required=True, help="GCP cloud project name", ) parser.add_argument("--registry", required=True, help="Cloud IoT Core registry id") args = parser.parse_args() client_id = ( f"projects/{args.project}/locations/{args.region}/" + f"registries/{args.registry}/devices/{args.device}" ) print(f"Device client_id is '{client_id}'") client = mqtt.Client(client_id=client_id) password_jwt = create_jwt( args.project, args.private_key_file.read(), args.algorithm ) print(f"Password is {password_jwt}") if args.private_key_file: client.username_pw_set( username="unused", password=password_jwt, ) context = ssl.create_default_context(cafile=args.ca_certs) context.check_hostname = False context.verify_mode = ssl.CERT_REQUIRED client.tls_set_context(context=context) client.on_message = on_message client.on_connect = on_connect client.connect(args.hostname, args.port) config_topic = f"/devices/{args.device}/config" print(f"Subscribing to config topic {config_topic}") client.subscribe(config_topic, qos=1) try: client.loop_forever() except KeyboardInterrupt: client.disconnect() print("Disconnected") if __name__ == "__main__": main()Copied!1
2
3
4
5
6
7
8
9
10
11
12
13
14
15
16
17
18
19
20
21
22
23
24
25
26
27
28
29
30
31
32
33
34
35
36
37
38
39
40
41
42
43
44
45
46
47
48
49
50
51
52
53
54
55
56
57
58
59
60
61
62
63
64
65
66
67
68
69
70
71
72
73
74
75
76
77
78
79
80
81
82
83
84
85
86
87
88
89
90
91
92
93
94
95
96
97
98
99
100
101
102
103
104
105
106
107
108
109
110
111
112
113
114
115
116
117
118
119
120
121
122
123
124
125Install the environment using the following command:
git clone https://github.com/emqx/emqx-gcp-iot-migrate.git cd emqx-gcp-iot-migrate python3 -m venv .venv source .venv/bin/activate pip install -r requirements.txtCopied!1
2
3
4
5Fetch google root certificates:
curl "https://pki.google.com/roots.pem" --location --output google-roots.pemCopied!1Run the test script:
python client-demo.py --project "iot-export" --region "europe-west1" --registry "my-registry" --algorithm ES256 --device "c2-ec-x509" --hostname mqtt.googleapis.com --private-key-file ./sample-keys/c2_ec_private.pem --ca-certs ./google-roots.pemCopied!1The output is:
Device client_id is 'projects/iot-export/locations/europe-west1/registries/my-registry/devices/c2-ec-x509' Password is eyJhbGciOiJFUzI1NiIsInR5cCI6IkpXVCJ9.eyJpYXQiOjE2ODIzMzQyNzksImV4cCI6MTY4MjMzNTQ3OSwiYXVkIjoiaW90LWV4cG9ydCJ9.djolGOTtK7OxYN1xh1HmEdNCUPFNNpTg8AA9dAO3wnqUByyZYu6OwmSBDRsb89EfWkxLR5Pszc_fsv5gGv_Fpw Subscribing to config topic /devices/c2-ec-x509/config on_connect Connection Accepted. Received message b'\x00\x01\x02\x03\x04\x05\x06\x07\x08\t\n\x0b\x0c\r\x0e\x0f\x10\x11\x12\x13\x14\x15\x16\x17\x18\x19\x1a\x1b\x1c\x1d\x1e\x1f !"#$%&\'()*+,-./0123456789:;<=>?@ABCDEFGHIJKLMNOPQRSTUVWXYZ[\\]^_`abcdefghijklmnopqrstuvwxyz{|}~\x7f\x80\x81\x82\x83\x84\x85\x86\x87\x88\x89\x8a\x8b\x8c\x8d\x8e\x8f\x90\x91\x92\x93\x94\x95\x96\x97\x98\x99\x9a\x9b\x9c\x9d\x9e\x9f\xa0\xa1\xa2\xa3\xa4\xa5\xa6\xa7\xa8\xa9\xaa\xab\xac\xad\xae\xaf\xb0\xb1\xb2\xb3\xb4\xb5\xb6\xb7\xb8\xb9\xba\xbb\xbc\xbd\xbe\xbf\xc0\xc1\xc2\xc3\xc4\xc5\xc6\xc7\xc8\xc9\xca\xcb\xcc\xcd\xce\xcf\xd0\xd1\xd2\xd3\xd4\xd5\xd6\xd7\xd8\xd9\xda\xdb\xdc\xdd\xde\xdf\xe0\xe1\xe2\xe3\xe4\xe5\xe6\xe7\xe8\xe9\xea\xeb\xec\xed\xee\xef\xf0\xf1\xf2\xf3\xf4\xf5\xf6\xf7\xf8\xf9\xfa\xfb\xfc\xfd\xfe\xff' on topic /devices/c2-ec-x509/config with qos 1Copied!1
2
3
4
5
The demonstration above shows the following:
- The client connects to the endpoint with the specially crafted
client_id. - It crafts a JWT token and uses it as a password (GCP IoT Core-specific way of authentication).
- It subscribes to the config topic, also following the GCP IoT Core convention.
- It receives the config from the config topic. The message is a binary blob but can be a JSON string or something else.
After the migration, you can expect the same things also work with EMQX, without modifications to the client code.
# Test the Migration
To test the migration, use the same client code as before, but to change the endpoint to the EMQX. You also need to change the CA certificate to the one used by EMQX.
docker cp emqx:/opt/emqx/etc/certs/cacert.pem ./сacert.pem python client-demo.py --project "iot-export" --region "europe-west1" --registry "my-registry" --algorithm ES256 --device "c2-ec-x509" --hostname localhost --private-key-file ./sample-keys/c2_ec_private.pem --ca-certs cacert.pemCopied!
2
The output is:
Device client_id is 'projects/iot-export/locations/europe-west1/registries/my-registry/devices/c2-ec-x509' Password is eyJhbGciOiJFUzI1NiIsInR5cCI6IkpXVCJ9.eyJpYXQiOjE2ODIzNDE2NzgsImV4cCI6MTY4MjM0Mjg3OCwiYXVkIjoiaW90LWV4cG9ydCJ9.04_zR71fmi0YikSxZbb_wxpVTnikt2XIkxkuI6JM6VS0VJ1B8QrggHuUron8MAOSJDJu9SVa2fuuFFjJEKJ-Bw Subscribing to config topic /devices/c2-ec-x509/config on_connect Connection Accepted. Received message b'\x00\x01\x02\x03\x04\x05\x06\x07\x08\t\n\x0b\x0c\r\x0e\x0f\x10\x11\x12\x13\x14\x15\x16\x17\x18\x19\x1a\x1b\x1c\x1d\x1e\x1f !"#$%&\'()*+,-./0123456789:;<=>?@ABCDEFGHIJKLMNOPQRSTUVWXYZ[\\]^_`abcdefghijklmnopqrstuvwxyz{|}~\x7f\x80\x81\x82\x83\x84\x85\x86\x87\x88\x89\x8a\x8b\x8c\x8d\x8e\x8f\x90\x91\x92\x93\x94\x95\x96\x97\x98\x99\x9a\x9b\x9c\x9d\x9e\x9f\xa0\xa1\xa2\xa3\xa4\xa5\xa6\xa7\xa8\xa9\xaa\xab\xac\xad\xae\xaf\xb0\xb1\xb2\xb3\xb4\xb5\xb6\xb7\xb8\xb9\xba\xbb\xbc\xbd\xbe\xbf\xc0\xc1\xc2\xc3\xc4\xc5\xc6\xc7\xc8\xc9\xca\xcb\xcc\xcd\xce\xcf\xd0\xd1\xd2\xd3\xd4\xd5\xd6\xd7\xd8\xd9\xda\xdb\xdc\xdd\xde\xdf\xe0\xe1\xe2\xe3\xe4\xe5\xe6\xe7\xe8\xe9\xea\xeb\xec\xed\xee\xef\xf0\xf1\xf2\xf3\xf4\xf5\xf6\xf7\xf8\xf9\xfa\xfb\xfc\xfd\xfe\xff' on topic /devices/c2-ec-x509/config with qos 1Copied!
2
3
4
5
The result shows that the device can connect to EMQX and receive message as it works with Google Cloud IoT Core.
# Limitations
It should also be noted that the EMQX broker is not a drop-in replacement for GCP IoT Core. The mentioned APIs are provided to help with migration. The most notable limitations are:
- EMQX does not support the "gateway" concept. However, this results only in the inability of devices behind a gateway to have gateway-independent credentials.
- Project, location, and registry are not used in EMQX. They are only used to construct or verify GCP IoT Core-compatible client ids. That means that devices imported into EMQX should have globally unique ids to avoid collisions.