Ingest MQTT Data into RabbitMQ
RabbitMQ is a widely used open-source message broker that implements the Advanced Message Queuing Protocol (AMQP). It provides a robust and scalable platform for messaging between distributed systems. EMQX supports integration with RabbitMQ, allowing you to forward MQTT messages and events to RabbitMQ.
This page provides a detailed overview of the data integration between EMQX and RabbitMQ with practical instructions on creating and validating the data integration.
How It Works
The RabbitMQ data integration is an out-of-the-box feature in EMQX designed to bridge the gap between MQTT-based IoT data and RabbitMQ's powerful message queue processing capabilities. With a built-in rule engine component, the integration simplifies the process of ingesting data from EMQX to RabbitMQ for storage and management, eliminating the need for complex coding.
The diagram below illustrates a typical architecture of data integration between EMQX and RabbitMQ:
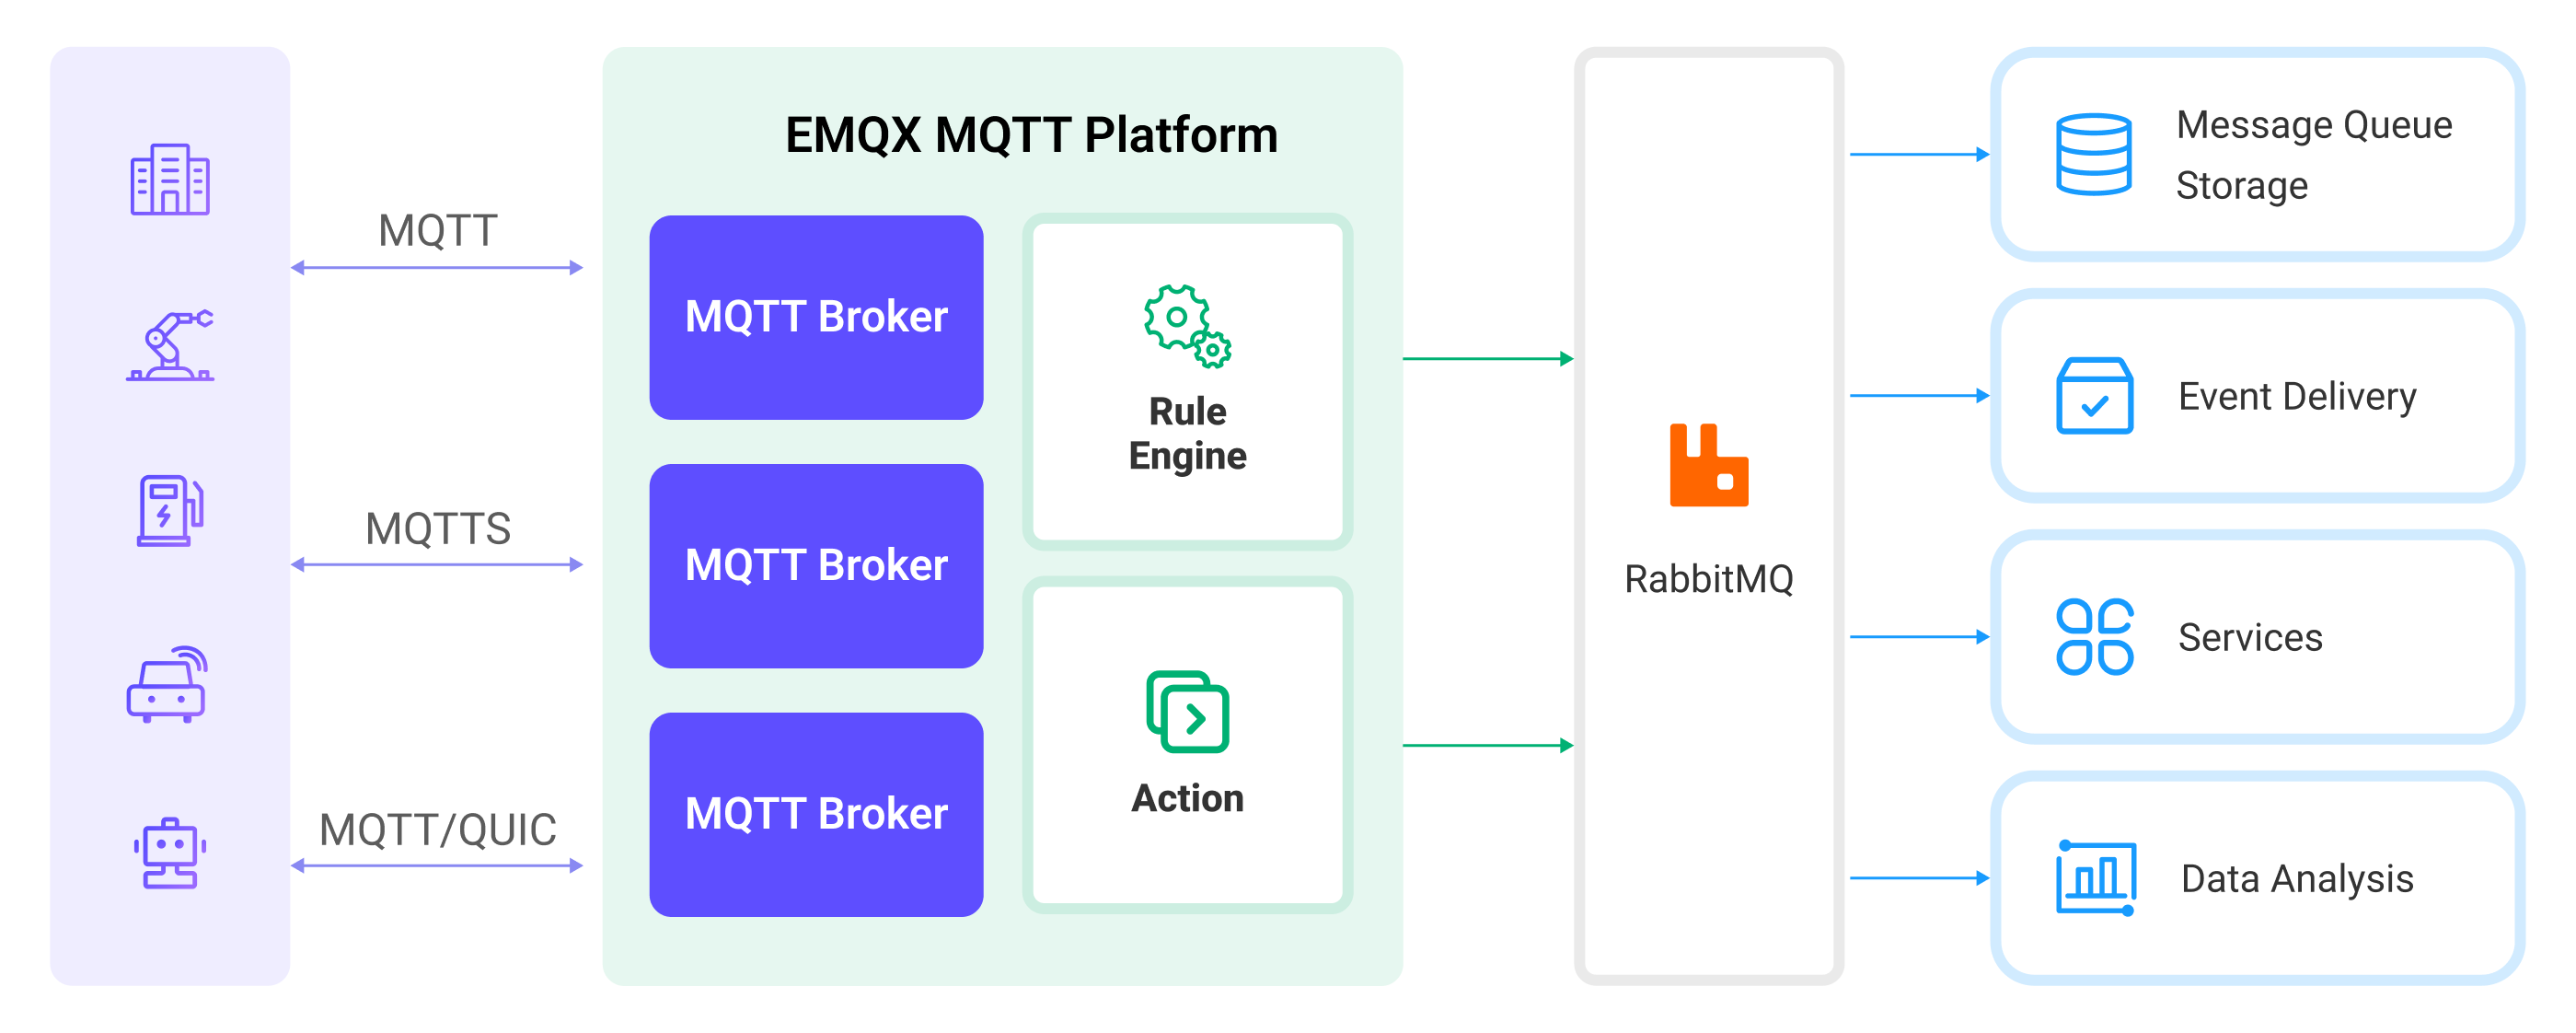
Ingesting MQTT data into RabbitMQ works as follows:
- Message publication and reception: Industrial IoT devices establish successful connections to EMQX through the MQTT protocol and publish real-time MQTT data to EMQX. When EMQX receives these messages, it initiates the matching process within its rules engine.
- Message data processing: When a message arrives, it passes through the rule engine and is then processed by the rule defined in EMQX. The rules, based on predefined criteria, determine which messages need to be routed to RabbitMQ. If any rules specify payload transformations, those transformations are applied, such as converting data formats, filtering out specific information, or enriching the payload with additional context.
- Message ingestion into RabbitMQ: When the rule has finished processing the message, it triggers an action of forwarding the messages to RabbitMQ. Processed messages will be seamlessly written into RabbitMQ.
- Data persistence and Utilization: RabbitMQ stores the messages in queues and delivers them to the appropriate consumers. The messages can be consumed by other applications or services for further processing, such as data analysis, visualization, and storage.
Features and Benefits
The data integration with RabbitMQ brings the following features and advantages to your business:
- Reliable IoT Data Message Delivery: EMQX ensures reliable connections and message delivery from devices to the cloud, while RabbitMQ handles message persistence and reliable delivery across different services, ensuring data reliability throughout various processes.
- MQTT Message Transformation: Using the rule engine, EMQX can filter and transform MQTT messages. Messages can undergo data extraction, filtering, enrichment, and transformation before being sent to RabbitMQ.
- Flexible Message Mapping: RabbitMQ data integration supports flexible mapping of MQTT topics to RabbitMQ Routing Key and Exchange, allowing seamless integration between MQTT and RabbitMQ.
- High Availability and Cluster Support: EMQX and RabbitMQ both support the construction of highly available message broker clusters, ensuring that the system can continue to provide services even in the event of node failures. Leveraging the cluster capabilities also provides excellent scalability.
- Processing Capabilities in High-Throughput Scenarios: RabbitMQ data integration supports both synchronous and asynchronous write modes, allowing for a flexible balance between latency and throughput according to different scenarios.
Before You Start
This section describes the preparations you need to complete before you start to create the RabbitMQ data integration, including how to create a RabbitMQ server and create RabbitMQ test exchange and queue.
Prerequisites
Knowledge about EMQX data integration rules
Knowledge about data integration
Basic knowledge of UNIX terminal and commands
Start a RabbitMQ Server
This section introduces how to start a RabbitMQ server using Docker.
Run the following command to start a RabbitMQ server with the management plugin enabled. The management plugin allows you to inspect RabbitMQ with a web interface.
docker run -it --rm --name rabbitmq -p 127.0.0.1:5672:5672 -p 127.0.0.1:15672:15672 rabbitmq:3.11-managementYou can find more information about running RabbitMQ in Docker on Docker Hub.
Create a RabbitMQ Test Exchange and Queue
After the RabbitMQ server is started, you can create a test exchange and a queue using the RabbitMQ Management Web Interface. You can skip this section if you already have an exchange and queue to test with.
Open your web browser and navigate to http://localhost:15672/ to access the RabbitMQ Management Web Interface. On the login page, enter the default credentials and click Login.
- Username:
guest - Password:
guest
- Username:
Click the Exchanges tab in the top menu. Unfold Add a new exchange, and input the following information:
- Name: Type
test_exchange - Type: Choose
directfrom the drop-down list - Durability: Choose
Durableto make the exchange persistent - Auto delete:
No - Internal:
No - Arguments: Leave empty
- Name: Type
Click the Add exchange button to create the test exchange.
Click the Queues tab in the top menu. Unfold Add a new queue, and input the following information:
- Type:
Default for virtual host - Name: Type
test_queue - Durability: Choose
Durableto make the queue persistent - Arguments: Leave empty
- Type:
Click the Add queue button to create the test queue. The new test_queue should appear in All queues section.
Click the queue name test_queue to open its details page. Unfold Bindings. In the Add binding to this queue section, input the following information:
- From exchange: Type
test_exchange - Routing key: Type
test_routing_key - Arguments: Leave empty
- From exchange: Type
Click the Bind button to bind the test queue to the test exchange with the specified routing key.
Create a Rule for RabbitMQ Sink
This section demonstrates how to create a rule to specify the data to be forwarded to RabbitMQ. It assumes that you run both EMQX and RabbitMQ on the local machine. If you have RabbitMQ and EMQX running remotely, please adjust the settings accordingly.
Go to the EMQX Dashboard, and click Data Integration -> Rules.
Click Create on the top right corner of the page.
Enter a rule ID, for example,
my_rule.Enter the following statement in the SQL editor, which will forward the MQTT messages matching the topic pattern
t/#:sqlSELECT payload as data, now_timestamp() as timestamp FROM "t/#"TIP
If you are a beginner user, click SQL Examples and Enable Test to learn and test the SQL rule.
Click the + Add Action button to define an action that will be triggered by the rule. With this action, EMQX sends the data processed by the rule to RabbitMQ.
Select
RabbitMQfrom the Type of Action dropdown list. Keep the Action dropdown with the defaultCreate Actionvalue. You can also select a Sink if you have created one. This demonstration will create a new Sink.Enter a name for the Sink. The name should be a combination of upper/lower case letters and numbers.
Enter the connection information:
Server: Enter
localhostor the actual hostname/IP if the RabbitMQ server is running remotely.Port: Enter
5672or the actual port if different.Username: Enter
guest.Password: Enter
guest.Exchange: Enter
test_exchangecreated before, which means messages will be published to this exchange.Routing Key: Enter
test_routing_keycreated before, which is the RabbitMQ routing key to be used when publishing messages.Virtual Host: Enter RabbitMQ virtual host;
/by default.In the Message Delivery Mode dropdown, select between
non_persistentandpersistent:non_persistent(default): Messages are not persisted to disk and may be lost if RabbitMQ restarts or crashes.persistent: Messages are persisted to disk, providing durability in case RabbitMQ restarts or crashes.TIP
You may also need to set the queue and exchange as durable to prevent messages from being lost in case RabbitMQ is restarted. See the RabbitMQ documentation for more information.
Wait for Publish Confirmations: Enabled by default to ensure that messages are successfully published to RabbitMQ.
TIP
With this option enabled RabbitMQ broker acknowledges the receipt of a published message before considering it successfully published, which improves the reliability of your message delivery.
Publish Confirmation Timeout:
30seconds by default. The publish confirmation timeout determines the duration the publisher will wait for the broker's acknowledgment before considering the publish operation a failure.Payload Template: The default value is an empty string, meaning the message payload will be forwarded as JSON-formatted text to RabbitMQ without modification.
You can also define a custom message payload format using placeholders within the template to dynamically include data from the incoming MQTT messages. For example, if you want to include the MQTT message payload and its timestamp in the RabbitMQ message, you can use the following template:
json{"payload": "${payload}", "timestamp": ${timestamp}}This template will produce a JSON-formatted message containing the payload and timestamp of the incoming MQTT message.
${payload}and${timestamp}are placeholders and will be replaced by the actual values from the message when it is forwarded to the RabbitMQ server.
Leave other options as default.
Advanced settings (optional): Choose whether to use sync or async query mode as needed. For details, see the relevant configuration information in Features of Sink.
Before clicking Create, you can click Test Connectivity to test that the Sink can be connected to the RabbitMQ server.
Click the Create button to complete the Sink configuration. A new Sink will be added to the Action Outputs.
Back on the Create Rule page, verify the configured information. Click the Create button to generate the rule.
You have now successfully created the rule for forwarding data through the RabbitMQ Sink. You can see the newly created rule on the Integration -> Rules page. Click the Actions(Sink) tab and you can see the new RabbitMQ Sink.
You can also click Integration -> Flow Designer to view the topology and you can see that the messages under topic t/# are sent and saved to RabbitMQ after parsing by rule my_rule.
Test the Rule
You can use the built-in WebSocket client in the EMQX dashboard to test our rule and Sink.
Click Diagnose -> WebSocket Client in the left navigation menu of the Dashboard.
Fill in the connection information for the current EMQX instance.
- If you run EMQX locally, you can use the default value.
- If you have changed EMQX's default configuration. For example, the configuration change on authentication can require you to type in a username and password.
Click Connect to connect the client to the EMQX instance.
Scroll down to the publish area and type the following:
- Topic:
t/test - Payload:
Hello World RabbitMQ from EMQX - QoS:
2
- Topic:
Click Publish to send the message.
If the Sink and rule are created successfully, a message should have been published to the specified exchange in the RabbitMQ server with the specified routing key.
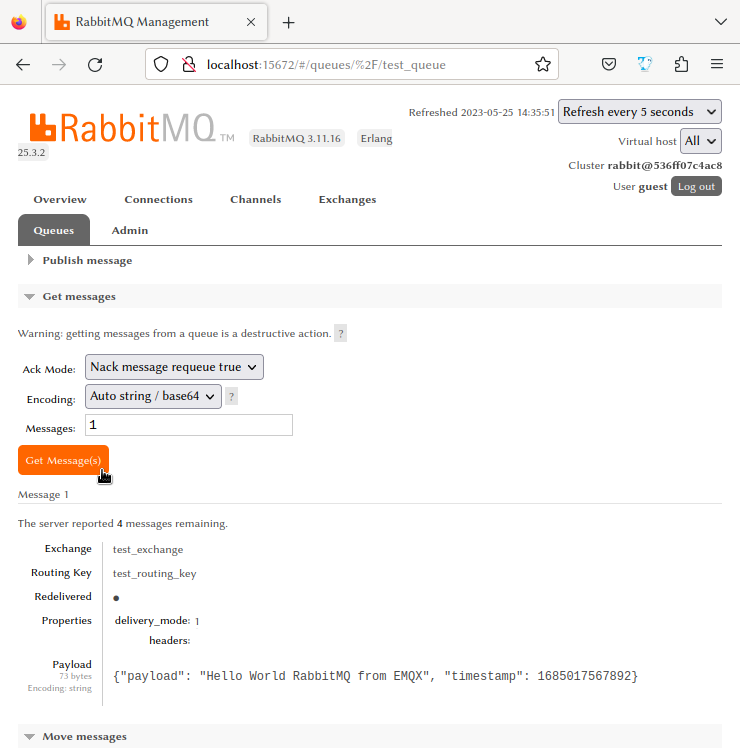
Visit the RabbitMQ Management Console at http://localhost:15672 and navigate to the Queues section.
TIP
Use
guestas both username and password if you have not changed the default setting.Verify that the message has been routed to the appropriate queue(s). Click the queue to see details and then click the Get Message(s) button to see the detailed message contents.