Ingest MQTT Data into Apache IoTDB
Apache IoTDB is a high-performance and scalable time series database that is designed to handle massive amounts of time series data generated by various IoT devices and systems. EMQX supports data integration with Apache IoTDB, enabling you to seamlessly forward data via the lightweight MQTT protocol to Apache IoTDB using their REST API V2. The data integration ensures a single-directional flow, where MQTT messages from EMQX are written into the IoTDB database, leveraging both EMQX's exceptional real-time data ingestion capabilities and IoTDB's specialized time-series data storage and query performance. This powerful combination is a solid foundation for businesses looking to manage their IoT data effectively.
This page provides a comprehensive introduction to the data integration between EMQX and Apache IoTDB with practical instructions on creating and validating the data integration.
How It Works
The Apache IoTDB data integration is an out-of-the-box feature in EMQX designed to bridge the gap between raw MQTT-based time series data and IoTDB's powerful data storage capabilities. With a built-in rule engine component, the integration simplifies the process of ingesting data from EMQX to IoTDB for storage and query, eliminating the need for complex coding.
The diagram below illustrates a typical architecture of data integration between EMQX and IoTDB.
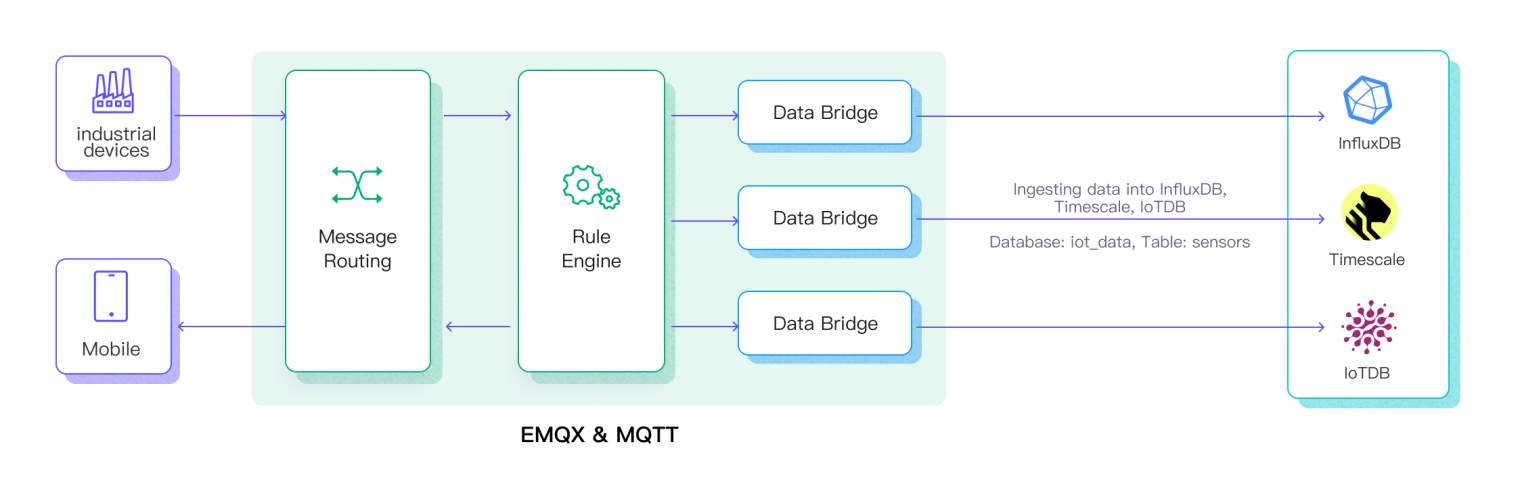
The workflow of the data integration is as follows:
- Message publication and reception: Devices, whether they are part of connected vehicles, IIoT systems, or energy management platforms, establish successful connections to EMQX through the MQTT protocol and send messages via MQTT based on their operational states, readings, or triggered events. When EMQX receives these messages, it initiates the matching process within its rules engine.
- Message data processing: When a message arrives, it passes through the rule engine and is then processed by the rule defined in EMQX. The rules, based on predefined criteria, determine which messages need to be routed to IoTDB. If any rules specify payload transformations, those transformations are applied, such as converting data formats, filtering out specific information, or enriching the payload with additional context.
- Data buffering: EMQX provides an in-memory message buffer to prevent data loss when the IoTDB is unavailable. Data is temporarily held in the buffer, and may be offloaded to disk to prevent memory overload. Note that data is not preserved if the data integration or the EMQX node is restarted.
- Data ingestion into IoTDB: Once the rule engine identifies a message for IoTDB storage, it triggers an action of forwarding the messages to IoTDB. Processed data will be seamlessly written into the IoTDB in a time series manner.
- Data Storage and Utilization: With the data now stored in IoTDB, businesses can harness its querying power for various use cases. For instance, in the realm of connected vehicles, this stored data can inform fleet management systems about vehicle health, optimize route planning based on real-time metrics, or track assets. Similarly, in IIoT settings, the data might be used to monitor machinery health, forecast maintenance, or optimize production schedules.
Features and Benefits
The data integration with IoTDB offers a range of features and benefits tailored to ensure effective data handling and storage:
Efficient Data Collection
By integrating EMQX with IoTDB, IoT time-series data can be efficiently collected through the lightweight MQTT messaging protocol from IoT devices with limited resources and ingested into the database, ensuring reliable and efficient data collection.
Flexible Data Transformation
EMQX provides a powerful SQL-based Rule Engine, allowing organizations to pre-process data before storing it in IoTDB. It supports various data transformation mechanisms, such as filtering, routing, aggregation, and enrichment, enabling organizations to shape the data according to their needs.
Scalability and High Throughput
EMQX is architected for horizontal scalability, effortlessly managing the surging message traffic generated by an ever-expanding fleet of IoT devices. This solution effortlessly adapts to expanding data volumes and supports high-concurrency access. As a result, IoT time-series workloads can effortlessly manage the increasing requirements of data ingestion, storage, and processing as IoT deployments scale to unprecedented levels.
Optimized Time-Series Storage: IoTDB provides optimized storage for time-stamped data. It leverages time-partitioning, compression, and data retention policies to efficiently store and manage large volumes of time-series data. This ensures a minimal storage footprint while maintaining high performance, which is essential for IoT workloads that generate massive amounts of time-series data.
Fast and Complex Querying: IoTDB has rich query semantics, supporting time alignment for timeseries data accross devices and sensors, computation in timeseries field (frequency domain transformation) and rich aggregation function support in time dimension. It also deeply integrates with Apache Hadoop, Spark and Flink, providing more powerful analytics capabilities. EMQX seamlessly integrates with IoTDB, providing a unified solution for storing and analyzing MQTT data.
Before You Start
This section describes the preparations you must complete before creating the Apache IoTDB data bridges in EMQX Dashboard.
Prerequisites
- Knowledge about EMQX data integration rules
- Knowledge about data bridges
Start an Apache IoTDB Server
This section introduces how to start an Apache IoTDB server using Docker. Make sure to have enable_rest_service=true in your IoTDB's configuration.
Run the following command to start an Apache IoTDB server with its REST interface enabled:
docker run -d --name iotdb-service \
              --hostname iotdb-service \
              -p 6667:6667 \
              -p 18080:18080 \
              -e enable_rest_service=true \
              -e cn_internal_address=iotdb-service \
              -e cn_target_config_node_list=iotdb-service:10710 \
              -e cn_internal_port=10710 \
              -e cn_consensus_port=10720 \
              -e dn_rpc_address=iotdb-service \
              -e dn_internal_address=iotdb-service \
              -e dn_target_config_node_list=iotdb-service:10710 \
              -e dn_mpp_data_exchange_port=10740 \
              -e dn_schema_region_consensus_port=10750 \
              -e dn_data_region_consensus_port=10760 \
              -e dn_rpc_port=6667 \
              apache/iotdb:1.1.0-standalone
You can find more information about running IoTDB in Docker on Docker Hub.
Create Rule and Apache IoTDB Sink
This section demonstrates how to create a rule in EMQX to process messages from the source MQTT topic root/# and send the processed results through the configured Apache IoTDB data bridge to store the time series data to IoTDB.
Go to the EMQX Dashboard, and click Integration -> Rules.
Click Create on the top right corner of the page.
Input a rule ID, for example,
my_rule.Input the following statement in the SQL editor, which will forward the MQTT messages matching the topic pattern
root/#:sqlSELECT * FROM "root/#"If you need to specify your own rule, you need to include the required contextual information in the MQTT message in the
SELECTpart of the rule. For example, the client is sending a message with the payload in JSON format as follows:json{ "measurement": "temp", "data_type": "FLOAT", "value": "32.67", "device_id": "root.sg27" // optional }You can use the following rule to present the fields
measurement,data_typeandvalue.sqlSELECT payload.measurement, payload.data_type, payload.value, clientid as payload.device_id FROM "root/#"If the payload is structured differently, you can use the rule to rewrite its structure like the following:
sqlSELECT payload.measurement, payload.dtype as payload.data_type, payload.val as payload.value FROM "root/#"Click the Add Action button, and select Forwarding with Data Bridge from the dropdown list. With this action, EMQX sends the data processed by the rule to the data bridge.
Click the + icon next to the Data bridge drop-down box to create a data bridge.
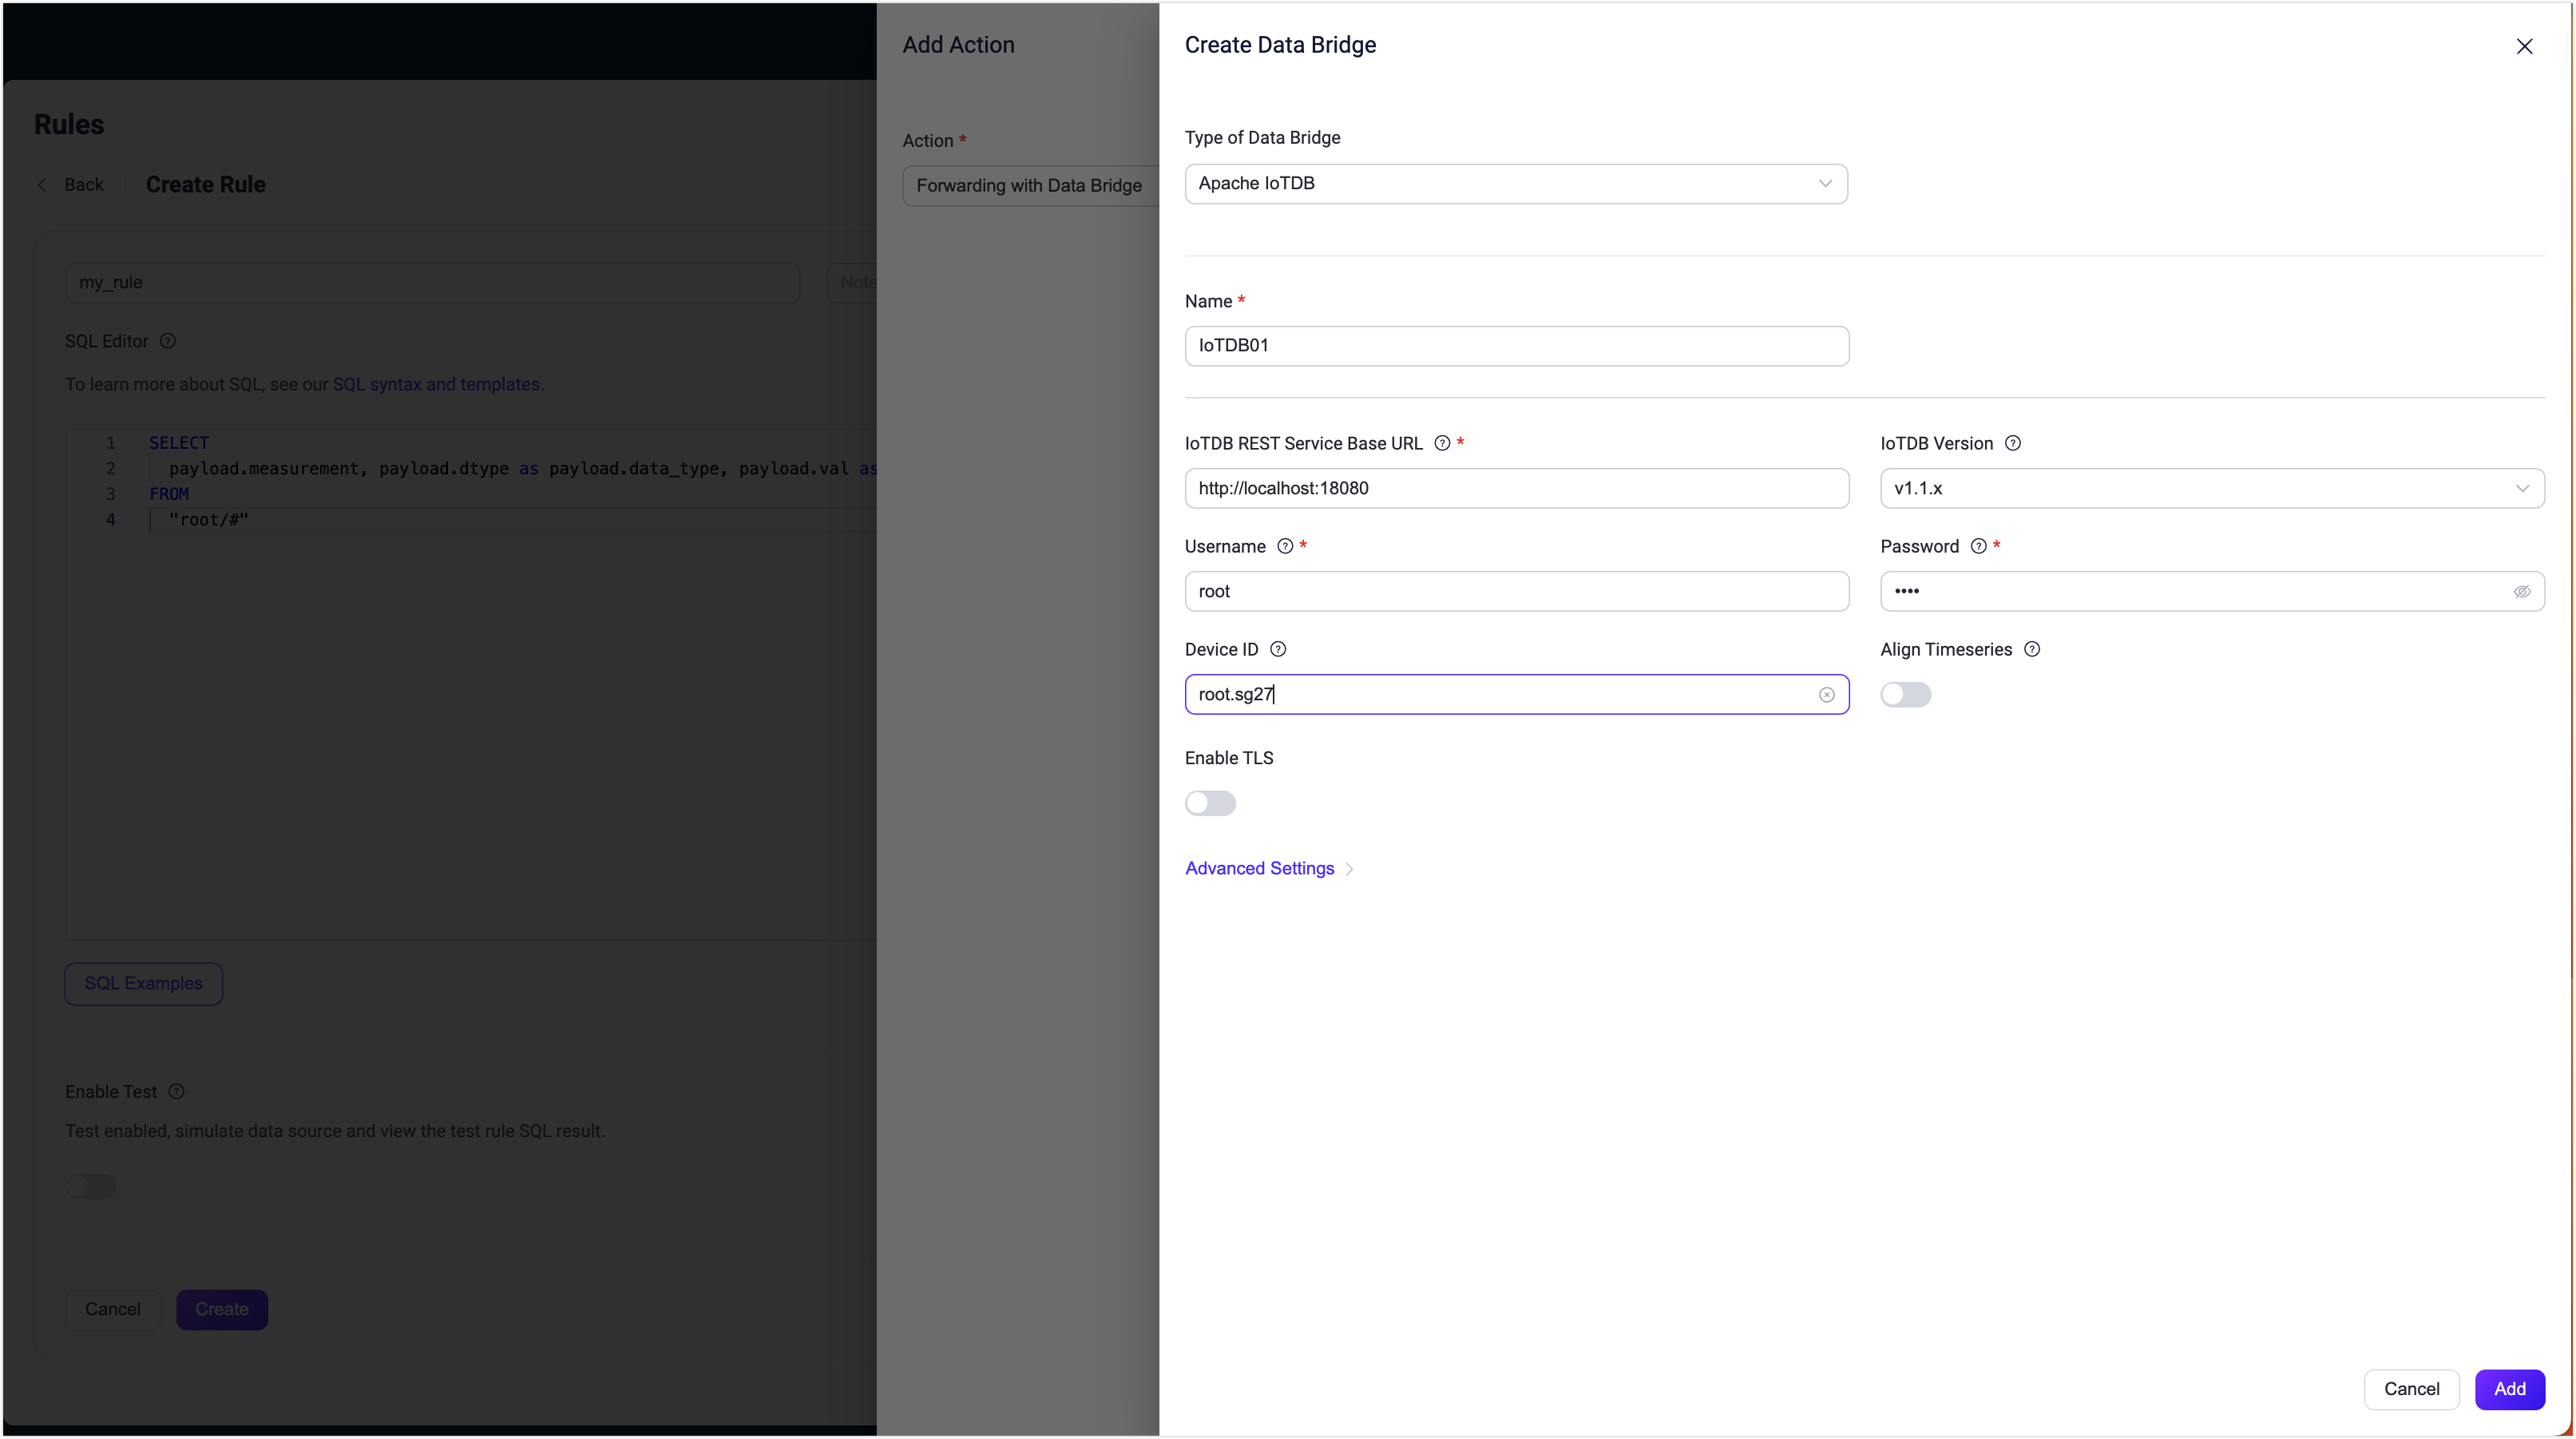
Select Apache IoTDB from the Type of Data Bridge drop-down list. Fill in the required fields (marked with an asterisk).
Enter a name for the data bridge. The name should be a combination of upper/lower case letters and numbers.
Enter the connection information:
IoTDB REST Service Base URL: Enter
http://localhost:18080, or the actual hostname/IP if the IoTDB server is running remotely.IoTDB Version: Select the version of the IoTDB server you have installed.
Username: Enter the IoTDB username.
Password: Enter the IoTDB password.
Device ID (optional): Enter a fixed device id used as the name of the device from which the timeseries data is forwarded and inserted into the IoTDB instance.
TIP
When left empty, the device id can also be specified in the publishing message or configured in the rule. For example, when publishing a JSON-encoded message with a
device_idfield in it, the value of that field will define the output device id. To extract this information using the rule engine, you must use SQL like the following:sqlSELECT json_decode(payload) as payload, `my_device` as payload.device_idHowever, the fixed device id configured in this field takes precedence over any methods mentioned previously.
- Align Timeseries: Disabled by default. Once enabled, the timestamp columns of a group of aligned timeseries are stored only once in IoTDB, rather than duplicating them for each individual timeseries within the group. For more information, see Aligned timeseries.
- Enable TLS: If you want to establish an encrypted connection, click the toggle switch. For more information about TLS connection, see TLS for External Resource Access.
Advanced settings (optional): See Advanced Configurations.
Click the Add button to complete the data bridge configuration. You will be redirected back to the Add Action page. Select the Apache IoTDB Data Bridge you just created from the Data bridge drop-down list. Click the Add button at the bottom to include this action in the rule.
Back on the Create Rule page, verify the configured information. Click the Create button to generate the rule.
Now a rule to forward data to Apache IoTDB via the data bridge is created. You can click Integration -> Flow Designer to view the topology. It can be seen that the messages under the topic root/# are sent and saved to Apache IoTDB.
Test Apache IoTDB Data Bridge and Rule
You can use the built-in WebSocket client in the EMQX dashboard to test your Apache IoT data bridge and rule.
Click Diagnose -> WebSocket Client in the left navigation menu of the Dashboard.
Fill in the connection information for the current EMQX instance.
- If you run EMQX locally, you can use the default value.
- If you have changed EMQX's default configuration. For example, the configuration change on authentication can require you to type in a username and password.
Click Connect to connect the client to the EMQX instance.
Scroll down to the publish area. Specify the device id in the message and type the following:
Topic:
root/testPayload:
json{ "measurement": "temp", "data_type": "FLOAT", "value": "37.6", "device_id": "root.sg27" }QoS:
2
Click Publish to send the message.
Publish another message with the device id specified in the topic:
Topic:
root/sg27Payload:
json{ "measurement": "temp", "data_type": "FLOAT", "value": "37.6" }QoS:
2
TIP
If your topic does not start with
rootit will automatically be prefixed. For example, if you publish the message totest/sg27the resulting device name will beroot.test.sg27. Make sure your rule and topic are configured correctly, so it forwards messages from that topic to the bridge.Click Publish to send the message.
If the data bridge and rule are successfully created, the messages should have been published to the specified time series table in the Apache IoTDB server.
Check the messages by using IoTDB's command line interface. If you're using it from docker as shown above, you can connect to the server by using the following command from your terminal:
shell$ docker exec -ti iotdb-service /iotdb/sbin/start-cli.sh -h iotdb-serviceIn the console, continue to type the following:
sqlIoTDB> select * from root.sg27You should see the data printed as follows:
+------------------------+--------------+
|                    Time|root.sg27.temp|
+------------------------+--------------+
|2023-05-05T14:26:44.743Z|          37.6|
|2023-05-05T14:27:44.743Z|          36.6|
+------------------------+--------------+
Advanced Configurations
This section describes some advanced configuration options that can optimize the performance of your data bridge and customize the operation based on your specific scenarios. When creating the data bridge, you can unfold the Advanced Settings and configure the following settings according to your business needs.
| Fields | Descriptions | Recommended Values |
|---|---|---|
| HTTP Pipelining | Specifies the number of HTTP requests that can be sent to the server in a continuous sequence without waiting for individual responses. This option takes a positive integer value that represents the maximum number of HTTP requests that will be pipelined. When set to 1, it indicates a traditional request-response model where each HTTP request will be sent, and then the client will wait for a server response before sending the next request. Higher values enable more efficient use of network resources by allowing multiple requests to be sent in a batch, reducing the round-trip time. | 100 |
| Pool Type | Defines the algorithmic strategy used for managing and distributing connections in the data bridge between EMQX and Apache IoTDB. When set to random, connections to the Apache IoTDB server will be randomly selected from the available connection pool. This option provides a simple, balanced distribution.When set to hash, a hashing algorithm is used to consistently map requests to connections in the pool. This type is often used in scenarios where a more deterministic distribution of requests is required, such as load balancing based on client identifiers or topic names.Note: Choosing the appropriate pool type depends on your specific use case and the distribution characteristics that you aim to achieve. | random |
| Connection Pool Size | Specifies the number of concurrent connections that can be maintained in the connection pool when interfacing with the Apache IoTDB service. This option helps in managing the application's scalability and performance by limiting or increasing the number of active connections between EMQX and Apache IoTDB. Note: Setting an appropriate connection pool size depends on various factors such as system resources, network latency, and the specific workload of your application. Too large a pool size may lead to resource exhaustion, while too small a size may limit throughput. | 8 |
| Connect Timeout | Specifies the maximum amount of time, in seconds, that the EMQX data bridge will wait while attempting to establish a connection with the Apache IoTDB HTTP server. Note: A carefully chosen timeout setting is crucial for balancing system performance and resource utilization. It is advisable to test the system under various network conditions to find the optimal timeout value for your specific use case. | 15 |
| HTTP Request Max Retries | Specifies the maximum number of times an HTTP request will be retried if it fails to successfully complete during communication between the EMQX data bridge and Apache IoTDB. | 2 |
| Start Timeout | Determines the maximum time interval, in seconds, that the EMQX data bridge will wait for an auto-started resource to reach a healthy state before responding to resource creation requests. This setting helps ensure that the data bridge does not proceed with operations until it verifies that the connected resource, such as a database instance in Apache IoTDB, is fully operational and ready to handle data transactions. | 5 |
| Buffer Pool Size | Specifies the number of buffer worker processes that will be allocated for managing data flow in egress-type bridges between EMQX and Apache IoTDB. These worker processes are responsible for temporarily storing and handling data before it is sent to the target service. This setting is particularly relevant for optimizing performance and ensuring smooth data transmission in egress (outbound) scenarios. For bridges that only deal with ingress (inbound) data flow, this option can be set to "0" as it is not applicable. | 18 |
| Request TTL | The "Request TTL" (Time To Live) configuration setting specifies the maximum duration, in seconds, that a request is considered valid once it enters the buffer. This timer starts ticking from the moment the request is buffered. If the request stays in the buffer for a period exceeding this TTL setting or if it is sent but does not receive a timely response or acknowledgment from Apache IoTDB, the request is deemed to have expired. | 45 |
| Health Check Interval | Specifies the time interval, in seconds, at which the data bridge will perform automated health checks on the connection to Apache IoTDB. | 15 |
| Max Buffer Queue Size | Specifies the maximum number of bytes that can be buffered by each buffer worker in the Apache IoTDB data bridge. Buffer workers temporarily store data before it is sent to IoTDB, serving as an intermediary to handle data flow more efficiently. Adjust the value according to your system's performance and data transfer requirements. | 265 |
| Query Mode | Allows you to choose asynchronous or synchronous query modes to optimize message transmission based on different requirements. In asynchronous mode, writing to IoTDB does not block the MQTT message publish process. However, this might result in clients receiving messages ahead of their arrival in IoTDB. | Async |
| Inflight Window | An "in-flight query" refers to a query that has been initiated but has not yet received a response or acknowledgment. This setting controls the maximum number of in-flight queries that can exist simultaneously when the data bridge is communicating with Apache IoTDB. When the query_mode is set to async (asynchronous), the "Inflight Window" parameter gains special importance. If it is crucial for messages from the same MQTT client to be processed in strict order, you should set this value to 1. | 100 |