Rule engine example
Check (debug)
Create a rule for testing: print the content of the message and all the args of the action, when a MQTT message is sent to topic 't/a'.
- The filter SQL is: SELECT * FROM "message.publish" WHERE topic = 't/a';
- The action is: "print the content of the message and all the args of the action", the action we need is 'inspect'.
$ ./bin/emqx_ctl rules create \
  "SELECT * FROM \"message.publish\" WHERE topic = 't/a'" \
  '[{"name":"inspect", "params": {"a": 1}}]' \
  -d 'Rule for debug'

Rule rule:803de6db created
The CLI above created a rule with ID='Rule rule:803de6db'.
The first two args are mandatory:
- SQL: SELECT * FROM "message.publish" WHERE topic = 't/a'
- Action List: [{"name":"inspect", "params": {"a": 1}}]. Action List is of tye JSON Array. "name" is the name of the action, "params" is the parameters of the action. Note that the action
inspectdoes not need a resource.
The last arg is an optional description of the rule: 'Rule for debug'.
If a MQTT message "hello" is sent to topic 't/a', the rule "Rule rule:803de6db" will be matched, and then action "inspect" will be triggered, the following info will be printed to the emqx console:
$ tail -f log/erlang.log.1

(emqx@127.0.0.1)1> [inspect]
Selected Data: #{client_id => <<"shawn">>,event => 'message.publish',
                    flags => #{dup => false,retain => false},
                    id => <<"5898704A55D6AF4430000083D0002">>,
                    payload => <<"hello">>,
                    peername => <<"127.0.0.1:61770">>,qos => 1,
                    timestamp => 1558587875090,topic => <<"t/a">>,
                    username => undefined}
Envs: #{event => 'message.publish',
        flags => #{dup => false,retain => false},
        from => <<"shawn">>,
        headers =>
            #{allow_publish => true,
                peername => {{127,0,0,1},61770},
                username => undefined},
        id => <<0,5,137,135,4,165,93,106,244,67,0,0,8,61,0,2>>,
        payload => <<"hello">>,qos => 1,
        timestamp => {1558,587875,89754},
        topic => <<"t/a">>}
Action Init Params: #{<<"a">> => 1}
Selected Datalisted the fields that selected by the SQL.All available fields will be listed here, as we usedselect *.Envsis the environment varibles that can be used internally in the action.Action Init Paramsis the params we passed to the action.
Creat WebHook Rules
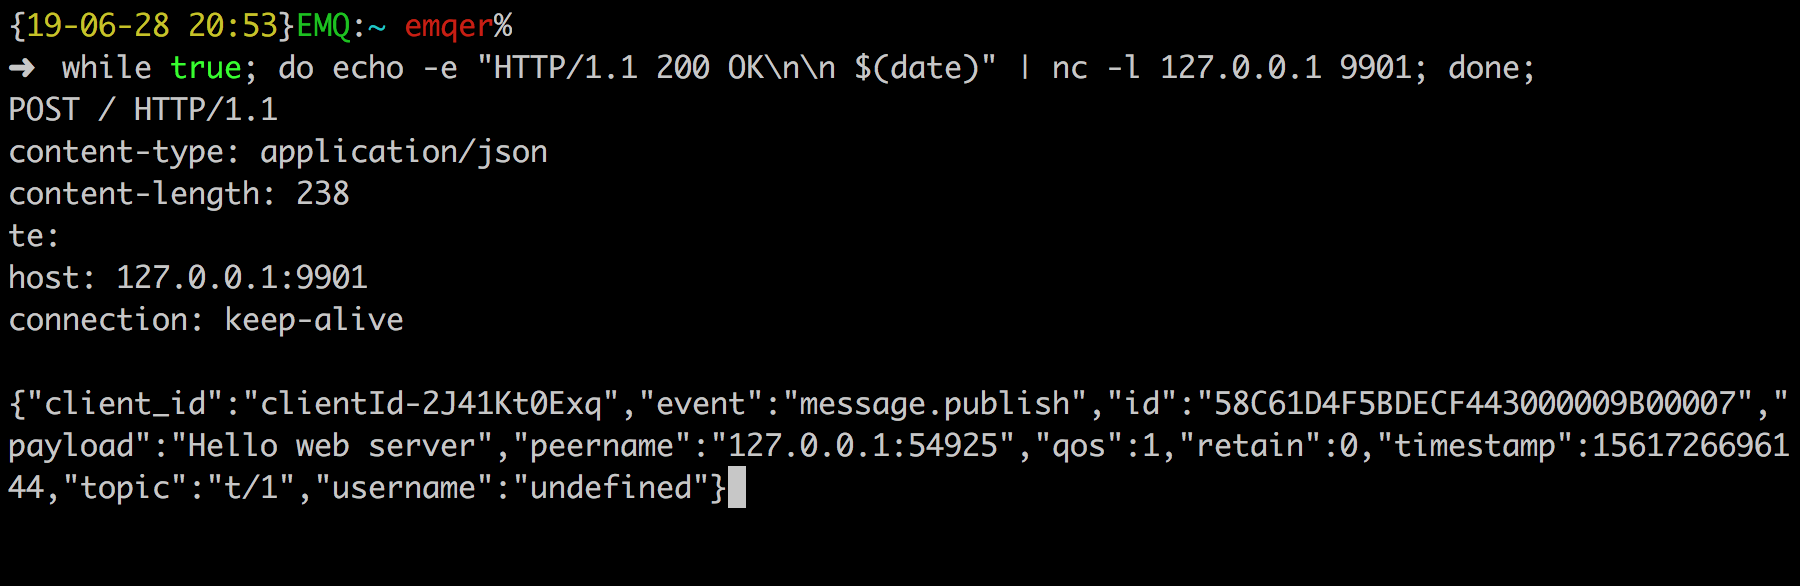
Setup a Web Service, here we setup a simple web service using the linux tool nc:
$ while true; do echo -e "HTTP/1.1 200 OK\n\n $(date)" | nc -l 127.0.0.1 9901; done;Create a rule:
Go to emqx dashboard, select the "rule" tab on the menu to the left.
Select "message.publish", then type in the following SQL:
SELECT
    *
FROM
    "message.publish"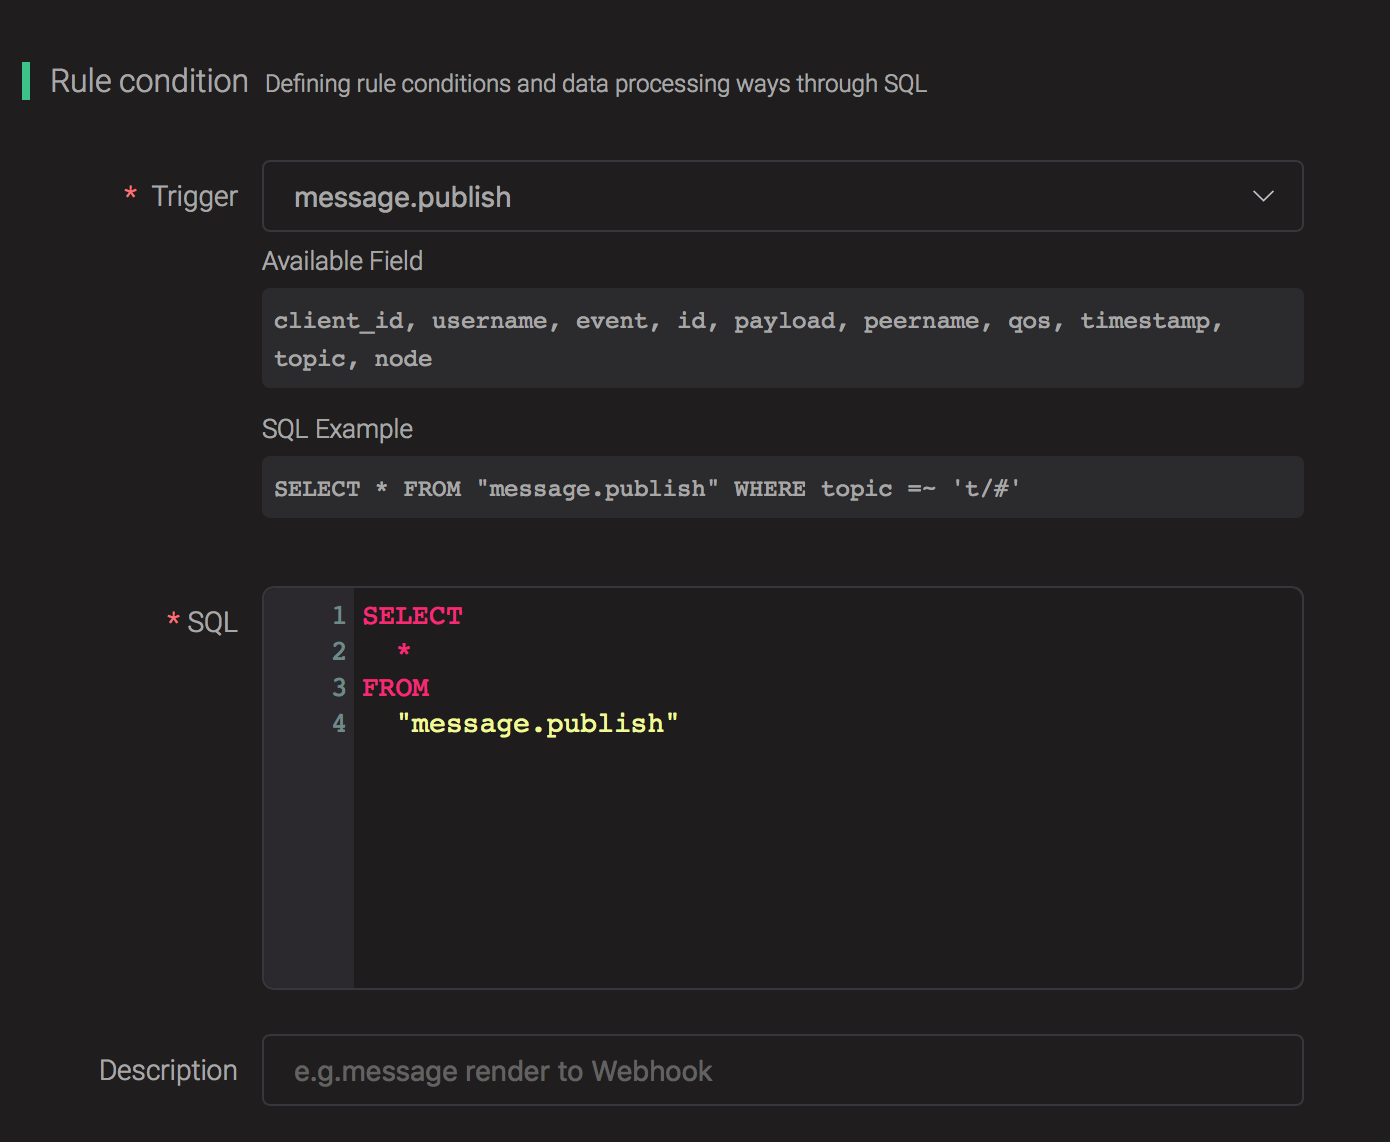
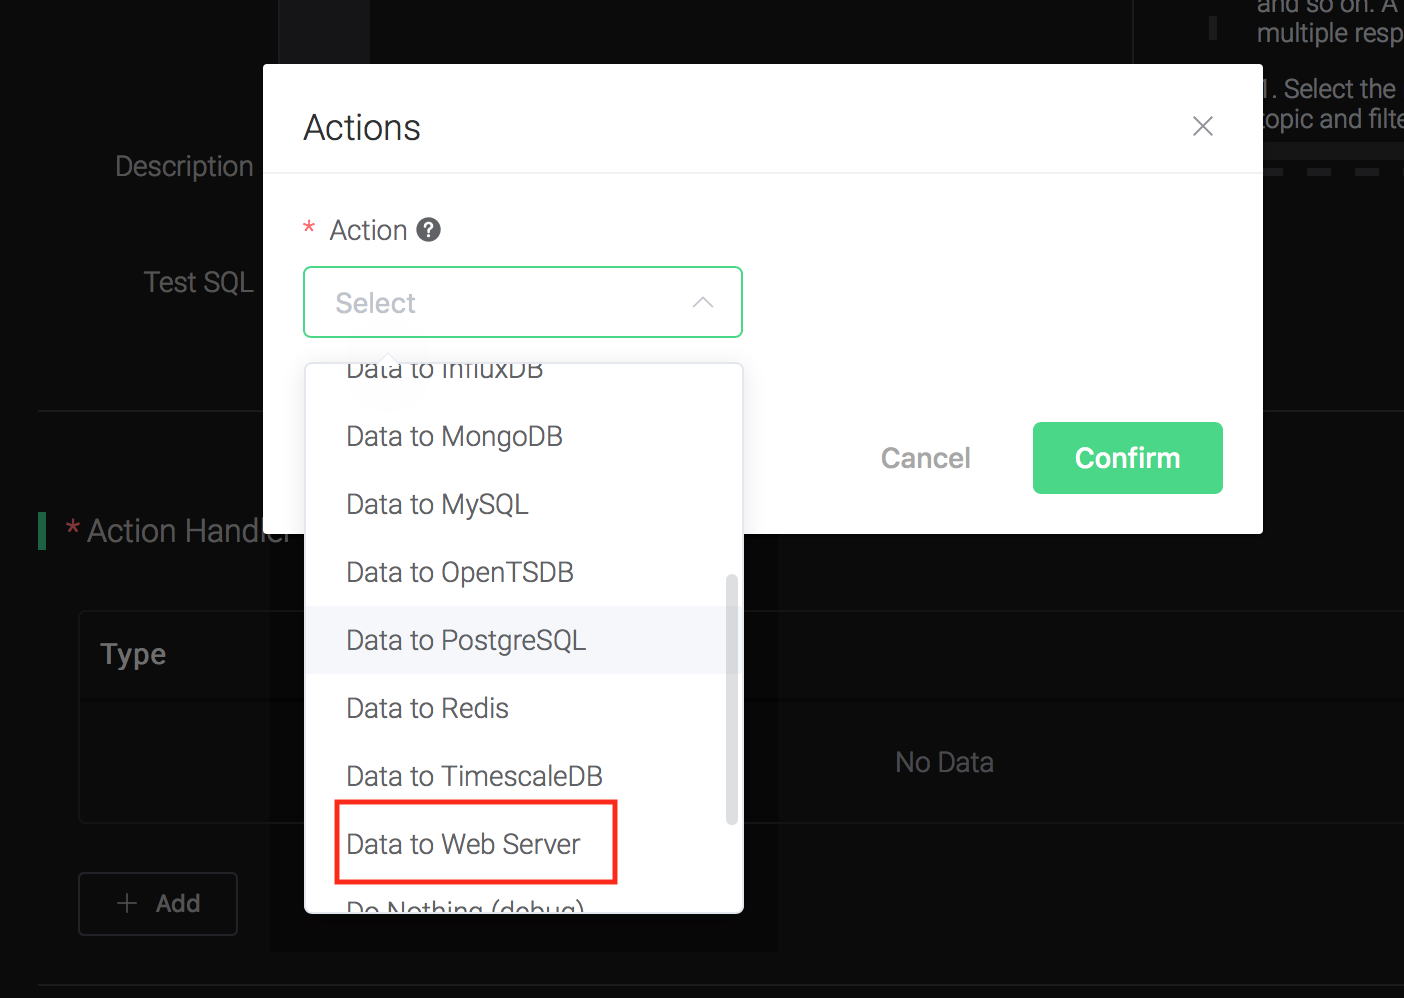
Bind an action:
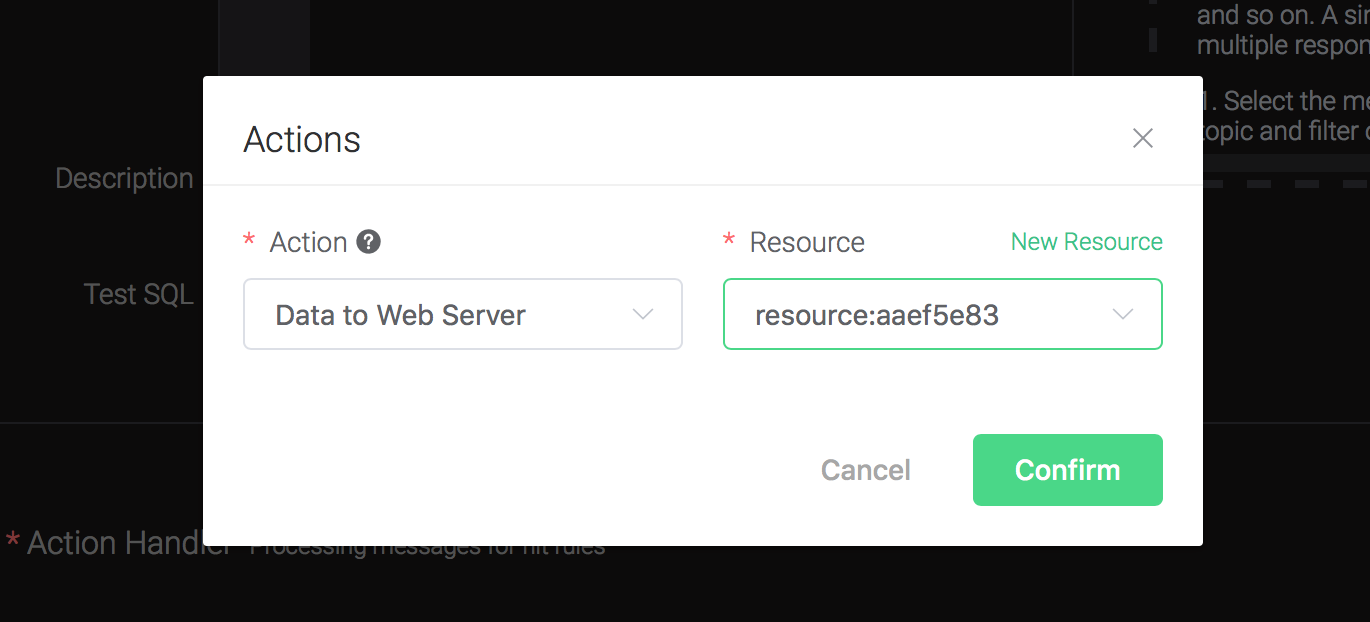
Click on the "+ Add" button under "Action Handler", and then select "Data to Web Server" in the pop-up dialog window.
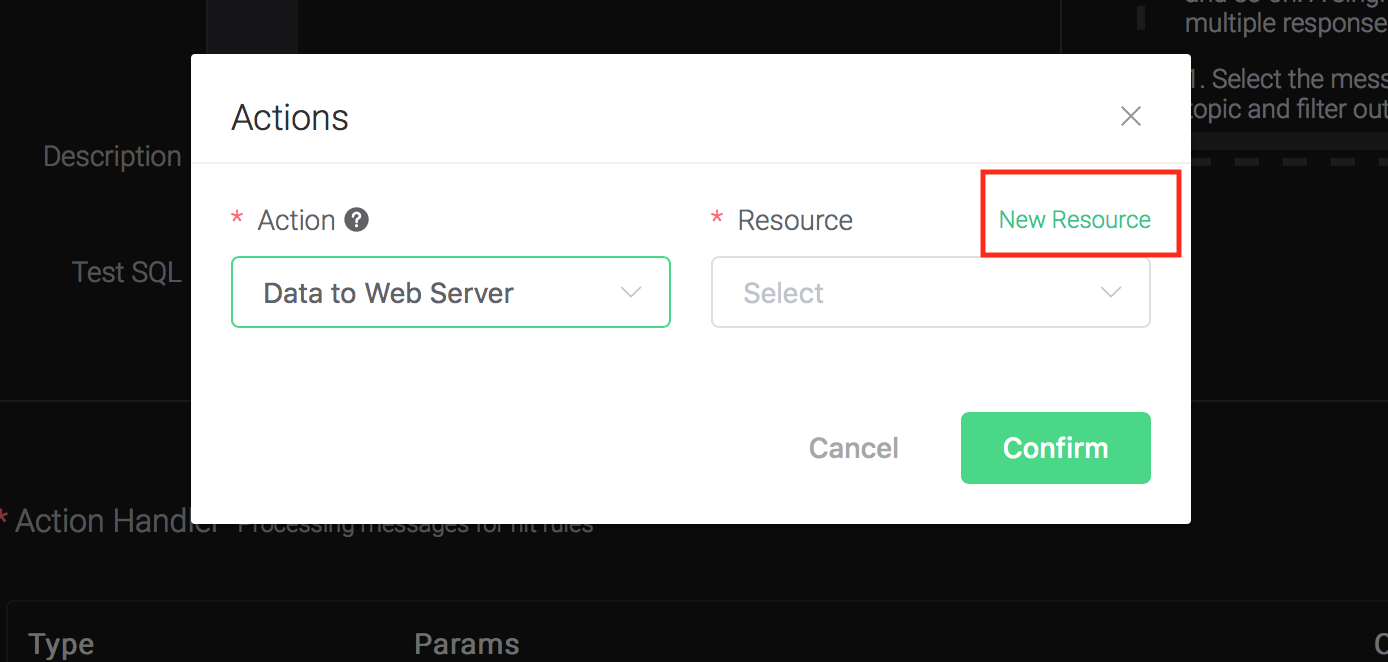
Bind a resource to the action:
Since the dropdown list "Resource" is empty for now, we create a new resource by clicking on the "New Resource" to the top right, and then select "WebHook":
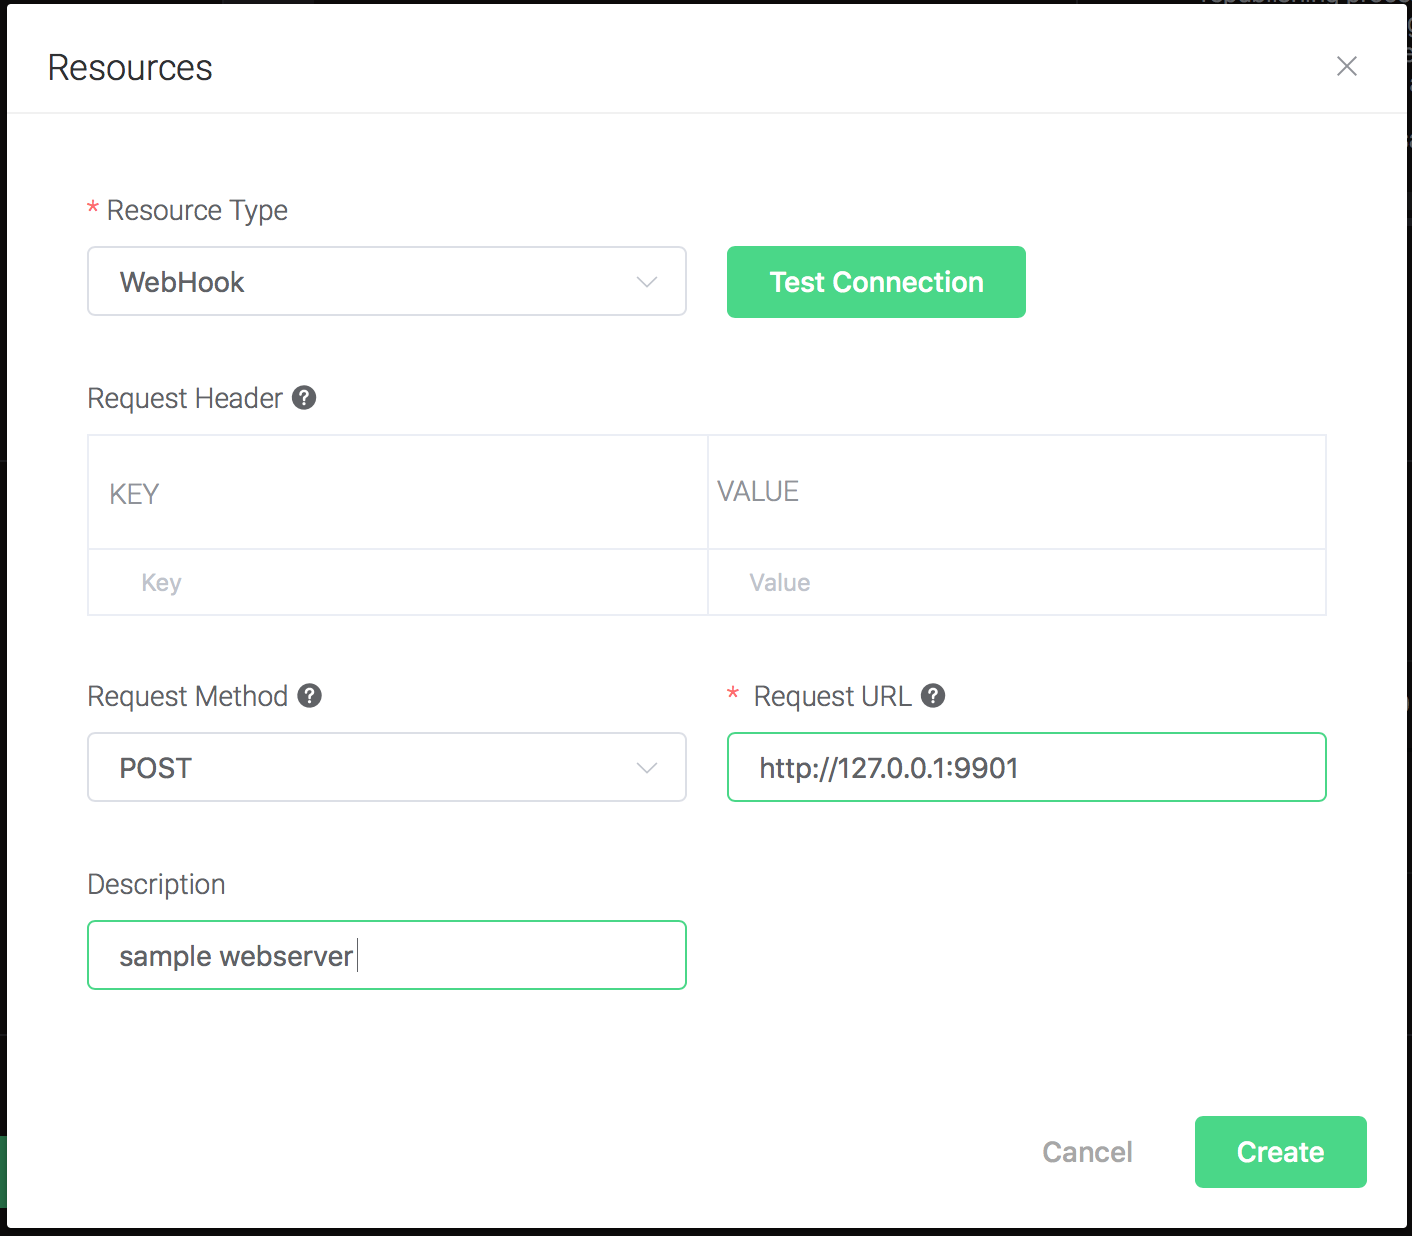
Configure the resource:
Fill in the "Request URL" and "Request Header"(Optional):
http://127.0.0.1:9901
And click on the "Testing Connection" button to make sure the connection can be created successfully, and then click on the "Create" button.
Back to the "Actions" dialog, and then click on the "Confirm" button.
Back to the creating rule page, then click on "Create" button. The rule we created will be show in the rule list:

We have finished, testing the rule by sending an MQTT message to emqx:
> Topic: "t/1"
>
> QoS: 1
>
> Payload: "Hello web server"
Then inspect the Web Service table, verify a new record has been received:
And from the rule list, verify that the "Matched" column has increased to 1:

Create BridgeMQTT Rules
Setup anther MQTT broker using mosquitto, change the port to 2883. Taking Mac OSX for instance:
$ brew install mosquitto

$ vim /usr/local/etc/mosquitto/mosquitto.conf

port 2883

# start mosquitto
$ brew services start mosquitto
Create a rule:
Go to emqx dashboard, select the "rule" tab on the menu to the left.
Select "message.publish", then type in the following SQL:
SELECT
    *
FROM
    "message.publish"
Bind an action:
Click on the "+ Add" button under "Action Handler", and then select
"Data bridge to MQTT Broker" in the pop-up dialog window.
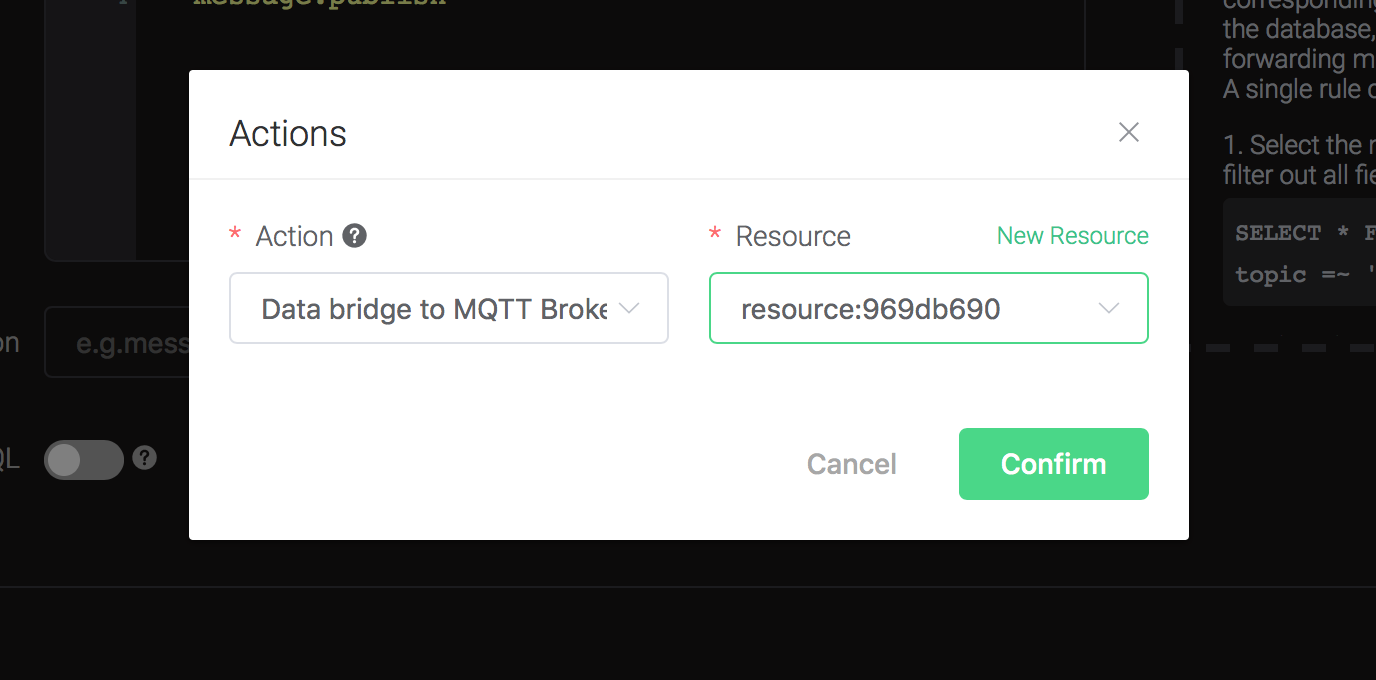
Bind a resource to the action. Since the dropdown list "Resource" is empty for now, we create a new resource by clicking on the "New Resource" to the top right, and then select "MQTT Bridge":
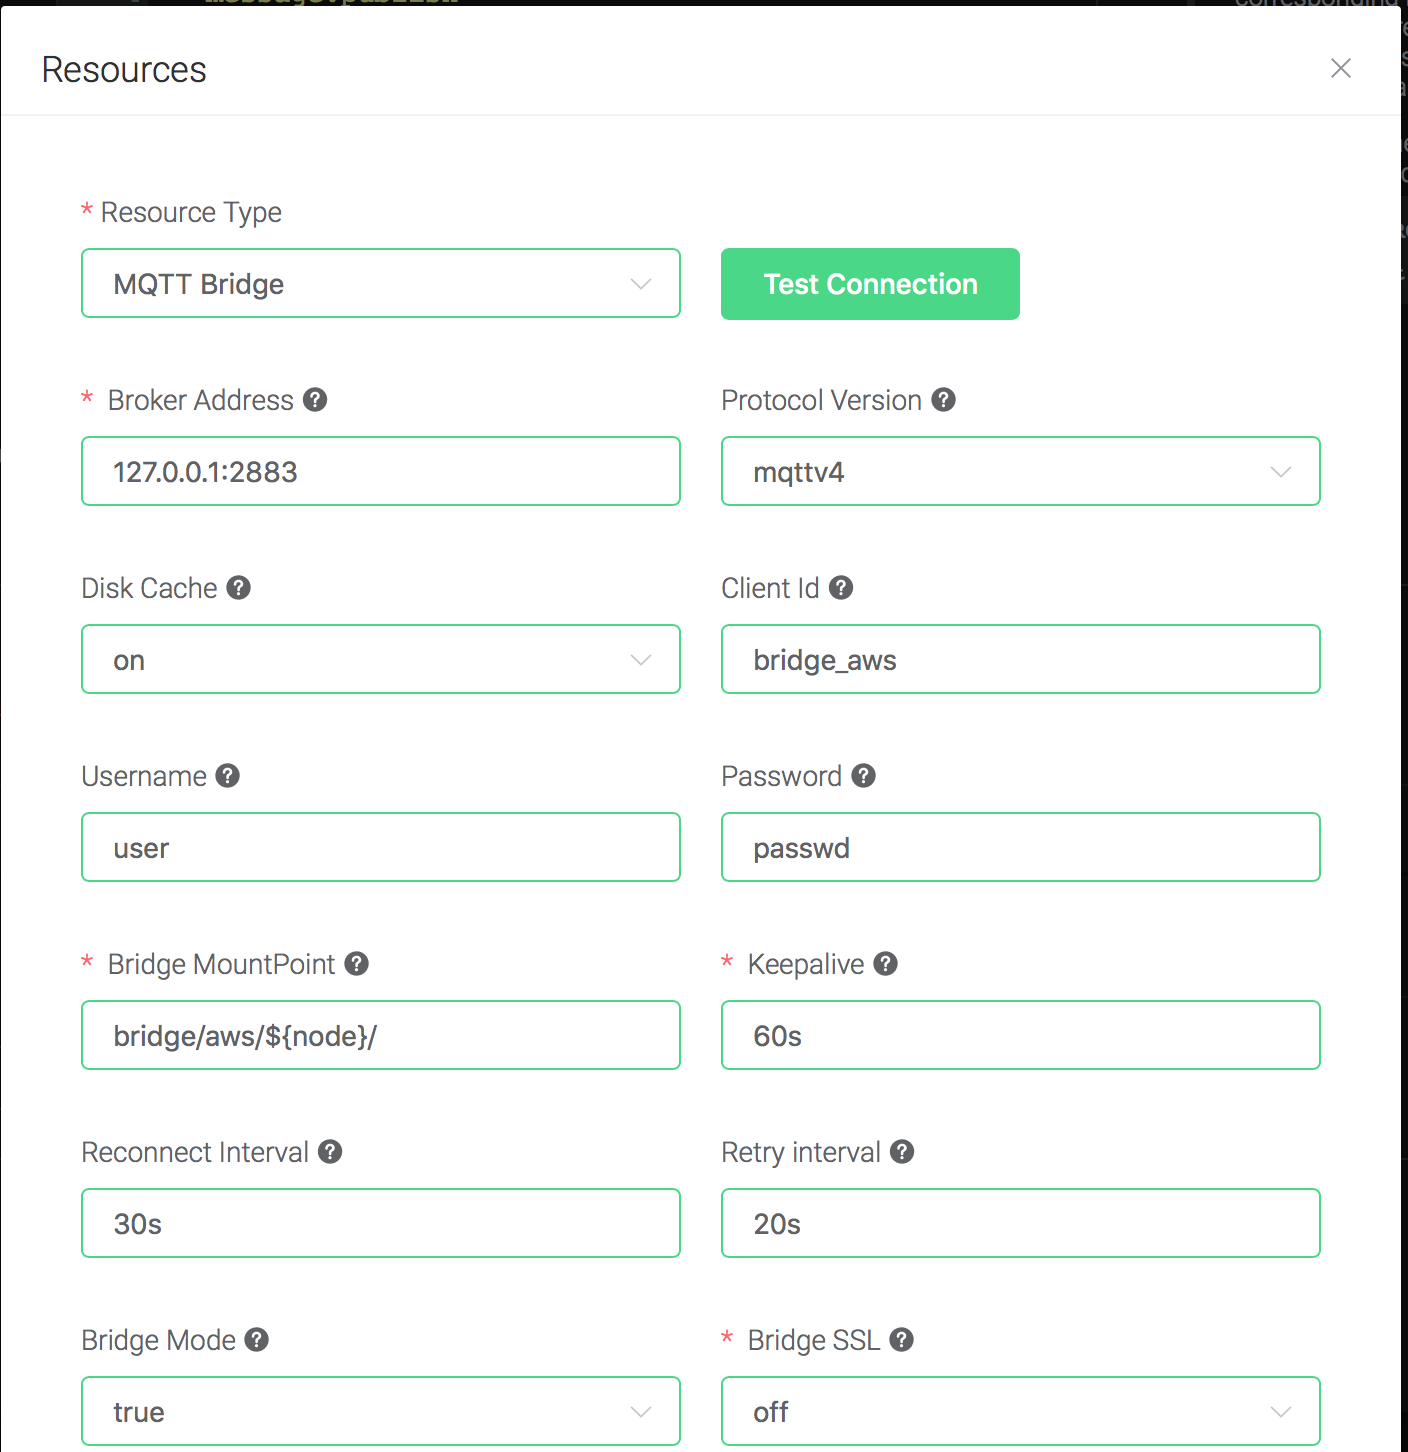
Configure the resource:
Set "Broker Address" to the address of mosquitto, here is
127.0.0.1:2883, and keep all other configs as default, and click on
the "Testing Connection" button to make sure the connection can be
created successfully, and then click on the "Create" button.
Back to the "Actions" dialog, and then click on the "Confirm" button.
Back to the creating rule page, then click on "Create" button. The rule we created will be show in the rule list:

We have finished, testing the rule by sending an MQTT message to emqx:
> Topic: "t/1"
>
> QoS: 0
>
> Retained: false
>
> Payload: "Hello, World\!"
Then verify a message has been published to mosquitto:

And from the rule list, verify that the "Matched" column has increased to 1:
Create MySQL Rules
Setup a MySQL database, and changes the username/password to root/public, taking Mac OSX for instance:
$ brew install mysql

$ brew services start mysql

$ mysql -u root -h localhost -p

ALTER USER 'root'@'localhost' IDENTIFIED BY 'public';
Initiate MySQL table:
$ mysql -u root -h localhost -ppublic

create "test" database:

CREATE DATABASE test;

create "t_mqtt_msg" table:

USE test;CREATE TABLE `t_mqtt_msg` (
`id` int(11) unsigned NOT NULL AUTO_INCREMENT,
`msgid` varchar(64) DEFAULT NULL,
`topic` varchar(255) NOT NULL,
`qos` tinyint(1) NOT NULL DEFAULT '0',
`payload` blob,
`arrived` datetime NOT NULL,
PRIMARY KEY (`id`),
INDEX topic_index(`id`, `topic`)
) ENGINE=InnoDB DEFAULT CHARSET=utf8MB4;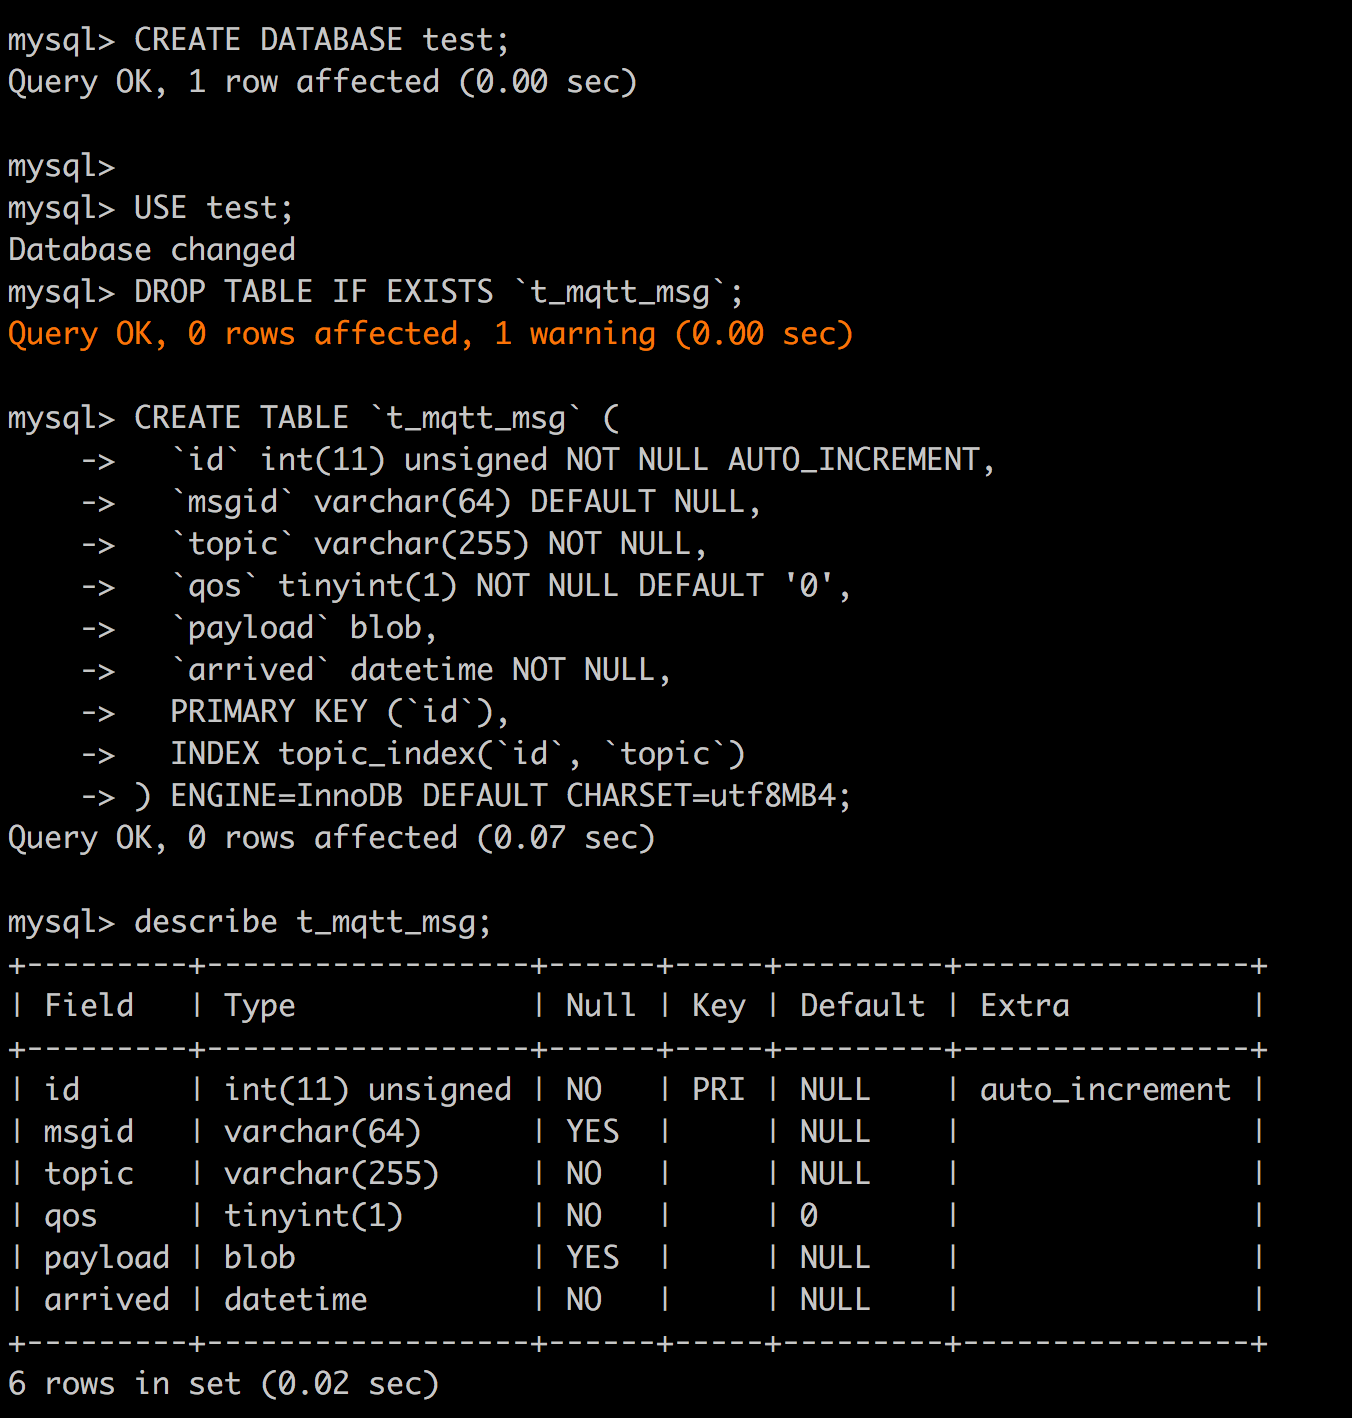
Create a rule:
Go to emqx dashboard, select the "rule" tab on the menu to the left.
Select "message.publish", then type in the following SQL:
SELECT * FROM "message.publish"
Bind an action:
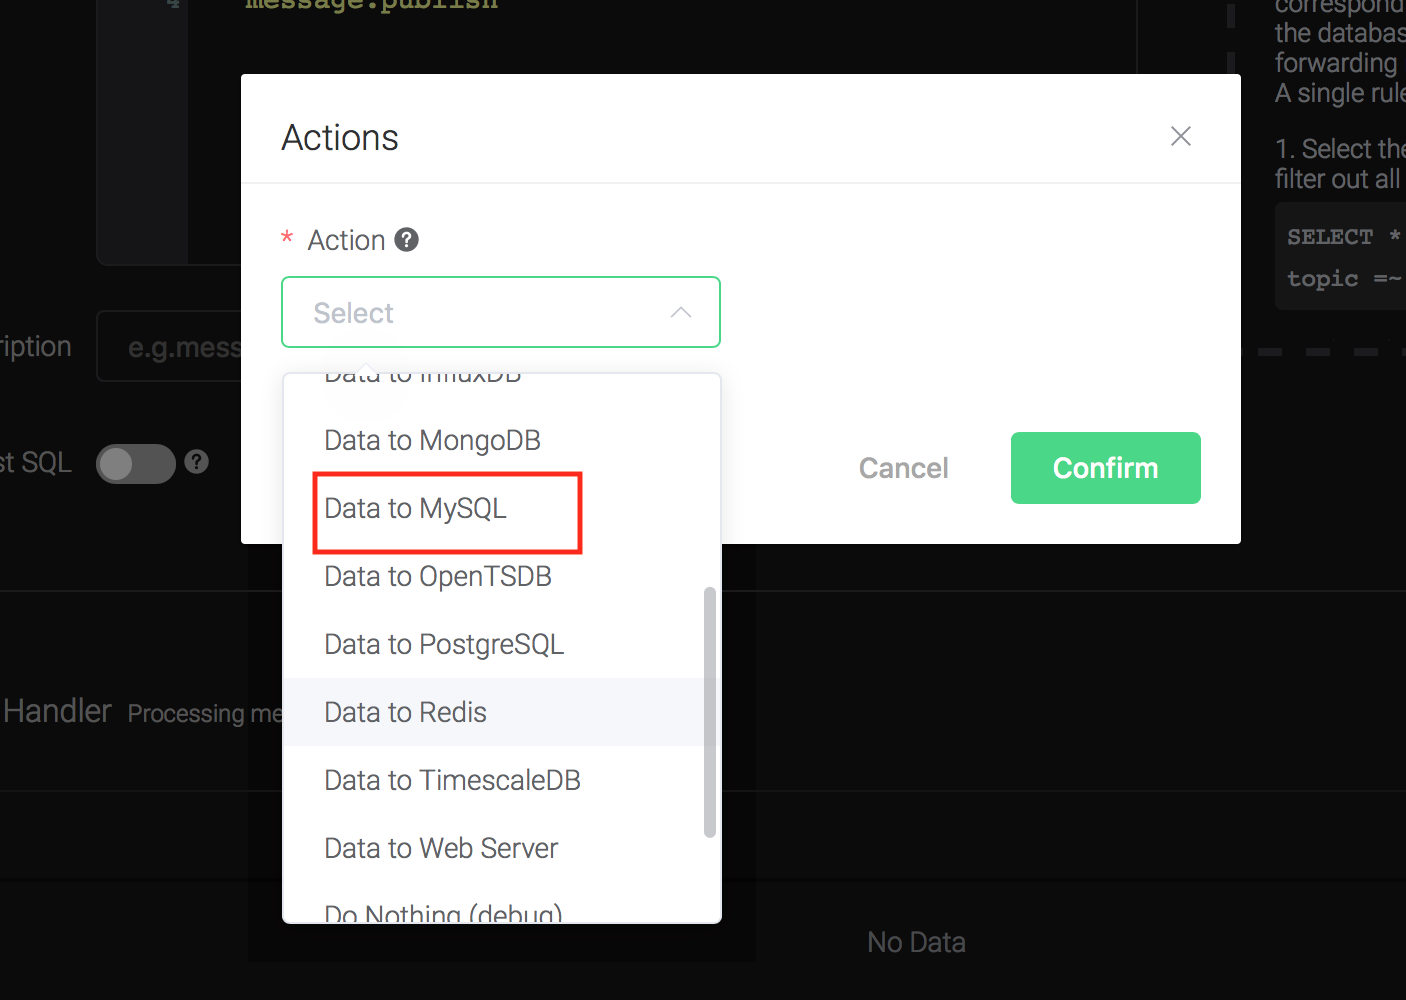
Click on the "+ Add" button under "Action Handler", and then select "Data to MySQL" in the pop-up dialog window.
Fill in the parameters required by the action:
Two parameters is required by action "Data to MySQL":
1). SQL template. SQL template is the sql command you'd like to run when the action is triggered. In this example we'll insert a message into mysql, so type in the following sql template:
insert into t_mqtt_msg(msgid, topic, qos, payload, arrived) values (${id}, ${topic}, ${qos}, ${payload}, FROM_UNIXTIME(${timestamp}/1000))Before data is inserted into the table, placeholders like ${key} will be replaced by the corresponding values.
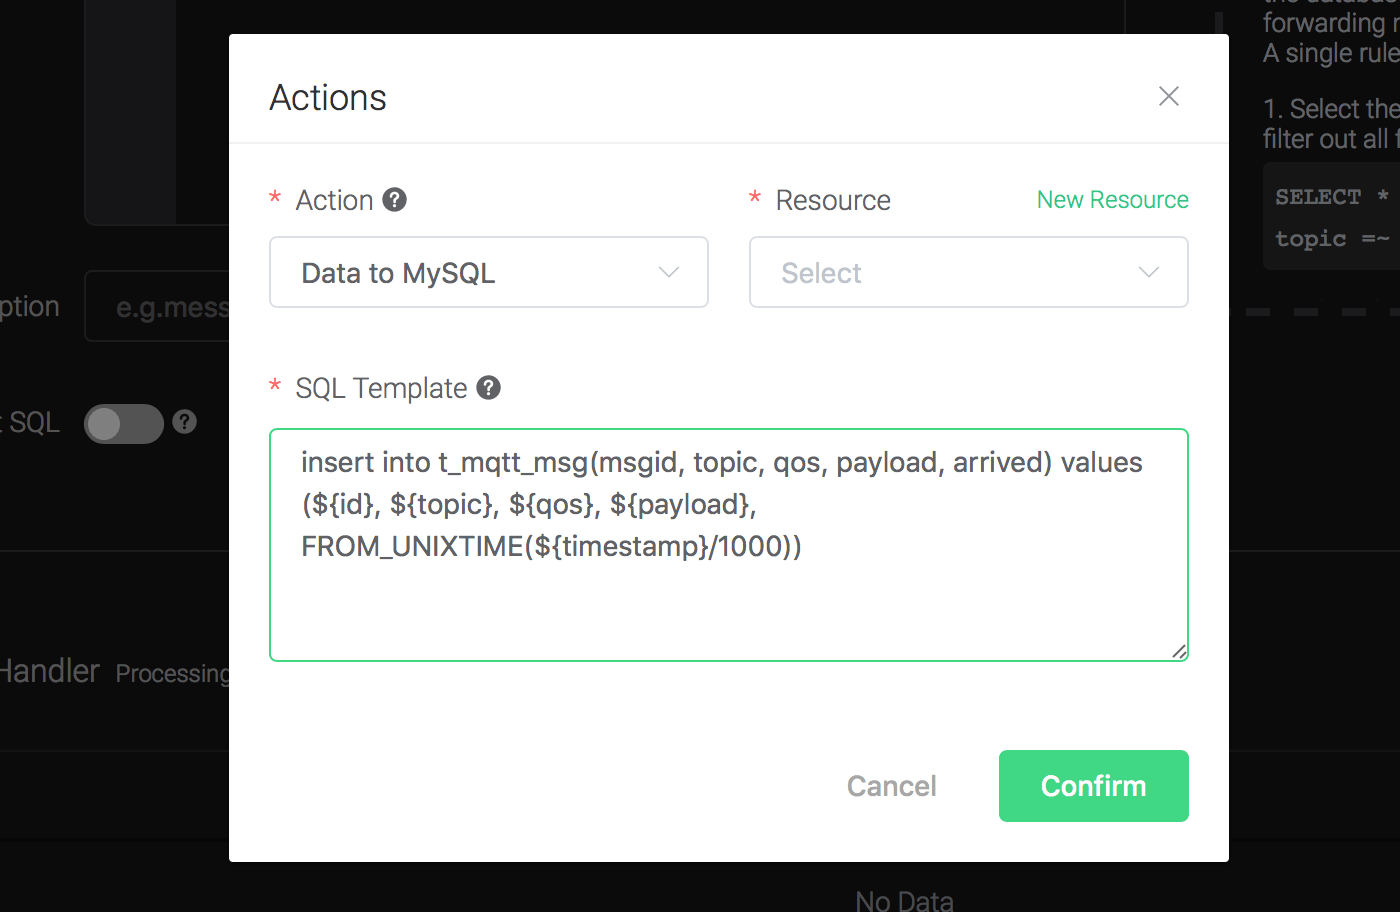
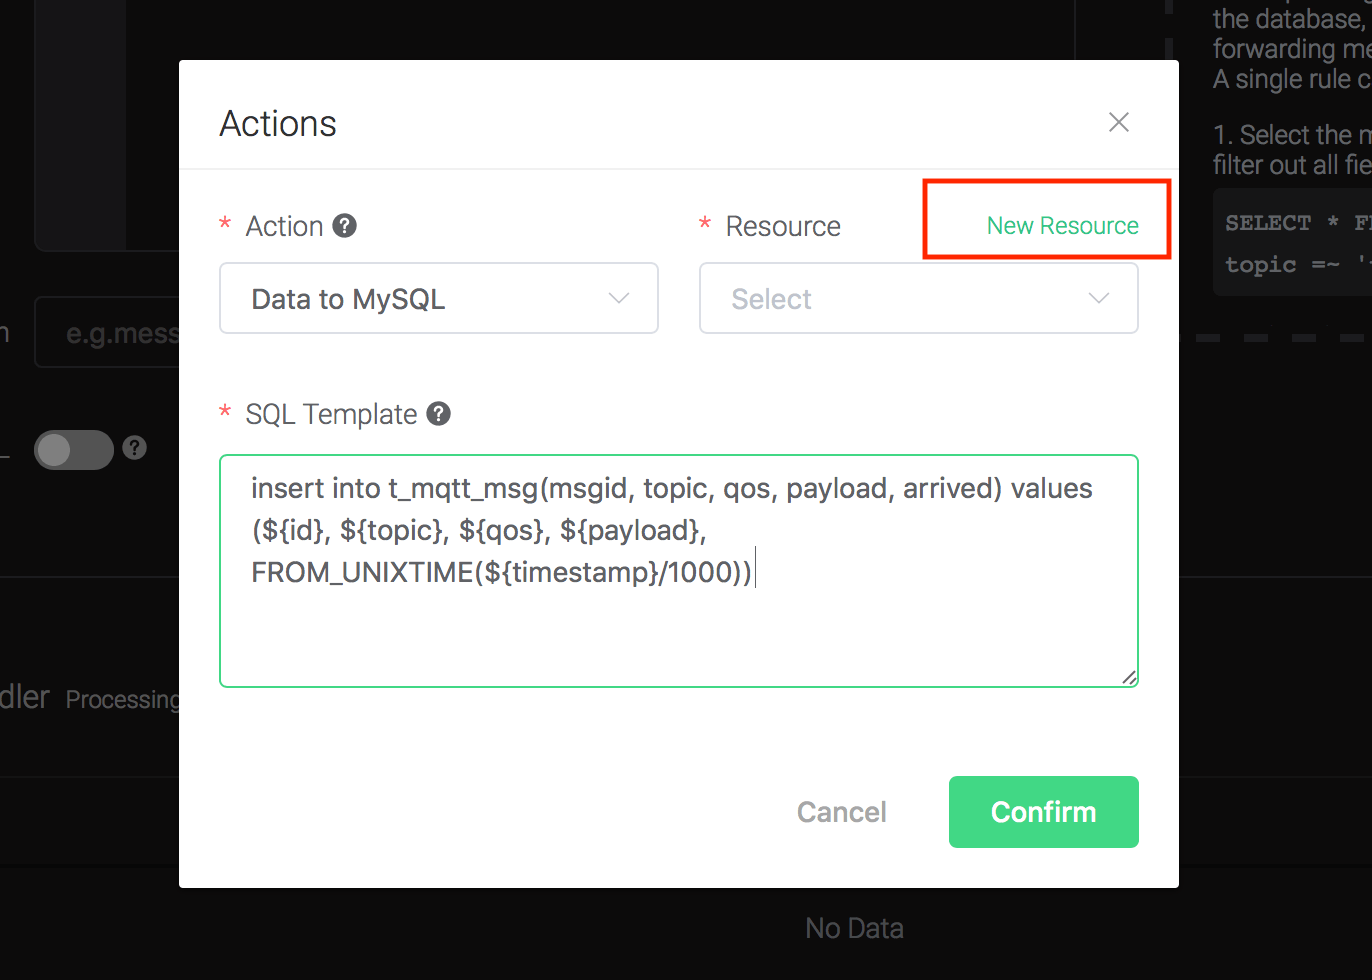
2). Bind a resource to the action. Since the dropdown list "Resource" is empty for now, we create a new resource by clicking on the "New Resource" to the top right, and then select "MySQL":
Configure the resource:
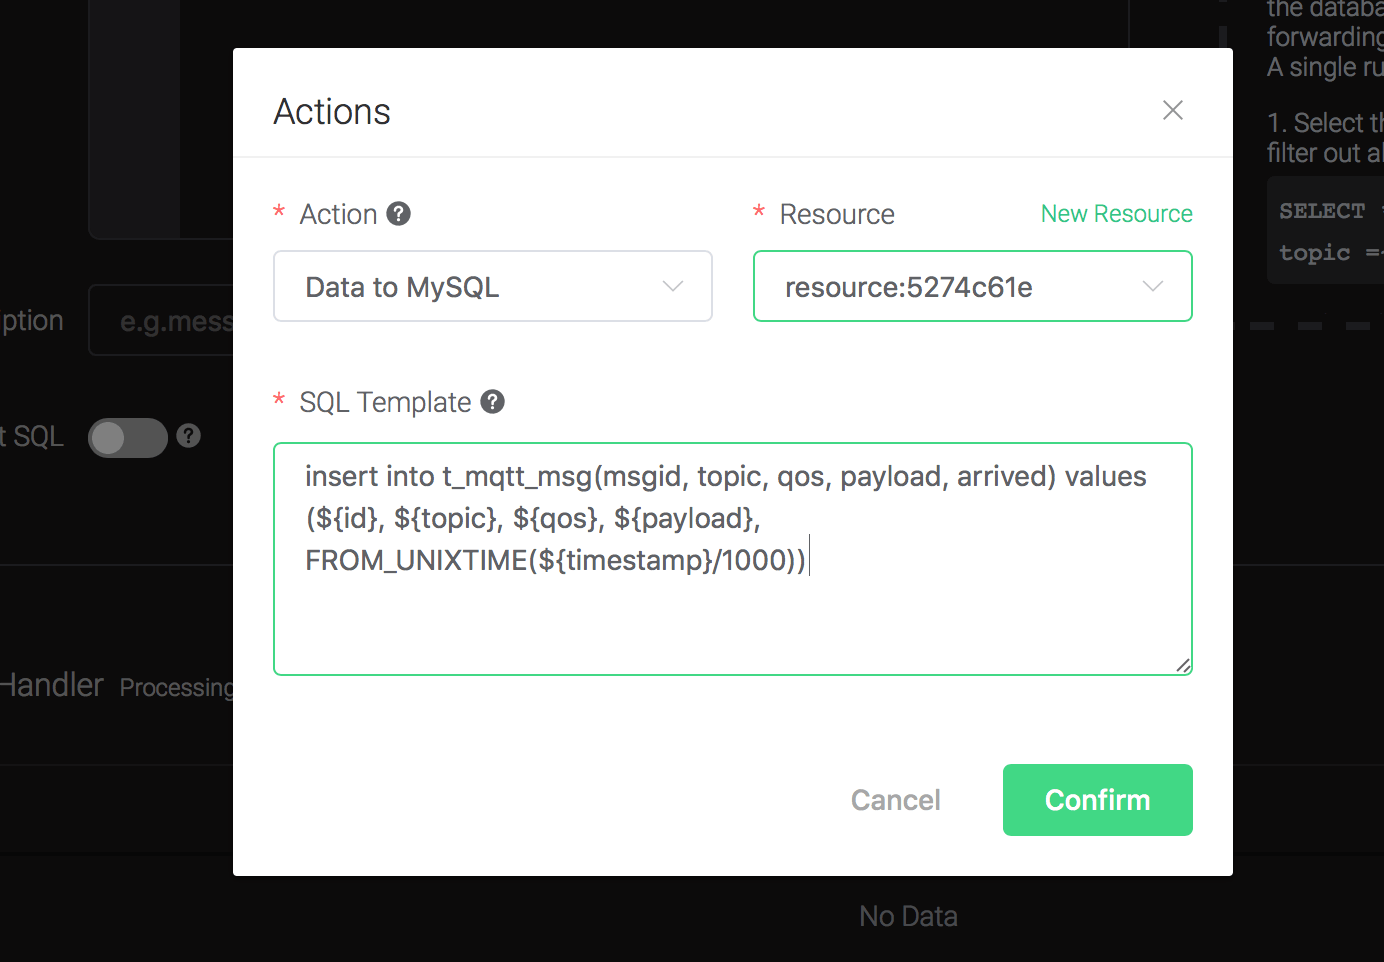
Set "MySQL Database" to "test", "MySQL Username" to "root", "MySQL Password" to "public", and "Description" to "MySQL resource to 127.0.0.1:3306 db=test", and click on the "Testing Connection" button to make sure the connection can be created successfully, and then click on the "Create" button.

Back to the "Actions" dialog, and then click on the "Confirm" button.
Back to the creating rule page, then click on "Create" button. The rule we created will be show in the rule list:

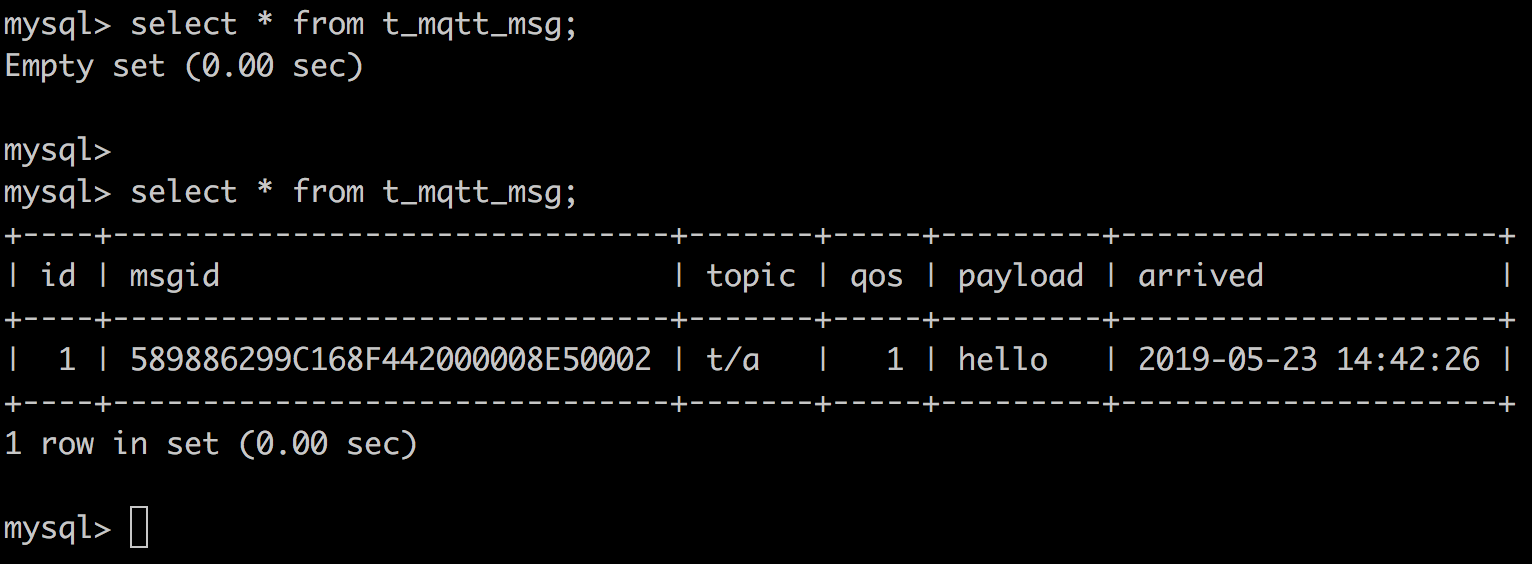
We have finished, testing the rule by sending an MQTT message to emqx:
> Topic: "t/a"
>
> QoS: 1
>
> Payload: "hello"
Then inspect the MySQL table, verify a new record has been inserted:
Create PostgreSQL Rules
Setup a PostgreSQL database, taking Mac OSX for instance:
$ brew install postgresql

$ brew services start postgresql

## create root user
$ createuser --interactive --pwprompt
Enter name of role to add: root
Enter password for new role: public
Enter it again: public
Shall the new role be a superuser? (y/n) y

## create database named 'mqtt' using root
$ createdb -U root mqtt

$ psql -U root mqtt

mqtt=> \dn;
List of schemas
Name  | Owner
--------+-------
public | shawn
(1 row)
Initiate PgSQL table:
\$ psql -U root mqttcreate t_mqtt_msg table:
CREATE TABLE t_mqtt_msg (
    id SERIAL primary key,
    msgid character varying(64),
    sender character varying(64),
    topic character varying(255),
    qos integer,
    retain integer,
    payload text,
    arrived timestamp without time zone
);
Create a rule:
Go to emqx dashboard, select the "Rule" tab on the menu to the left.
Select "message.publish", then type in the following SQL:
SELECT
 *
FROM
 "message.publish"
Bind an action:
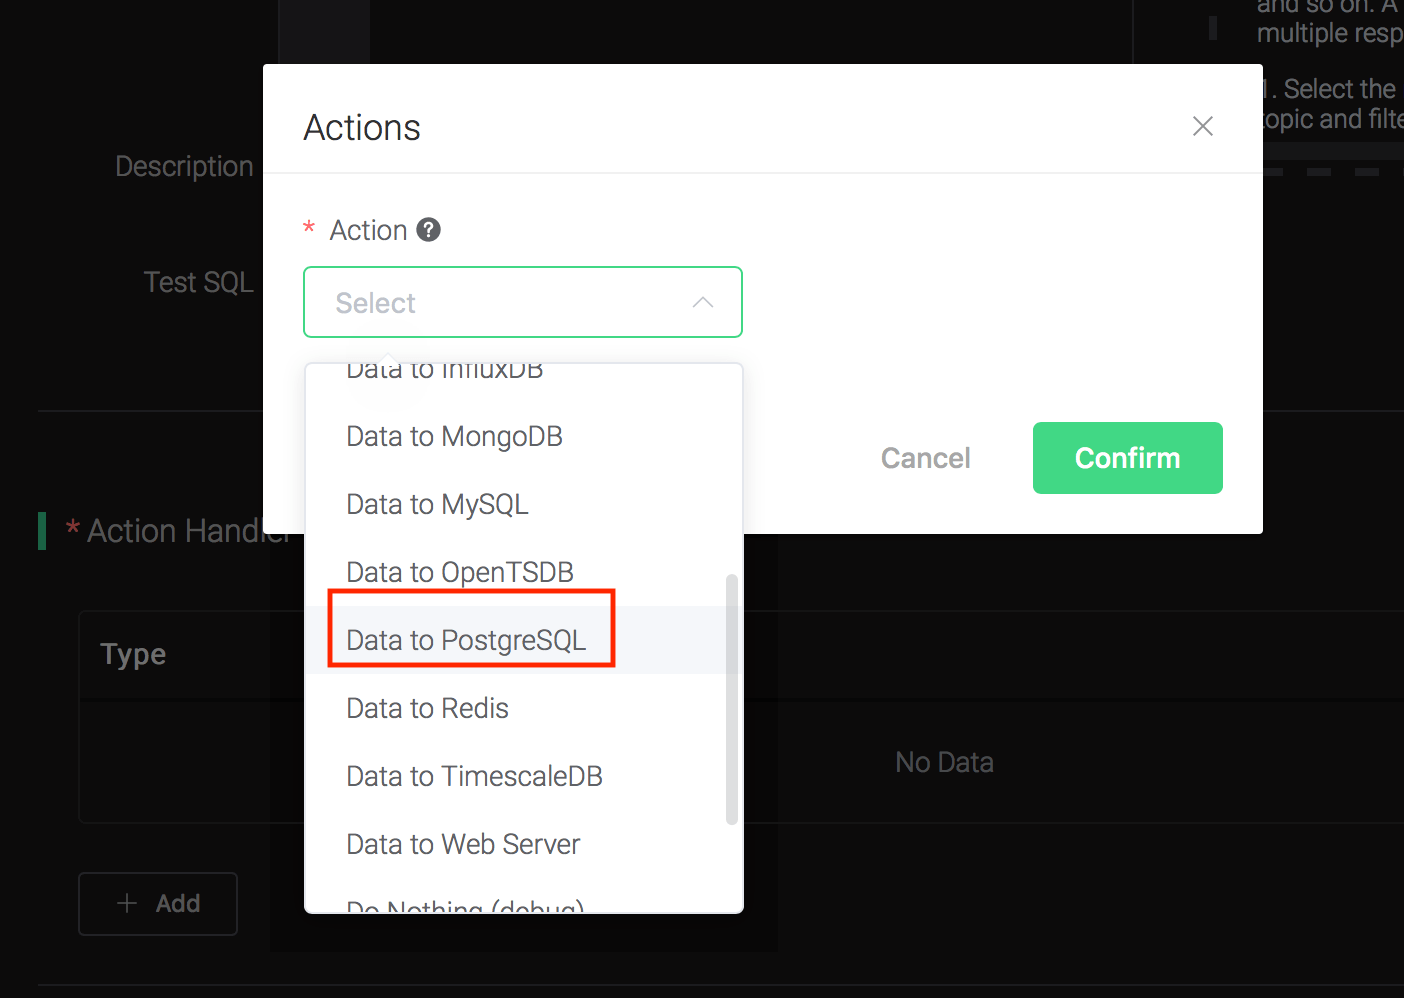
Click on the "+ Add" button under "Action Handler", and then select "Data to PostgreSQL" in the pop-up dialog window.
Fill in the parameters required by the action:
Two parameters is required by action "Data to PostgreSQL":
1). SQL template. SQL template is the sql command you'd like to run when the action is triggered. In this example we'll insert a message into pgsql, so type in the following sql template:
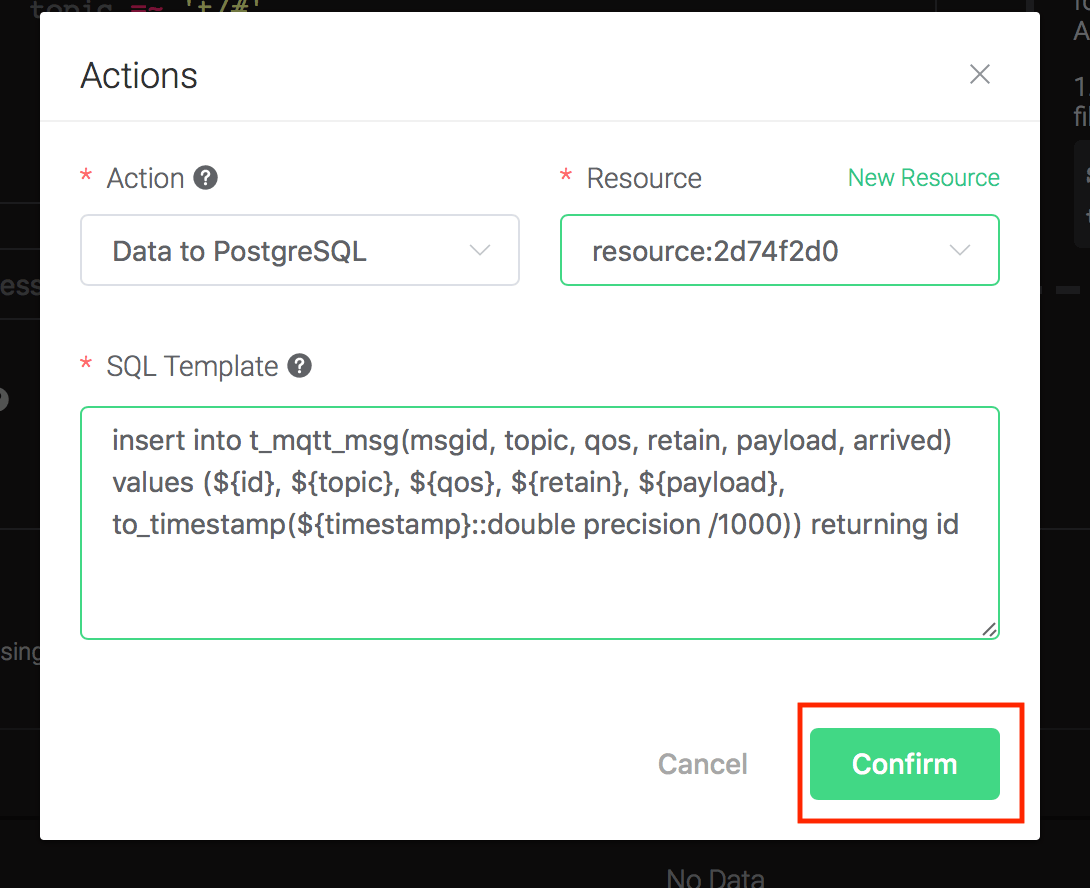
insert into t_mqtt_msg(msgid, topic, qos, retain, payload, arrived) values (${id}, ${topic}, ${qos}, ${retain}, ${payload}, to_timestamp(${timestamp}::double precision /1000)) returning idBefore data is inserted into the table, placeholders like ${key} will be replaced by the corresponding values.
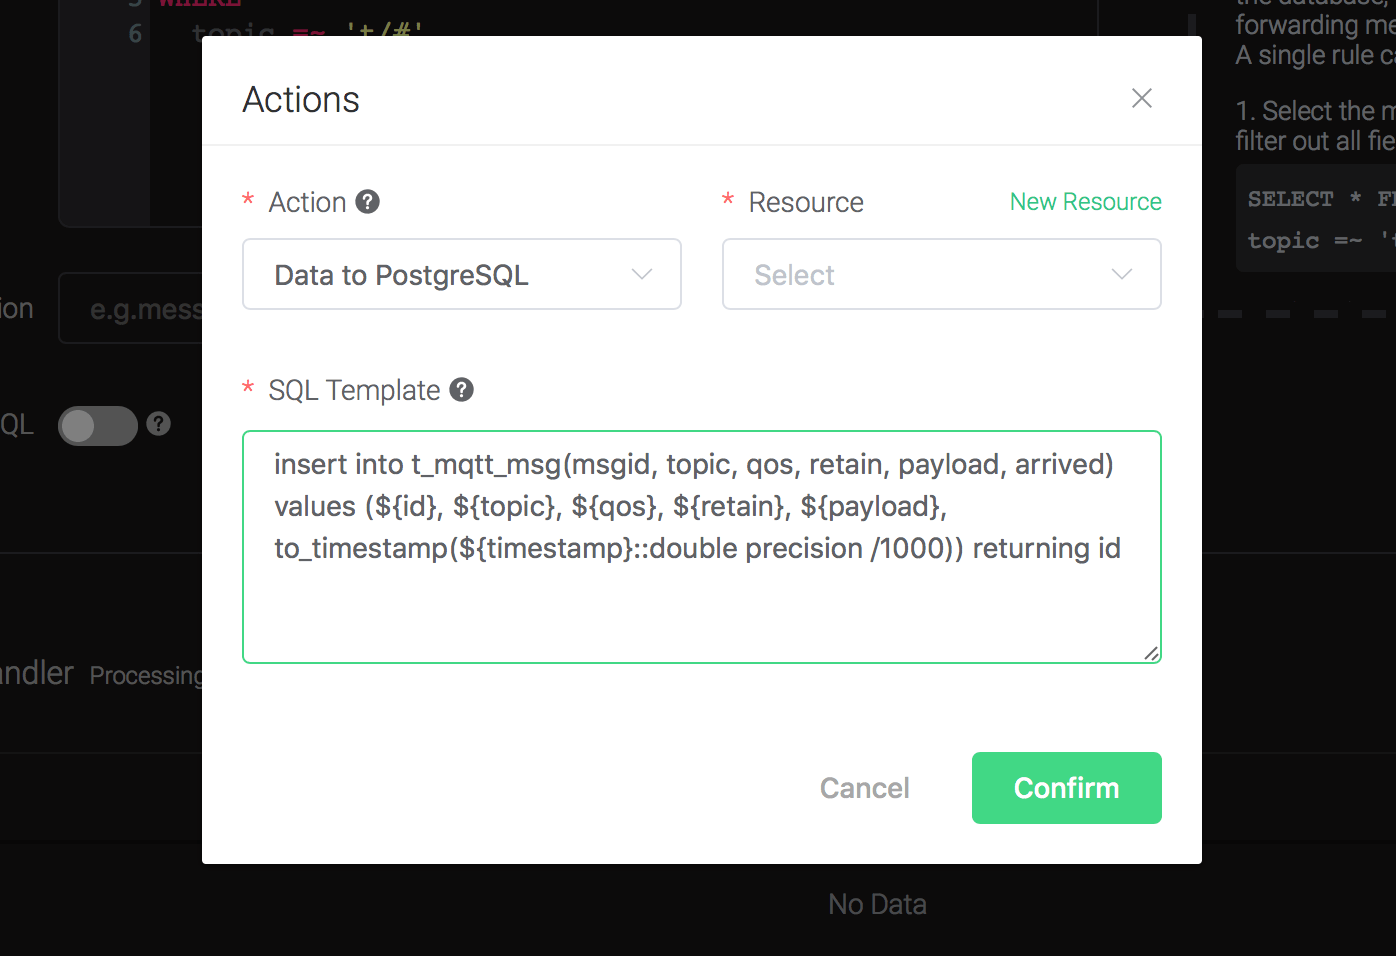
2). Bind a resource to the action. Since the dropdown list "Resource" is empty for now, we create a new resource by clicking on the "New Resource" to the top right, and then select "PostgreSQL":

Select "PostgreSQL Resource".
Configure the resource:
Set "PostgreSQL Database" to "mqtt", "PostgreSQL User" to "root", and keep all other configs as default, and click on the "Testing Connection" button to make sure the connection can be created successfully.
Finally click on the "Create" button.

Back to the "Actions" dialog, and then click on the "Confirm" button.
Back to the creating rule page, then click on "Create" button. The rule we created will be show in the rule list:

We have finished, testing the rule by sending an MQTT message to emqx:
> Topic: "t/1"
>
> QoS: 0
>
> Retained: false
>
> Payload: "hello1"
Then inspect the PgSQL table, verify a new record has been inserted:

And from the rule list, verify that the "Matched" column has increased to 1:

Create Cassandra Rules
Setup a Cassandra database, and changes the root/password to root/public, taking Mac OSX for instance:
$ brew install cassandra

## change the config file to enable authentication
$  vim /usr/local/etc/cassandra/cassandra.yaml

    authenticator: PasswordAuthenticator
    authorizer: CassandraAuthorizer

$ brew services start cassandra

## login to cql shell and then create the root user
$ cqlsh -ucassandra -pcassandra

cassandra@cqlsh> create user root with password 'public' superuser;
Initiate Cassandra Table:
$ cqlsh -uroot -ppublicCreate Keyspace "test":
CREATE KEYSPACE test WITH replication = {'class': 'SimpleStrategy', 'replication_factor': '1'} AND durable_writes = true;Create "t_mqtt_msg" table:
USE test;

CREATE TABLE t_mqtt_msg (
    msgid text,
    topic text,
    qos int,
    payload text,
    retain int,
    arrived timestamp,
    PRIMARY KEY (msgid, topic)
);
Create a rule:
Go to emqx dashboard, select the "rule" tab on the menu to the left.
Select "message.publish", then type in the following SQL:
SELECT
    *
FROM
    "message.publish"
Bind an action:
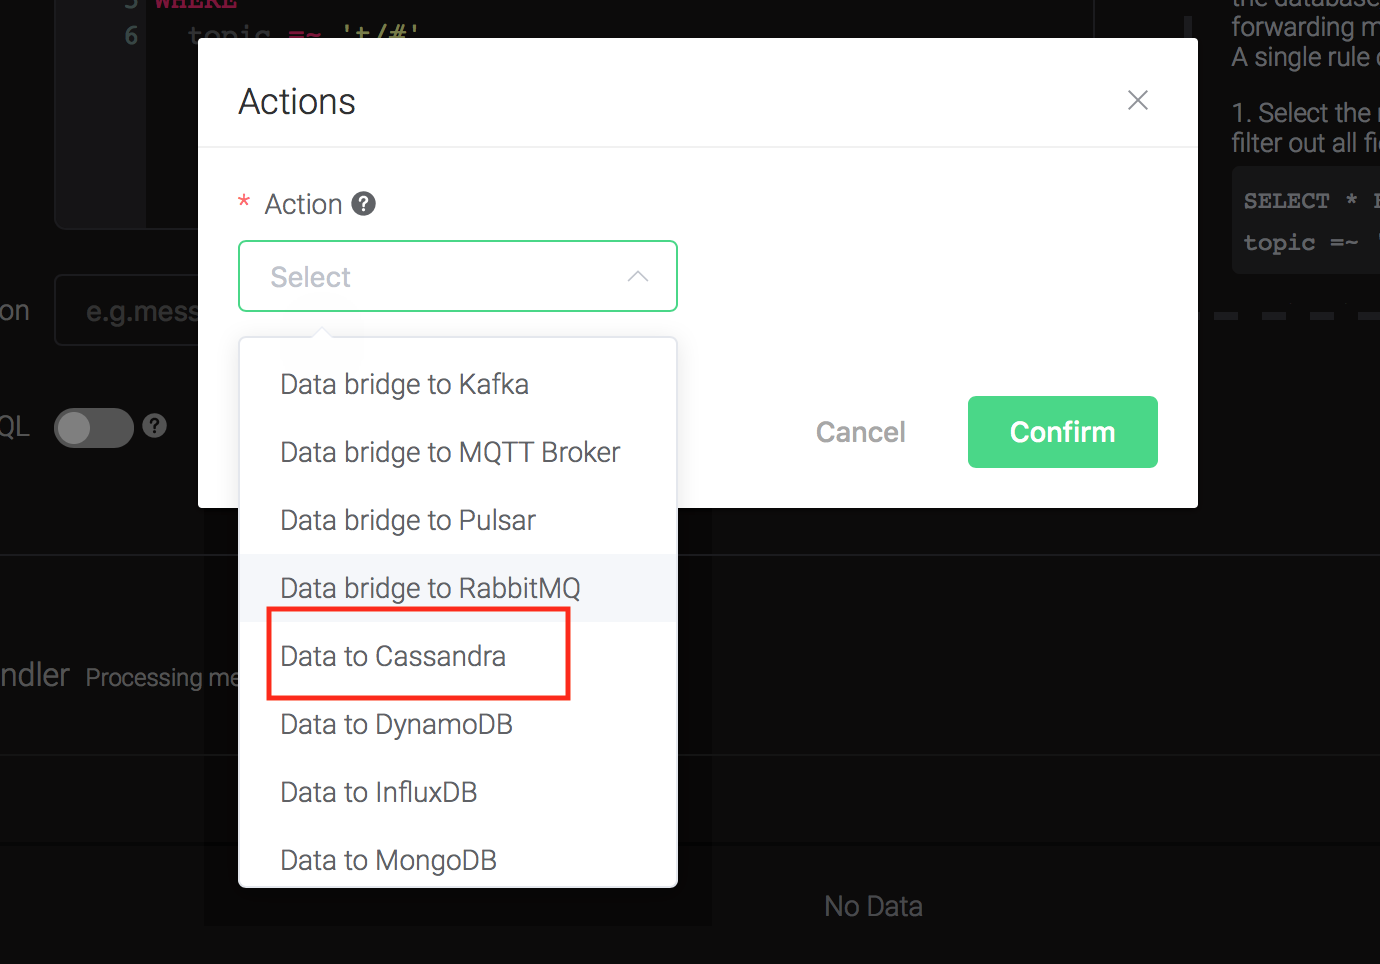
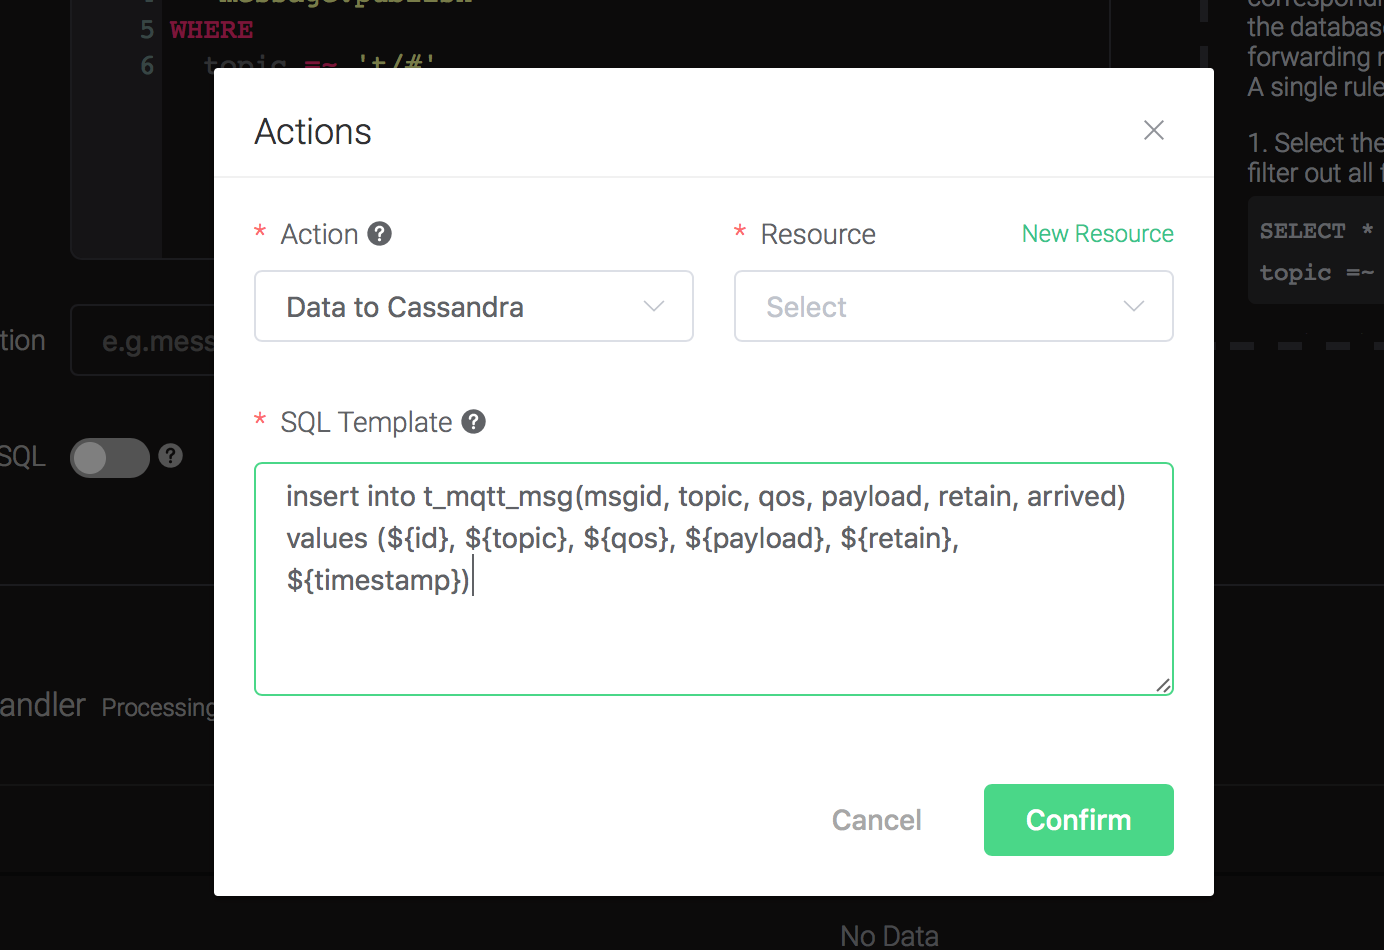
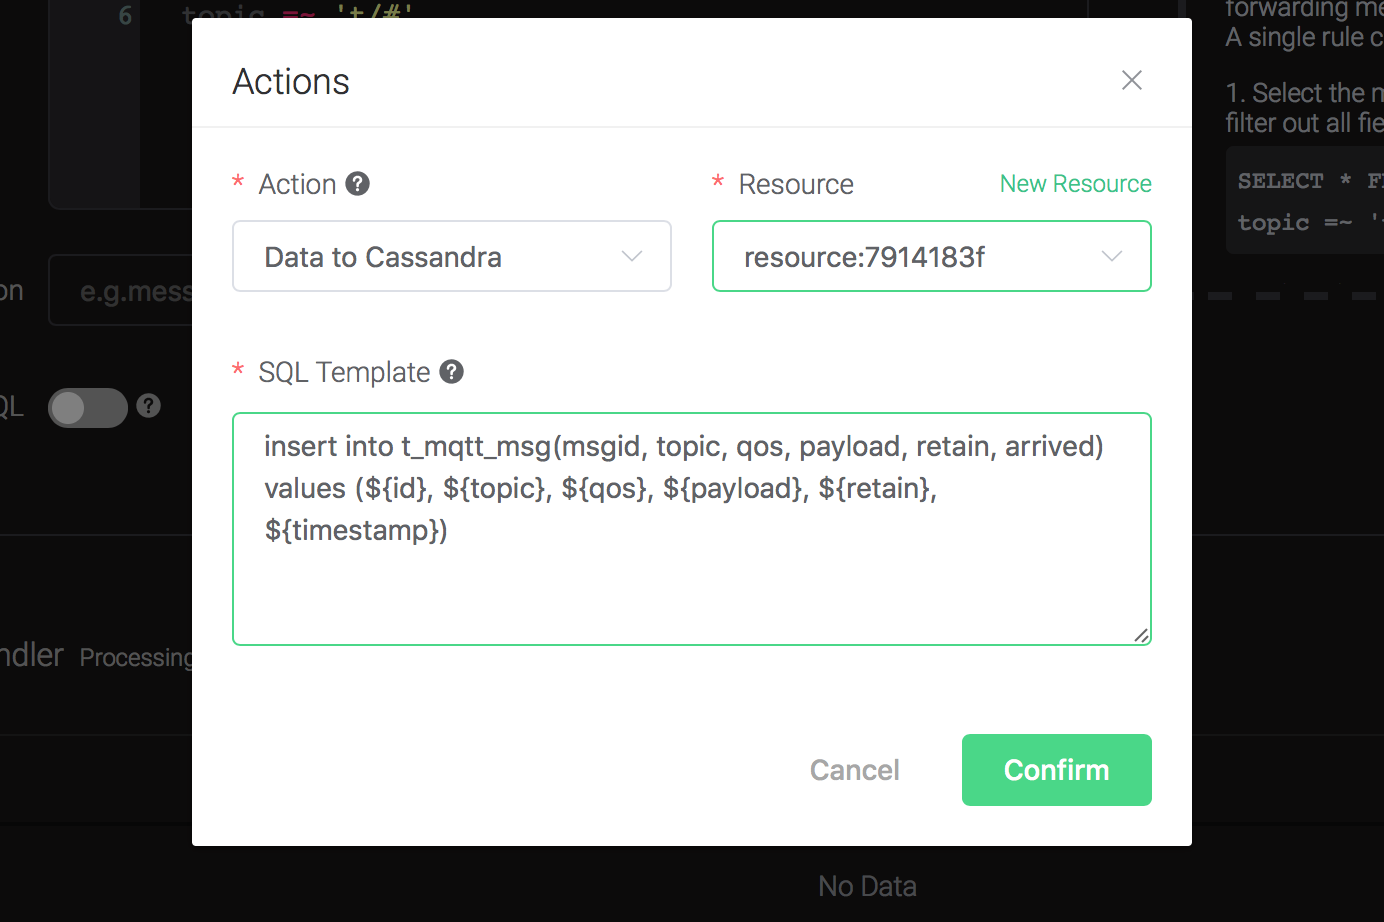
Click on the "+ Add" button under "Action Handler", and then select "Data to Cassandra" in the pop-up dialog window.
Fill in the parameters required by the action:
Two parameters is required by action "Data to Cassandra":
1). SQL template. SQL template is the sql command you'd like to run when the action is triggered. In this example we'll insert a message into Cassandra, so type in the following sql template:
insert into t_mqtt_msg(msgid, topic, qos, payload, retain, arrived) values (${id}, ${topic}, ${qos}, ${payload}, ${retain}, ${timestamp})Before data is inserted into the table, placeholders like ${key} will be replaced by the corresponding values.
2). Bind a resource to the action. Since the dropdown list "Resource" is empty for now, we create a new resource by clicking on the "New Resource" to the top right, and then select "Cassandra":

Configure the resource:
Set "Cassandra Keyspace" to "test", "Cassandra Username" to "root", "Cassandra Password" to "public", and keep all other configs as default, and click on the "Testing Connection" button to make sure the connection can be created successfully.
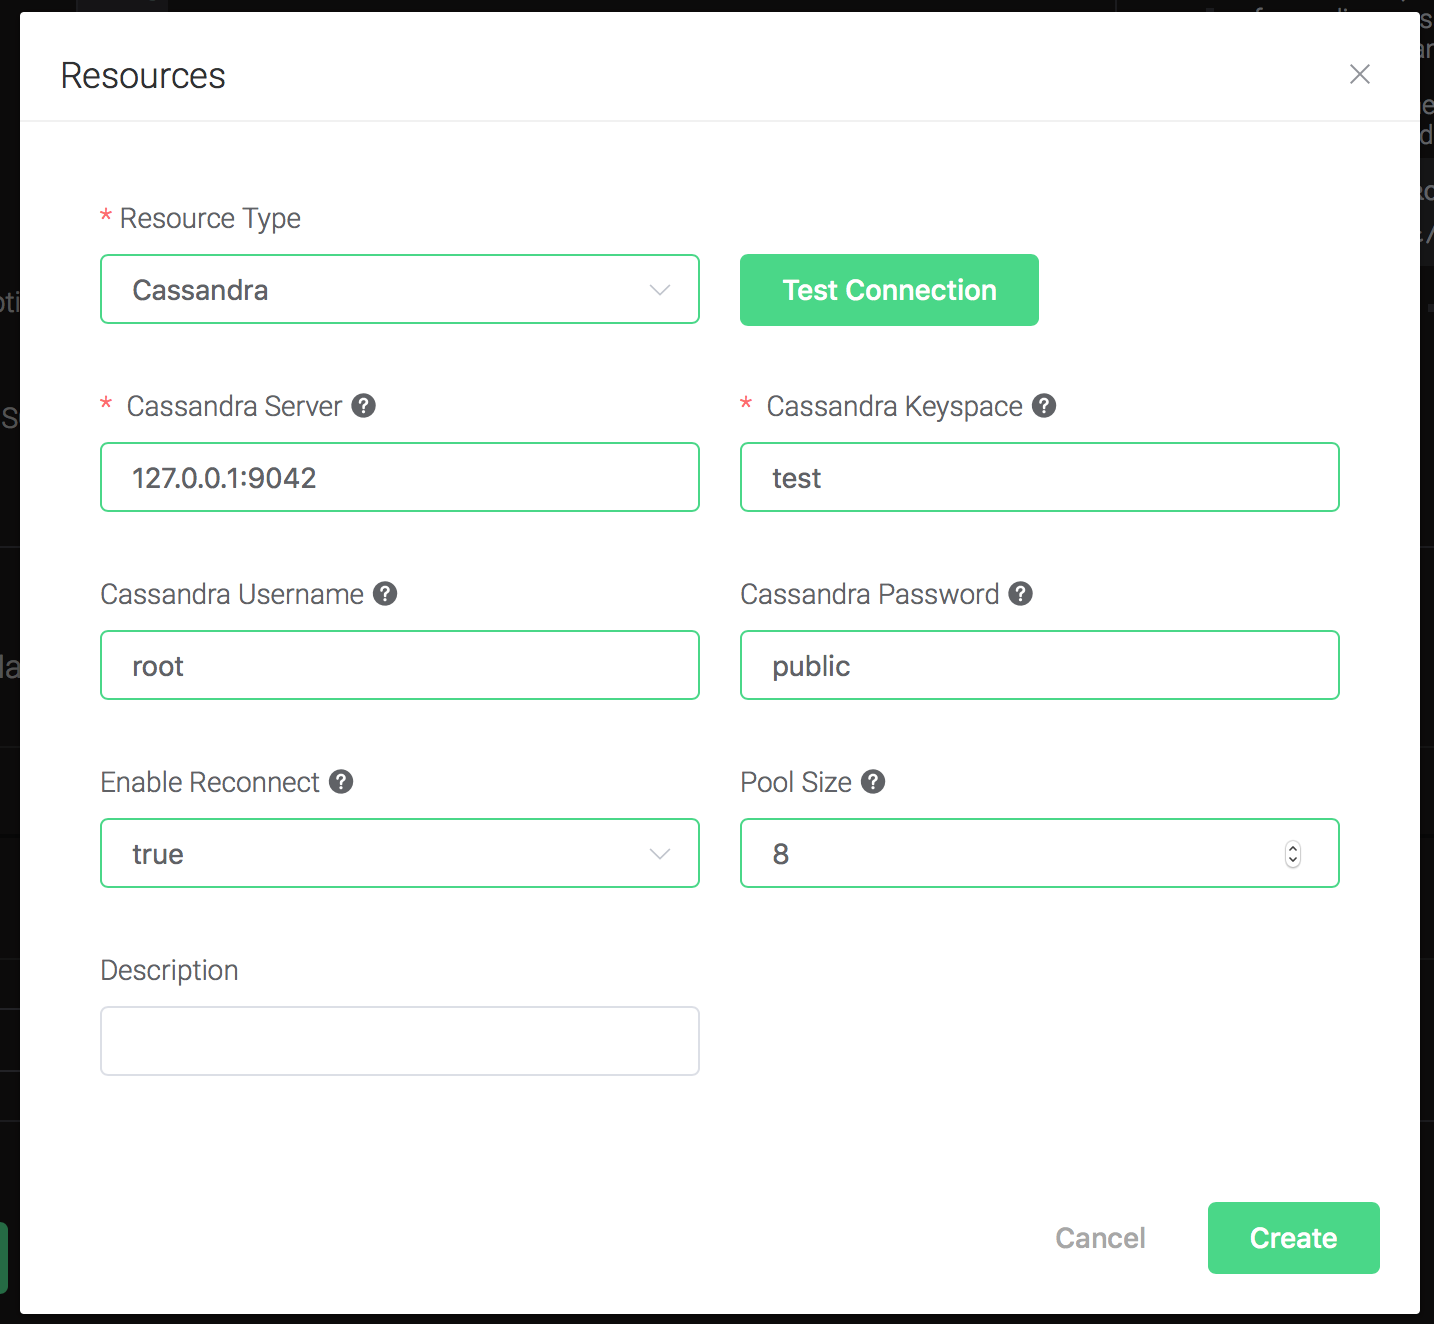
Then click on the "Create" button.
Back to the "Actions" dialog, and then click on the "Confirm" button.
Back to the creating rule page, then click on "Create" button. The rule we created will be show in the rule list:

We have finished, testing the rule by sending an MQTT message to emqx:
> Topic: "t/cass"
> QoS: 1
> Retained: true
> Payload: "hello"
Then inspect the Cassandra table, verify a new record has been inserted:

And from the rule list, verify that the "Matched" column has increased to 1:

Create MongoDB Rules
Setup a MongoDB database, and changes the username/password to root/public, taking Mac OSX for instance:
$ brew install mongodb
$ brew services start mongodb

## add user root
$ use mqtt;
$ db.createUser({user: "root", pwd: "public", roles: [{role: "readWrite", db: "mqtt"}]});

## change the config file to enable authentication
$ vim /usr/local/etc/mongod.conf

    security:
        authorization: enabled

$ brew services restart mongodb
Initiate the MongoDB table:
$ mongo 127.0.0.1/mqtt -uroot -ppublic

db.createCollection("t_mqtt_msg");
Create a rule:
Go to emqx dashboard, select the "rule" tab on the menu to the left.
Select "message.publish", then type in the following SQL:
SELECT
    *
FROM
    "message.publish"
Bind an action:
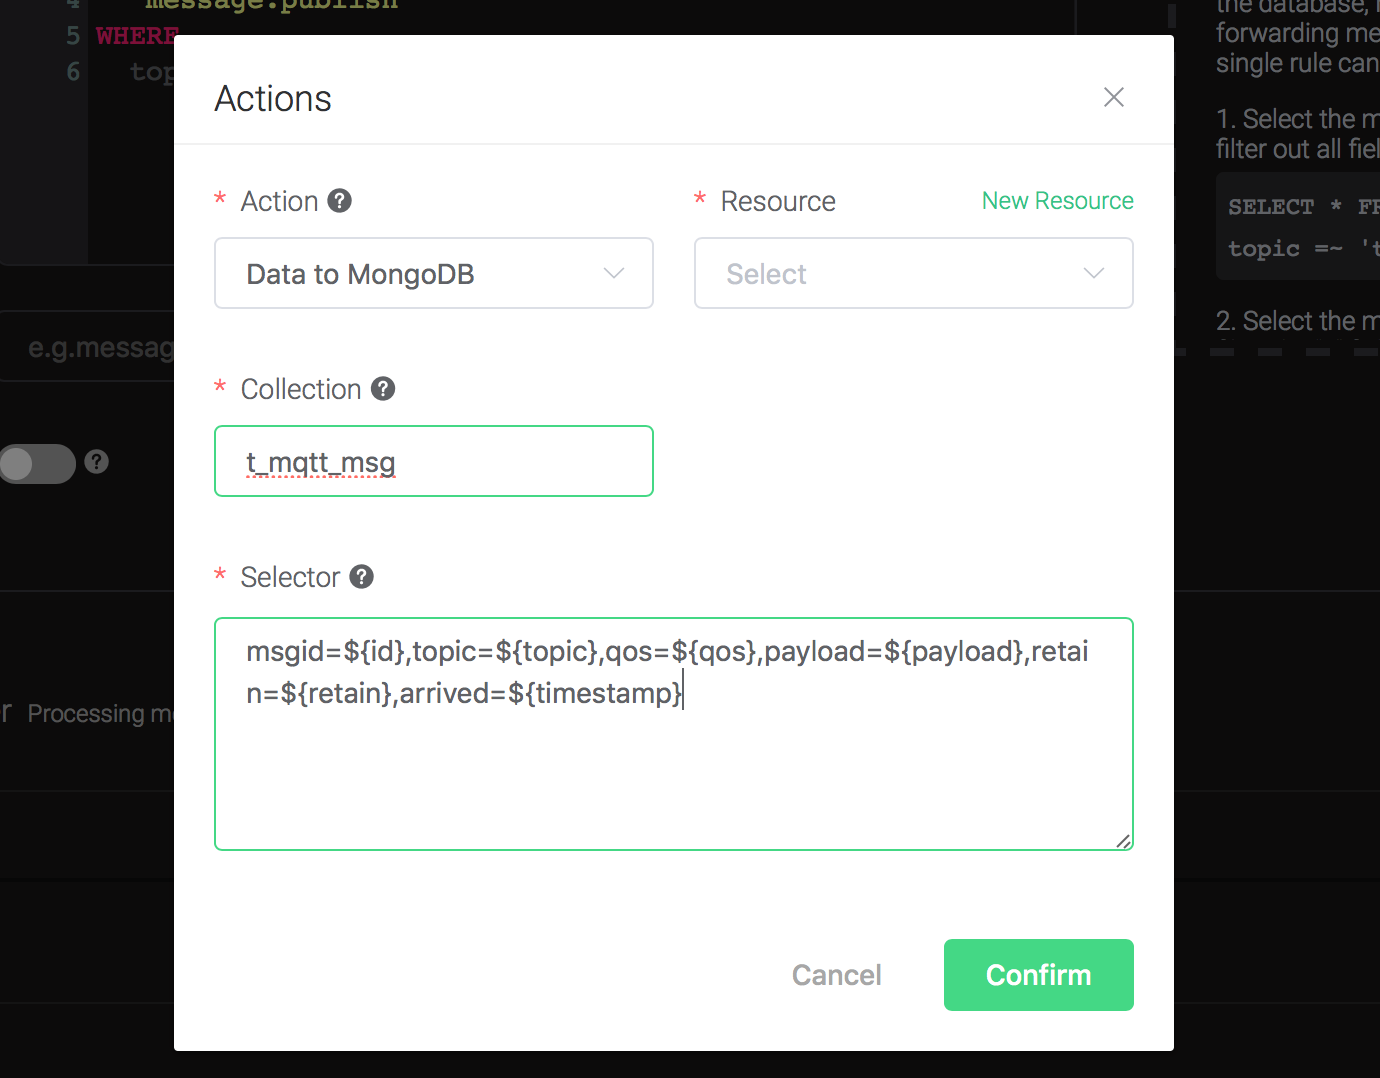
Click on the "+ Add" button under "Action Handler", and then select "Data to MongoDB" in the pop-up dialog window.

Fill in the parameters required by the action:
Two parameters is required by action "Data to MongoDB":
1). The mongodb collection. Set it to "t_mqtt_msg" we just created.
2). Selector template. Selector template is the keys and values you'd like to insert into mongodb when the action is triggered. In this example we'll insert a message into mongodb, so type in the following sql template:
msgid=${id},topic=${topic},qos=${qos},payload=${payload},retain=${retain},arrived=${timestamp}Before data is inserted into the table, placeholders like ${key} will be replaced by the corresponding values.
3). Bind a resource to the action. Since the dropdown list "Resource" is empty for now, we create a new resource by clicking on the "New Resource" to the top right, and then select "MongoDB Single Mode":

Configure the resource:
Set "Database Name" to "mqtt", "Username" to "root", "Password" to "public", "Auth Source" to "mqtt", and keep all other configs as default, and click on the "Testing Connection" button to make sure the connection can be created successfully, and then click on the "Create" button..

Back to the "Actions" dialog, and then click on the "Confirm" button.

Back to the creating rule page, then click on "Create" button. The rule we created will be show in the rule list:

We have finished, testing the rule by sending an MQTT message to emqx:
Topic: "t/mongo"
QoS: 1
Retained: true
Payload: "hello"
Then inspect the MongoDB table, verify a new record has been inserted:

And from the rule list, verify that the "Matched" column has increased to 1:

Create DynamoDB Rules
Setup a DynamoDB database, taking Mac OSX for instance:
$ brew install dynamodb-local

$ dynamodb-local
Initiate the DynamoDB table:
1). Create table definition file "mqtt_msg.json" for DynamoDB:
{
    "TableName": "mqtt_msg",
    "KeySchema": [
        { "AttributeName": "msgid", "KeyType": "HASH" }
    ],
    "AttributeDefinitions": [
        { "AttributeName": "msgid", "AttributeType": "S" }
    ],
    "ProvisionedThroughput": {
        "ReadCapacityUnits": 5,
        "WriteCapacityUnits": 5
    }
}
2). Create the DynamoDB table:
$aws dynamodb create-table --cli-input-json file://mqtt_msg.json --endpoint-url http://localhost:8000Create a rule:
Go to emqx dashboard, select the "rule" tab on the menu to the left.
Select "message.publish", then type in the following SQL:
SELECT
     msgid as id, topic, payload
    FROM
      "message.pubish"
Bind an action:
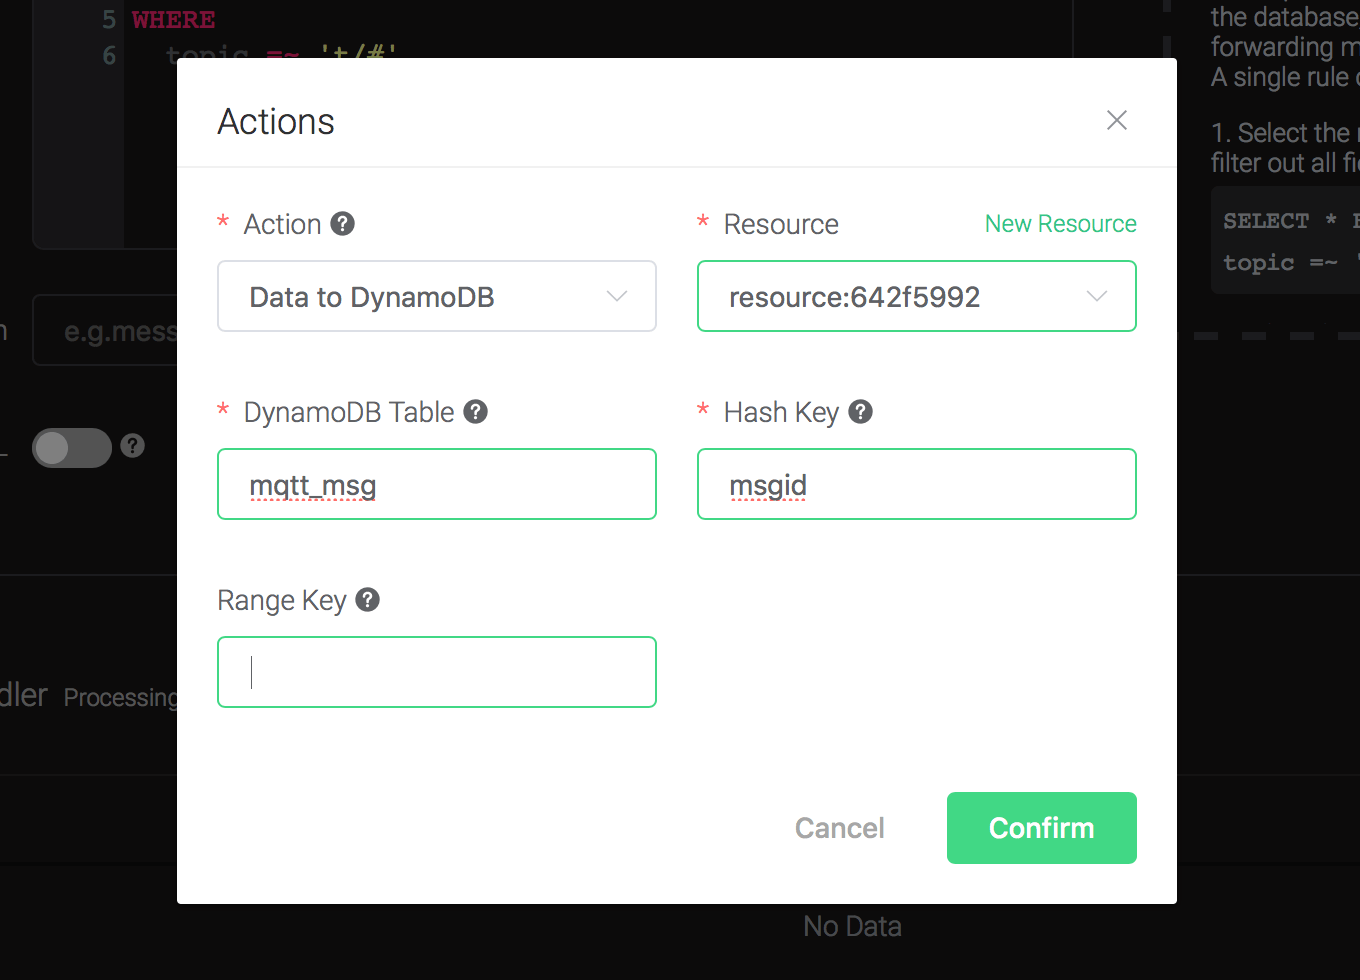
Click on the "+ Add" button under "Action Handler", and then select "Data to DynamoDB" in the pop-up dialog window.

Fill in the parameters required by the action:
Four parameters is required by action "Data to DynamoDB":
1). DynamoDB Table. Here set it to "mqtt_msg".
2). Hash Key. Here set it to "msgid".
3). DynamoDB Range Key. Leave it empty as we didn't define a range key in the dynamodb definition file.

4). Bind a resource to the action. Since the dropdown list "Resource" is empty for now, we create a new resource by clicking on the "New Resource" to the top right, and then select "DynamoDB":

Configure the resource:
Fill in the configs as following:
- DynamoDB Region: us-west-2
- DynamoDB Server: http://localhost:8000
- AWS Access Key Id: "AKIAU5IM2XOC7AQWG7HK"
- AWS Secret Access Key: "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"
And then click on the "Create" button.

Back to the "Actions" dialog, and then click on the "Confirm" button.
Back to the creating rule page, then click on "Create" button. The rule we created will be show in the rule list:

We have finished, testing the rule by sending an MQTT message to emqx:
> Topic: "t/a"
>
> QoS: 1
>
> Payload: "hello"
Then inspect the DynamoDB table, verify a new record has been inserted:

And from the rule list, verify that the "Matched" column has increased to 1:

Create Redis Rules
Setup a Redis database, taking Mac OSX for instance:
$ wget http://download.redis.io/releases/redis-4.0.14.tar.gz
$ tar xzf redis-4.0.14.tar.gz
$ cd redis-4.0.14
$ make && make install

# start redis
$ redis-server
Create a rule:
Go to emqx dashboard, select the "rule" tab on the menu to the left.
Select "message.publish", then type in the following SQL:
SELECT
    *
FROM
    "message.publish"
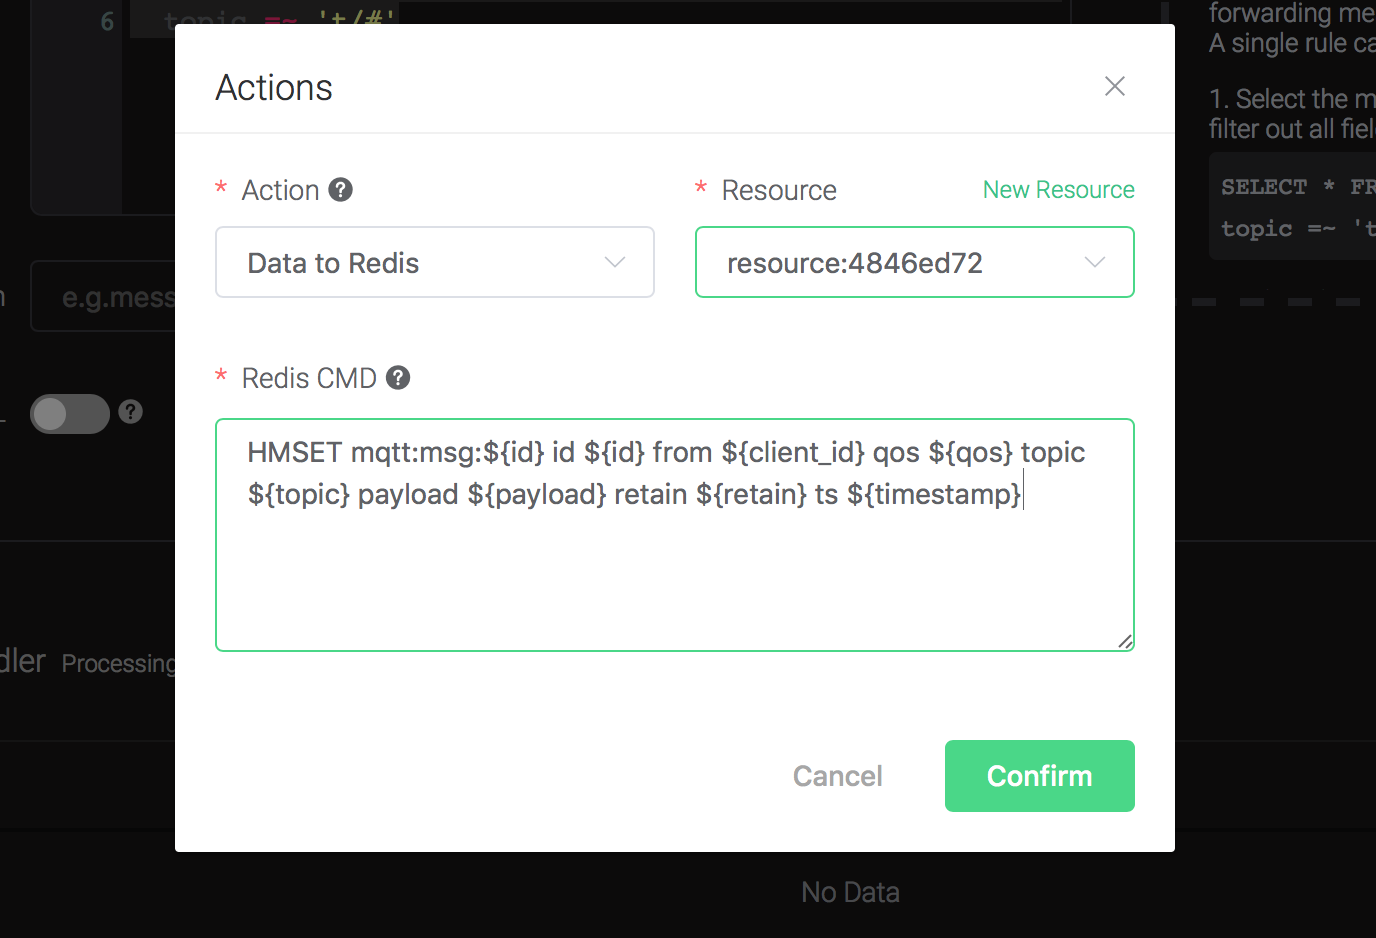
Bind an action:
Click on the "+ Add" button under "Action Handler", and then select
"Data to MySQL" in the pop-up dialog window.
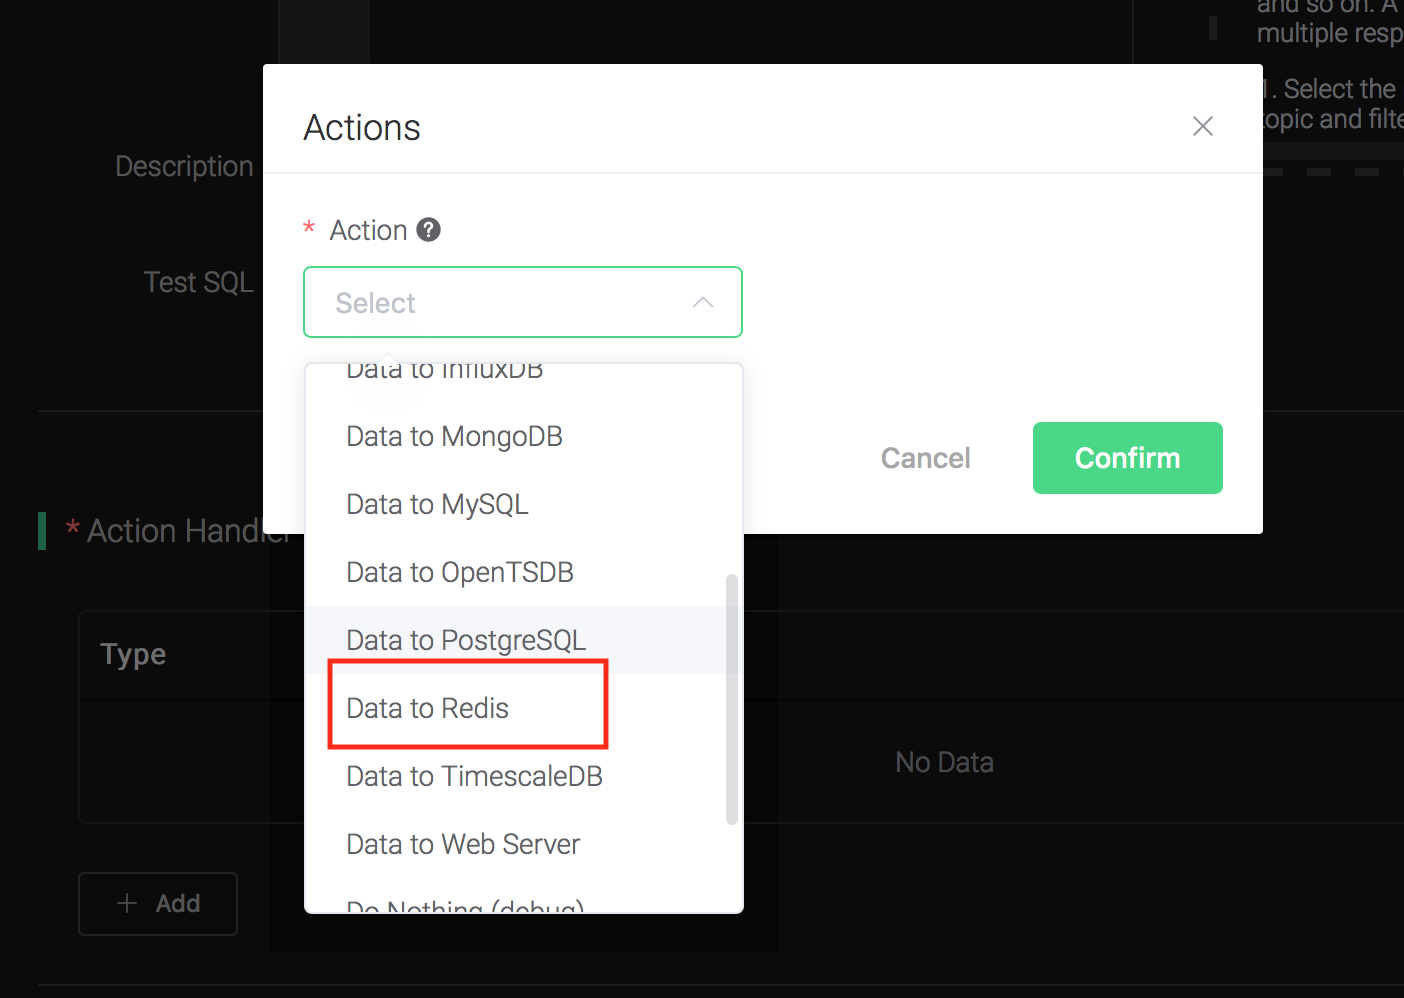
Fill in the parameters required by the action:
Two parameters is required by action "Data to Redis":
1). Redis CMD. The redis command you'd like to run when the action is triggered. In this example we'll insert a message into redis, so type in the following command:
HMSET mqtt:msg:${id} id ${id} from ${client_id} qos ${qos} topic ${topic} payload ${payload} retain ${retain} ts ${timestamp}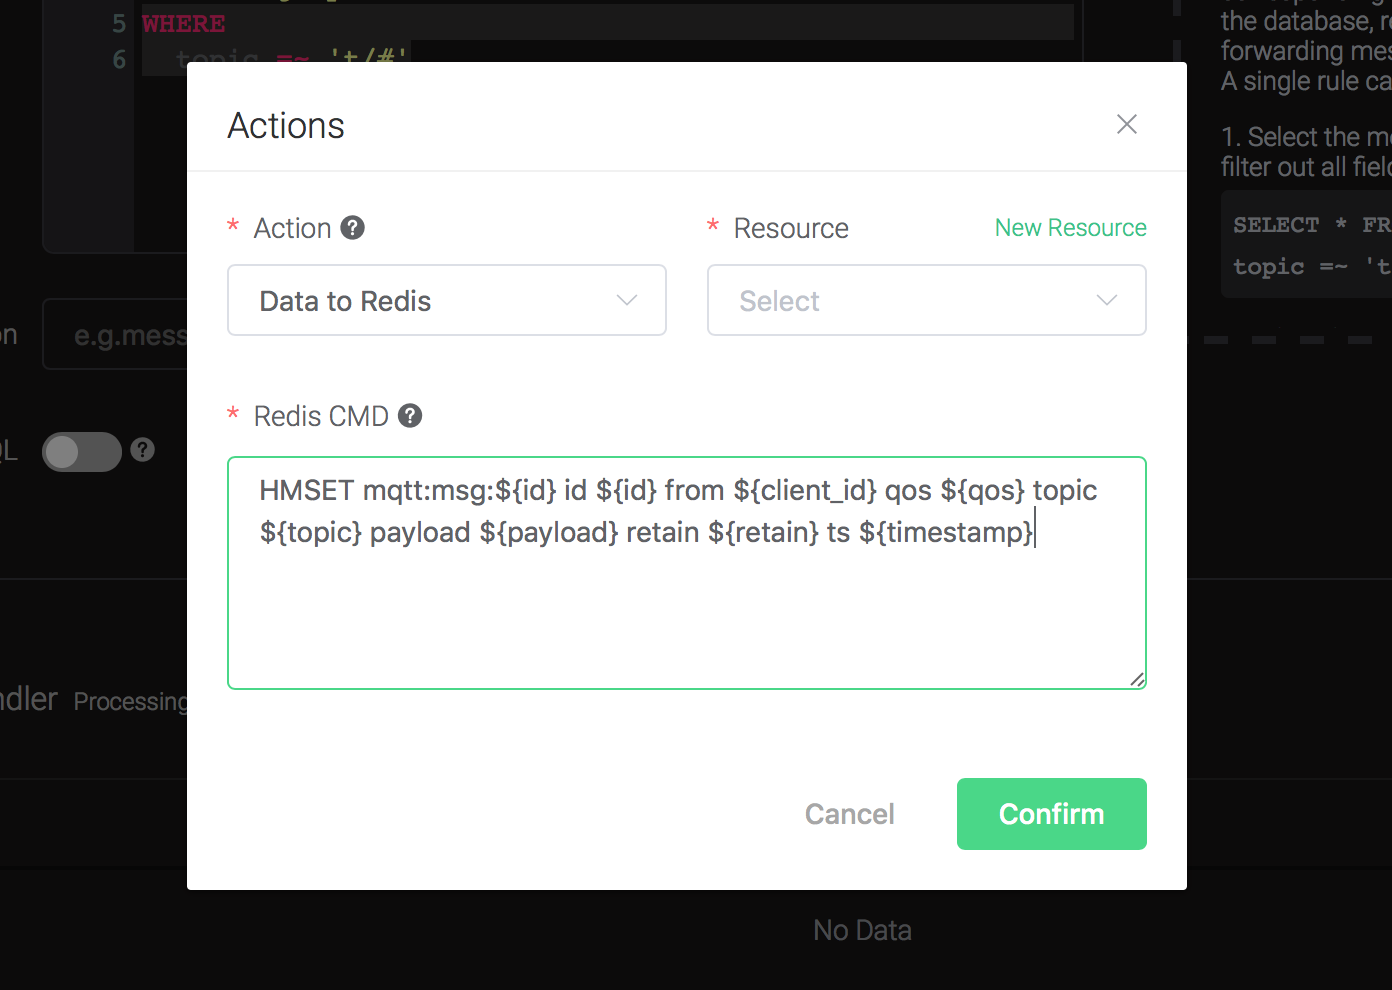
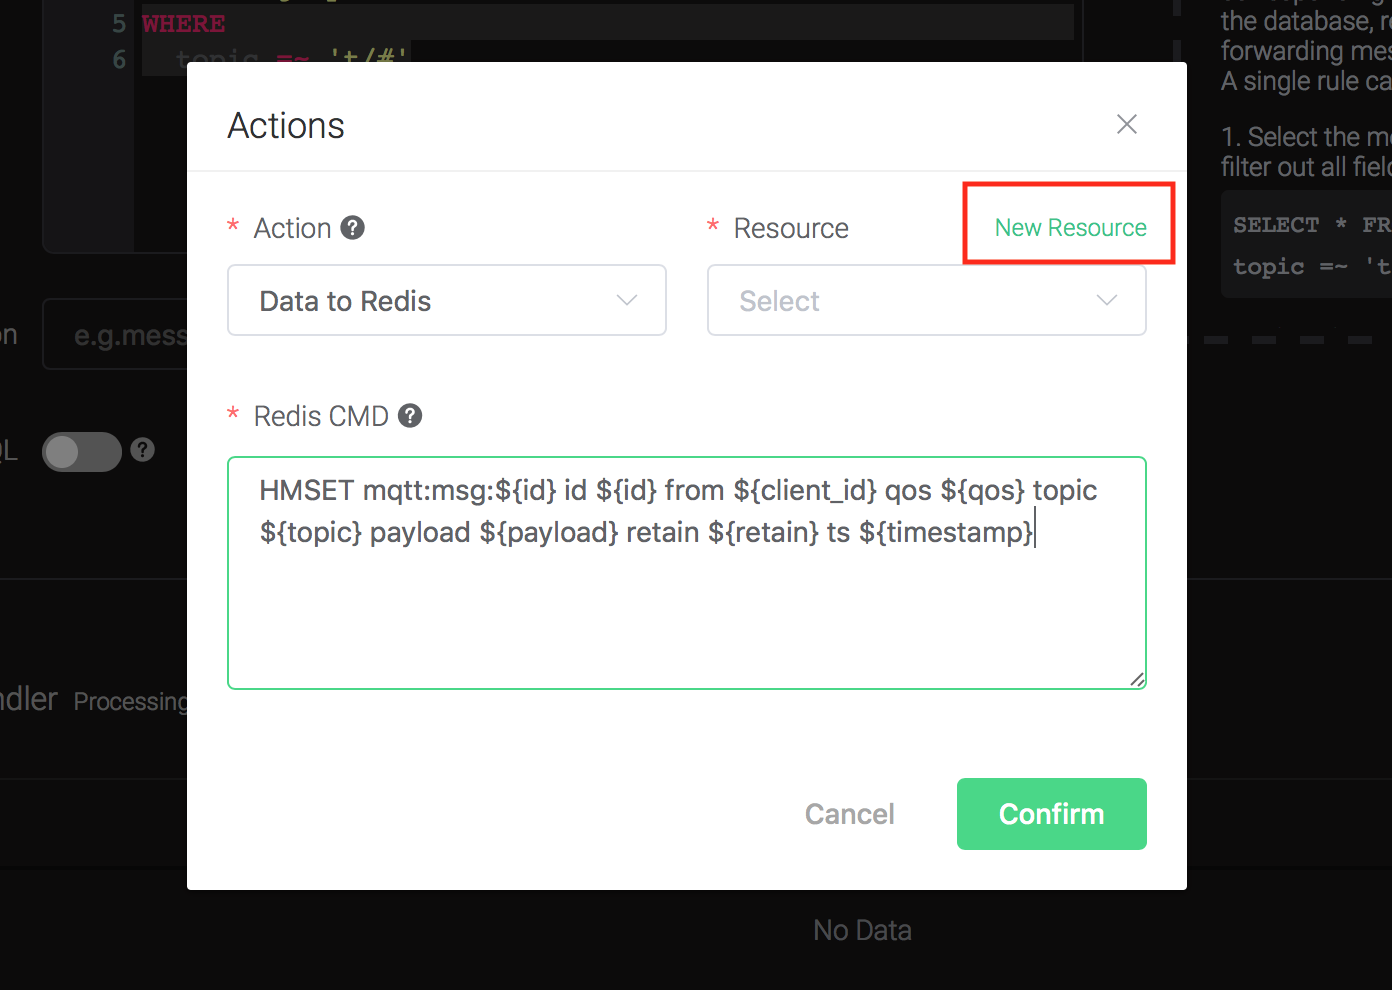
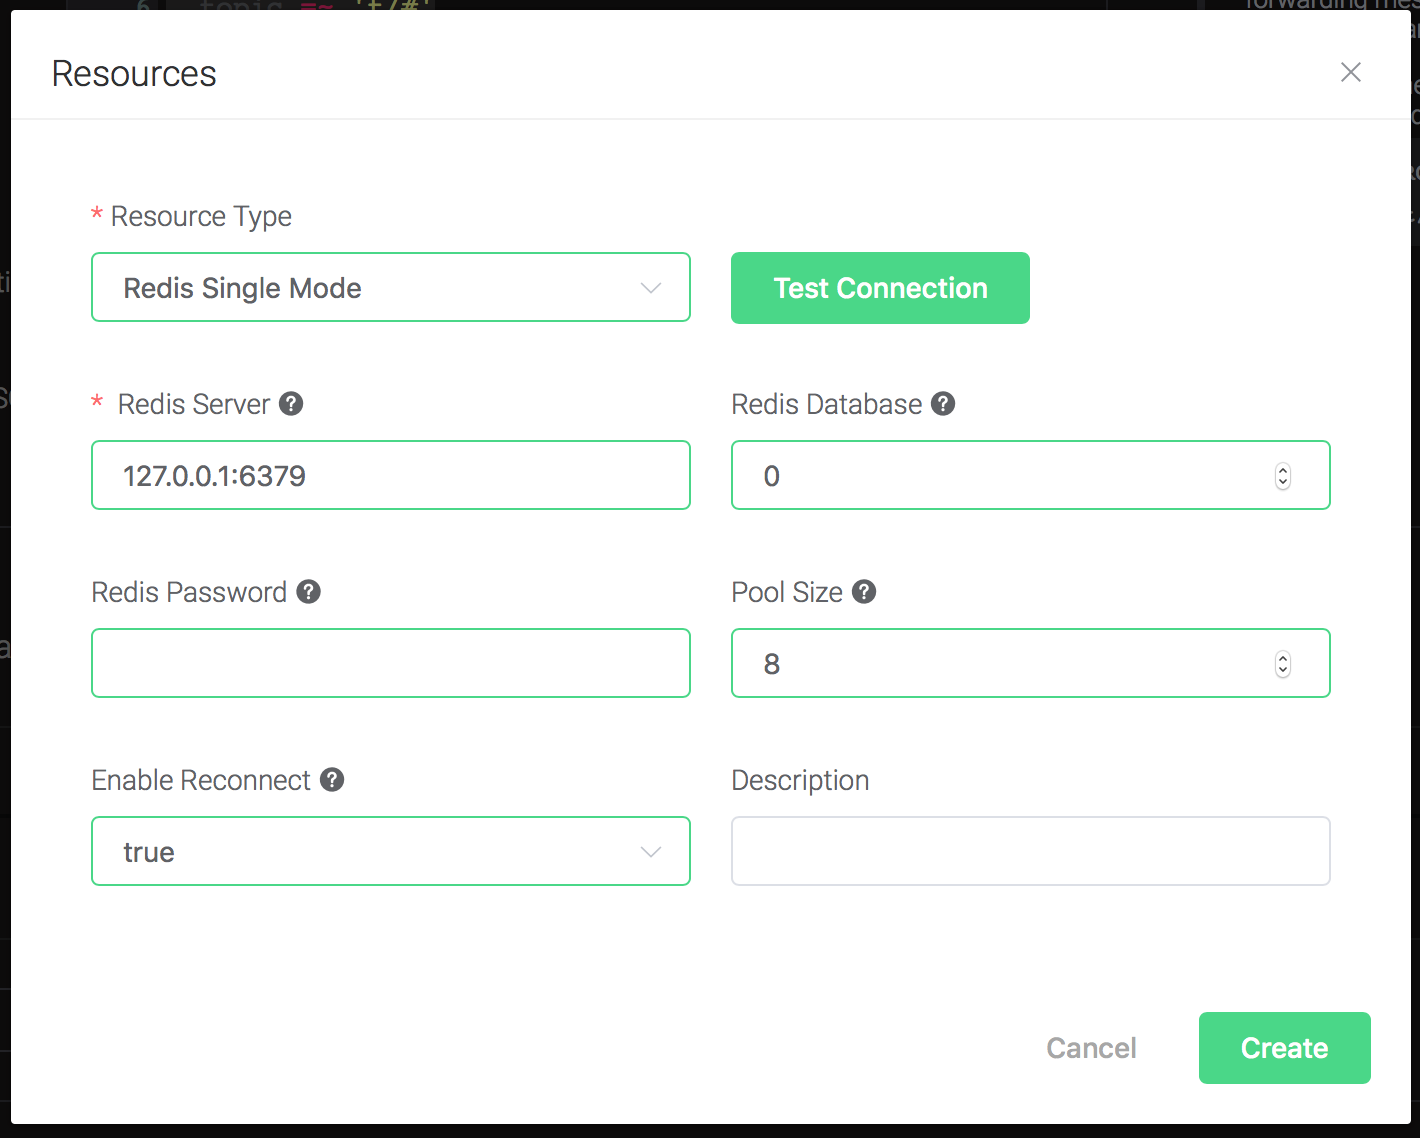
2). Bind a resource to the action. Since the dropdown list "Resource" is empty for now, we create a new resource by clicking on the "New Resource" to the top right, and then select "Redis Single Mode":
Configure the resource:
Fill in the "Redis Server", and keep all other configs as default,
and click on the "Testing Connection" button to make sure the
connection can be created successfully, and then click on the
"Create" button.
Back to the "Actions" dialog, and then click on the "Confirm" button.
Back to the creating rule page, then click on "Create" button. The rule we created will be show in the rule list:

We have finished, testing the rule by sending an MQTT message to emqx:
> Topic: "t/1"
>
> QoS: 0
>
> Retained: false
>
> Payload: "hello"
Then inspect the Redis table, verify a new record has been inserted:
\$ redis-cli

127.0.0.1:6379\> KEYS mqtt:msg\*

127.0.0.1:6379\> hgetall <key\>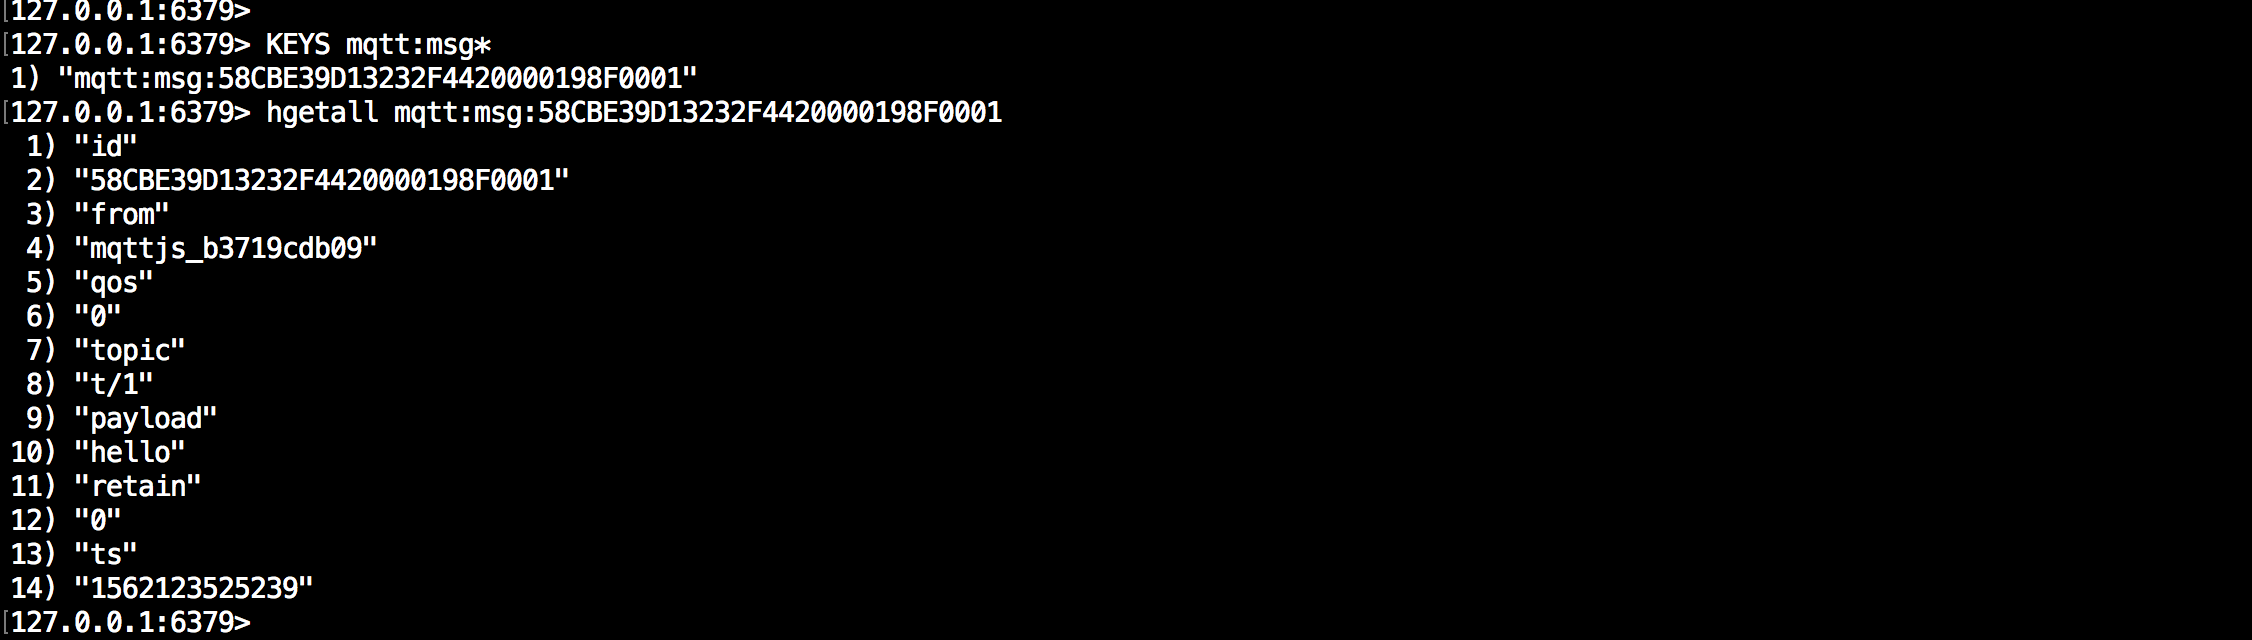
And from the rule list, verify that the "Matched" column has increased to 1:

Create OpenTSDB Rules
Setup a OpenTSDB database, taking Mac OSX for instance:
$ docker pull petergrace/opentsdb-docker

$ docker run -d --name opentsdb -p 4242:4242 petergrace/opentsdb-docker
Create a rule:
Go to emqx dashboard, select the "rule" tab on the menu to the left.
Select "message.publish", then type in the following SQL:
SELECT
    payload.metric as metric, payload.tags as tags, payload.value as value
FROM
    "message.publish"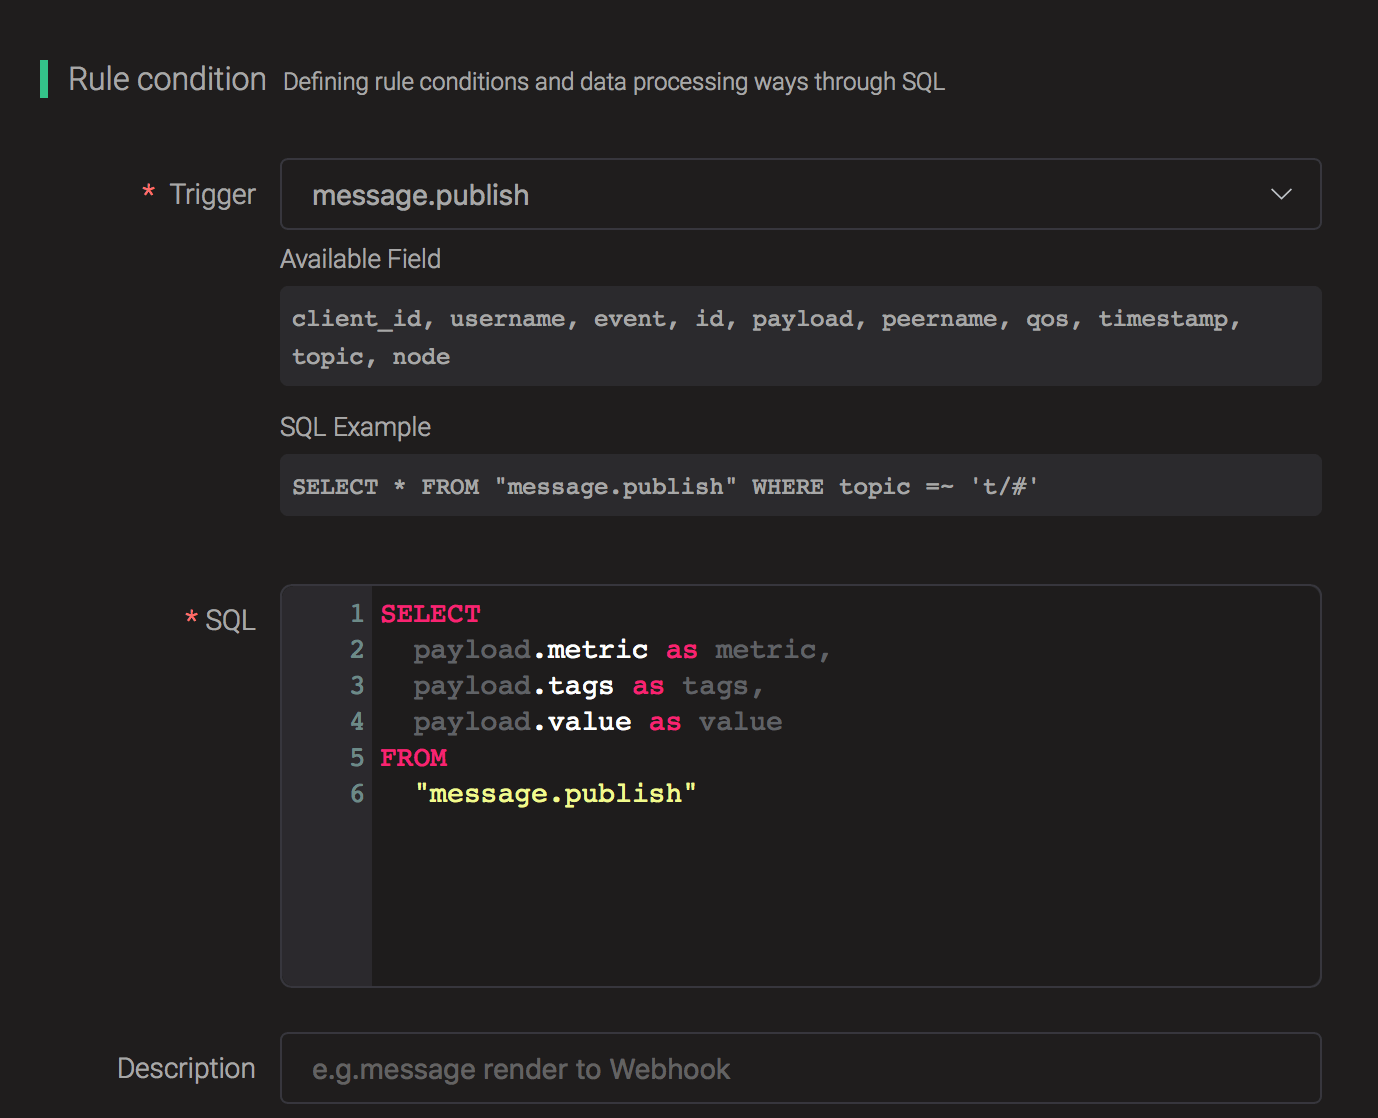
Bind an action:
Click on the "+ Add" button under "Action Handler", and then select "Data to OpenTSDB" in the pop-up dialog window.

Fill in the parameters required by the action:
Six parameters is required by action "Data to OpenTSDB":
1). Details. Whether let OpenTSDB Server return the failed data point and their error reason, defaults to false.
2). Summary. Whether let OpenTSDB Server return data point success/failure count, defaults to true.
3). Max Batch Size. In case of heavy traffic, how many data points are allowed to be included in a single request. Default to 20.
4). Sync Call. Defaults to false.
5). Sync Timeout. Defaults to 0.

6). Bind a resource to the action. Since the dropdown list "Resource" is empty for now, we create a new resource by clicking on the "New Resource" to the top right, and then select "OpenTSDB":

Configure the resource:
Keep all the default configs as default, and click on the "Testing Connection" button to make sure the connection can be created successfully, and then click on the "Create" button.

Back to the "Actions" dialog, and then click on the "Confirm" button.

Back to the creating rule page, then click on "Create" button. The rule we created will be show in the rule list:

We have finished, testing the rule by sending an MQTT message to emqx:
> Topic: "t/1"
>
> QoS: 0
>
> Retained: false
>
> Payload: {"metric":"cpu","tags":{"host":"serverA"},"value":12}
Then inspect the OpenTSDB table, verify a new record has been inserted:
## Use postman to send an HTTP request to the opentsdb server:
POST /api/query HTTP/1.1
Host: 127.0.0.1:4242
Content-Type: application/json
cache-control: no-cache
Postman-Token: 69af0565-27f8-41e5-b0cd-d7c7f5b7a037
{
    "start": 1560409825000,
    "queries": [
        {
            "aggregator": "last",
            "metric": "cpu",
            "tags": {
                "host": "*"
            }
        }
    ],
    "showTSUIDs": "true",
    "showQuery": "true",
    "delete": "false"
}
------WebKitFormBoundary7MA4YWxkTrZu0gW--
The response should look like following:
[
  {
      "metric": "cpu",
      "tags": {
          "host": "serverA"
      },
      "aggregateTags": [],
      "query": {
          "aggregator": "last",
          "metric": "cpu",
          "tsuids": null,
          "downsample": null,
          "rate": false,
          "filters": [
              {
                  "tagk": "host",
                  "filter": "*",
                  "group_by": true,
                  "type": "wildcard"
              }
          ],
          "index": 0,
          "tags": {
              "host": "wildcard(*)"
          },
          "rateOptions": null,
          "filterTagKs": [
              "AAAC"
          ],
          "explicitTags": false
      },
      "tsuids": [
          "000002000002000007"
      ],
      "dps": {
          "1561532453": 12
      }
  }
]
And from the rule list, verify that the "Matched" column has increased to 1:

Create TimescaleDB Rules
Setup a TimescaleDB database, taking Mac OSX for instance:
$ docker pull timescale/timescaledb

$ docker run -d --name timescaledb -p 5432:5432 -e POSTGRES_PASSWORD=password timescale/timescaledb:latest-pg11

$ docker exec -it timescaledb psql -U postgres

## create tutorial database
> CREATE database tutorial;

> \c tutorial

> CREATE EXTENSION IF NOT EXISTS timescaledb CASCADE;
Initiate the TimescaleDB table:
$ docker exec -it timescaledb psql -U postgres -d tutorial

CREATE TABLE conditions (
    time        TIMESTAMPTZ       NOT NULL,
    location    TEXT              NOT NULL,
    temperature DOUBLE PRECISION  NULL,
    humidity    DOUBLE PRECISION  NULL
);

SELECT create_hypertable('conditions', 'time');
Create a rule:
Go to emqx dashboard, select the "rule" tab on the menu to the left.
Select "message.publish", then type in the following SQL:
SELECT
    payload.temp as temp,
    payload.humidity as humidity,
    payload.location as location
FROM
    "message.publish"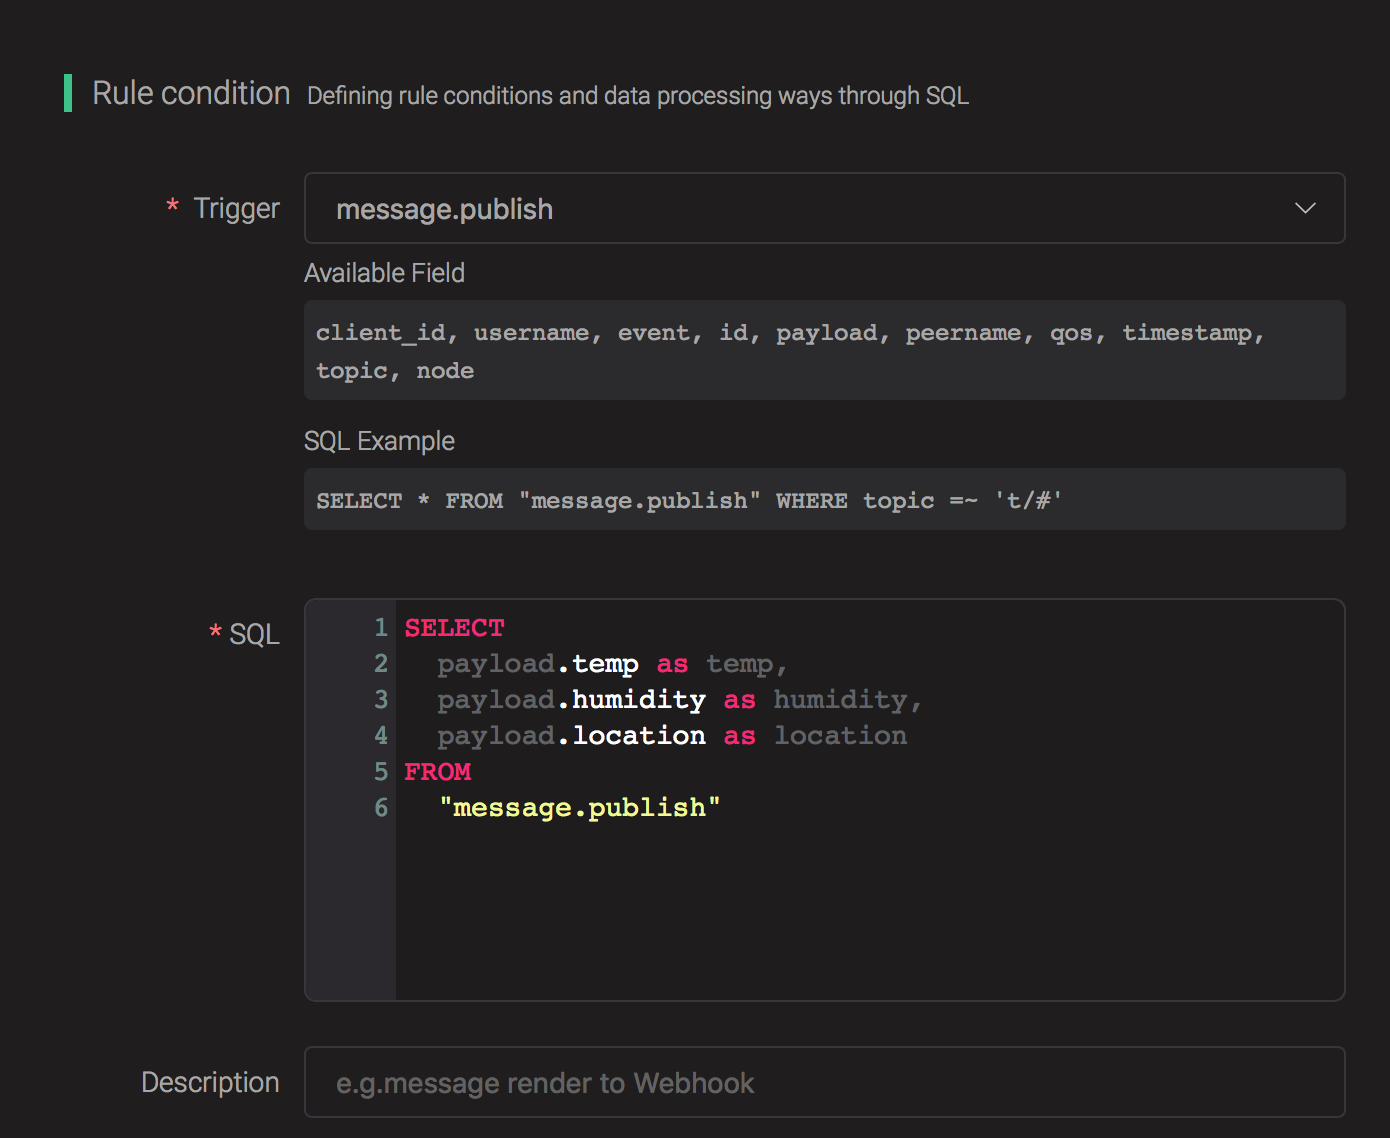
Bind an action:
Click on the "+ Add" button under "Action Handler", and then select "Data to TimescaleDB" in the pop-up dialog window.

Fill in the parameters required by the action:
Two parameters is required by action "Data to TimescaleDB":
1). SQL template. SQL template is the sql command you'd like to run when the action is triggered. In this example we'll insert a message into timescaledb, so type in the following sql template:
insert into conditions(time, location, temperature, humidity) values (NOW(), ${location}, ${temp}, ${humidity})Before data is inserted into the table, placeholders like ${key} will be replaced by the corresponding values.
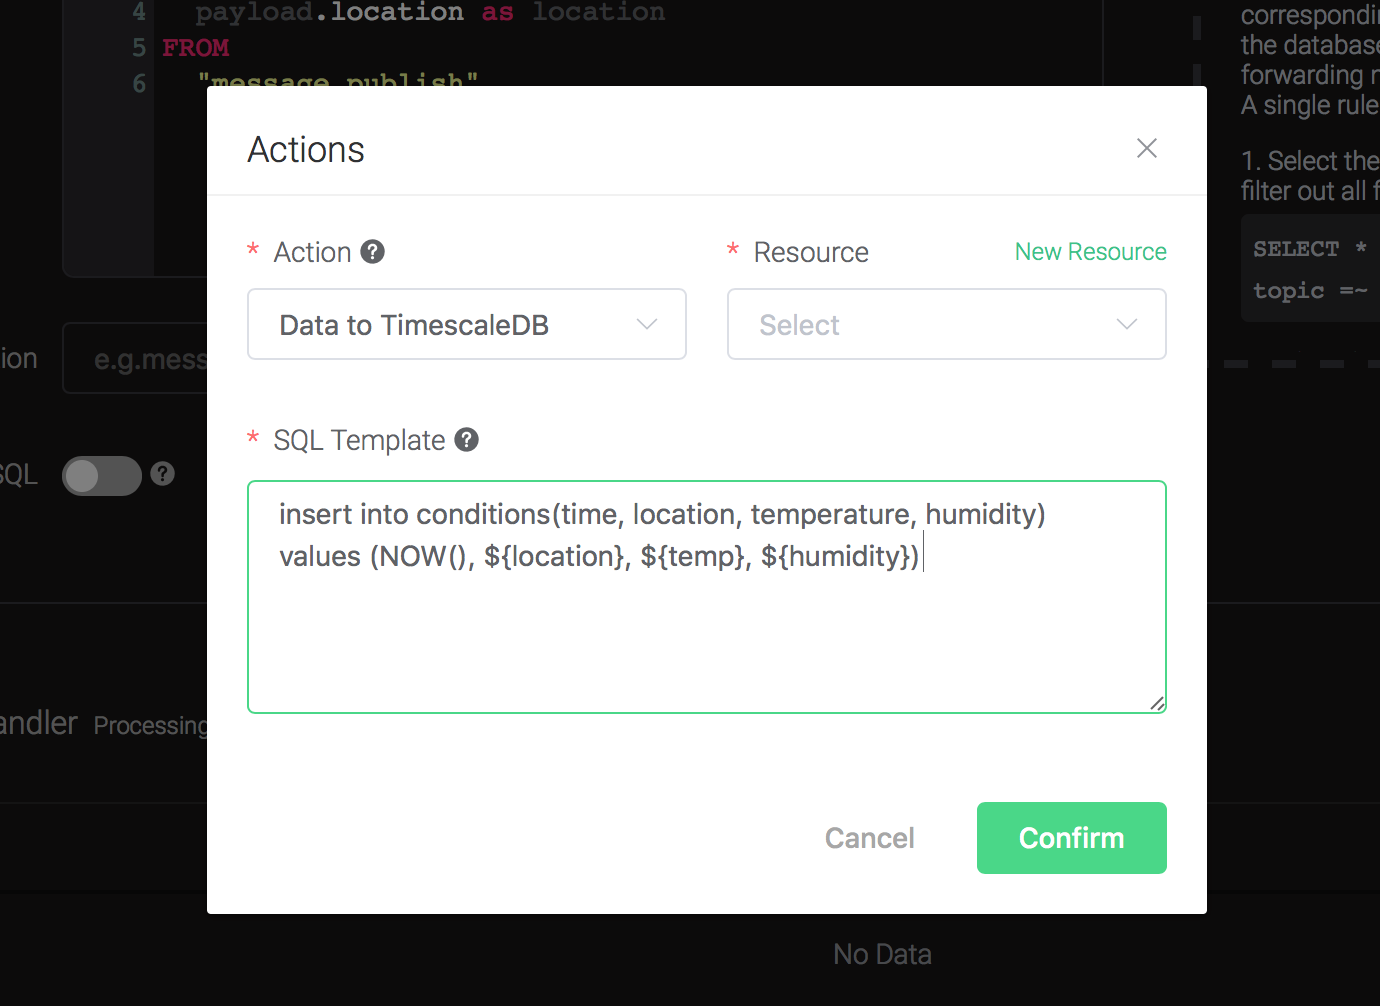
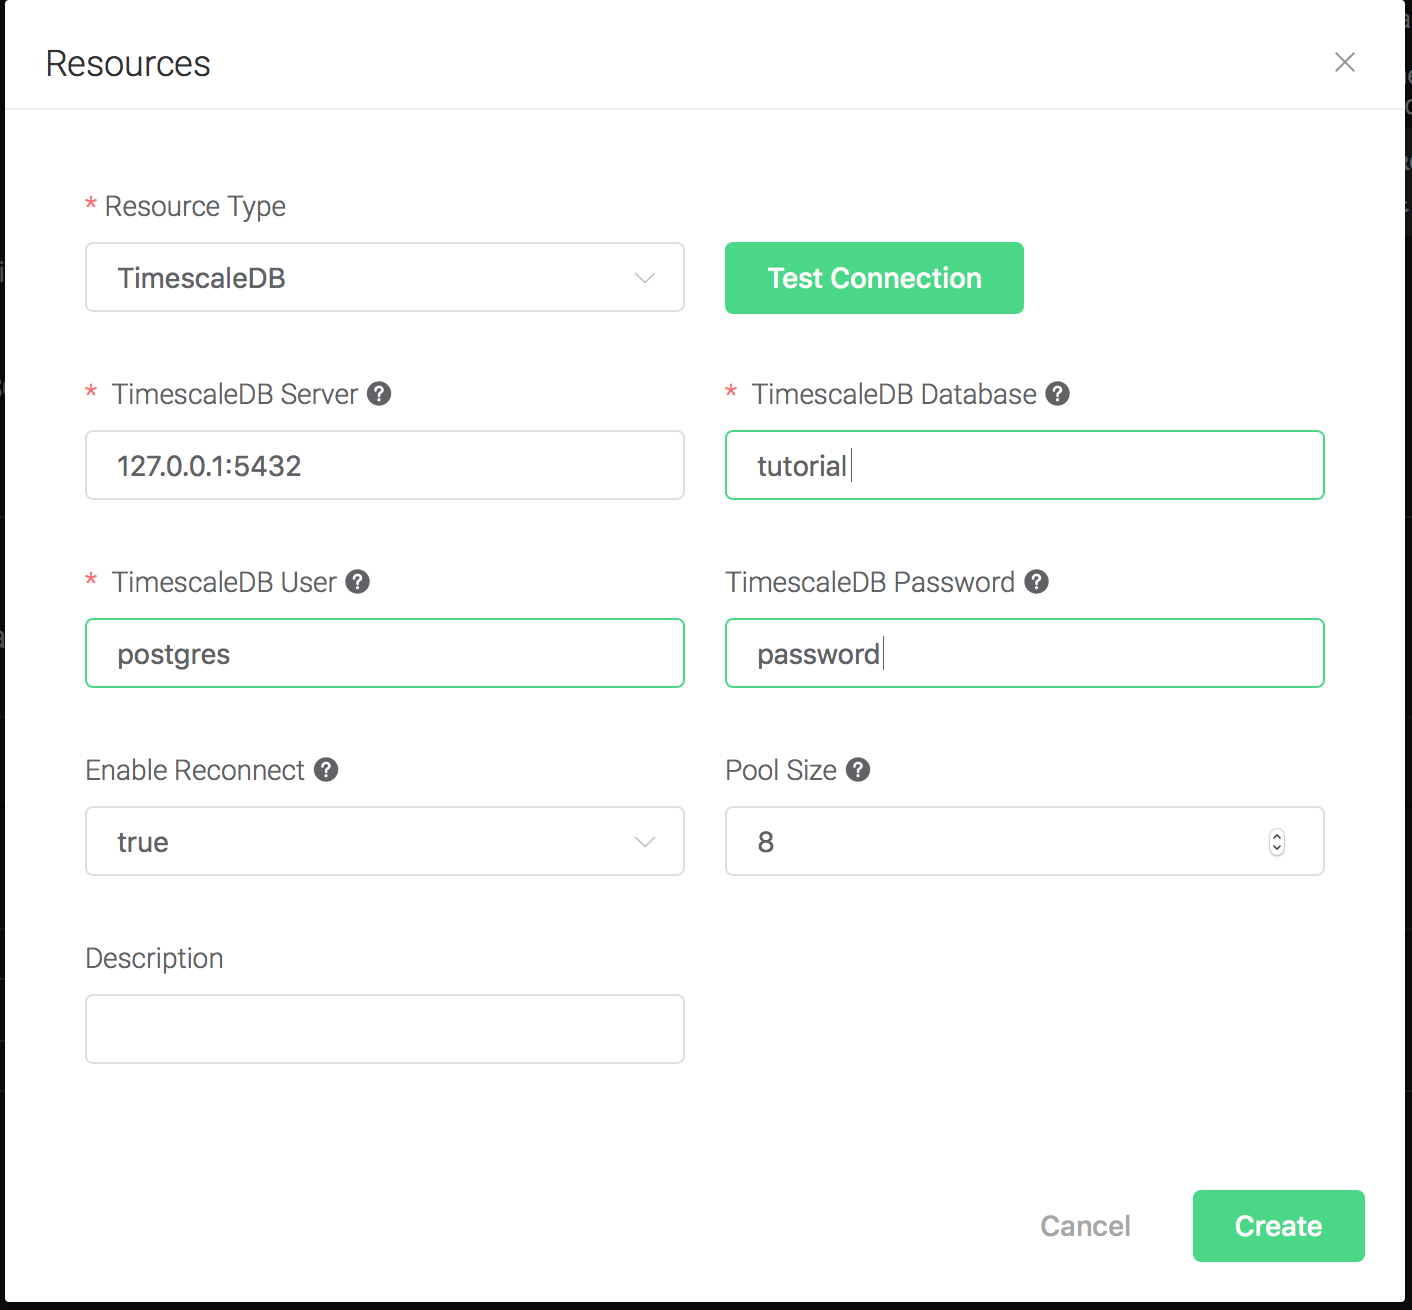
2). Bind a resource to the action. Since the dropdown list "Resource" is empty for now, we create a new resource by clicking on the "New Resource" to the top right, and then select "TimescaleDB":
Configure the resource:
Set "TimescaleDB Database" to "tutorial", "TimescaleDB User" to "postgres", "TimescaleDB Password" to "password", and keep all other configs as default, and click on the "Testing Connection" button to make sure the connection can be created successfully, and then click on the "Create" button.
Back to the "Actions" dialog, and then click on the "Confirm" button.
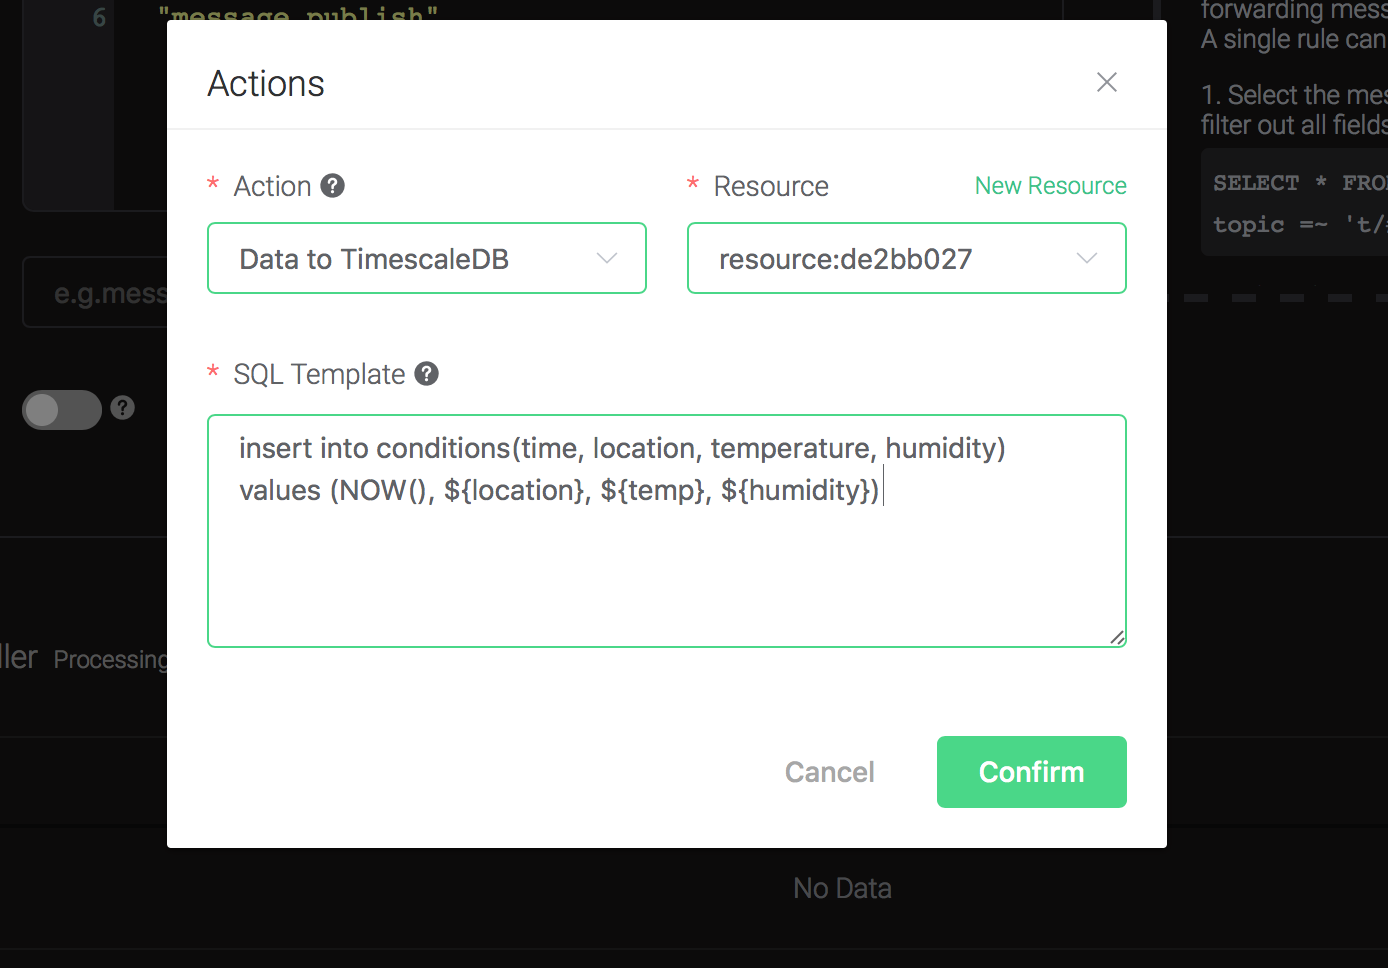
Back to the creating rule page, then click on "Create" button. The rule we created will be show in the rule list:

We have finished, testing the rule by sending an MQTT message to emqx:
> Topic: "t/1"
>
> QoS: 0
>
> Retained: false
>
> Payload: {"temp":24,"humidity":30,"location":"hangzhou"}
Then inspect the TimescaleDB table, verify a new record has been inserted:
tutorial=# SELECT * FROM conditions LIMIT 100;
The output data could look like
this:
    time              | location | temperature | humidity

 \------------------------------+----------+-------------+----------2019-06-27
 01:41:08.752103+00 | hangzhou | 24 | 30
And from the rule list, verify that the "Matched" column has increased to 1:

Create InfluxDB Rules
Setup a InfluxDB database, taking Mac OSX for instance:
$ docker pull influxdb

$ git clone -b v1.0.0 https://github.com/palkan/influx_udp.git

$ cd influx_udp

$ docker run --name=influxdb --rm -d -p 8086:8086 -p 8089:8089/udp -v ${PWD}/files/influxdb.conf:/etc/influxdb/influxdb.conf:ro -e INFLUXDB_DB=db influxdb:latest
Create a rule:
Go to emqx dashboard, select the "rule" tab on the menu to the left.
Select "message.publish", then type in the following SQL:
SELECT
    payload.host as host,
    payload.location as location,
    payload.internal as internal,
    payload.external as external
FROM
    "message.publish"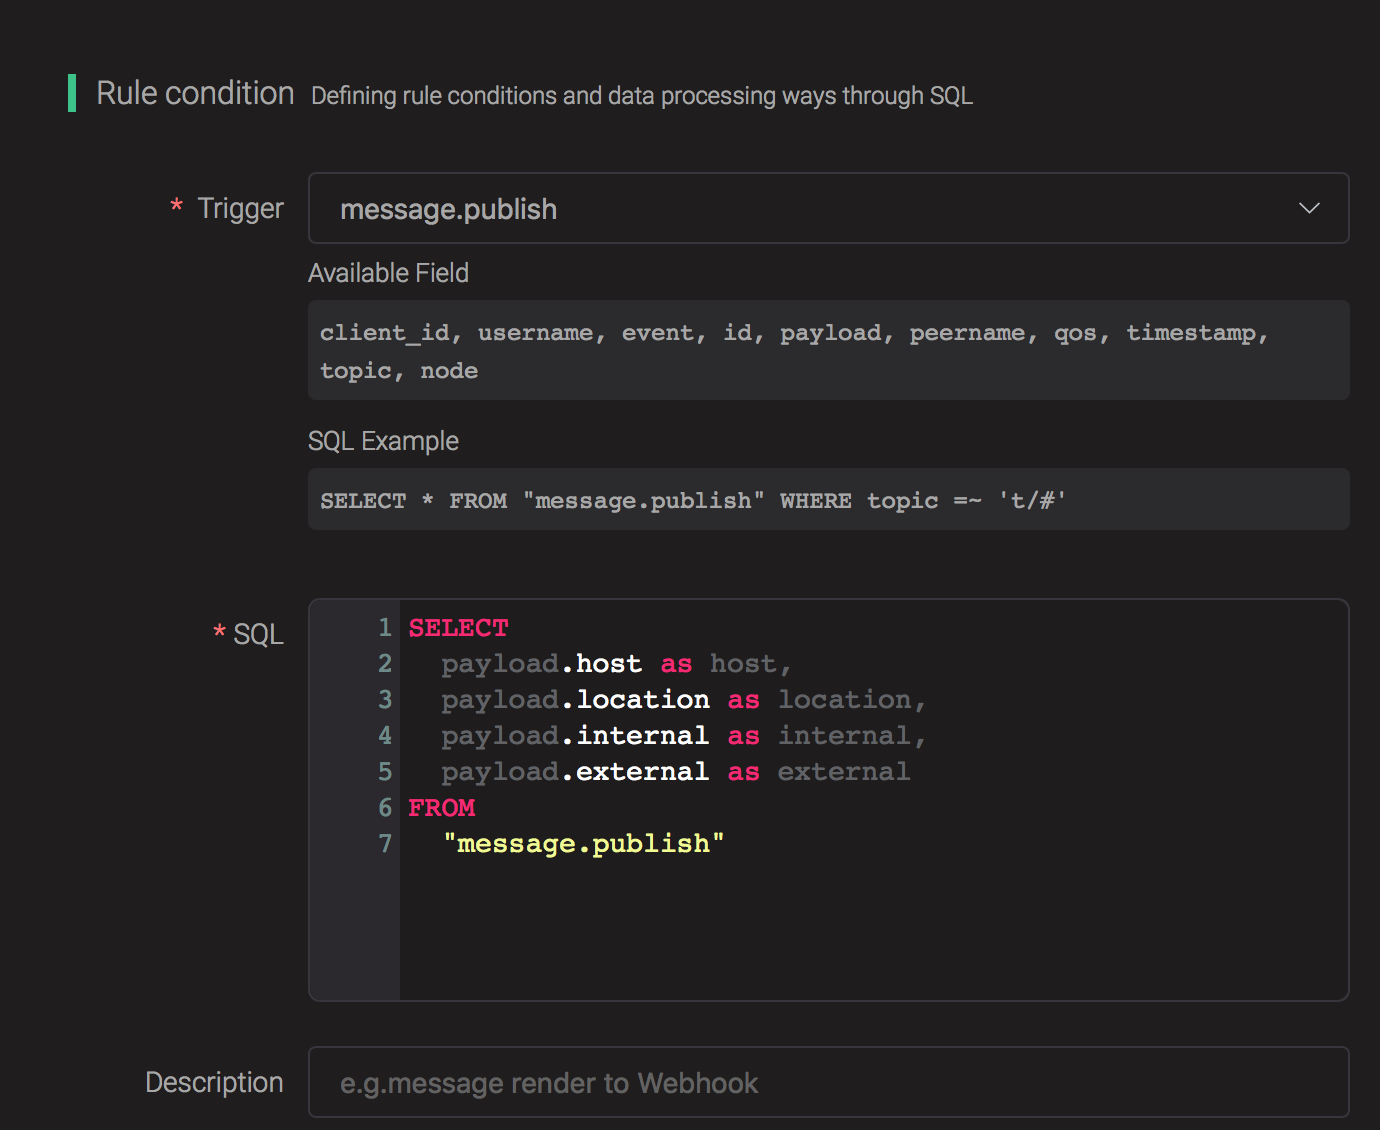
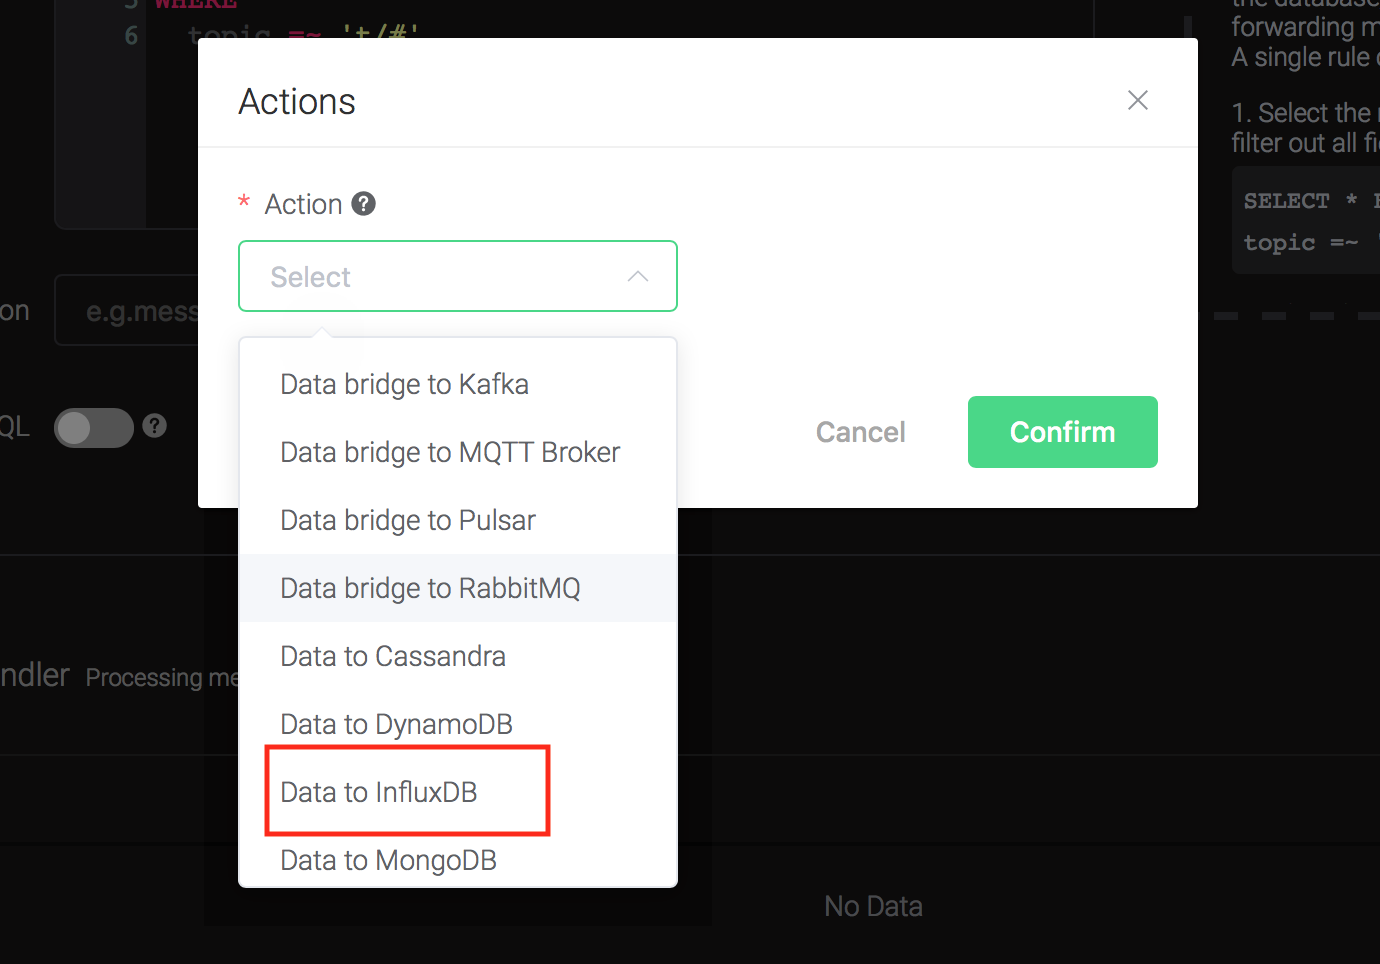
Bind an action:
Click on the "+ Add" button under "Action Handler", and then select "Data to InfluxDB" in the pop-up dialog window.
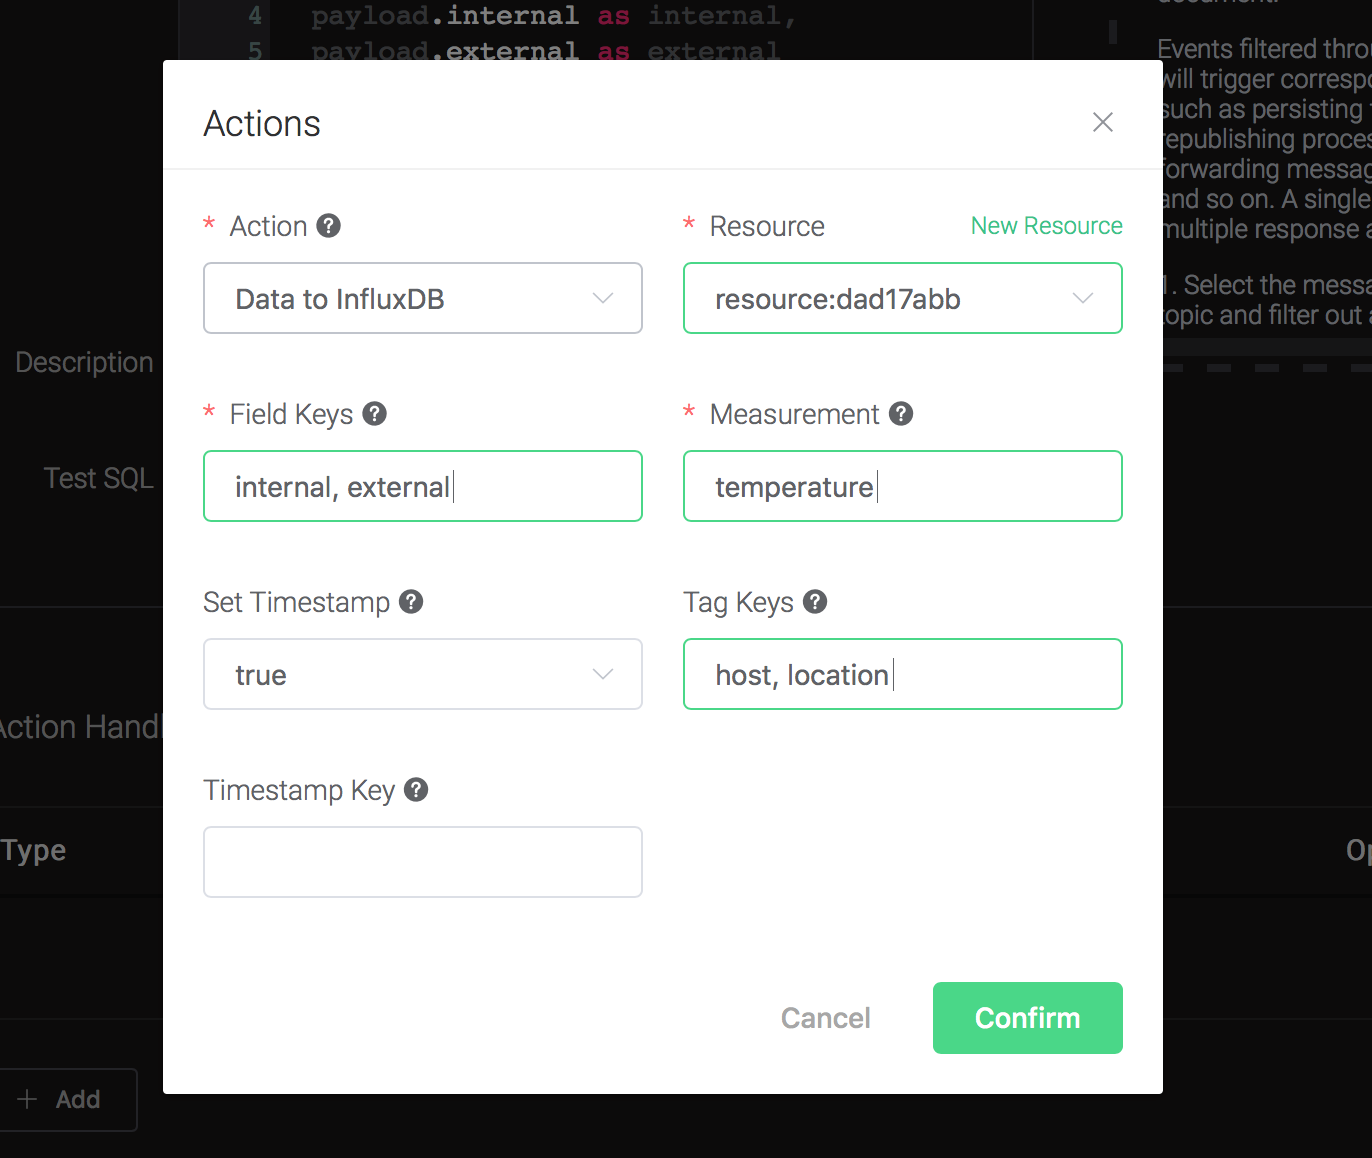
Fill in the parameters required by the action:
Six parameters is required by action "Data to InfluxDB" :
1). Measurement: Measurement of the data point.
2). Field Keys: Which fields can be used as fields of data point.
3). Tags Keys. Which fields can be used as tags of data point.
4). Timestamp Key. Which fields can be used as timestamp of data point.
5). Set Timestamp. Whether to generate a timestamp if 'Timestamp Key' is not configured.
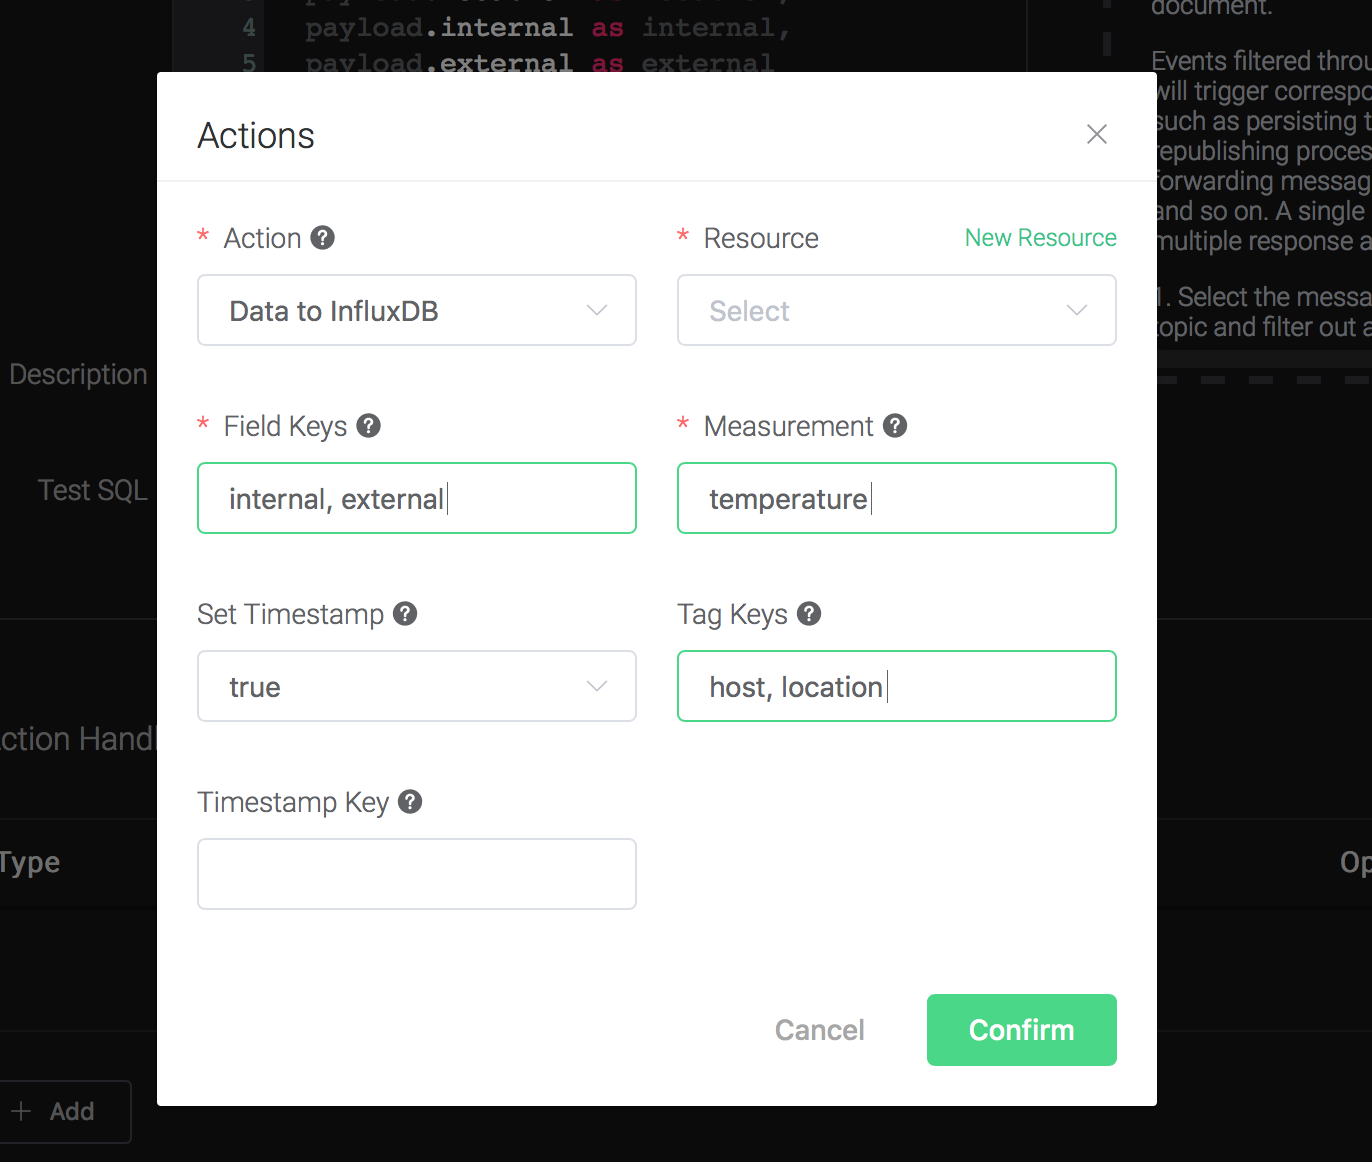
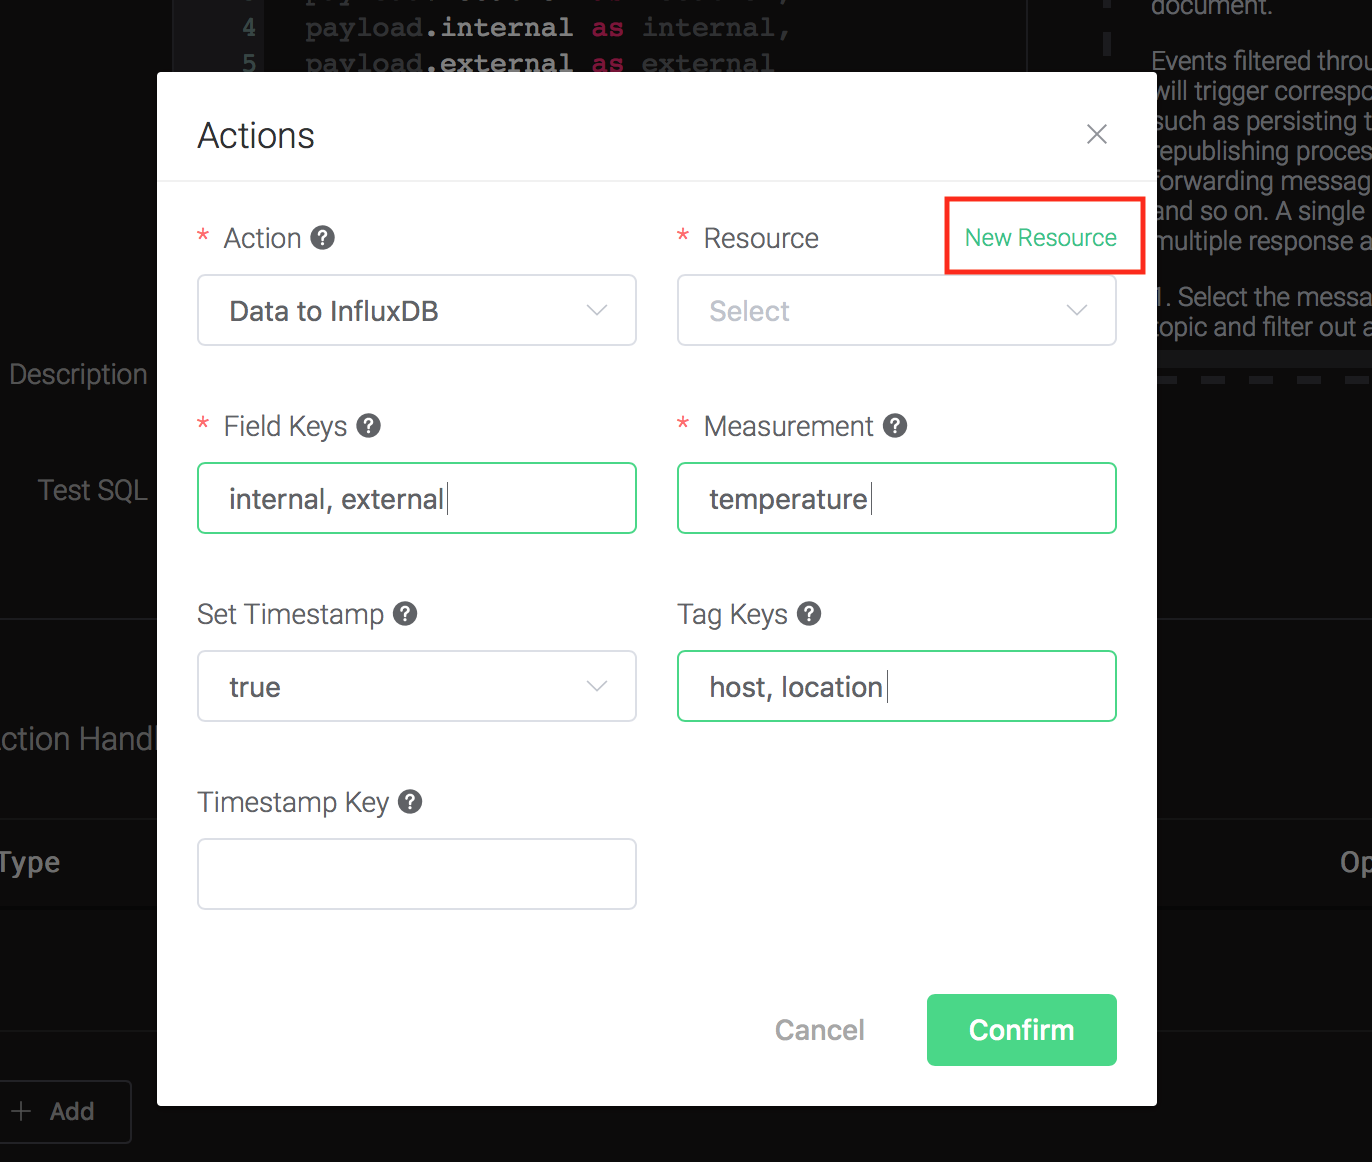
6). Bind a resource to the action. Since the dropdown list "Resource" is empty for now, we create a new resource by clicking on the "New Resource" to the top right, and then select "InfluxDB":
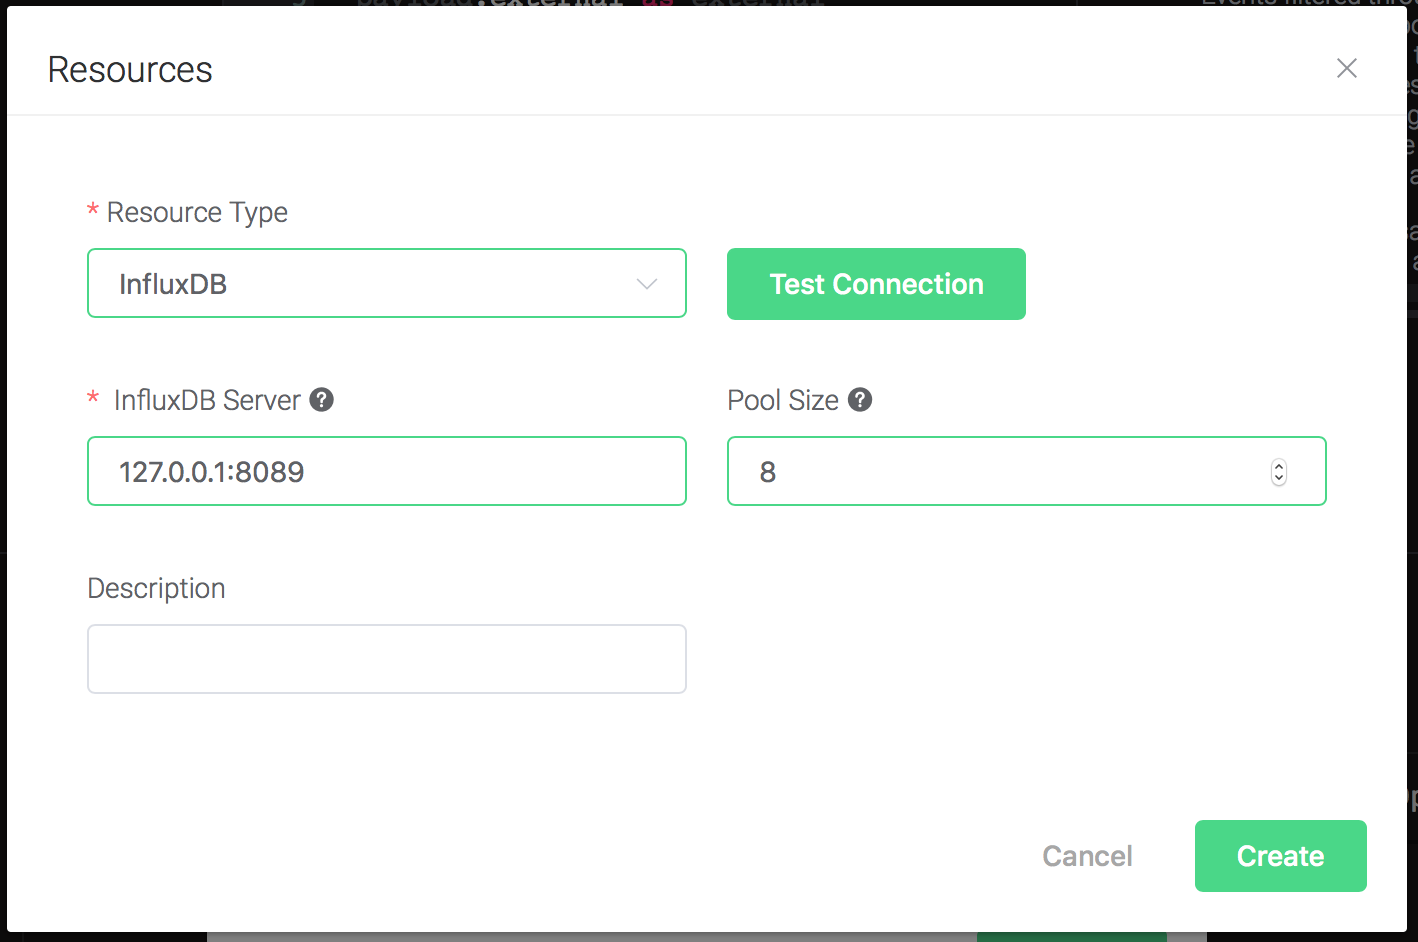
Configure the resource:
Keep all the configs as default, and click on the "Testing Connection" button to make sure the connection can be created successfully, and then click on the "Create" button.
Back to the "Actions" dialog, and then click on the "Confirm" button.
Back to the creating rule page, then click on "Create" button. The rule we created will be show in the rule list:
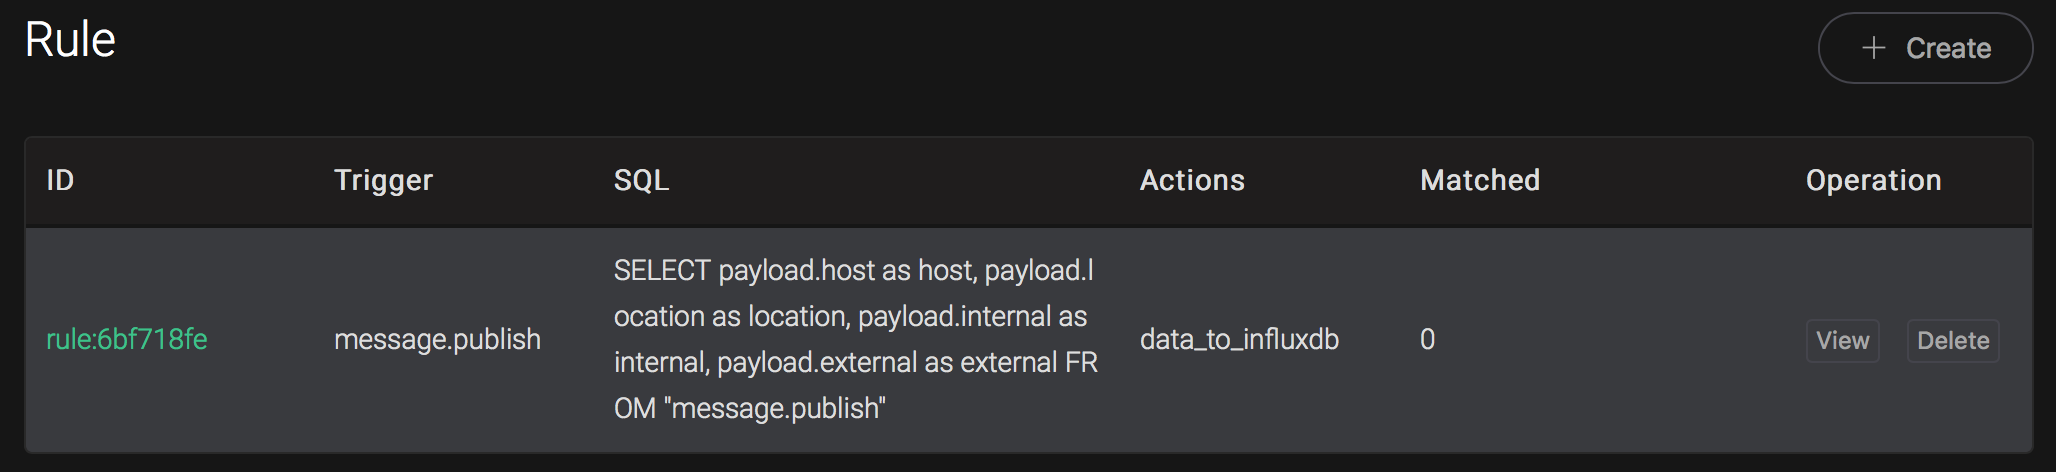
We have finished, testing the rule by sending an MQTT message to emqx:
> Topic: "t/1"
>
> QoS: 0
>
> Retained: false
>
> Payload:
> {"host":"serverA","location":"roomA","internal":25,"external":37}
Then inspect the InfluxDB table, verify a new record has been inserted:
$ docker exec -it influxdb influx
> use db
Using database db
> select * from "temperature"
name: temperature
time external host internal location
---- -------- ---- -------- --------
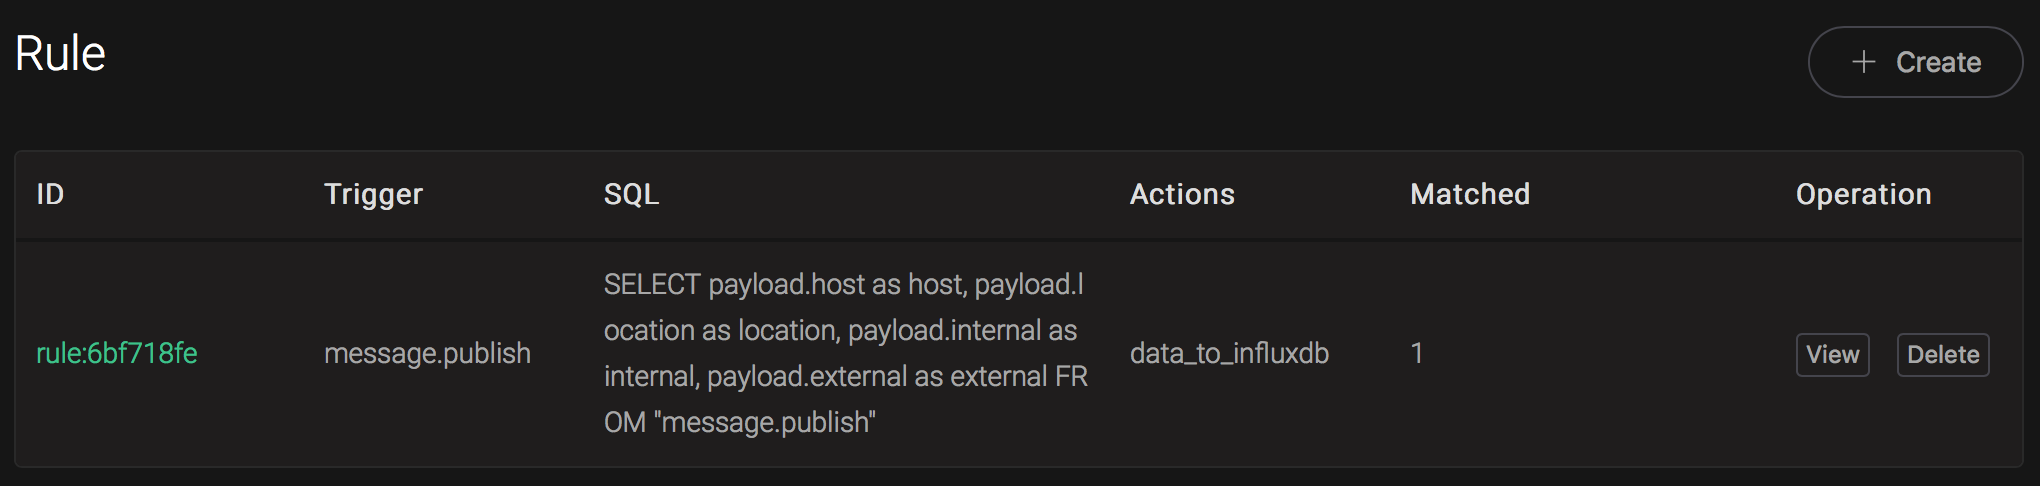
1561535778444457348 35 serverA 25 roomAAnd from the rule list, verify that the "Matched" column has increased to 1:
Create Kafka Rules
Setup a Kafka, taking Mac OSX for instance:
$ wget http://apache.claz.org/kafka/2.3.0/kafka_2.12-2.3.0.tgz

$ tar -xzf  kafka_2.12-2.3.0.tgz

$ cd kafka_2.12-2.3.0

# start Zookeeper
$ ./bin/zookeeper-server-start.sh config/zookeeper.properties
# start Kafka
$ ./bin/kafka-server-start.sh config/server.properties
Create topics for Kafka:
$ ./bin/kafka-topics.sh --zookeeper localhost:2181 --replication-factor 1 --partitions 1 --topic testTopic --create

Created topic testTopic.

.. note:: Kafka topics should be created before creating the kafka rule, or the rule creation would not success.
Create a rule:
Go to emqx dashboard, select the "rule" tab on the menu to the left.
Select "message.publish", then type in the following SQL:
SELECT
    *
FROM
    "message.publish"
Bind an action:
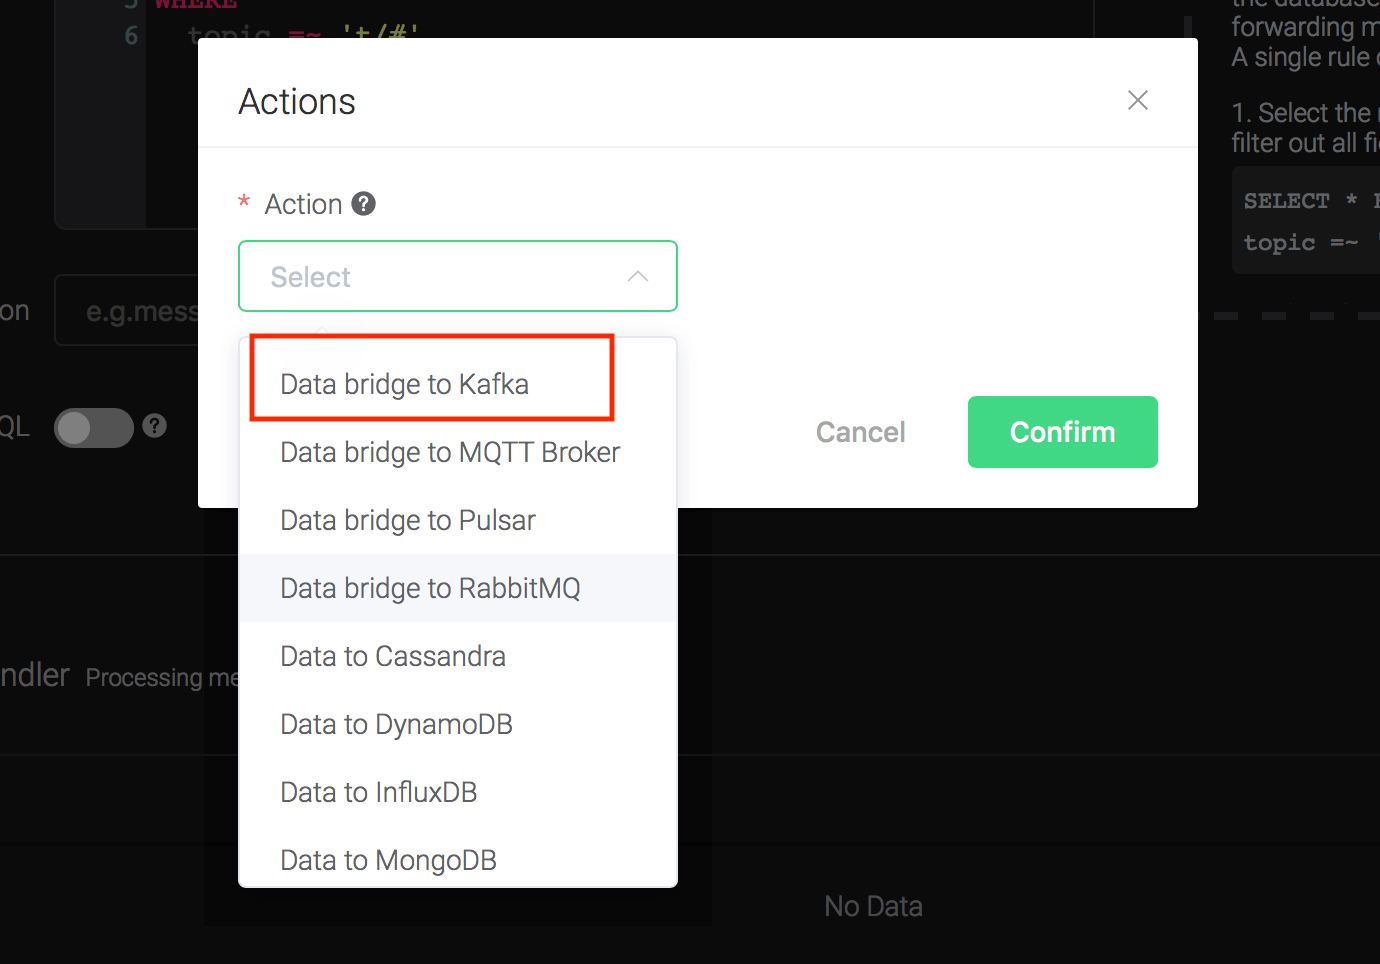
Click on the "+ Add" button under "Action Handler", and then select "Data bridge to Kafka" in the pop-up dialog window.
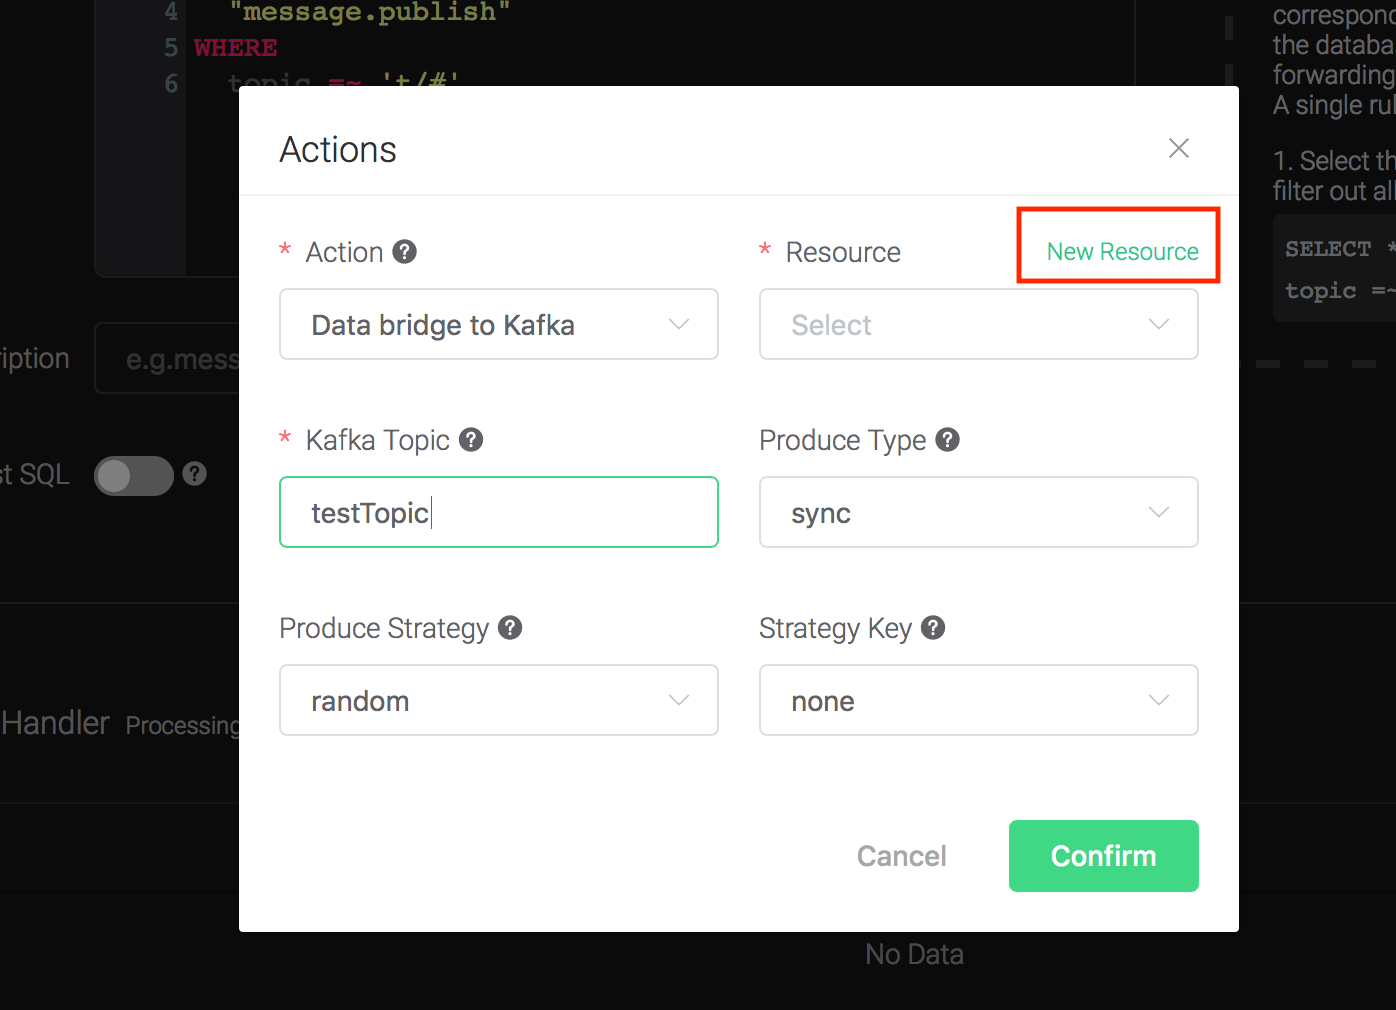
Fill in the parameters required by the action:
Two parameters is required by action "Data to Kafka":
1). Kafka Topic
2). Bind a resource to the action. Since the dropdown list "Resource" is empty for now, we create a new resource by clicking on the "New Resource" to the top right, and then select "Kafka":
Configure the resource:
Set the "Kafka Server" to "127.0.0.1:9092" (multiple servers should
be separated by comma), and keep all other configs as default, and
click on the "Testing Connection" button to make sure the connection
can be created successfully, and then click on the "Create" button.

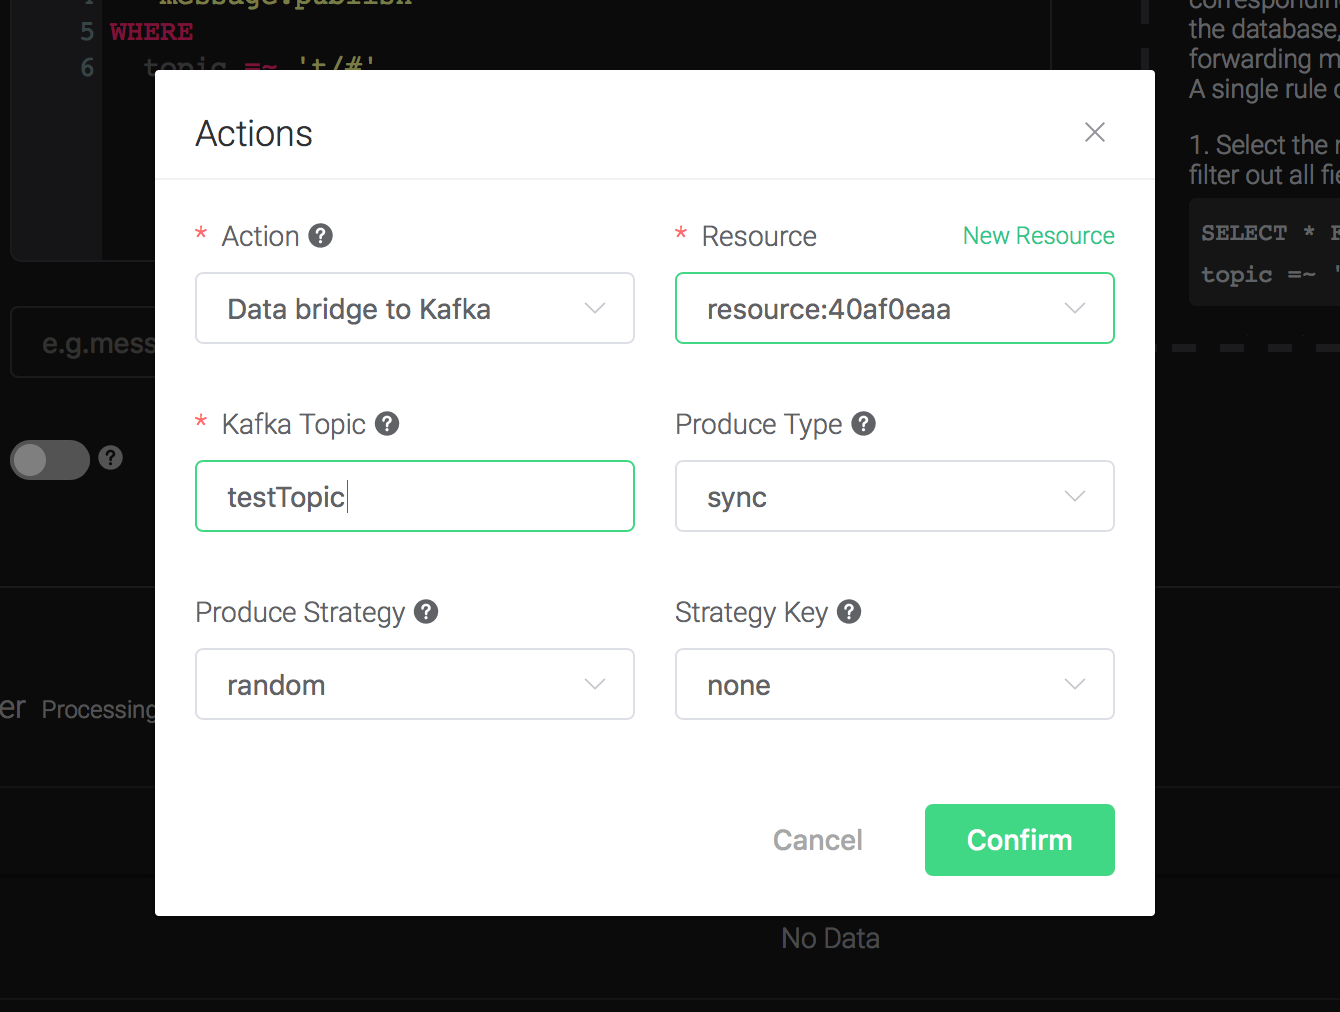
Back to the "Actions" dialog, and then click on the "Confirm" button.
Back to the creating rule page, then click on "Create" button. The rule we created will be show in the rule list:

We have finished, testing the rule by sending an MQTT message to emqx:
> Topic: "t/1"
>
> QoS: 0
>
> Retained: false
>
> Payload: "hello"
Then inspect Kafka by consume from the topic:
$ ./bin/kafka-console-consumer.sh --bootstrap-server 127.0.0.1:9092 --topic testTopic --from-beginningAnd from the rule list, verify that the "Matched" column has increased to 1:
Create Pulsar Rules
Setup a Pulsar, taking Mac OSX for instance:
$ wget http://apache.mirrors.hoobly.com/pulsar/pulsar-2.3.2/apache-pulsar-2.3.2-bin.tar.gz

$ tar xvfz apache-pulsar-2.3.2-bin.tar.gz

$ cd apache-pulsar-2.3.2

# Start Pulsar
$ ./bin/pulsar standalone
Create Pulsar Topics:
$ ./bin/pulsar-admin topics create-partitioned-topic -p 5 testTopicCreate a rule:
Go to emqx dashboard, select the "rule" tab on the menu to the left.
Select "message.publish", then type in the following SQL:
SELECT
    *
FROM
    "message.publish"
Bind an action:
Click on the "+ Add" button under "Action Handler", and then select "Data bridge to Pulsar" in the pop-up dialog window.

Fill in the parameters required by the action:
Two parameters is required by action "Data bridge to Pulsar":
1). Pulsar Topic
2). Bind a resource to the action. Since the dropdown list "Resource" is empty for now, we create a new resource by clicking on the "New Resource" to the top right, and then select "Pulsar":

Configure the resource:
Set the " Pulsar Server" to "127.0.0.1:6650"(multiple servers should
be separated by comma), and keep all other configs as default, and
click on the "Testing Connection" button to make sure the connection
can be created successfully, and then click on the "Create" button.

Back to the "Actions" dialog, and then click on the "Confirm" button.

Back to the creating rule page, then click on "Create" button. The rule we created will be show in the rule list:

We have finished, testing the rule by sending an MQTT message to emqx:
> Topic: "t/1"
>
> QoS: 0
>
> Retained: false
>
> Payload: "hello"
Then inspect the Pulsar by consume the topic, verify a new record has been produced:
\$ ./bin/pulsar-client consume testTopic -s "sub-name" -n 1000And from the rule list, verify that the "Matched" column has increased to 1:

Create RabbitMQ Rules
Setup a RabbitMQ, taking Mac OSX for instance:
$ brew install rabbitmq

# start rabbitmq
$ rabbitmq-server
Create a rule:
Go to emqx dashboard, select the "rule" tab on the menu to the left.
Select "message.publish", then type in the following SQL:
SELECT
    *
FROM
    "message.publish"
Bind an action:
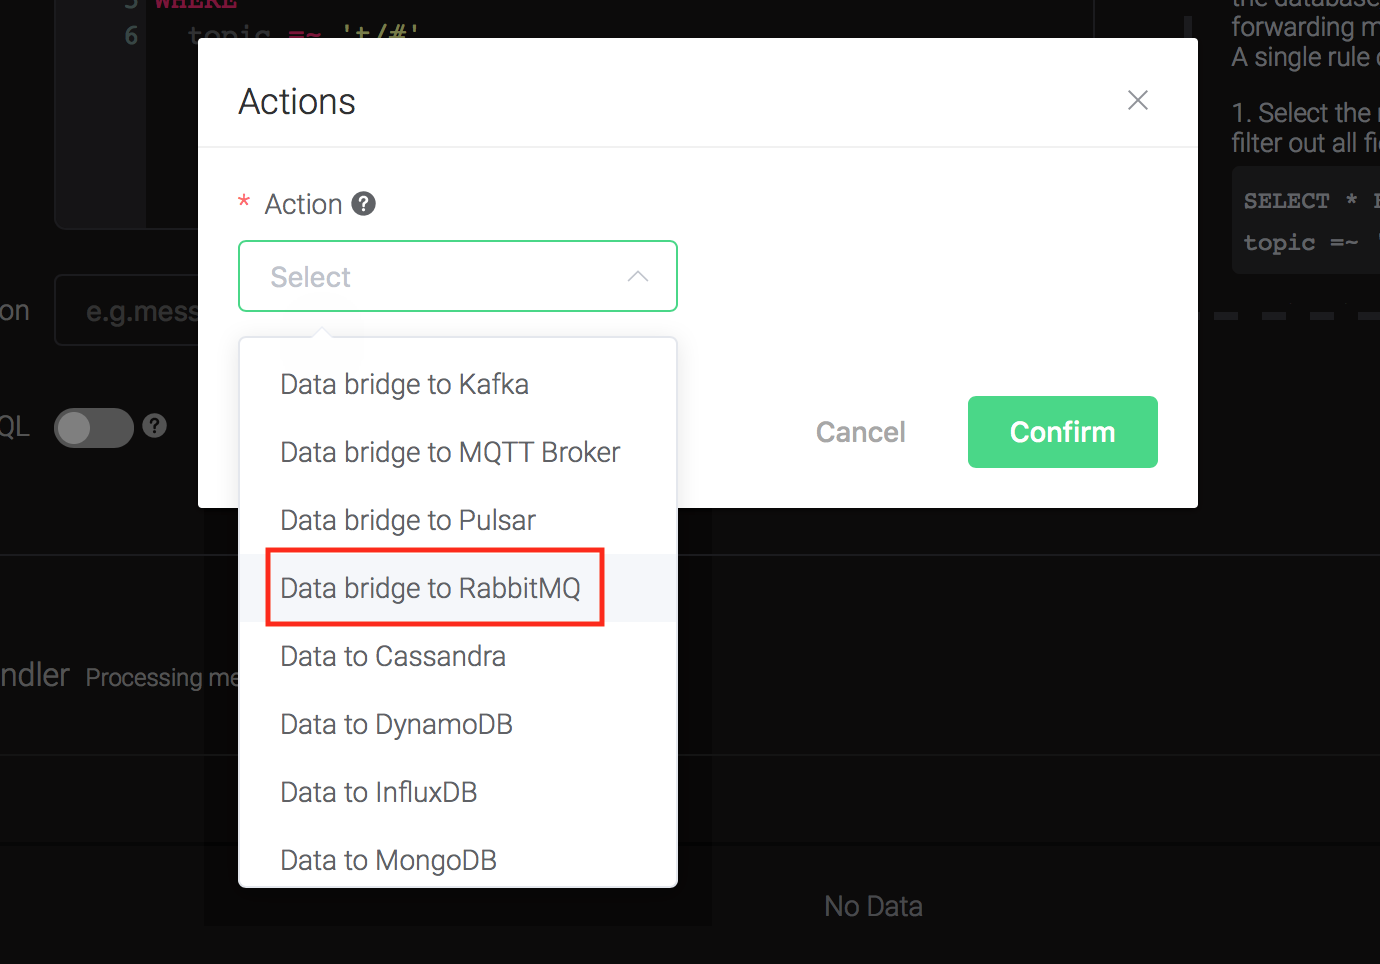
Click on the "+ Add" button under "Action Handler", and then select
"Data bridge to RabbitMQ" in the pop-up dialog window.
Fill in the parameters required by the action:
Two parameters is required by action "Data bridge to RabbitMQ":
1). RabbitMQ Exchange. Here set it to "messages"
2). RabbitMQ Exchange Type. Here set it to "topic"
3). RabbitMQ Routing Key. Here set it to "test"
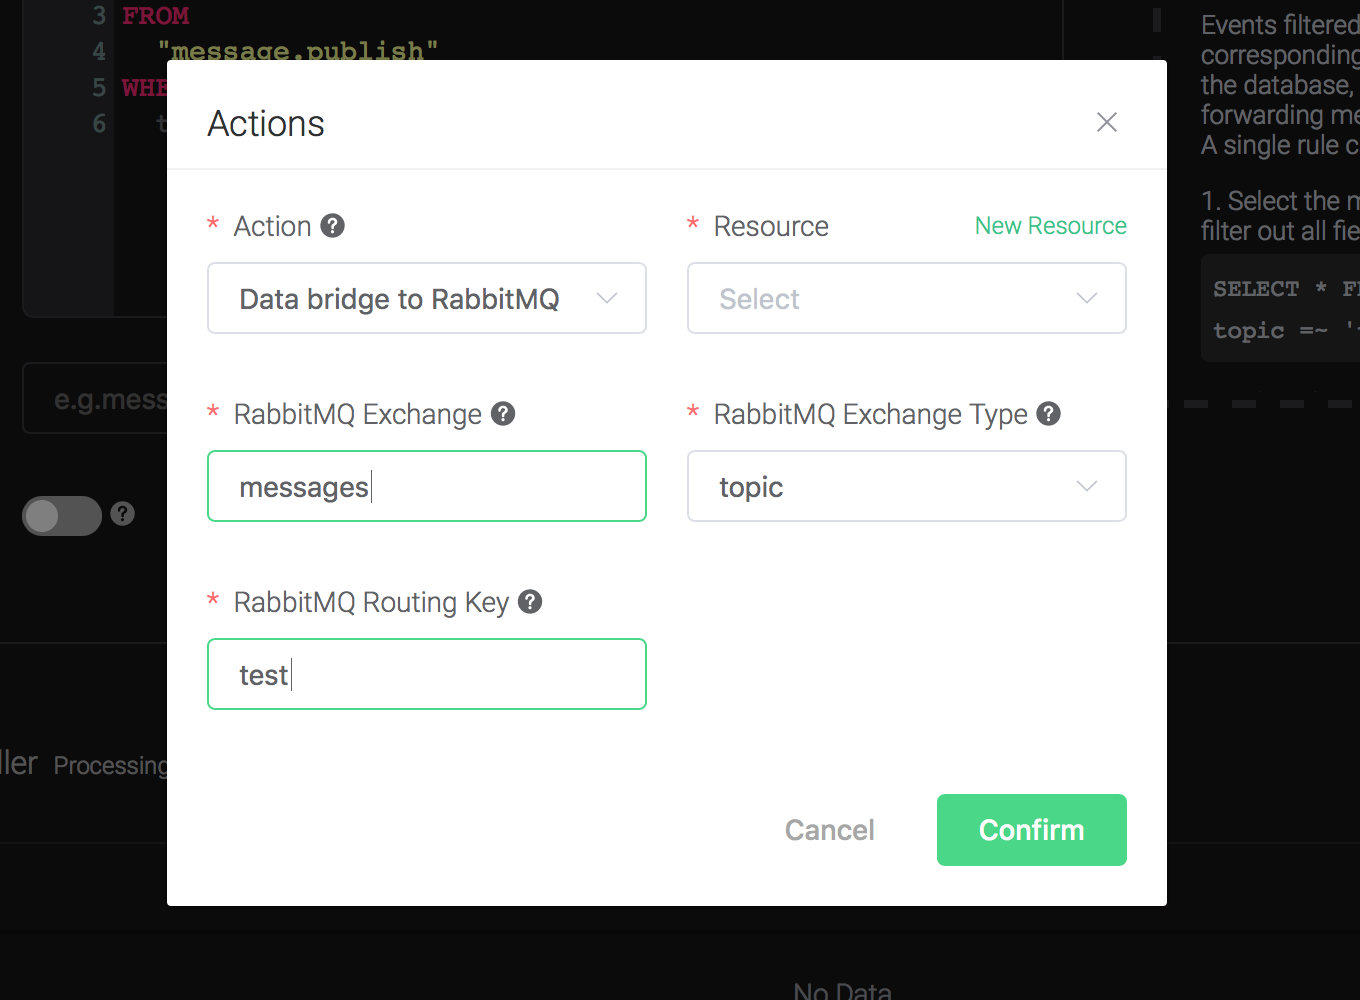
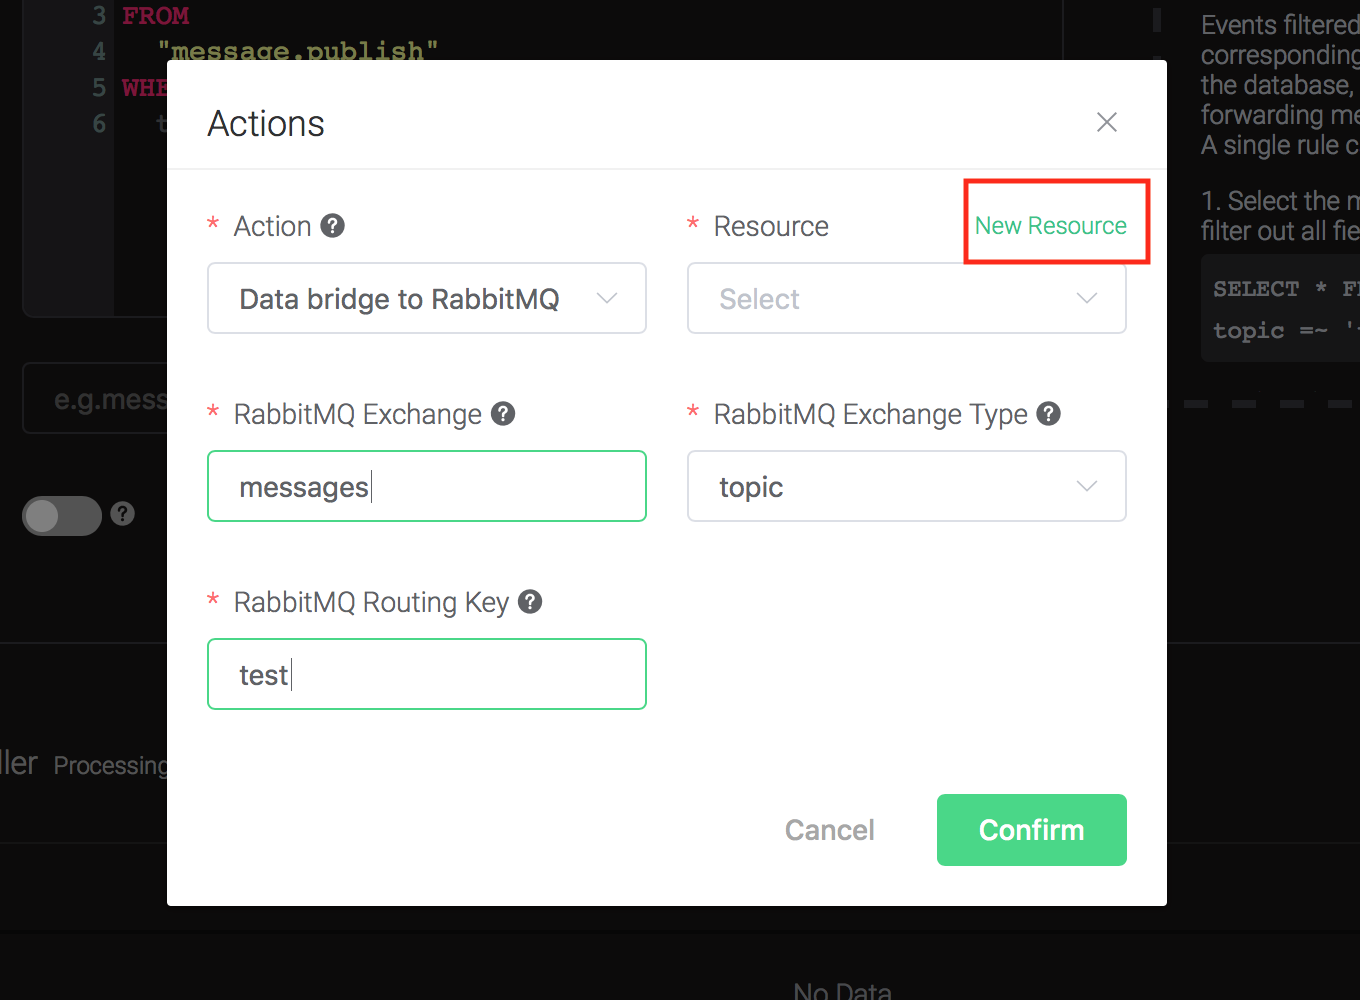
4). Bind a resource to the action. Since the dropdown list "Resource" is empty for now, we create a new resource by clicking on the "New Resource" to the top right, and then select "RabbitMQ":
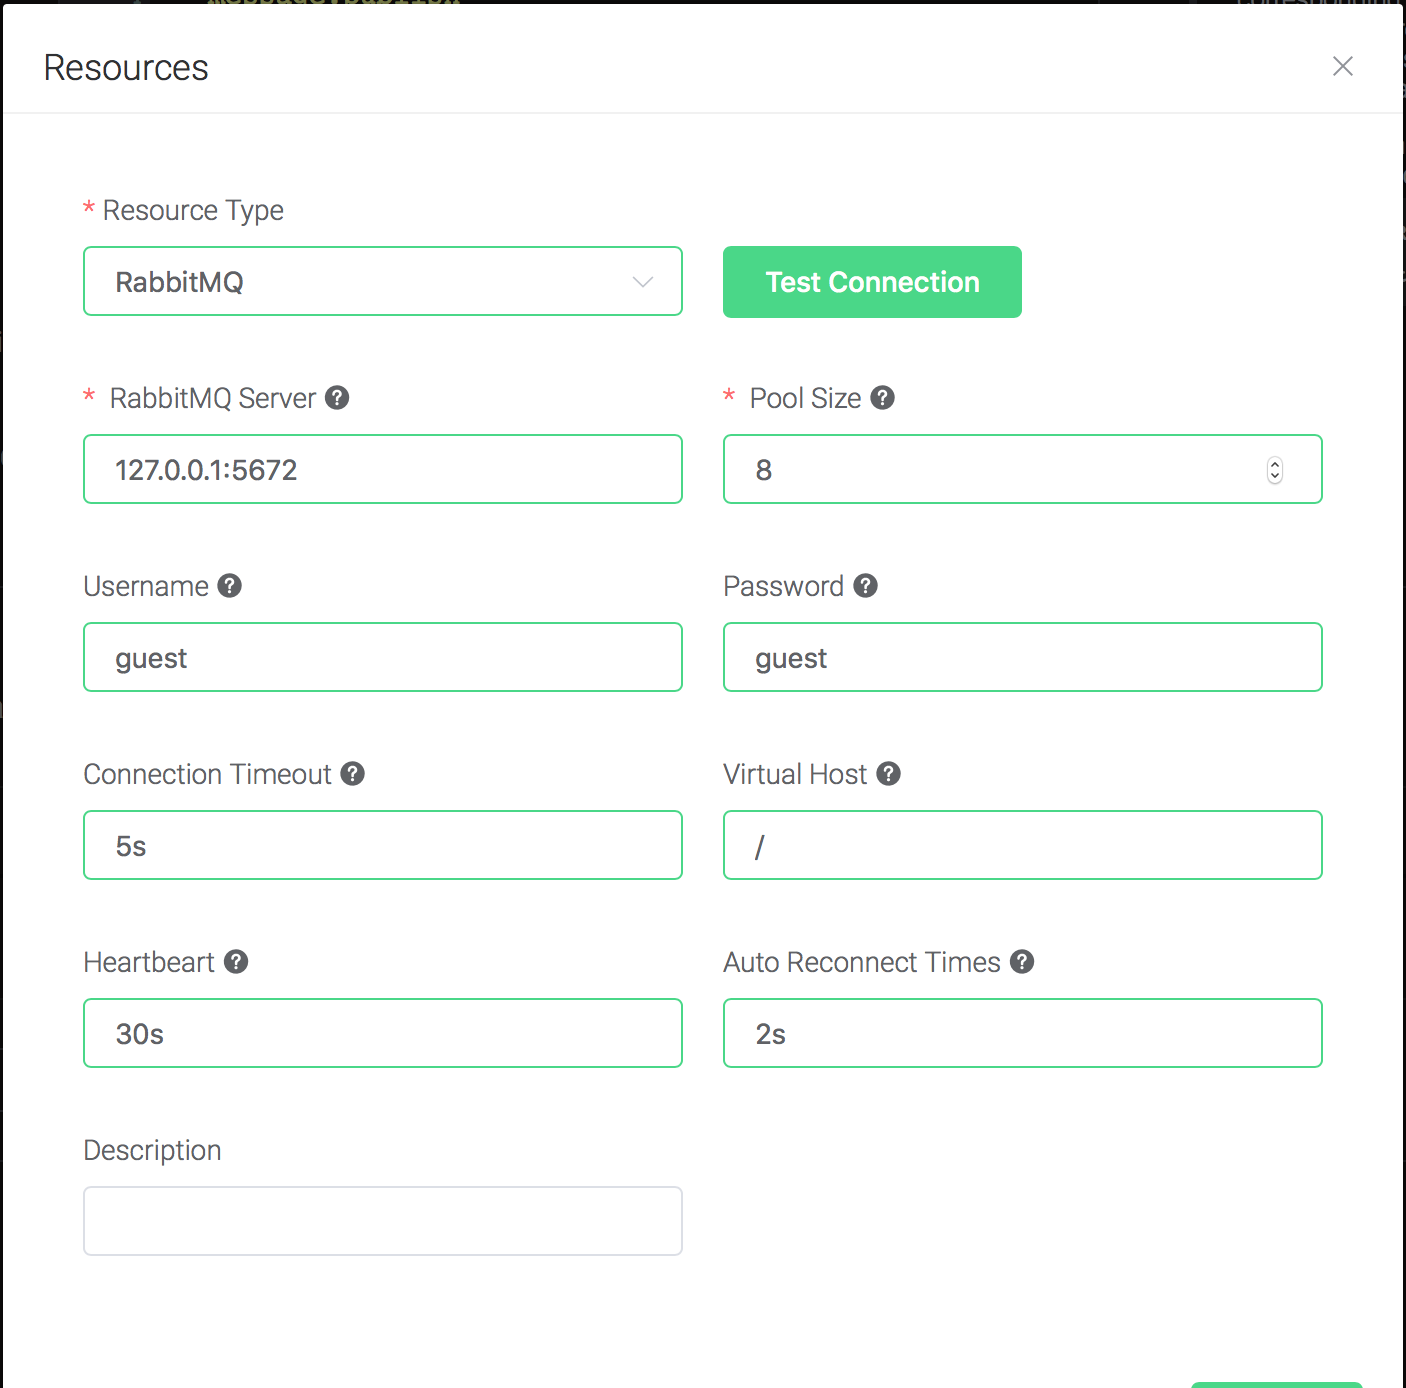
Configure the resource:
Set "RabbitMQ Server" to "127.0.0.1:5672", and keep all other configs as default, and click on the "Testing Connection" button to make sure the connection can be created successfully, and then click on the "Create" button.
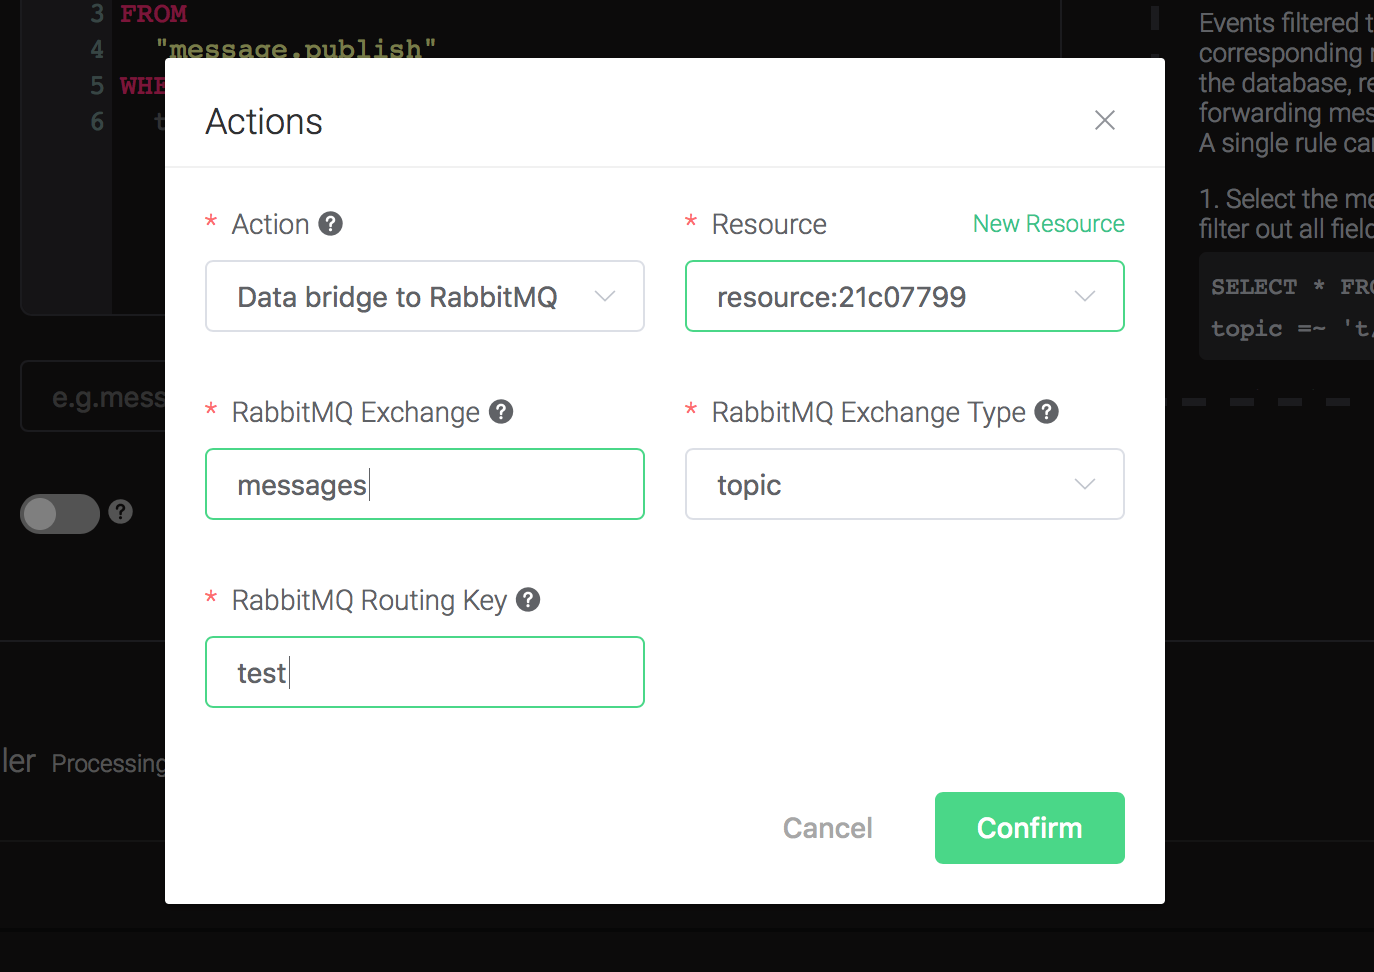
Back to the "Actions" dialog, and then click on the "Confirm" button.
Back to the creating rule page, then click on "Create" button. The rule we created will be show in the rule list:

We have finished, testing the rule by sending an MQTT message to emqx:
> Topic: "t/1"
>
> QoS: 0
>
> Retained: false
>
> Payload: "Hello, World\!"
Write an AMQP Client to consume the messages, following is the one written in python:
#!/usr/bin/env python
import pika

connection = pika.BlockingConnection(
    pika.ConnectionParameters(host='localhost'))
channel = connection.channel()

channel.exchange_declare(exchange='messages', exchange_type='topic')

result = channel.queue_declare(queue='', exclusive=True)
queue_name = result.method.queue

channel.queue_bind(exchange='messages', queue=queue_name, routing_key='test')

print('[*] Waiting for messages. To exit press CTRL+C')

def callback(ch, method, properties, body):
    print(" [x] %r" % body)

channel.basic_consume(
    queue=queue_name, on_message_callback=callback, auto_ack=True)

channel.start_consuming()
And from the rule list, verify that the "Matched" column has increased to 1:

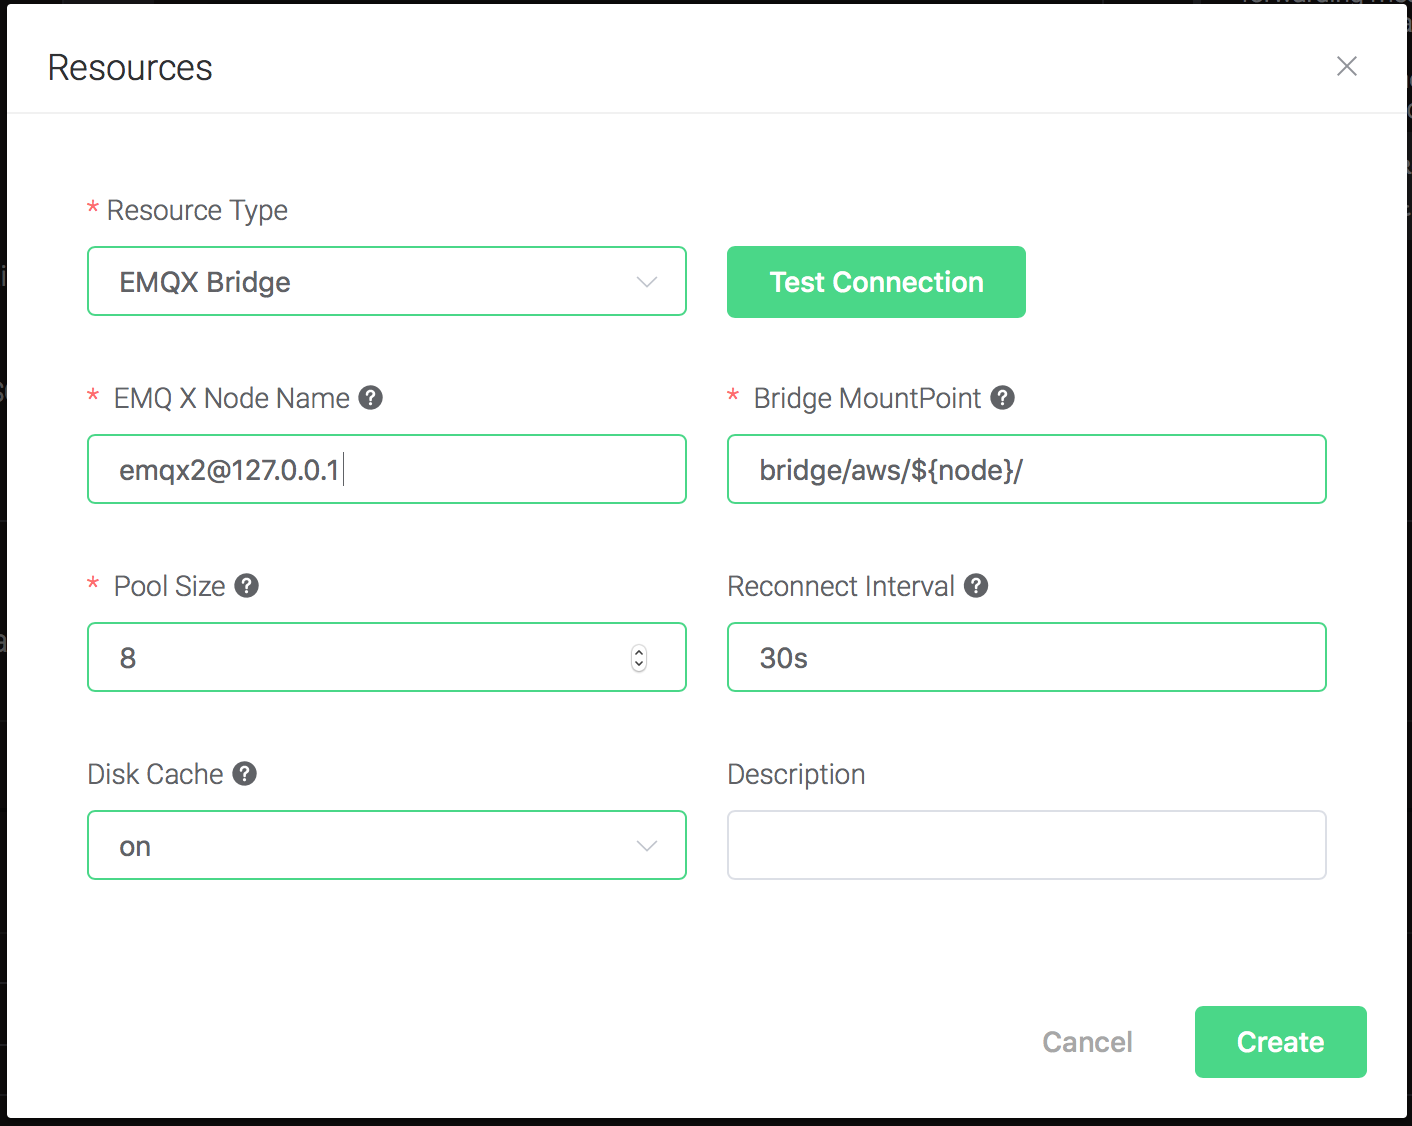
Create EMQX Bridge Rules
Setup anther MQTT broker using emqx, taking Mac OSX for instance:
$ brew tap emqx/emqx/emqx

$ brew install emqx

# start emqx
$ emqx console
Create a rule:
Go to emqx dashboard, select the "rule" tab on the menu to the left.
Select "message.publish", then type in the following SQL:
SELECT
    *
FROM
    "message.publish"
Bind an action:
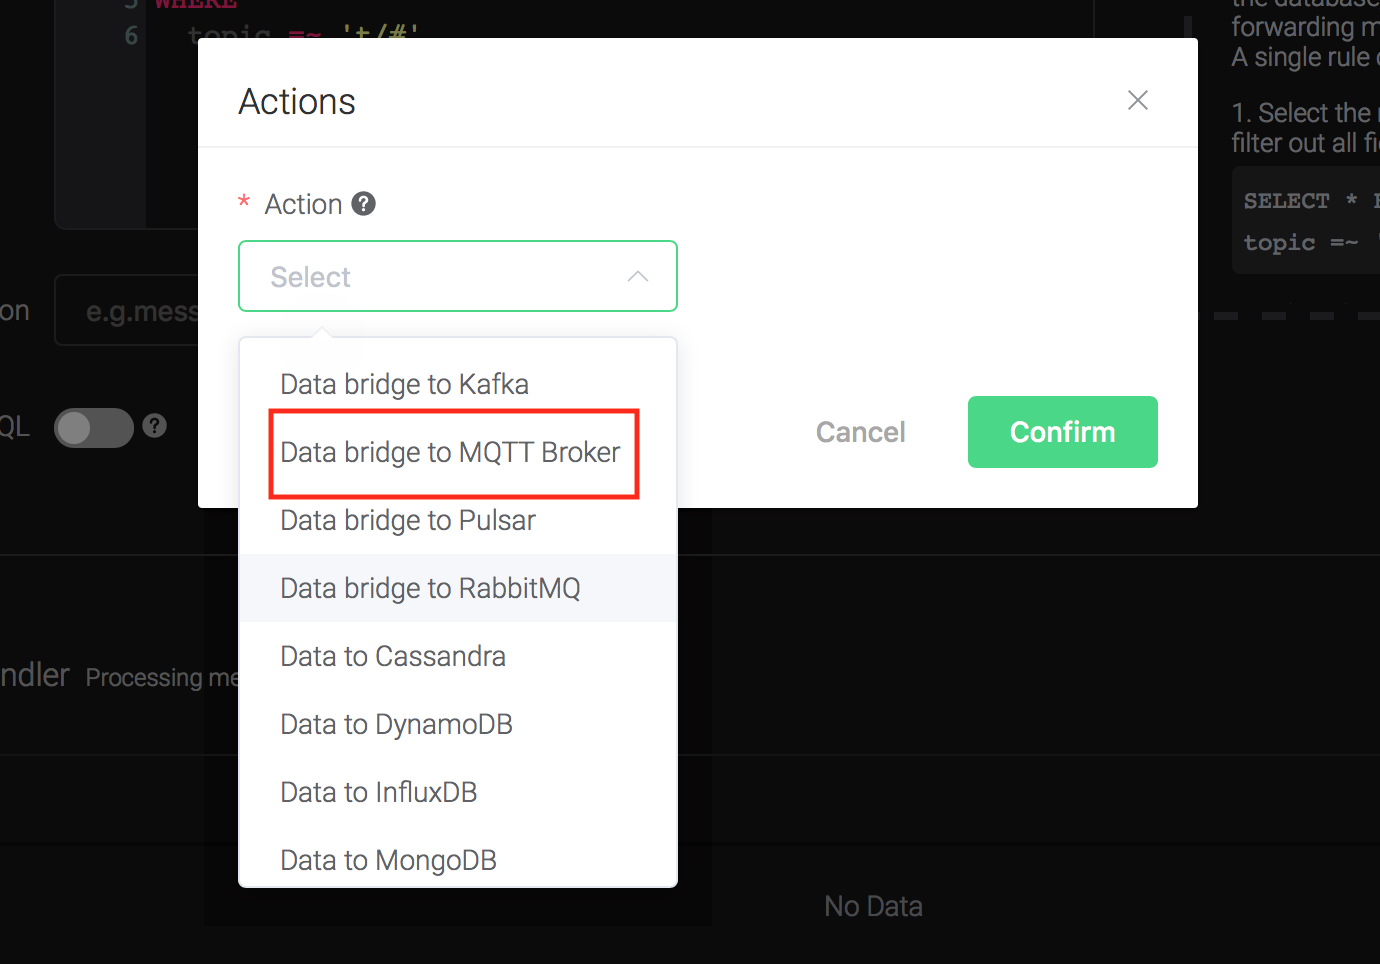
Click on the "+ Add" button under "Action Handler", and then select "Data bridge to MQTT Broker" in the pop-up dialog window.
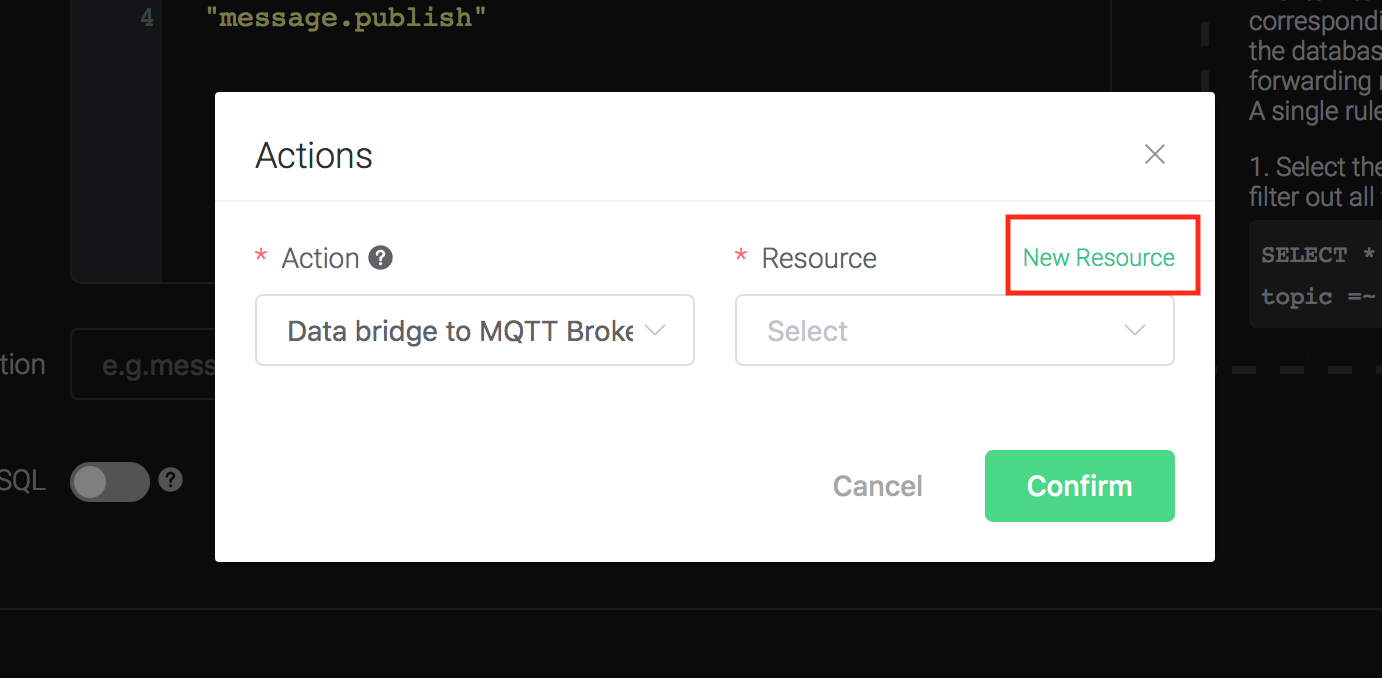
Bind a resource to the action. Since the dropdown list "Resource" is empty for now, we create a new resource by clicking on the "New Resource" to the top right, and then select "MQTT Bridge":
Configure the resource:
Set "EMQ X Node Name" to the node name of the remote name, and keep
all other configs as default, and click on the "Testing Connection"
button to make sure the connection can be created successfully, and
then click on the "Create" button.
Back to the "Actions" dialog, and then click on the "Confirm" button.

Back to the creating rule page, then click on "Create" button. The rule we created will be show in the rule list:

We have finished, testing the rule by sending an MQTT message to emqx:
> Topic: "t/1"
>
> QoS: 0
>
> Retained: false
>
> Payload: "Hello, World\!"
Then verify a message has been published to the other emqx:
And from the rule list, verify that the "Matched" column has increased to 1:
