Quick Start: Create an MQTT over TCP Bridge
This guide demonstrates how to create an MQTT over TCP bridge using a free public MQTT broker. The bridge forwards MQTT messages between EMQX Edge and a remote broker. You can configure it via the Dashboard or using the configuration file.
Create an MQTT Bridge via the Dashboard
Follow the steps below to configure an MQTT over TCP bridge using the EMQX Edge Dashboard.
Step 1: Open the Bridge Creation Wizard
- In the Dashboard, navigate to Bridges.
- On the Bridges page, click Add in the upper right corner.
- The bridge configuration form will appear with the following tabs:
- Connector
- Forwards
- Subscriptions
- Security
- Advanced
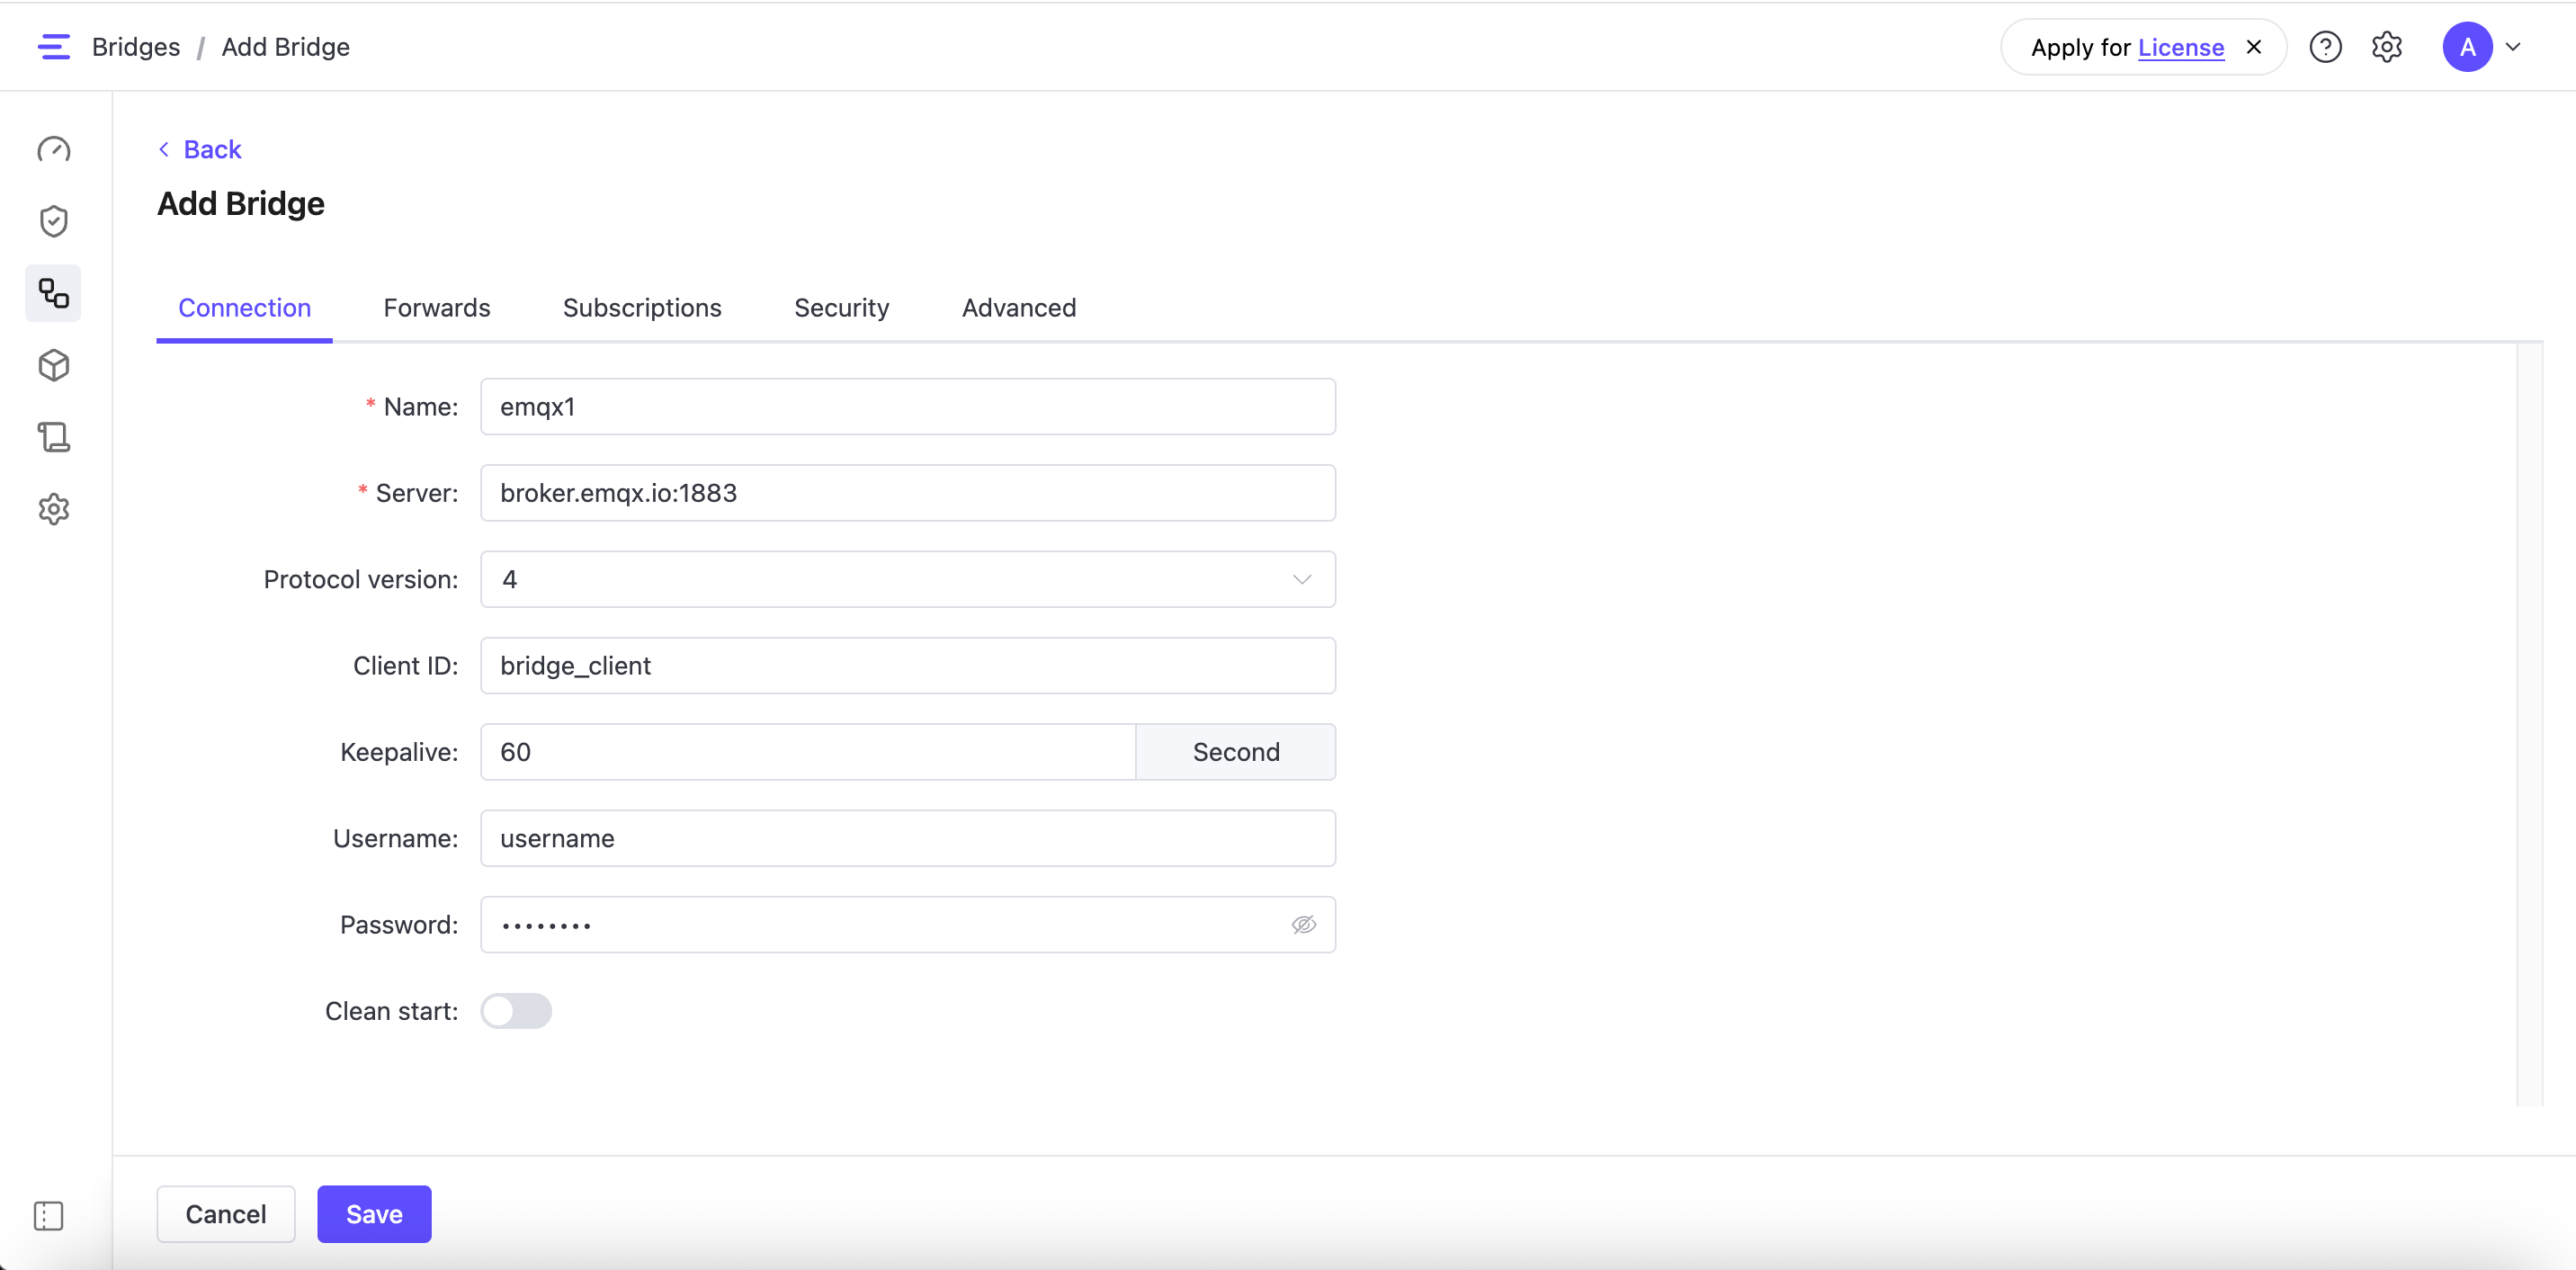
Step 2: Set Up the Connector
The Connector tab defines how EMQX Edge connects to the remote MQTT broker.
Configure the connection settings for the bridge:
Name: Specify a unique name for the bridge, for example,
emqx1.Server: The remote broker address. EMQX Edge supports a decoupled protocol and transport design, where the URL prefix defines the transport layer for MQTT. You can use different prefixes to indicate whether to connect via TCP, TLS over TCP, or QUIC. Supported protocols:
mqtt-tcptls+mqtt-tcpmqtt-quic
In this demonstration, set the address as
mqtt-tcp://broker.emqx.io:1883.Protocol version: MQTT protocol version:
5for MQTT 5.04for MQTT 3.1.1
Example:
4Client ID: Unique identifier for this bridge connection, for example,
bridge_client. If omitted, a random ID is generated.Clean start: Boolean flag. Some platforms require this. When enabled, the bridge always starts a new session each time it connects; when disabled, it tries to resume previous sessions.
Username/Password: Credentials used for authenticating with the remote broker. In this example, set to
username/password.Keepalive: Optional keepalive interval in seconds. Helps maintain the connection.
Step 3: Define Forwarding Rules
The Forwards tab defines how messages from EMQX Edge are forwarded to the remote MQTT broker.
To create a rule for message forwarding:
- Click Add.
- Configure the following fields:
- Local Topic: Topic on your local EMQX Edge instance
- Remote Topic: Target topic on the remote broker
- QoS: Select
0,1, or2
Example Forward Rule:
| Local Topic | Remote Topic | QoS |
|---|---|---|
| topic1 | fwd/topic1 | 1 |
You can edit or delete each rule later using the action buttons.
Step 4: Define Subscription Rules
The Subscriptions tab defines how EMQX Edge subscribes to topics from the remote broker and republishes incoming messages locally.
To create a subscription rule:
Click Add.
Configure the following fields:
Remote topic: Topic on the remote broker
Local topic: The corresponding topic on EMQX Edge
- QoS: Select
0,1, or2
Example Subscription Rule:
| Remote Topic | Local Topic | QoS |
|---|---|---|
| cmd/topic3 | topic3 | 1 |
You can edit or delete each rule later using the action buttons.
Step 5: Security and Advanced Settings (Optional)
The Security tab allows you to enable TLS to establish a secure, encrypted connection to the remote broker (e.g., tls+mqtt-tcp://broker.emqx.io:8883). When enabled, you can configure the following fields:
- Key Password: Password used to unlock your private key file.
- Key: Path to your private key file (e.g.,
/etc/certs/key.pem). - Cert: Path to your certificate file (e.g.,
/etc/certs/cert.pem). - Cacert: Path to the certificate authority file (e.g.,
/etc/certs/cacert.pem). - Verify Peer: When enabled, the client will verify the server’s certificate for authenticity.
- Fail if No Peer Cert: When enabled, the connection fails if the server doesn't provide a certificate.
The Advanced tab allow you to define the following option:
- Max parallel processes: Number of concurrent connections the bridge uses. Default is
2. Increase to improve throughput if needed.
Step 6: Save and Apply the Bridge Configuration
- Click Save to apply your bridge settings.
- After clicking Save, a prompt is displayed indicating that the bridge configuration will take effect after restarting EMQX Edge. Click Confirm to close the prompt.
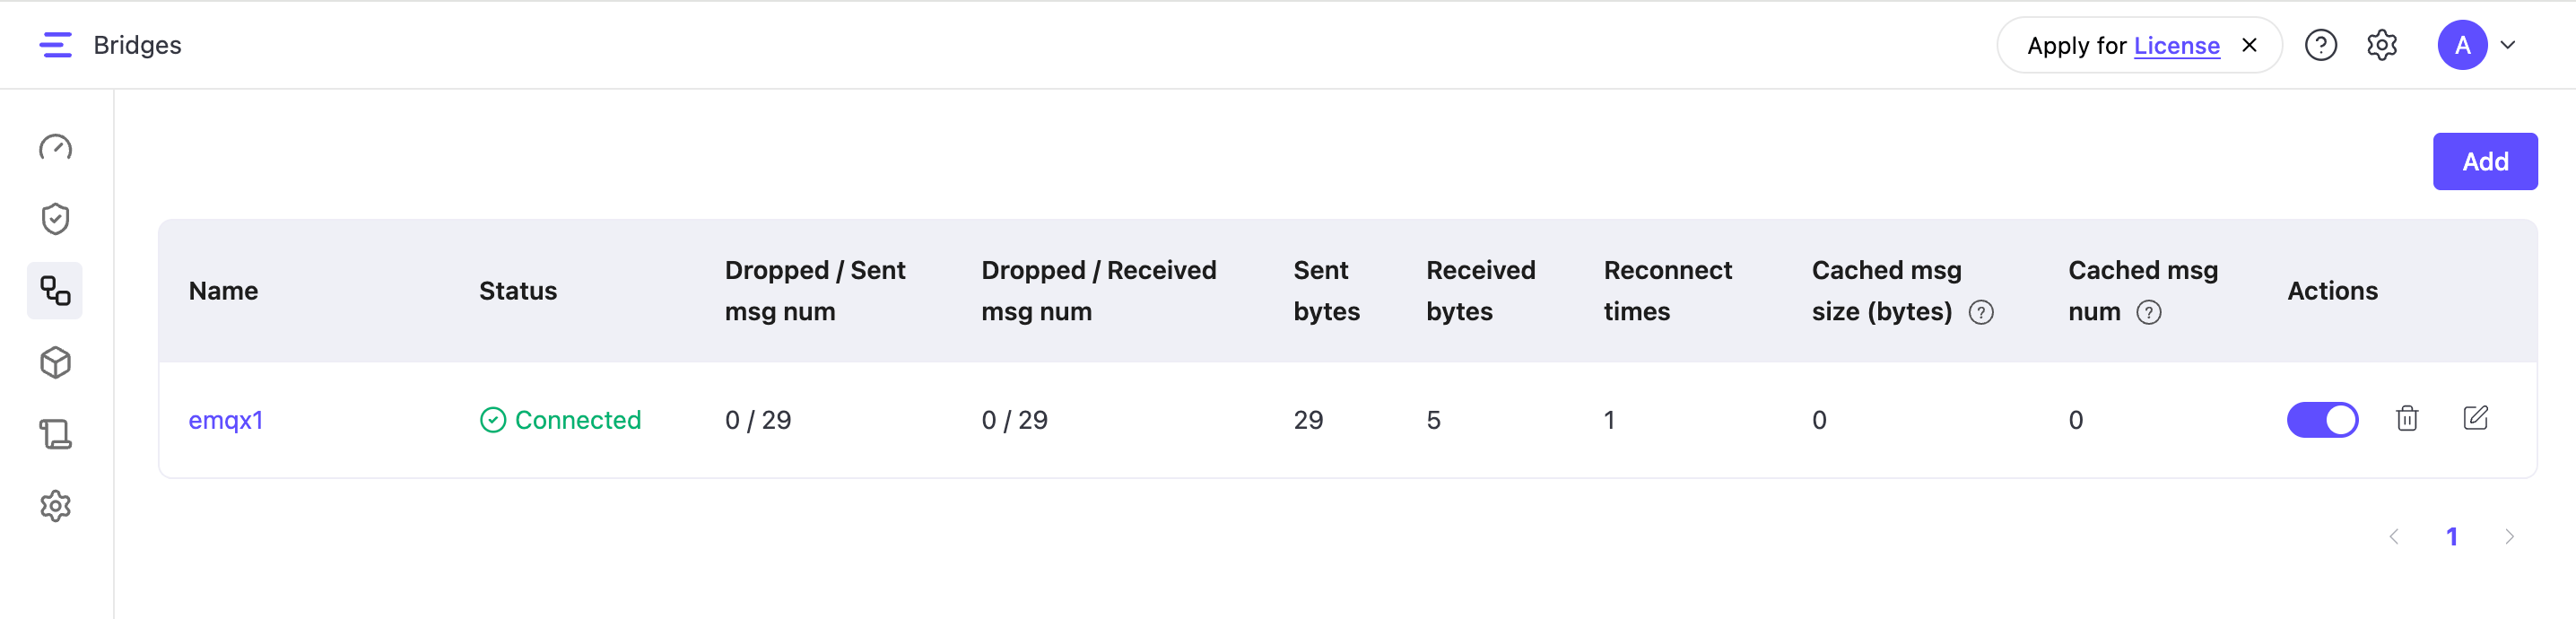
Once EMQX Edge restarts, the new bridge will appear in the Bridges list. You can toggle the switch in the Action column to enable or disable the bridge. When disabled, the bridge will not connect or exchange data, and no metrics will be shown on the Bridges page.
Create an MQTT Bridge via Configuration File
This section demonstrates how to establish an MQTT-over-TCP data bridge between EMQX Edge and a free public MQTT broker through the configuration file to forward and receive messages.
Option 1: Add Configuration via the Dashboard (All configurations)
If you prefer working within the EMQX Edge Dashboard, you can directly paste the bridge configuration into the Settings -> All configurations page:
Navigate to Settings in the left-hand menu.
Click the All configurations tab.
Define the bridge configuration settings by adding the following configuration snippet into the editor:
bridges.mqtt.emqx1 {
  server = "mqtt-tcp://broker.emqx.io:1883"
  proto_ver = 5
  clientid = "bridge_client"
  keepalive = 60s
  clean_start = false
  username = username
  password = passwd

  forwards = [
    {
      remote_topic = "fwd/topic1"
      local_topic = "topic1"
      qos = 1
    }
  ]

  subscription = [
    {
      remote_topic = "cmd/topic3"
      local_topic = "topic3"
      qos = 1
    }
  ]

  max_parallel_processes = 2
  max_send_queue_len = 32
  max_recv_queue_len = 128
}
Click Save, then restart EMQX Edge to apply the changes.
Option 2: Edit the nanomq.conf File
- Open the configuration file
nanomq.confunder the directory/etc. - Define the bridge configuration settings by adding the following HOCON snippet to the configuration file:
bridges.mqtt.emqx1 {
  server = "mqtt-tcp://broker.emqx.io:1883"
  proto_ver = 5
  clientid = "bridge_client"
  keepalive = 60s
  clean_start = false
  username = username
  password = passwd

  forwards = [
    {
      remote_topic = "fwd/topic1"
      local_topic = "topic1"
      qos = 1
    }
  ]

  subscription = [
    {
      remote_topic = "cmd/topic3"
      local_topic = "topic3"
      qos = 1
    }
  ]

  max_parallel_processes = 2
  max_send_queue_len = 32
  max_recv_queue_len = 128
}
Start EMQX Edge with the Bridge Configuration
Run the following command to start EMQX Edge with your local configuration file:
emqx-edge start --conf /path/to/your/nanomq.conf --license /path/to/your/nanomq.licReplace /path/to/your/nanomq.conf with the actual path to your nanomq.conf file on your local machine.
For a complete list of configuration options, refer to the Data Bridge Configuration. The settings will take effect after EMQX Edge is restarted.
TIP
If you are using HOCON-format configuration items and EMQX Edge version 0.19 or later, you can either write the bridge-related configurations directly into the nanomq.conf file or place them in a separate file, such as nanomq_bridge.conf, and include it using HOCON’s include directive within nanomq.conf:
Example:
include "path/to/nanomq_bridge.conf"To view more log data during runtime, you can set the log level log.level in the configuration file.
Test the MQTT Data Bridge
This section demonstrates how to use MQTTX to simulate clients and test the data bridge between EMQX Edge and the public MQTT broker. You will create two connections, one to EMQX Edge and another to the remote MQTT broker, to verify the bidirectional message forwarding.
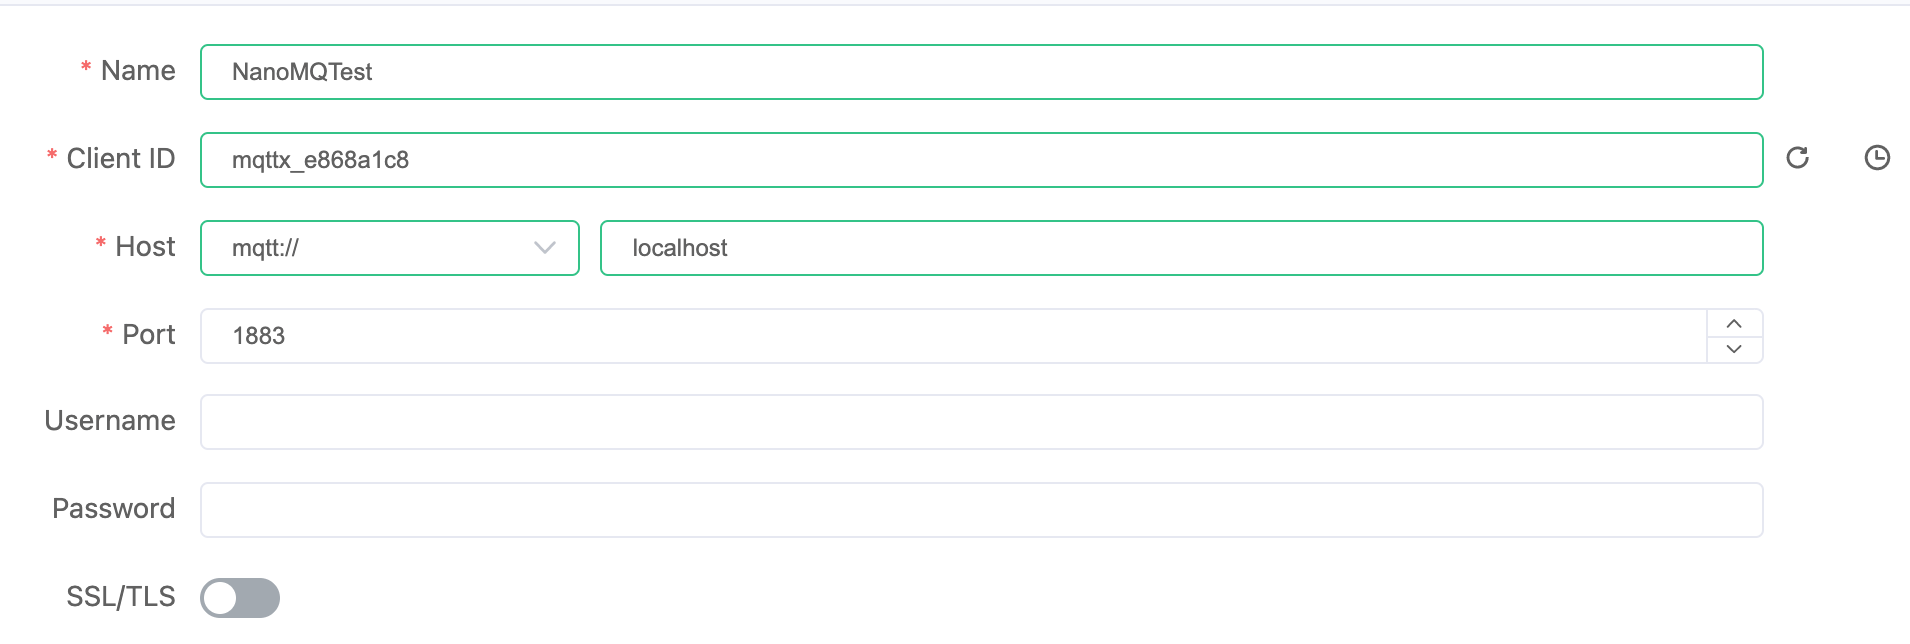
Connect a Client to EMQX Edge
Create a client in MQTTX named NanoMQTest, connecting to localhost:1883.
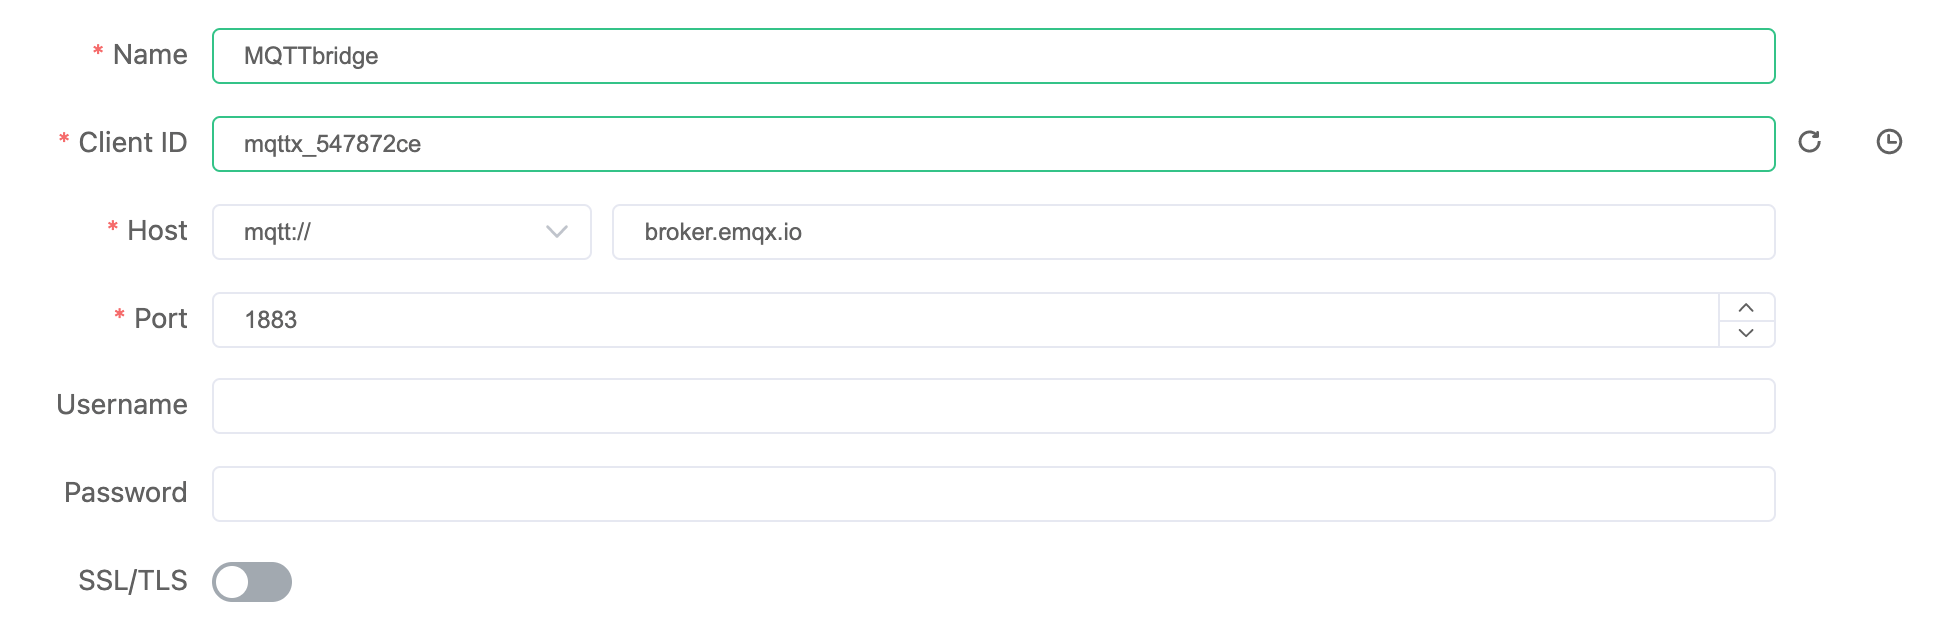
Connect a Client to the RMQTT Broker
Create another client in MQTTX named MQTTbridge, connecting to broker.emqx.io:1883.
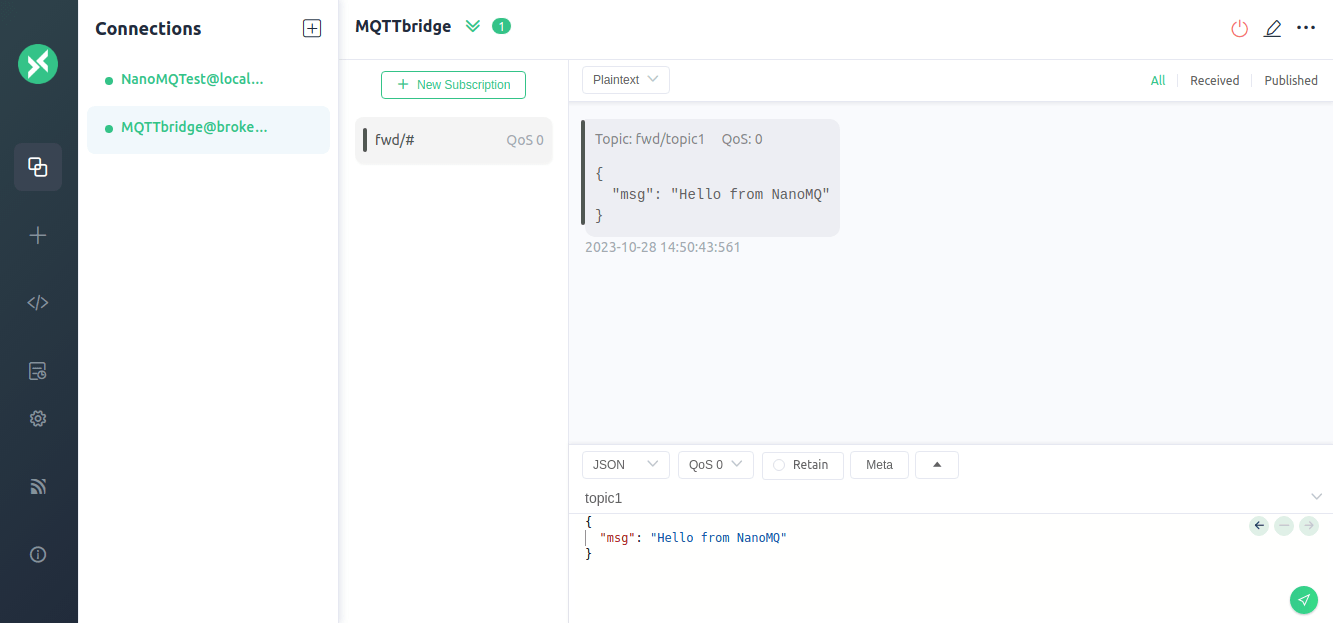
Test Message Forwarding from EMQX Edge to Remote Broker
- On the
MQTTbridgeclient, subscribe to the topicfwd/#. - On the
NanoMQTestclient, publish a message totopic1, such asHello from NanoMQ. - Confirm that the message appears on the
MQTTbridgeclient, indicating successful forwarding.
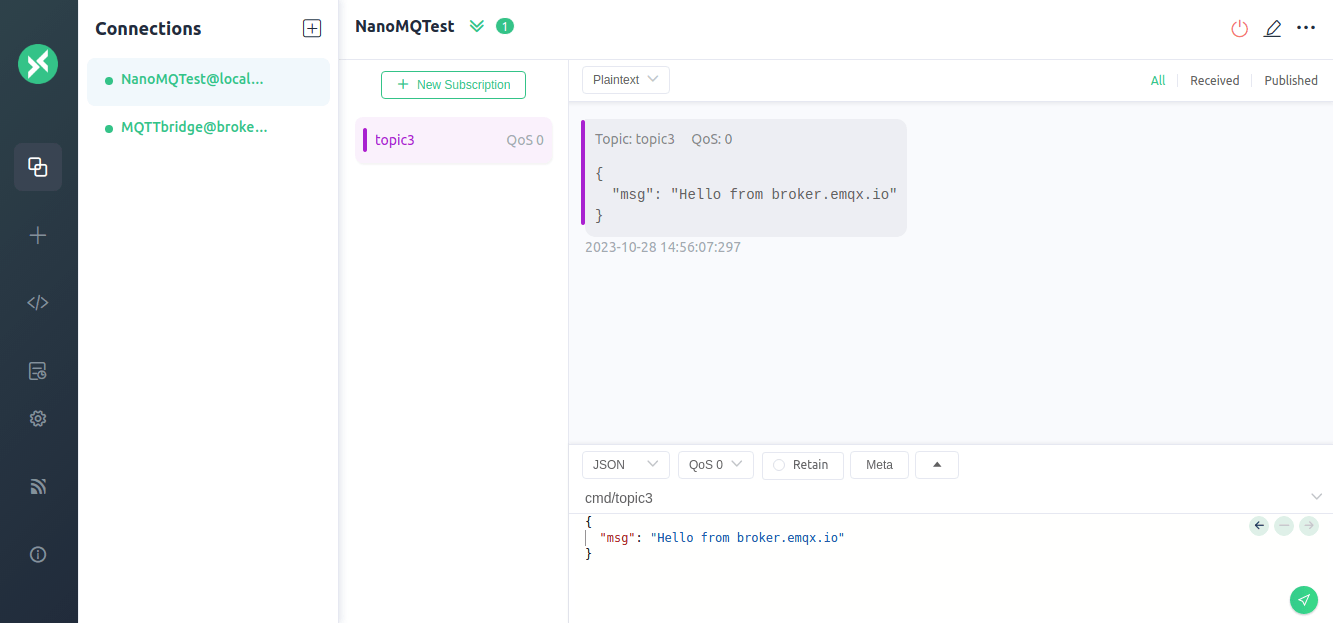
Test Message Subscription from Remote Broker to EMQX Edge
- On the
NanoMQTestclient, subscribe to the topictopic3. - On the
MQTTbridgeclient, publish a message tocmd/topic3, such asHello from broker.emqx.io. - Verify that the message is received by the
NanoMQTestclient, confirming successful subscription.
View Bridge Metrics and Status
After testing the message forwarding and receiving, you can monitor the bridge status and metrics on the Bridges page in the Dashboard.