SDK Access
SDK Access connects real hardware to a Device Agent. After the device-side program connects over MQTT, it can report state and events, respond to commands, and appear as a real device in the device list. namespace identifies the current runtime space; its default value is default.
Choose an Access Path
Click Connect device in a Device Agent workspace. The console provides three entry points:
| Path | Best for |
|---|---|
| SDK toolkit | You need a runnable device-side project and will add hardware logic yourself |
| Agent-enhanced SDK | Generate device-side business logic on top of the SDK toolkit, then run or refine it |
| Existing device | You already have firmware, a gateway, or a backend service and only need to adapt it to MQTT topics and payloads |
The first two entry points produce device-side code packages. Existing device access does not generate code; it provides connection details and payload examples.
SDK Toolkit
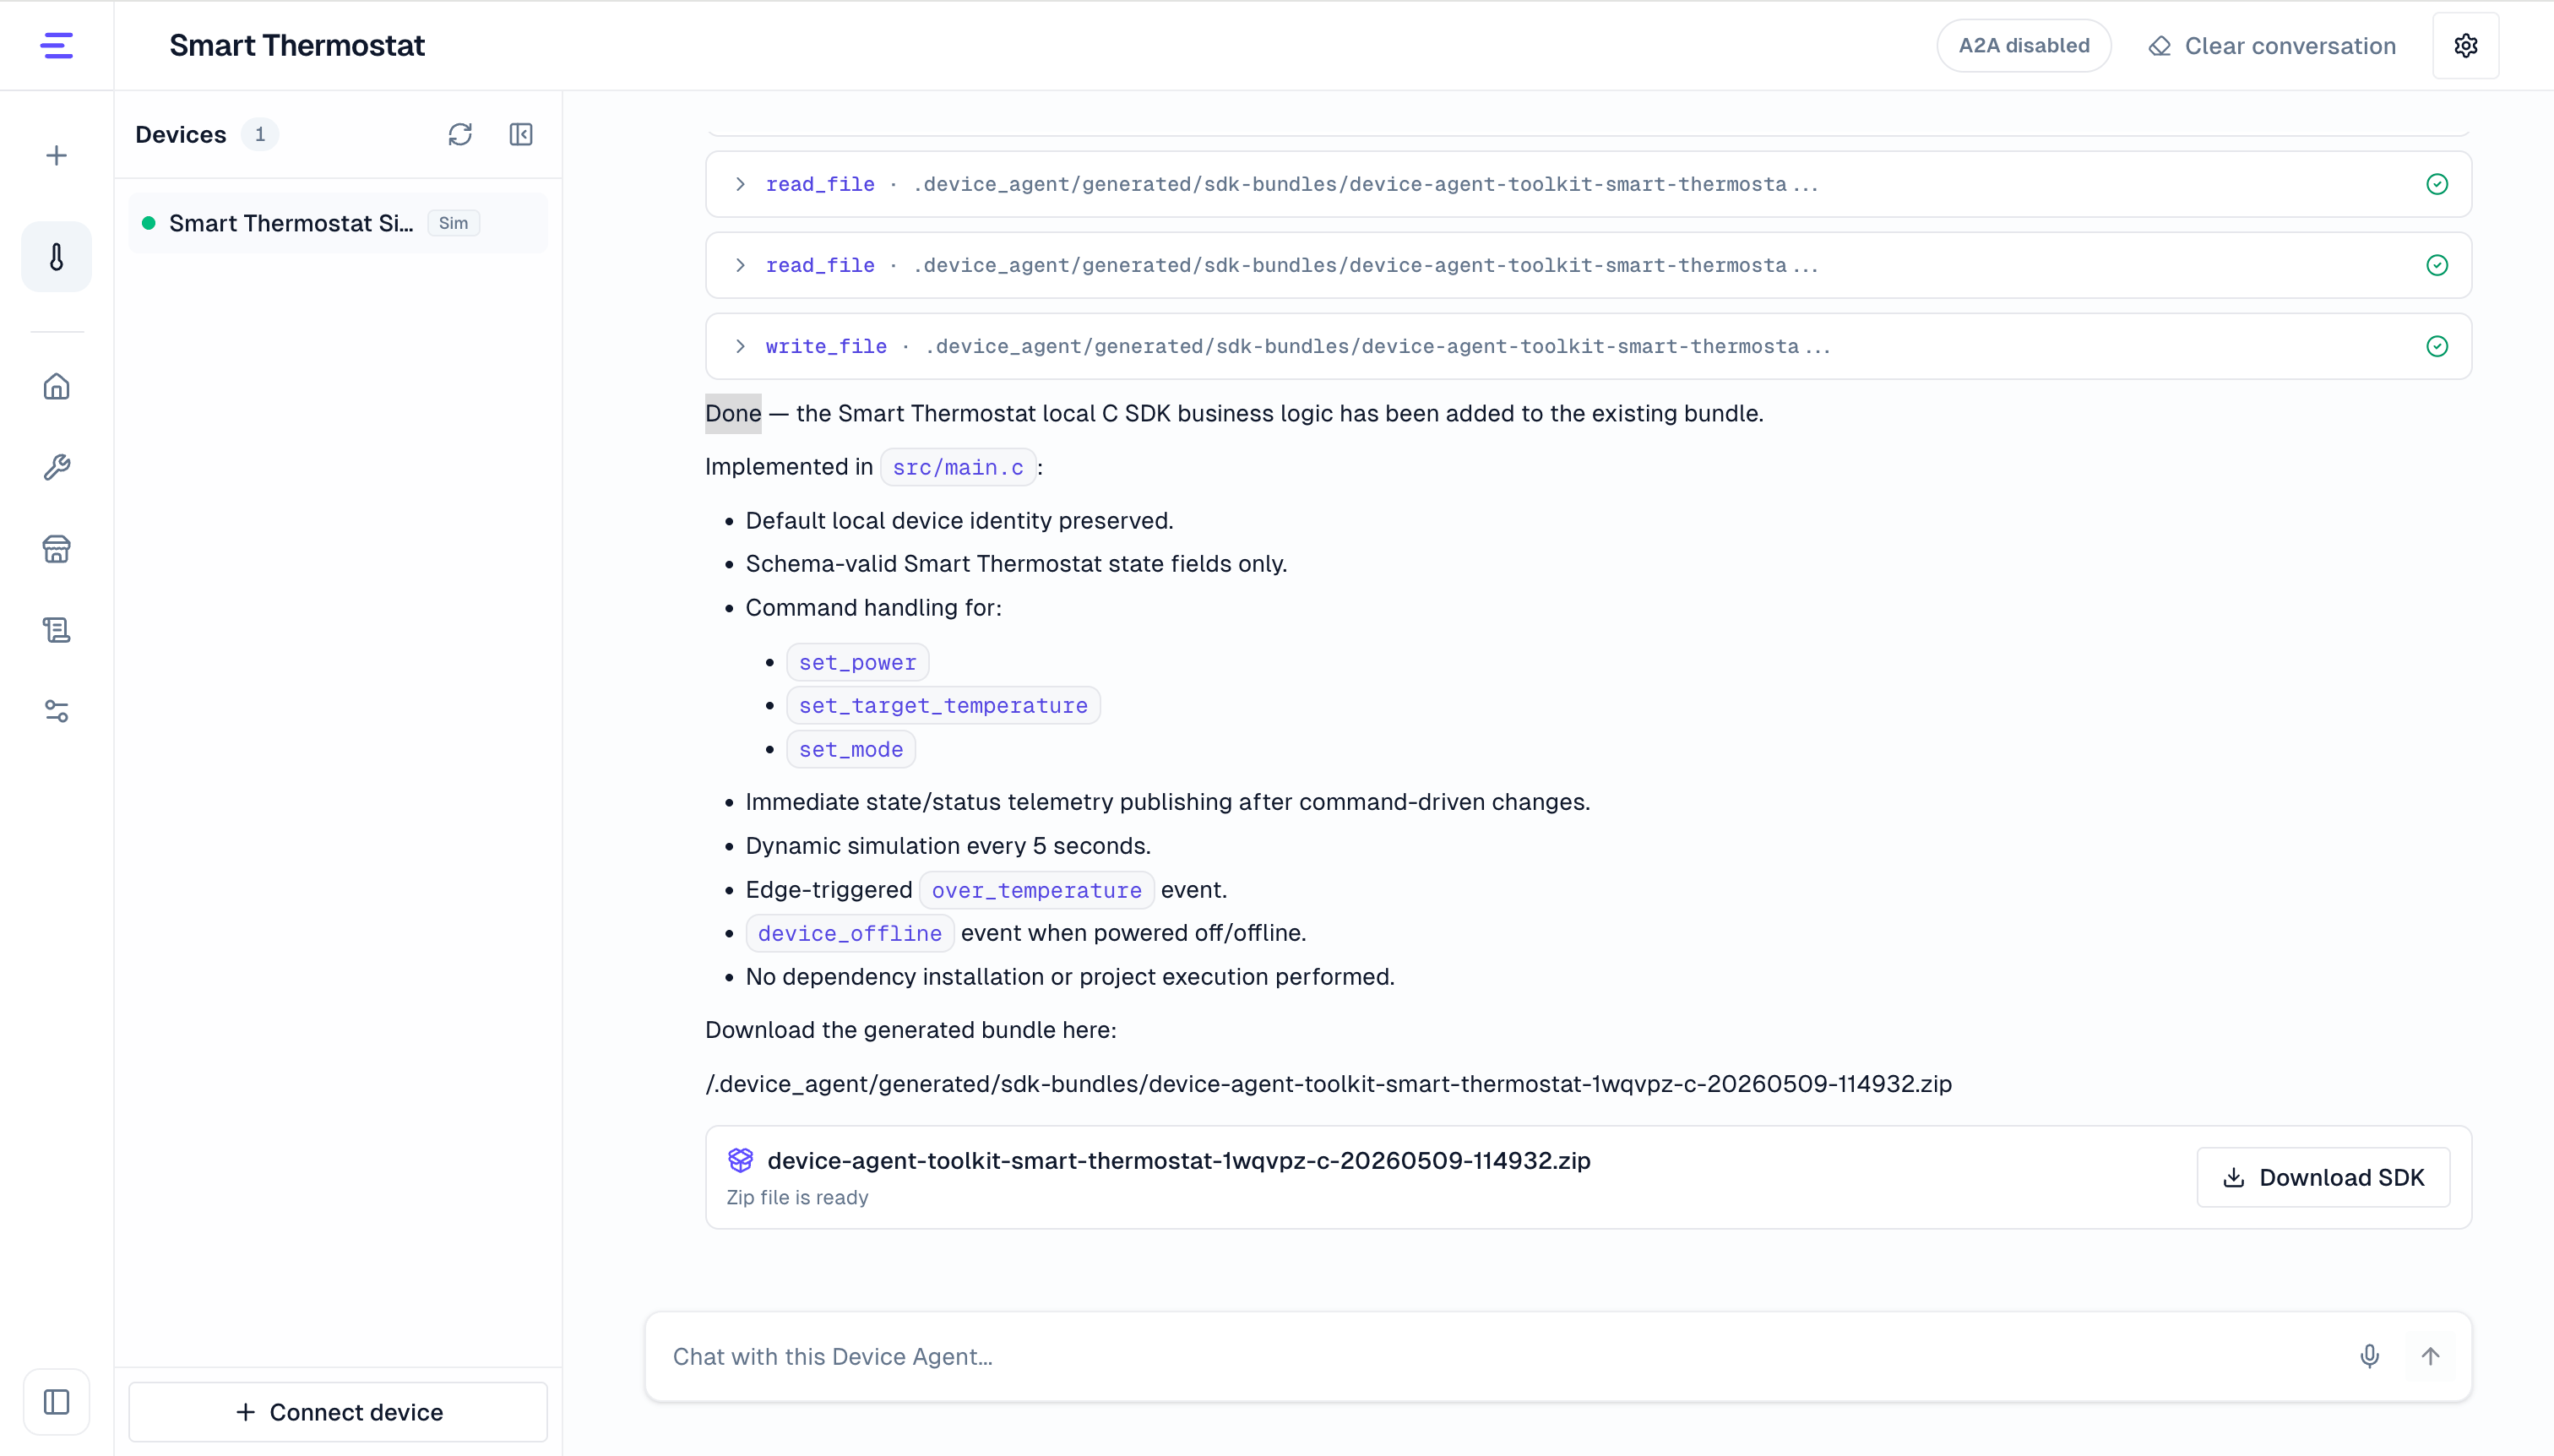
An SDK toolkit is a runnable device-side project. It already includes MQTT, device identity, command responses, state reports, and event reports. Real hardware logic is added in the device logic entry point.
File names vary by language, but the structure is consistent:
SDK toolkit
├── .env.example        Connection settings: MQTT, namespace, productId, deviceId
├── device-spec.json    Current DeviceSpec: commands, properties, events
├── README.md           Setup, configuration, run, and development guide
├── src/
│   ├── main.*          Startup entry: load config and connect to MQTT
│   └── device.*        Business logic entry: handle commands, update state, emit events
├── Voice code           Connect device-side voice through /ws/voice
├── Vision code          Upload images and run photo recognition
└── SDK runtime layer    Subscribe to commands, send responses, report status, telemetry, events
device-spec.json is the source of truth for device-side implementation. Keep command names, parameter names, property fields, and event fields aligned with it.
Voice and Vision Code
SDK toolkits also include optional voice and vision code. Use it to connect microphones, speakers, cameras, or image sources on a real device to the Device Agent.
- Voice: the device opens a WebSocket connection to
/ws/voice, sends 16 kHz mono Int16LE PCM audio, and receives ASR text, agent replies, and TTS audio. - Vision: for photo recognition commands, the device captures one image, uploads it to
/api/vision/frames, then calls/api/chatwith the returnedvisionRefs.
VOICE_CHAT_HOST in .env.example is the shared host entry point for voice and vision APIs. Voice and vision do not replace MQTT device control; MQTT still handles commands, state, telemetry, and events.
| Language | Voice code | Vision code |
|---|---|---|
| C | voice_client.h, voice_client.c, examples/voice_chat.c | vision_client.h, vision_client.c |
| Python | src/voice_client.py | Photo recognition command handling in src/main.py |
| Node.js | VoiceClient | VisionClient and captureLocalVisionImage() |
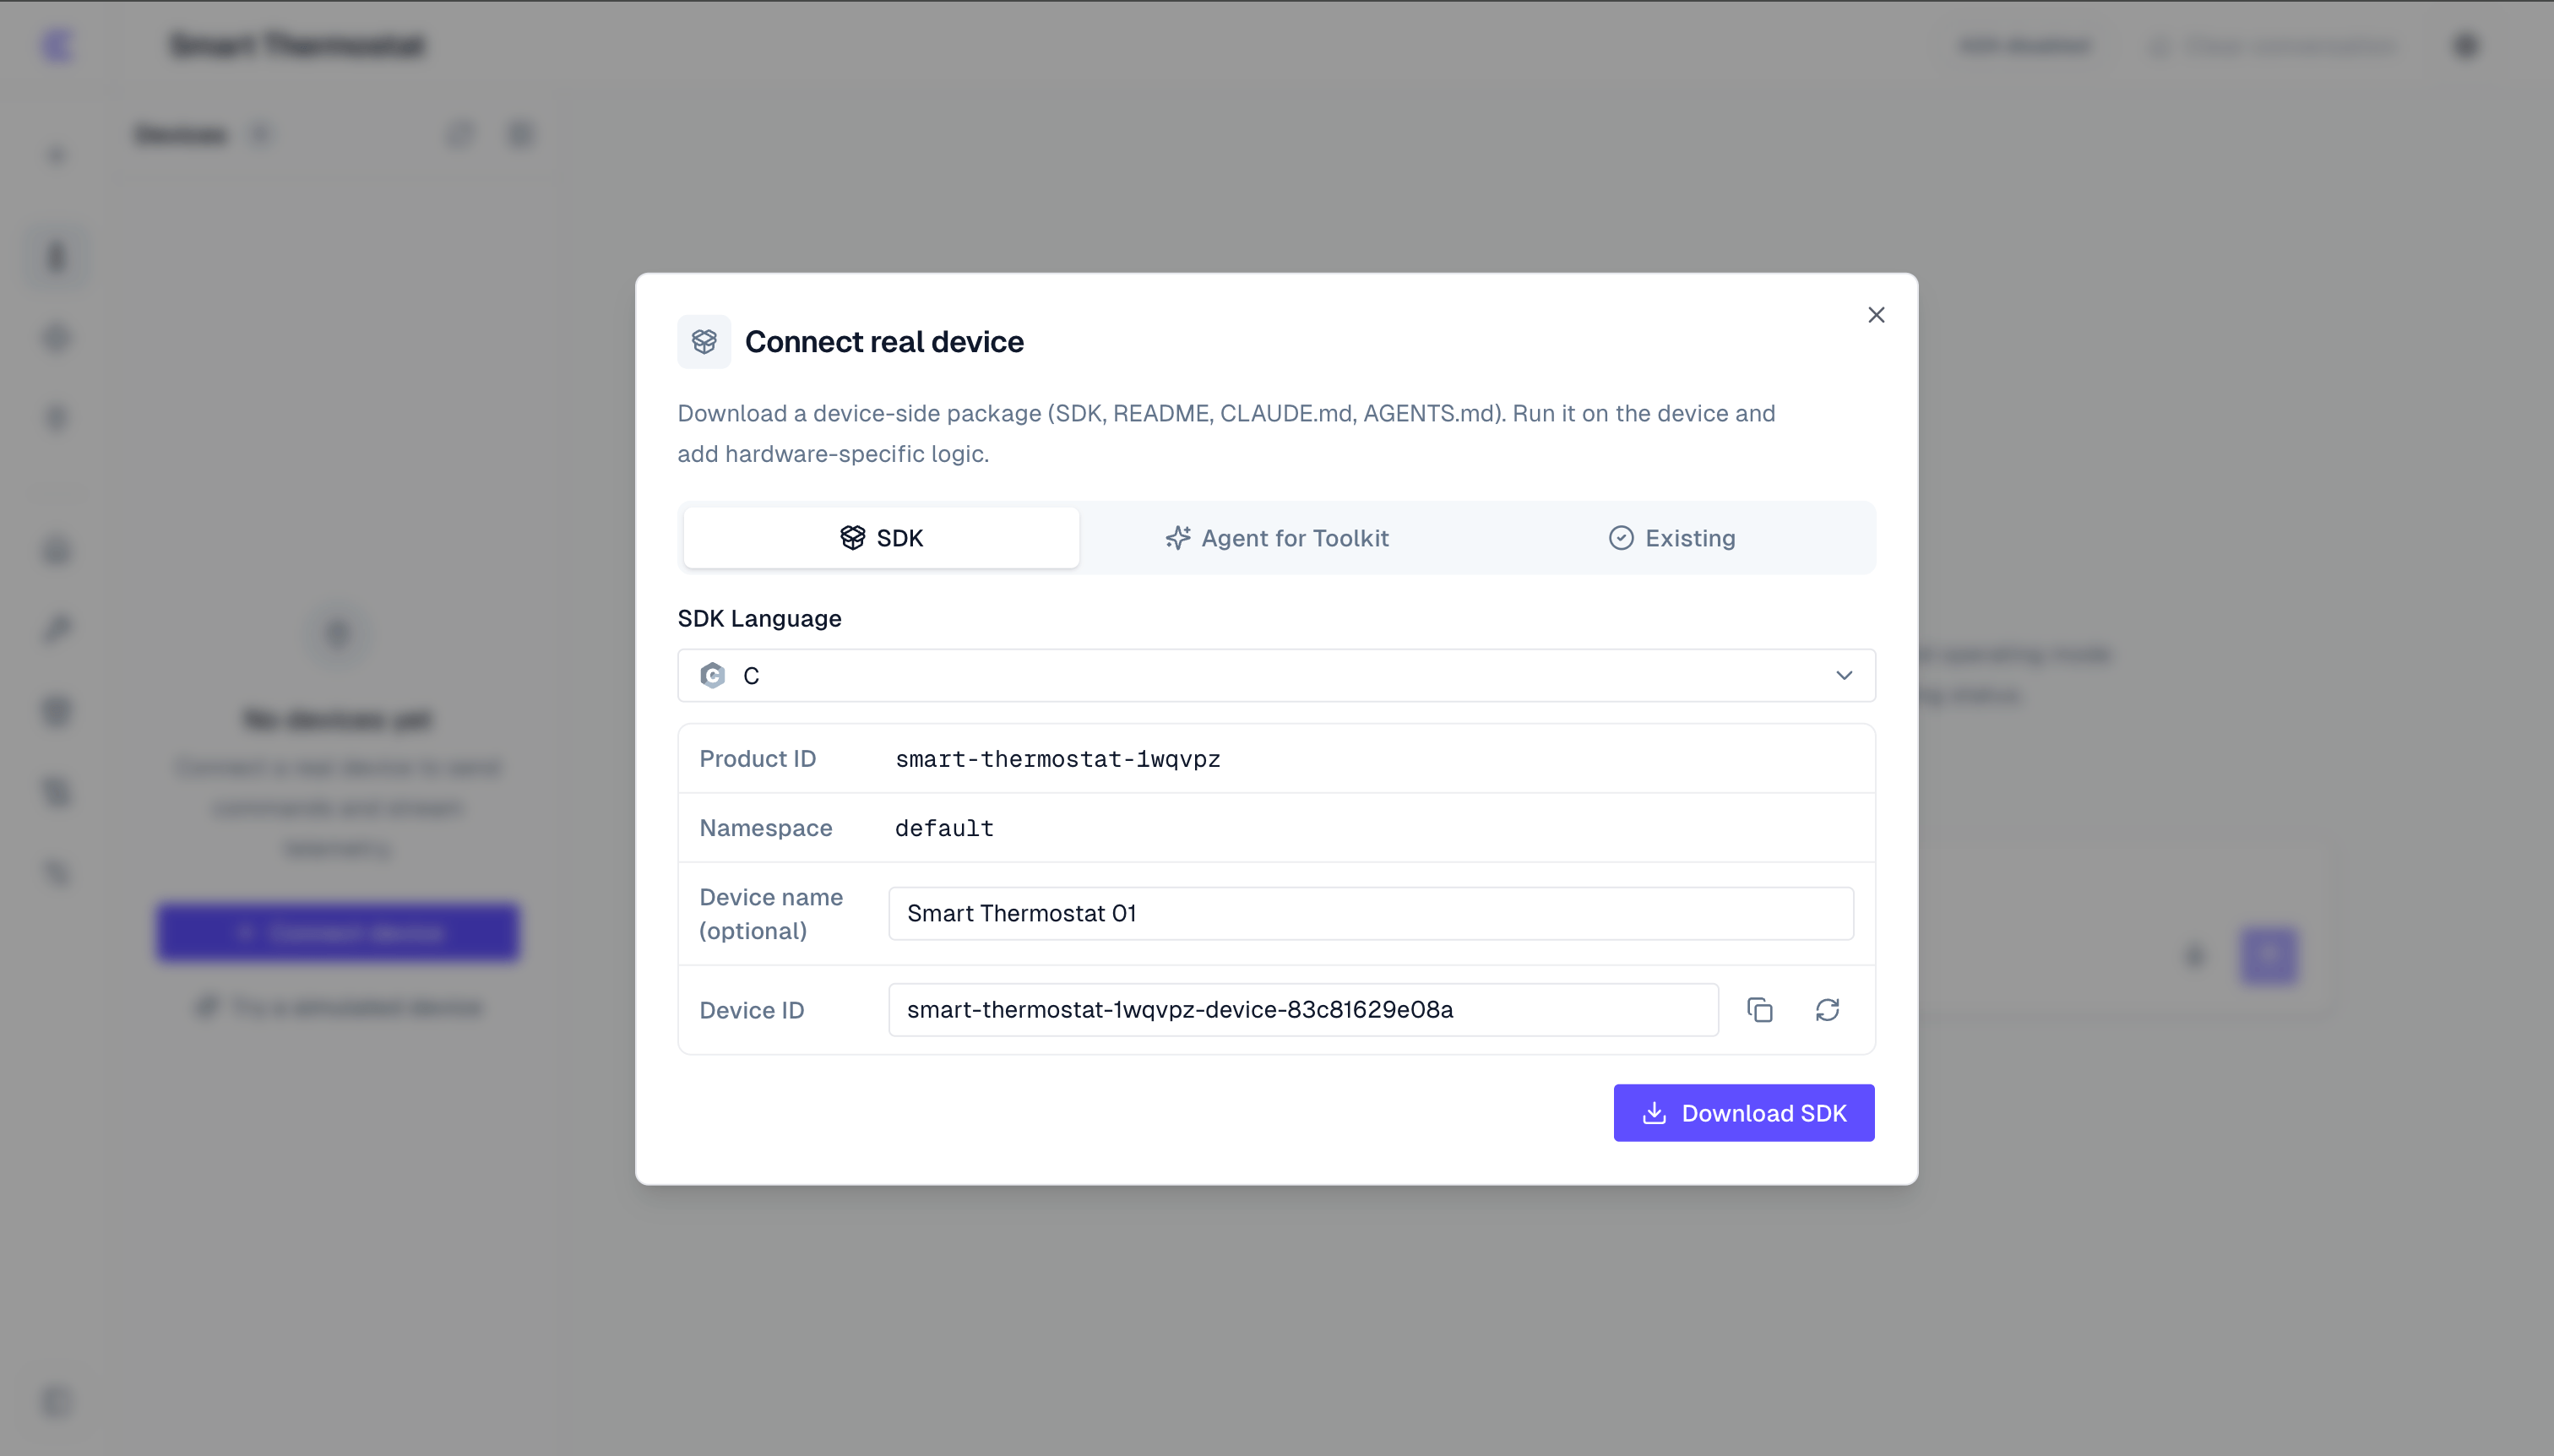
Download an SDK Toolkit
When creating an SDK toolkit, confirm:
- SDK language: the console currently supports C, Node.js, and Python.
- Device name: used to identify the device in the console.
- Device ID: the unique identifier for this real device under the current Device Agent.
Start with the README to bring the device online, then replace the default logic with real sensors, actuators, or business service calls. The package keeps device-spec.json, README.md, and .env.example. Node.js toolkits also include AGENTS.md, CLAUDE.md, and device implementation guidance for Claude Code, Cursor, or Codex.
The usual flow is:
- Unzip the package.
- Configure connection settings from
.env.example. - Install dependencies or build the project.
- Start the device-side program.
After startup and the first state report, the device appears in the current Device Agent's device list.
See the language-specific SDK pages:
Use an Agent-Enhanced SDK
Use an Agent-enhanced SDK when device-side business logic has not been written yet. It starts from the SDK toolkit, then uses your description to generate state reporting, command handling, event triggers, and device-side flows.
You can provide:
- Device-side behavior, such as how to read sensors, control actuators, or emit alert events.
- Business requirements, such as reporting interval, threshold events, and how state should update after commands.
- Optional hardware context, such as chip, system, driver documentation links, interface docs, or protocol files.
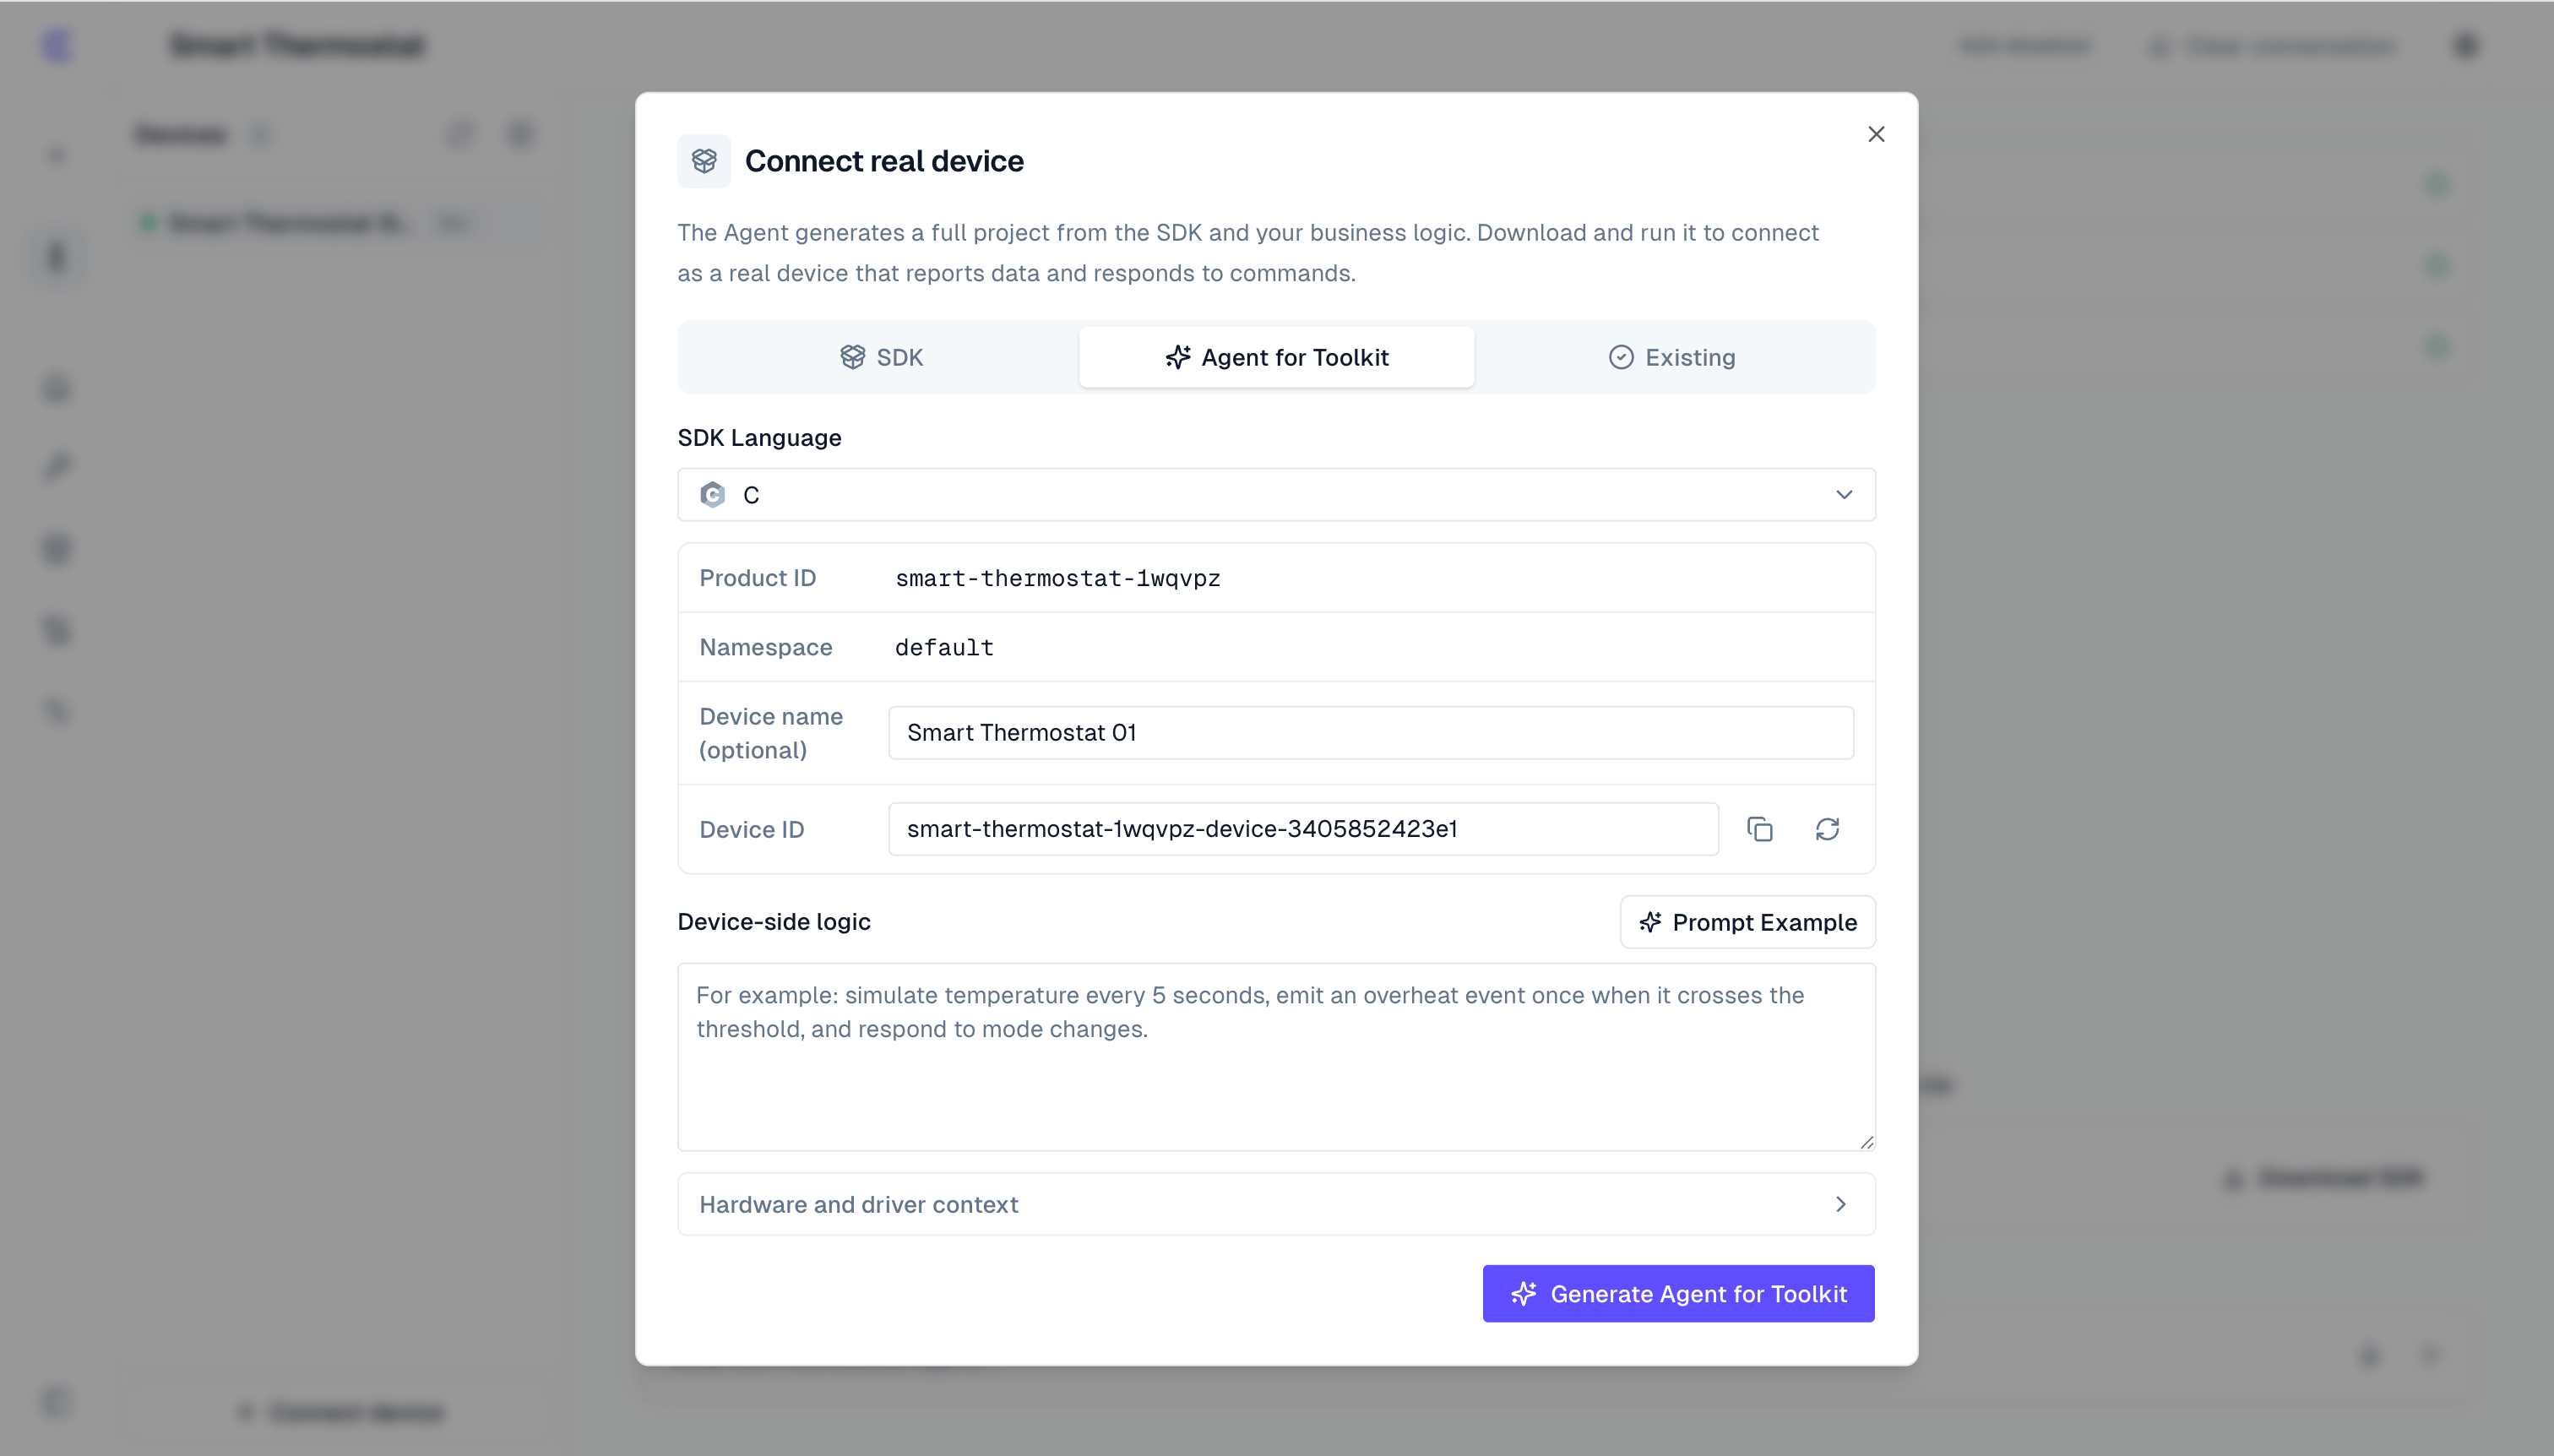
After submission, the Device Agent returns a downloadable code package in the conversation. If the result needs adjustment, continue the conversation: add a driver call, change event trigger logic, or simplify telemetry reporting.
Connect an Existing Device
If firmware, a gateway, or a backend service already exists, choose Existing device. This entry point does not generate SDK code. It shows the MQTT broker, device identity, topics, and payload examples so your existing system can adapt directly.
Existing device access is about subscribing to commands, responding to commands, and reporting state and events over MQTT. See MQTT Access for the full guide.
Run and Verify
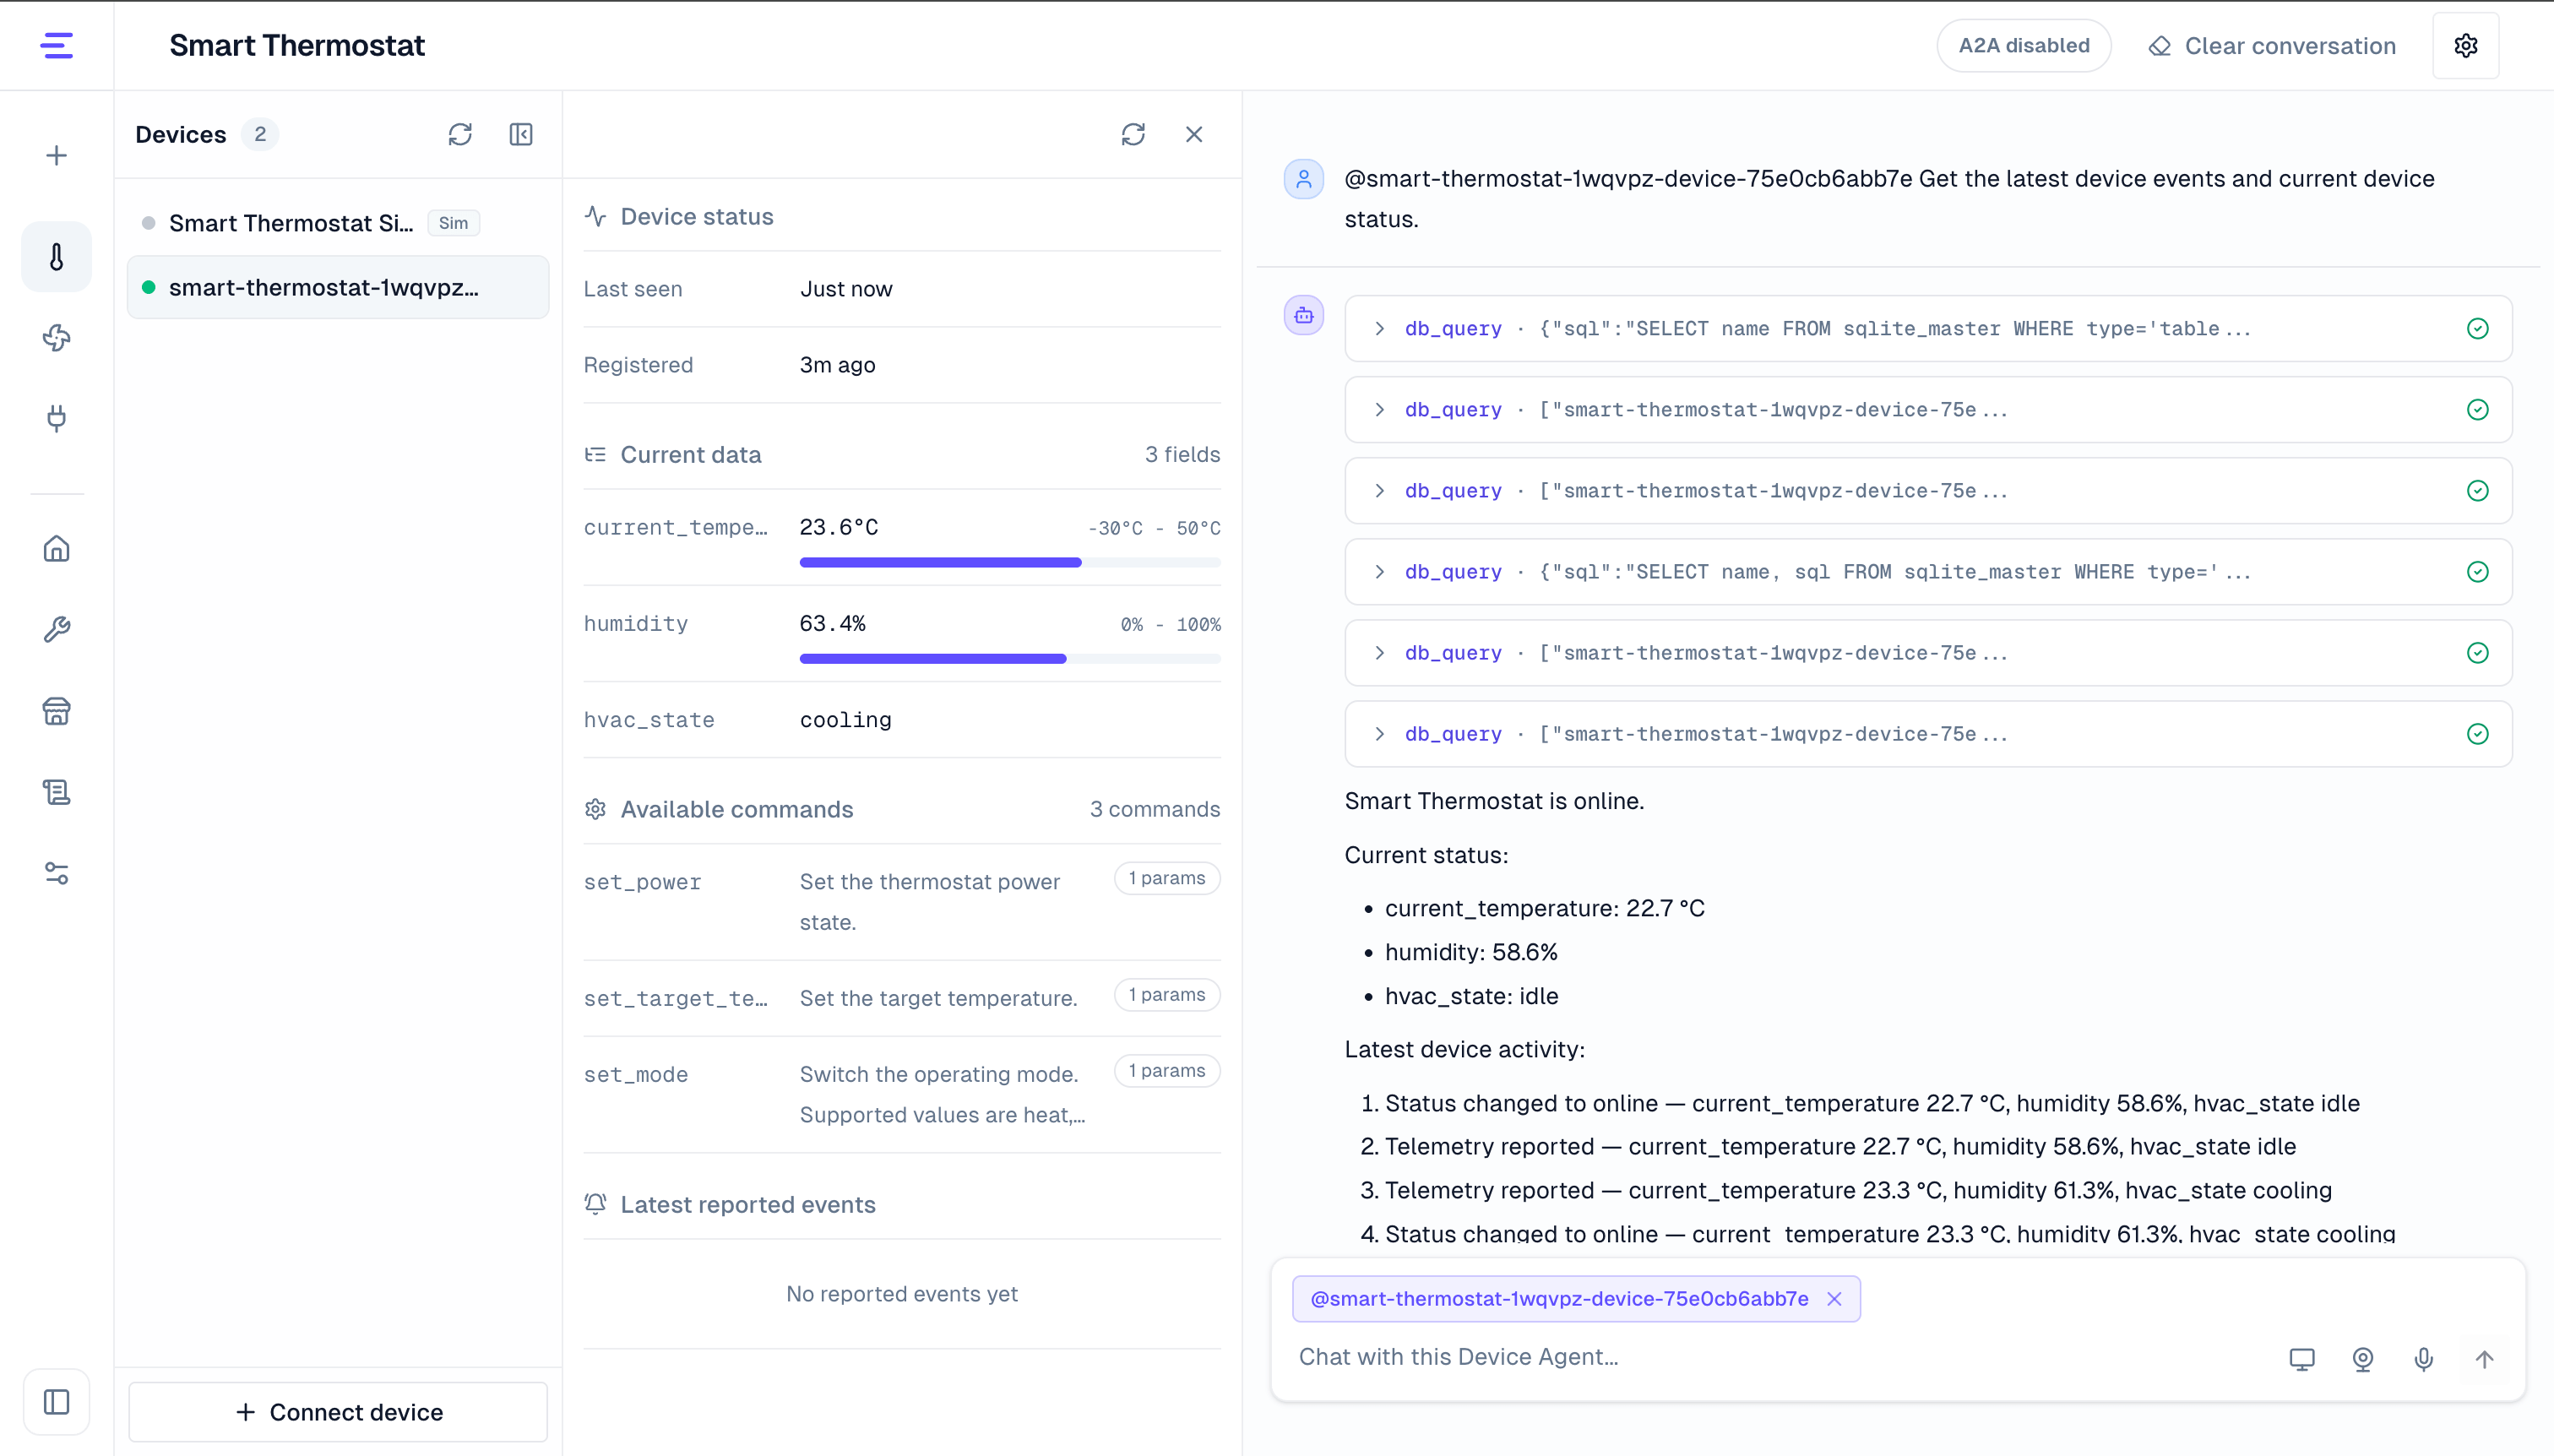
After the device-side program starts, return to the Device Agent workspace and confirm:
- The new real device appears in the device list.
- The device is online.
- Current state shows reported property fields.
- A conversation control request reaches the device and returns a result.
- If the device emits events, recent events show the reported records.
If the device does not appear, check whether the device-side program is connected to MQTT, whether productId and deviceId are correct, and whether it has reported status or telemetry. See Configuration for related settings.
Next Steps
- Read MQTT Access to adapt existing devices directly to topics and payloads.
- Read Voice Interaction to connect device-side voice interaction.
- Read Camera and Vision to connect cameras and image input.
- Read Simulated Display to validate visual device output.