Add EMQX Clusters
ECP supports adding existing EMQX clusters by a cluster management agent. ECP supports management for EMQX v4 Enterprise Edition (4.4.6 and above) and EMQX v5 Enterprise Edition (5.6.0 and above).
Add an Existing Cluster
Log in to the ECP platform as a system admin, organization admin, or project admin. In Workspace - Data Integration - Data Access page, click Add Cluster.
Provide a name for the cluster in the Cluster Name field. The name should be between 1-200 characters long and can include "_" and blank spaces.
If you try to add an EMQX v5 cluster, fill in the Cluster Address (i.e. EMQX dashboard access address). You can also input the Cluster Address later by Edit operation.
Click Confirm to finish the adding process. The newly-created clusters will be listed in the Cluster List panel with the status Created.

Click Register Node and a cluster registration guide page will show.
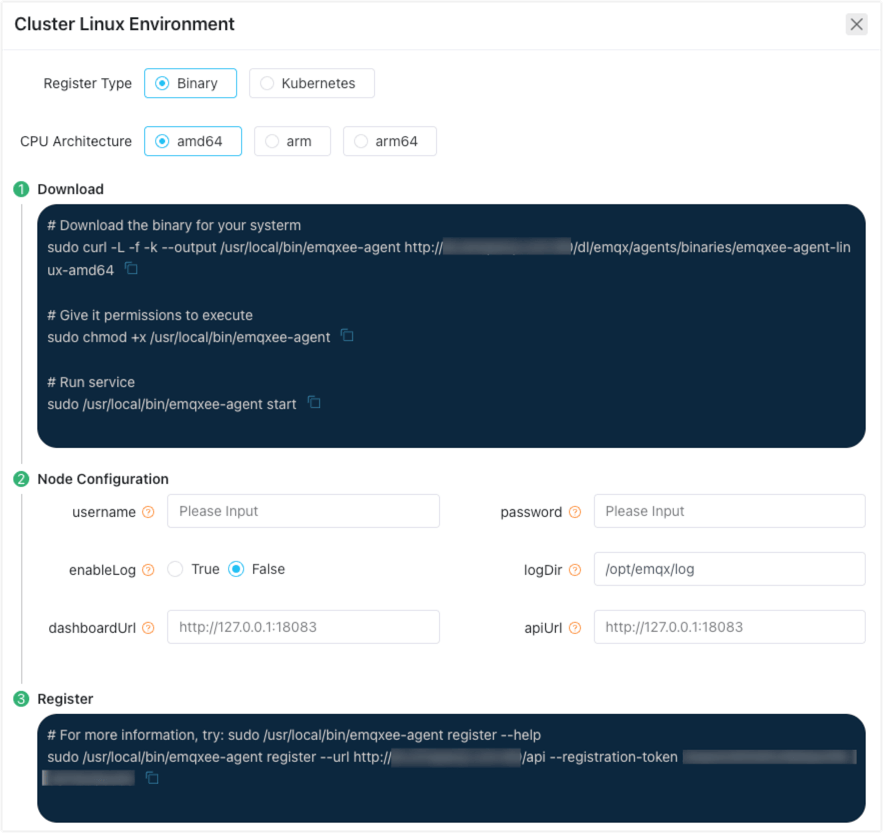
Select Register Type and CPU Architecture to choose how the cluster management agent be installed. Currently, the agent can be installed by binary or in Kubernetes. For binary installation, amd64, arm, and arm64 are supported.
Log in to the virtual machine hosting the EMQX cluster, execute the commands provided on the registration guide page to download, install and register the agent.
bash# Download EMQX Agent sudo curl -L -f -k --output /usr/local/bin/emqxee-agent https://[emqxee-agent] # Update EMQX Agent permission sudo chmod +x /usr/local/bin/emqxee-agent # Install EMQX Agent sudo /usr/local/bin/emqxee-agent install # Start EMQX Agent sudo /usr/local/bin/emqxee-agent startFollow the instructions to fill in the fields in Node Configuration part. The content will be automatically filled into the registration command:
- For binary installation, the agent and the EMQX cluster will be on the same virtual machine, therefore, localhost can be used in
dashboardUrlandapiUrl. - For Kubernetes installation, please be sure that the agent can visit the EMQX cluster by
dashboardUrlandapiUrl. - To enable cluster logs collection, set
enableLogtoTrue, and specify the cluster logs directory path which can be accessed by the agent inlogDir.
- For binary installation, the agent and the EMQX cluster will be on the same virtual machine, therefore, localhost can be used in
Copy and execute the command in Register part on the virtual machine to run the agent to finish registration.
bash# Register on ECP sudo /usr/local/bin/emqxee-agent register --url https://[ecp] --registration-token [token] --emqx-dashboard-username [emqx-username] --emqx-dashboard-password [emqx-password] --emqx-dashboard-url [emqx-dashboard-url] --emqx-api-url [emqx-api-url]Upon returning to the Workspace - Data Integration - Data Access page, you will find that the newly added existing cluster is now in the Running status.
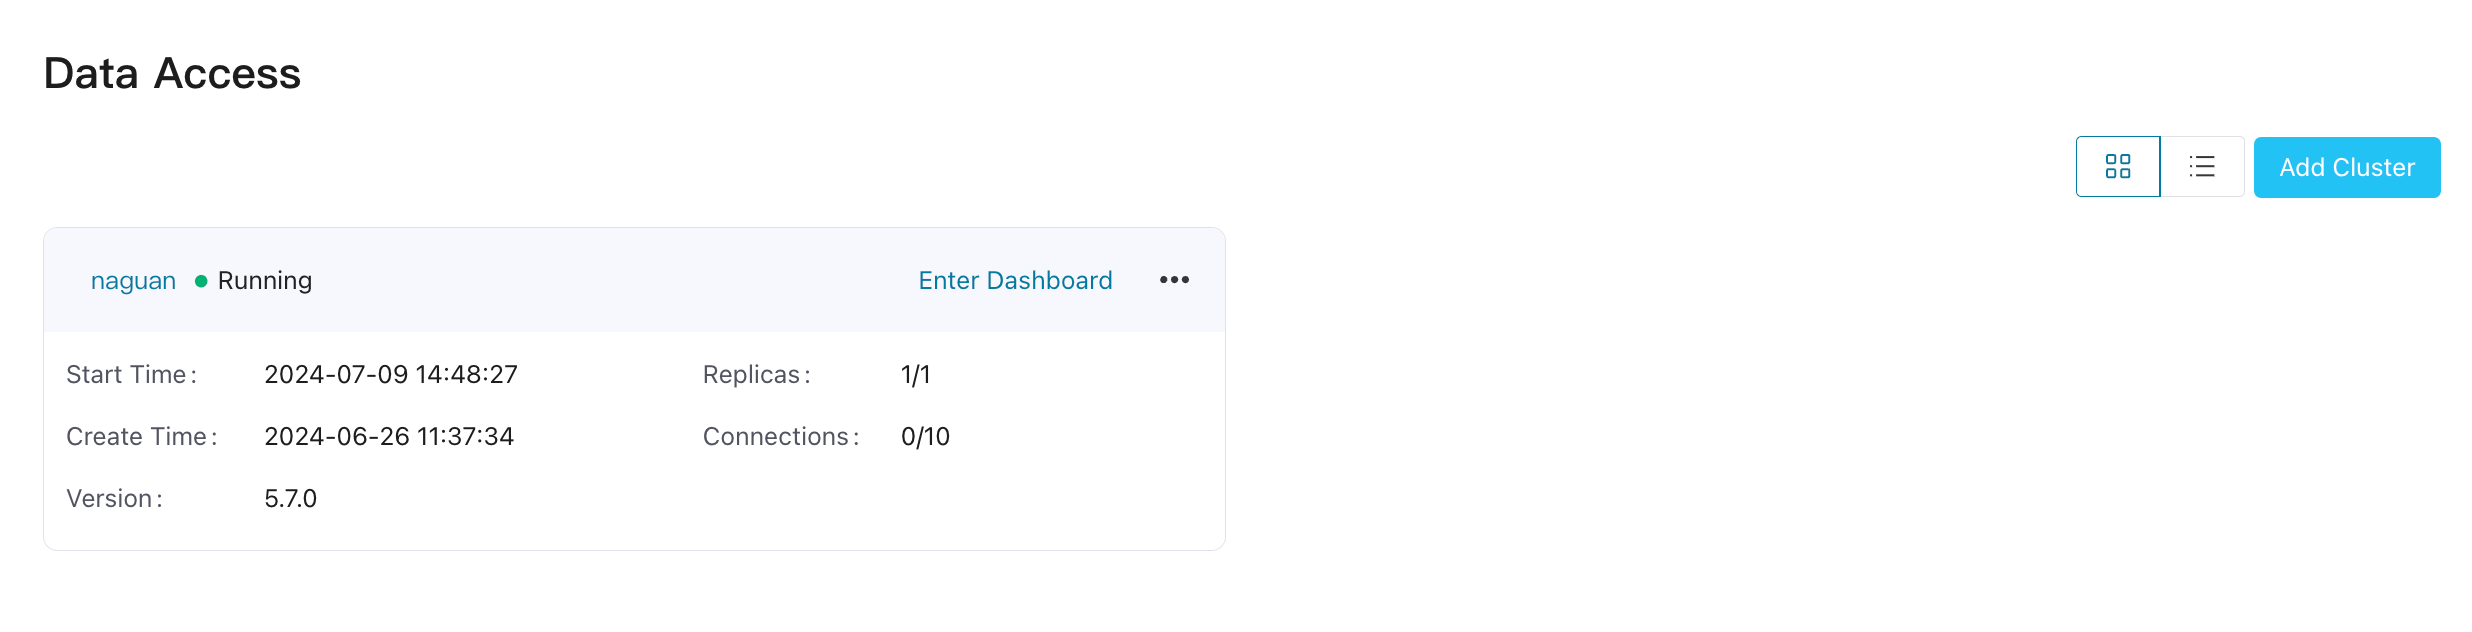
If an EMQX v4 cluster is added for management, an Enter Dashboard button will display. Click it to view the EMQX v4 dashboard. If the Enter Dashboard button is not visible, please make sure
cluster.agentsection is correctly configured in ECP configuration file and the MQTT broker configured in it can be accessed by the agent.If an EMQX v5 cluster is added for management, an Enter Dashboard button will display if the Cluster Address has been configured. Click it to directly view the EMQX v5 dashboard in a new window.
Agent Commands
If you have installed the agent on a Linux system using a binary package, in addition to the installation and registration commands introduced above, the agent also supports a variety of operation commands. The detailed commands are as follows:
| Command | Description |
|---|---|
| install | Install the agent. Once installed, the agent will be managed as a systemd service, and it will be automatically restarted if stops unexpectedly. |
| uninstall | Uninstall the agent from system |
| start | Start the agent |
| stop | Stop the agent |
| restart | Restart the agent |
| status | View the running status of the agent |
| register | register EMQX cluster to ECP for management |
| unregister | unregister EMQX cluster from ECP |
Cluster Status
Managed EMQX cluster can be in the following states:
| Status | Description |
|---|---|
| Created | Cluster with no node registered yet |
| Registering | Intermediate state during cluster node registration |
| Running | Normal running state of the cluster |
| Deleting | Intermediate state before cluster deletion completes |
| Error | Abnormal running state of the cluster, or network connection issue between agent and cluster or between agent and ECP |
For clusters in the state of Error, you can click the Error status icon to view possible cause.