Authenticate Edge Services
Before you can manage edge services using ECP, you must first complete the necessary authentication configuration if authentication is enabled on the edge service.
ECP supports authentication authorization on hosted and managed NeuronEX.
Authentication on Hosted NeuronEX
For NeuronEX services created via ECP, you have the option to enable authentication by selecting the Authentication Enabled checkbox. If this option is activated, ECP will place the RSA public key file into the designated folder within NeuronEX. For additional information about the RSA public key, refer to the RSA Signature Authentication section.
Authentication on Managed NeuronEX
If authentication is enabled at the managed NeuronEX side, you can configure as follows:
- Log in to ECP as system admin, organization admin, or project admin.
- Download the public key file: On the Administration page, navigate to System Settings -> Resource Settings. Click to expand the Managed EdgeService Authentication Configuration, and download the key file.
- Then Log in to the container or virtual machine where NeuronEX is located, and upload the downloaded public key file to the
etcdirectory in the NeuronEX installation directory.
Taking the NeuronEX container neuronex-test installed by Docker as an example, execute the following command on the machine where NeuronEX is deployed:
$ docker cp my-ecp.pub neuronex-test:/opt/neuronex/etc/my-ecp.pubTest the Authentication Setting
To verify the authentication configuration, try adding an existing NeuronEX service. If the authentication is correctly set up, the NeuronEX service should be added successfully. You can then click on the service to view its details.
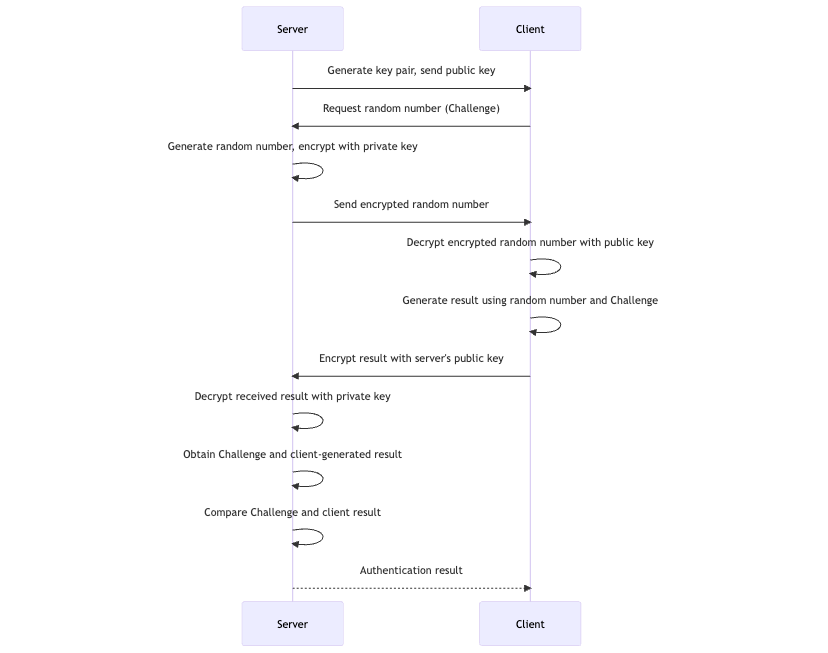
RSA Signature Authentication
RSA (Rivest–Shamir–Adleman) is a public-key cryptosystem that is widely used for secure data transmission. It uses a key pair consisting of a public key for encryption and a private key for decryption.
- Public Key: For encryption, it is shared openly and usually stored by the data provider, such as Neuron.
- Private Key: For decryption, it must be kept secret and is stored on ECP.
The authentication flow is as follows:
RSA Key Pair Management on ECP
ECP automatically generates key pairs during installation. If key generation fails, reinstallation will be prompted.
If you need to manage the generated key pairs manually, you can obtain the key pair information as follows:
For K8S deployment, suppose you are in the
emqx-ci-devnamespace, you can use the command below to view the RSA key pair:bash$ kubectl get ns # Get namespace emqx-ci-dev $ kubectl get pod -n emqx-ci-dev # Get the POD information in the namespace and find the ECP container name $ kubectl -n emqx-ci-dev exec -it emqx-bc-main-658b5f5fd6-74vnd -c emqx-bc-main -- sh # Enter the container $ ls # View the key pair
For Docker deployment, assume you are using the container ID
717aee745efb, you can use the command below to view the RSA key pair:bash$ docker ps # Get POD information, find the ECP container ID '717aee745efb' $ docker exec -it 717aee745efb -- sh # Enter the container $ ls # View the key pair