Resource Settings
Resource settings is the configuration of the resource layer based on the ECP deployed by Docker or Kubernetes, which mainly includes Basic Config, Docker Deployment Mode Configuration, Kubernetes Deployment Mode Configuration three categories.
Basic Config
Image Repository Configuration
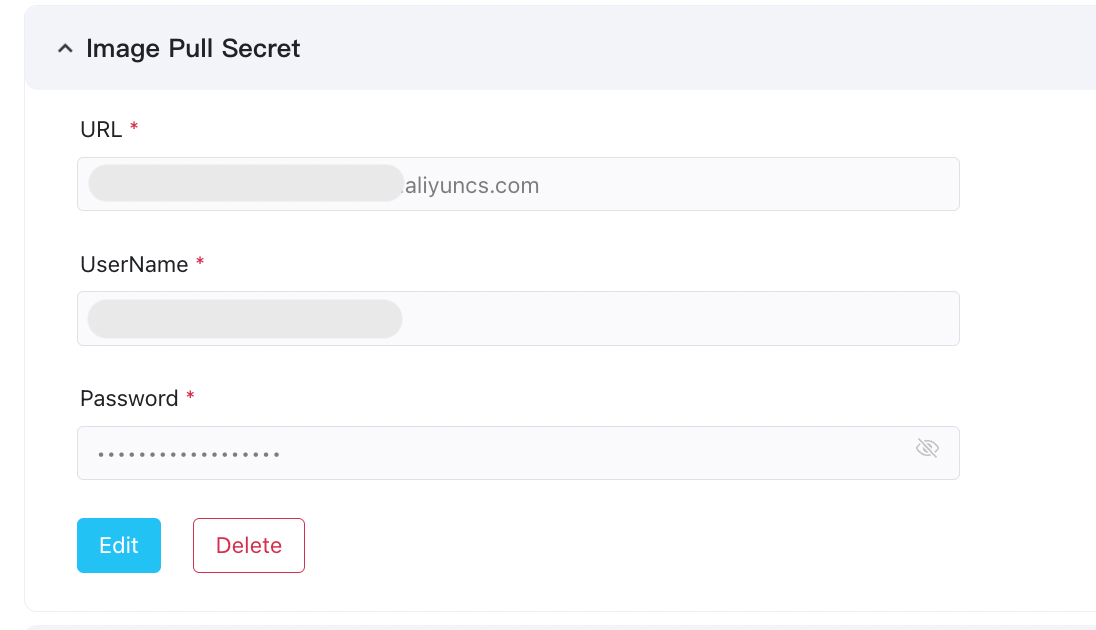
ECP supports connecting to the internal private image registry. To configure the connection to an internal private image registry in ECP, follow these steps:
- Log in to ECP as a system admin and navigate to System Settings -> Resource Settings.
- Expand the Image Repository Configuration panel.
- Click Edit to enter the editing page.
- Enter the repository URL, and the Email and password to access this repository.
- Before confirming the setting, click Test to test the connection.
- Click Save to complete the configuration.
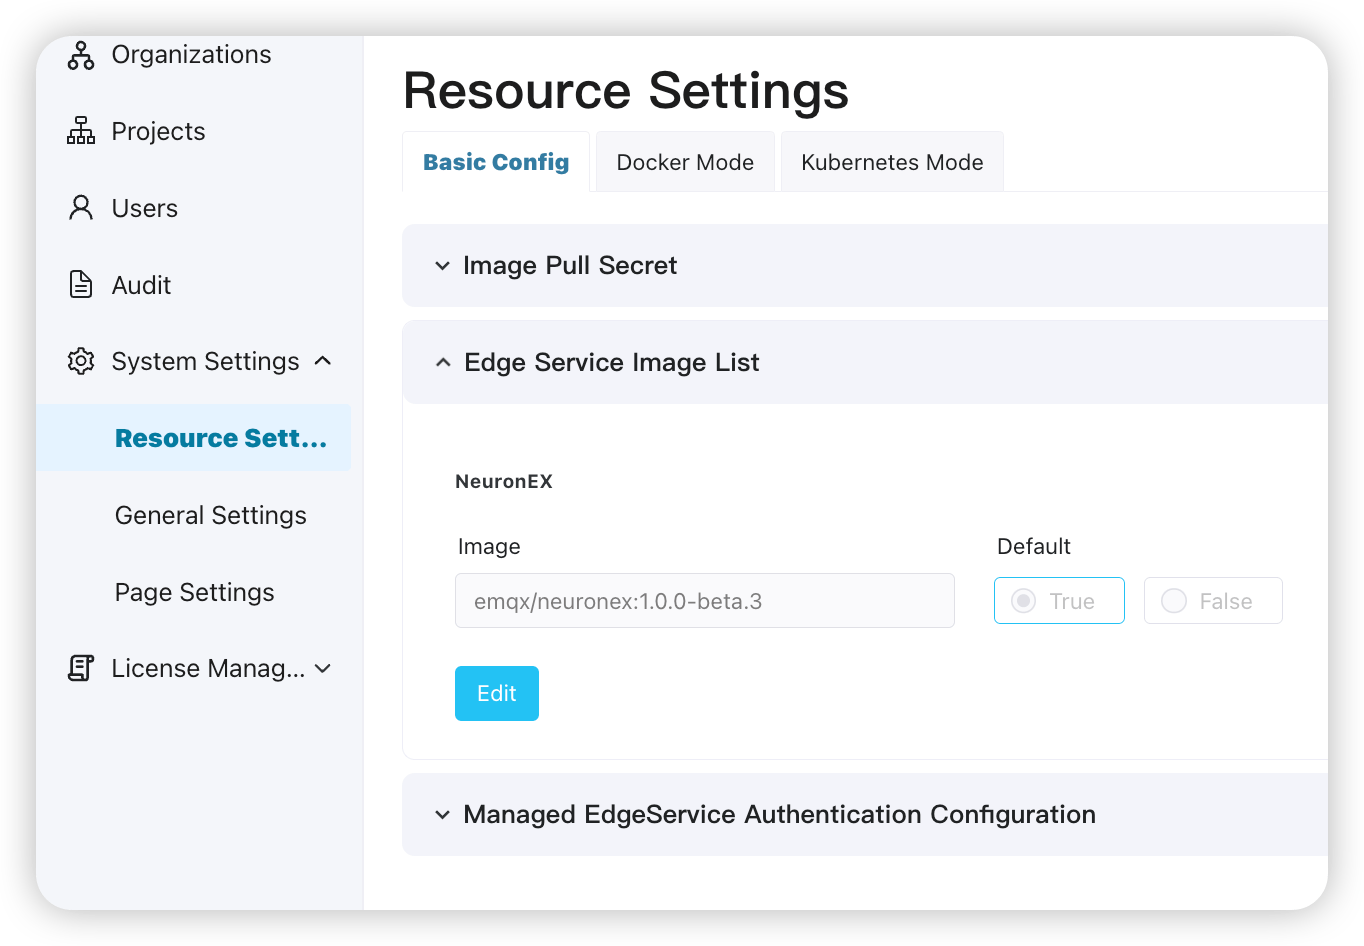
Edge Service Image List
System administrators can add, edit, or delete edge service image list. When there is a public network connection, the administrator can directly configure the public image repository. If you are using a private server image, you can also refer to the Image Repository Configuration.
Log in to ECP as a system administrator, and on the system management page, click System Settings -> Resource Settings.
Click to expand the Basic Config section, and click to expand the Edge Service Image List.
Click Edit under NeuronEX to enter the editing page.
You can click
+to add a new image and determine whether to set it as the default image. You can also click the delete icon to delete an image.Click Confirm to complete the settings.
Managed edge service authentication configuration
The public key file automatically generated by ECP during installation can be obtained from Managed Edge Service Authentication Configuration, which is used as the secret key when Managed NeuronEX turns on authentication. For information on NeuronEX certification, please refer to Authenticate Edge Services.

Docker Deployment Mode Configuration
Docker Configuration
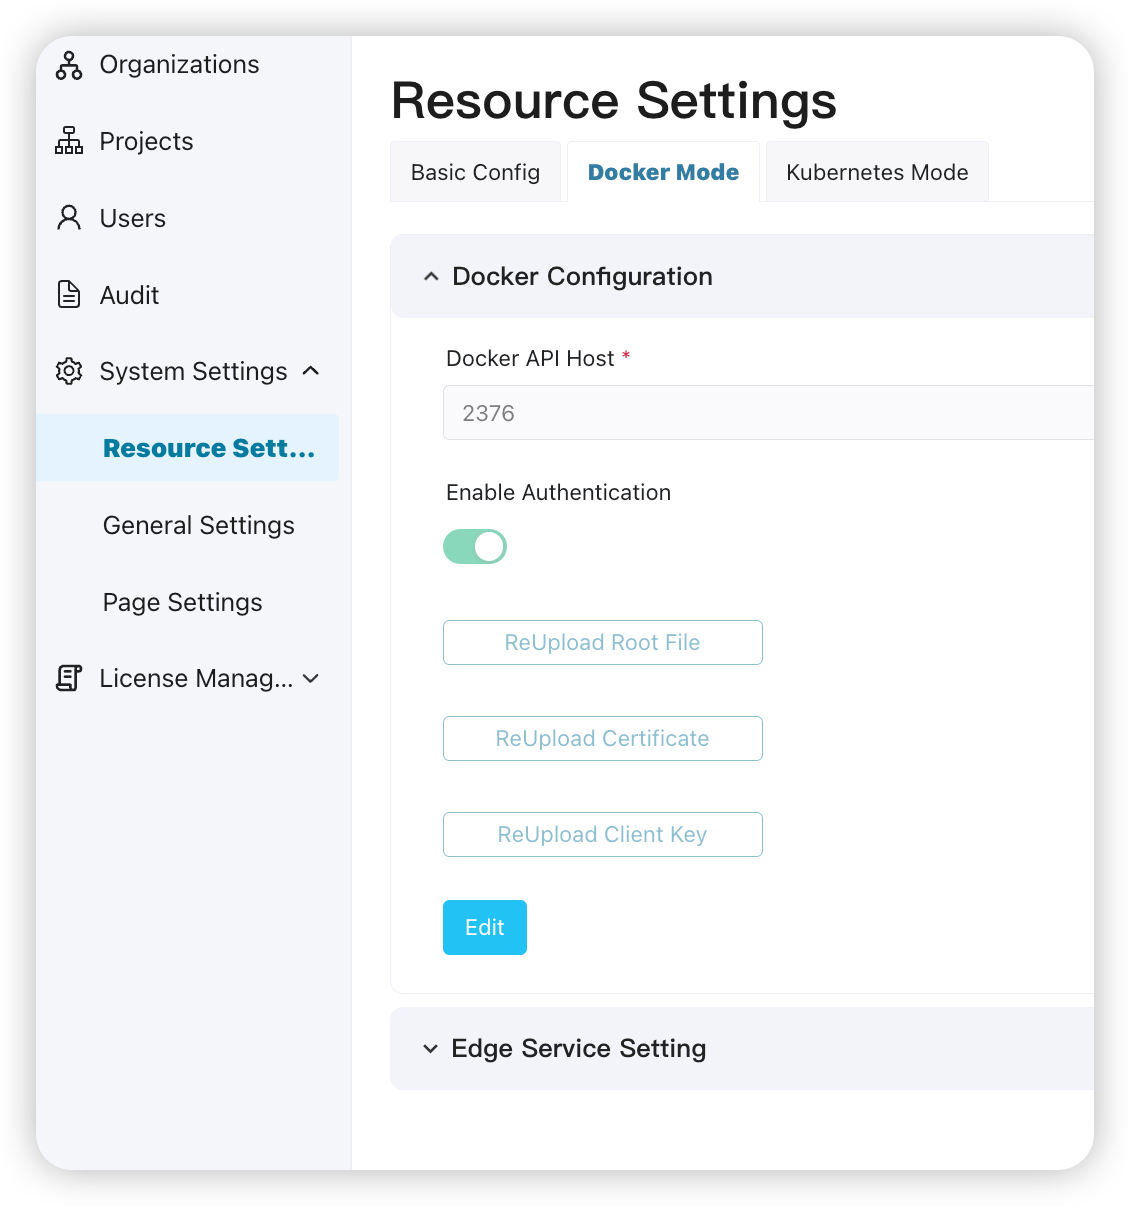
For edge services created using ECP, you have the option to customize the docker node connect configuration. However, you are recommended to keep the default settings as they are verified by EMQ technical team. Modify them only if necessary.
- Log in to ECP as a system admin and navigate to System Settings -> Resource Settings.
- Expand the Docker Mode -> Docker Configuration.
- Click Edit to enter the editing page, where you can modify the settings.
Edge Service Setting
- Log in to ECP as a system admin and navigate to System Settings -> Resource Settings.
- Expand the Docker Mode -> Edge Service Setting.
- Click Edit to enter the editing page, where you can modify the settings.
Kubernetes Deployment Mode Configuration
Kubernetes Connection Setting
Before ECP can manage, control or authenticate Kubernetes resources, system admins must first finish the Kubernetes Connection settings for ECP.
Obtain kuberconfig File from Kubernetes
Download the kubeconfig from the Kubernetes master cluster, which is usually located in ~/.kube/config
ECP does not support accessing external files within your kubeconfig for authentication. Therefore if the certificate-authority-data, client-certificate-data, and client-key-data fields are file paths rather than base64-encoded strings, you need to convert the certificate file to a base64-encoded string before uploading them:
macOS & Linux
cat "certificate file" | base64Windows
certutil -f -encode "certificate file" "output file"Then update the kubeconfig file
- Change
certificate-authoritytocertificate-authority-data, and enter the base64-encoded string of the*/ca.crtcertificate file. - Change
client-certificatetoclient-certificate-data, and enter the base64-encoded string of the*/client.crtcertificate file. - Change
client-keytoclient-key-data, and enter the base64-encoded string of the*/client.keycertificate file.
WARNING
To ensure high availability, replace the server address in the kubeconfig file with the Loadbalancer or vip address.
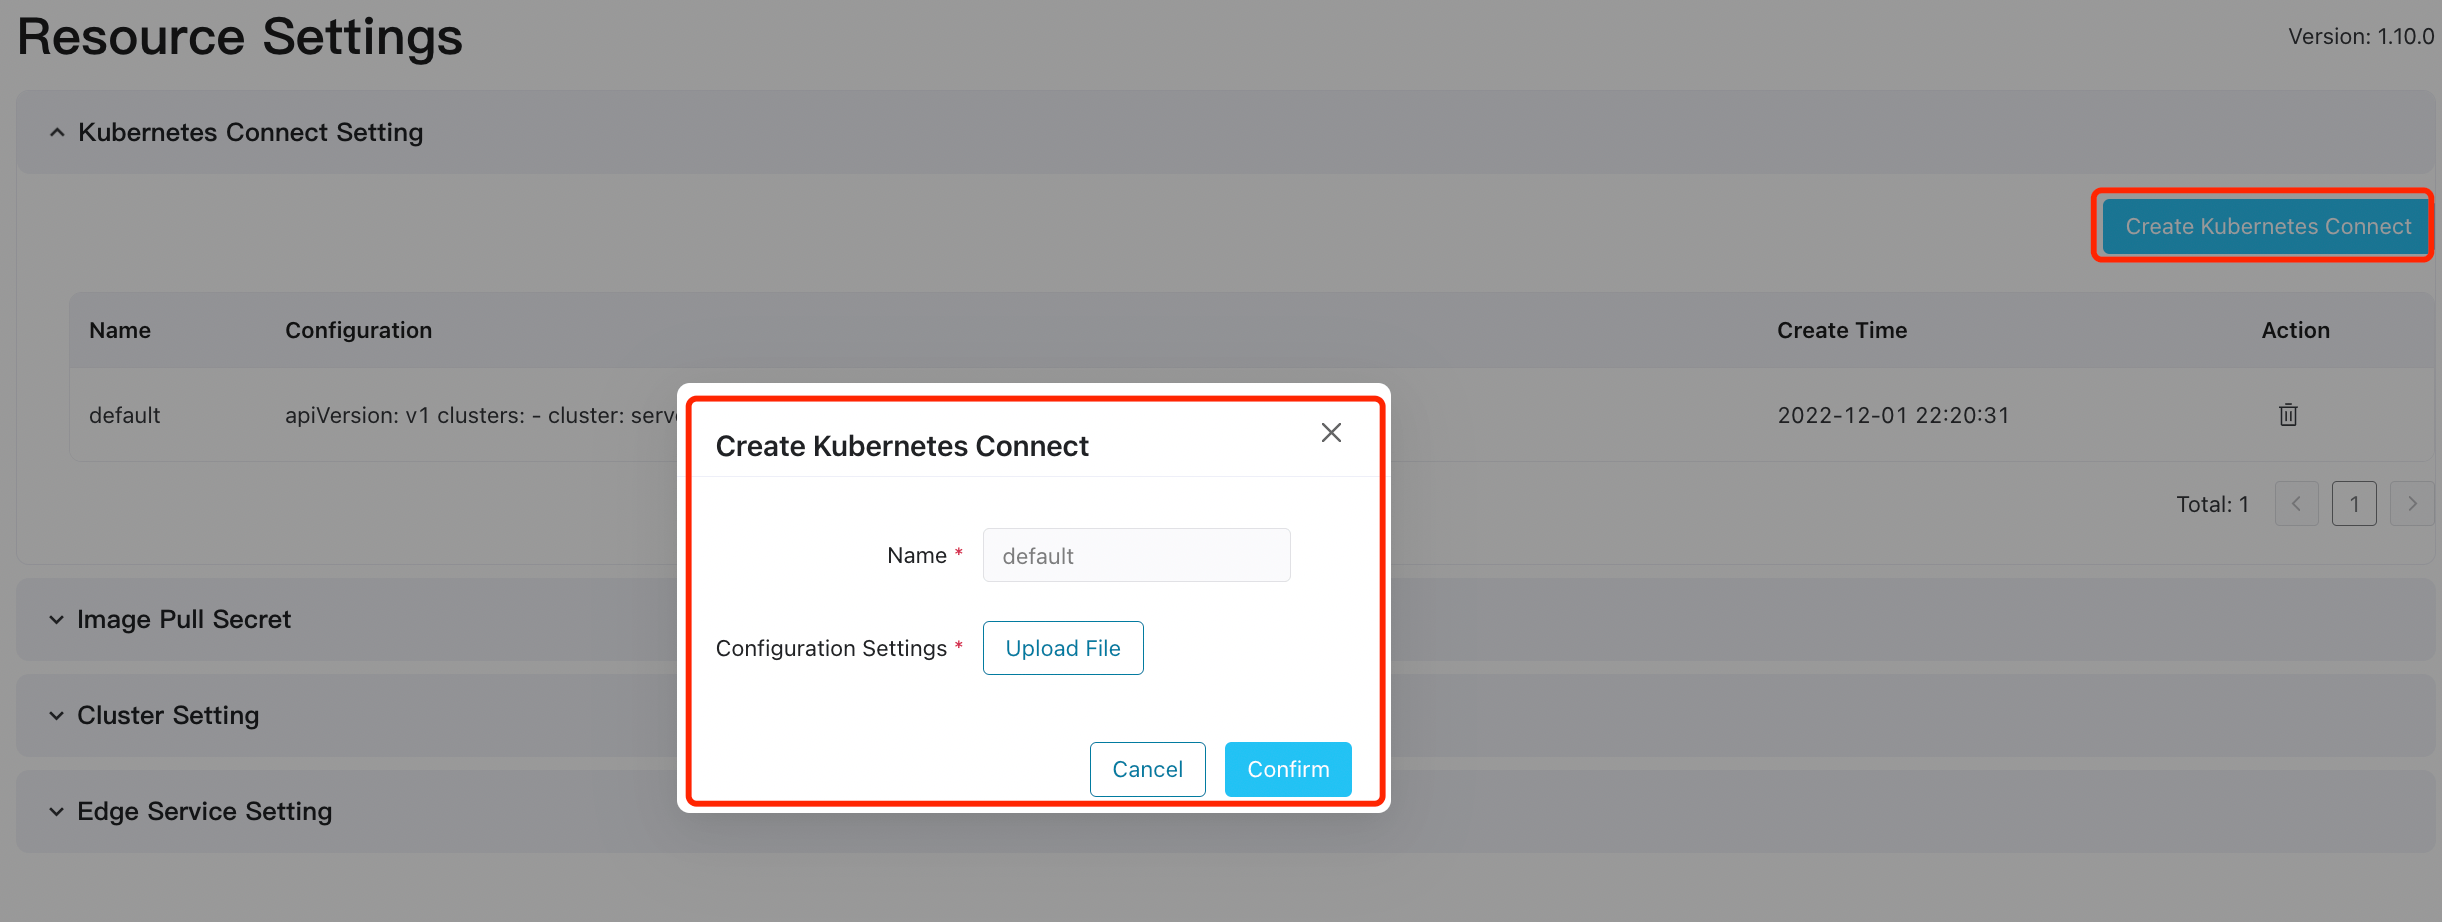
Upload kuberconfig to ECP
- Log in to ECP as a system admin and navigate to System Settings -> Resource Settings.
- Expand the Create Kubernetes Connect panel.
- Click Create Kubernetes Connect and select the certificate file to upload in the dialog box. The changes will take effect immediately without requiring a restart of ECP.
WARNING
Once connected to Kubernetes and with active running clusters, it is recommended to avoid modifying the settings. Modifying the settings can result in the disruption of all active clusters.
EMQX Cluster Setting
This is to configure the EMQX cluster image versions, define quota, and annotate load balancing for public cloud clients.
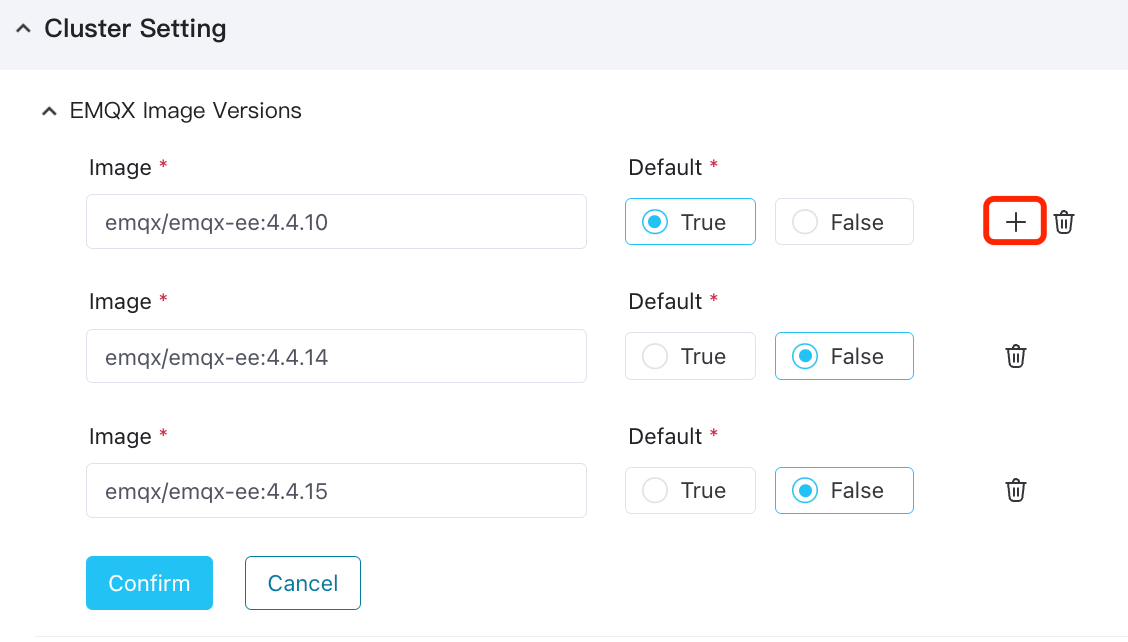
Configure EMQX Image Versions
System admins can add, edit or delete EMQX image versions. If you have internet connectivity, you can use public image addresses. Additionally, you can also specify a private image registry service. On how to configure a Telegraf image, see Image Repository Configuration.
- Log in to ECP as a system admin and navigate to System Settings -> Resource Settings -> Kubernetes Mode.
- Expand the EMQX Cluster Setting -> EMQX Image Versions.
- Click Edit to enter the editing page.
- To add a new image version, click the "+" icon and provide the image version. You can choose to set it as the default version. To delete an image version, simply click the delete icon.
- Click Save to complete the configuration.
Configure EMQX Cluster Quota
For EMQX clusters created using ECP, you have the option to customize the quota according to your specific business requirements. However, you are recommended to keep the default settings as they are verified by EMQ technical team. Modify them only if necessary.
Log in to ECP as a system admin and navigate to System Settings -> Resource Settings -> Kubernetes Mode.
Expand the EMQX Cluster Setting -> EMQX Quota List.
Click Edit to enter the editing page, where you can modify the CPU and memory-related quota for each quota entry, delete an existing quota entry, or add a new quota entry. Note: Deleting a quota entry will not impact the currently running clusters.
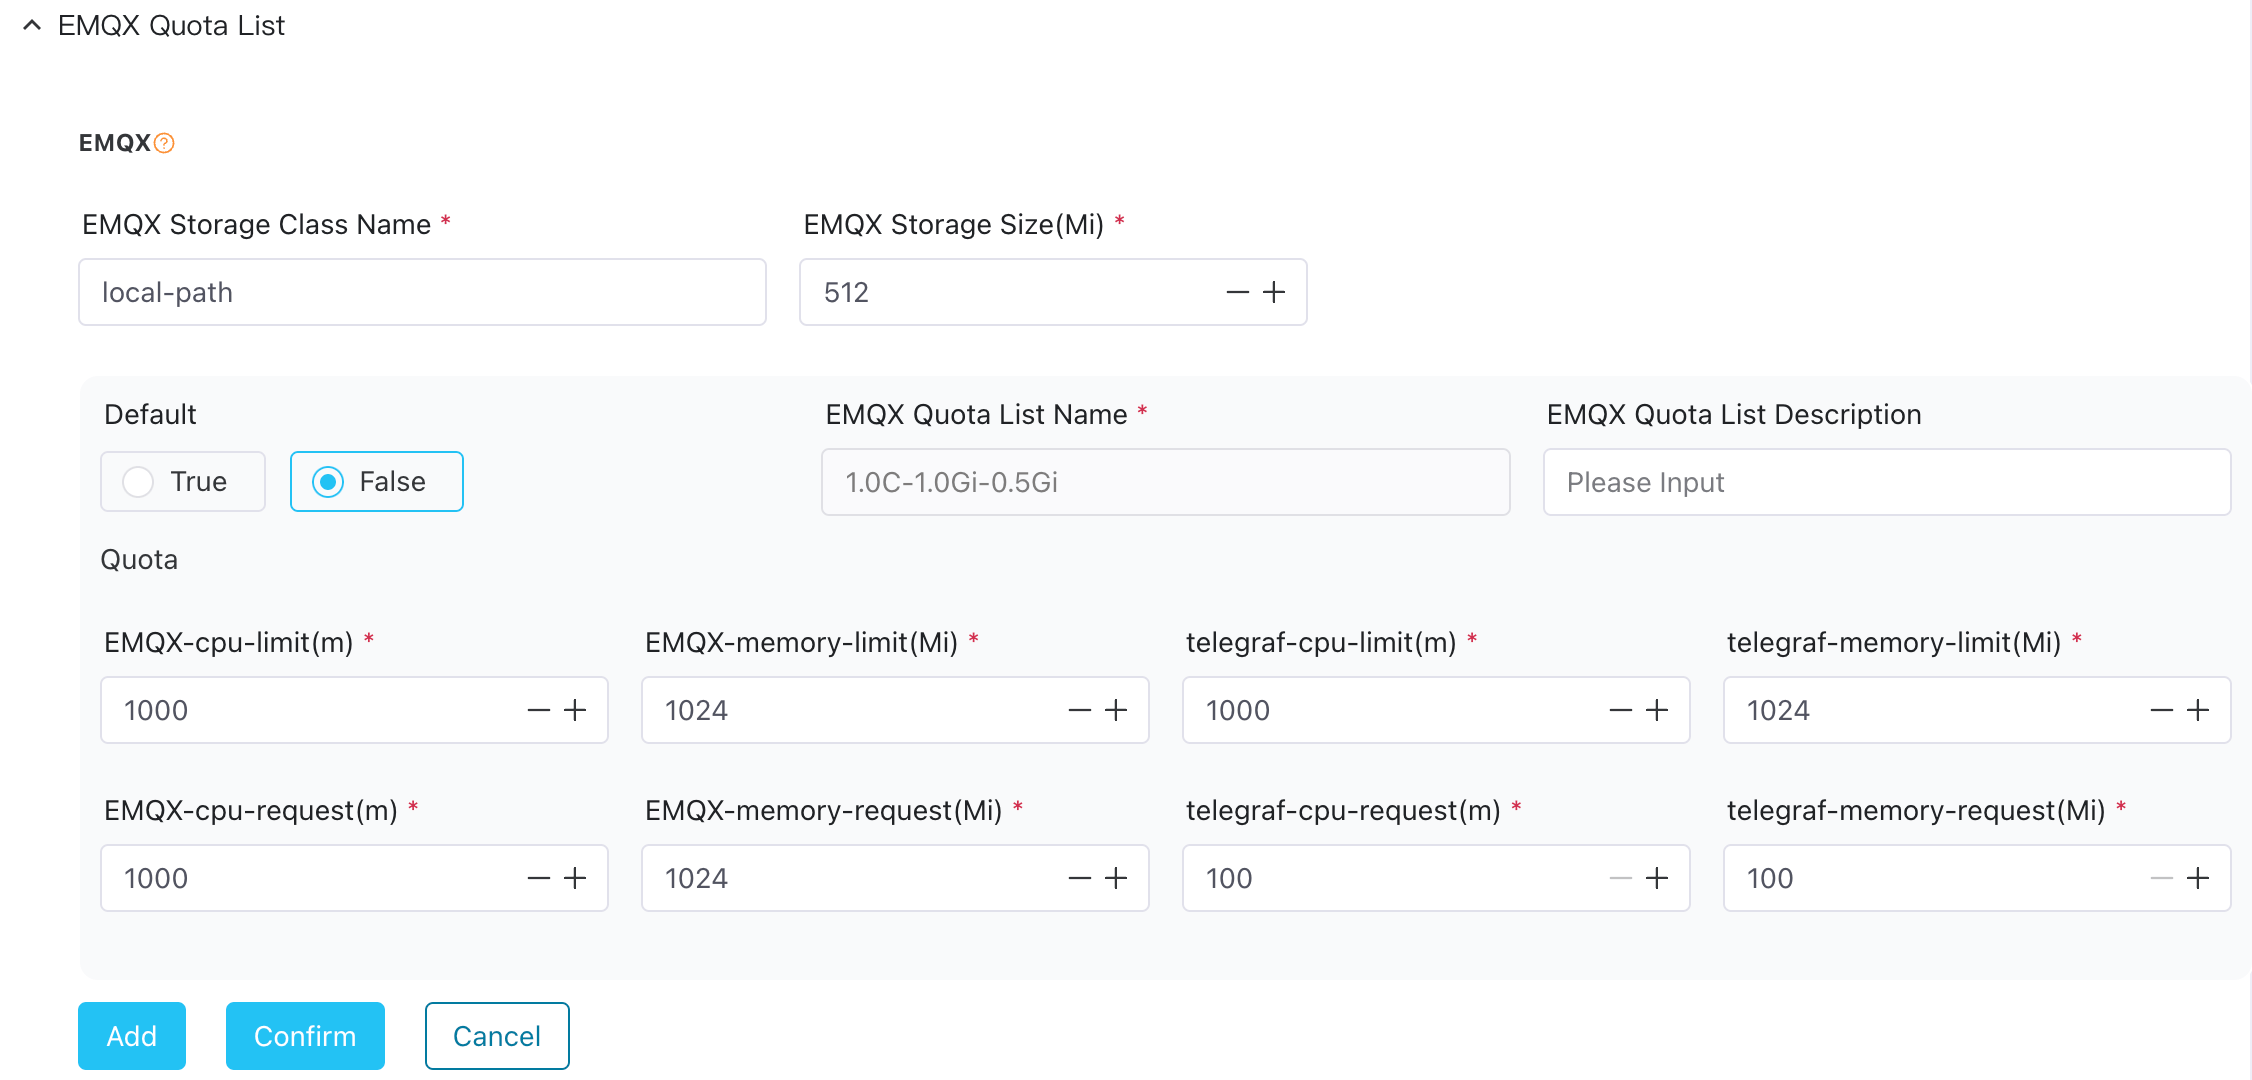
Below is the specification for an EMQX cluster with 1 CPU core, 1 GiB of memory, and 512 MiB of disc space:
| Item | Specification/Unit | Description |
|---|---|---|
| EMQX Storage Class | local-path | The Kubernetes storage class name |
| EMQX Storage Size | 512Mi | Occupied disk space size |
| Default | true or false | true: Set to default false: Not set as default |
| EMQX Quota List Note | 1C1G0.5G | The specification name displayed when installing the EMQX cluster |
| EMQX-cpu-limit | 1000m | Maximum CPU usage limit for the cluster |
| EMQX-memory-limit | 1024Mi | Maximum memory usage limit for the cluster |
| EMQX-cpu-request | 1000m | Minimum CPU usage limit for the cluster |
| EMQX-memory-request | 1024Mi | Minimum memory usage limit for the cluster |
| Telegraf-cpu-limit | 1000m | Maximum CPU usage limit for Telegraf |
| Telegraf-memory-limit | 1024Mi | Maximum memory usage limit for Telegraf |
| Telegraf-cpu-request | 100m | Minimum CPU usage limit for Telegraf |
| Telegraf-memory-request | 100Mi | Minimum memory usage limit for Telegraf |
Configure Load Balancing
For public cloud clients, you can configure load balancing by adding annotations.
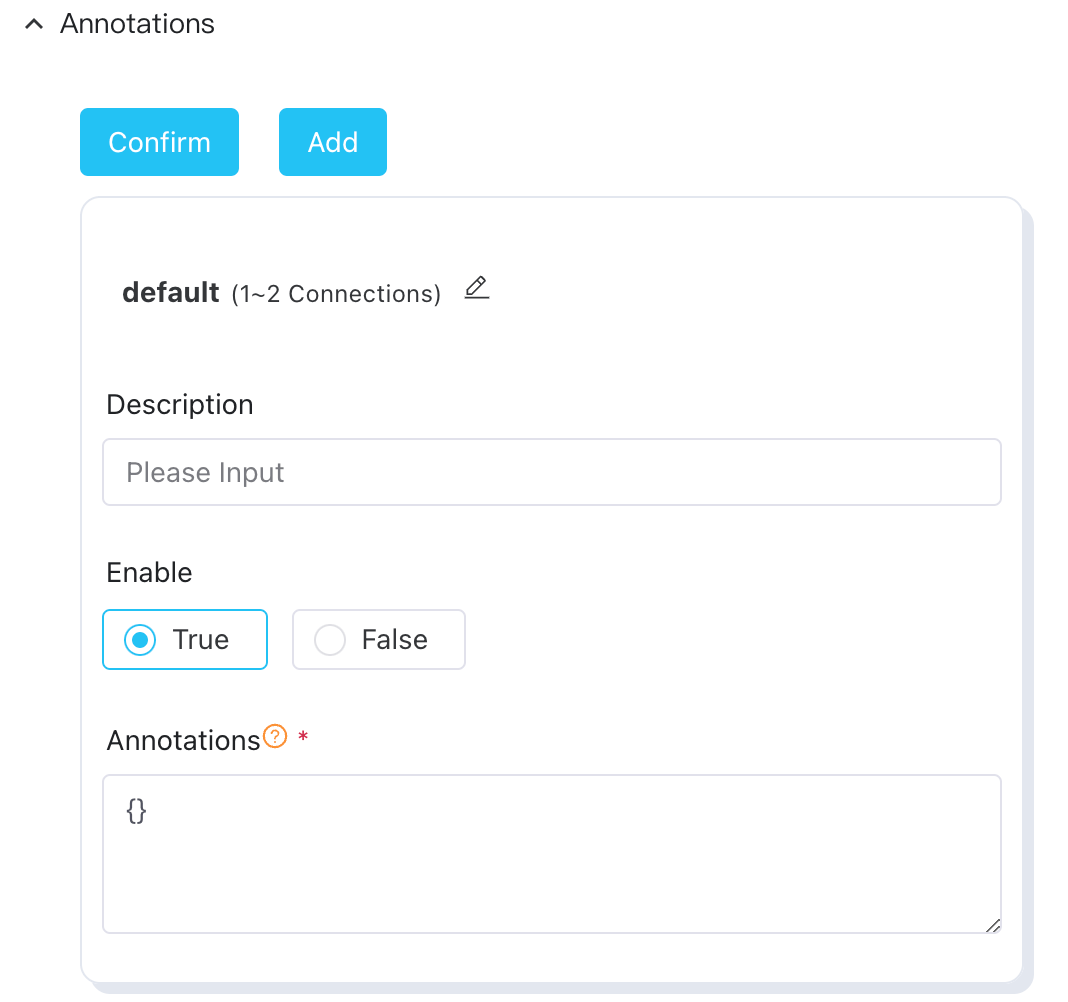
You can configure the annotation feature as follows:
- Add configurations and set the range of connection numbers.
- Multiple configurations can be created and made effective.
- By default, configurations are matched based on business connection numbers.
- When there is an overlap in connection numbers, the earliest created configuration is selected by default.
- The maximum number of configurations is 100.
Configure Storage Class
A Storage Class provides a way for administrators to describe the "classes" of storage they offer. In ECP, StorageClass is used to specify the provisioning PVs for storage.
Obtain the Storage Class from Kubernetes
Log in to the Kubernetes environment using the command line interface (CLI).
Execute the following command to view the list of storage classes:
bashkubectl get sc NAME PROVISIONER RECLAIMPOLICY VOLUMEBINDINGMODE ALLOWVOLUMEEXPANSION AGE alicloud-disk-ssd diskplugin.csi.alibabacloud.com Delete Immediate true 170d alicloud-disk-topology diskplugin.csi.alibabacloud.com Delete WaitForFirstConsumer true 170d local-path rancher.io/local-path Delete WaitForFirstConsumer false 169d
Configure EMQX Storage Class
- Log in to ECP as a system admin and navigate to System Settings -> Resource Settings.
- Expand the Cluster Setting panel, and then the EMQX Quota List panel.
- Click Edit to enter the editing page.
- Enter the Storage Class Name obtained from Kubernetes, the desired Storage Size in MiB, and indicate whether it should be set as the default Storage Class.

- Click Save to complete the configuration. The changes will take effect immediately.
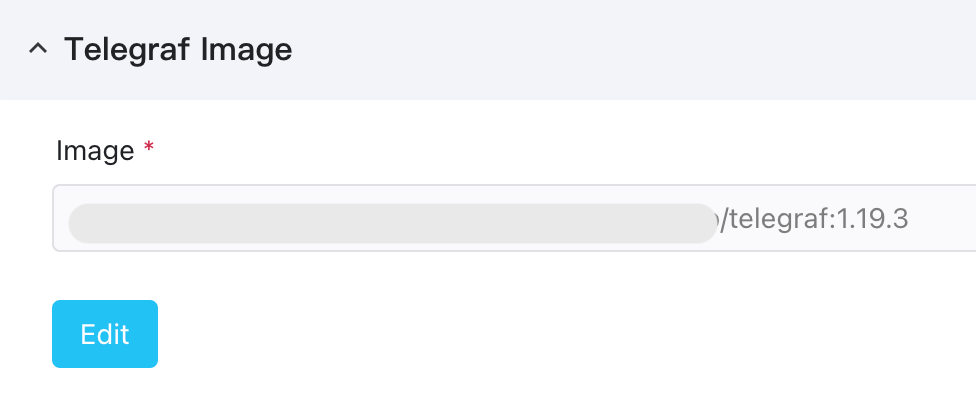
Telegraf Image
Telegraf is for the log collection of EMQX clusters.
Edge Service Setting(Kubernetes)
- Log in to ECP as a system admin and navigate to System Settings -> Resource Settings.
- Expand the Kubernetes Mode -> Edge Service Setting.
- Click Edit to enter the editing page, where you can modify the settings.
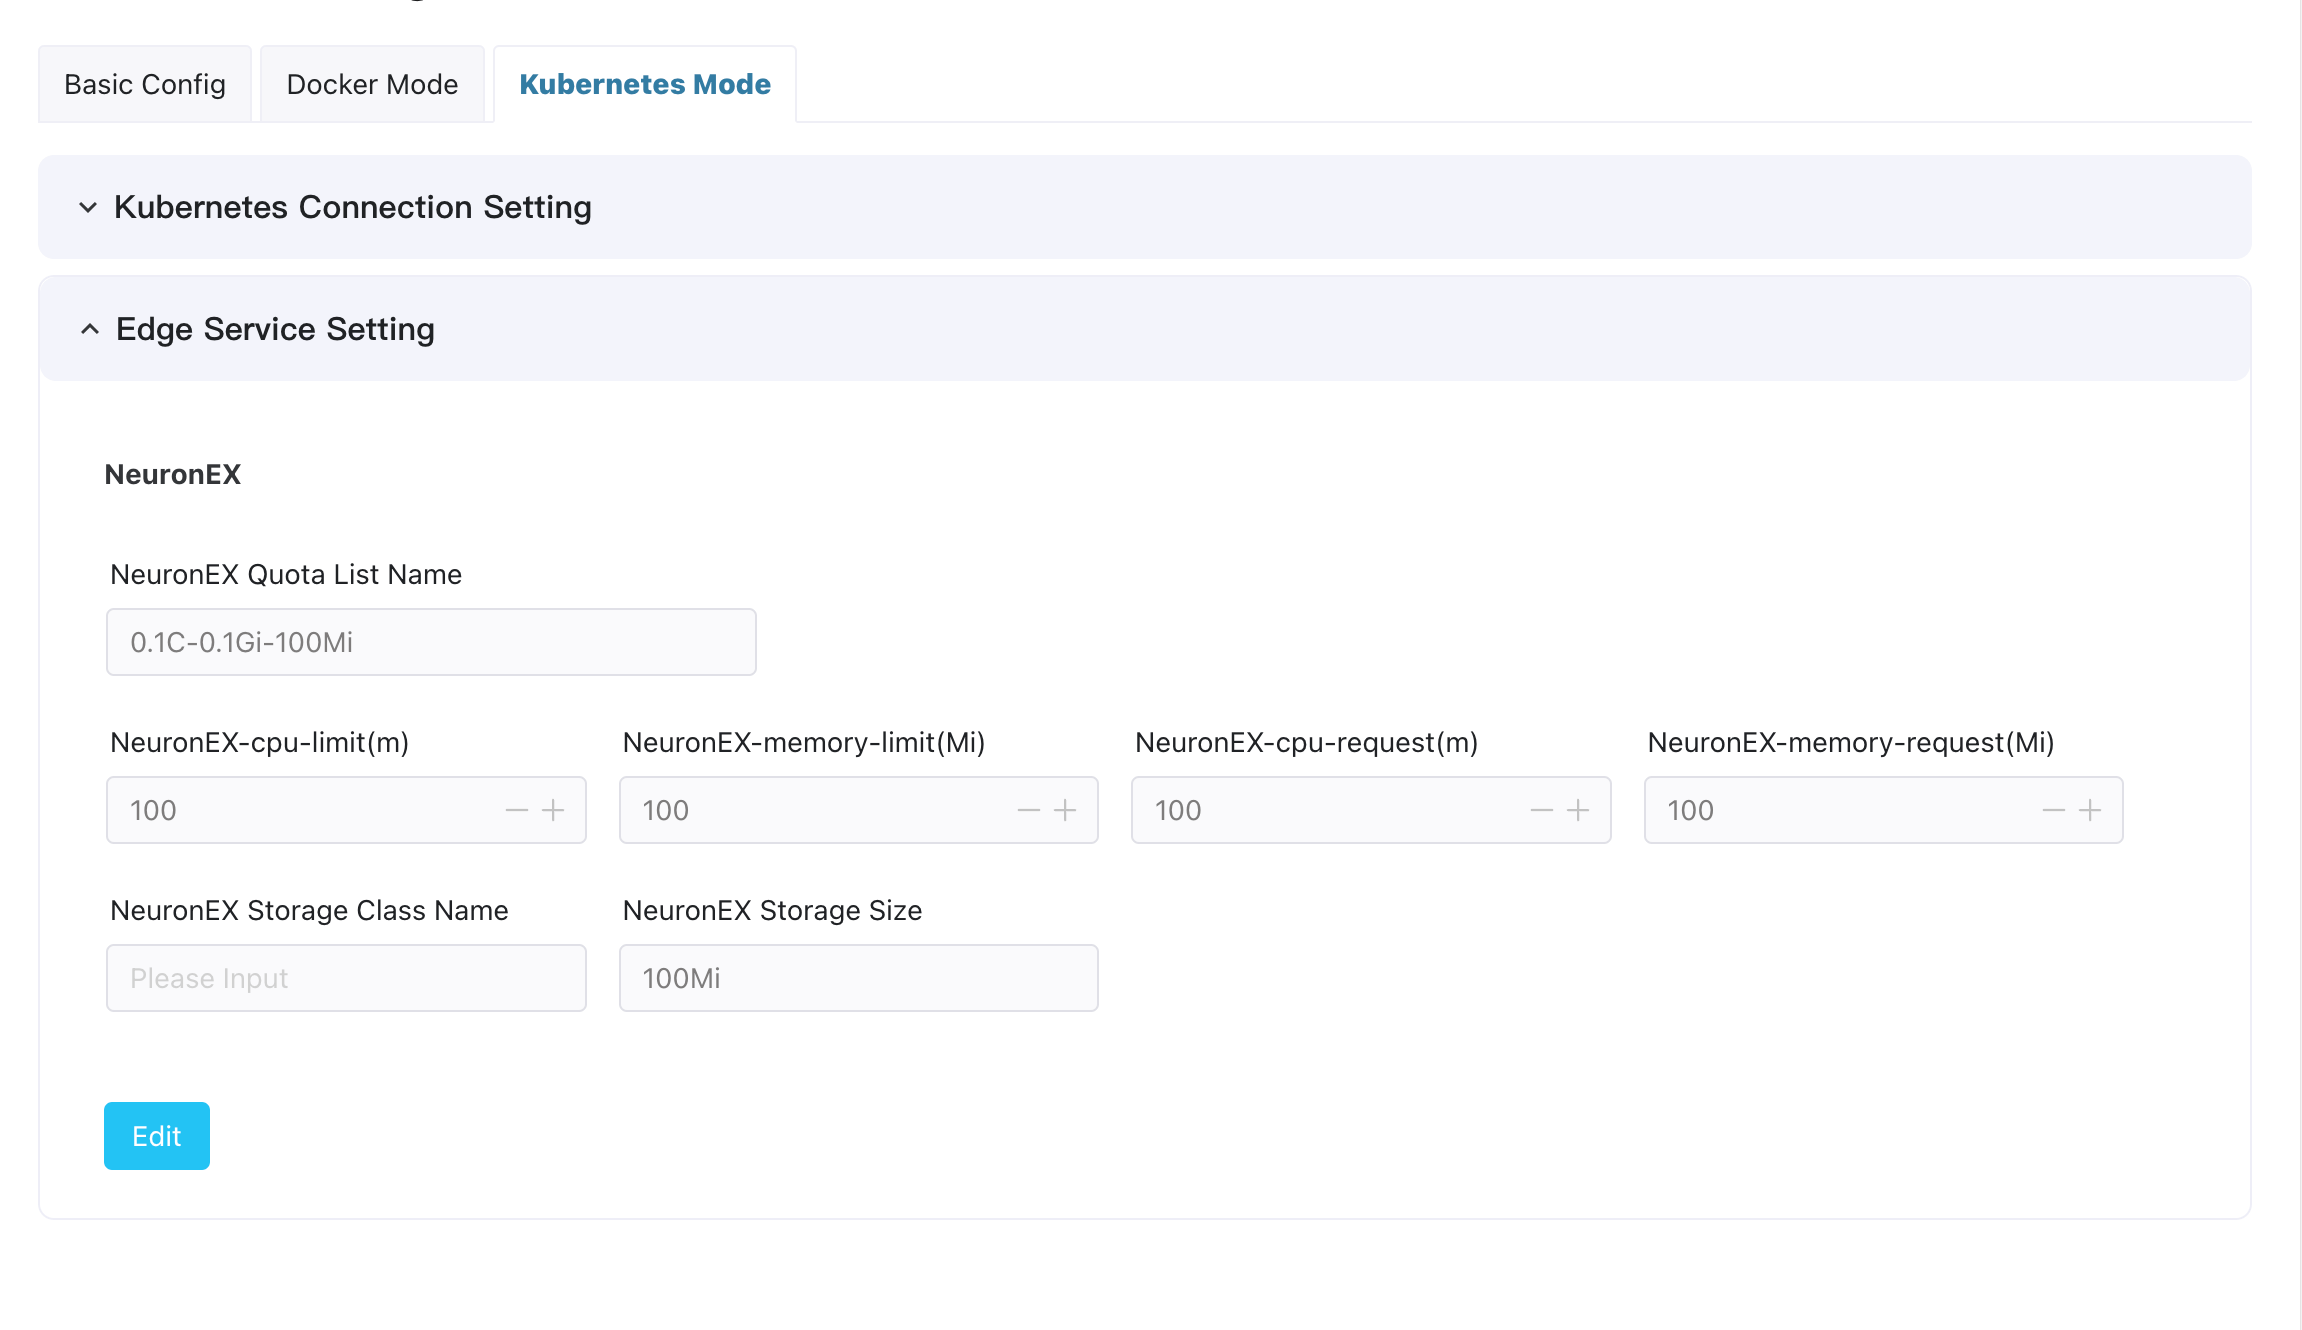
Below is the specification for a NeuronEX with 1 CPU core, 1 GiB of memory, and 512 MiB of disc space:
| Item | Specification/Unit | Description |
|---|---|---|
| NeuronEX Storage Class | local-path | The Kubernetes storage class name |
| NeuronEX Storage Size | 512Mi | Occupied disk space size |
| NeuronEX Quota List Note | 1C1G0.5G | The specification name displayed when installing the NeuronEX |
| NeuronEX-cpu-limit | 1000m | Maximum CPU usage limit for the NeuronEX |
| NeuronEX-memory-limit | 1024Mi | Maximum memory usage limit for the NeuronEX |
| NeuronEX-cpu-request | 1000m | Minimum CPU usage limit for the NeuronEX |
| NeuronEX-memory-request | 1024Mi | Minimum memory usage limit for the NeuronEX |