使用 React 通过 MQTT.js 连接到部署
本文主要介绍如何在 React 框架搭建的 Web 应用程序中使用 MQTT.js ,实现客户端与 MQTT 服务器的连接、订阅、收发消息、取消订阅等功能。
前置准备
在将您的 Web 应用程序连接到 EMQX Cloud 之前,请确保已完成以下准备:
- 部署 MQTT 服务器
- 创建 React 应用
部署 MQTT 服务器
要将应用程序连接到 EMQX Cloud,您需要创建并配置一个部署。
Serverless 部署
- 在 EMQX Cloud 控制台中创建一个 Serverless 部署。
- 部署创建并运行后,进入部署的概览 页面,获取 MQTT 连接信息,包括:
- Broker 地址
- 端口号(Serverless 部署仅支持 TLS 端口)
- Serverless 部署仅支持 TLS 连接。请务必从概览页面下载 CA 证书,并使用
8883端口进行 TLS 连接。 - 在部署中通过访问控制 -> 客户端认证配置默认认证信息(用户名/密码)。
更多详情请参考:Serverless 连接指引。
弹性专有版或 BYOC 部署
- 您可以在 EMQX Cloud 控制台中创建一个弹性专有版或 BYOC 部署。
- 创建完成后,进入部署的概览页面,获取 MQTT 连接信息,包括:
- Broker 地址
- MQTT 和 WebSocket 的 TCP 与 TLS 端口(支持 TCP 和 TLS 连接)
- 在部署中通过访问控制 -> 客户端认证 配置默认认证信息(用户名/密码)。
详细端口配置请参考:弹性专有版 / BYOC 连接指引。
创建 React 应用
参考链接:https://zh-hans.reactjs.org/docs/getting-started.html
使用 Create React App 创建新的 React 应用
shellnpx create-react-app react-mqtt-test如需使用 TypeScript 只需要在命令行后加入 --template typescript 参数即可
shellnpx create-react-app react-mqtt-test --template typescript然后添加 React 项目中需要的 TypeScript 的类型库
shellnpm install --save typescript @types/node @types/react @types/react-dom @types/jest # or yarn add typescript @types/node @types/react @types/react-dom @types/jest使用 TypeScript 将不作为本文示例中的使用重点介绍,如需使用,可参考该创建示例和完整的代码示例后自行添加 TypeScript 特性。
使用 CDN 链接引入 React
html<script crossorigin src="https://unpkg.com/react@16/umd/react.production.min.js"></script> <script crossorigin src="https://unpkg.com/react-dom@16/umd/react-dom.production.min.js"></script>
安装依赖
MQTT.js 是一个完全开源的 MQTT 协议的客户端库,使用 JavaScript 编写,可用于 Node.js 和浏览器环境。有关 MQTT.js 的更多内容和使用方法,您可以前往查阅 MQTT.js GitHub 页面。
MQTT.js 支持通过 NPM 或 Yarn 安装,通过 CDN 或相对路径引入。本示例将通过 Yarn 命令安装 MQTT.js,直接引入文件的方法更适用于通过 CDN 使用 React 的项目。
通过命令行安装,可以使用 npm 或 yarn 命令(二者选一)
shellnpm install mqtt --save # or yarn add mqtt通过 CDN 引入
html<script src="https://unpkg.com/mqtt/dist/mqtt.min.js"></script>下载到本地,然后使用相对路径引入
html<script src="/your/path/to/mqtt.min.js"></script>
通过 WebSocket 端口连接
通过以下代码设置客户端 ID、用户名及密码,客户端 ID 应具有唯一性。
const clientId = "emqx_react_" + Math.random().toString(16).substring(2, 8);
const username = "emqx_test";
const password = "emqx_test";
通过以下代码建立客户端与 MQTT Broker 的连接。
const client = mqtt.connect("ws://broker.emqx.io:8083/mqtt", {
  clientId,
  username,
  password,
  // ...other options
});
通过 WebSocket TLS/SSL 端口连接
启用 TLS/SSL 加密时,连接参数选项与通过 WebSocket 端口建立连接一致,您只需注意将协议改为 wss,且匹配正确的端口号即可。
通过以下代码建立客户端与 MQTT Broker 的连接。
const client = mqtt.connect("wss://broker.emqx.io:8084/mqtt", {
  clientId,
  username,
  password,
  // ...other options
});
订阅和发布
订阅主题
设置将要订阅的主题及对应 QoS 等级。
const mqttSub = (subscription) => {
    if (client) {
      const { topic, qos } = subscription
      client.subscribe(topic, { qos }, (error) => {
        if (error) {
          console.log('Subscribe to topics error', error)
          return
        }
        console.log(`Subscribe to topics: ${topic}`)
        setIsSub(true)
      })
    }
  }
取消订阅
通过以下代码取消订阅,此时应指定取消订阅的主题及对应的 QoS 等级。
const mqttUnSub = (subscription) => {
  if (client) {
    const { topic, qos } = subscription
    client.unsubscribe(topic, { qos }, (error) => {
      if (error) {
        console.log('Unsubscribe error', error)
        return
      }
      console.log(`unsubscribed topic: ${topic}`)
      setIsSub(false)
    })
  }
}
发布消息
const mqttPublish = (context) => {
  if (client) {
    // 发布的主题、消息及 QoS
    const { topic, qos, payload } = context;
    client.publish(topic, payload, { qos }, (error) => {
      if (error) {
        console.log("Publish error: ", error);
      }
    });
  }
};
接收消息
通过以下代码指定客户端对消息事件进行监听,并在收到消息后执行回调函数,将接收到的消息及其主题打印到控制台。
client.on("message", (topic: string, message) => {
  console.log(`received message: ${message} from topic: ${topic}`);
});
断开连接
如客户端希望主动断开连接,可以通过如下代码实现:
const mqttDisconnect = () => {
  if (client.connected) {
    try {
      client.end(false, () => {
        setConnectStatus('Connect')
        console.log('disconnected successfully')
      })
    } catch (error) {
      console.log('disconnect error:', error)
    }
  }
}以上部分仅列出了一些关键代码,项目完整代码请见:MQTT Client - React,您可以进行下载并体验。
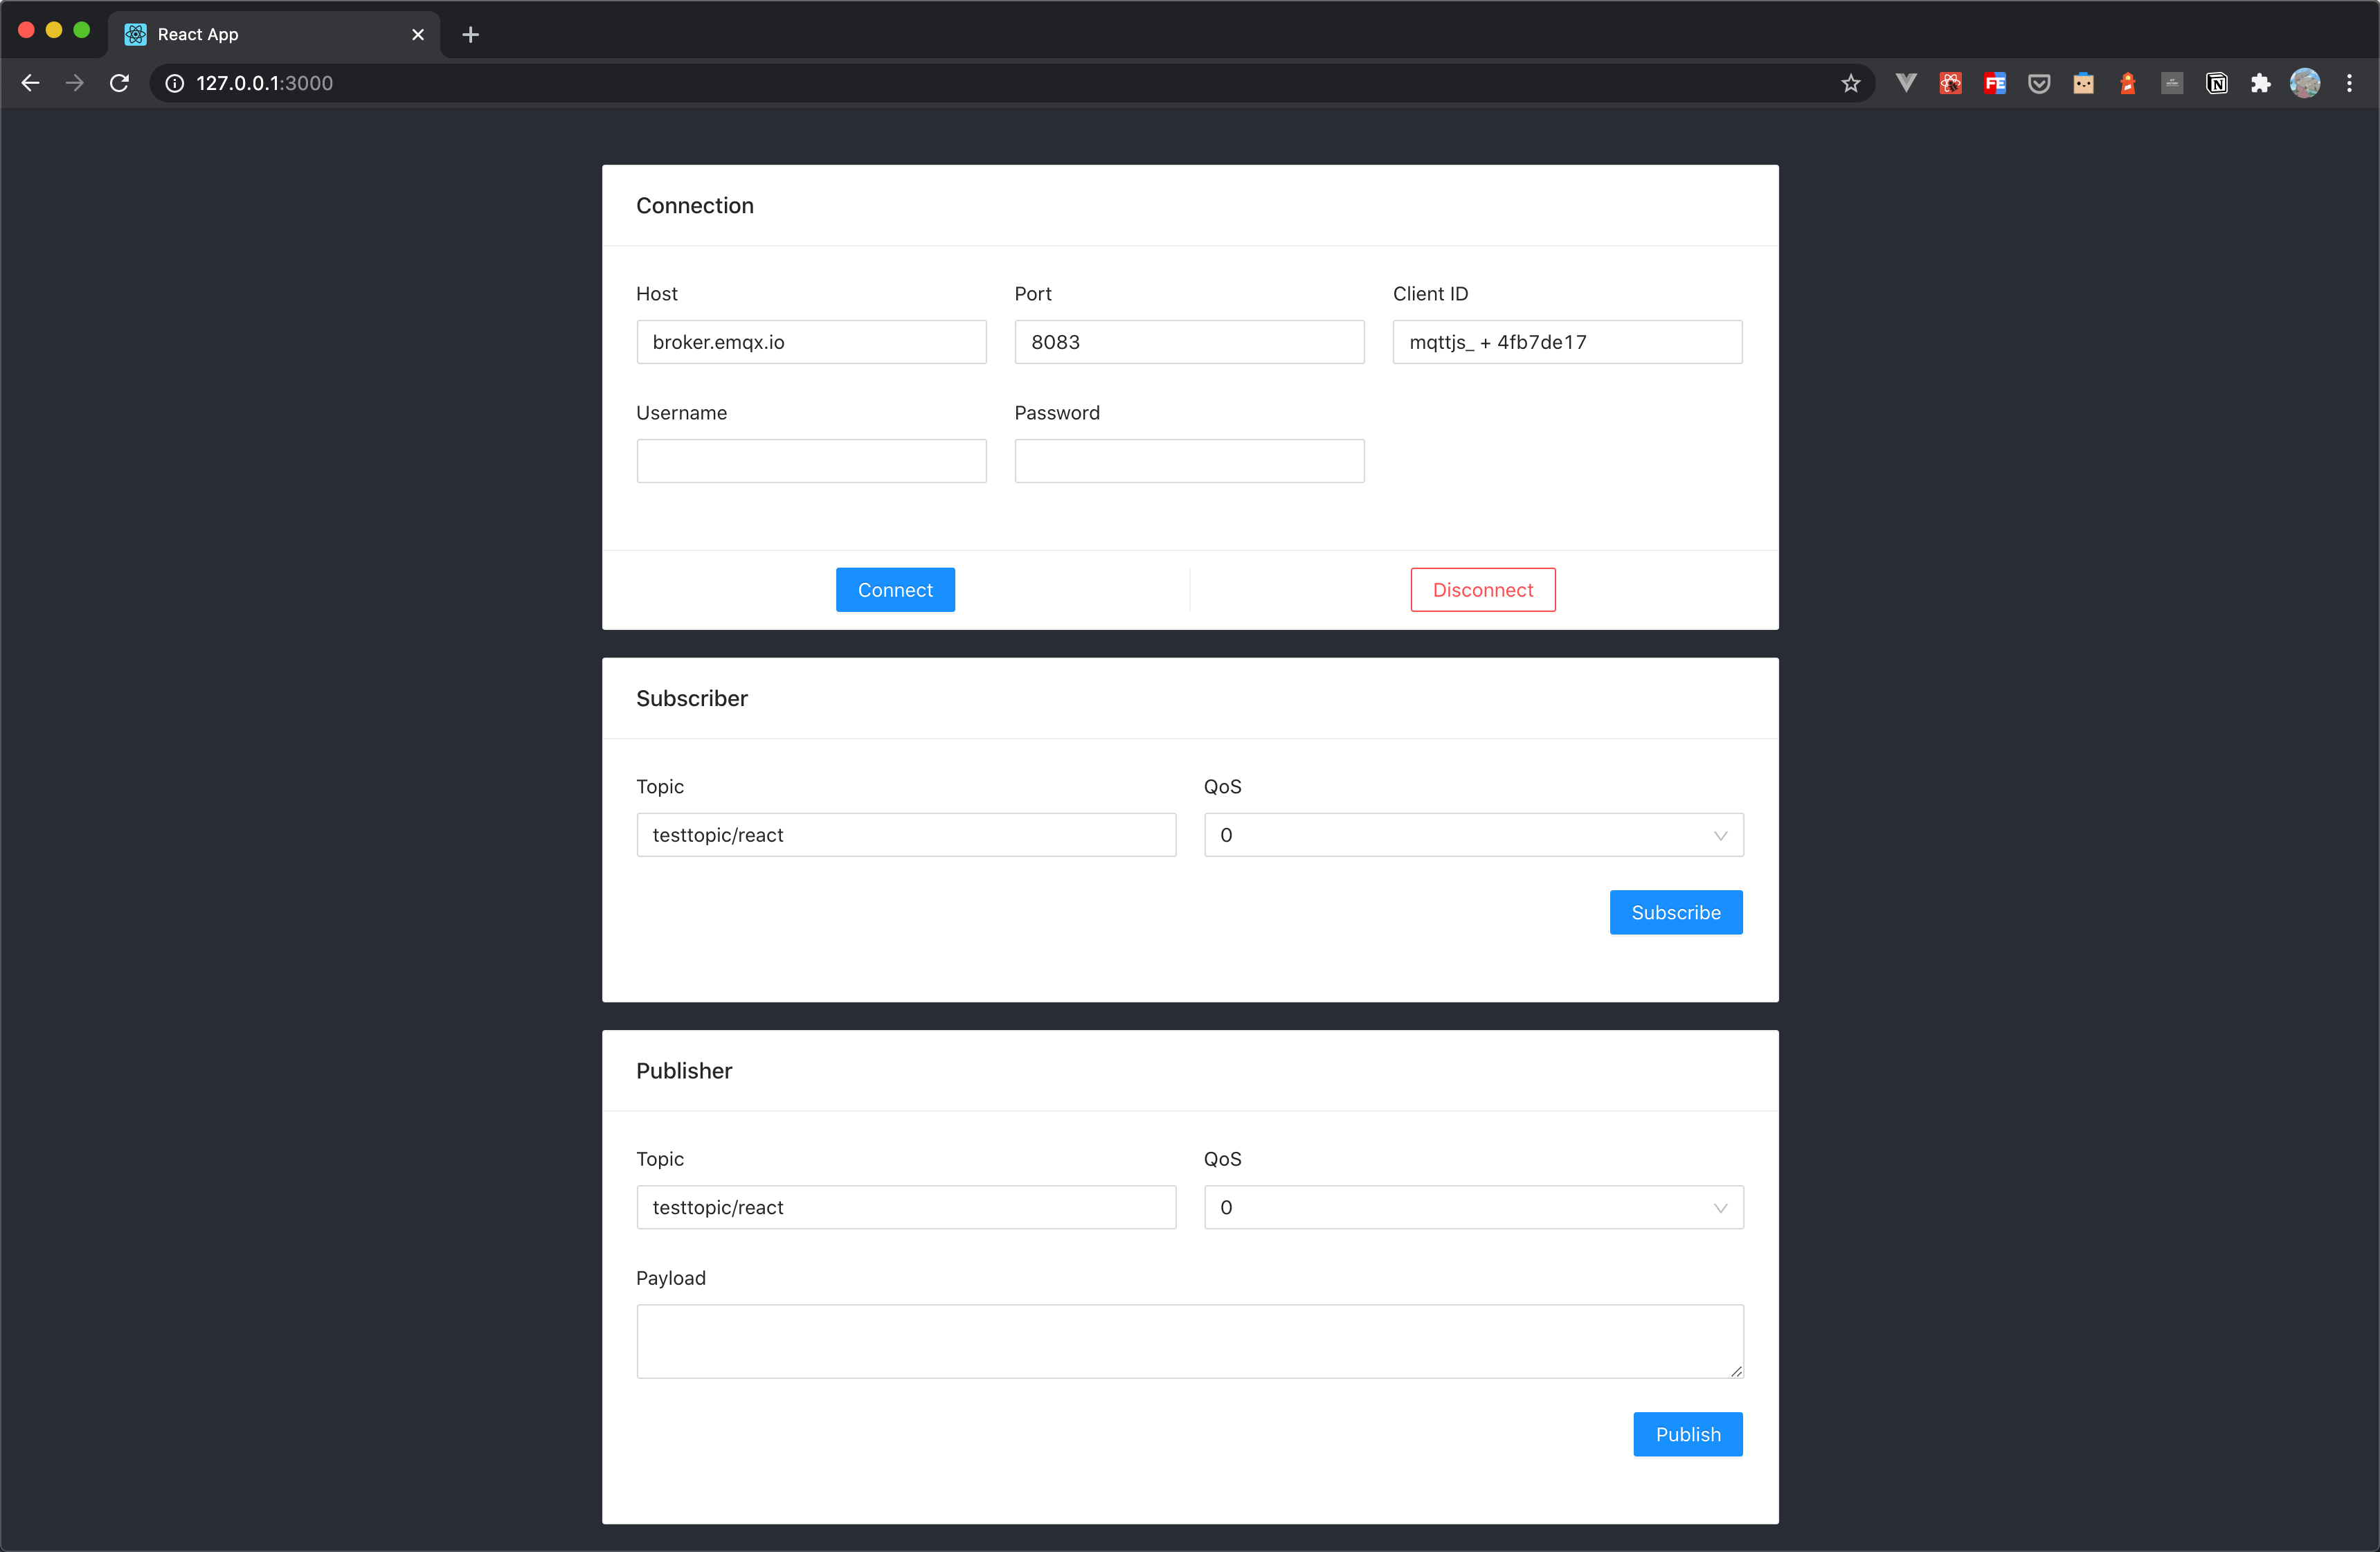
测试验证
我们使用 React 编写了如下简单的浏览器应用,该应用具备:创建连接、订阅主题、收发消息、取消订阅、断开连接等功能。
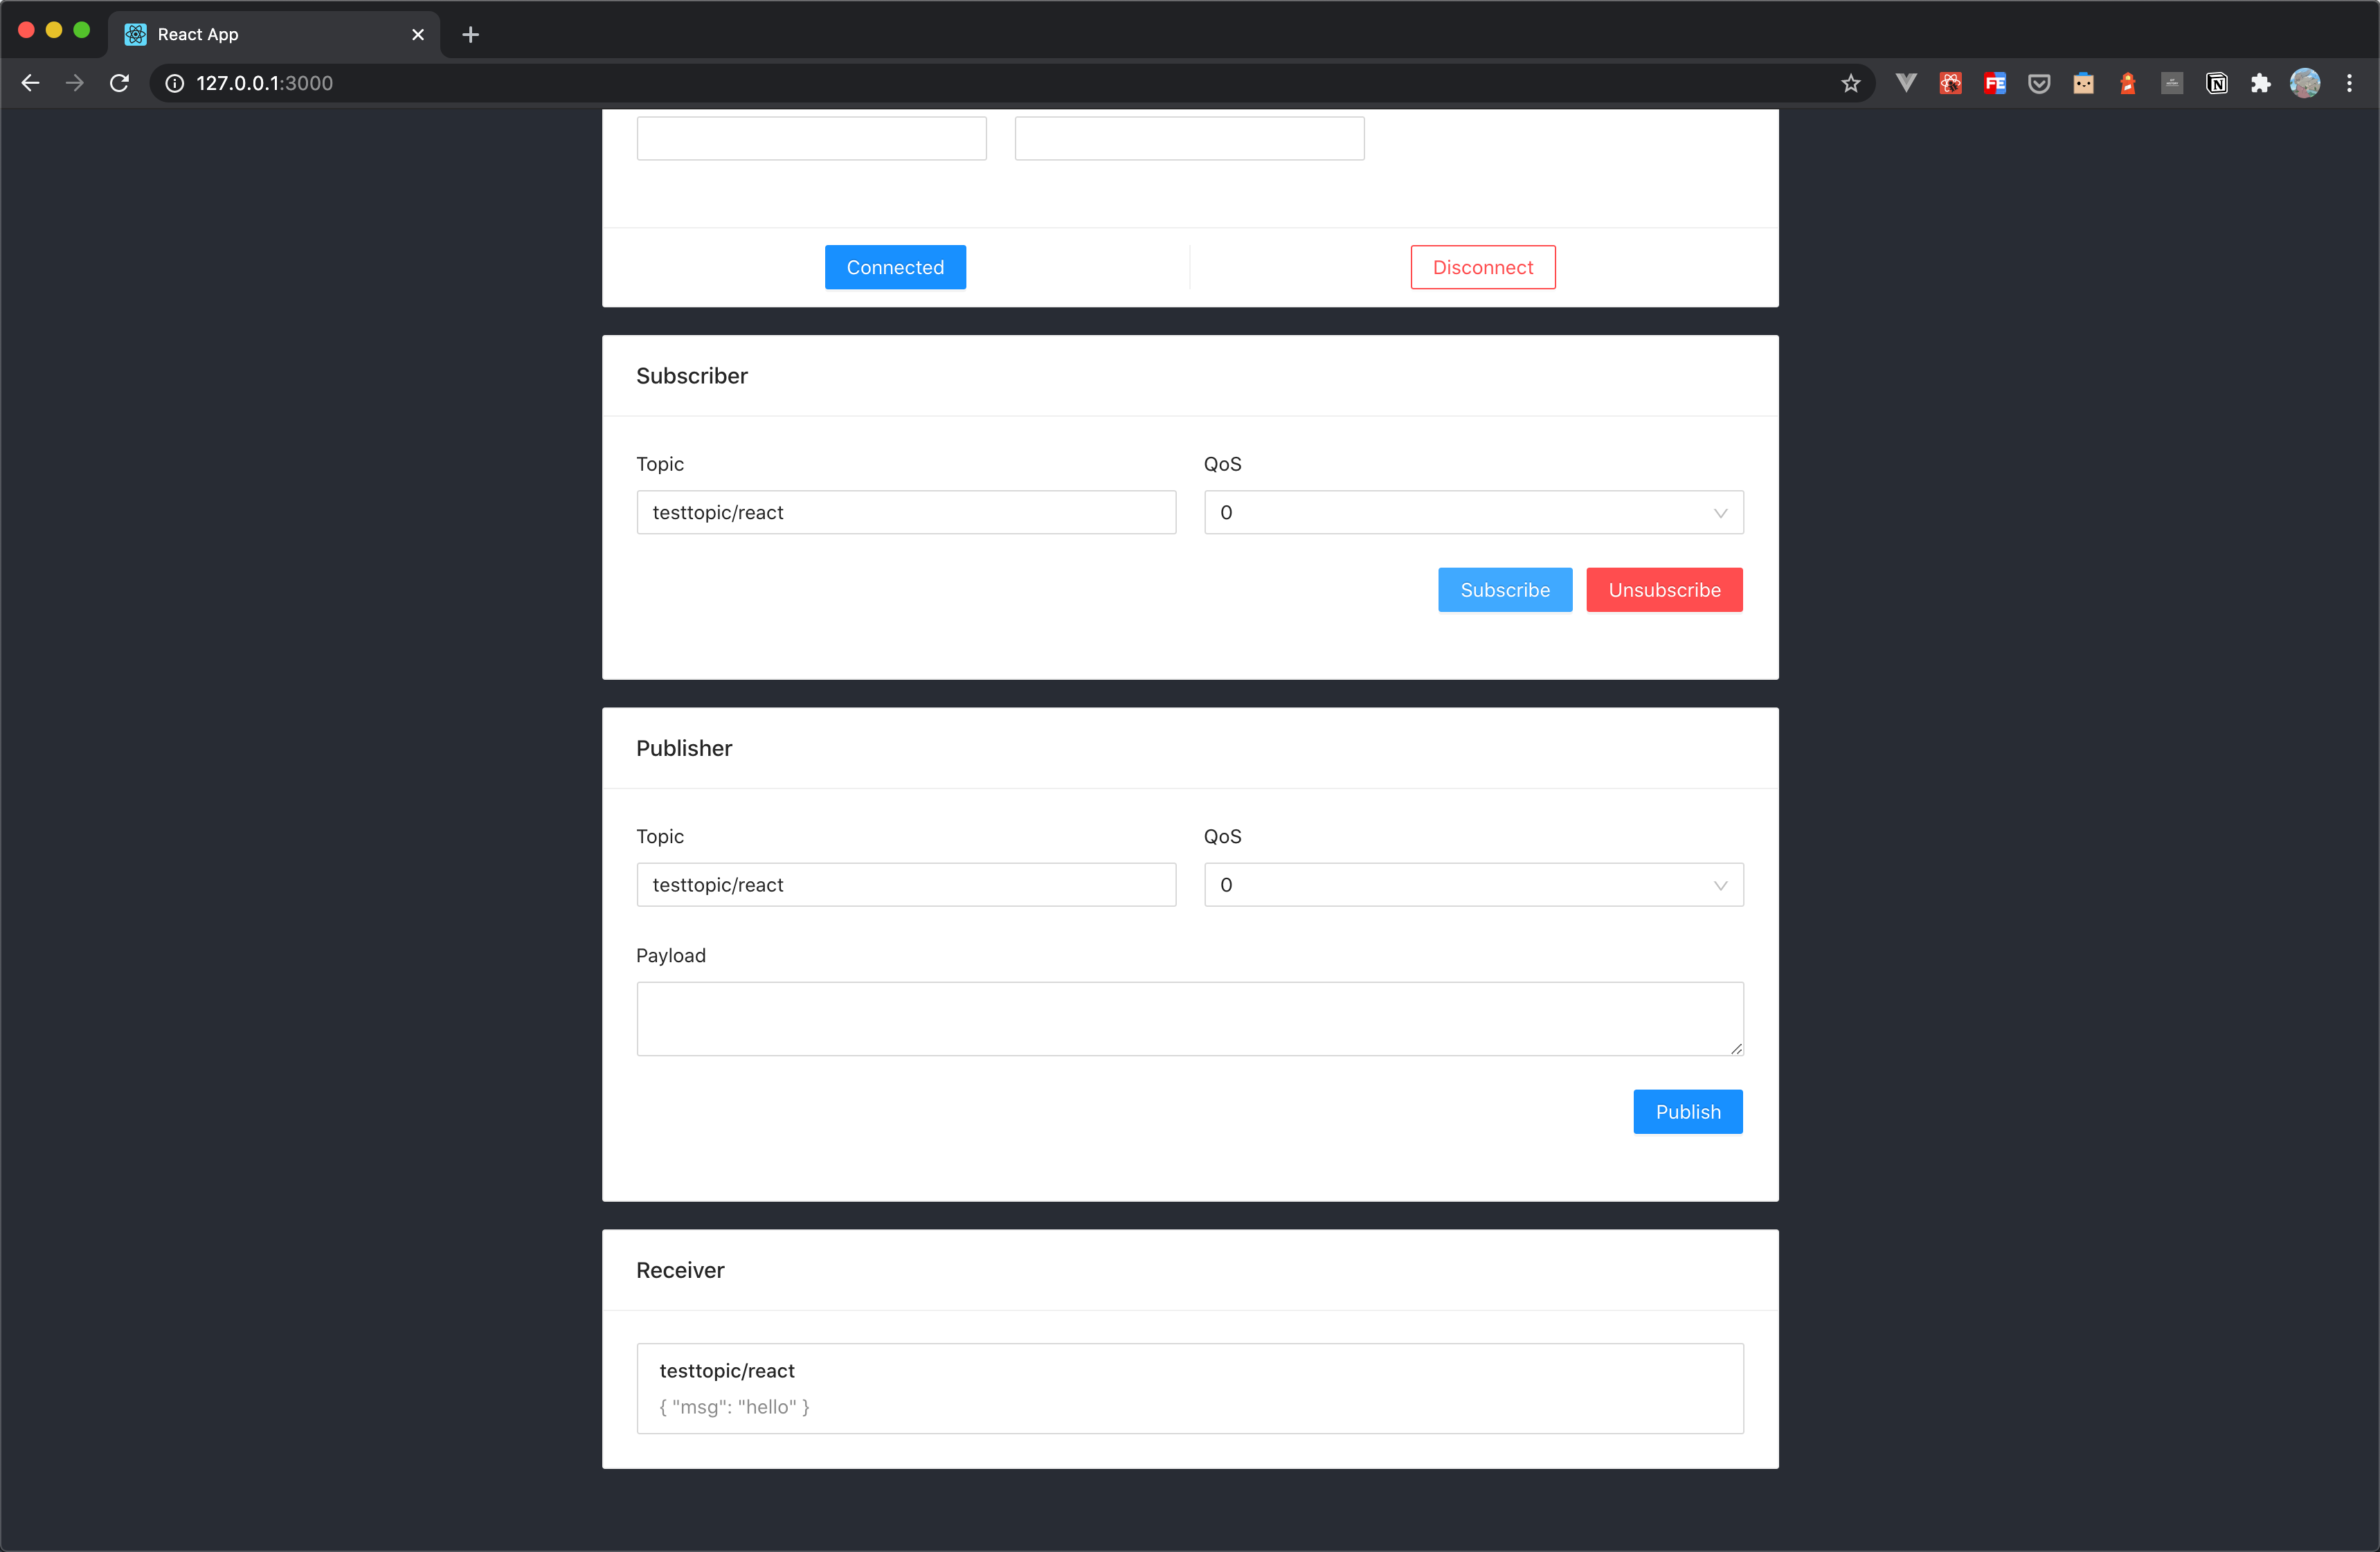
使用 MQTT 5.0 客户端工具 - MQTTX 作为另一个客户端进行消息收发测试。
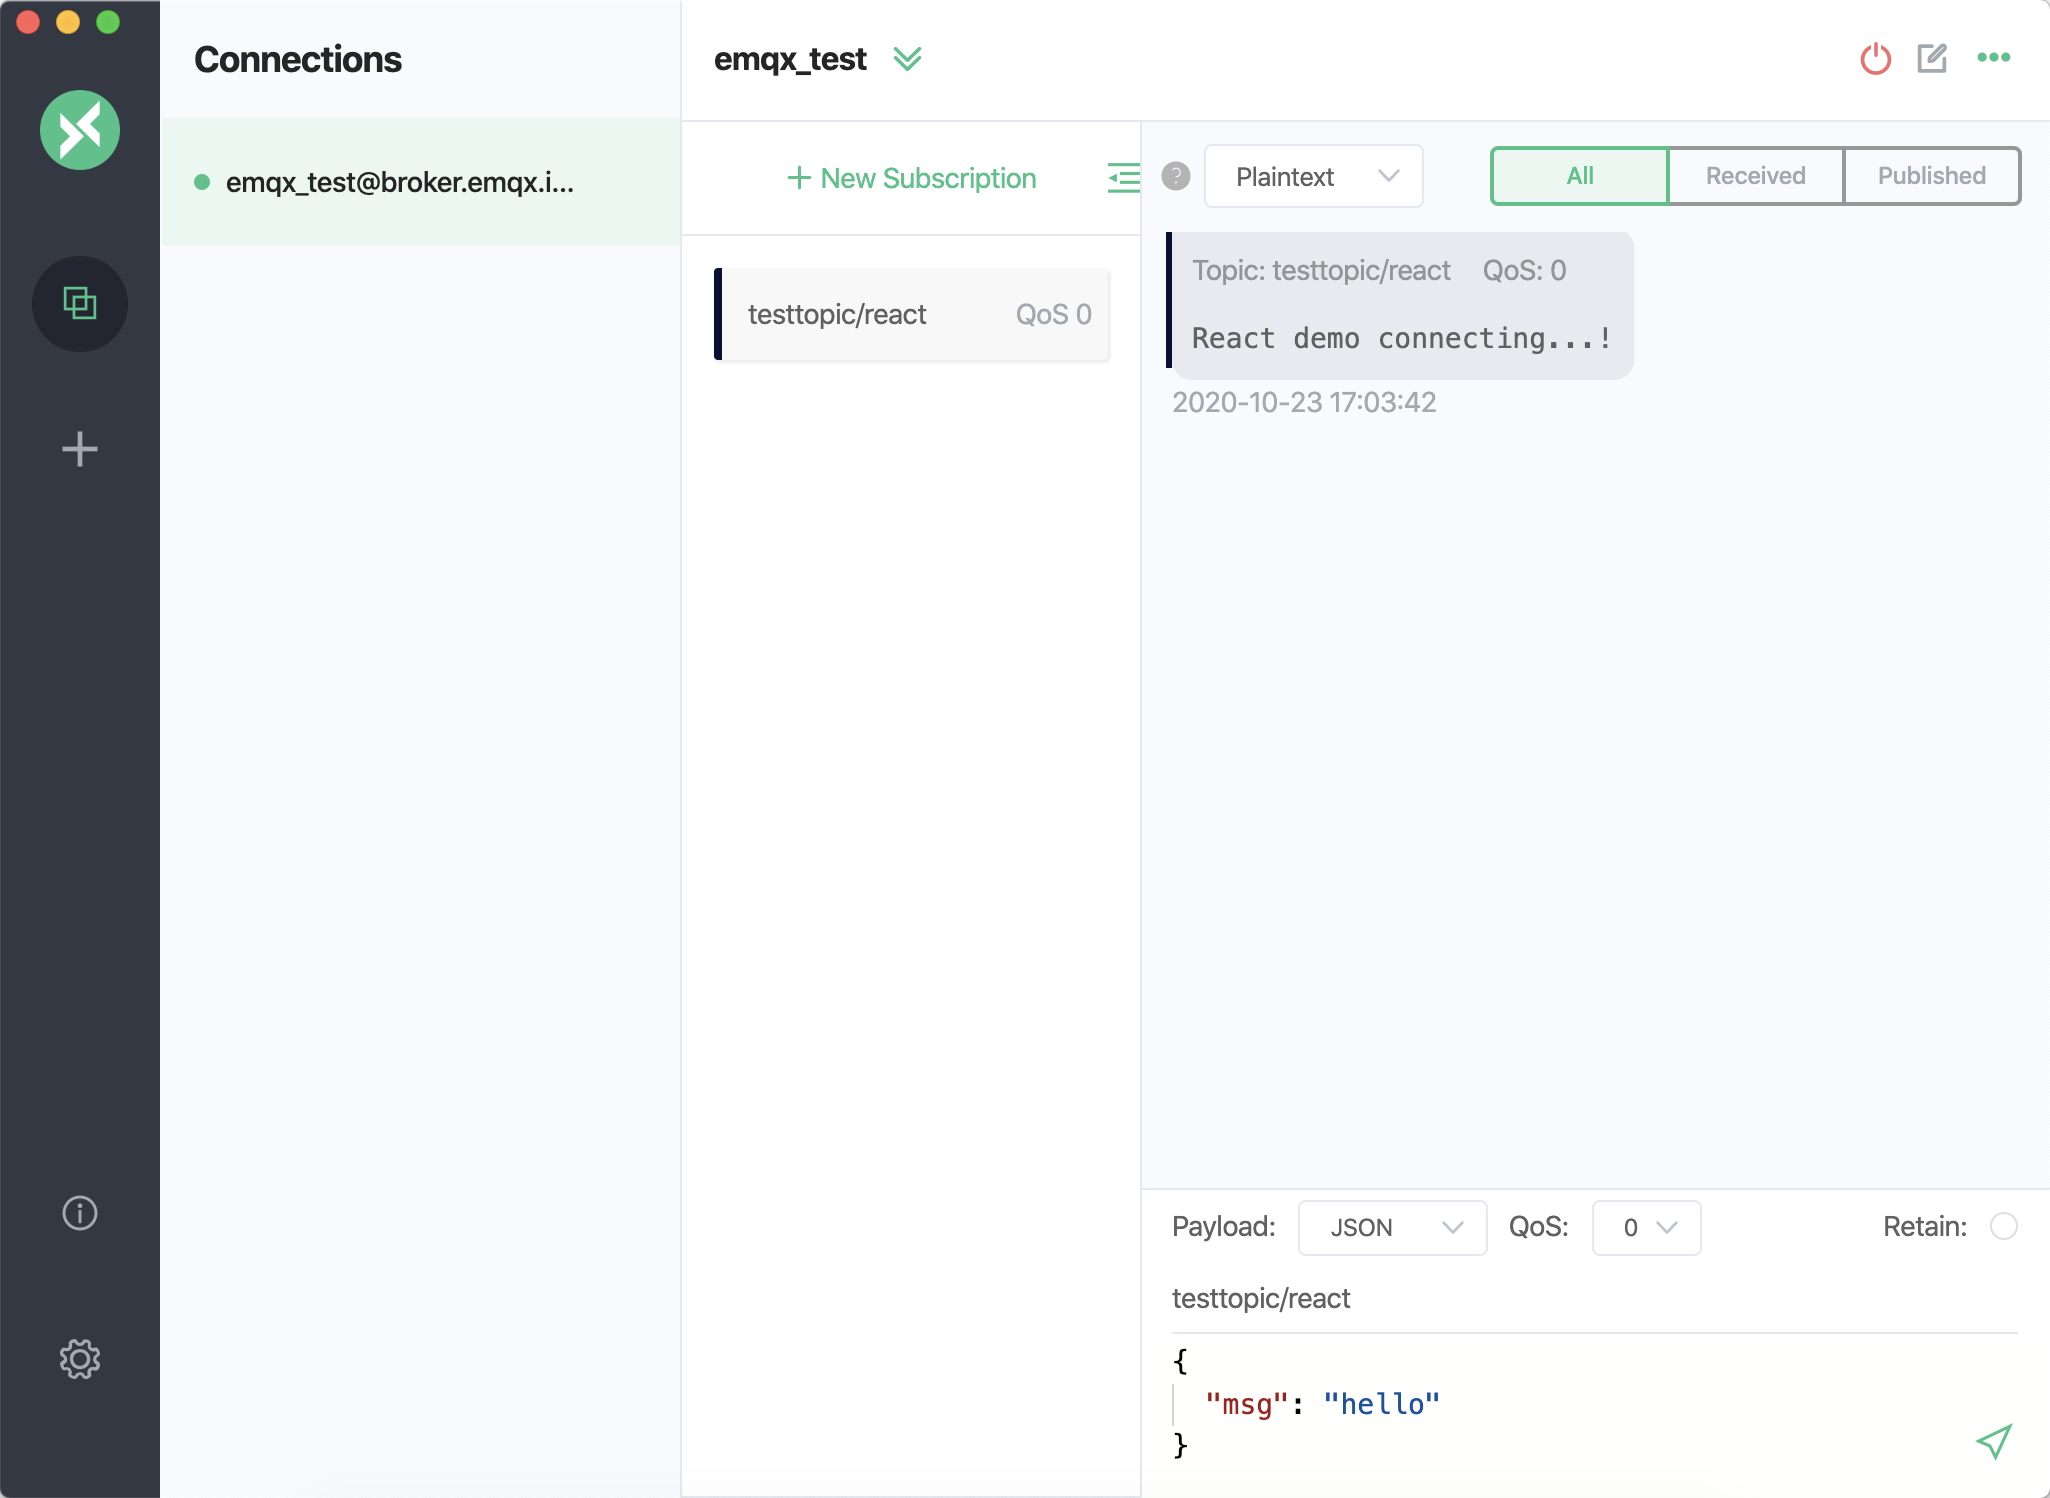
可以看到 MQTTX 可以正常接收来自浏览器端发送的消息,同样,使用 MQTTX 向该主题发送一条消息时,也可以看到浏览器端可以正常接收到该消息。
常见问题
是否支持自签名 TLS/SSL 证书?是否支持双向 TLS/SSL 认证?
由于浏览器的限制,均暂不支持。参考 MQTT.js issue: 如何在浏览器环境中使用双向认证?和 Node.js 中双向认证可用,但在浏览器中不支持。
更多内容
综上所述,我们实现了在 React 项目中创建 MQTT 连接,模拟了客户端与 MQTT 服务器进行订阅、收发消息、取消订阅以及断开连接的场景。
本文使用的 React 版本为 v18.2.0,因此将使用 Hook Component 特性来作为示例代码演示,如有需求也可参考完整的示例代码中的 ClassMqtt 组件来使用 Class Component 特性来进行项目构建。
可以在 MQTT Client - React 页面下载完整的示例源码,同时也欢迎前往 MQTT Client 示例页面探索更多其他语言的 Demo 示例。