Test with MQTT Clients
It is more safe and efficient for the developers to test the EMQX messaging services using client tools before connecting the real-time devices to the EMQX and developing the IoT applications.
Even before a local deployment of EMQX, you can also leverage the free online public MQTT broker and MQTT client tools provided by EMQ as verification tools for quick testing of the MQTT messaging services and application development.
This section introduces the commonly used MQTT 5.0 client tools and provides a simple demonstration on how to use these tools to test the following messaging services:
- Establish client connections
- Subscribe to topics
- Publish messages
- Receive and view messages
MQTTX
MQTTX is an elegant cross-platform MQTT 5.0 verification tool open-sourced by EMQ. It includes 3 types of tools.
- MQTTX Client
- MQTTX CLI
- MQTT Web
MQTTX Desktop
MQTTX Desktop is a cross-platform MQTT desktop client tool. It provides users with an easy-to-use graphic interface to allow users to quickly create, test MQTT connections, and publish/subscribe MQTT messages.
Before you test, download and install the MQTTX Client:
- Download the installation package from the application store or MQTTX website based on your operating system.
- Install the MQTTX Client. For detailed instructions, see MQTTX - Installation.
Follow the instructions below to use the MQTTX desktop client for a simple test:
Start the MQTTX Client. Click the New Connection to create an MQTT connection.
Configure the new connection as a client that publishes messages.
In the General section, fill in the general information of the client.
- Name: Type a connection
Name. - Client ID: Leave it as default. It is the one and only identification of a client connection and can be automatically generated by clicking the refresh button.
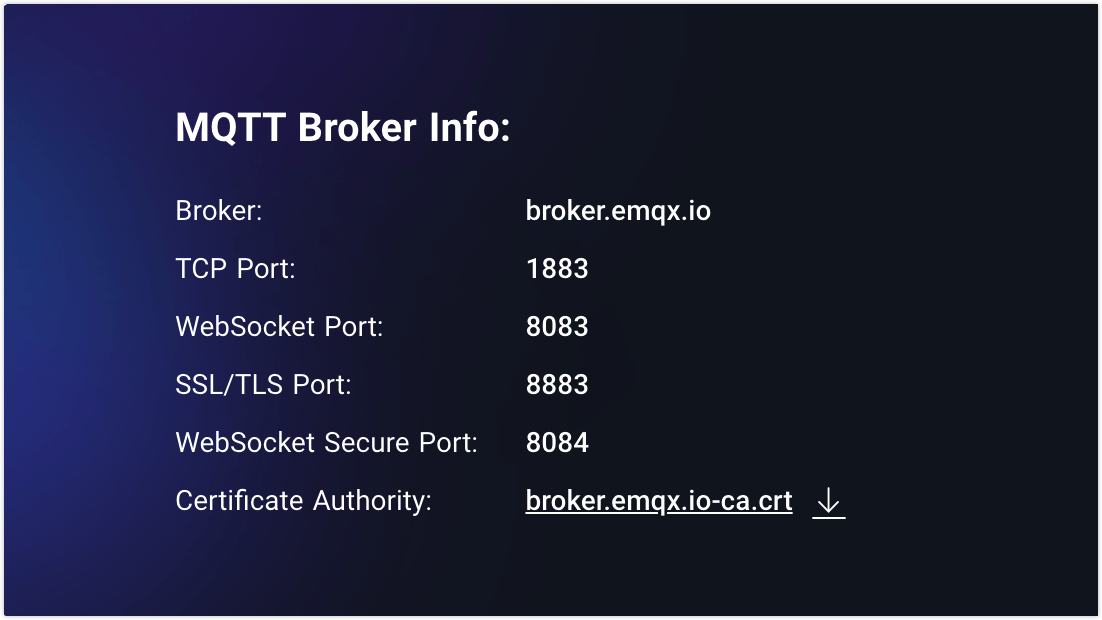
- Host: Select the protocol to be used. Select
mqtt://orws://. If anSSL/TLSauthentication connection is used, you need to selectmqtts://orwss://. The host IP address is set tobroker.emqx.ioby default, indicating you will connect to the public broker. If you are working with your own EMQX, replace it with the actual IP. - Port: Type the port corresponding to the selected protocol.
- Username and Password: Fill in the username and password if your broker enables user authentication or just leave them blank.
- SSL/TLS: Enable the SSL/TLS by clicking the toggle button if an
SSL/TLSauthentication connection is used.
Leave the rest settings as default. Click the Connect button at the upper right corner.
- Name: Type a connection
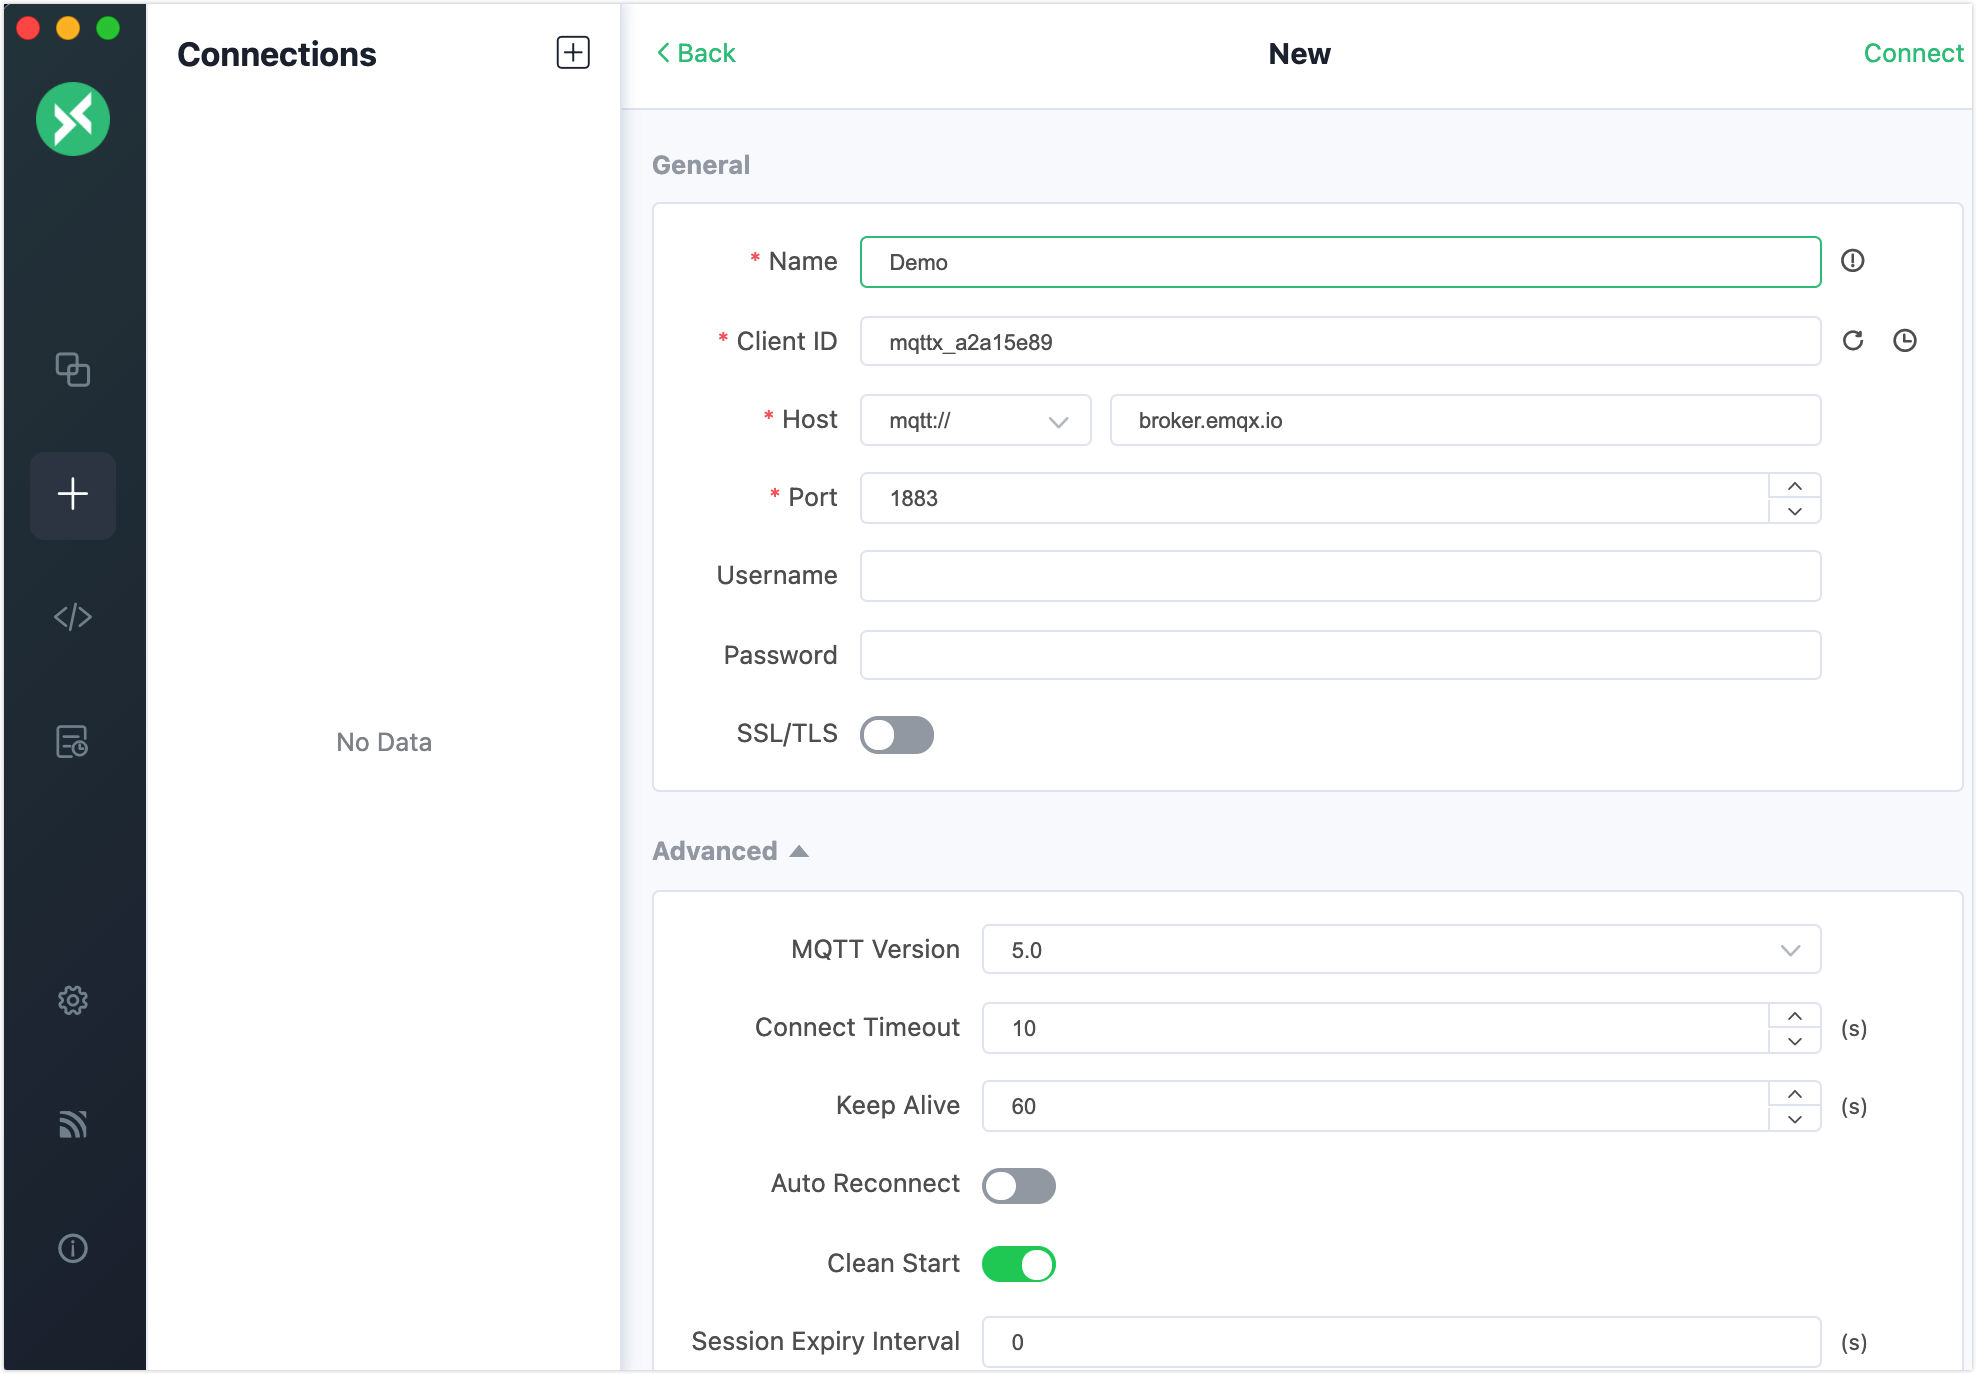
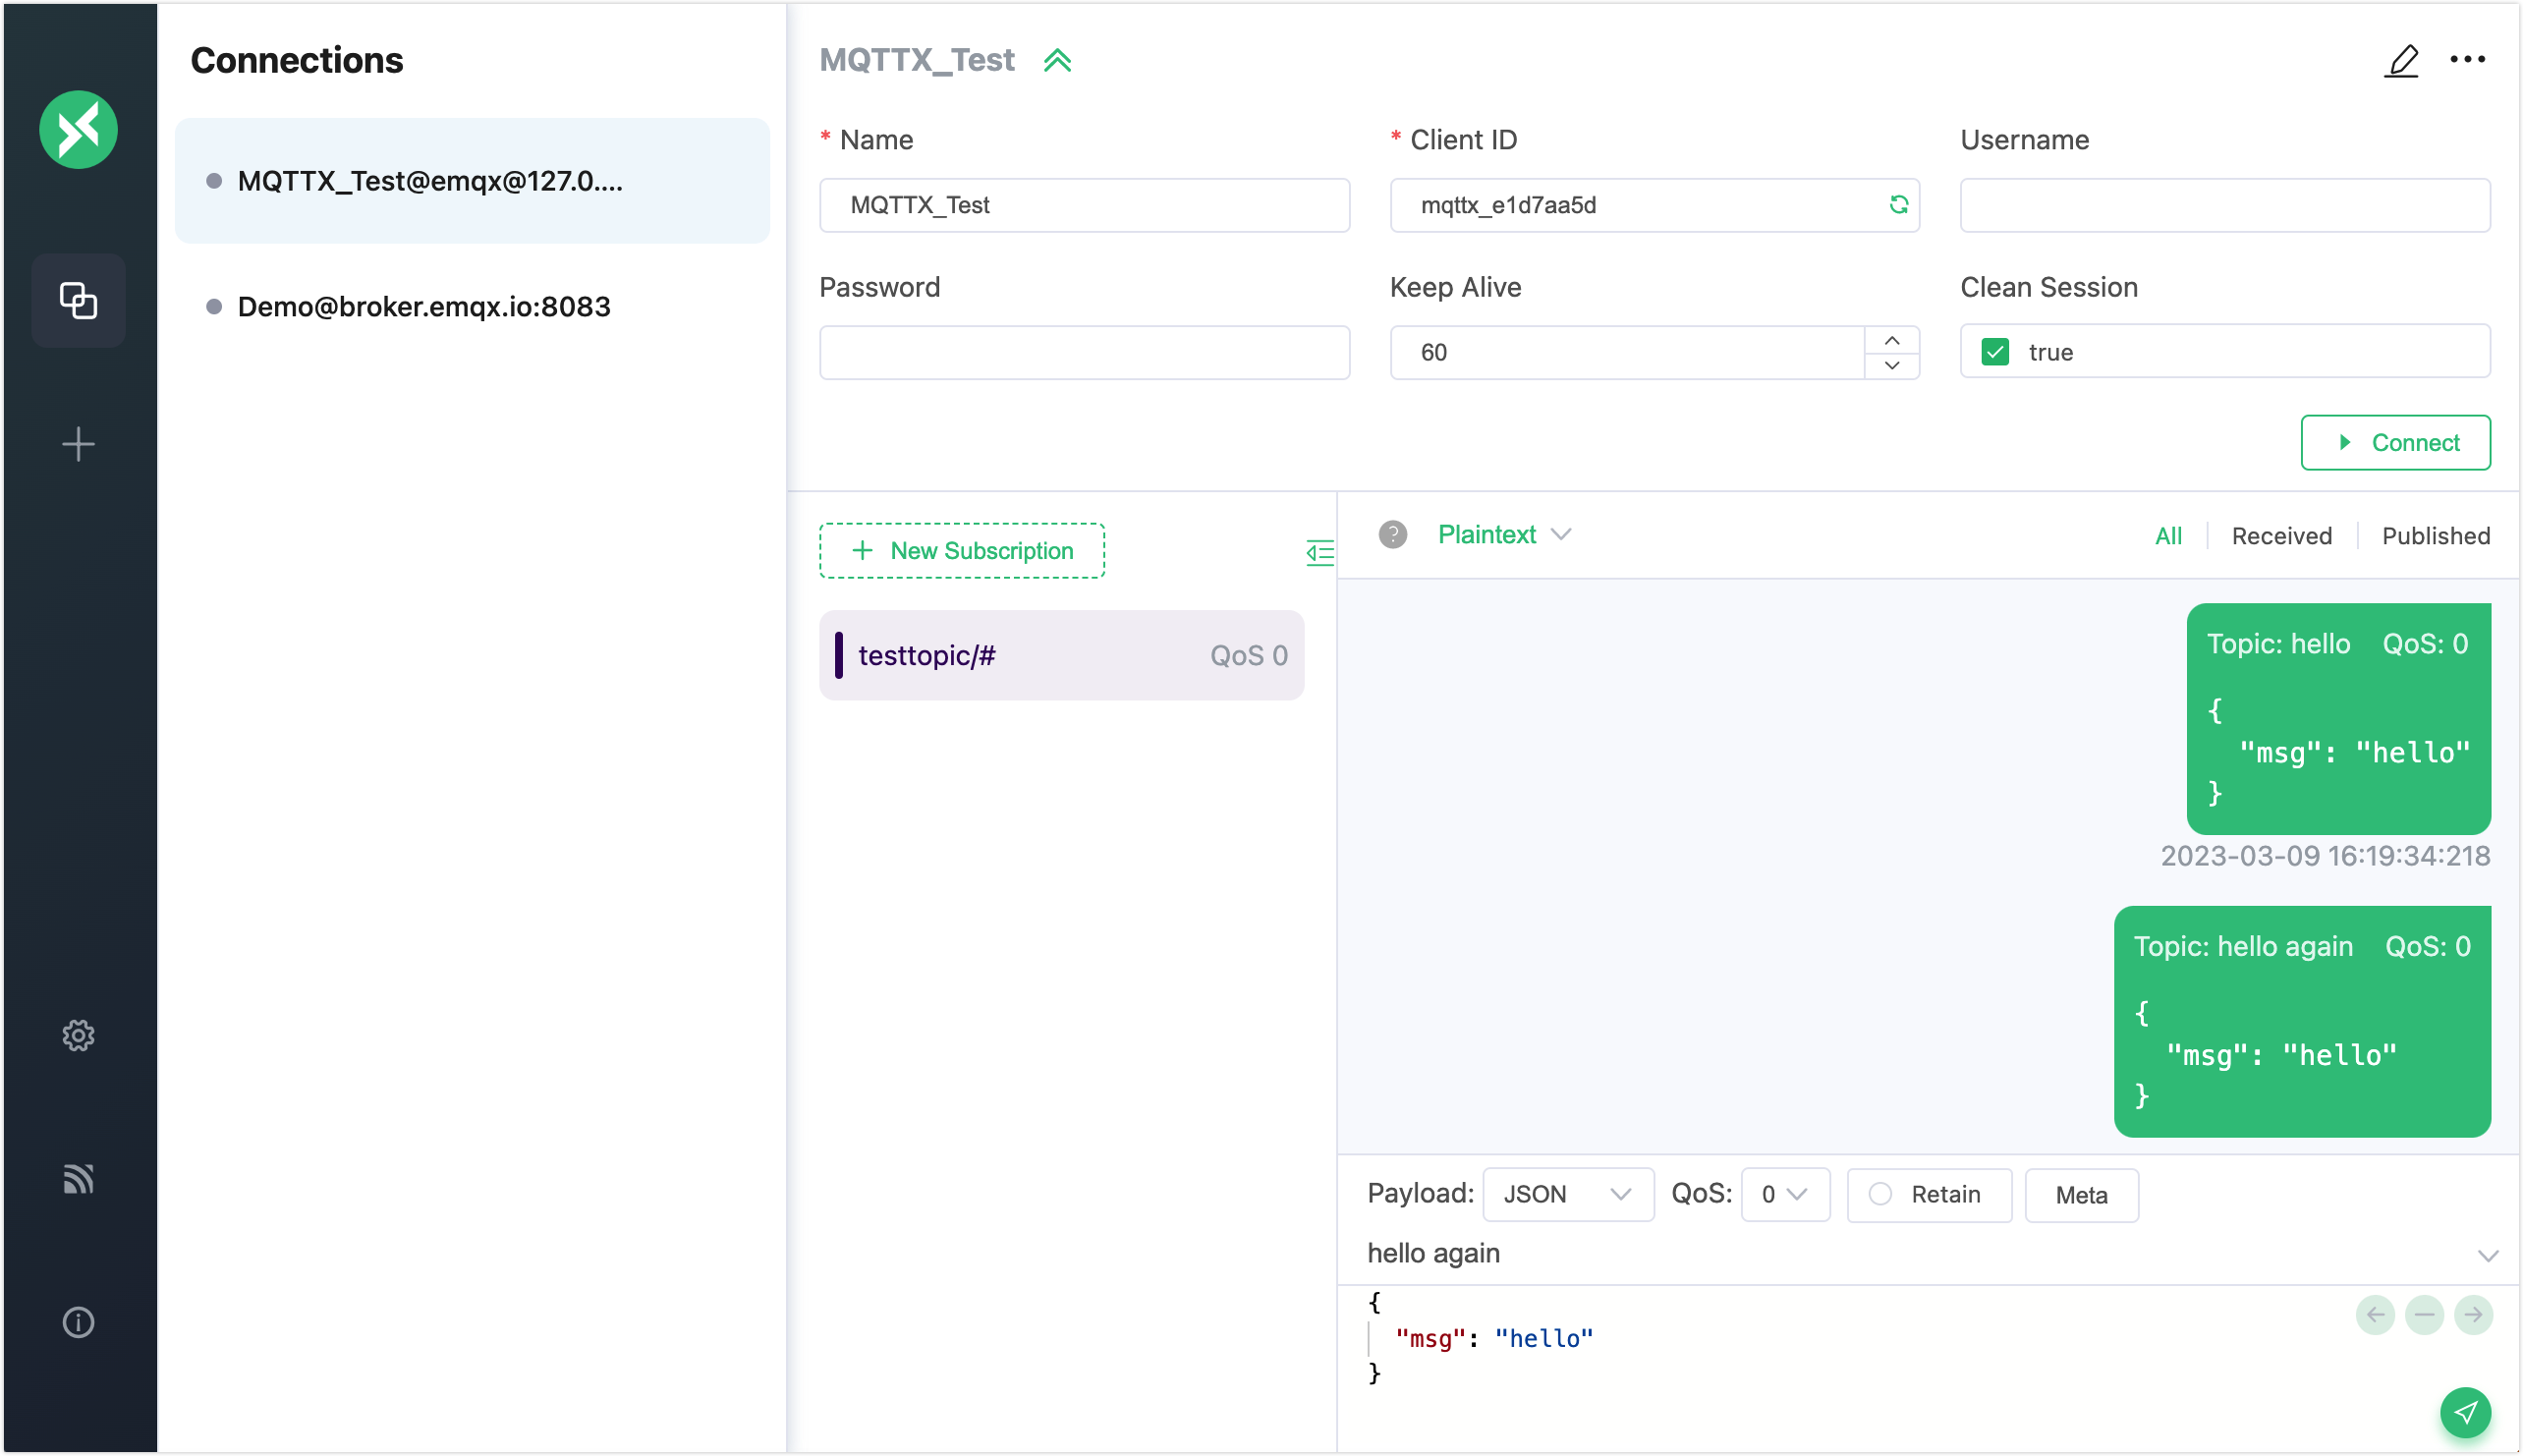
After the successful connection, type the topic heading
testin the text box and compose the message as shown in the screenshot. Click the send button. A message under the topictestappears in the dialogue box.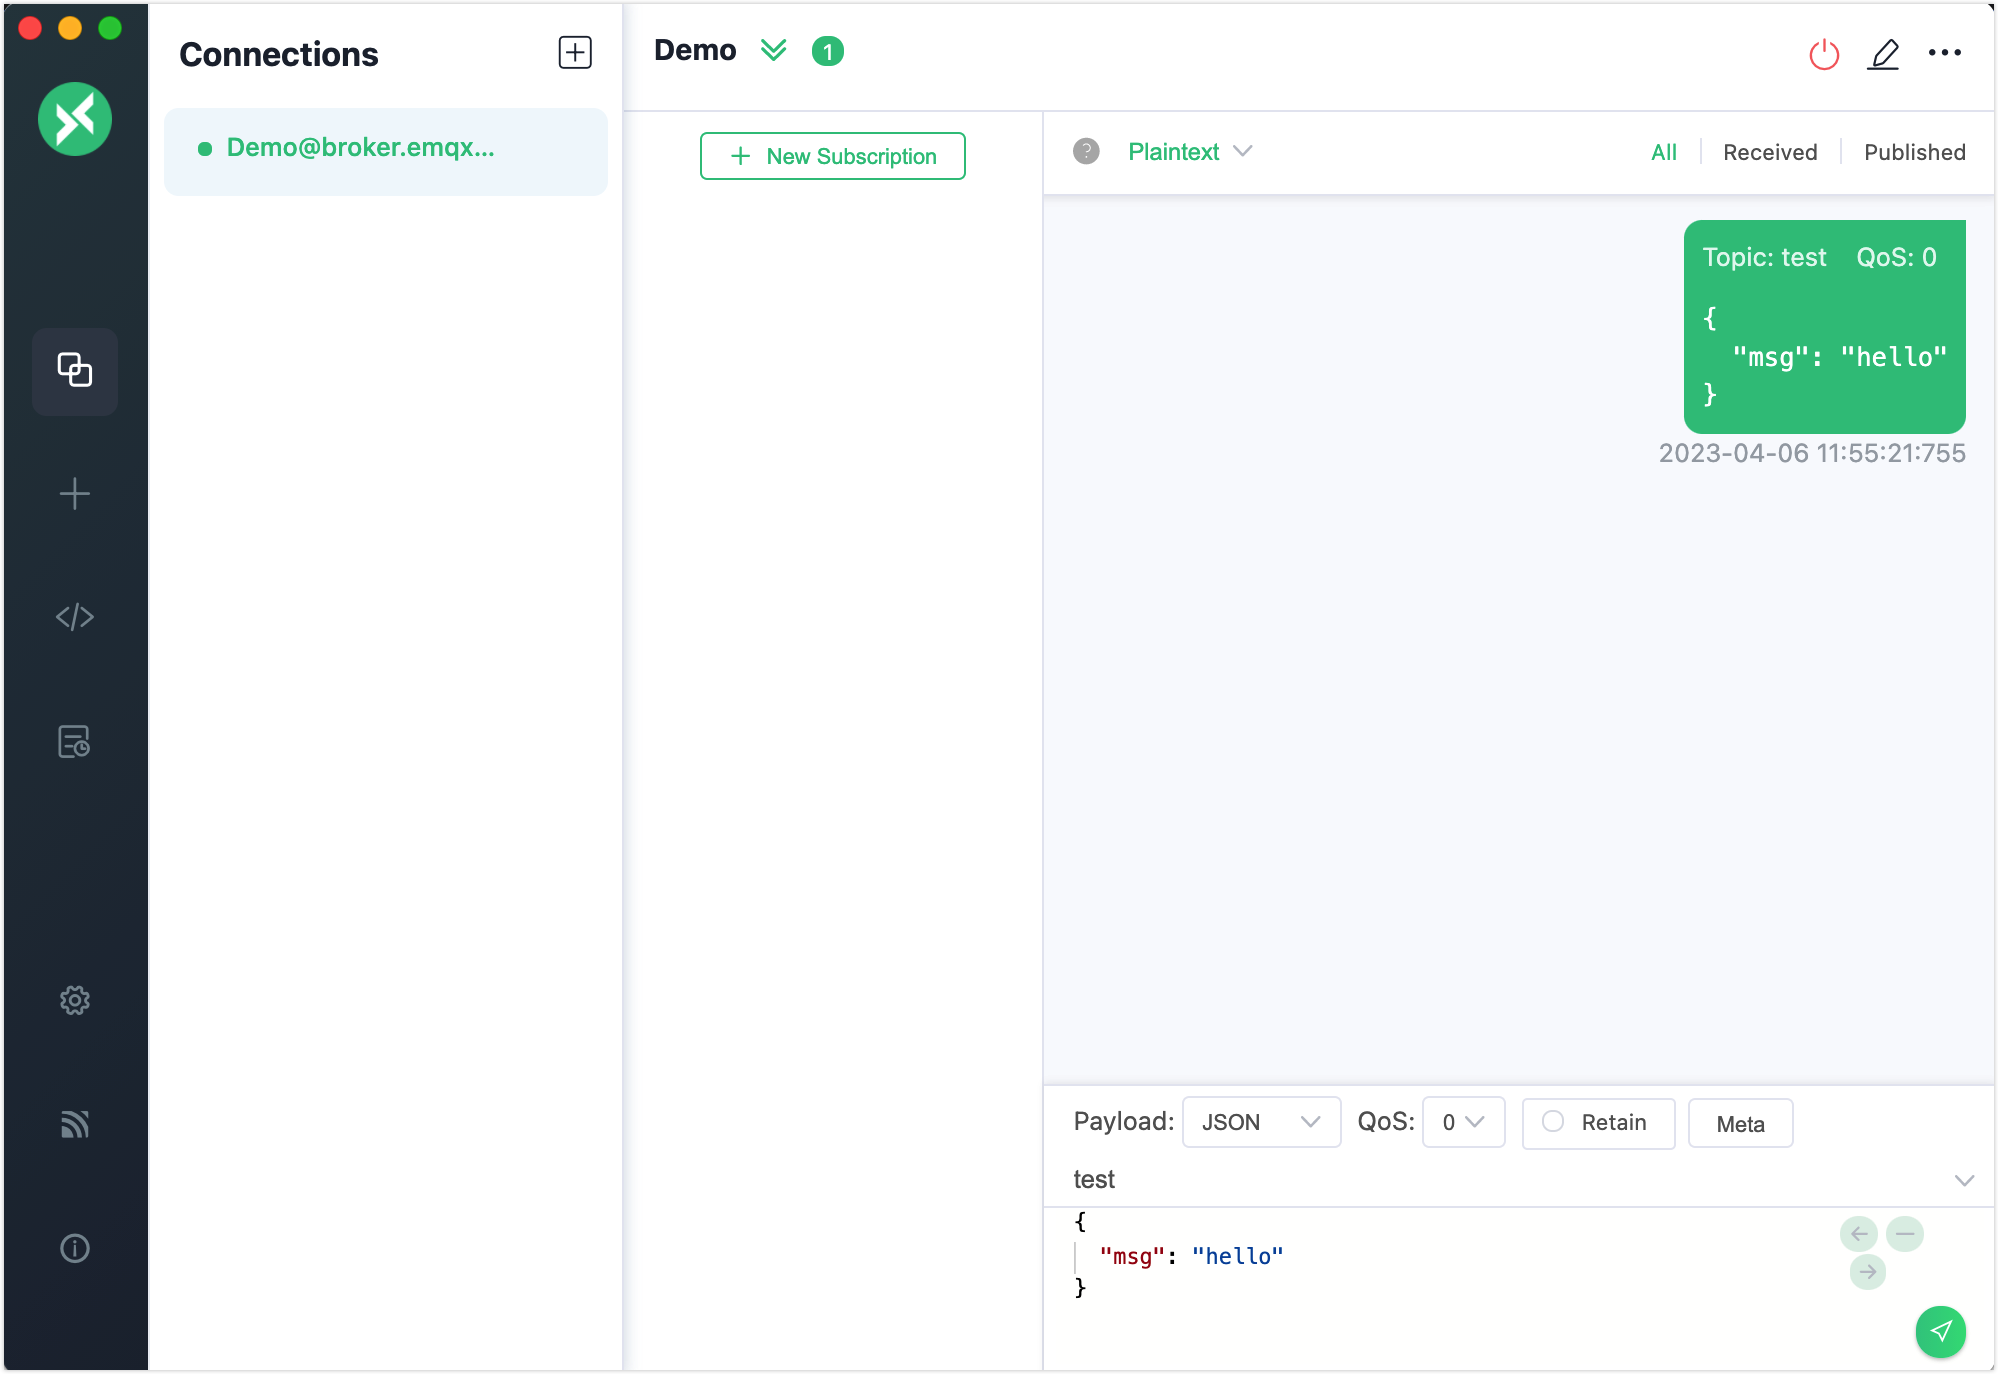
Click + -> New Connection from the Connections pane to create another new connection as a client that receives messages. Set the name to
Subscriberand leave other general connection configurations the same as that of the clientDemo.Select the client
Subscriberin the Connections pane. Click the + New Subscription.Topic: Type
testin the text box.QoS: Set as the default value.
Color: You can select the color to mark the subscription.
Leave other options empty for a general test. Click the Confirm button.
Select the client
Demoat the Connections pane. Publish a new message to the topictest. You can see the clientSubscriberreceives a new message.
Now you have tried the basic publishing and subscribing operations using the MQTTX Client. For detailed and advanced operations, see MQTTX - Publish and Subscription.
MQTTX CLI
MQTTX CLI is an open-source MQTT 5.0 command line tool provided by EMQ. It is an MQTTX tool running on the command line tool so users can test and debug MQTT services and applications with no need for a graphic interface.
Follow the instructions below to connect, publish/subscribe, and view messages using MQTTX CLI:
Download and install MQTT CLI. The demonstration takes macOS as an example, for the other operating systems, see MQTTX CLI - Installation.
bash# Homebrew brew install emqx/mqttx/mqttx-cli # Intel Chip curl -LO https://www.emqx.com/zh/downloads/MQTTX/v1.9.0/mqttx-cli-macos-x64 sudo install ./mqttx-cli-macos-x64 /usr/local/bin/mqttx # Apple Silicon curl -LO https://www.emqx.com/zh/downloads/MQTTX/v1.9.0/mqttx-cli-macos-arm64 sudo install ./mqttx-cli-macos-arm64 /usr/local/bin/mqttxIn the command line tool, execute the following command to connect to EMQX and subscribe to the
testtopic/#topic:shellmqttx sub -t 'testtopic/#' -q 1 -h 'localhost' -p 1883 'public' -vParameter Description:
-t: Subscription topic
-q: QoS of the message (default: 0)-h: IP address of the listener (default:localhost)-p: Broker port (default:1883)-v: Print the topic before the message
After successful execution, the command line will be in blocking receive state and will print the message after receiving the message.
For information on more parameters, see MQTTX CLI - Subscribe.
Open a new command line window, execute the command below to connect to EMQX, and publish a message to topic
testtopic/#:bashmqttx pub -t 'testtopic/1' -q 1 -h 'localhost' -p 1883 -m 'from MQTTX CLI'Parameters:
-t: Subscription topic-q: QoS of the message (default: 0)-h: IP address of the listener (default:localhost)-p: Broker port (default:1883)-m: Message body
After successful execution, the command line will establish the connection, publish the message and then disconnect from the broker, and the command line window in step 2 will print the following message:
bashtopic: testtopic/1 payload: from MQTTX CLIFor information on more parameters, see MQTTX CLI - Publish.
MQTTX Web
MQTTX Web is a browser-based MQTT 5.0 WebSocket client tool. You can use it to complete the development and debugging via MQTT over WebSocket, with no need to download or install any tools. The testing operations using the MQTTX Web is basically the same as using the MQTTX Client.
Dashboard WebSocket
EMQX Dashboard provides a WebSocket client as a quick and highly effective MQTT test tool. With this MQTT over WebSocket, you can test connecting to EMQX, subscribing to topics, and publishing messages.
In EMQX Dashboard, click Diagnose -> WebSocket Client on the left navigation menu.
Fill in the connection information in the Connection section.
- Host: Fill in the corresponding IP address (Default:
localhost). - Port: Keep the default port
8083. - Username and Password: Fill in the username and password if there are any or just leave them blank if no access control is used.
Leave other settings as default.
- Host: Fill in the corresponding IP address (Default:
Click the Connect button to establish a connection.
Set the topic to subscribe as
testtopic/#in the Subscription section. Click the Subscribe button to finish the subscription. The topictesttopic/#will be added to the table below.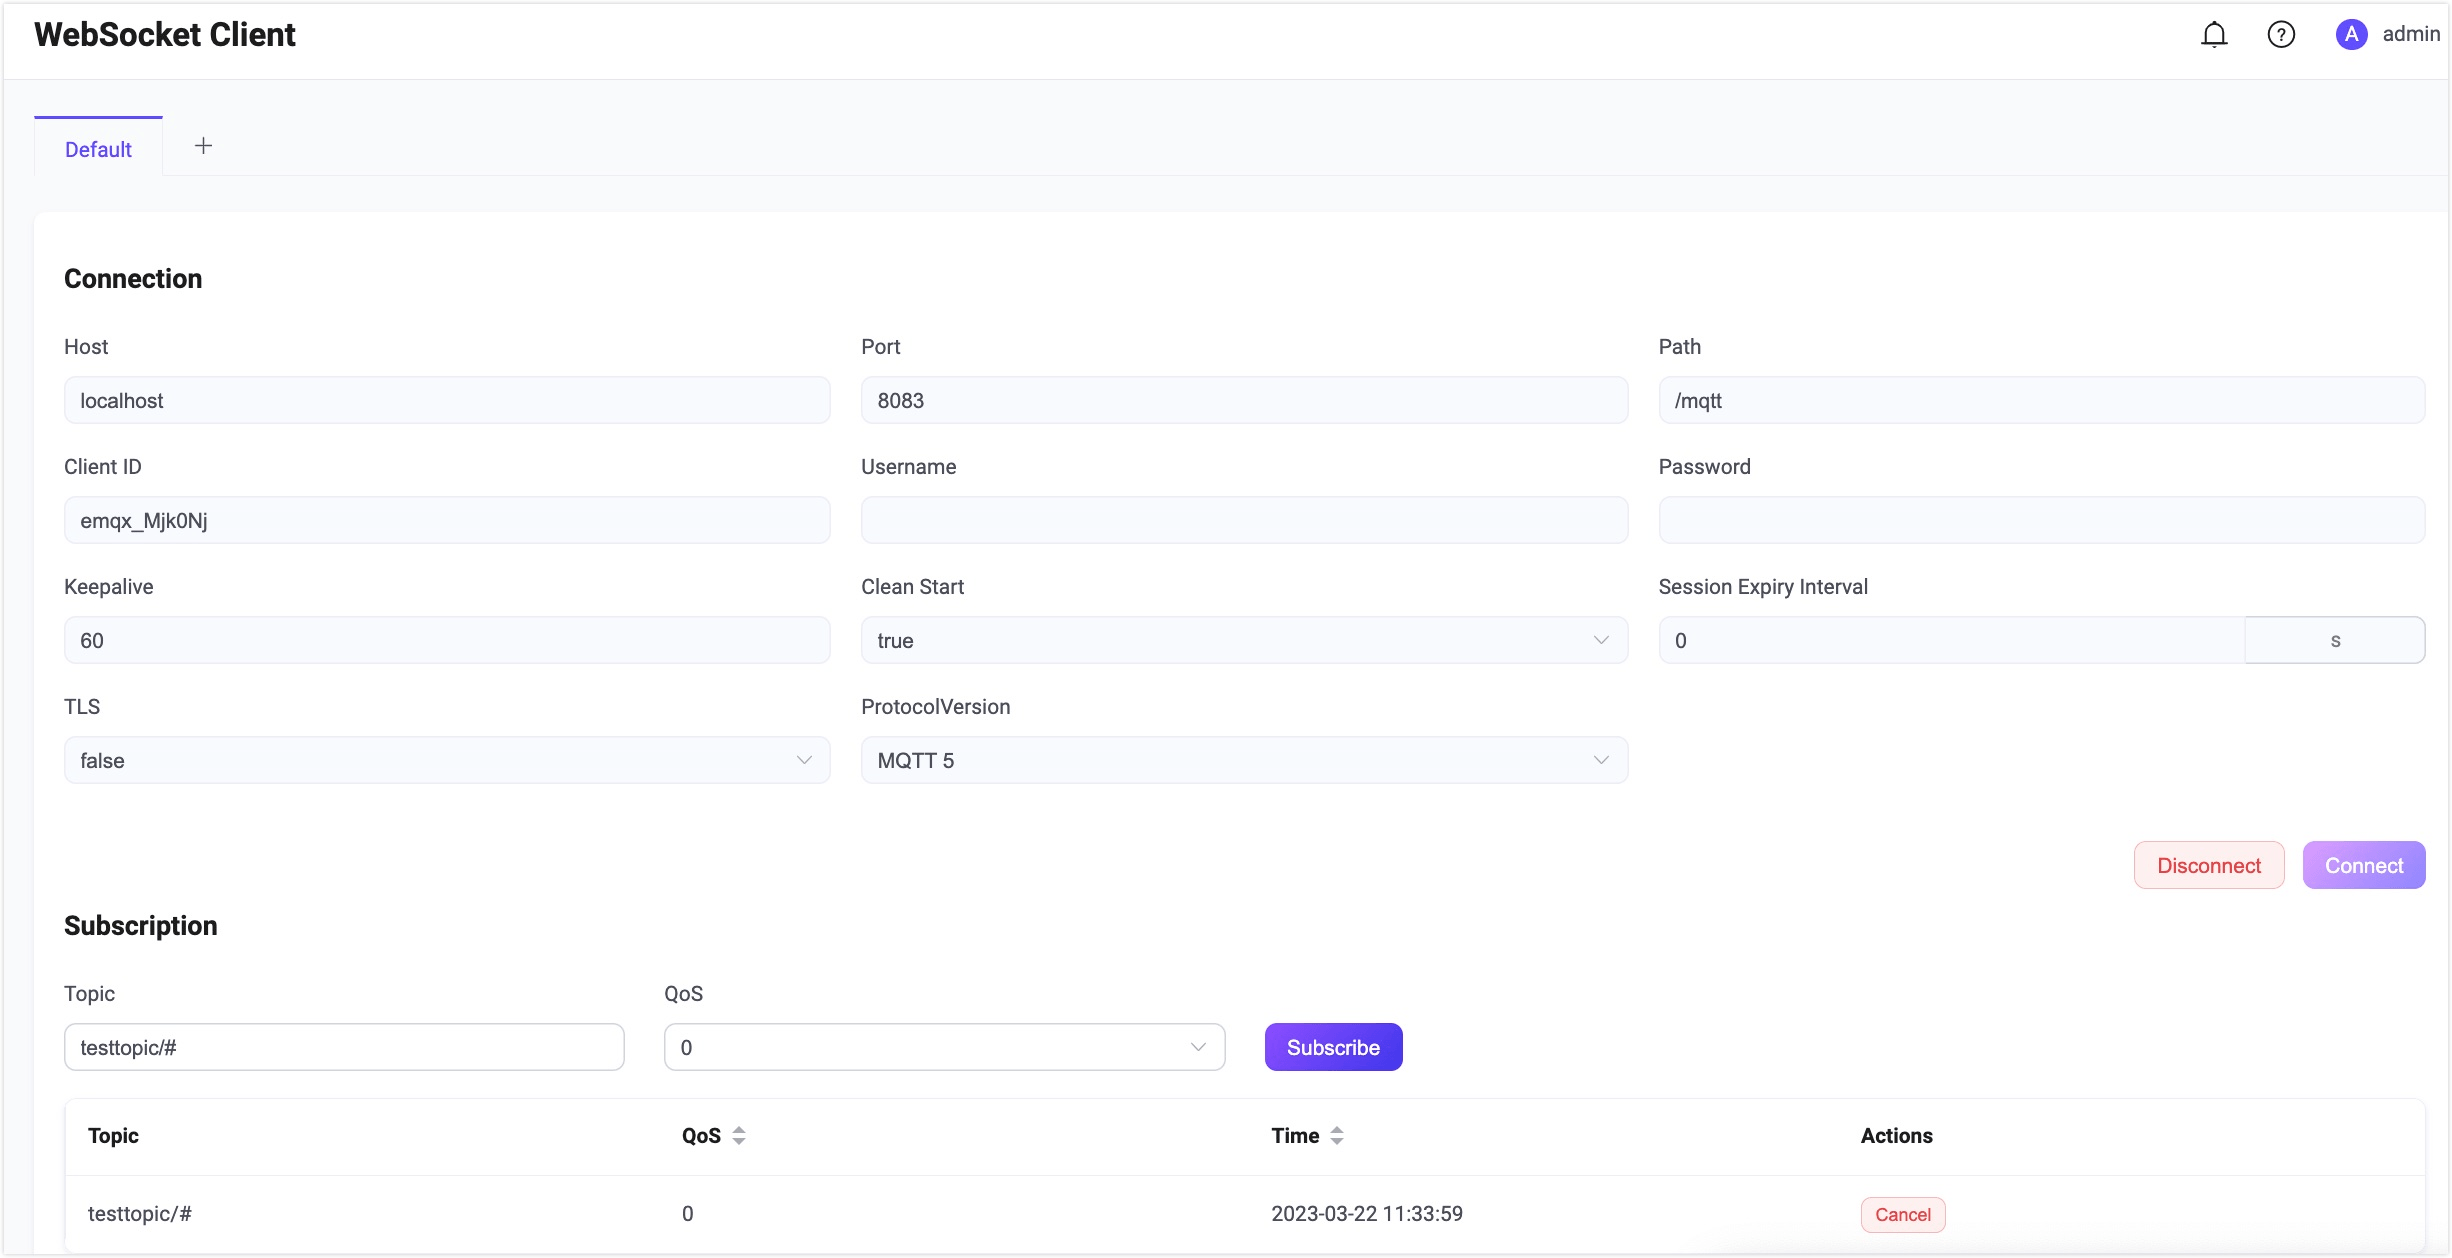
After the subscription, all messages matching the topic will be forwarded to this connection.
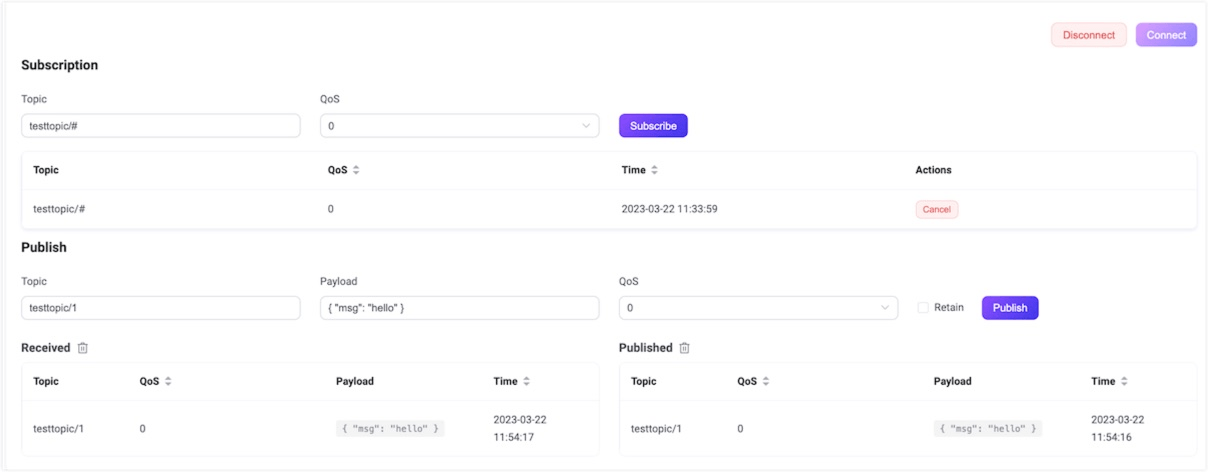
Set the topic for the message to be published in the Publish section.
- Topic: Set to
testtopic/1(wildcards like+and#are not supported). - Payload: Set to
{"msg": 'Hello"}. - QoS: Set as default value
0. - Retain: Select the checkbox if you want to set it as a retained message. For more information on retained messages, see Retained Message.
Click the Publish button, and one record will be added to the Published section below. The message will be routed to all subscribers. As the publisher is also the receiver in this test, one new record will also be added to the Received section below.
- Topic: Set to