Webhook
Webhook provides a way to integrate EMQX client messages and events with external HTTP servers. Compared to using rule engines and data bridges, Webhook offers a more straightforward method, significantly lowering the barrier to entry, and quickly enabling integration between EMQX and external systems.
This page comprehensively introduces information related to Webhook, along with practical usage instructions.
How It Works
When a client publishes a message to a specific topic or performs certain actions, it triggers the Webhook. Webhook is compatible with all messages and events supported by the rule engine.
You can configure Webhook to be triggered in the following scenarios. For the request content of each event, refer to SQL Data Source and Fields.
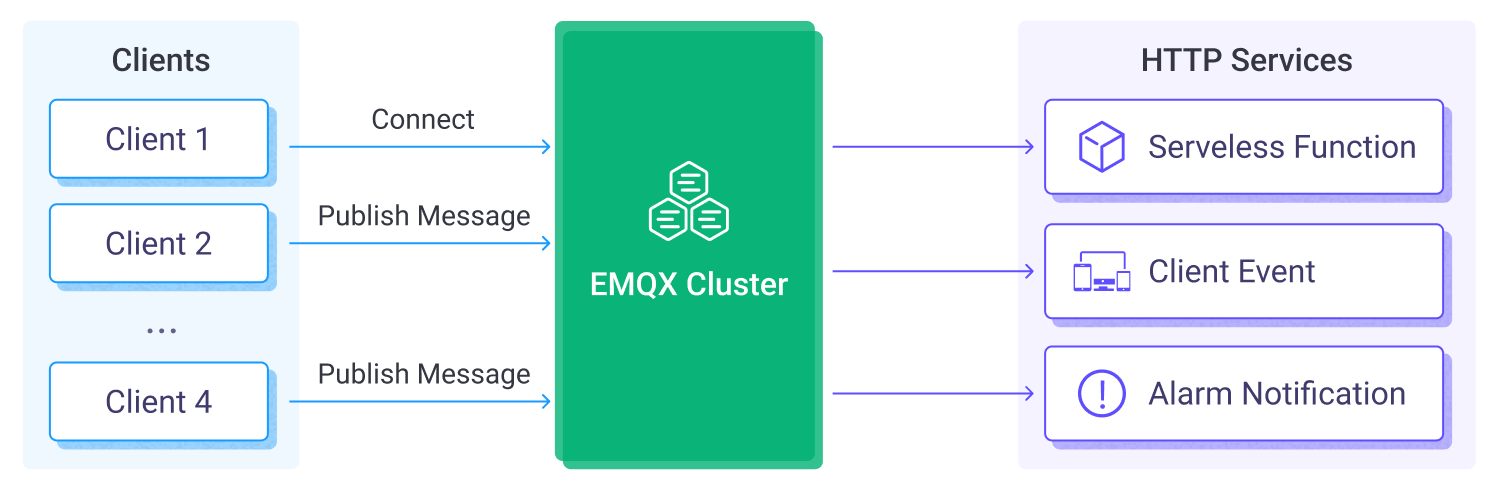
Messages
When a publisher publishes a message, or the message status changes, including:
- Message published
- Message delivered
- Message acknowledged
- Message forwarded and dropped
- Message delivery dropped
Multiple topic filters can be set for messages; only the matching messages will trigger the Webhook.
Events
When a client performs specific operations, or the status changes, including:
- Connection established
- Connection terminated
- Connection confirmed
- Authorization result
- Session subscription completed
- Session unsubscribed
Features
Using EMQX's Webhook integration can bring the following advantages to your business:
- Pass Data to More Downstream Systems: Webhook can easily integrate MQTT data into more external systems like analytics platforms, cloud services, etc., enabling multi-system data distribution.
- Real-Time Response and Trigger Business Processes: Through Webhook, external systems can receive MQTT data in real-time and trigger business processes, enabling quick responses. For example, receiving alarm data and triggering business workflows.
- Customize Data Processing: External systems can further process the received data as needed, implementing more complex business logic, without being limited by EMQX's functionalities.
- Loosely Coupled Integration Method: Webhook uses a simple HTTP interface, providing a loosely coupled way of system integration.
In summary, Webhook integration provides real-time, flexible, and customized data integration capabilities, satisfying the need for flexible and rich application development.
Get Started
This section takes macOS as an example to introduce how to configure and use Webhook.
Create HTTP Service
Here we quickly create an HTTP server using Python, listening on the local port 5000, and print the URL when receiving a Webhook request. In actual applications, please replace it with your business server:
First, we use Python to build a simple HTTP service to receive POST / requests. The service prints the request content and returns 200 OK:
from flask import Flask, json, request

api = Flask(__name__)

@api.route('/', methods=['POST'])
def print_messages():
  reply= {"result": "ok", "message": "success"}
  print("got post request: ", request.get_data())
  return json.dumps(reply), 200

if __name__ == '__main__':
  api.run()
Save the above code as http_server.py file, and run the following commands in the directory where the file is located:
# Install flask dependency
pip install flask

# Start Service
python3 http_server.py
Create Webhook
Click Integration -> Webhooks from the Dashboard left menu.
Click the Create Webhook button on the page.
Enter a Name and optional Note for the webhook.
The name should contain only uppercase or lowercase English letters and numbers. For example:
my_webhook.Configure the Webhook request settings:
- Select
POSTas the request method and set URL tohttp://localhost:5000. - Optionally, configure Query String to add query parameters to the Webhook request URL, and configure Headers to add custom HTTP request headers.
- To use OAuth2 to protect the Webhook request, turn on OAuth2 Client Credentials and configure the required settings. For details, see Configure OAuth2 Client Credentials. You can click Test next to the URL input box to test the connection.
In this example, select All Messages and Events. For details about other options, see How it Works.
- Select
Configure the request settings:
- Method:
POST - URL:
http://localhost:5000
You can verify the connection by clicking Test next to the URL field. Leave the other settings with their default values.
- Method:
Click Save at the bottom of the page to create the webhook.
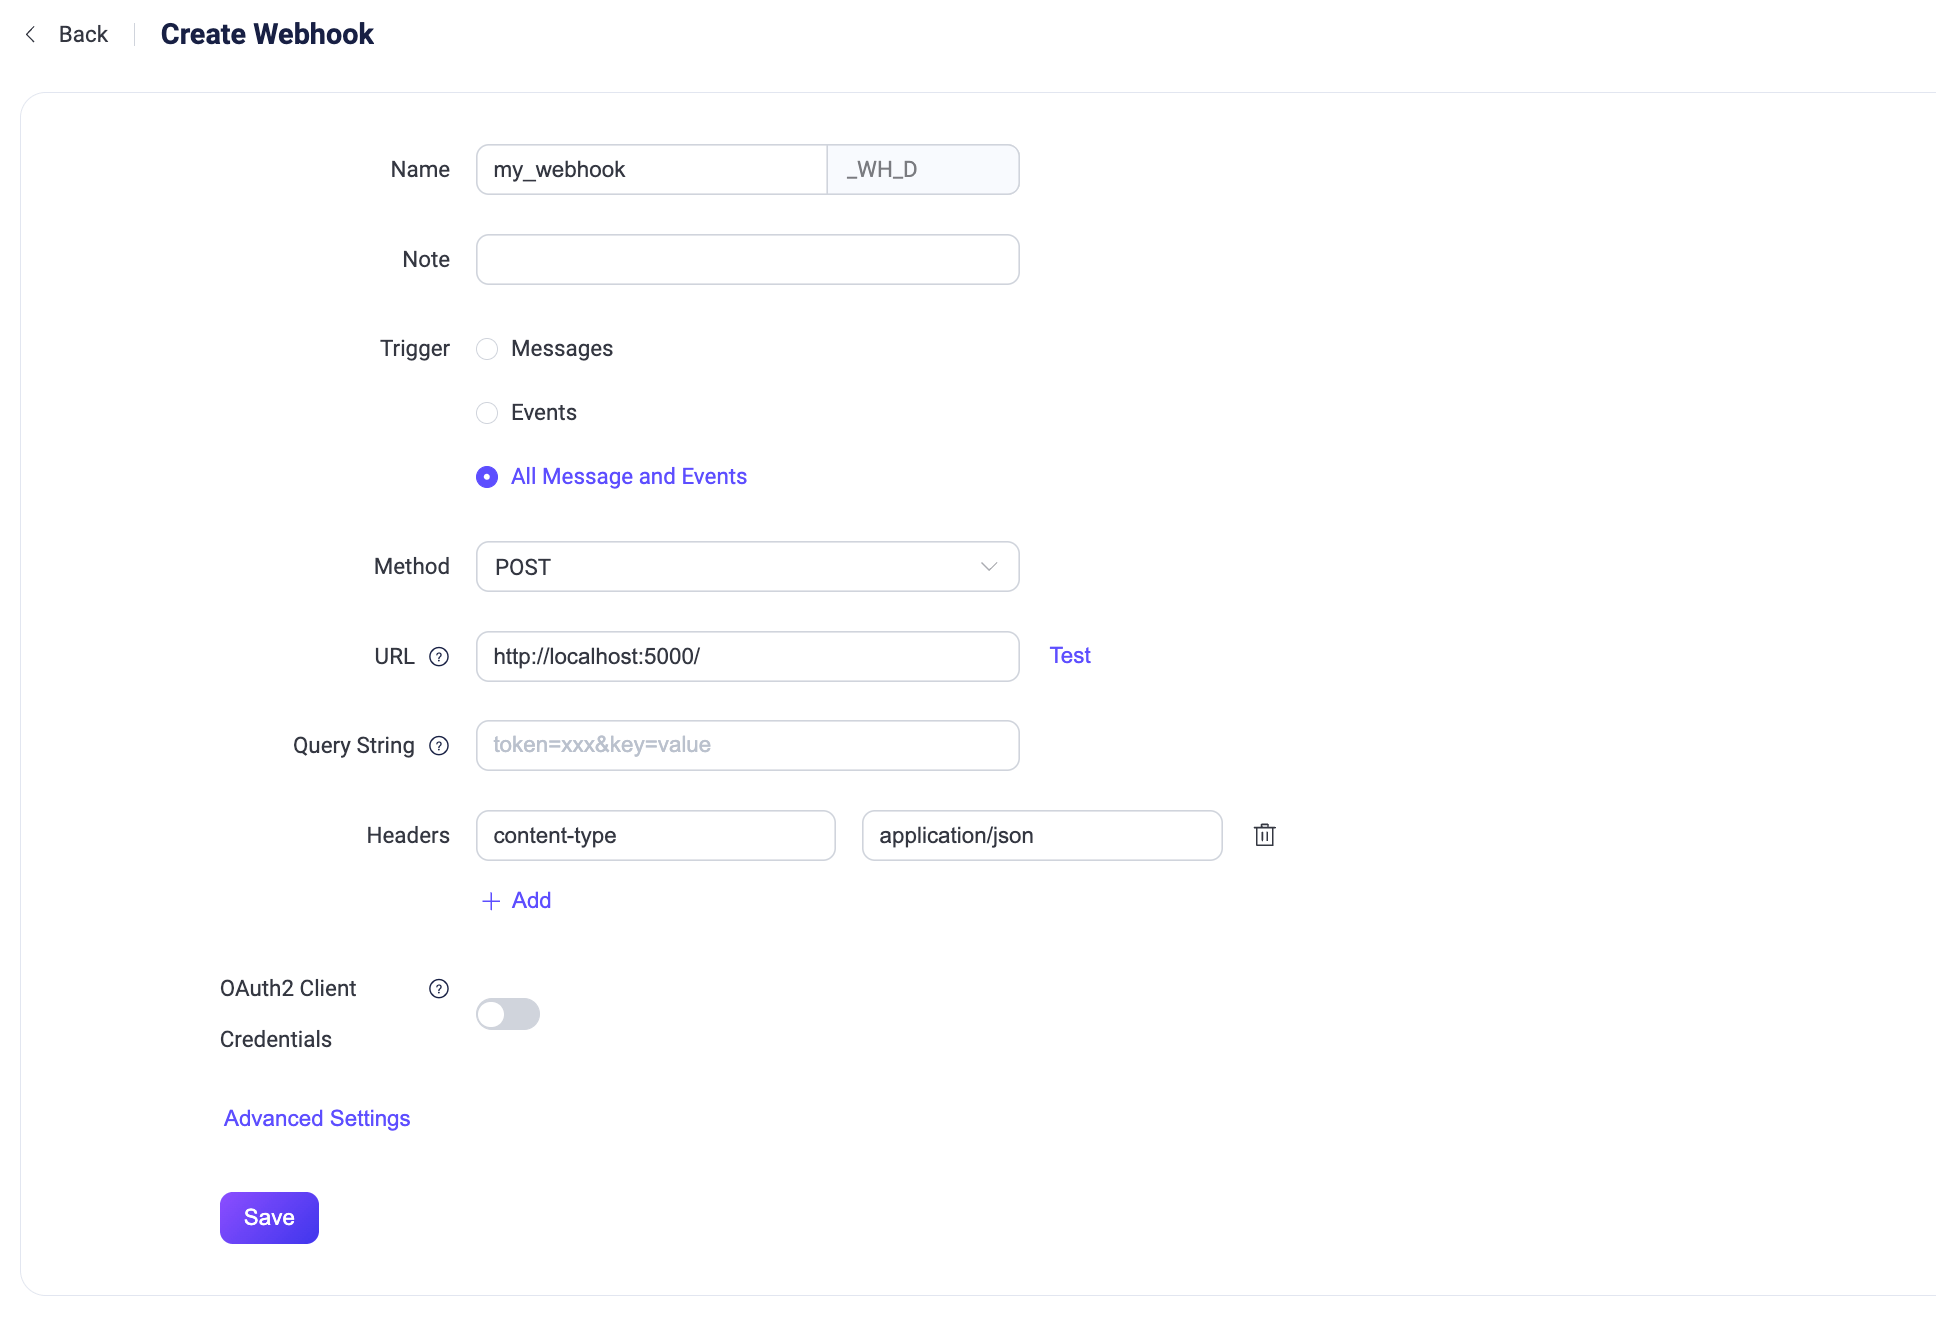
The webhook is now successfully created.
Configure OAuth2 Client Credentials
Starting from EMQX 6.0.4, Webhook supports the OAuth 2.0 Client Credentials Grant. When OAuth2 is enabled, EMQX obtains, caches, and automatically refreshes an access token from the configured token endpoint. When EMQX sends a Webhook request to the target HTTP server, it includes the token in the Authorization: Bearer <access_token> request header so that the target server can authenticate EMQX.
Obtain the token endpoint, client credentials, and allowed scopes from your OAuth2 authorization server, identity provider (IdP), or target API administrator. Turn on OAuth2 Client Credentials, and then configure the following settings:
| Dashboard Setting | Description |
|---|---|
| Token Endpoint | Required. OAuth2 authorization server endpoint used to request an access token. The URL must use HTTP or HTTPS and must not contain user information. |
| Client ID | Required. OAuth2 client ID used to request an access token. |
| Client Secret | Required. OAuth2 client secret used to request an access token. |
| Scope | Optional OAuth2 scope requested for the access token. Separate multiple scopes with spaces. Leave this field empty if the authorization server does not require a scope. |
| Token Request Timeout | Timeout for the HTTP request to the token endpoint. The default is 5 seconds. |
| Enable TLS | Turn on the toggle switch to enable TLS for the token endpoint. |
EMQX sends a POST request with the application/x-www-form-urlencoded content type to the token endpoint. The request body contains grant_type, client_id, client_secret, and the optional scope. The token endpoint must return a 200 response with a JSON body containing an access_token. It can also return token_type and expires_in. If present, token_type must be Bearer, and expires_in must be a positive integer.
Important Notice
- Do not configure an
Authorizationheader for the Webhook when OAuth2 is enabled. EMQX rejects the configuration because it conflicts with the automatically generated Bearer authorization header. - The token endpoint must accept the client ID and client secret as form fields in the request body. Authenticating to the token endpoint with an HTTP Basic
Authorizationheader is not supported.
Test Webhook
Use MQTTX CLI to publish a message to the t/1 topic:
mqttx pub -i emqx_c -t t/1 -m '{ "msg": "Hello Webhook" }'This operation will sequentially trigger the following events:
- Connection established
- Connection confirmed
- Authorization checked and completed
- Message published
- Connection terminated
If the t/1 topic has no subscribers, it will also trigger the message forwarded and dropped event after the message is published.
Check whether the corresponding events and message data have been forwarded to the HTTP service. You should see the following data:
got post request:  b'{"username":"undefined","timestamp":1694681417717,"sockname":"127.0.0.1:1883","receive_maximum":32,"proto_ver":5,"proto_name":"MQTT","peername":"127.0.0.1:61003","node":"emqx@127.0.0.1","mountpoint":"undefined","metadata":{"rule_id":"my-webhook_WH_D"},"keepalive":30,"is_bridge":false,"expiry_interval":0,"event":"client.connected","connected_at":1694681417714,"conn_props":{"User-Property":{},"Request-Problem-Information":1},"clientid":"emqx_c","clean_start":true}'
127.0.0.1 - - [14/Sep/2023 16:50:17] "POST / HTTP/1.1" 200 -
got post request:  b'{"username":"undefined","timestamp":1694681417719,"sockname":"127.0.0.1:1883","reason_code":"success","proto_ver":5,"proto_name":"MQTT","peername":"127.0.0.1:61003","node":"emqx@127.0.0.1","metadata":{"rule_id":"my-webhook_WH_D"},"keepalive":30,"expiry_interval":0,"event":"client.connack","conn_props":{"User-Property":{},"Request-Problem-Information":1},"clientid":"emqx_c","clean_start":true}'
127.0.0.1 - - [14/Sep/2023 16:50:17] "POST / HTTP/1.1" 200 -
got post request:  b'{"username":"undefined","topic":"t/1","timestamp":1694681417728,"result":"allow","peerhost":"127.0.0.1","node":"emqx@127.0.0.1","metadata":{"rule_id":"my-webhook_WH_D"},"event":"client.check_authz_complete","clientid":"emqx_c","authz_source":"file","action":"publish"}'
127.0.0.1 - - [14/Sep/2023 16:50:17] "POST / HTTP/1.1" 200 -
got post request:  b'{"username":"undefined","topic":"t/1","timestamp":1694681417728,"qos":0,"publish_received_at":1694681417728,"pub_props":{"User-Property":{}},"peerhost":"127.0.0.1","payload":"{ \\"msg\\": \\"Hello Webhook\\" }","node":"emqx@127.0.0.1","metadata":{"rule_id":"my-webhook_WH_D"},"id":"0006054DC3E940F8F445000038A60002","flags":{"retain":false,"dup":false},"event":"message.publish","clientid":"emqx_c"}'
127.0.0.1 - - [14/Sep/2023 16:50:17] "POST / HTTP/1.1" 200 -
got post request:  b'{"username":"undefined","topic":"t/1","timestamp":1694681417729,"reason":"no_subscribers","qos":0,"publish_received_at":1694681417728,"pub_props":{"User-Property":{}},"peerhost":"127.0.0.1","payload":"{ \\"msg\\": \\"Hello Webhook\\" }","node":"emqx@127.0.0.1","metadata":{"rule_id":"my-webhook_WH_D"},"id":"0006054DC3E940F8F445000038A60002","flags":{"retain":false,"dup":false},"event":"message.dropped","clientid":"emqx_c"}'
127.0.0.1 - - [14/Sep/2023 16:50:17] "POST / HTTP/1.1" 200 -
got post request:  b'{"username":"undefined","timestamp":1694681417729,"sockname":"127.0.0.1:1883","reason":"normal","proto_ver":5,"proto_name":"MQTT","peername":"127.0.0.1:61003","node":"emqx@127.0.0.1","metadata":{"rule_id":"my-webhook_WH_D"},"event":"client.disconnected","disconnected_at":1694681417729,"disconn_props":{"User-Property":{}},"clientid":"emqx_c"}'
127.0.0.1 - - [14/Sep/2023 16:50:17] "POST / HTTP/1.1" 200 -