System
The System menu in the EMQX Dashboard provides access to system management options such as user and role management, audit logs, API keys, licensing, SSO, data backup and restore, hot upgrade, and general settings.
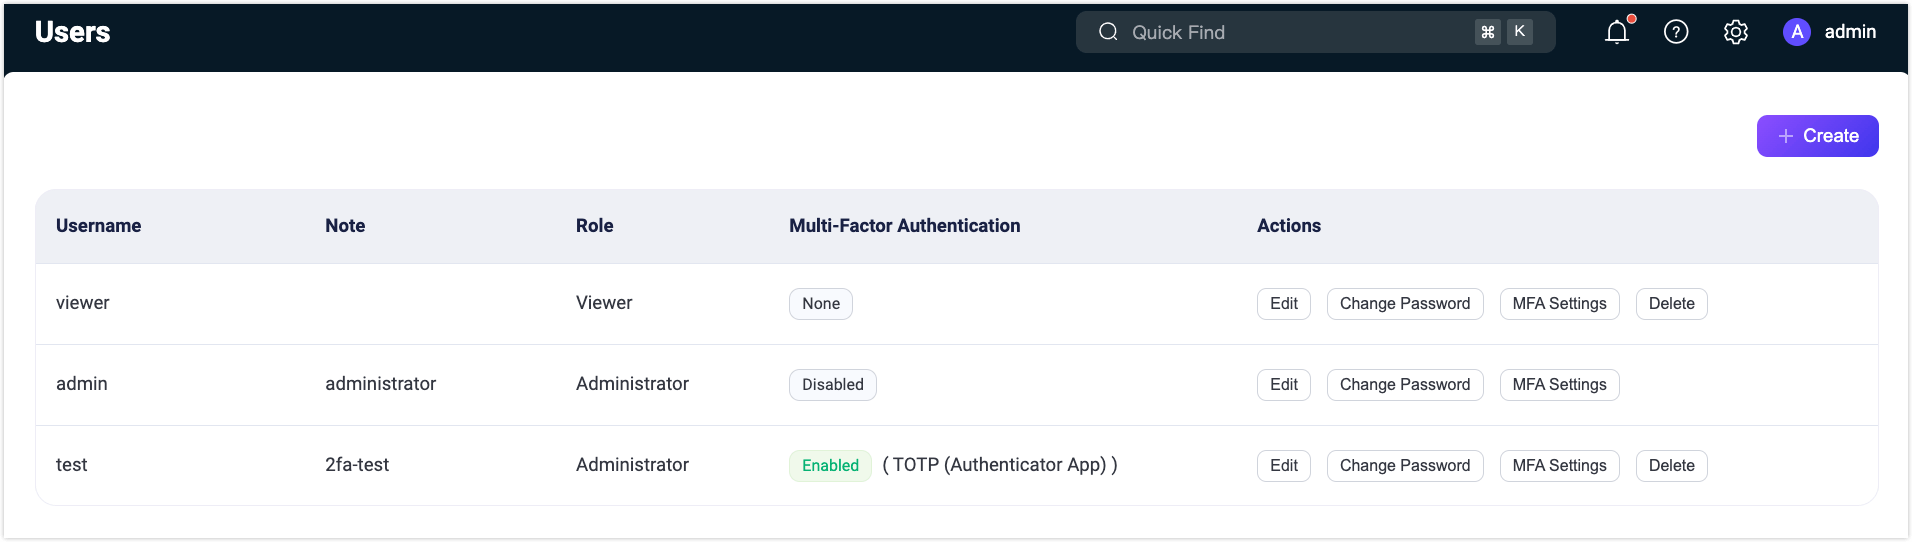
Users
The Users page provides an overview of all active Dashboard users, including those generated via the CLI.
To add new users, click the + Create button in the page's top-right corner. A pop-up dialog will appear, prompting you to input the necessary user details. Once entered, click the Create button to generate the user account. You can easily access these options through the Actions column for further user management, such as editing users, updating passwords, or deleting users' information.
For security reasons, starting with EMQX 5.0.0, Dashboard users cannot be used for REST API authentication.
Role-Based Access Control
Starting from EMQX 5.3, the Dashboard introduces the Role-Based Access Control (RBAC) feature for EMQX Enterprise users.
RBAC allows you to assign permissions to users based on their roles within the organization. This feature simplifies authorization management, enhances security by restricting access, and improves organizational compliance, making it an essential access control mechanism for the Dashboard.
Currently, either of the following two predefined roles can be set for a user. You can select the role from the Role dropdown when you create users.
Administrator
Administrators have full access to manage all EMQX features and resources, including client management, system configuration, API key, and user management.
Viewer
Viewers can access all EMQX data and configurations, corresponding to all
GETrequests in the REST API. However, they do not have the right to create, modify, or delete any data.
Login User Scopes
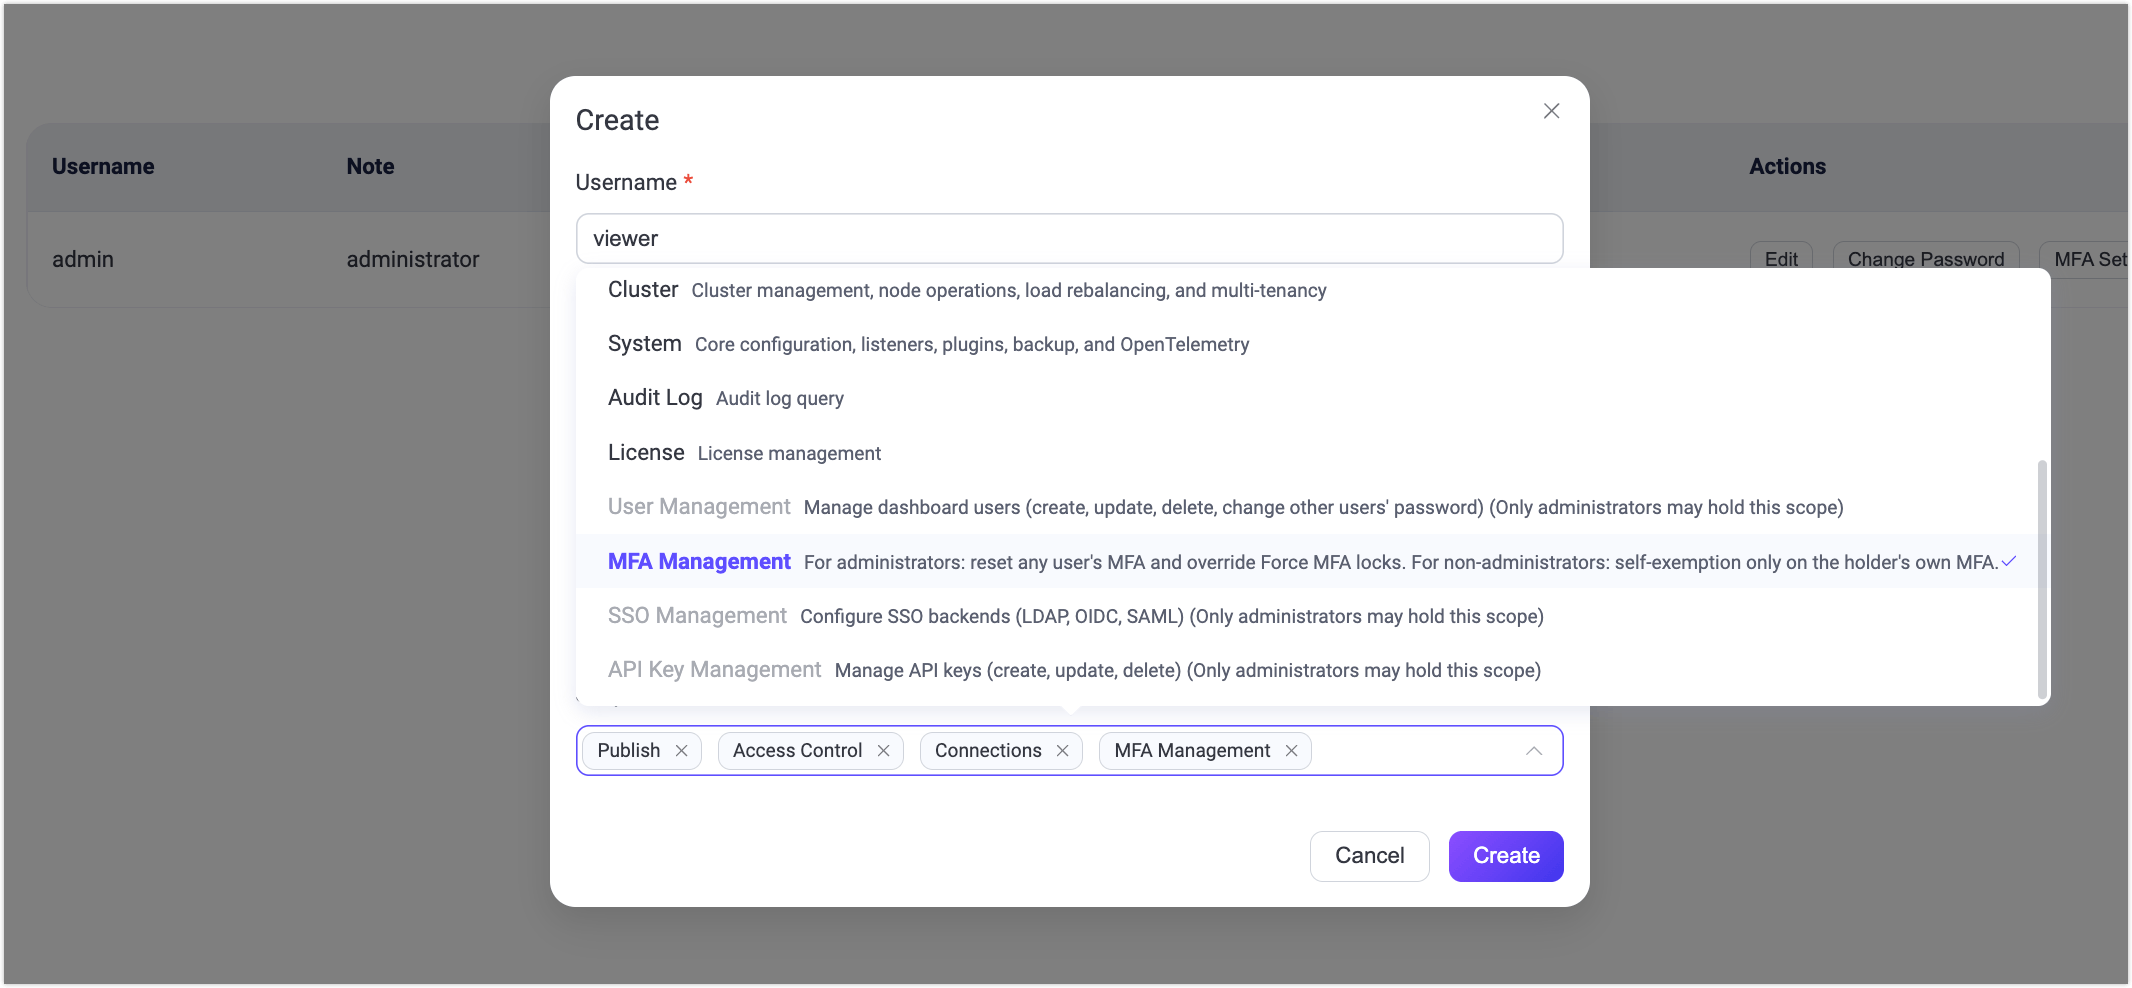
Starting from EMQX 5.10, you can assign scopes to Dashboard login users to further restrict which parts of the API they can access within their role. In addition to the 10 API-key scopes, Dashboard users have four additional scopes that apply only to browser sessions:
| Scope | Required role | Purpose |
|---|---|---|
user_management | Administrator | Manage Dashboard users (create / update / delete). |
sso_management | Administrator | Manage SSO backends and SSO user records. |
api_key_management | Administrator | Manage API keys. |
mfa_management | Any | Manage own MFA; administrators can manage other users’ MFA. |
Three of these scopes (user_management, sso_management, and api_key_management) require the Administrator role and cannot be assigned to Viewers. The exception is mfa_management: Viewers can hold it, but it only allows them to manage MFA on their own account. It does not grant access to other users’ MFA settings. This is useful when you want Viewer accounts to be able to re-enroll or recover their own authenticator without gaining any additional privileges.
When you create or edit a user, the Scopes field is optional. If you leave it empty, the user receives a default scope set derived from their role:
- Administrator: All scopes, including the four login-only ones above.
- Viewer: All generic API-key scopes;
mfa_managementis only granted if you explicitly assign it.
Treat broad scopes as administrator-equivalent
The following scopes are inherently broad and effectively grant administrator capabilities even when other scopes are not assigned:
systemcovers configuration management (/configs*,/data/*, ...). A user holdingsystemcan update any configuration subtree or restore backup archives that contain stored user and API key records.user_managementlets the holder create or modify other Dashboard users, including ones with any scope set.api_key_managementlets the holder create or modify API keys, including ones with any scope set.
Granting any of these scopes together with a restricted scope list on the same user does not reliably enforce the restriction. The user can reach restricted areas through configuration changes, backup import, or by provisioning a new account or key. Reserve these three scopes for fully trusted users, and grant only the scopes a user actually needs.
Role Changes and Scope Compatibility
When you change a user’s role, EMQX checks whether the user’s current scopes are compatible with the new role. If they are not, the request is rejected with HTTP 400. To resolve this, include a scopes list in the same request that is valid for the new role.
For example, if you demote an Administrator to Viewer and that user holds user_management, sso_management, or api_key_management, the request will be rejected because those scopes require the Administrator role. Include a scopes list containing only Viewer-compatible scopes to complete the change. (mfa_management is not admin-only and does not cause this rejection.)
Default Administrator Protection
The dashboard.default_username account (created with the password configured in dashboard.default_password) is a break-glass account. To make sure the system can always be recovered when other administrators are misconfigured or have lost access, the default user is protected from accidental lockout:
- It cannot be deleted from the Dashboard or REST API. The Delete button is disabled.
- Its role cannot be changed away from
administrator. - Its scope set cannot be customized; it always retains the full administrator scope.
- Its description and password can be edited normally.
Other administrators are unaffected and can be deleted as long as at least one administrator remains in the system.
Self-Service Boundaries
Every Dashboard user is allowed to perform two self-service actions regardless of their scopes:
- Change their own password.
- Enroll or re-enroll their own TOTP / MFA. Disabling MFA is also allowed, unless an administrator has explicitly required MFA for the user’s account. In that case, the
mfa_managementscope is needed to disable it.
All other profile updates (description, role, scopes assigned by an administrator) require the appropriate scope on the acting user and are not bypassed, even when the target is the acting user.
Namespaced Roles
Starting from EMQX 6.0, the Dashboard supports namespaced roles. This feature extends role-based access control to enable multi-tenancy, in which each user can be restricted to operating only within a specific namespace.
Trusted Deployments Only
Namespaced admin access is intended for trusted internal deployments, such as separating teams or business units within one organization, to reduce the risk of accidental cross-team configuration changes. This feature does not provide strong isolation guarantees and is not suitable as a security boundary for public or untrusted multi-tenant deployments.
If you allow delegated administrators to manage namespace-scoped resources, enable SSRF protection under Management > Cluster Settings > Rule Engine Security to validate rule-engine-managed outbound targets. For runtime network enforcement, add host-level egress controls such as iptables or nftables. See Mitigate SSRF with Rule Engine Policy and Firewall Rules.
TIP
To learn more about the namespaces, see Namespace.
Create a User with a Namespaced Role
When creating a new user in the Dashboard, you will now see a Namespace option.
Prerequisite
- Create a managed namespace (for example,
namespace_01) in the Dashboard. For instructions, see Create Namespaces. - Ensure your EMQX license and cluster are running EMQX 6.0 or later.
- Navigate to System -> Users and click + Create.
- Fill in the required fields:
- Username: Unique identifier for the user.
- Note: Optional description.
- Password: User’s login password.
- Role: Select either Administrator or Viewer.
- Toggle the Namespace option and select an existing namespace (for example,
namespace_01). - Click Create to finish.
When creating users via the CLI or API, the role must be explicitly specified in the following format:
ns:<NAMESPACE>::<ROLE>For example:
ns:namespace_01::administratorns:namespace_01::viewer
Behavior of Namespaced Users
- Scoped resources: Namespaced users can view and manage only the resources within their assigned namespace, such as Connectors, Actions, Sources, Rules, and other namespace-aware modules.
- Cluster-level settings: Configurations not yet namespace-aware remain read-only for namespaced users. Only global administrators can modify them.
- Blocked message-content endpoints: Certain REST API endpoints that access or manipulate raw MQTT message content are unavailable to namespaced users and return
403 Forbidden. These endpoints are accessible only to global administrators:- Mqueue messages:
GET /clients/:clientid/mqueue_messages - Inflight messages:
GET /clients/:clientid/inflight_messages - Retained messages:
GET /mqtt/retainer/messages,GET /mqtt/retainer/message/:topic,DELETE /mqtt/retainer/message/:topic,DELETE /mqtt/retainer/messages - Delayed messages:
GET /mqtt/delayed/messages,GET /mqtt/delayed/messages/:node/:msgid,DELETE /mqtt/delayed/messages/:node/:msgid,DELETE /mqtt/delayed/messages/:topic
- Mqueue messages:
- Trace scoping: When accessing trace endpoints, namespaced users see only traces that belong to their namespace. Attempts to stop, download, stream logs, or delete a trace from a different namespace (
PUT /trace/:name/stop,GET /trace/:name/download,GET /trace/:name/log,GET /trace/:name/log_detail,DELETE /trace/:name) return404 Not Found, so the existence of cross-namespace traces is not leaked. The bulk-delete endpoint (DELETE /trace) returns403 Forbiddenfor namespaced users; only global administrators can clear all traces. - Default landing page: Namespaced users log in to the Dashboard normally and start on the Overview page. All menu items remain visible, but resource data is automatically filtered to their namespace.
- License management: Namespaced users do not see license notifications. License handling remains a responsibility of system administrators.
Role Semantics within a Namespace
- Administrator: Full control (create, update, delete, and read) over resources in the assigned namespace.
- Viewer: Read-only access (equivalent to
GETrequests) within the assigned namespace.
Audit Logs
The Audit Logs page allows administrators to configure audit logging for monitoring critical operational changes within the EMQX cluster in real time.
For a detailed overview of the Audit Log feature, see Audit Log.
API Keys
The API Keys page allows you to create and manage API keys for accessing the HTTP API. For instructions on creating and managing API keys, including role and scope assignment, see Create API Keys.
License
Click on License under the System menu on the left to access the License page. On this page, you can view the basic information of your current License, including the License connection quota usage, EMQX version, customer, and issue information.
Click Update License to upload your License Key. In the License Settings section, you can set the high and low watermark limits for the license connection quota usage. For more information about the license, see Work with EMQX Enterprise License.
SSO
The SSO page provides settings for the administrators to configure the SSO feature for user login management. For more information about the SSO feature, see Single Sign-On (SSO).
Backup & Restore
The Backup & Restore page provides settings for backing up your operating data and configuration files. You can perform data import and export operations on this page. For details of the Backup and Restore function, see Backup and Restore.
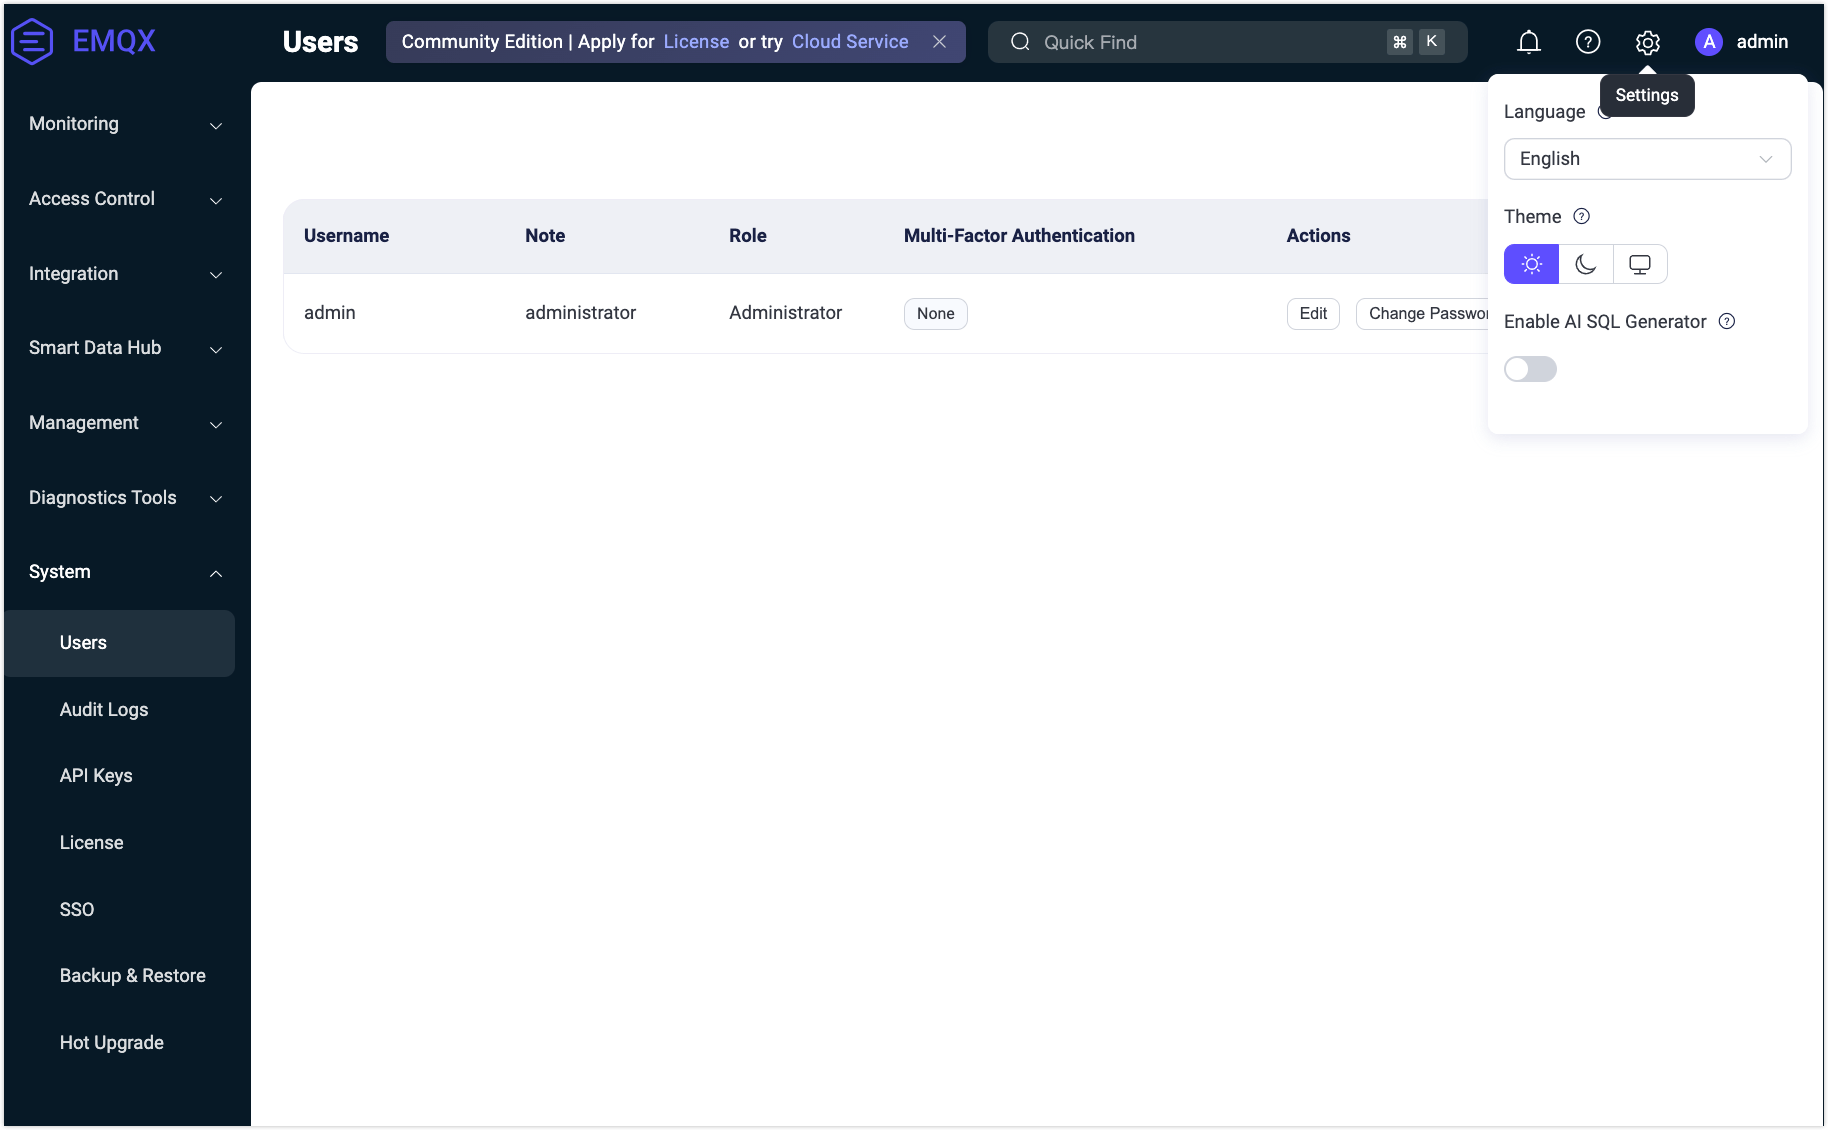
Settings
To access the settings, click the gear icon in the upper-right corner of the Dashboard.
In the Settings menu, you can customize the Dashboard's language and theme:
- Language: Choose your preferred display language.
- Theme: Select between light and dark themes, or enable automatic synchronization with your operating system's theme. When sync is enabled, the theme will follow your OS settings, and manual selection will be disabled.
Additionally, the Settings menu includes a toggle to enable or disable the AI SQL Generator feature on the Rules page.