Use Built-in Database
EMQX provides users with a low-cost, out-of-the-box authorization rule storage method through the built-in database. You can use the built-in database (Mnesia) as a data source by setting it up through the Dashboard or configuration files, and add relevant authorization check rules through the Dashboard or HTTP API.
Prerequisite
Knowledge about basic EMQX authorization concepts
Create Built-in Database Authorizer via Dashboard
On the EMQX Dashboard, navigate to Access Control > Authorization in the left-hand menu to open the Authorization page.
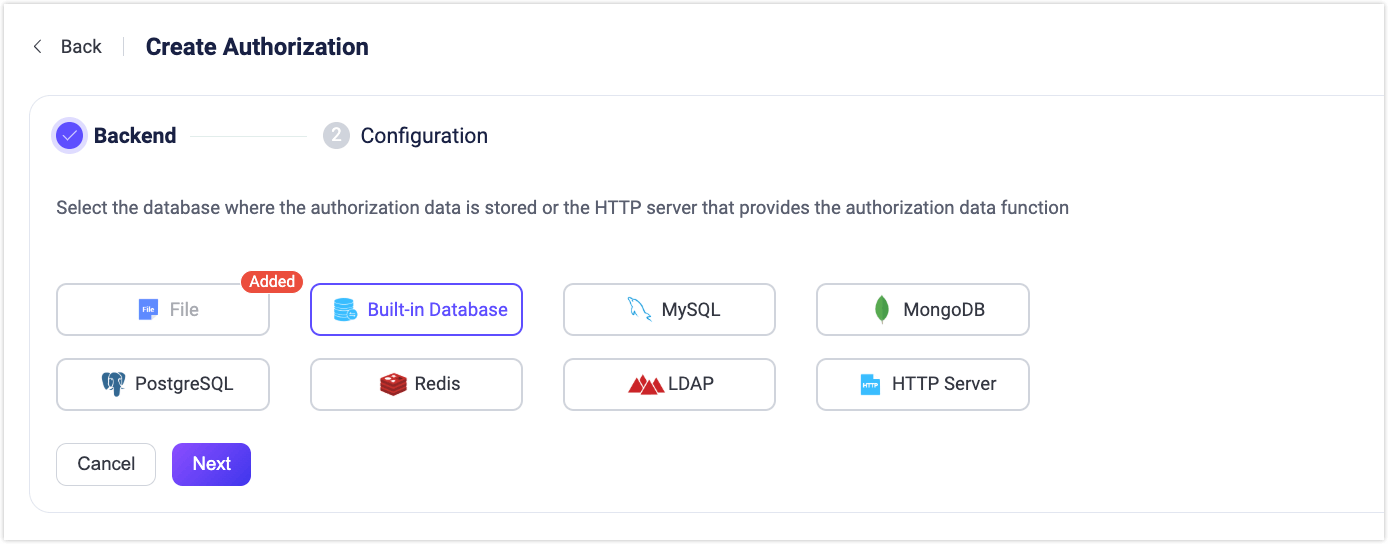
Click Create in the top-right corner, select Built-in Database as the Backend, then click Next to continue.
In the Configuration step, set the value for Max Rules (default:
100), which defines the maximum number of authorization rules allowed per client or user.Note
Setting a high number of rules may impact system performance.
Click Create to complete the setup.
Create Built-in Database Authorizer via Configuration File
The built-in database authorizer is identified by type built_in_database.
Sample configuration:
{
    type = built_in_database
    enable = true
}type: The data source type of the authorization checker; fill inbuilt_in_databasehere.enable: Whether to activate this checker; optional values:true,false.
Create Authorization Rules
You can create authorization rules through the Dashboard or API.
Create Authorization Rules via Dashboard
You can define authorization rules directly from the EMQX Dashboard by using the Permissions page of the Built-in Database backend.
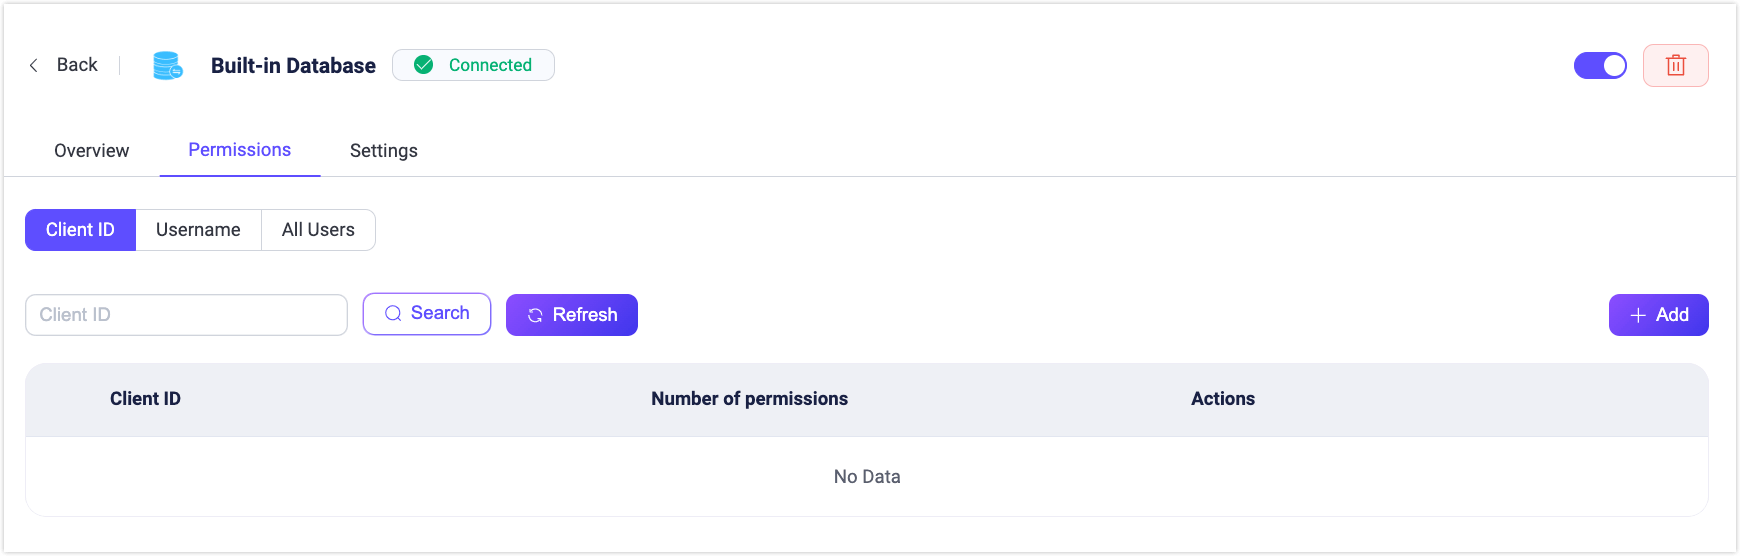
Access the Permissions Page
- In the Dashboard, go to the Authorization page.
- In the Actions column of the Built-in Database backend, click Permissions.
Authorization Rule Scope
Authorization rules can be configured at three scopes:
- Client ID: Apply rules to a specific client ID.
- Username: Apply rules to a specific username.
- All Users: Apply rules to all clients/users, optionally filtered by patterns or IP ranges.
Common Rule Fields
These fields are available for all rule types:
| Field | Description |
|---|---|
| Action | The operation type the rule applies to. Options: Publish, Subscribe, Publish & Subscribe. |
| Permission | Whether to allow or deny the operation. Options: Allow, Deny. |
| Topic | The MQTT topic this rule applies to. Wildcards (+, #) are supported. |
| QoS | Allowed QoS levels. Multiple values can be selected: 0, 1, 2. |
| Retain | Whether the rule applies to retained messages. Options: true, false, All. |
| IP Address Range | Specifies the client IP range this rule applies to. Supports CIDR notation (e.g., 192.168.1.0/24) or exact IPs. |
| Listener | The listener this rule applies to. Use {type}:{name} format, e.g., tcp:default, ws:default. |
| Zone | The Zone in which the rule takes effect. Applicable in multi-Zone deployments. |
Fields by Rule Scope
| Rule Scope | Fields |
|---|---|
| Client ID | Client ID: (Required) Exact client ID to which this rule applies. Username Pattern: (Optional) A regular expression to match usernames for which this rule is valid. |
| Username | Username: (Required) Exact username to which this rule applies. Client ID Pattern: (Optional) A regular expression to match client IDs for which this rule is valid. |
| All Users | Client ID Pattern: (Optional) A regular expression to match usernames for which this rule is valid. Username Pattern: (Optional) A regular expression to match usernames for which this rule is valid. |
Example patterns:
^device-user-.*: Matches usernames starting withdevice-user-.^sensor-.*: Matches client IDs starting withsensor-.
Add a Rule
- On the Permissions page, select the target tab: Client ID, Username, or All Users.
- Click Add.
- Fill in the common fields and any scope-specific fields.
- (Optional) Click Add Permission to add multiple rules. Use the Up and Down buttons to adjust rule execution order.
- Click Add to save the rule.
Manage Multiple Rules (All Users Only)
For All Users rules, you can change rule order from the More menu in the Actions column:
- Move Up
- Move Down
- Move to Top
- Move to Bottom
Rules are evaluated from top to bottom, so order determines priority.
Edit and Manage Rules
On the Permissions page, you can edit or delete existing rules:
- In the Actions column of the corresponding rule, click the Edit button to modify rule fields, matching patterns, or IP range settings.
- Click the Delete button to remove a rule.
Create Authorization Rules via REST API
You can also manage authorization rules through the REST API. The API endpoints correspond directly to the Dashboard's three scopes: Username, Client ID, and All Users.
Endpoints
- Username rules
POST /authorization/sources/built_in_database/rules/users: Create rules for a user.PUT /authorization/sources/built_in_database/rules/users/:username: Replace rules for a specific user.
- Client ID rules
POST /authorization/sources/built_in_database/rules/clients: Create rules for a client.PUT /authorization/sources/built_in_database/rules/clients/:clientid: Replace rules for a specific client.
- All Users rules
POST /authorization/sources/built_in_database/rules/all: Create or replace global rules that apply to all clients/users.- There is no
PUTrequest, justPOSTupdating or creating all the rules.
Step 1: Obtain Authentication Token
You need to authenticate with the EMQX Dashboard to obtain a token for API access:
export EMQX_TOKEN=$(curl --silent -X 'POST' "http://localhost:18083/api/v5/login" \
  -H 'Accept: application/json' \
  -H 'Content-Type: application/json' \
  -d '{"username": "admin","password": "public"}' | jq -r ".token")
Step 2: Create the Built-in Database Authorization Source
Before creating rules, ensure the Built-in Database authorization source is created:
curl -X 'POST' \
  'http://localhost:18083/api/v5/authorization/sources' \
  -H "Authorization: Bearer $EMQX_TOKEN" \
  -H 'Accept: */*' \
  -H 'Content-Type: application/json' \
  -d '{
        "enable": true,
        "max_rules": 100,
        "type": "built_in_database"
  }'
Step 3: Create Authorization Rules
You can create rules for:
A specific client by client ID:
bashcurl -X 'POST' \ 'http://localhost:18083/api/v5/authorization/sources/built_in_database/rules/clients' \ -H "Authorization: Bearer $EMQX_TOKEN" \ -H 'Accept: */*' \ -H 'Content-Type: application/json' \ -d '[ { "clientid": "client1", "rules": [ { "action": "publish", "permission": "allow", "topic": "test/topic/1" }, { "action": "subscribe", "permission": "allow", "topic": "test/topic/2" }, { "action": "all", "permission": "deny", "topic": "eq test/#" } ] } ]'A specific client by username:
bashcurl -X 'POST' \ 'http://localhost:18083/api/v5/authorization/sources/built_in_database/rules/users' \ -H "Authorization: Bearer $EMQX_TOKEN" \ -H 'Accept: */*' \ -H 'Content-Type: application/json' \ -d '[ { "username": "user1", "rules": [ { "topic": "v1/devices/#", "permission": "allow", "action": "publish", "qos": [0,1,2], "retain": "all" } ] } ]'
Example: Update Rules for a User
curl -X PUT 'http://localhost:18083/api/v5/authorization/sources/built_in_database/rules/users/user1' \
  -H "Authorization: Bearer $EMQX_TOKEN" \
  -H 'Content-Type: application/json' \
  -d '{
    "username": "user1",
    "rules": [
      {
        "topic": "v1/devices/+/state",
        "permission": "allow",
        "action": "subscribe",
        "qos": [0,1],
        "retain": "all"
      }
    ]
  }'
Example: Create Rules for All Users
curl -X POST 'http://localhost:18083/api/v5/authorization/sources/built_in_database/rules/all' \\
  -H "Authorization: Bearer $EMQX_TOKEN" \\
  -H 'Content-Type: application/json' \\
  -d '[
    {
      "rules": [
        {
          "topic": "v1/#",
          "permission": "deny",
          "action": "all"
        }
      ]
    }
  ]'
Rule Fields
Each rule can include the following fields:
| Field | Description |
|---|---|
| username / clientid | The exact username or client ID this rule applies to (depending on endpoint). |
| topic | The MQTT topic this rule applies to. Supports wildcards (+, #) and topic placeholders. |
| permission | Whether to allow or deny the operation request from the current client/user. Options: allow, deny. |
| action | Operation type. Options: publish, subscribe, all. |
| qos | (Optional) Allowed QoS levels. Example: [0,1]. Default: all levels. |
| retain | (Optional) Whether the rule applies to retained messages. Options: true, false, all. |