Ingest MQTT Data into Azure Blob Storage
Azure Blob Storage is Microsoft's cloud-based object storage solution, designed specifically for handling large volumes of unstructured data. Unstructured data refers to data types that do not follow a specific data model or format, such as text files or binary data. EMQX can efficiently store MQTT messages in Blob Storage containers, providing a versatile solution for storing Internet of Things (IoT) data.
This page provides a detailed introduction to the data integration between EMQX and Azure Blob Storage, and offers practical guidance on the rule and Sink creation.
How It Works
Azure Blob Storage data integration in EMQX is a ready-to-use feature that can be easily configured for complex business development. In a typical IoT application, EMQX acts as the IoT platform responsible for device connectivity and message transmission, while Azure Blob Storage serves as the data storage platform, handling message data storage.
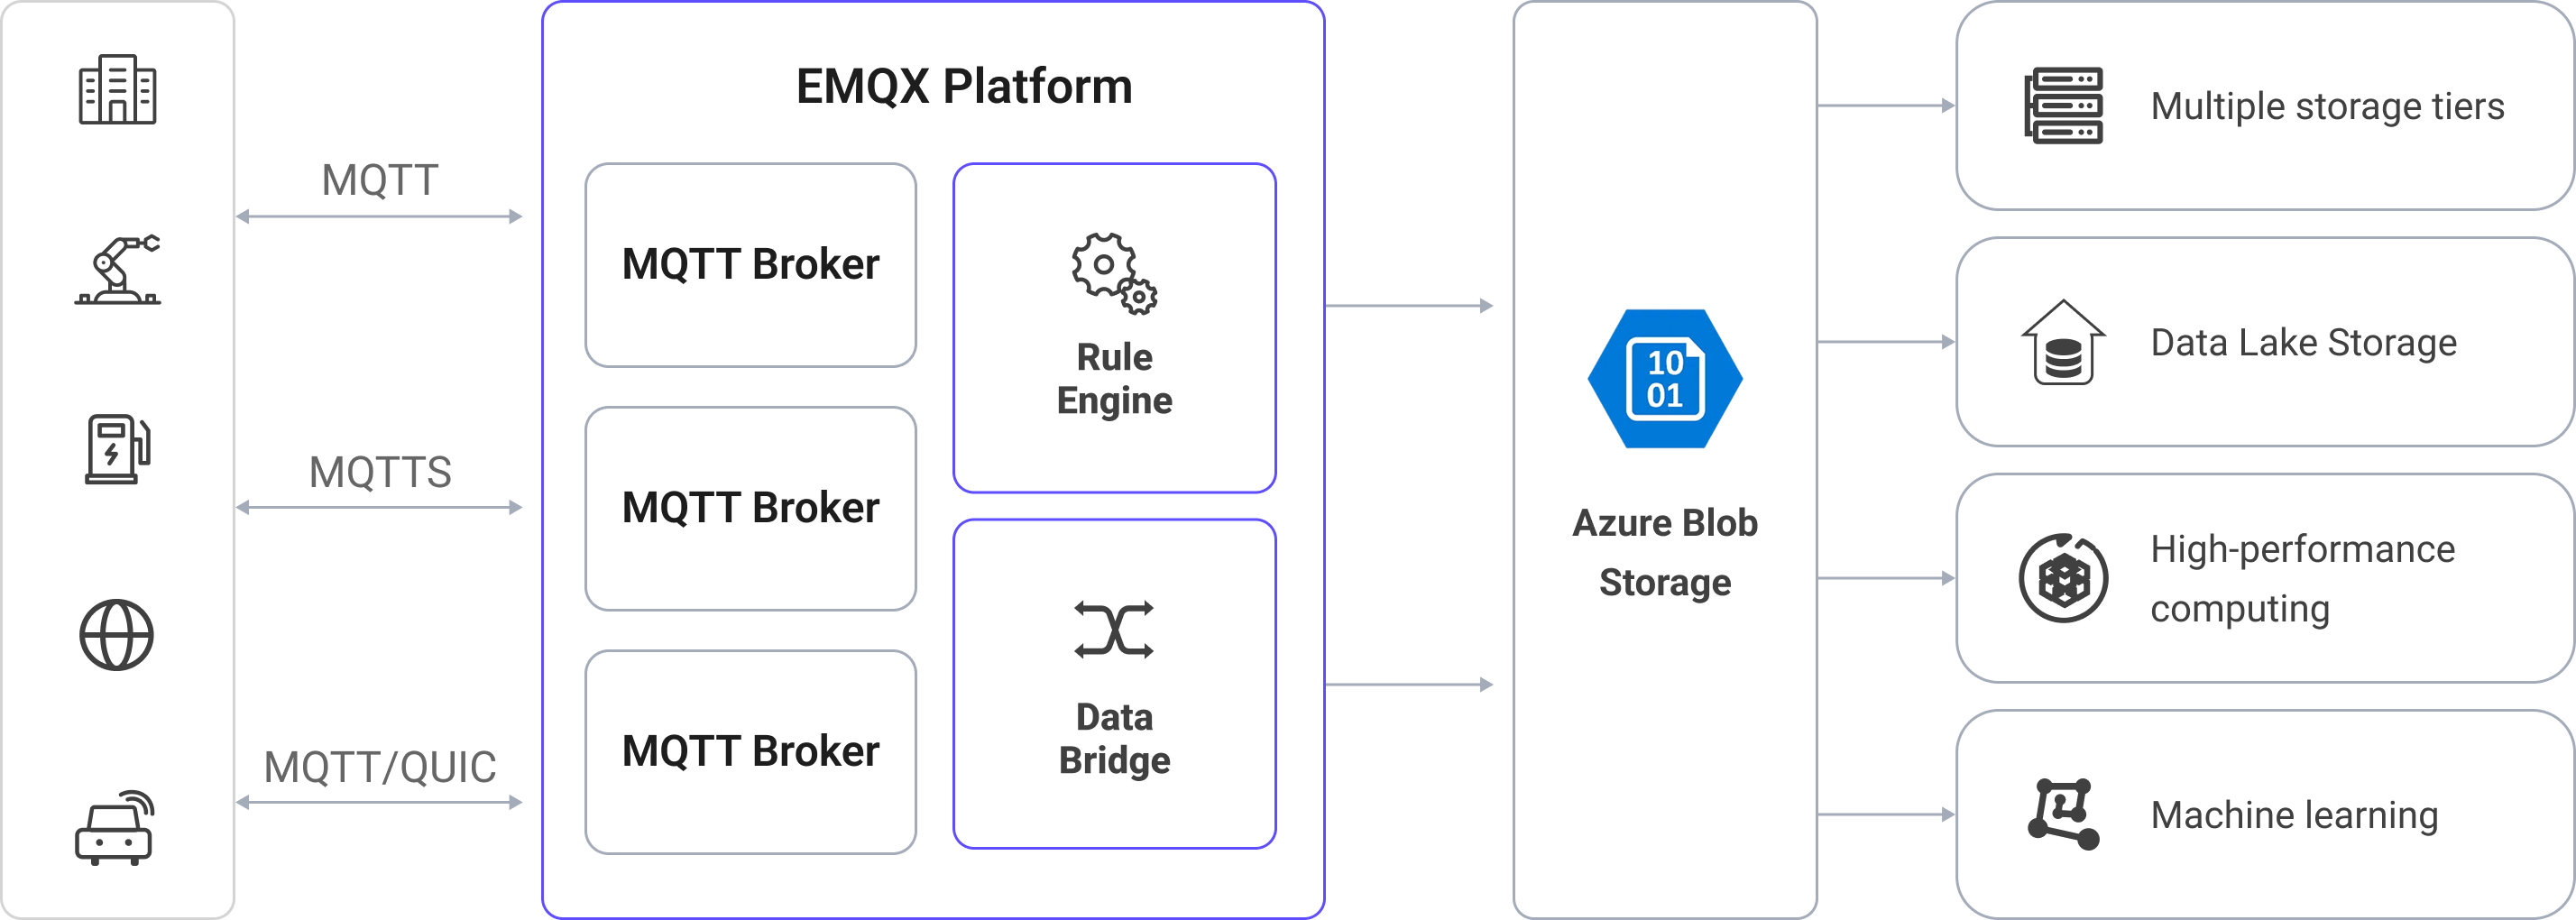
EMQX utilizes rules engines and Sinks to forward device events and data to Azure Blob Storage. Applications can read data from Azure Blob Storage for further data applications. The specific workflow is as follows:
- Device Connection to EMQX: IoT devices trigger an online event upon successfully connecting via the MQTT protocol. The event includes device ID, source IP address, and other property information.
- Device Message Publishing and Receiving: Devices publish telemetry and status data through specific topics. EMQX receives the messages and compares them within the rules engine.
- Rules Engine Processing Messages: The built-in rules engine processes messages and events from specific sources based on topic matching. It matches corresponding rules and processes messages and events, such as data format transformation, filtering specific information, or enriching messages with context information.
- Writing to Azure Blob Storage: The rule triggers an action to write the message to Storage Container. Using the Azure Blob Storage Sink, users can extract data from processing results and send it to Blob Storage. Messages can be stored in text or binary format, or multiple lines of structured data can be aggregated into a single CSV, JSON Lines, or Parquet file, depending on the message content and the Sink configuration.
After events and message data are written to Storage Container, you can connect to Azure Blob Storage to read the data for flexible application development, such as:
- Data archiving: Store device messages as objects in Azure Blob Storage for long-term preservation to meet compliance requirements or business needs.
- Data analysis: Import data from Storage Container into analytics services like Snowflake for predictive maintenance, device efficiency evaluation, and other data analysis services.
Features and Benefits
Using Azure Blob Storage data integration in EMQX can bring the following features and advantages to your business:
- Message Transformation: Messages can undergo extensive processing and transformation in EMQX rules before being written to Azure Blob Storage, facilitating subsequent storage and use.
- Flexible Data Operations: With the Azure Blob Storage Sink, specific fields of data can be conveniently written into Azure Blob Storage containers, supporting the dynamic setting of containers and object keys for flexible data storage.
- Integrated Business Processes: The Azure Blob Storage Sink allows device data to be combined with the rich ecosystem applications of Azure Blob Storage, enabling more business scenarios like data analysis and archiving.
- Low-Cost Long-Term Storage: Compared to databases, Azure Blob Storage offers a highly available, reliable, and cost-effective object storage service, suitable for long-term storage needs.
These features enable you to build efficient, reliable, and scalable IoT applications and benefit from business decisions and optimizations.
Before You Start
This section introduces the preparations required before creating an Azure Blob Storage Sink in EMQX.
Prerequisites
- Understanding of rules.
- Understanding of data integration.
Create a container in Azure Storage
To access Azure Storage, you'll need an Azure subscription. If you don't already have a subscription, create a free account before you begin.
All access to Azure Storage takes place through a storage account. For this quickstart, create a storage account using the Azure portal, Azure PowerShell, or Azure CLI. For help creating a storage account, see Create a storage account.
To create a container in the Azure portal, navigate to your new storage account in the Azure portal. In the left menu for the storage account, scroll to the Data storage section, then select Containers. Select the + Container button, use
iot-dataas a name for your new container, and click Create to create the container.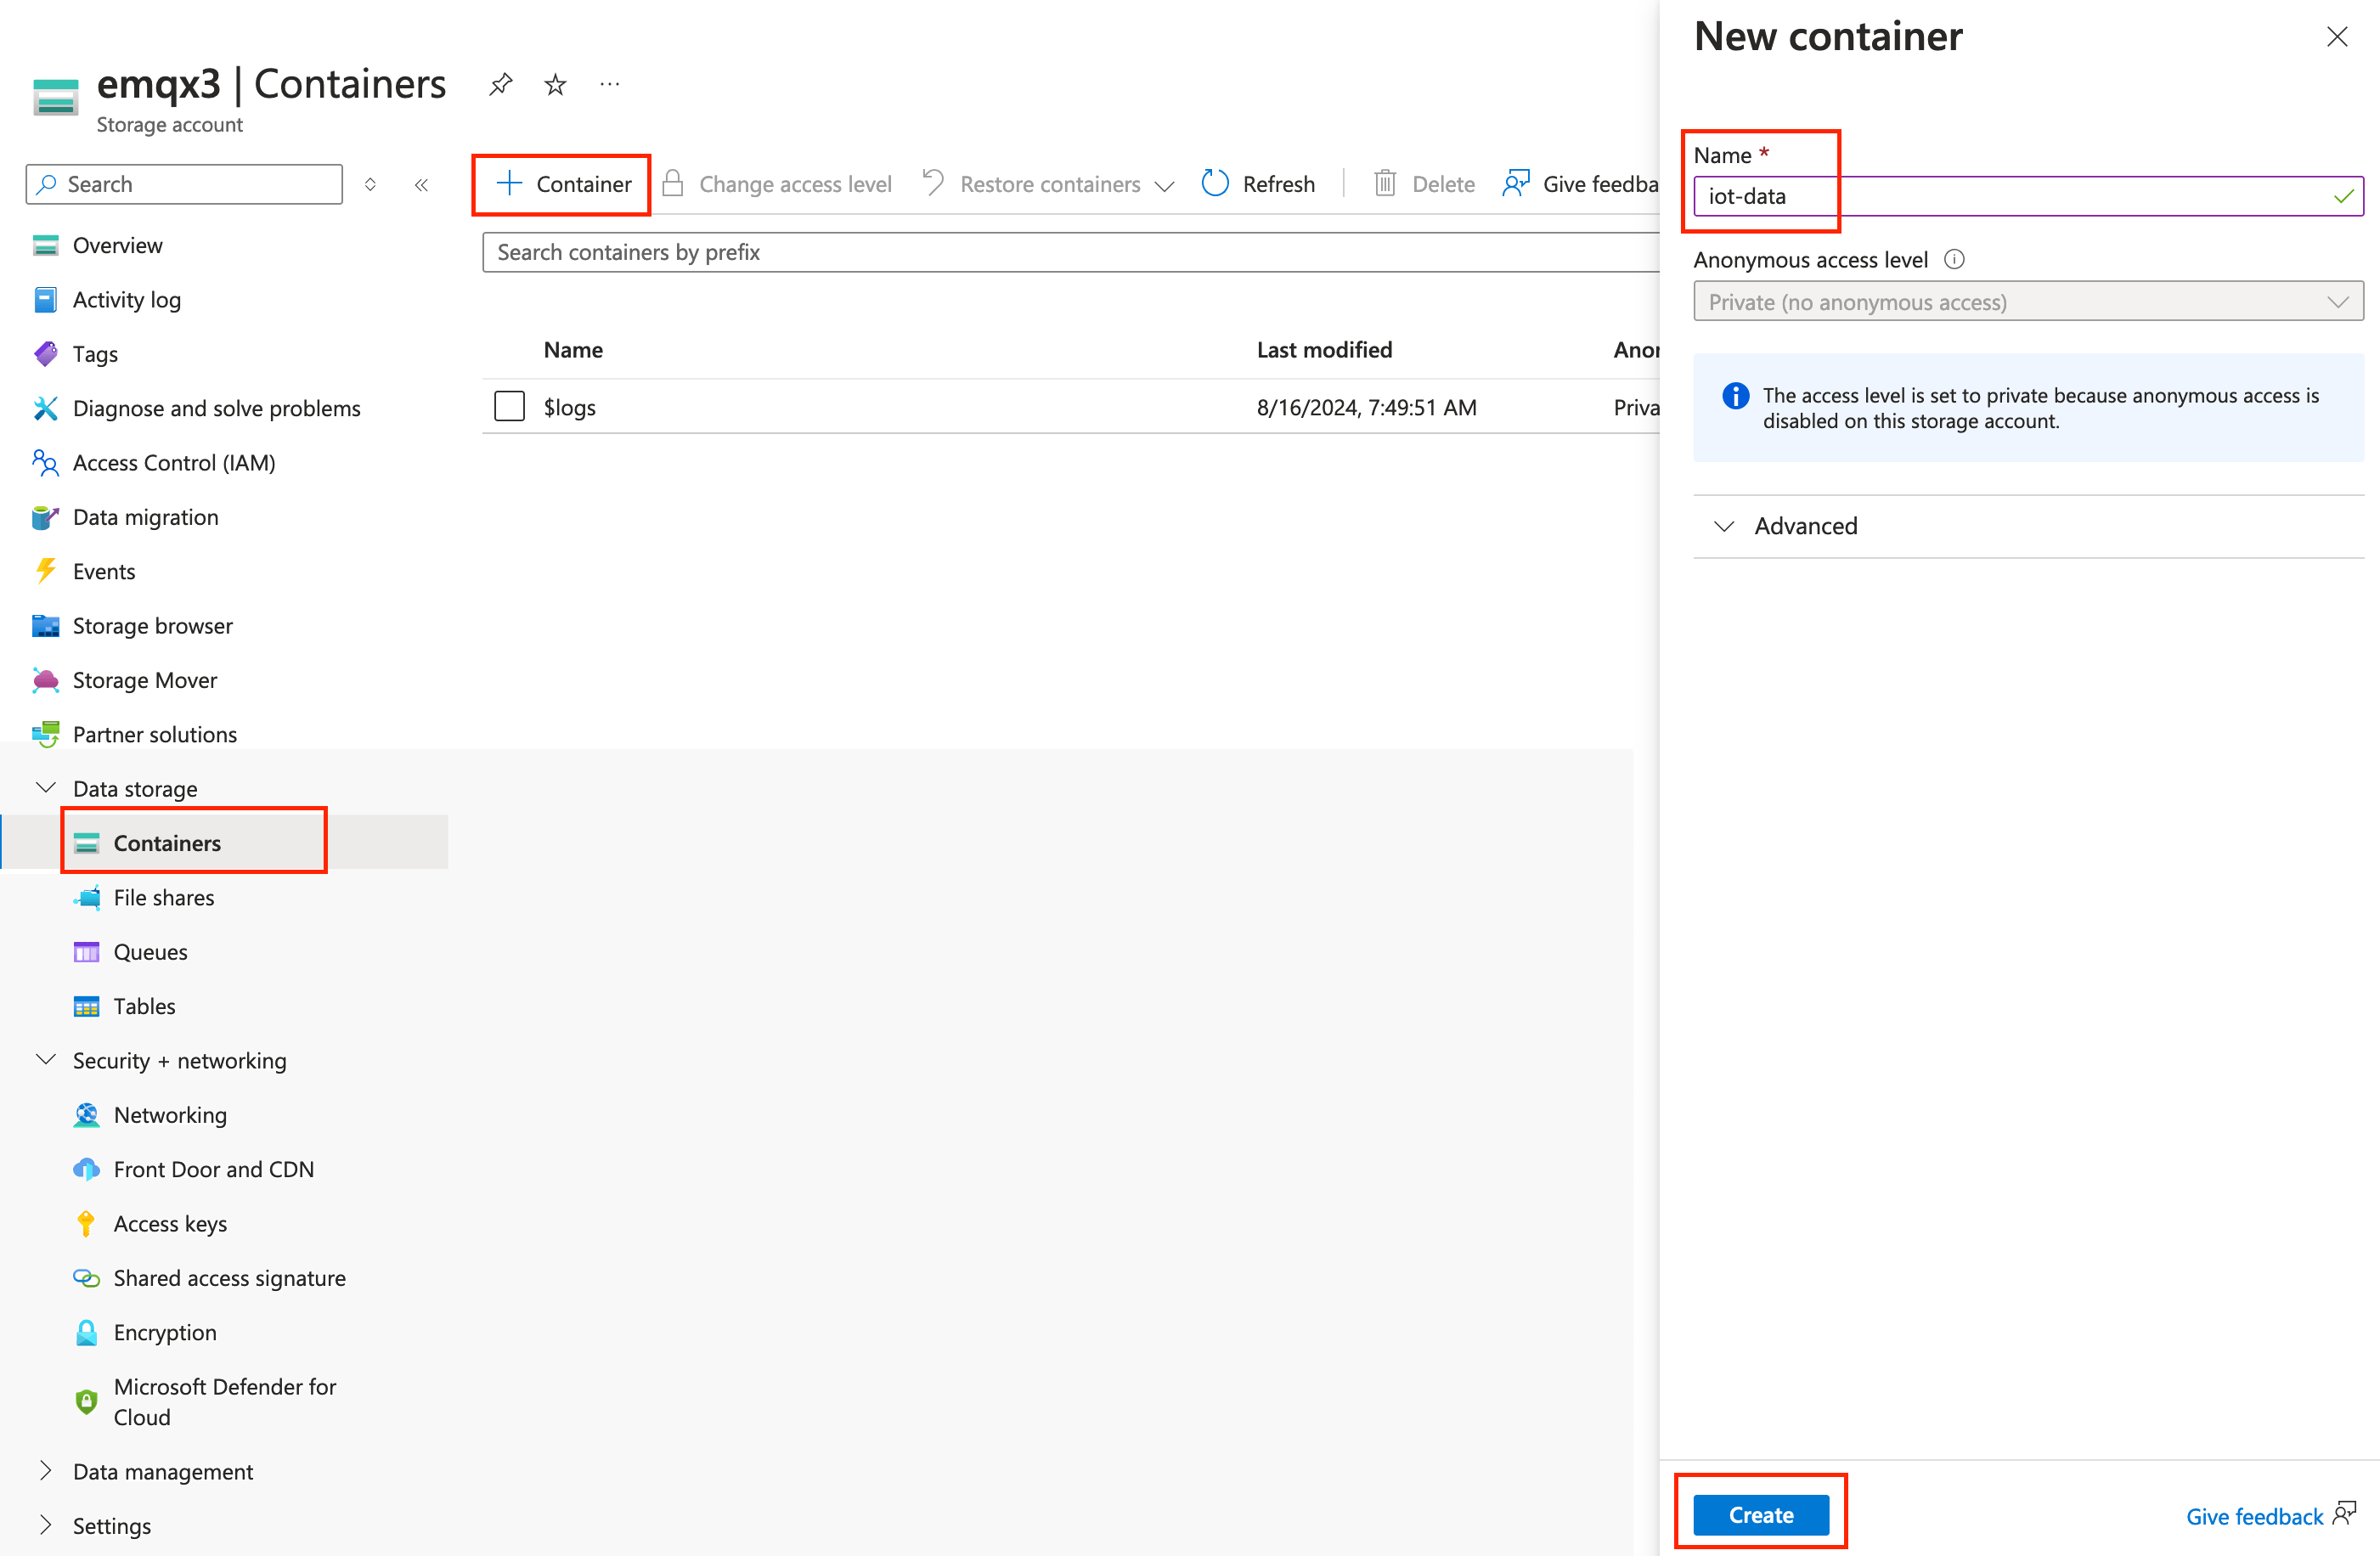
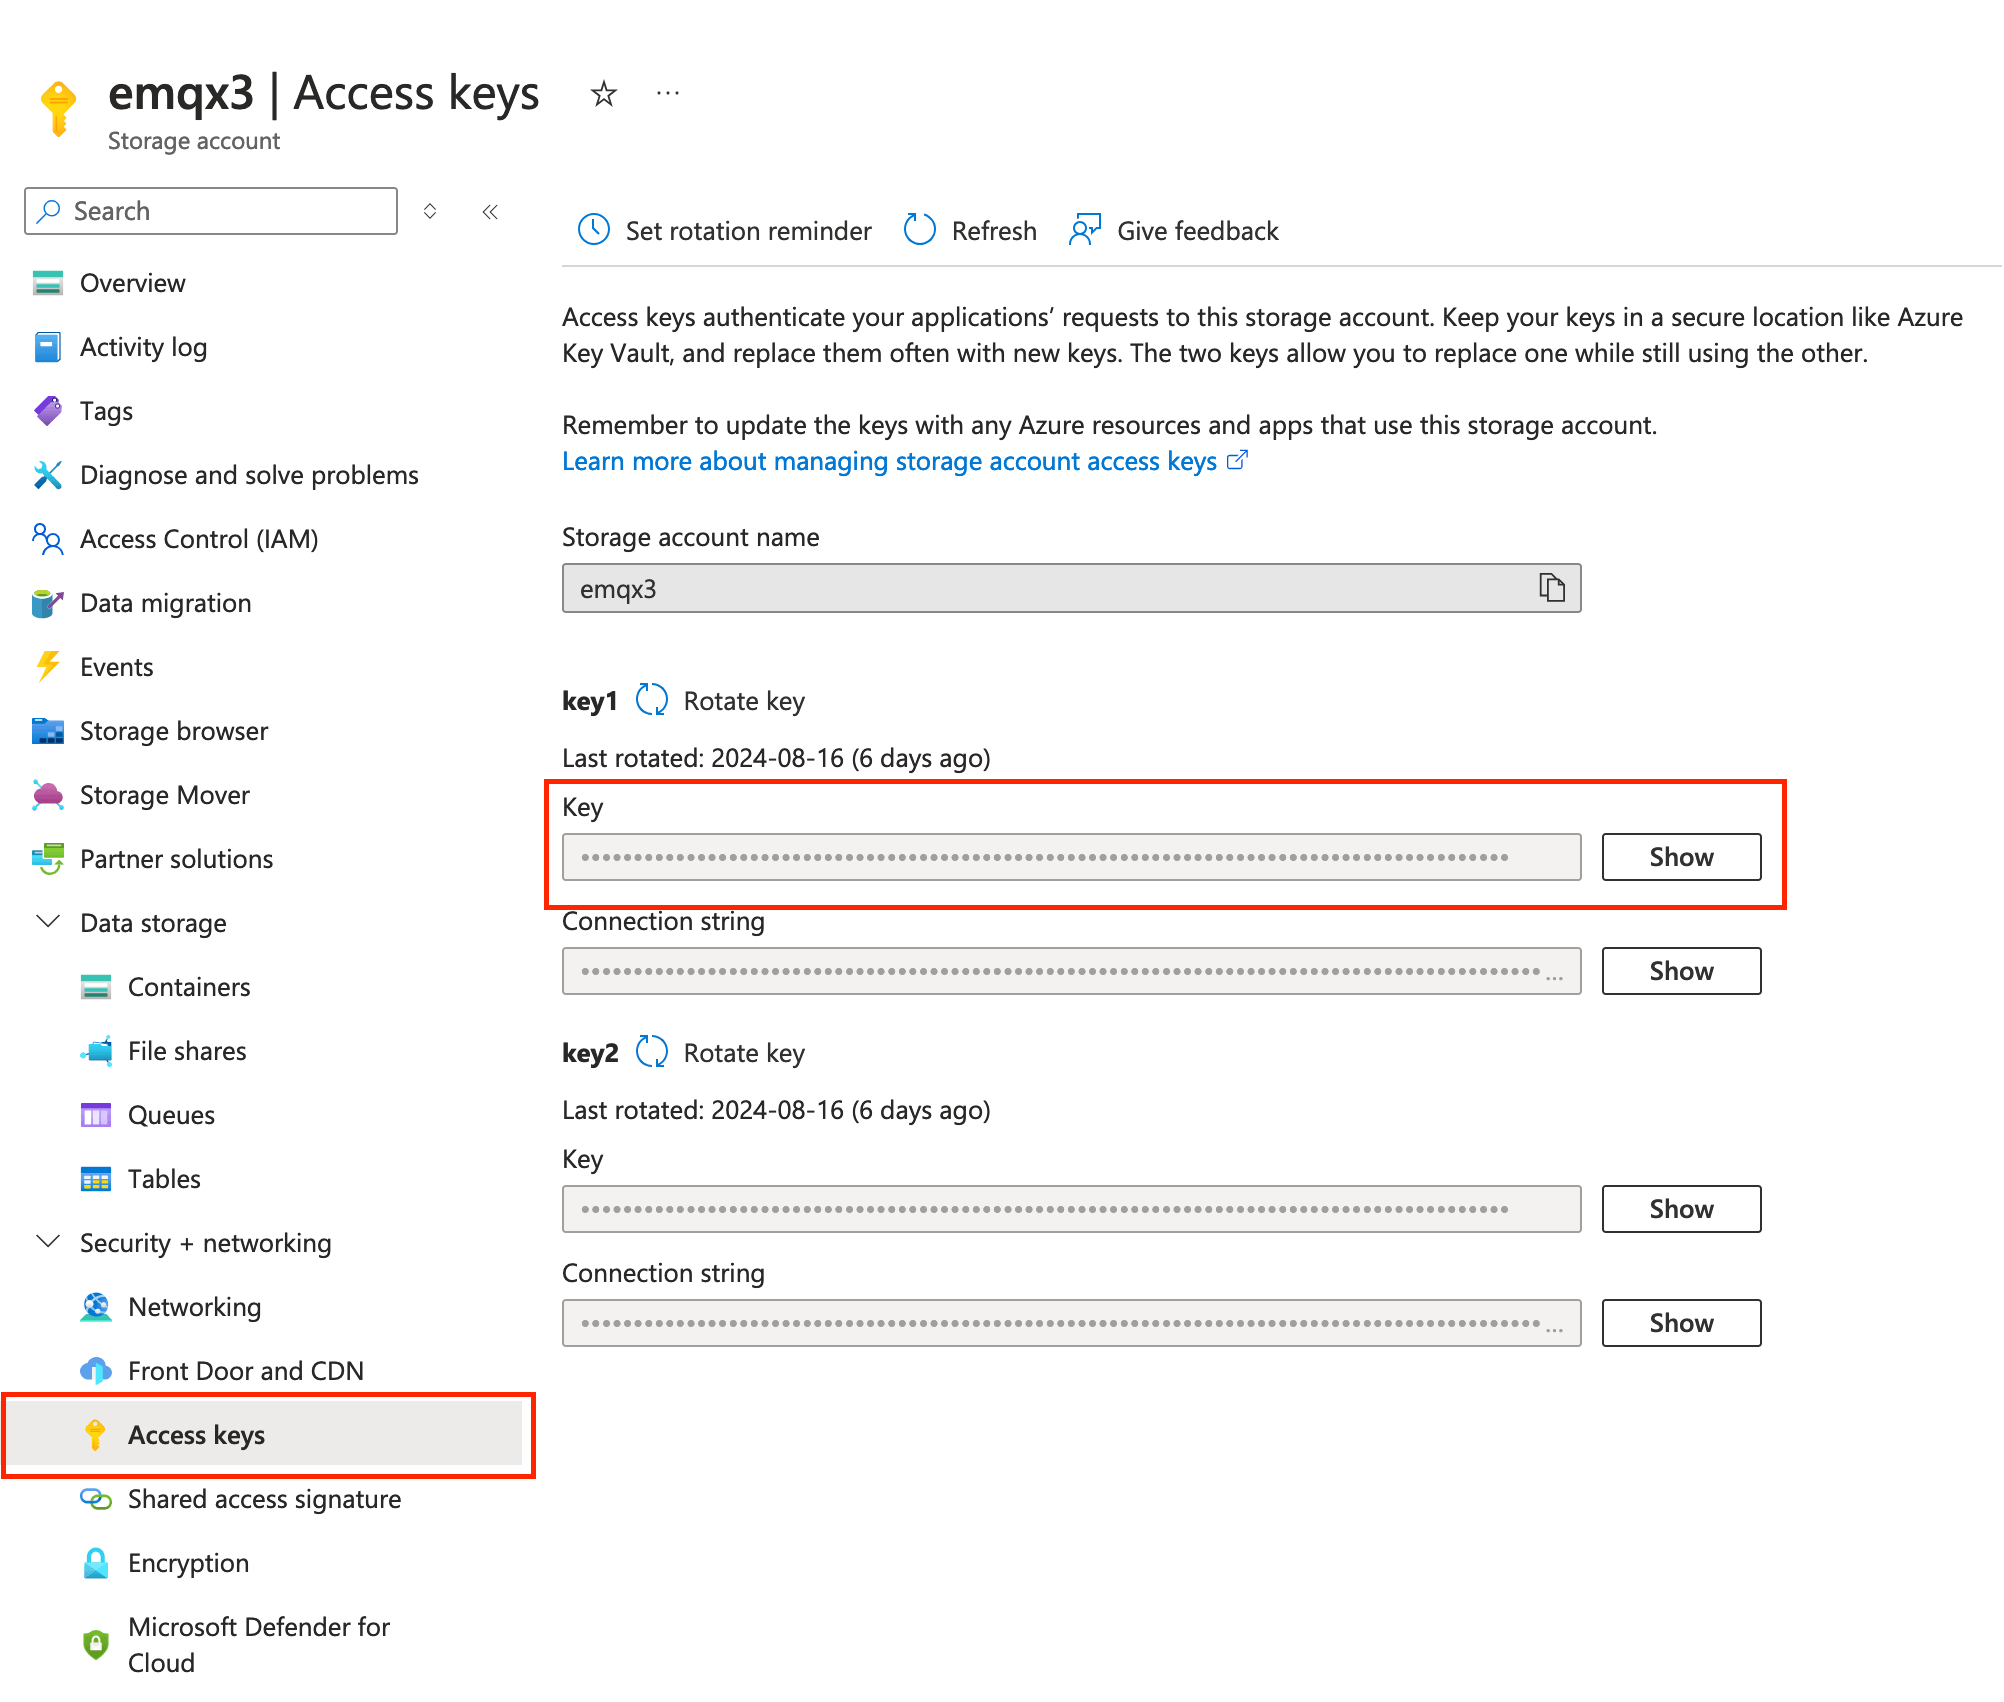
Navigate to Security+Networking -> Access keys in the storage account, and copy the Key. You will need this key to configure the Sink in EMQX.
Create a Connector
Before adding the Azure Blob Storage Sink, you need to create the corresponding connector.
- Go to the Dashboard Integration -> Connector page.
- Click the Create button in the top right corner.
- Select Azure Blob Storage as the connector type and click next.
- Enter the connector name, a combination of upper and lowercase letters and numbers. Here, enter
my-azure. - Enter the connection information.
- Account Name: Your Storage Account name
- Account Key: Your Storage Account key from previous step
- Before clicking Create, you can click Test Connectivity to test if the connector can connect to the Azure Storage.
- Click the Create button at the bottom to complete the connector creation.
You have now completed the connector creation and will proceed to create a rule and Sink for specifying the data to be written into the Azure Storage service.
Create a Rule with Azure Blob Storage Sink
This section demonstrates how to create a rule in EMQX to process messages from the source MQTT topic t/# and write the processed results to the iot-data container in Azure Storage through the configured Sink.
Go to the Dashboard Integration -> Rules page.
Click the Create button in the top right corner.
Enter the rule ID
my_rule, and input the following rule SQL in the SQL editor:sqlSELECT * FROM "t/#"TIP
If you are new to SQL, you can click SQL Examples and Enable Debug to learn and test the rule SQL results.
Add an action, select
Azure Blob Storagefrom the Action Type dropdown list, keep the action dropdown as the defaultcreate actionoption, or choose a previously created Azure Blob Storage action from the action dropdown. Here, create a new Sink and add it to the rule.Enter the Sink's name and description.
Select the
my-azureconnector created earlier from the connector dropdown. You can also click the create button next to the dropdown to quickly create a new connector in the pop-up box. The required configuration parameters can be found in Create a Connector.Set the Container by entering
iot-data.Select the Upload Method. The differences between the two methods are as follows:
- Direct Upload: Each time the rule is triggered, data is uploaded directly to Azure Blob Storage according to the preset object key and content. This method is suitable for storing binary or large text data. However, it may generate a large number of files.
- Aggregated Upload: This method packages the results of multiple rule triggers into a single file (such as a CSV file) and uploads it to Azure Blob Storage, making it suitable for storing structured data. It can reduce the number of files and improve write efficiency.
The configuration parameters differ for each method. Please configure according to the selected method:
Fallback Actions (Optional): If you want to improve reliability in case of message delivery failure, you can define one or more fallback actions. These actions will be triggered if the primary Sink fails to process a message. See Fallback Actions for more details.
Expand Advanced Settings and configure the advanced setting options as needed (optional). For more details, refer to Advanced Settings.
Use the default values for the remaining settings. Click the Create button to complete the Sink creation. After successful creation, the page will return to the rule creation, and the new Sink will be added to the rule actions.
Back on the rule creation page, click the Create button to complete the entire rule creation process.
You have now successfully created the rule. You can see the newly created rule on the Rules page and the new Azure Blob Storage Sink on the Actions (Sink) tab.
You can also click Integration -> Flow Designer to view the topology. The topology visually shows how messages under the topic t/# are written into Azure Storage container after being parsed by the rule my_rule.
Parquet Format Options
When the Aggregation Type is set to parquet, EMQX stores aggregated rule results in the Apache Parquet format, a columnar, compressed file format optimized for analytical workloads.
This section describes all configurable options for the Parquet output format.
Parquet Schema (Avro)
This option defines how MQTT message fields are mapped to the columns in the Parquet file. EMQX uses the Apache Avro schema specification to describe the structure of the Parquet data.
You can choose one of the following options:
Avro Schema That Lives in Schema Registry: Use an existing Avro schema managed in EMQX Schema Registry.
When this option is chosen, you must also specify a Schema Name, which identifies the schema to use for serialization.
TIP
Use this option if you manage schemas centrally in a registry and want consistent schema evolution across multiple systems.
Avro Schema Defined: Define the Avro schema directly within EMQX by entering the schema JSON structure in the Schema Definition field.
Example:
json{ "type": "record", "name": "MessageRecord", "fields": [ {"name": "clientid", "type": "string"}, {"name": "timestamp", "type": "long"}, {"name": "payload", "type": "string"} ] }
TIP
Ensure that the field names and data types match the fields returned by your rule SQL. Incorrect or missing fields may cause serialization errors when writing to Parquet.
Parquet Default Compression
This option specifies the compression algorithm applied to Parquet data pages within each row group. Compression helps reduce storage space and can improve I/O efficiency when querying data.
Supported values:
| Value | Description |
|---|---|
snappy (default) | A balanced choice offering fast compression and decompression with good compression ratio. Recommended for most cases. |
zstd | Provides a higher compression ratio with moderate CPU usage. Ideal for large-scale analytical data or long-term storage. |
None | Disables compression. Suitable only for debugging or when compression is not desired. |
Parquet Max Row Group Bytes
This option specifies the maximum size (in bytes) for each Parquet row group, which is the fundamental unit of work for reading and writing data. Once the buffered data size exceeds this threshold, EMQX flushes the current row group and starts a new one.
- Default value:
128 MB
Guidelines:
- Increase the value to improve read performance for analytical queries, especially when using Athena or Spark.
- Reduce the value to limit memory usage during writing or when using small datasets.
TIP
Parquet readers load data at the row group level. Larger row groups typically reduce metadata overhead and improve analytical query performance.
Test the Rule
This section shows how to test the rule configured with the direct upload method.
Use MQTTX to publish a message to the topic t/1:
mqttx pub -i emqx_c -t t/1 -m '{ "msg": "Hello Azure" }'After sending a few messages, access the Azure Portal to view the uploaded objects in the iot-data container.
Login to the Azure portal, navigate to the storage account, and open the iot-data container. You should see the uploaded objects in the container.
Advanced Settings
This section delves into the advanced configuration options available for the Azure Blob Storage Sink. In the Dashboard, when configuring the Sink, you can expand Advanced Settings to adjust the following parameters based on your specific needs.
| Field Name | Description | Default Value |
|---|---|---|
| Buffer Pool Size | Specifies the number of buffer worker processes, which are allocated to manage the data flow between EMQX and Azure Storage. These workers temporarily store and process data before sending it to the target service, crucial for optimizing performance and ensuring smooth data transmission. | 16 |
| Request TTL | The "Request TTL" (Time To Live) configuration setting specifies the maximum duration, in seconds, that a request is considered valid once it enters the buffer. This timer starts ticking from the moment the request is buffered. If the request stays in the buffer for a period exceeding this TTL setting or if it is sent but does not receive a timely response or acknowledgment from Azure Storage, the request is deemed to have expired. | 45 |
| Health Check Interval | Specifies the time interval (in seconds) for the Sink to perform automatic health checks on its connection with Azure Storage. | 15 |
| Max Buffer Queue Size | Specifies the maximum number of bytes that can be buffered by each buffer worker process in the Azure Blob Storage Sink. The buffer workers temporarily store data before sending it to Azure Storage, acting as intermediaries to handle the data stream more efficiently. Adjust this value based on system performance and data transmission requirements. | 256 |
| Query Mode | Allows you to choose between synchronous or asynchronous request modes to optimize message transmission according to different requirements. In asynchronous mode, writing to Azure Storage does not block the MQTT message publishing process. However, this may lead to clients receiving messages before they arrive at Azure Storage. | Asynchronous |
| Batch Size | Specifies the maximum size of data batches transmitted from EMQX to Azure Storage in a single transfer operation. By adjusting the size, you can fine-tune the efficiency and performance of data transfer between EMQX and Azure Storage. If the "Batch Size" is set to "1," data records are sent individually, without being grouped into batches. | 1 |
| Inflight Window | "In-flight queue requests" refer to requests that have been initiated but have not yet received a response or acknowledgment. This setting controls the maximum number of in-flight queue requests that can exist simultaneously during Sink communication with Azure Storage. When Request Mode is set to asynchronous, the "Request In-flight Queue Window" parameter becomes particularly important. If strict sequential processing of messages from the same MQTT client is crucial, then this value should be set to 1. | 100 |