Multi-Factor Authentication (MFA)
EMQX 5.9.0 introduces the Multi-Factor Authentication (MFA) feature for the EMQX Dashboard to enhance security. The feature requires users to complete a two-step authentication process when logging in. This process adds an additional layer of security to prevent unauthorized access by verifying the user's identity using a password and a time-based one-time password (TOTP).
This page explains how to set up and use MFA for the EMQX Dashboard, covering both the user and administrator perspectives.
Key Concepts
- MFA: A security feature that requires two forms of identification: the user's password and a second factor, such as a TOTP generated by an authenticator app.
- TOTP: A temporary code generated by an authenticator app like Google Authenticator or Authy, based on a shared secret between the app and the server.
- QR Code: A graphical representation of the shared secret that can be scanned by an authenticator app to simplify the setup process.
How MFA Works
When MFA is enabled on the EMQX Dashboard, it enhances the login process by adding an extra layer of security. Here's how the MFA process works:
- User Login: When you attempt to log in to the Dashboard, you'll first enter your username and password as usual.
- MFA Prompt: If MFA is enabled for your account, you will be prompted to enter a verification code. This code is generated by an authenticator app (like Google Authenticator or Authy) on your mobile device.
- First-Time Setup: If MFA has never been set up before, you will be asked to scan a QR code or manually enter a secret key into your authenticator app to complete the setup.
- Subsequent Logins: After the initial setup, each time you log in, you'll need to open your authenticator app and enter the time-sensitive code it generates to complete the login process.
The goal of MFA is to ensure that even if someone obtains your password, they cannot log in to your account without also having access to the code from your authenticator app.
TIP
To help protect your account, it’s important to complete the TOTP setup promptly. After enabling TOTP for your own account or on behalf of another user, please ensure that the QR code is scanned or the secret key is entered into your authenticator app as soon as possible. Delays in completing this step may increase the risk of unauthorized enrollment, especially if login credentials are compromised.
Enable and Configure MFA
MFA is disabled by default. To enable MFA for users, the administrator must configure the system to support MFA and set it up for individual users. Only users with administrator privileges can enable or disable MFA for other users.
Enable MFA by Default for the Dashboard
To enable MFA for all Dashboard users by default, the administrator needs to configure the dashboard.default_mfa setting in the configuration file. This can be set to either none (to disable MFA) or {mechanism: totp} (to enable TOTP-based MFA).
Example configuration:
dashboard.default_mfa = {mechanism: totp}Enable MFA for Users via EMQX Dashboard
Administrators can enable MFA directly from the Dashboard by following these steps:
- In the Dashboard, click System -> Users from the left menu.
- On the Users page, you will see a list of users. In the Actions column, click MFA Settings next to the specific user for whom you want to enable MFA.
- In the MFA Settings dialog, click Enable to enable MFA for the selected user.
Note
If you enable MFA via the Dashboard for your own account, you are immediately prompted in the same session to complete MFA setup (see First-Time Setup).
If an admin enables MFA for another user, the MFA step remains deferred until that user’s next login.
Reset TOTP Secret Key
In case the user needs to reset their TOTP setup (for example, if the authenticator app is uninstalled or if the secret key has been compromised), the administrator can reset the TOTP secret key for the user via the MFA Settings dialog.
On the System -> Users page, locate the user for whom you want to reset the TOTP secret key. In the Actions column, click on MFA Settings for the selected user.
In the MFA Settings dialog, you will see the Reset TOTP Secret Key button. Clicking this button will initiate the reset process.
A confirmation prompt will appear, notifying you that resetting the secret key will make the previous key invalid. The user will need to set up a new TOTP secret key during their next login.
Click Confirm to proceed with the reset. After the reset, the user will need to follow the initial MFA setup process during their next login (scanning a new QR code or entering a new secret key in their authenticator app).
Enable and Manage MFA via Configuration File and REST API
Administrators can enable or manage MFA for users through the configuration file and REST API.
TIP
The POST and DELETE methods on the /users/{username}/mfa endpoint can only be used by administrators or by the user themselves. This means that a user with a "viewer" role cannot modify another user's MFA settings. Only the user associated with the current authentication token (the "bearer token") can modify their own MFA settings.
For more information on the role-based access control implementation of the REST API, see Roles and Permissions.
Enable MFA for a Specific User
To enable MFA for a specific user, the administrator can send a POST request to the /users/{username}/mfa API endpoint with the following request body:
{
  "mechanism": "totp"
}
Disable MFA for a Specific User
To disable MFA for a specific user, the administrator can send a DELETE request to the /users/{username}/mfa API endpoint.
Log In Using MFA
As a user, once MFA is enabled for your account, you will need to follow these steps to log in to the EMQX Dashboard:
First-Time Setup
When you log in for the first time after MFA has been enabled, you'll need to set up your authenticator app.
Enter Your Username and Password: On the login page, enter your username and password as usual.
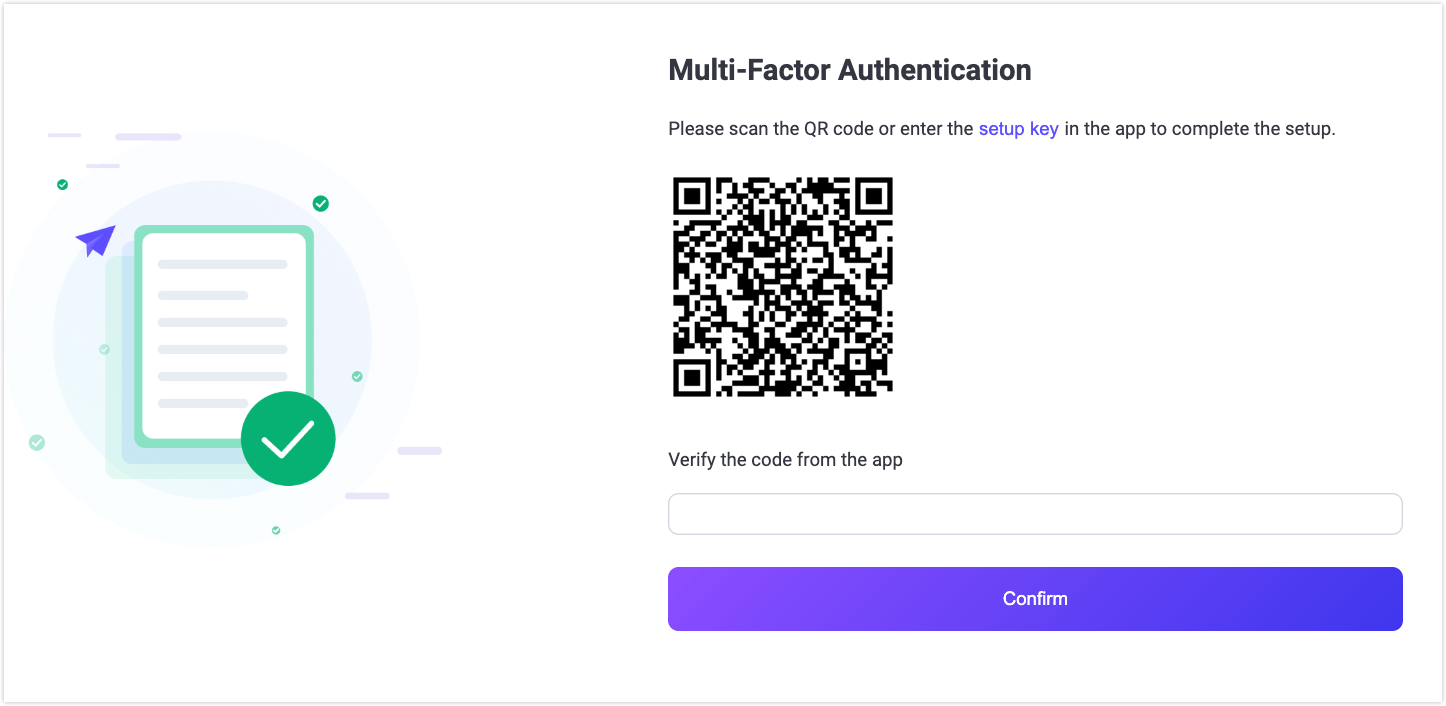
Scan the QR Code or Enter Setup Key: After the initial password verification, the Dashboard will prompt you to scan a QR code or manually enter a setup key into your authenticator app to complete setup.
Verify the code from the app: The app will generate time-sensitive codes for future logins. Enter the code from the app for verification and click Confirm.
The code is valid only for a short period of time (usually 30 seconds), so make sure to enter it quickly.
Subsequent Logins
After you've completed the initial setup, you can use the authenticator app to log in.
- Enter Your Username and Password: On subsequent login attempts, enter your username and password.
- Enter the TOTP Code: Once your password is verified, you will be prompted to enter the TOTP code generated by your authenticator app.
- Successful Login: If the code is valid, you will be logged into the Dashboard.
- Invalid Code: If the code is incorrect or expired, you will see an error message. In this case, you can try entering the current code from your authenticator app.
Forced MFA for SSO Users
Starting from EMQX 5.10, MFA can also be required for SSO users. Once you have enabled Single Sign-On (SSO) (SAML, OIDC, or LDAP), you can turn on a per-backend force_mfa switch that requires every user arriving from that backend to pass a TOTP second factor in addition to the IdP authentication.
This matters especially for EMQX deployments exposed on public networks: even if an identity is leaked at the upstream IdP, an attacker still cannot reach the Dashboard without also owning the user's authenticator device.
force_mfa is configured for each SSO backend (saml, oidc, and ldap) independently. Local accounts are unaffected. Each SSO user's TOTP secret is stored separately from local users'. Administrators can enable, disable, or reset MFA for any individual SSO user; a user with MFA disabled is exempt from TOTP even when the backend has force_mfa = true, which is useful for break-glass admin accounts.
Enable Forced MFA for an SSO Backend
In base.hocon, add force_mfa = true to each backend that must require MFA. You can also configure this in the Dashboard SSO configuration UI; see Configure LDAP SSO, Configure SAML SSO, and Configure OIDC SSO.
Example configuration:
dashboard {
  sso {
    saml {
      enable = true
      force_mfa = true          # every SAML user must complete TOTP at login
      # ... other SAML settings
    }
    oidc {
      enable = true
      force_mfa = false         # not enforced; you can still enable it per user
      # ... other OIDC settings
    }
    ldap {
      enable = true
      force_mfa = true
      # ... other LDAP settings
    }
  }
}
force_mfa defaults to false, preserving pre-5.10 behaviour.
TIP
Turning force_mfa on does not retroactively invalidate existing sessions. It takes effect on the next fresh login.
Manage MFA for Individual SSO Users
In the Dashboard, go to System -> Users. SSO users are listed with their backend shown next to the username. Click the MFA Settings button in the Actions column to:
- Enable MFA: force this user to set up and use TOTP on the next login, even when the corresponding backend has
force_mfaoff. - Disable MFA: mark the user as exempt. They skip TOTP even when the backend requires it. This is useful for break-glass administrators.
- Reset TOTP secret: clear the current secret. The user enters the setup flow again on the next login. Use this when a user loses their authenticator device.
SSO Login Flow with MFA
Forcing MFA does not change the SSO login experience:
- Click the "Log in with SSO" button as usual.
- Authenticate at the IdP.
- After returning to the Dashboard, enter a TOTP code if MFA applies to you.
- On the first login when
force_mfais enabled, you will be guided through a one-time TOTP setup (scan QR / enter key) before reaching the Dashboard.
Security Note
By design, no Dashboard access credential is issued before TOTP succeeds. Intercepting the SSO callback link cannot bypass MFA.
FAQ
Q: Will already-logged-in SSO users be kicked out when I enable force_mfa? A: No. force_mfa only gates new logins. Existing sessions remain valid until they expire.
Q: How do I temporarily disable MFA for a break-glass account? A: Find the user under System -> Users, click MFA Settings -> Disable MFA. Subsequent logins skip TOTP until you re-enable or reset.
Q: Can I require MFA for only a subset of SSO users instead of the whole backend? A: Yes — leave force_mfa at false and enable MFA for the users you want to cover one by one from the Users page.