MQTT Streams Quick Start
This page walks you through how to use the MQTT Streams feature in EMQX 6.1. You’ll use MQTTX to simulate clients, create and manage streams from the EMQX Dashboard, and experience how messages can be stored, replayed, and compacted.
Objectives
This quick start demonstrates how EMQX MQTT Streams can:
- Persist messages independently of subscriber availability
- Support timestamp-based replay
- Enable Last-Value semantics for state-oriented messaging
- Automatically create streams on demand through
$stream/subscriptions
Prerequisites
Before starting, ensure you have:
- EMQX 6.1+ running
- MQTTX (or any MQTT 5.0-capable client)
- Access to the EMQX Dashboard (default:
http://localhost:18083)
Test MQTT Streams Basic Features (Regular Stream)
This section demonstrates how MQTT Streams stores messages and allows consumers to replay historical data.
Prerequisite
Before starting, ensure that the MQTT Streams feature is enabled and that the auto-creation behavior will not interfere with this example.
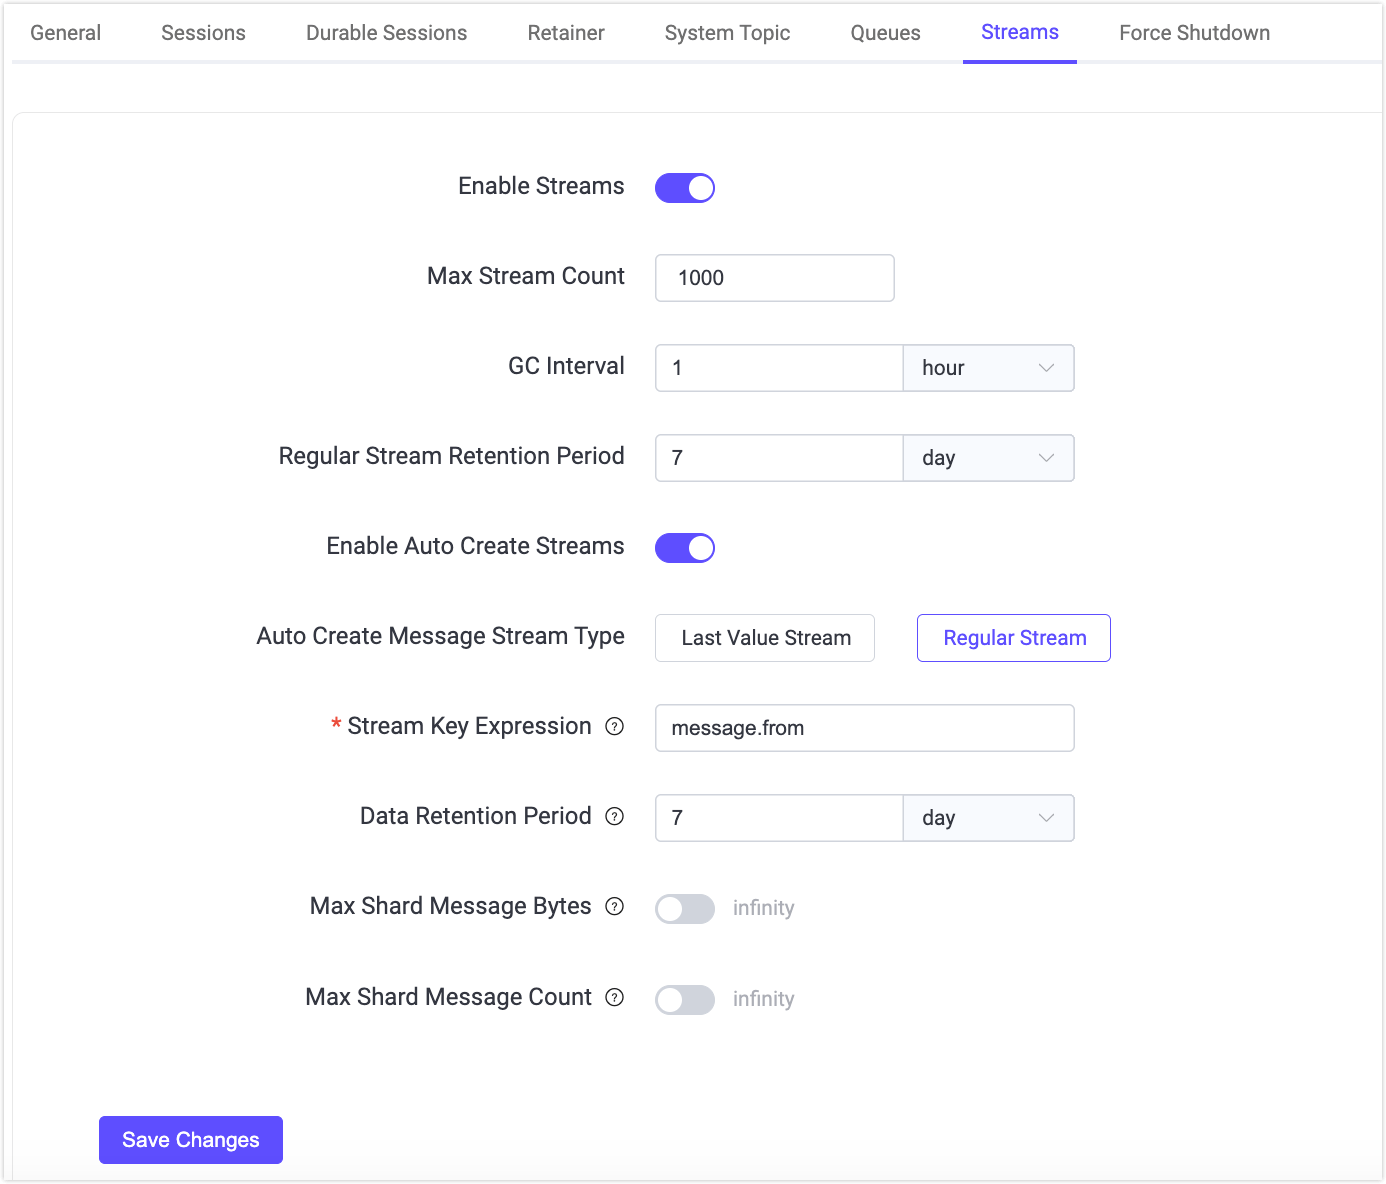
Go to Streams in the left menu.
If Message Stream is disabled, click Settings. You will be redirected to the Management -> MQTT Settings -> Streams page.
Toggle the Enable Streams switch on.
Verify the auto-create settings to ensure a Regular Stream is used:
Enable Auto Create Streams is disabled, or
Auto Create Stream Type is set to Regular Stream.
This prevents the stream from being auto-created as a Last-Value Stream, which would retain only the most recent message per key.
If you make any changes, click Save Changes to apply them.
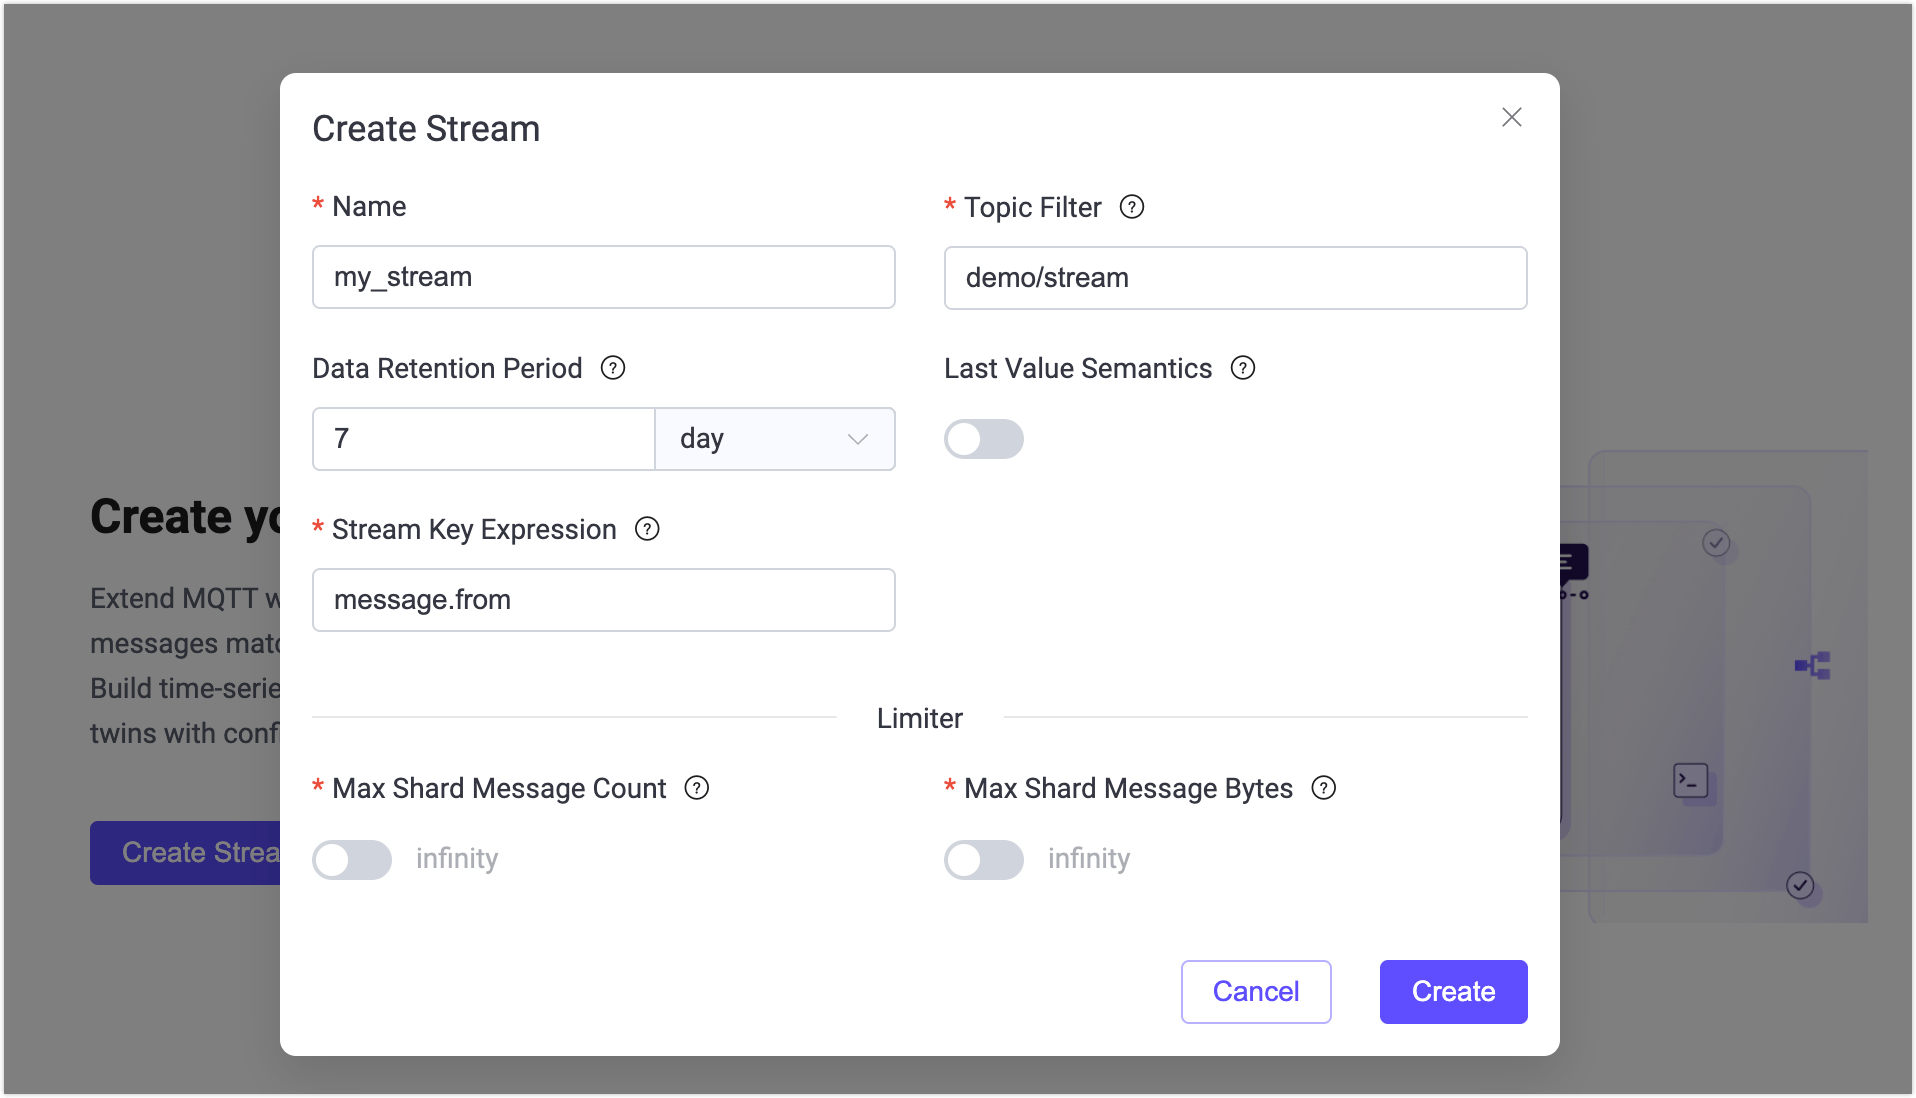
Step 1: Create a Named Stream
Navigate to Streams in the left menu.
Click Create Stream on the page, or click Create in the upper-right corner.
In the Create Stream dialog, configure the following settings:
- Name:
my_stream - Topic Filter:
demo/stream - Last-Value Semantics: Disabled
- Stream Key Expression:
message.from
Leave all other options at their default value.
- Name:
Click Create.
Step 2: Publish Messages
Use MQTTX CLI to simulate a publisher client.
Ensure MQTTX CLI is installed. For more information, see Installation.
Connect to EMQX:
bashmqttx conn -h 'localhost' -p 1883Publish several messages to the topic
demo/streamwith QoS 1.Example commands:
bashmqttx pub -t 'demo/stream' -h 'localhost' -p 1883 -q 1 -m '{"value": 1}' mqttx pub -t 'demo/stream' -h 'localhost' -p 1883 -q 1 -m '{"value": 2}' mqttx pub -t 'demo/stream' -h 'localhost' -p 1883 -q 1 -m '{"value": 3}'Expected output:
bash✔ Connected ✔ Message published
Since this is a regular stream, all published messages are stored in the stream according to its retention policy.
Step 3: Replay All Messages from the Stream
Now use MQTTX CLI to subscribe to the stream and replay messages from the beginning by setting the MQTT 5 subscription user property stream-offset.
mqttx sub -t \$stream/my_stream -q 1 -h localhost -up "stream-offset: 0"Expected Behavior:
You should receive all previously published messages in publish order:
topic: demo/stream, qos: 0, size: 10B, userProperties: [
  { key: 'key', value: 'mqttx_28c50267' },
  { key: 'ts', value: '1772161077594532' }
]
{"value": 1}

topic: demo/stream, qos: 0, size: 10B, userProperties: [
  { key: 'key', value: 'mqttx_1989d120' },
  { key: 'ts', value: '1772161084921509' }
]
{"value": 2}

topic: demo/stream, qos: 0, size: 10B, userProperties: [
  { key: 'key', value: 'mqttx_085ea00d' },
  { key: 'ts', value: '1772161094020511' }
]
{"value": 3}
This confirms that:
- The stream is a regular stream.
- The
stream-offsetsubscription property works correctly. - No messages were compacted or overwritten.
Replay Messages from Different Positions
MQTT Streams allow consumers to control where message replay starts by specifying a stream-offset value when subscribing.
This example demonstrates how to replay only messages published after a specific point in time.
Step 1: Get the Current Timestamp
Before publishing new messages, record the current Unix timestamp in microseconds.
You can obtain the current timestamp in milliseconds using:
Linux / macOS:
bashdate +%s000JavaScript:
javascriptDate.now()
Example output:
1772162409000Multiply this value by 1000 to get the microseconds. Save this value. It will be used as the replay starting position.
Step 2: Publish New Messages
Publish more messages to the stream:
mqttx pub -t 'demo/stream' -h 'localhost' -p 1883 -q 1 -m '{"value": 4}'
mqttx pub -t 'demo/stream' -h 'localhost' -p 1883 -q 1 -m '{"value": 5}'
Step 3: Replay from the Recorded Timestamp
Subscribe to the stream using the saved timestamp as the stream-offset:
mqttx sub -t \$stream/my_stream -q 1 -h localhost -up "stream-offset: 1772162409000000"Expected Behavior:
Only messages published at or after this time are delivered to the subscriber:
topic: demo/stream, qos: 1, size: 12B, userProperties: [
  { key: 'key', value: 'mqttx_a5508c54' },
  { key: 'ts', value: '1772163340159513' }
]
{"value": 4}

topic: demo/stream, qos: 1, size: 12B, userProperties: [
  { key: 'key', value: 'mqttx_e0848366' },
  { key: 'ts', value: '1772163350666523' }
]
{"value": 5}
Different consumers can independently replay the same stream from different positions:
- One consumer can replay from the beginning (
earliest) - Another can replay from a specific timestamp
- Another can receive only new messages (
latest)
Each consumer’s replay position is independent and does not affect other subscribers.
This demonstrates consumer-controlled replay in MQTT Streams.
Test Last-Value Semantics
This section demonstrates how Last-Value MQTT streams keep only the latest message per key, which is useful for representing state.
Step 1: Delete the Existing Stream
- Navigate to Streams in the Dashboard.
- Locate the stream
my_stream. - Click Delete and confirm.
Step 2: Create a Last-Value Message Stream
- Click Create on the Streams page.
- Configure the following settings:
- Name:
device_stream - Topic Filter:
device/state - Data Retention Period:
7day - Last-Value Semantics: Enabled
- Stream Key Expression:
message.from
- Name:
- Click Create.
Since the key expression is message.from, the stream is now configured to retain only the latest message in streams with the same key.
Step 3: Publish State Updates
Now publish messages from the same client ID -i device-1.
mqttx pub -t 'device/state' -h 'localhost' -p 1883 -q 1 -i device-1 -m '{"status": "online"}'

mqttx pub -t 'device/state' -h 'localhost' -p 1883 -q 1 -i device-1 -m '{"status": "offline"}'
Since the stream key expression is set to message.from, which extracts the client ID from the message metadata as the stream key, both messages share the same stream key. The second message overwrites the first.
Step 4: Subscribe to the Stream
Now subscribe to the stream and replay from the earliest position:
mqttx sub -t '$stream/device_stream' -h 'localhost' -p 1883 -q 1 -up "stream-offset: 0"Expected Behavior:
Only the most recent message is delivered:
topic: device/state, qos: 1, size: 21B, userProperties: [
  { key: 'key', value: 'device-1' },
  { key: 'ts', value: '1772173666097076' }
]
{"status": "offline"}
This demonstrates how MQTT Streams support state-oriented messaging patterns using Last-Value semantics.
Auto-Create Streams
MQTT Streams in EMQX can be automatically created when a client subscribes to a $stream/-prefixed topic. This allows streams to be provisioned dynamically without manually creating them in the Dashboard.
This section demonstrates how to enable and test auto-created streams.
Go to Management -> MQTT Settings -> Streams in the Dashboard.
Make sure that Enable Auto Create Streams is switched on.
Select the stream type:
- Regular Stream
- Last-Value Stream
Only one type can be active for auto-creation at a time.
Leave other options as the default.
Click Save Changes.
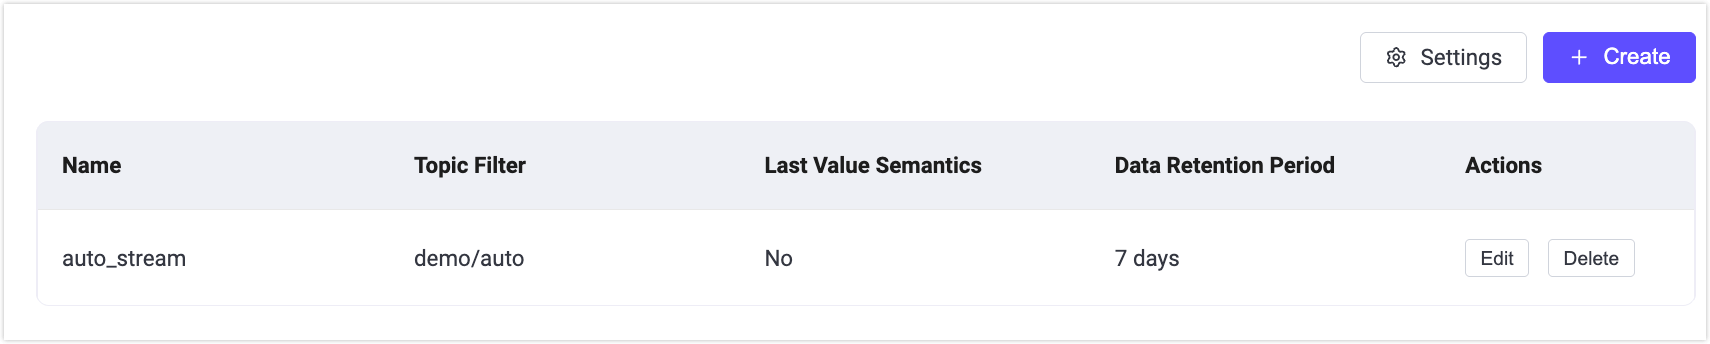
Subscribe to trigger auto-creation using the following command:
bashmqttx sub -h localhost -p 1883 -q 1 -t '$stream/auto_stream/demo/auto' -up "stream-offset: earliest"Unlike manually created streams, auto-created streams require the topic filter (
demo/autoin this example) in the subscription.If the stream does not already exist, EMQX will:
- Create a new stream named
auto_stream - Set its Topic Filter to
demo/auto - Apply the configured auto-create type (Regular or Last-Value)
- Create a new stream named
Verify the auto-creation in the Streams page of the Dashboard. You should see a new stream named "auto_stream" in the Streams list.