Ingest MQTT Data into Snowflake
Snowflake is a cloud-based data platform that provides a highly scalable and flexible solution for data warehousing, analytics, and secure data sharing. Known for its ability to handle structured and semi-structured data, Snowflake is designed to store vast amounts of data while providing fast query performance and seamless integration with various tools and services.
This page provides a detailed introduction to the data integration between EMQX and Snowflake, and provides practical guidance on creating a rule and Sink.
How It Works
Snowflake data integration in EMQX is a ready-to-use feature that can be easily configured to support complex IoT business workflows. In a typical IoT application, EMQX acts as the IoT platform responsible for device connectivity and message transmission, while Snowflake serves as the data storage and processing platform, handling the ingestion, storage, and analysis of this message data.
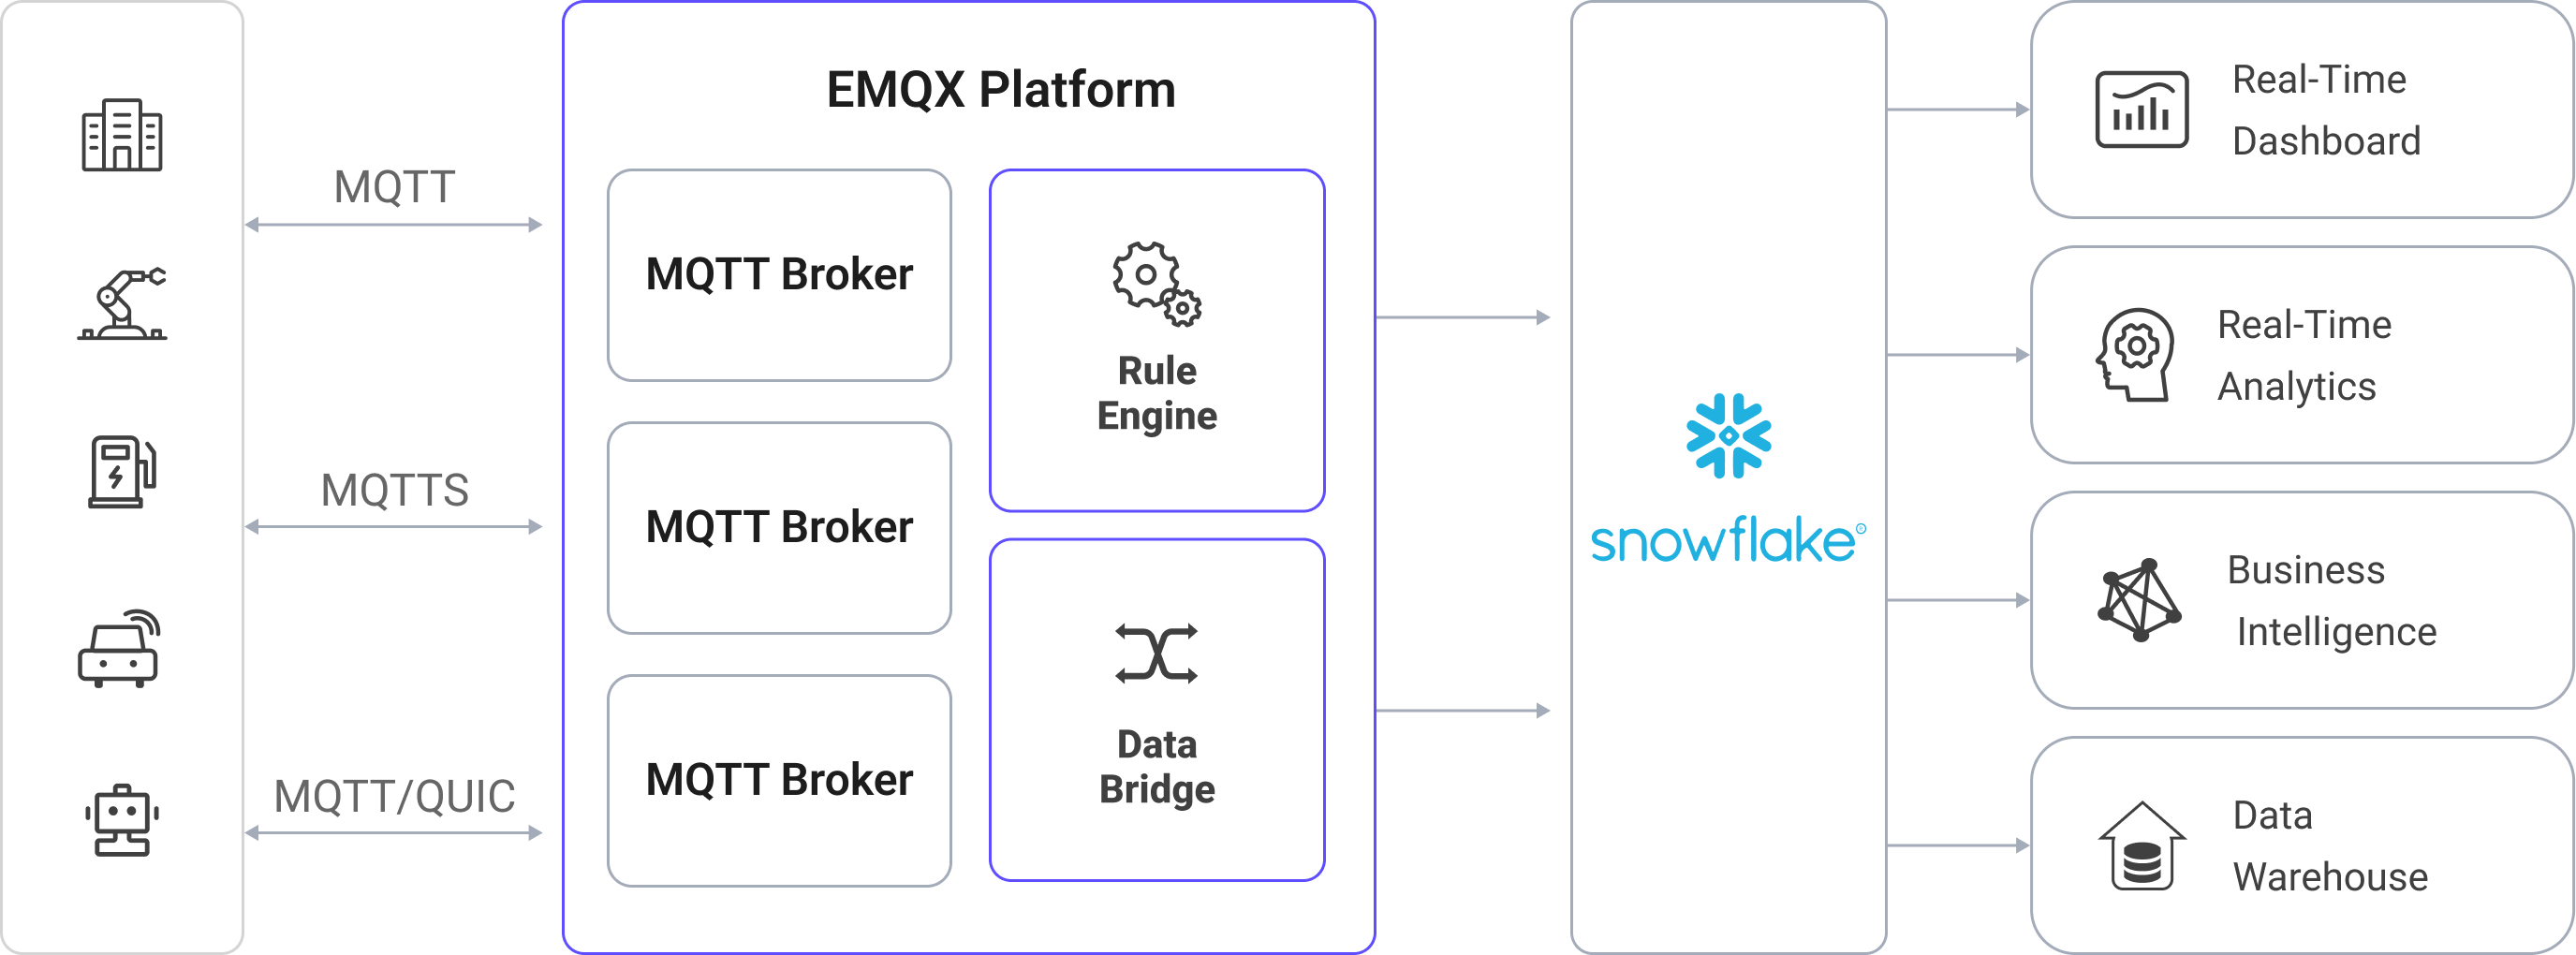
EMQX utilizes the rule engine and Sink to forward device events and data to Snowflake. End users and applications can then access data in Snowflake tables. The specific workflow is as follows:
Device Connection to EMQX: IoT devices trigger an online event upon successfully connecting via the MQTT protocol. The event includes device ID, source IP address, and other identifying properties.
Device Message Publishing and Receiving: Devices publish telemetry and status data through specific topics. EMQX receives the messages and compares them within the rule engine.
Rules Engine Processing Messages: The built-in rules engine processes messages and events from specific sources based on topic matching. It matches corresponding rules and processes messages and events, such as data format transformation, filtering specific information, or enriching messages with context information.
Writing to Snowflake: The rule triggers an action that writes message data to Snowflake, either by batching messages into files and loading them via Stage and Pipe (aggregated mode), or by streaming them directly using the Snowpipe Streaming API (streaming mode).
After events and message data are written to the Snowflake, they can be accessed for a variety of business and technical purposes, including:
- Data Archiving: Safely store IoT data in Snowflake for long-term archival, ensuring compliance and historical data availability.
- Data Analytics: Leverage Snowflake’s data warehousing and analytics capabilities to perform real-time or batch analysis, enabling predictive maintenance, operational insights, and device performance assessments.
Features and Advantages
Using Snowflake data integration in EMQX can bring the following features and advantages to your business:
- Message Transformation: Messages can undergo extensive processing and transformation in EMQX rules before being written to Snowflake, facilitating subsequent storage and use.
- Flexible Data Operations: The Snowflake Sink offers flexibility in data handling by allowing users to select specific fields to write into Snowflake, enabling efficient and dynamic storage configurations tailored to business needs.
- Integrated Business Processes: The Snowflake Sink allows device data to be combined with the rich ecosystem applications of Snowflake, enabling more business scenarios like data analysis and archiving.
- Low-Cost Long-Term Storage: Snowflake’s scalable storage infrastructure is optimized for long-term data retention at a lower cost compared to traditional databases, making it an ideal solution for storing large volumes of IoT data.
These features enable you to build efficient, reliable, and scalable IoT applications and benefit from business decisions and optimizations.
Before You Start
This section introduces the preparations required before creating a Snowflake Sink in EMQX.
Prerequisites
- Understanding of EMQX rules and data integration concepts.
- A working Snowflake account with admin privileges.
Choose Upload Mode
TIP
Choose the mode first, as it determines how you configure both EMQX and your Snowflake environment.
EMQX supports two modes for sending data to Snowflake:
| Mode | Description | Requires ODBC |
|---|---|---|
| Aggregated | EMQX buffers MQTT messages into local files, then uploads them to a Snowflake stage. A pipe, configured with a COPY INTO statement, automatically loads those staged files into a target table. For more details, see Snowflake Snowpipe Documentation. | Yes |
| Streaming | Sends data in real time via the Snowpipe Streaming API, writing rows directly to Snowflake tables. | Yes |
Initialize Snowflake ODBC Driver
To enable EMQX to communicate with Snowflake and efficiently transfer data, it is necessary to install and configure the Snowflake Open Database Connectivity (ODBC) driver. This driver enables EMQX to write data to a Snowflake stage. It acts as the communication bridge, ensuring that data is properly formatted, authenticated, and transferred.
For more information, refer to the official ODBC Driver page and the license agreement.
Initialize Snowflake ODBC Driver on Linux
EMQX provides an installation script designed specifically for the quick deployment of the Snowflake ODBC driver on Debian-based systems (such as Ubuntu), along with the required system configuration.
Note
This script is for testing only, not a recommendation on how to set up the ODBC driver in production environments. You can refer to the official installation instructions for Linux.
Run the Installation Script
Copy the scripts/install-snowflake-driver.sh script to your local machine. Run chmod a+x to make the script executable, and run it with sudo:
chmod a+x scripts/install-snowflake-driver.sh
sudo ./scripts/install-snowflake-driver.sh
The script automatically downloads the Snowflake ODBC .deb installation package (e.g., snowflake-odbc-3.4.1.x86_64.deb) to the current working directory. It then installs the driver and updates the following system configuration files:
/etc/odbc.ini: Adds the Snowflake data source configuration/etc/odbcinst.ini: Registers the Snowflake driver path
Sample Configuration
Run the following command to view the configurations in the /etc/odbc.ini file:
emqx@emqx-0:~$ cat /etc/odbc.ini

[snowflake]
Description=SnowflakeDB
Driver=SnowflakeDSIIDriver
Locale=en-US
PORT=443
SSL=on

[ODBC Data Sources]
snowflake = SnowflakeDSIIDriver
Run the following command to view the configurations in the /etc/odbcinst.ini file:
emqx@emqx-0:~$ cat /etc/odbcinst.ini

[ODBC Driver 18 for SQL Server]
Description=Microsoft ODBC Driver 18 for SQL Server
Driver=/opt/microsoft/msodbcsql18/lib64/libmsodbcsql-18.5.so.1.1
UsageCount=1

[ODBC Driver 17 for SQL Server]
Description=Microsoft ODBC Driver 17 for SQL Server
Driver=/opt/microsoft/msodbcsql17/lib64/libmsodbcsql-17.10.so.6.1
UsageCount=1

[SnowflakeDSIIDriver]
APILevel=1
ConnectFunctions=YYY
Description=Snowflake DSII
Driver=/usr/lib/snowflake/odbc/lib/libSnowflake.so
DriverODBCVer=03.52
SQLLevel=1
UsageCount=1
Initialize Snowflake ODBC Driver on macOS
To install and configure the Snowflake ODBC driver on macOS, follow these steps:
Install unixODBC, for example:
brew install unixodbcRefer to Installing and configuring the ODBC Driver for macOS for detailed installation and configuration instructions.
After installation, update the following configuration files:
Update permissions and configuration for the Snowflake ODBC driver:
bashchown $(id -u):$(id -g) /opt/snowflake/snowflakeodbc/lib/universal/simba.snowflake.ini echo 'ODBCInstLib=libiodbcinst.dylib' >> /opt/snowflake/snowflakeodbc/lib/universal/simba.snowflake.iniCreate or update the
~/.odbc.inifile to configure the ODBC connection:cat << EOF > ~/.odbc.ini [ODBC] Trace=no TraceFile= [ODBC Drivers] Snowflake = Installed [ODBC Data Sources] snowflake = Snowflake [Snowflake] Driver = /opt/snowflake/snowflakeodbc/lib/universal/libSnowflake.dylib EOF
Create a User Account and Set Up Snowflake Resources
Regardless of upload mode, you must configure your Snowflake environment, such as setting up a user account, database, and related resources for data ingestion. The following credentials will be required later for configuring the Connector and Sink in EMQX:
| Field | Value | Description |
|---|---|---|
| Data Source Name (DSN) | snowflake (aggregated only) | ODBC DSN configured in /etc/odbc.ini, used for aggregated uploads. |
| Username | snowpipeuser | Snowflake user used to authenticate connections. Must have appropriate privileges for either mode. |
| Password | Snowpipeuser99 | Optional if using key-pair authentication. |
| Database Name | testdatabase | Snowflake database where the target table is located. |
| Schema | public | Schema within the database containing your table and pipe. |
| Stage (aggregated) | emqx | Snowflake stage used to hold files before ingestion. |
| Pipe (aggregated) | emqx | Pipe that loads data from the stage into the target table. |
| Pipe (streaming) | emqxstreaming | Pipe created using DATA_SOURCE(TYPE => 'STREAMING') to ingest data via Snowpipe Streaming API. |
| Private Key | file://<path to snowflake_rsa_key.private.pem> | RSA private key used to sign JWTs for API authentication. |
Generate RSA Key Pair (Optional for Aggregated Mode)
Snowflake supports multiple authentication methods. In EMQX, your choice of method depends on the upload mode and how you configure the connection:
| Upload Mode | Authentication Options | Key Pair Required |
|---|---|---|
| Streaming (HTTPS) | RSA key pair + JWT (only supported method) | Yes |
| Aggregated (ODBC) | Username/password (via DSN or EMQX) RSA key pair + JWT (optional, configured in EMQX only) | Optional |
Key pair authentication is mandatory only for streaming mode, where EMQX signs JWTs to securely authenticate to Snowflake's Streaming API.
For the aggregated mode, either username/password or RSA key pair can be used for authentication. You can provide credentials in one of the following ways:
- Enter the username and password directly in the EMQX Connector configuration on the Dashboard.
- Provide the path to a private RSA key (if using key-pair authentication).
- Or, if neither is specified in EMQX, ensure that credentials are correctly configured in your system’s ODBC DSN, such as
/etc/odbc.ini(Linux) or~/.odbc.ini(macOS).
TIP
Use either Password or Private Key for authentication, not both.
If neither is configured in EMQX, the Connector will fall back to using credentials from /etc/odbc.ini.
Example (/etc/odbc.ini with username/password)
[snowflake]
Driver=SnowflakeDSIIDriver
Server=<account>.snowflakecomputing.com
UID=snowpipeuser
PWD=Snowpipeuser99
Database=testdatabase
Schema=public
Warehouse=compute_wh
Role=snowpipe
This approach allows EMQX to refer to the
DSN(snowflake) in its configuration without directly including credentials.
If You Use Key Pair Authentication
If you choose or are required to use RSA key pair authentication (e.g. for streaming mode), use the commands below to generate and configure the keys:
# Generate private key
openssl genrsa 2048 | openssl pkcs8 -topk8 -inform PEM -out snowflake_rsa_key.private.pem -nocrypt

# Generate public key
openssl rsa -in snowflake_rsa_key.private.pem -pubout -out snowflake_rsa_key.public.pem
When EMQX uses key-pair authentication (supported in both aggregated and streaming modes):
- EMQX uses the private RSA key to sign a JWT, which serves as a secure, verifiable identity token.
- Snowflake verifies the token’s signature using the public key.
For more information, refer to Key-pair authentication and key-pair rotation.
Set Up Snowflake Resources Using SQL
After generating the RSA key pair, you’ll set up the necessary Snowflake objects for either aggregated or streaming ingestion using SQL commands.
This includes:
- Creating a database and table
- Creating a stage and pipe (for
aggregated) - Creating a streaming pipe (for
streaming) - Creating a user and role, and granting access
In the Snowflake console, open the SQL Worksheet and execute the following SQL commands to create the database, table, stage, and pipe:
sqlUSE ROLE accountadmin; -- Create a database to store your data (if not exists) CREATE DATABASE IF NOT EXISTS testdatabase; -- Create a table to receive MQTT data CREATE OR REPLACE TABLE testdatabase.public.emqx ( clientid STRING, topic STRING, payload STRING, publish_received_at TIMESTAMP_LTZ ); -- Create a Snowflake stage for uploading files (aggregated mode only) CREATE STAGE IF NOT EXISTS testdatabase.public.emqx FILE_FORMAT = (TYPE = CSV PARSE_HEADER = TRUE FIELD_OPTIONALLY_ENCLOSED_BY = '"') COPY_OPTIONS = (ON_ERROR = CONTINUE PURGE = TRUE); -- Create a pipe for aggregated mode that copies from the stage CREATE PIPE IF NOT EXISTS testdatabase.public.emqx AS COPY INTO testdatabase.public.emqx FROM @testdatabase.public.emqx MATCH_BY_COLUMN_NAME = CASE_INSENSITIVE; -- Create a pipe for streaming mode (direct ingestion) CREATE PIPE IF NOT EXISTS testdatabase.public.emqxstreaming AS COPY INTO testdatabase.public.emqx ( clientid, topic, payload, publish_received_at ) FROM ( SELECT $1:clientid::STRING, $1:topic::STRING, $1:payload::STRING, $1:publish_received_at::TIMESTAMP_LTZ FROM TABLE(DATA_SOURCE(TYPE => 'STREAMING')) );- The
COPY INTOinside the pipe ensures Snowflake automatically loads staged or streamed data into your table. - The
$1:fieldsyntax in streaming pipes extracts fields from JSON payloads ingested via EMQX.
- The
Create a dedicated user (e.g.,
snowpipeuser) for EMQX to authenticate with, and bind the RSA public key for that user:sql-- Create the user account CREATE USER IF NOT EXISTS snowpipeuser PASSWORD = 'Snowpipeuser99' MUST_CHANGE_PASSWORD = FALSE; -- Bind the RSA public key to the user ALTER USER snowpipeuser SET RSA_PUBLIC_KEY = ' <YOUR_PUBLIC_KEY_CONTENTS_LINE_1> <YOUR_PUBLIC_KEY_CONTENTS_LINE_2> <YOUR_PUBLIC_KEY_CONTENTS_LINE_3> <YOUR_PUBLIC_KEY_CONTENTS_LINE_4> ';TIP
You need to remove the
-----BEGIN PUBLIC KEY-----and-----END PUBLIC KEY-----lines from the PEM file, and include the remaining content-preserving line breaks.This key is uploaded to the Snowflake user and stored inside Snowflake.
Create and assign the required role to the user for managing the Snowflake resources:
sqlCREATE OR REPLACE ROLE snowpipe; -- Grant usage and read/write permissions GRANT USAGE ON DATABASE testdatabase TO ROLE snowpipe; GRANT USAGE ON SCHEMA testdatabase.public TO ROLE snowpipe; GRANT INSERT, SELECT ON testdatabase.public.emqx TO ROLE snowpipe; -- Aggregated mode requires access to stage and pipe GRANT READ, WRITE ON STAGE testdatabase.public.emqx TO ROLE snowpipe; GRANT OPERATE, MONITOR ON PIPE testdatabase.public.emqx TO ROLE snowpipe; -- Streaming mode requires permissions on the streaming pipe GRANT OPERATE, MONITOR ON PIPE testdatabase.public.emqxstreaming TO ROLE snowpipe; -- Link role to the user and set it as default GRANT ROLE snowpipe TO USER snowpipeuser; ALTER USER snowpipeuser SET DEFAULT_ROLE = snowpipe;
Create a Snowflake Connector for Aggregated Mode
If you plan to use the aggregated upload mode in your Snowflake Sink, you need to create a Snowflake Connector to establish the connection with your Snowflake environment. This connector uses ODBC (via DSN) to connect through a stage.
Go to the Dashboard Integration -> Connector page.
Click the Create button in the top right corner.
Select Snowflake as the connector type and click next.
Enter the connector name, a combination of upper and lowercase letters and numbers. Here, enter
my-snowflake.Enter the connection information.
Server Host: The server host is the Snowflake endpoint URL, typically in the format
<Your Snowflake Organization ID>-<Your Snowflake Account Name>.snowflakecomputing.com. You need to replace<Your Snowflake Organization ID>-<Your Snowflake Account Name>with the subdomain specific to your Snowflake instance.Account: Enter your Snowflake Organization ID and Snowflake account name separated by a dash (
-), which is part of the URL you use to access the Snowflake platform and can be found in your Snowflake console.Data Source Name (DSN): Enter
snowflake, which corresponds to the DSN configured in the.odbc.inifile during ODBC driver setup.Username: Enter
snowpipeuser, as defined during the previous setup process.Password: The password for authenticating with Snowflake via ODBC using username/password authentication. This field is optional:
You may enter the password here, e.g.,
Snowpipeuser99, as defined during the previous setup process;Or configure it in
/etc/odbc.ini;If using key-pair authentication instead, leave this field blank.
TIP
Use either Password or Private Key for authentication, not both. If neither is configured here, ensure the appropriate credentials are set in
/etc/odbc.ini.
Private Key Path: The absolute file path to the private RSA key used for authenticating with Snowflake via ODBC. This path must be consistent across all nodes of the cluster. For example:
/etc/emqx/certs/snowflake_rsa_key.private.pem.Private Key Password: The password used to decrypt the private RSA key file, if the key is encrypted. Leave this field blank if the key was generated without encryption (i.e., with the
-nocryptoption in OpenSSL).Proxy: Configuration settings for connecting to Snowflake through an HTTP proxy server. HTTPS proxies are not supported. By default, no proxy is used. To enable proxy support, select the
Enable Proxyand provide the following:- Proxy Host: The hostname or IP address of the proxy server.
- Proxy Port: The port number used by the proxy server.
If you want to establish an encrypted connection, click the Enable TLS toggle switch. For more information about TLS connection, see TLS for External Resource Access. TLS must be enabled for streaming mode, as communication is over HTTPS.
Advanced settings (optional): See Advanced Settings.
Before clicking Create, you can click Test Connectivity to test if the connector can connect to the Snowflake.
Click the Create button at the bottom to complete the connector creation.
You have now completed the connector creation and can proceed to create a rule and Sink to specify how the data will be written into Snowflake.
Create a Snowflake Streaming Connector
If you plan to use the streaming upload mode in your Snowflake Sink, you need to create a Snowflake Streaming Connector to establish the connection with your Snowflake environment. This connector uses HTTPS and the Snowpipe Streaming REST API.
Go to the Dashboard Integration -> Connector page.
Click the Create button in the top right corner.
Select Snowflake Streaming as the connector type and click next.
Enter the connector name, a combination of upper and lowercase letters and numbers. Here, enter
my-snowflake-streaming.Enter the connection information.
- Server Host: The server host is the Snowflake endpoint URL, typically in the format
<Your Snowflake Organization ID>-<Your Snowflake Account Name>.snowflakecomputing.com. You need to replace<Your Snowflake Organization ID>-<Your Snowflake Account Name>with the subdomain specific to your Snowflake instance. - Account: Enter your Snowflake Organization ID and Snowflake account name separated by a dash (
-), which is part of the URL you use to access the Snowflake platform and can be found in your Snowflake console. - Pipe User: The name of a Snowflake user account that has a role with permissions to operate the target Pipe, for example,
snowpipeuser. The role must have at least theOPERATEandMONITORprivileges. - Private Key Path: The RSA private key used by EMQX to sign JWT tokens to authenticate itself with the Snowflake API. You can paste the full PEM-formatted private key content directly as a string or specify the path to the private key file, starting with
file://. For example:file:///etc/emqx/certs/snowflake_rsa_key.private.pem. - Private Key Password: The password used to decrypt the private RSA key file, if the key is encrypted. Leave this field blank if the key was generated without encryption (i.e., with the
-nocryptoption in OpenSSL). - Proxy: Configuration settings for connecting to Snowflake through an HTTP proxy server. HTTPS proxies are not supported. By default, no proxy is used. To enable proxy support, select the
Enable Proxyand provide the following:- Proxy Host: The hostname or IP address of the proxy server.
- Proxy Port: The port number used by the proxy server.
- Server Host: The server host is the Snowflake endpoint URL, typically in the format
If you want to establish an encrypted connection, click the Enable TLS toggle switch. For more information about TLS connection, see TLS for External Resource Access. TLS must be enabled for streaming mode, as communication is over HTTPS.
Advanced settings (optional): See Advanced Settings.
Before clicking Create, you can click Test Connectivity to test if the connector can connect to the Snowflake.
Click the Create button at the bottom to complete the connector creation.
You have now completed the connector creation and can proceed to create a rule and Sink to specify how the data will be written into Snowflake.
Create a Rule with Snowflake Sink
This section demonstrates how to create a rule in EMQX to process messages (e.g., from the source MQTT topic t/#) and write the processed results to Snowflake through a configured Sink.
Create a Rule with Defined SQL
Go to the Dashboard Integration -> Rules page.
Click the Create button in the top right corner.
Enter the rule ID
my_rule, and input the following rule SQL in the SQL editor:sqlSELECT clientid, unix_ts_to_rfc3339(publish_received_at, 'millisecond') as publish_received_at, topic, payload FROM "t/#"TIP
If you are new to SQL, you can click SQL Examples and Enable Debug to learn and test the rule SQL results.
TIP
For Snowflake integration, it is important that the selected fields exactly match the number of columns and their names of the table defined in Snowflake, so avoid adding extra fields or selecting from
*.Add action to the rule by configuring a Sink.
- If you want to write the rule processing results to Snowflake using the aggregated upload mode, refer to Add Snowflake Sink with Aggregated Upload Mode.
- If you want to write the rule processing results to Snowflake using the streaming upload mode, refer to Add Snowflake Sink with Streaming Upload Mode.
After the action is added, you will see the newly added Sink appear under the Action Outputs section. Click the Save button on the Create Rule page to complete the entire rule creation process.
You have now successfully created the rule. You can see the newly created rule on the Rules page and the new Snowflake Sink on the Actions (Sink) tab.
You can also click Integration -> Flow Designer to view the topology. The topology visually shows how messages under the topic t/# are written into the Snowflake after being parsed by the rule my_rule.
Add Snowflake Sink with Aggregated Upload Mode
This section demonstrates how to add a Sink to the rule to write the processed results to Snowflake using the aggregated upload mode. This mode consolidates the results of multiple rule triggers into a single file (e.g., a CSV file) and uploads it to Snowflake, thereby reducing the number of files and enhancing write efficiency.
On the Create Rule page, click Add Action under the Action Outputs section to add an action to the rule.
Select
Snowflakefrom the Action Type dropdown list, keep the Action dropdown as the defaultCreate Actionoption, or choose a previously created Snowflake action from the action dropdown. Here, create a new Sink and add it to the rule.Enter the Sink's name (for example,
snowflake_sink) and a brief description.Select the
my-snowflakeconnector created earlier from the Connectors dropdown. You can also click the create button next to the dropdown to quickly create a new connector in the pop-up box. The required configuration parameters can be found in Create a Snowflake Connector for Aggregated Mode.Configure the settings for the aggregated upload mode.
Database Name: Enter
testdatabase. This is the Snowflake database that was created for storing EMQX data.Schema: Enter
public, the schema within thetestdatabasewhere the data table is located.Stage: Enter
emqx, the stage created in Snowflake for holding the data before loading it into the table.Pipe: Enter
emqx, the pipe automating the loading process from the stage to the table.Pipe User: Enter
snowpipeuser, the Snowflake user with the appropriate permissions to manage the pipe.Private Key: The RSA private key used by the pipe user to securely access the Snowflake pipe. You can provide the key in one of two formats:
- Plain Text: Paste the full PEM-formatted private key content directly as a string.
- File Path: Specify the path to the private key file, starting with
file://. The file path must be consistent across all nodes in the cluster and accessible by the EMQX application user. For example,file:///etc/emqx/certs/snowflake_rsa_key.private.pem.
Private Key Password: The password used to decrypt the private RSA key file, if the key is encrypted. Leave this field blank if the key was generated without encryption (i.e., with the
-nocryptoption in OpenSSL).Aggregation Upload Format: Currently, only
csvis supported. Data will be staged to Snowflake in comma-separated CSV format.Column Order: Select the order of the columns from the dropdown list based on your desired arrangement. The generated CSV file will be sorted first by the selected columns, with unselected columns sorted alphabetically afterward.
Max Records: Set the maximum number of records before aggregation is triggered. For example, you can set it to
1000to upload after collecting 1000 records. When the maximum number of records is reached, the aggregation of a single file will be completed and uploaded, resetting the time interval.Time Interval: Set the time interval (in seconds) at which aggregation occurs. For example, if set to
60, data will be uploaded every 60 seconds even if the maximum number of records hasn’t been reached, resetting the maximum number of records.Proxy: Configuration settings for connecting to Snowflake through an HTTP proxy server. HTTPS proxies are not supported. By default, no proxy is used. To enable proxy support, select the
Enable Proxyand provide the following:- Proxy Host: The hostname or IP address of the proxy server.
- Proxy Port: The port number used by the proxy server.
Fallback Actions (optional): If you want to improve reliability in case of message delivery failure, you can define one or more fallback actions. These actions will be triggered if the primary Sink fails to process a message. See Fallback Actions for more details.
Expand Advanced Settings and configure the advanced setting options as needed (optional). For more details, refer to Advanced Settings.
Before clicking Create, you can click Test Connectivity to test that the Sink can be connected to the Snowflake server.
Click the Create button to complete the Sink creation. After successful creation, the page will return to the rule creation, and the new Sink will be added to the rule actions.
Add Snowflake Sink with Streaming Upload Mode
This section demonstrates how to add a Sink to the rule to write the processed results to Snowflake using the Streaming upload mode. This mode enables real-time ingestion using the Snowpipe Streaming API.
- On the Create Rule page, click Add Action under the Action Outputs section to add an action to the rule.
- Select
Snowflake Streamingfrom the Action Type dropdown list, keep the Action dropdown as the defaultCreate Actionoption, or choose a previously created Snowflake action from the action dropdown. Here, create a new Sink and add it to the rule. - Enter the Sink's name (for example,
snowflake_sink_streaming) and a brief description. - Select the
my-snowflake-streamingconnector created earlier from the connector dropdown. You can also click the create button next to the dropdown to quickly create a new connector in the pop-up box. The required configuration parameters can be found in Create a Snowflake Streaming Connector. - Configure the settings for the streaming upload mode.
- Database Name: Enter
testdatabase. This is the Snowflake database that was created for storing EMQX data. - Schema: Enter
public, the schema within thetestdatabasewhere the data table is located. - Pipe: Enter
emqxstreaming, the name of the Snowflake Streaming pipe created using a SQL statement. The name must match exactly as defined in Snowflake. - HTTP Pipelining: The maximum number of HTTP requests that can be sent without waiting for responses. Default:
100. - Connect Timeout: The time limit for establishing a connection to Snowflake before the attempt is aborted. Default:
15seconds. - Connection Pool Size: The maximum number of concurrent connections EMQX can maintain to Snowflake for this Sink. Default:
8. - Max Inactive: The maximum amount of time an idle connection can remain open before being closed. Default:
10seconds.
- Database Name: Enter
- Fallback Actions (optional): If you want to improve reliability in case of message delivery failure, you can define one or more fallback actions. These actions will be triggered if the primary Sink fails to process a message. See Fallback Actions for more details.
- Expand Advanced Settings and configure the advanced setting options as needed (optional). For more details, refer to Advanced Settings.
- Before clicking Create, you can click Test Connectivity to test that the Sink can be connected to the Snowflake server.
- Click the Create button to complete the Sink creation. After successful creation, the page will return to the rule creation, and the new Sink will be added to the rule actions.
Test the Rule
This section shows how to test the configured rule.
Publish a Test Message
Use MQTTX to publish a message to the topic t/1:
mqttx pub -i emqx_c -t t/1 -m '{ "msg": "Hello Snowflake" }'Repeat this step a few times to generate multiple test messages.
Verify the Data in Snowflake
After sending the test messages, you can verify that the data was successfully written to Snowflake by accessing your Snowflake instance and querying the target table.
Open the Snowflake web interface and log in to the Snowflake Console with your credentials.
In the Snowflake Console, execute the following SQL query to view the data written by the rule into the
emqxtable:SELECT * FROM testdatabase.public.emqx;This will display all the records uploaded to the
emqxtable, including theclientid,topic,payload, andpublish_received_atfields.You should see the test messages you sent, such as the message content
{ "msg": "Hello Snowflake" }, along with other metadata like the topic and timestamp.
Advanced Settings
This section delves into the advanced configuration options available for the Snowflake Sink. In the Dashboard, when configuring the Sink, you can expand Advanced Settings to adjust the following parameters based on your specific needs.
| Field Name | Description | Default Value |
|---|---|---|
| Buffer Pool Size | Specifies the number of buffer worker processes, which are allocated to manage the data flow between EMQX and Snowflake. These workers temporarily store and process data before sending it to the target service, crucial for optimizing performance and ensuring smooth data transmission. | 16 seconds |
| Request TTL | The "Request TTL" (Time To Live) configuration setting specifies the maximum duration, in seconds, that a request is considered valid once it enters the buffer. This timer starts ticking from the moment the request is buffered. If the request stays in the buffer for a period exceeding this TTL setting or if it is sent but does not receive a timely response or acknowledgment from Snowflake, the request is deemed to have expired. | 45 seconds |
| Health Check Interval | Specifies the time interval (in seconds) for the Sink to perform automatic health checks on its connection with Snowflake. | 15 seconds |
| Health Check Interval Jitter | A uniform random delay added on top of the base health check interval to reduce the chance that multiple nodes initiate health checks at the same time. When multiple Actions or Sources share the same Connector, enabling jitter ensures their health checks are initiated at slightly different times. | 0 millisecond |
| Health Check Timeout | Specify the timeout duration for the connector to perform automatic health checks on its connection with S3 Tables. | 60 seconds |
| Max Buffer Queue Size | Specifies the maximum number of bytes that can be buffered by each buffer worker process in the Snowflake Sink. The buffer workers temporarily store data before sending it to Snowflake, acting as intermediaries to handle the data stream more efficiently. Adjust this value based on system performance and data transmission requirements. | 256 MB |
| Query Mode | Allows you to choose between synchronous or asynchronous request modes to optimize message transmission according to different requirements. In asynchronous mode, writing to Snowflake does not block the MQTT message publishing process. However, this may lead to clients receiving messages before they arrive at Snowflake. | Asynchronous |
| Batch Size | Specifies the maximum size of data batches transmitted from EMQX to Snowflake in a single transfer operation. By adjusting the size, you can fine-tune the efficiency and performance of data transfer between EMQX and Snowflake. If the "Batch Size" is set to "1," data records are sent individually, without being grouped into batches. | 100 |
| Inflight Window | "In-flight queue requests" refer to requests that have been initiated but have not yet received a response or acknowledgment. This setting controls the maximum number of in-flight queue requests that can exist simultaneously during Sink communication with Snowflake. When Request Mode is set to asynchronous, the "Request In-flight Queue Window" parameter becomes particularly important. If strict sequential processing of messages from the same MQTT client is crucial, then this value should be set to 1. | 100 |