Ingest MQTT Data into BigQuery
BigQuery is an enterprise data warehouse for large amounts of relational structured data. It is optimized for large-scale, ad-hoc SQL-based analysis and reporting, which makes it best suited for gaining organizational insights. EMQX supports seamless integration with BigQuery for real-time extraction, processing, and analysis of MQTT data.
This page provides a comprehensive introduction to the data integration between EMQX and BigQuery, with practical instructions on creating and validating the data integration.
How It Works
BigQuery data integration is an out-of-the-box feature of EMQX designed to help users seamlessly integrate MQTT data streams with Google Cloud and leverage its rich services and capabilities for IoT application development.
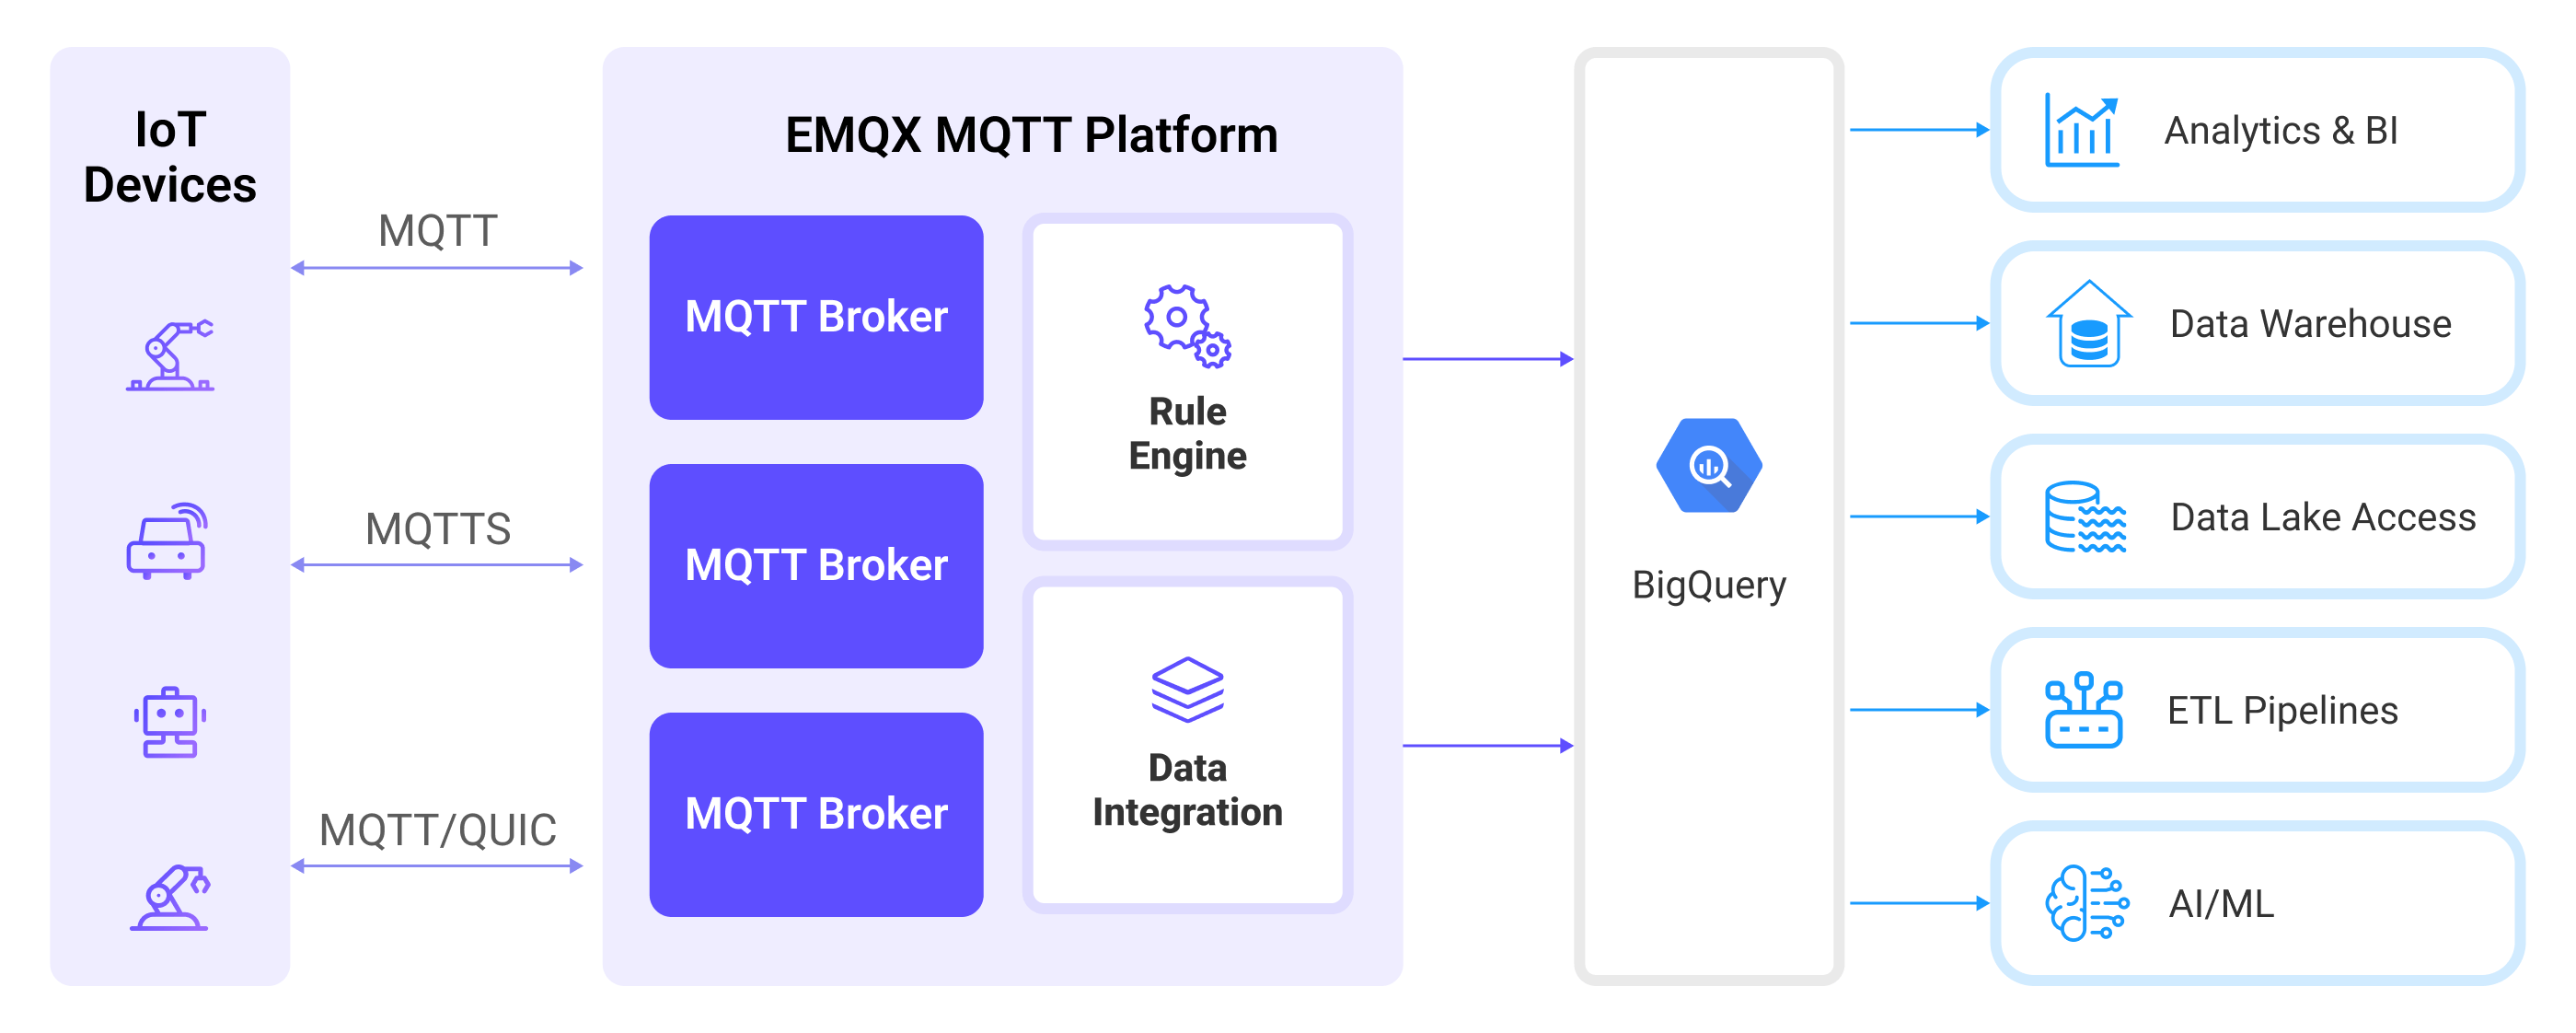
EMQX forwards MQTT data to BigQuery through the rule engine and Sink. The complete process is as follows:
- IoT Devices Publish Messages: Devices publish telemetry and status data through specific topics, triggering the rule engine.
- Rule Engine Processes Messages: Using the built-in rule engine, MQTT messages from specific sources are processed based on topic matching. The rule engine matches corresponding rules and processes messages, such as converting data formats, filtering specific information, or enriching messages with contextual information.
- Bridging to BigQuery: The rule triggers the action of forwarding messages to BigQuery, allowing easy configuration of data properties, ordering keys, and mapping of MQTT topics to BigQuery topics. This provides richer context information and order assurance for data integration, enabling flexible IoT data processing.
Features and Benefits
Integrating EMQX with BigQuery offers a robust, scalable, and real-time data pipeline for MQTT data. The following features and benefits help simplify IoT analytics and data-driven decision-making:
- Real-time Data Ingestion: Seamlessly stream MQTT messages from EMQX into BigQuery with low latency. Supports time-sensitive applications that require immediate processing and analysis of IoT data.
- Flexible Data Mapping: Customize how MQTT topics and message payloads are mapped to BigQuery tables and fields.
- Scalable and Serverless Analytics: Leverage BigQuery’s fully managed, serverless architecture to analyze IoT data at scale.
- Easy Integration with Google Cloud Ecosystem: Native compatibility with Google Cloud services like Data Studio, Looker, and AI Platform for visualization and machine learning. Simplifies building end-to-end pipelines from data collection to insight generation.
Before You Start
This section describes the preparations you need to complete before you start to create the BigQuery data integration.
Prerequisites
- Knowledge about EMQX data integration rules
- Knowledge about Data Integration
Create Service Account Key in GCP
To allow EMQX to connect with BigQuery, you need to create a Service Account in Google Cloud and generate a key in JSON format.
Create a Service Account in your GCP account. Ensure that the Service Account has the necessary permissions to access the datasets and tables you will use. For example, by granting the "BigQuery Data Editor" role to read and write the required datasets or tables, or at least ensuring it has read/write access to their data.
Click the email address for the service account you created.
Click the Key tab. In the Add key drop-down list, select Create new key to create a Service Account key for that account and download it in JSON format.
TIP
Keep the downloaded Service Account key file secure, as it will be used later to authenticate EMQX with BigQuery.

Set Up Workload Identity Federation in GCP
Workload Identity Federation (WIF) allows EMQX to access GCP resources without a long-lived service account key file. Instead, EMQX exchanges a token from your external identity provider (such as Microsoft Azure) for a temporary GCP token via GCP's Security Token Service, then uses it to impersonate a GCP service account. Token renewal is handled automatically.
To use WIF, complete the following in your GCP project before creating the connector.
In the Google Cloud console, go to IAM & Admin -> Workload Identity Federation, create a workload identity pool, and note the Pool ID and Project Number.
Add a provider to the pool and note the Provider ID. For OIDC-based authentication, obtain the OAuth 2.0 client credentials (client ID, client secret, and token endpoint URI) from your external identity provider.
Grant the workload identity pool permission to impersonate the GCP service account with access to your BigQuery datasets and tables. The service account email is required when configuring the connector.
TIP
See Configure Workload Identity Federation for detailed instructions.
Example: Microsoft Azure (Entra ID)
In Microsoft Entra ID, register an application that exposes an API and create a client secret for it. Use the following values when configuring the connector:
| Connector field | Value |
|---|---|
| Endpoint URI | https://login.microsoftonline.com/<tenant-id>/oauth2/v2.0/token |
| OAuth Client ID | The Application (client) ID, in the form api://<application-id> |
| OAuth Client Secret | The client secret generated for the application |
| OAuth Request Scope | api://<application-id>/.default |
Note
The scope must exactly match the application's audience (aud). Otherwise, the token exchange with GCP STS will fail. See the OAuth 2.0 client credentials flow in the Microsoft documentation for details.
When granting the Service Account access to the WIF pool, use the Object ID (not the Application ID) as the Subject value. The Object ID is visible on the application's Overview page in the Azure portal under Enterprise applications.
Create and Manage Datasets and Tables in GCP
Before configuring the BigQuery data integration on EMQX, you must create the required datasets and tables in GCP.
In the Google Cloud console, go to the BigQuery -> Studio page. For detailed instructions, see Load and query data quickstart guide.
TIP
The Service Account you plan to use must have write permissions for the target table in the dataset.
In the Explorer pane, click the kebab icon (⋮), then select Create dataset. Define a name for your dataset and click Create dataset.
After the dataset is created, click on it in the Explorer pane, then click (+) Create table.
Set the source as "Empty Table".
Provide a table name.
Define the table schema. For example, click the Edit as text toggle, and paste the following schema definition into the text field.
clientid:string,payload:bytes,topic:string,publish_received_at:timestampClick Create table to complete the setup.
Configure permissions to allow EMQX to write data:
- Select the dataset and click Share.
- Add your Service Account email as a principal.
- Assign appropriate roles, such as:
- "BigQuery Data Viewer" (read access) for the dataset
- "Editor" (read and write access) for the table
Once the table is created, you can verify it by running a query:
Click the table, then click Query.
Run a simple SQL statement to check that the table is accessible:
sqlSELECT * FROM `my_project.my_dataset.my_tab` LIMIT 1000
Create a BigQuery Connector
Before adding a BigQuery Producer Sink action, you need to create a BigQuery connector to establish a connection between EMQX and BigQuery.
- Go to the EMQX Dashboard and click Integration -> Connector.
- Click Create in the top right corner of the page, select BigQuery on the connector selection page, and click Next.
- Enter a name and description, such as
my_bigquery. The name is used to associate the BigQuery Sink with the connector and must be unique within the cluster. - In the Authentication dropdown, select one of the following authentication methods and fill in the corresponding fields:
- Service Account JSON: Upload the Service Account credentials in JSON format that you exported in Create Service Account Key in GCP.
- Workload Identity Federation (WIF): Fill in the following fields. This method does not use a service account JSON file. See Set Up Workload Identity Federation in GCP for prerequisites.
- GCP Project ID: The Project ID for the resource being accessed by the connector.
- GCP Project Number: The Project Number for the resource being accessed by the connector.
- Service Account Email: The email of the service account that will be impersonated.
- Workload Identity Pool ID: The ID of the Workload Identity Pool used in the WIF token exchange.
- Workload Identity Provider ID: The ID of the Workload Identity Provider used in the WIF token exchange.
- Under Initial Token Configuration, select the credential type and fill in the corresponding fields. Currently, only OIDC with Client Credentials Grant Type is supported:
- Endpoint URI: The OAuth Token Endpoint URI from the OIDC provider.
- OAuth Client ID: The client ID used to request a token from the OAuth server.
- OAuth Client Secret: The client secret used to request a token from the OAuth server.
- OAuth Request Scope: The
scopeto provide when requesting the OAuth access token, if required by your provider.
- Before clicking Create, you can click Test Connectivity to test if the connector can connect to the BigQuery server.
- Click the Create button at the bottom to complete the creation of the connector. In the pop-up dialog, you can click Back to Connector List or click Create Rule to continue creating a rule with Sink to specify the data to be forwarded to BigQuery. For detailed steps, see Create a Rule with BigQuery Sink.
Create a Rule with BigQuery Sink
This section demonstrates how to create a rule to specify the data to be saved into BigQuery.
Go to EMQX Dashboard, and click Integration -> Rules.
Click Create on the top right corner of the page.
Enter
my_ruleas the rule ID.Set the rules in the SQL Editor. Here if you want to save the MQTT messages under topic
t/bqto BigQuery, you can use the SQL syntax below.Note: If you want to specify your own SQL syntax, make sure that the
SELECTpart includes all fields required by the payload template in the Sink.sqlSELECT clientid, topic, payload, publish_received_at FROM "t/bq"Note
Be sure to select only the fields that are columns in your BigQuery table, otherwise BigQuery will not recognize unknown fields.
TIP
If you are a beginner user, click SQL Examples and Enable Test to learn and test the SQL rule.
Click the Add Action button to define an action that will be triggered by the rule. Select
BigQueryfrom the Type of Action dropdown list so that EMQX will send the data processed by the rule to BigQuery.Keep the Action dropdown box with the value
Create Action. Or, you also can select a BigQuery Sink previously created. In this demonstration, you create a new Sink and add it to the rule.In the Name field, enter a name for the Sink. The name should be a combination of upper/lower case letters and numbers.
Select the
my_bigqueryjust created from the Connector dropdown box. You can also create a new Connector by clicking the button next to the dropdown box. For the configuration parameters, see Create a Connector.In Dataset and Table, enter the dataset and table names you created in Create and Manage Datasets and Tables in GCP, respectively.
Fallback Actions (Optional): If you want to improve reliability in case of message delivery failure, you can define one or more fallback actions. These actions will be triggered if the primary Sink fails to process a message. See Fallback Actions for more details.
Advanced settings (optional): Configure the advanced setting options as needed (optional). For more details, refer to Advanced Settings.
Before clicking Create, you can click Test Connectivity to test that the Connector can connect to the BigQuery server.
Click the Create button to complete the Sink configuration and you will see the new Sink appear under the Action Outputs tab.
Back on the Create Rule page, click Create to create the rule.
You have now successfully created the rule. You can see the newly created rule on the Integration -> Rules page. Click the Actions(Sink) tab and you can see the new BigQuery Sink.
You can also click Integration -> Flow Designer to view the topology and you can see that the messages under topic t/bq are sent and saved to BigQuery after parsing by rule my_rule.
Test the Rule
Use MQTTX to send messages on the topic
t/bq.bashmqttx pub -i emqx_c -t t/bq -m '{ "msg": "hello BigQuery" }'Check the running status of the Sink, there should be one new incoming and one new outgoing message.
Go to GCP BigQuery -> Studio, click your table, then click Query. Run a query and you should see the message.
Advanced Settings
This section delves into the advanced configuration options available for the BigQuery Producer Sink. In the Dashboard, when configuring the Sink, you can expand Advanced Settings to adjust the following parameters based on your specific needs.
| Field Name | Description | Default Value |
|---|---|---|
| Buffer Pool Size | Specifies the number of buffer worker processes, which are allocated to manage the data flow between EMQX and BigQuery. These workers temporarily store and process data before sending it to the target service, crucial for optimizing performance and ensuring smooth data transmission. | 16 |
| Request TTL | The "Request TTL" (Time To Live) configuration setting specifies the maximum duration, in seconds, that a request is considered valid once it enters the buffer. This timer starts ticking from the moment the request is buffered. If the request stays in the buffer for a period exceeding this TTL setting or if it is sent but does not receive a timely response or acknowledgment from BigQuery, the request is deemed to have expired. | 45 seconds |
| Health Check Interval | Specifies the time interval (in seconds) for the Sink to perform automatic health checks on its connection with BigQuery. | 15 seconds |
| Health Check Interval Jitter | A uniform random delay added on top of the base health check interval to reduce the chance that multiple nodes initiate health checks at the same time. When multiple Actions or Sources share the same Connector, enabling jitter ensures their health checks are initiated at slightly different times. | 0 millisecond |
| Health Check Timeout | Specifies the timeout duration for the connector to perform automatic health checks on its connection with BigQuery. | 60 seconds |
| Max Buffer Queue Size | Specifies the maximum number of bytes that can be buffered by each buffer worker process in the BigQuery Sink. The buffer workers temporarily store data before sending it to BigQuery, acting as intermediaries to handle the data stream more efficiently. Adjust this value based on system performance and data transmission requirements. | 256 |
| Query Mode | Allows you to choose between synchronous or asynchronous request modes to optimize message transmission according to different requirements. In asynchronous mode, writing to BigQuery does not block the MQTT message publishing process. However, this may lead to clients receiving messages before they arrive at BigQuery. | Async |
| Batch Size | Specifies the maximum size of data batches transmitted from EMQX to BigQuery in a single transfer operation. By adjusting the size, you can fine-tune the efficiency and performance of data transfer between EMQX and BigQuery. If the "Batch Size" is set to "1," data records are sent individually, without being grouped into batches. | 1000 |
| Inflight Window | "In-flight queue requests" refer to requests that have been initiated but have not yet received a response or acknowledgment. This setting controls the maximum number of in-flight queue requests that can exist simultaneously during Sink communication with BigQuery. When Request Mode is set to asynchronous, the "Request In-flight Queue Window" parameter becomes particularly important. If strict sequential processing of messages from the same MQTT client is crucial, then this value should be set to 1. | 100 |