BigQueryへのMQTTデータ取り込み
BigQueryは、大量のリレーショナル構造化データ向けのエンタープライズデータウェアハウスです。大規模なアドホックSQLベースの分析およびレポーティングに最適化されており、組織の洞察を得るのに最適です。EMQXは、MQTTデータのリアルタイム抽出、処理、分析のためにBigQueryとのシームレスな統合をサポートしています。
本ページでは、EMQXとBigQuery間のデータ統合について包括的に紹介し、データ統合の作成および検証に関する実践的な手順を提供します。
動作の仕組み
BigQueryデータ統合は、EMQXの標準機能として提供されており、ユーザーがMQTTデータストリームをGoogle Cloudとシームレスに統合し、IoTアプリケーション開発のための豊富なサービスや機能を活用できるよう設計されています。
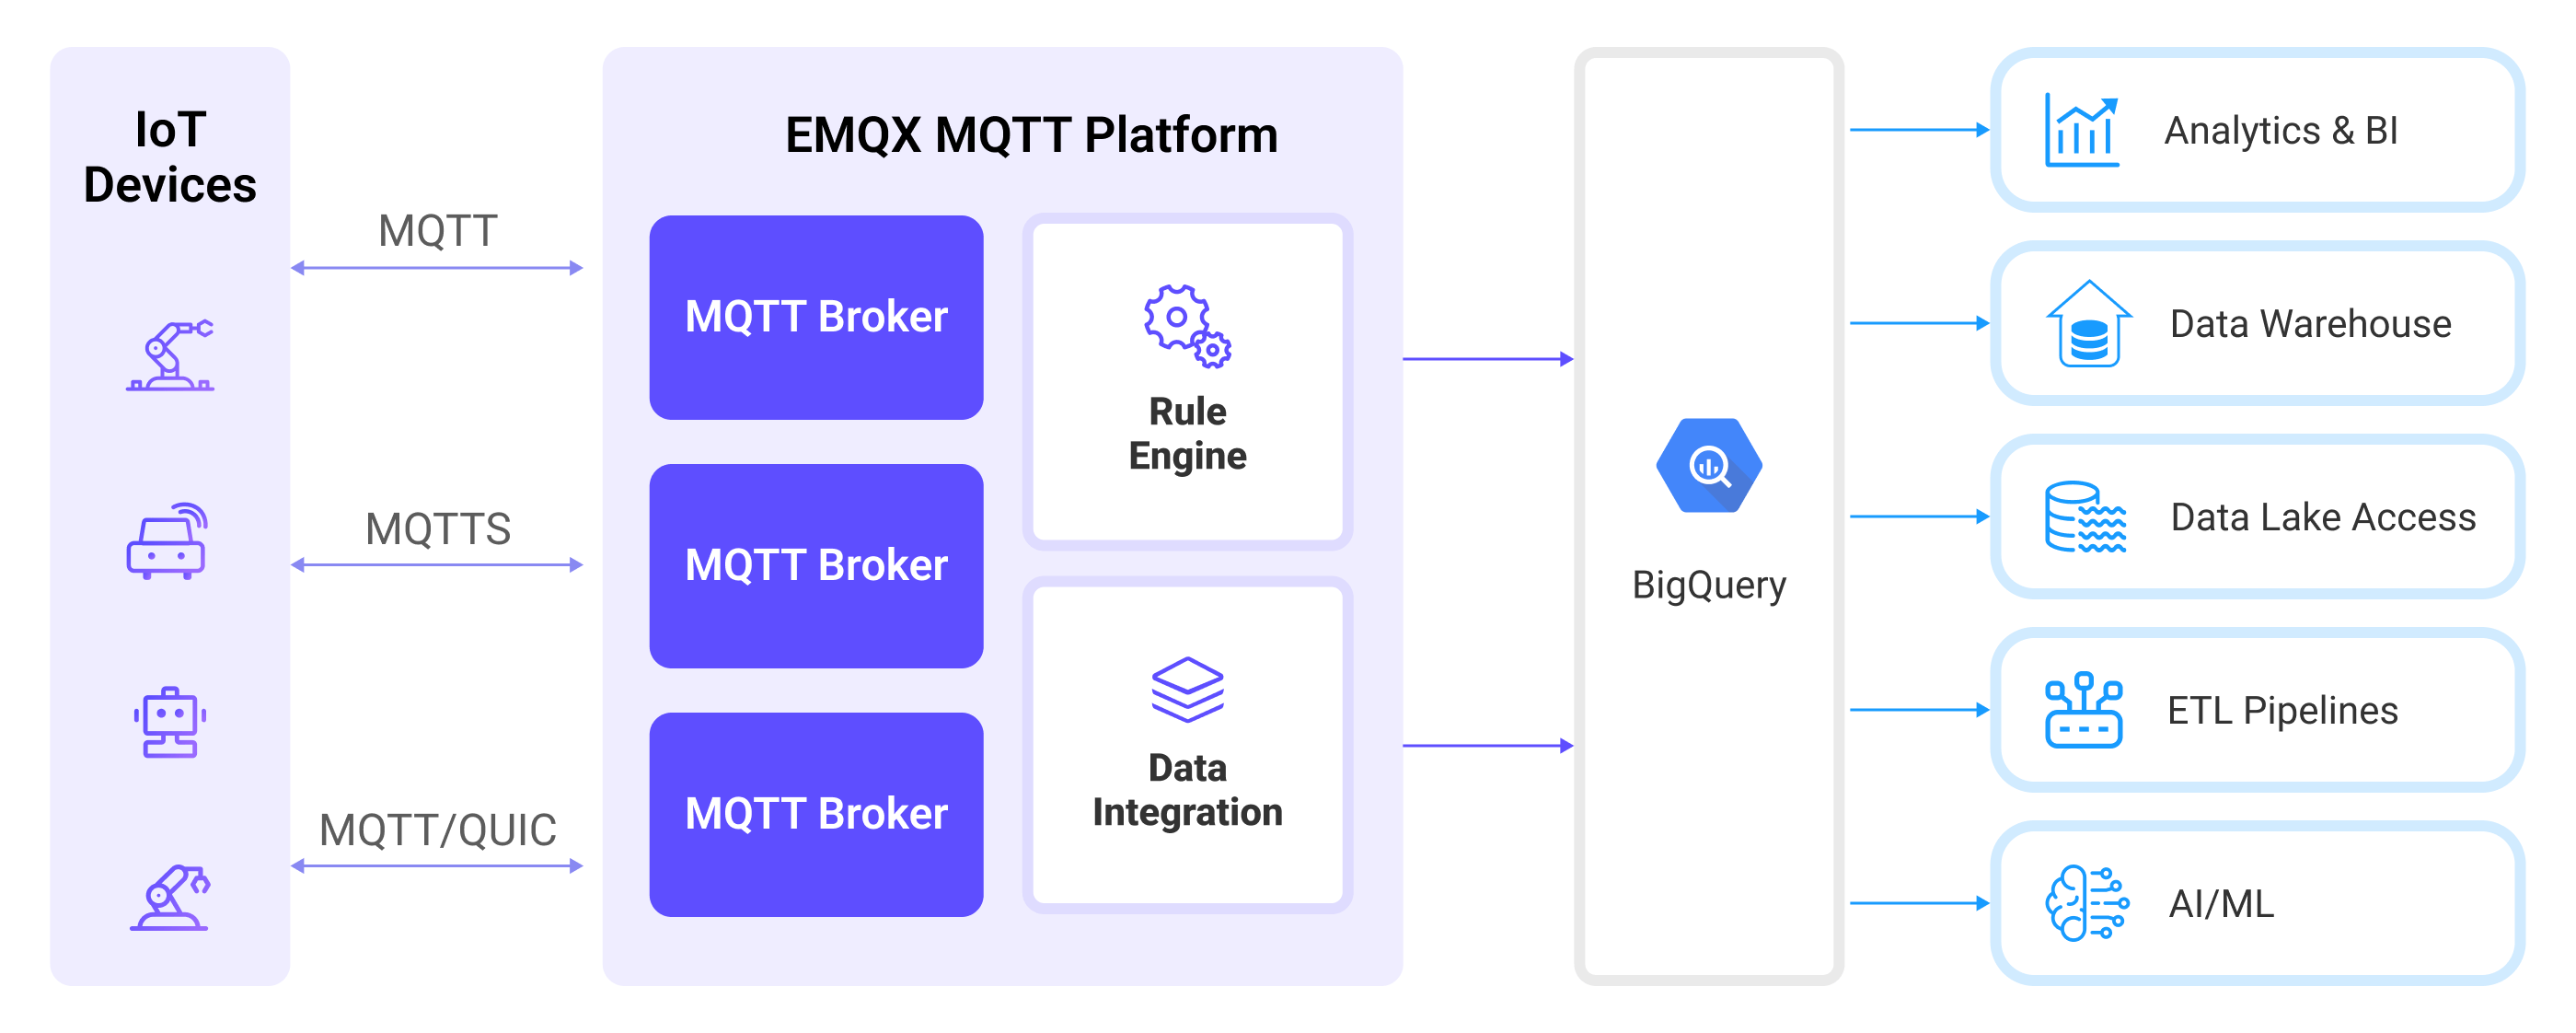
EMQXはルールエンジンとSinkを介してMQTTデータをBigQueryに転送します。全体のプロセスは以下の通りです。
- IoTデバイスがメッセージをパブリッシュする:デバイスは特定のトピックを通じてテレメトリやステータスデータをパブリッシュし、ルールエンジンをトリガーします。
- ルールエンジンがメッセージを処理する:組み込みのルールエンジンを使用し、特定のソースからのMQTTメッセージをトピックマッチングに基づいて処理します。ルールエンジンは対応するルールをマッチングし、データ形式の変換、特定情報のフィルタリング、文脈情報によるメッセージの付加などの処理を行います。
- BigQueryへのブリッジング:ルールはメッセージをBigQueryに転送するアクションをトリガーし、データプロパティ、オーダーキー、MQTTトピックとBigQueryトピックのマッピングを簡単に設定できます。これにより、データ統合におけるより豊かなコンテキスト情報と順序保証が提供され、柔軟なIoTデータ処理が可能になります。
特長と利点
EMQXとBigQueryの統合は、MQTTデータの堅牢でスケーラブルかつリアルタイムなデータパイプラインを提供します。以下の特長と利点により、IoT分析とデータ駆動型の意思決定を簡素化します。
- リアルタイムデータ取り込み:低レイテンシでEMQXからBigQueryへMQTTメッセージをシームレスにストリームします。即時処理と分析が必要な時間依存型アプリケーションに対応します。
- 柔軟なデータマッピング:MQTTトピックおよびメッセージペイロードをBigQueryのテーブルやフィールドにカスタマイズしてマッピング可能です。
- スケーラブルでサーバレスな分析:BigQueryの完全管理型サーバレスアーキテクチャを活用し、大規模なIoTデータを分析できます。
- Google Cloudエコシステムとの簡単な統合:Data Studio、Looker、AI PlatformなどのGoogle Cloudサービスとネイティブに連携し、可視化や機械学習を簡単に実現。データ収集から洞察生成までのエンドツーエンドパイプライン構築を簡素化します。
はじめる前に
本セクションでは、BigQueryデータ統合を作成する前に準備すべき事項を説明します。
前提条件
GCPでのサービスアカウントキーの作成
EMQXがBigQueryに接続できるように、Google Cloudでサービスアカウントを作成し、JSON形式のキーを生成する必要があります。
GCPアカウントでサービスアカウントを作成します。サービスアカウントには、使用するデータセットやテーブルへのアクセス権限が必要です。例えば、「BigQuery Data Editor」ロールを付与して対象データセットやテーブルの読み書きを許可するか、少なくともデータの読み書きアクセス権を持たせてください。
作成したサービスアカウントのメールアドレスをクリックします。
Keyタブをクリックし、Add keyのドロップダウンからCreate new keyを選択してサービスアカウントキーを作成し、JSON形式でダウンロードします。
TIP
ダウンロードしたサービスアカウントキーは後でEMQXのBigQuery認証に使用するため、安全に保管してください。

GCPでのWorkload Identity Federationの設定
Workload Identity Federation(WIF)を利用すると、EMQXは長期間有効なサービスアカウントキーを使わずにGCPリソースにアクセスできます。代わりに、EMQXは外部IDプロバイダー(例:Microsoft Azure)から取得したトークンをGCPのSecurity Token Service経由で一時的なGCPトークンに交換し、そのトークンを使ってGCPサービスアカウントを代理します。トークンの更新は自動で行われます。
WIFを利用するには、コネクター作成前にGCPプロジェクトで以下を完了してください。
Google CloudコンソールでIAM & Admin -> Workload Identity Federationに移動し、ワークロードアイデンティティプールを作成し、Pool IDとProject Numberを控えます。
プールにプロバイダーを追加し、Provider IDを控えます。OIDC認証の場合、外部IDプロバイダーからOAuth 2.0クライアント認証情報(クライアントID、クライアントシークレット、トークンエンドポイントURI)を取得します。
ワークロードアイデンティティプールにBigQueryのデータセットやテーブルにアクセス可能なGCPサービスアカウントの代理権限を付与します。コネクター設定時にサービスアカウントのメールアドレスが必要です。
TIP
詳細な手順はWorkload Identity Federationの設定を参照してください。
例:Microsoft Azure (Entra ID)
Microsoft Entra IDでAPIを公開するアプリケーションを登録し、クライアントシークレットを作成します。コネクター設定時に以下の値を使用します。
| コネクター項目 | 値 |
|---|---|
| Endpoint URI | https://login.microsoftonline.com/<tenant-id>/oauth2/v2.0/token |
| OAuth Client ID | アプリケーション(クライアント)ID、形式は api://<application-id> |
| OAuth Client Secret | アプリケーション用に生成したクライアントシークレット |
| OAuth Request Scope | api://<application-id>/.default |
注意
scopeはアプリケーションのaudience(aud)と完全に一致させる必要があります。そうしないとGCP STSとのトークン交換が失敗します。詳細はMicrosoftのOAuth 2.0クライアント認証フローを参照してください。
サービスアカウントにWIFプールへのアクセス権を付与する際は、Subject値にObject ID(アプリケーションIDではない)を使用してください。Object IDはAzureポータルのアプリケーションの概要ページのEnterprise applicationsに表示されます。
GCPでのデータセットおよびテーブルの作成と管理
EMQXでBigQueryデータ統合を設定する前に、GCPで必要なデータセットとテーブルを作成してください。
Google CloudコンソールでBigQuery -> Studioページに移動します。詳細はデータのロードとクエリクイックスタートガイドを参照してください。
TIP
使用するサービスアカウントには、対象テーブルへの書き込み権限が必要です。
Explorerペインでケバブアイコン(⋮)をクリックし、Create datasetを選択します。データセット名を定義し、Create datasetをクリックします。
データセット作成後、Explorerペインでデータセットをクリックし、(+) Create tableをクリックします。
ソースは「Empty Table」を選択します。
テーブル名を入力します。
テーブルスキーマを定義します。例えば、Edit as textを切り替え、以下のスキーマ定義をテキストフィールドに貼り付けます。
clientid:string,payload:bytes,topic:string,publish_received_at:timestampCreate tableをクリックして設定を完了します。
EMQXが書き込みできるように権限を設定します。
データセットを選択し、Shareをクリックします。
サービスアカウントのメールアドレスをプリンシパルとして追加します。
以下のような適切なロールを割り当てます。
データセットに対して「BigQuery Data Viewer」(読み取りアクセス)
テーブルに対して「Editor」(読み書きアクセス)
テーブル作成後、クエリを実行して確認できます。
テーブルをクリックし、Queryをクリックします。
以下のようなシンプルなSQLを実行してテーブルにアクセスできることを確認します。
sqlSELECT * FROM `my_project.my_dataset.my_tab` LIMIT 1000
BigQueryコネクターの作成
BigQuery Producer Sinkアクションを追加する前に、EMQXとBigQuery間の接続を確立するためのBigQueryコネクターを作成する必要があります。
EMQXダッシュボードでIntegration -> Connectorをクリックします。
ページ右上のCreateをクリックし、コネクター選択ページでBigQueryを選択してNextをクリックします。
名前と説明を入力します(例:
my_bigquery)。この名前はBigQuery Sinkとコネクターを紐付けるために使用され、クラスター内で一意である必要があります。Authenticationドロップダウンから以下の認証方法のいずれかを選択し、対応する項目を入力します。
Service Account JSON:前述のサービスアカウントキーの作成でエクスポートしたJSON形式のサービスアカウント認証情報をアップロードします。
Workload Identity Federation (WIF):以下の項目を入力します。この方法はサービスアカウントJSONファイルを使用しません。前提条件はWorkload Identity Federationの設定を参照してください。
GCP Project ID:コネクターがアクセスするリソースのプロジェクトID
GCP Project Number:コネクターがアクセスするリソースのプロジェクト番号
Service Account Email:代理するサービスアカウントのメールアドレス
Workload Identity Pool ID:WIFトークン交換に使用するワークロードアイデンティティプールのID
Workload Identity Provider ID:WIFトークン交換に使用するワークロードアイデンティティプロバイダーのID
Initial Token Configurationでは認証情報の種類を選択し、対応する項目を入力します。現在サポートされているのはOIDC with Client Credentials Grant Typeのみです。
Endpoint URI:OIDCプロバイダーのOAuthトークンエンドポイントURI
OAuth Client ID:OAuthサーバーからトークンを取得するためのクライアントID
OAuth Client Secret:OAuthサーバーからトークンを取得するためのクライアントシークレット
OAuth Request Scope:OAuthアクセストークン取得時に指定する
scope(プロバイダーによっては必須)
Createをクリックする前に、Test ConnectivityをクリックしてコネクターがBigQueryサーバーに接続できるかテストできます。
ページ下部のCreateボタンをクリックしてコネクターを作成します。ポップアップダイアログでBack to Connector Listをクリックするか、Create RuleをクリックしてSinkを指定するルール作成に進めます。詳細はBigQuery Sink付きルールの作成を参照してください。
BigQuery Sink付きルールの作成
本セクションでは、BigQueryに保存するデータを指定するルールの作成方法を示します。
EMQXダッシュボードでIntegration -> Rulesをクリックします。
ページ右上のCreateをクリックします。
ルールIDに
my_ruleを入力します。SQL Editorでルールを設定します。例えば、トピック
t/bqのMQTTメッセージをBigQueryに保存したい場合、以下のSQL文を使用します。注意:独自のSQL文を指定する場合は、Sinkのペイロードテンプレートで必要なすべてのフィールドを
SELECTに含めるようにしてください。sqlSELECT clientid, topic, payload, publish_received_at FROM "t/bq"注意
BigQueryテーブルのカラムに存在しないフィールドは選択しないでください。BigQueryが未知のフィールドとして認識しません。
TIP
初心者の方はSQL Examplesをクリックし、Enable Testを有効にしてSQLルールの学習とテストを行ってください。
Add Actionボタンをクリックし、ルールでトリガーされるアクションを定義します。Type of Actionドロップダウンから
BigQueryを選択すると、EMQXはルールで処理したデータをBigQueryに送信します。Actionドロップダウンは
Create Actionのままにするか、既存のBigQuery Sinkを選択できます。本例では新しいSinkを作成してルールに追加します。Name欄にSinkの名前を入力します。名前は英数字の組み合わせで指定してください。
Connectorドロップダウンから先ほど作成した
my_bigqueryを選択します。新しいコネクターを作成する場合はドロップダウン横のボタンをクリックしてください。設定パラメーターの詳細はコネクターの作成を参照してください。DatasetおよびTableに、GCPでのデータセットおよびテーブルの作成と管理で作成したデータセット名とテーブル名をそれぞれ入力します。
フォールバックアクション(オプション):メッセージ配信失敗時の信頼性向上のため、1つ以上のフォールバックアクションを定義できます。プライマリSinkがメッセージ処理に失敗した場合にこれらがトリガーされます。詳細はフォールバックアクションを参照してください。
詳細設定(オプション):必要に応じて詳細設定オプションを構成します。詳細は詳細設定を参照してください。
Createをクリックする前に、Test ConnectivityをクリックしてコネクターがBigQueryサーバーに接続できるかテストできます。
CreateボタンをクリックしてSinkの設定を完了すると、新しいSinkがAction Outputsタブに表示されます。
Create Ruleページに戻り、Createをクリックしてルールを作成します。
これでルールの作成が完了しました。Integration -> Rulesページで新規作成したルールを確認できます。**Actions(Sink)**タブをクリックすると新しいBigQuery Sinkが表示されます。
また、Integration -> Flow Designerをクリックするとトポロジーを確認でき、トピックt/bqのメッセージがルールmy_ruleで解析されてBigQueryに送信・保存されていることがわかります。
ルールのテスト
MQTTXを使ってトピック
t/bqにメッセージを送信します。bashmqttx pub -i emqx_c -t t/bq -m '{ "msg": "hello BigQuery" }'Sinkの稼働状況を確認し、新しい受信メッセージと送信メッセージが1件ずつあることを確認します。
GCPのBigQuery -> Studioに移動し、テーブルをクリックしてQueryをクリックします。クエリを実行するとメッセージが確認できます。
詳細設定
本セクションでは、BigQuery Producer Sinkの詳細な設定オプションについて説明します。ダッシュボードでSinkを設定する際にAdvanced Settingsを展開し、用途に応じて以下のパラメーターを調整できます。
| 項目名 | 説明 | デフォルト値 |
|---|---|---|
| Buffer Pool Size | EMQXとBigQuery間のデータフローを管理するバッファワーカープロセスの数を指定します。これらのワーカーはデータを一時的に保持・処理し、ターゲットサービスへ送信します。パフォーマンス最適化とスムーズなデータ送信に重要です。 | 16 |
| Request TTL | リクエストTTL(Time To Live)は、リクエストがバッファに入ってから有効とみなされる最大時間(秒)を指定します。TTLを超えてバッファに滞留するか、送信後にBigQueryからの応答やアックがタイムリーに得られない場合、リクエストは期限切れとみなされます。 | 45秒 |
| Health Check Interval | SinkがBigQueryとの接続状態を自動でヘルスチェックする間隔(秒)を指定します。 | 15秒 |
| Health Check Interval Jitter | 複数のノードが同時にヘルスチェックを開始するのを防ぐため、基本のヘルスチェック間隔に加える一様ランダム遅延です。複数のアクションやソースが同じコネクターを共有する場合、ジッターを有効にするとヘルスチェックの開始時刻がずれます。 | 0ミリ秒 |
| Health Check Timeout | コネクターがBigQueryとの接続のヘルスチェックを行う際のタイムアウト時間を指定します。 | 60秒 |
| Max Buffer Queue Size | BigQuery Sinkの各バッファワーカーがバッファリングできる最大バイト数を指定します。バッファワーカーはデータを一時的に保持し、BigQueryへの送信を効率化します。システム性能やデータ送信要件に応じて調整してください。 | 256 |
| Query Mode | メッセージ送信を最適化するために、synchronous(同期)またはasynchronous(非同期)のリクエストモードを選択できます。非同期モードではBigQueryへの書き込みがMQTTメッセージのパブリッシュ処理をブロックしませんが、クライアントがBigQuery到達前にメッセージを受け取る可能性があります。 | Async |
| Batch Size | EMQXからBigQueryへ一度に転送するデータバッチの最大サイズを指定します。サイズを調整することでデータ転送の効率と性能を最適化できます。Batch Sizeを1に設定すると、データレコードはバッチ化せず個別に送信されます。 | 1000 |
| Inflight Window | 「インフライトキューリクエスト」とは、送信済みでまだ応答やアックを受け取っていないリクエストのことです。この設定はSinkとBigQuery間の通信中に同時に存在できる最大インフライトキューリクエスト数を制御します。Request Modeがasynchronousの場合に特に重要です。同一MQTTクライアントからのメッセージを厳密に順序処理したい場合は、この値を1に設定してください。 | 100 |