クイックスタート:Geminiノードを使ったFlowの作成
このセクションでは、Geminiノードを使った実践的なユースケースを通じて、FlowデザイナーでLLMベースのFlowを素早く作成しテストする方法を説明します。
この例では、構造化されたセンサーデータを含むMQTTデバイスのメッセージを処理しつつ、ルーティングのためにclientidを保持するFlowの構築方法を示します。Geminiノードはメッセージのペイロードに基づいて返信を生成し、RepublishノードがAIの返信をクライアントごとのトピックdevices/${clientid}/replyに送信することで、各デバイスにカスタマイズされた返信を届けます。
シナリオの説明
産業用モニタリングのシナリオでは、各デバイスが定期的にJSON形式の構造化センサーデータをトピックdevices/<device_id>にパブリッシュします。従来のルールベースのアラート(例:温度の閾値超過)では、隠れたパターンや異常指標の組み合わせを見逃す可能性があります。
このFlowはGeminiを活用し、振動、温度、圧力など複数のフィールドの全体的な文脈を分析し、潜在的な機械故障を示唆する複雑な異常を検出します。例えば、振動と温度が同時に高い場合、Geminiはより深刻なリスク(例:ベアリングの過負荷)を推論し、正確かつ説明可能なアラートを出力します。
- データ処理:ペイロードからデバイスの計測値を抽出し、後続で利用できるように
clientid(例:device_1)を公開します。 - LLMベースの処理:全フィールドにわたる包括的な解析のためにペイロード全体をGeminiに送信します。
- メッセージ再パブリッシュ:AI生成のアラートをクライアントごとのトピック
devices/<district_id>/replyにパブリッシュします。
受信メッセージの例(devices/device_1宛):
{
  "vibration": 9.5,
  "temperature": 85,
  "pressure": 1.2
}期待される再パブリッシュ出力(devices/device_1/reply宛):
Critical Alert: Simultaneous severe vibration and high temperature detected, indicating an immediate critical equipment malfunction risk.Flowの作成
前提条件
有効なGemini APIキーを用意してください。
FlowsページでCreate Flowボタンをクリックします。
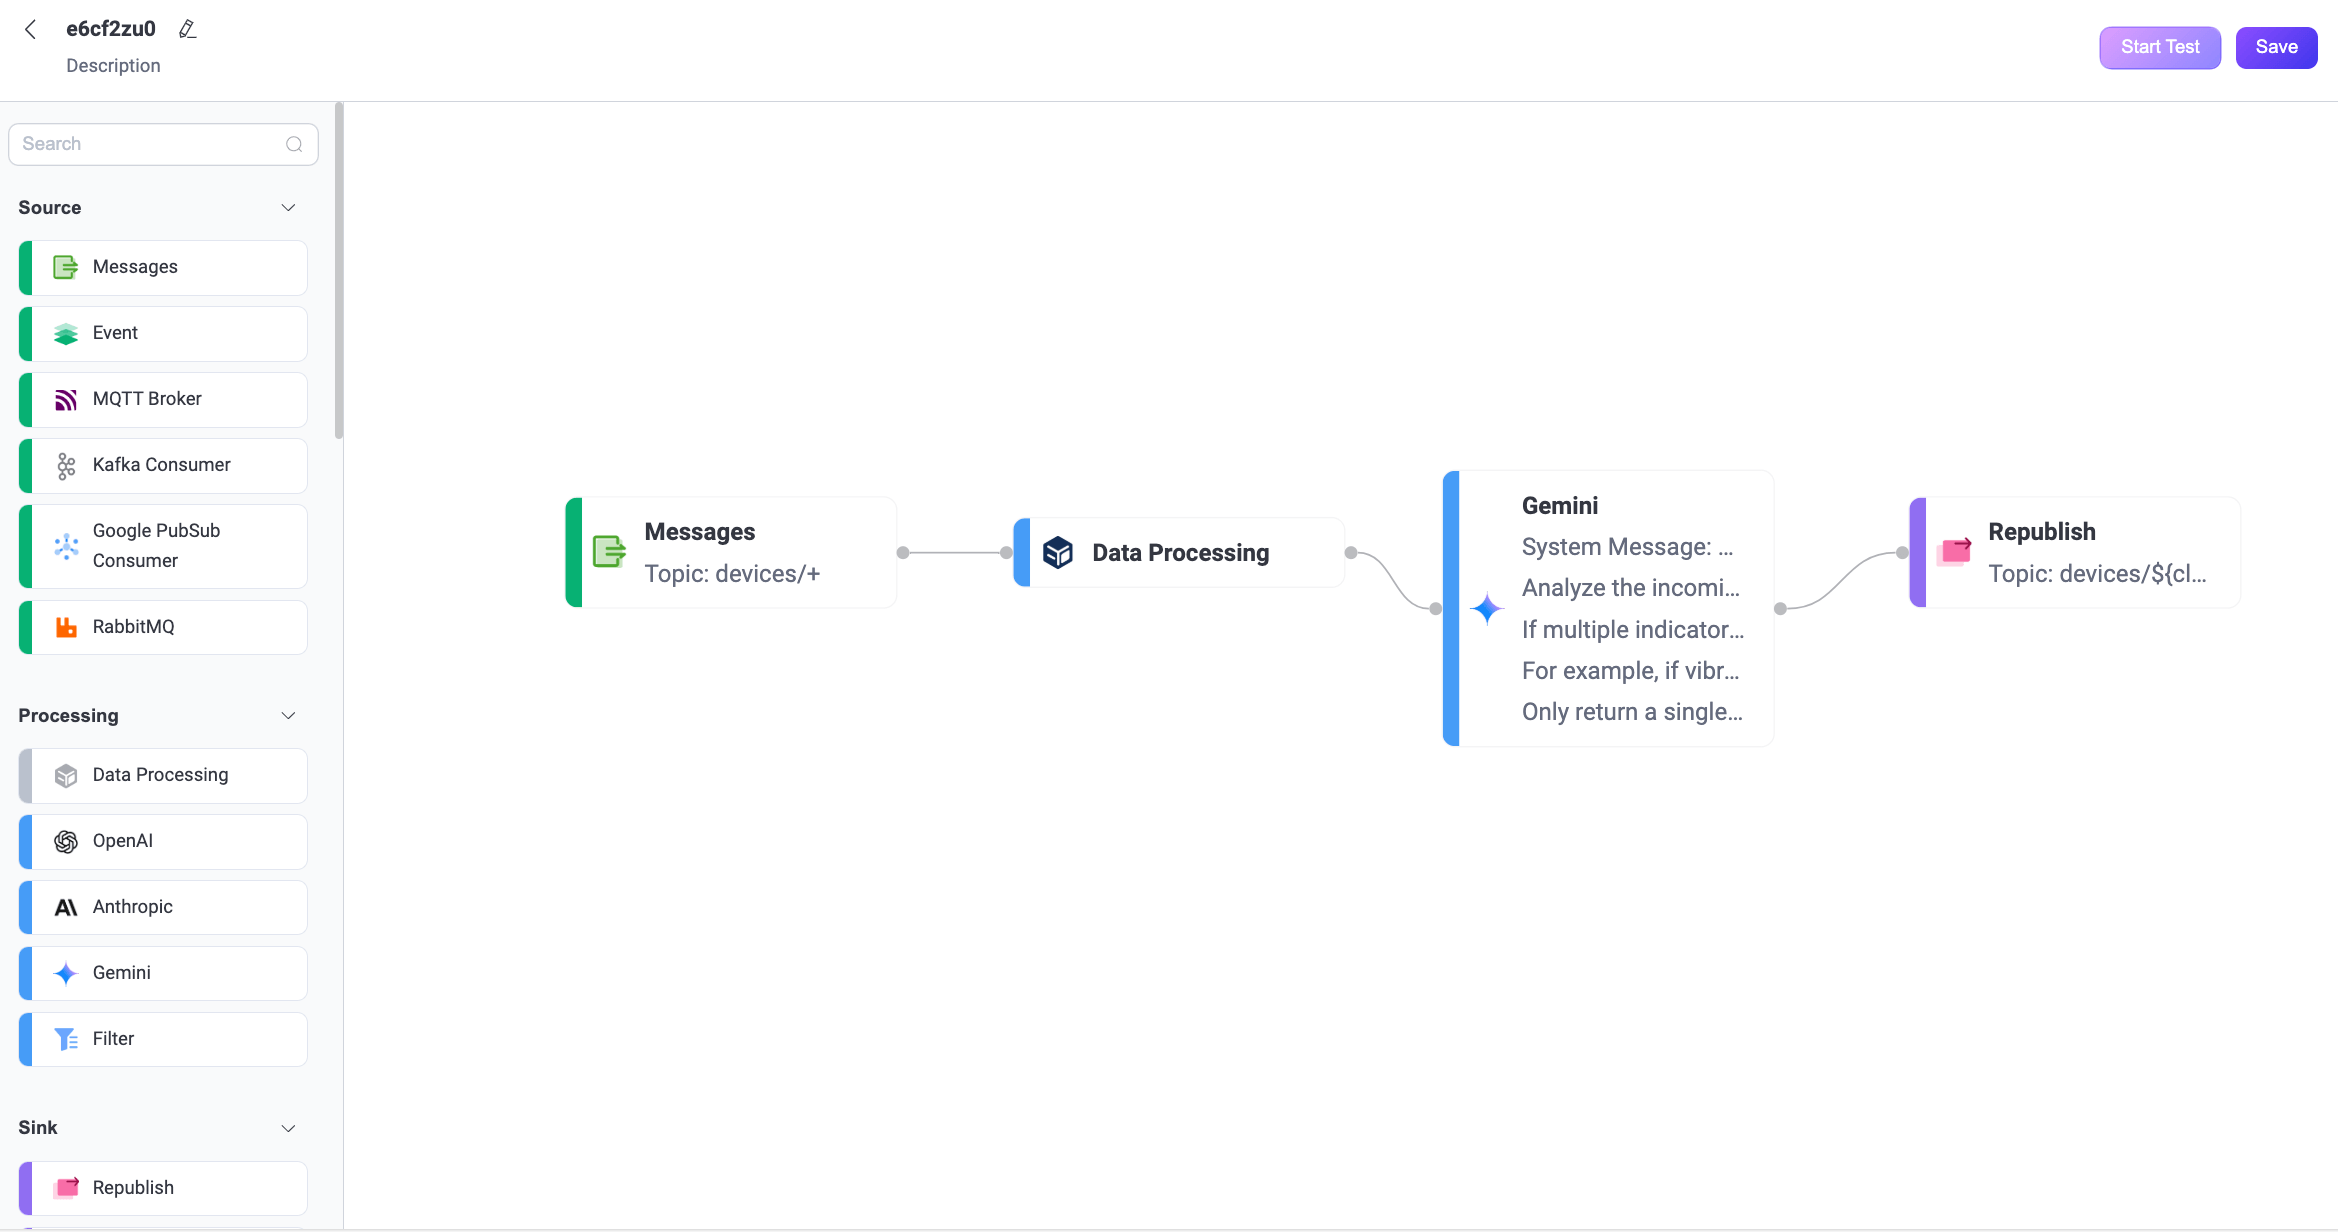
Messagesノードを追加します。
- ソースパネルからMessagesノードをドラッグします。
- トピックを
devices/+に設定します。 - Saveをクリックします。
Data Processingノードを追加します。
ProcessingセクションからData Processingノードをドラッグします。
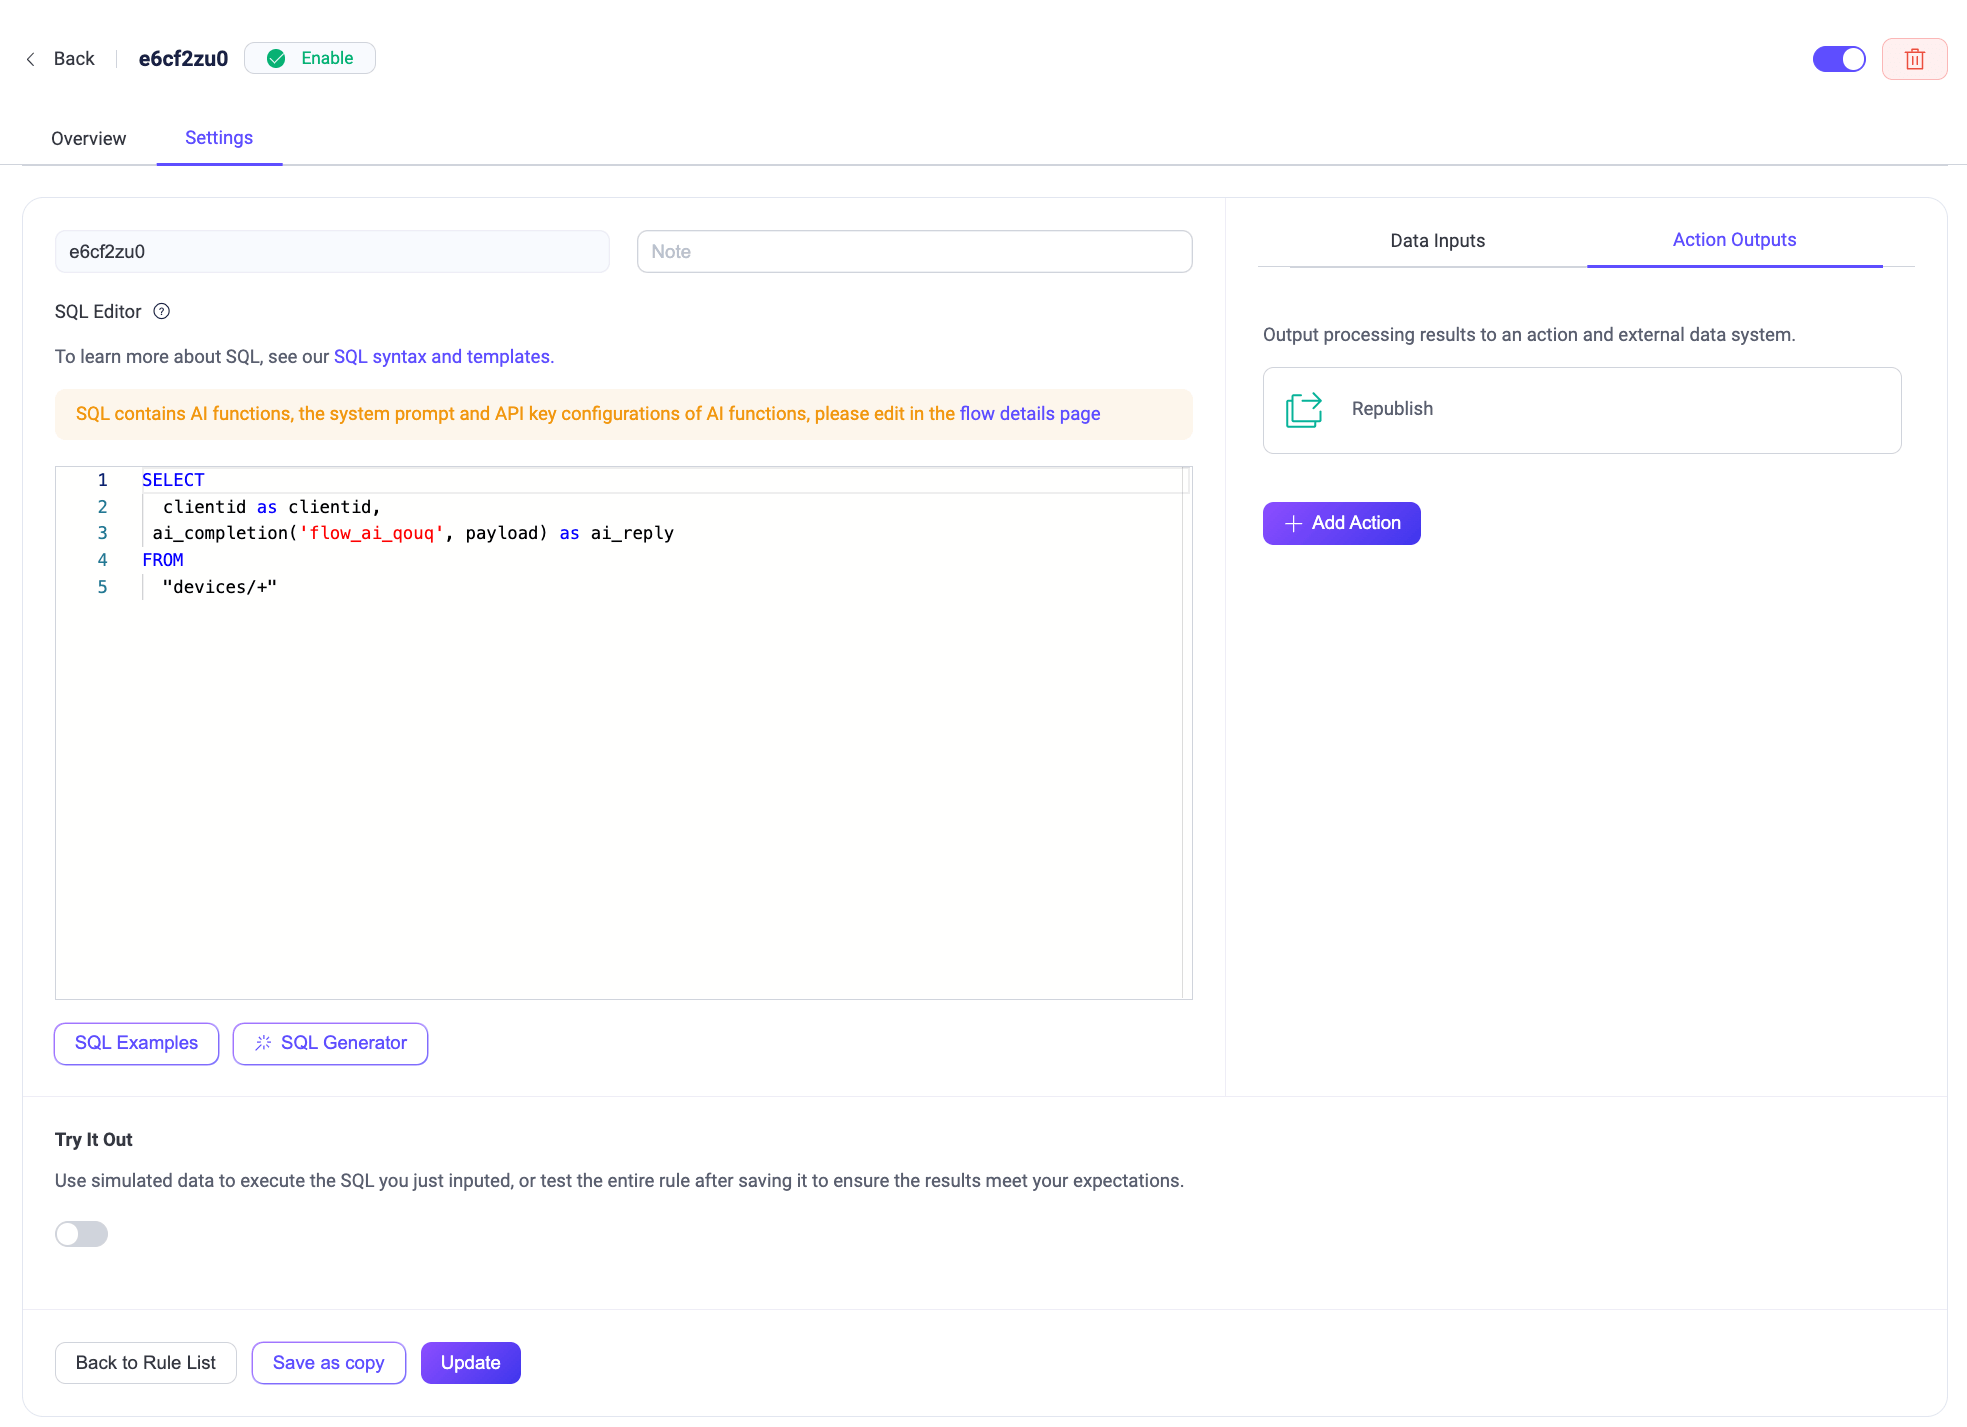
以下の設定でフォームを入力します。この設定により、後続ノードで利用可能なように
clientidを公開します(例:再パブリッシュのトピック内で${clientid}を使用可能にします)。- Field:
clientid - Transform: 空欄のまま
- Alias:
clientid
- Field:
Saveをクリックします。
Geminiノードを追加します。
ProcessingセクションからGeminiノードをドラッグします。
ノードを設定します:
Input:
payloadと入力します。System Message: 以下のプロンプトを入力します:
You are an industrial anomaly detection assistant. Analyze the incoming sensor data (vibration, temperature, pressure) as a whole. If multiple indicators exceed risk thresholds at the same time, for example, if vibration > 8 and temperature > 80 in the same reading, the combined risk is significantly higher than a single abnormal value. In such cases, generate a precise, high-priority alert. Only return a single alert sentence—no extra explanation.Model: デフォルトの
gemini-2.0-flashのままで構いません。API Key: GeminiのAPIキーを入力します。
Base URL: 空欄のままにしてGeminiのデフォルトエンドポイントを使用します。
Output Result Alias:
ai_replyと入力します。
Saveをクリックします。
Republishノードを追加します。
- SinkセクションからRepublishノードをドラッグします。
- トピックを
devices/${clientid}/replyに設定します。 - ペイロードを
${ai_reply}に設定します。 - Saveをクリックします。
すべてのノードを接続し、右上のSaveをクリックしてFlowを保存します。
Flowとフォームルールは連携可能です。ルールページでSQLや関連ルール設定を確認できます。
Flowのテスト
MQTTクライアントをEMQXに接続します。
Flowを素早くテストするには、ダッシュボードのDiagnostic Tools → WebSocket Clientを使ってMQTTクライアントをシミュレートできます。あるいは、MQTTXなどのツールや実際のMQTTクライアントも利用可能です:
- EMQXサーバーに接続します。
- 例えば
devices/device_1/replyトピックをサブスクライブします。
テストを開始します。
Flowデザイナーで任意のノードをクリックし、編集パネルを開きます。
Editをクリックし、続けてStart Testをクリックすると、画面下部にテストパネルが開きます。
Input Simulated Dataをクリックし、以下のメッセージをトピック
devices/device_1にパブリッシュするためSubmit Testをクリックします:json{ "vibration": 9.5, "temperature": 85, "pressure": 1.2 }
結果を確認します。
Flowの実行結果が成功したことを確認できます。
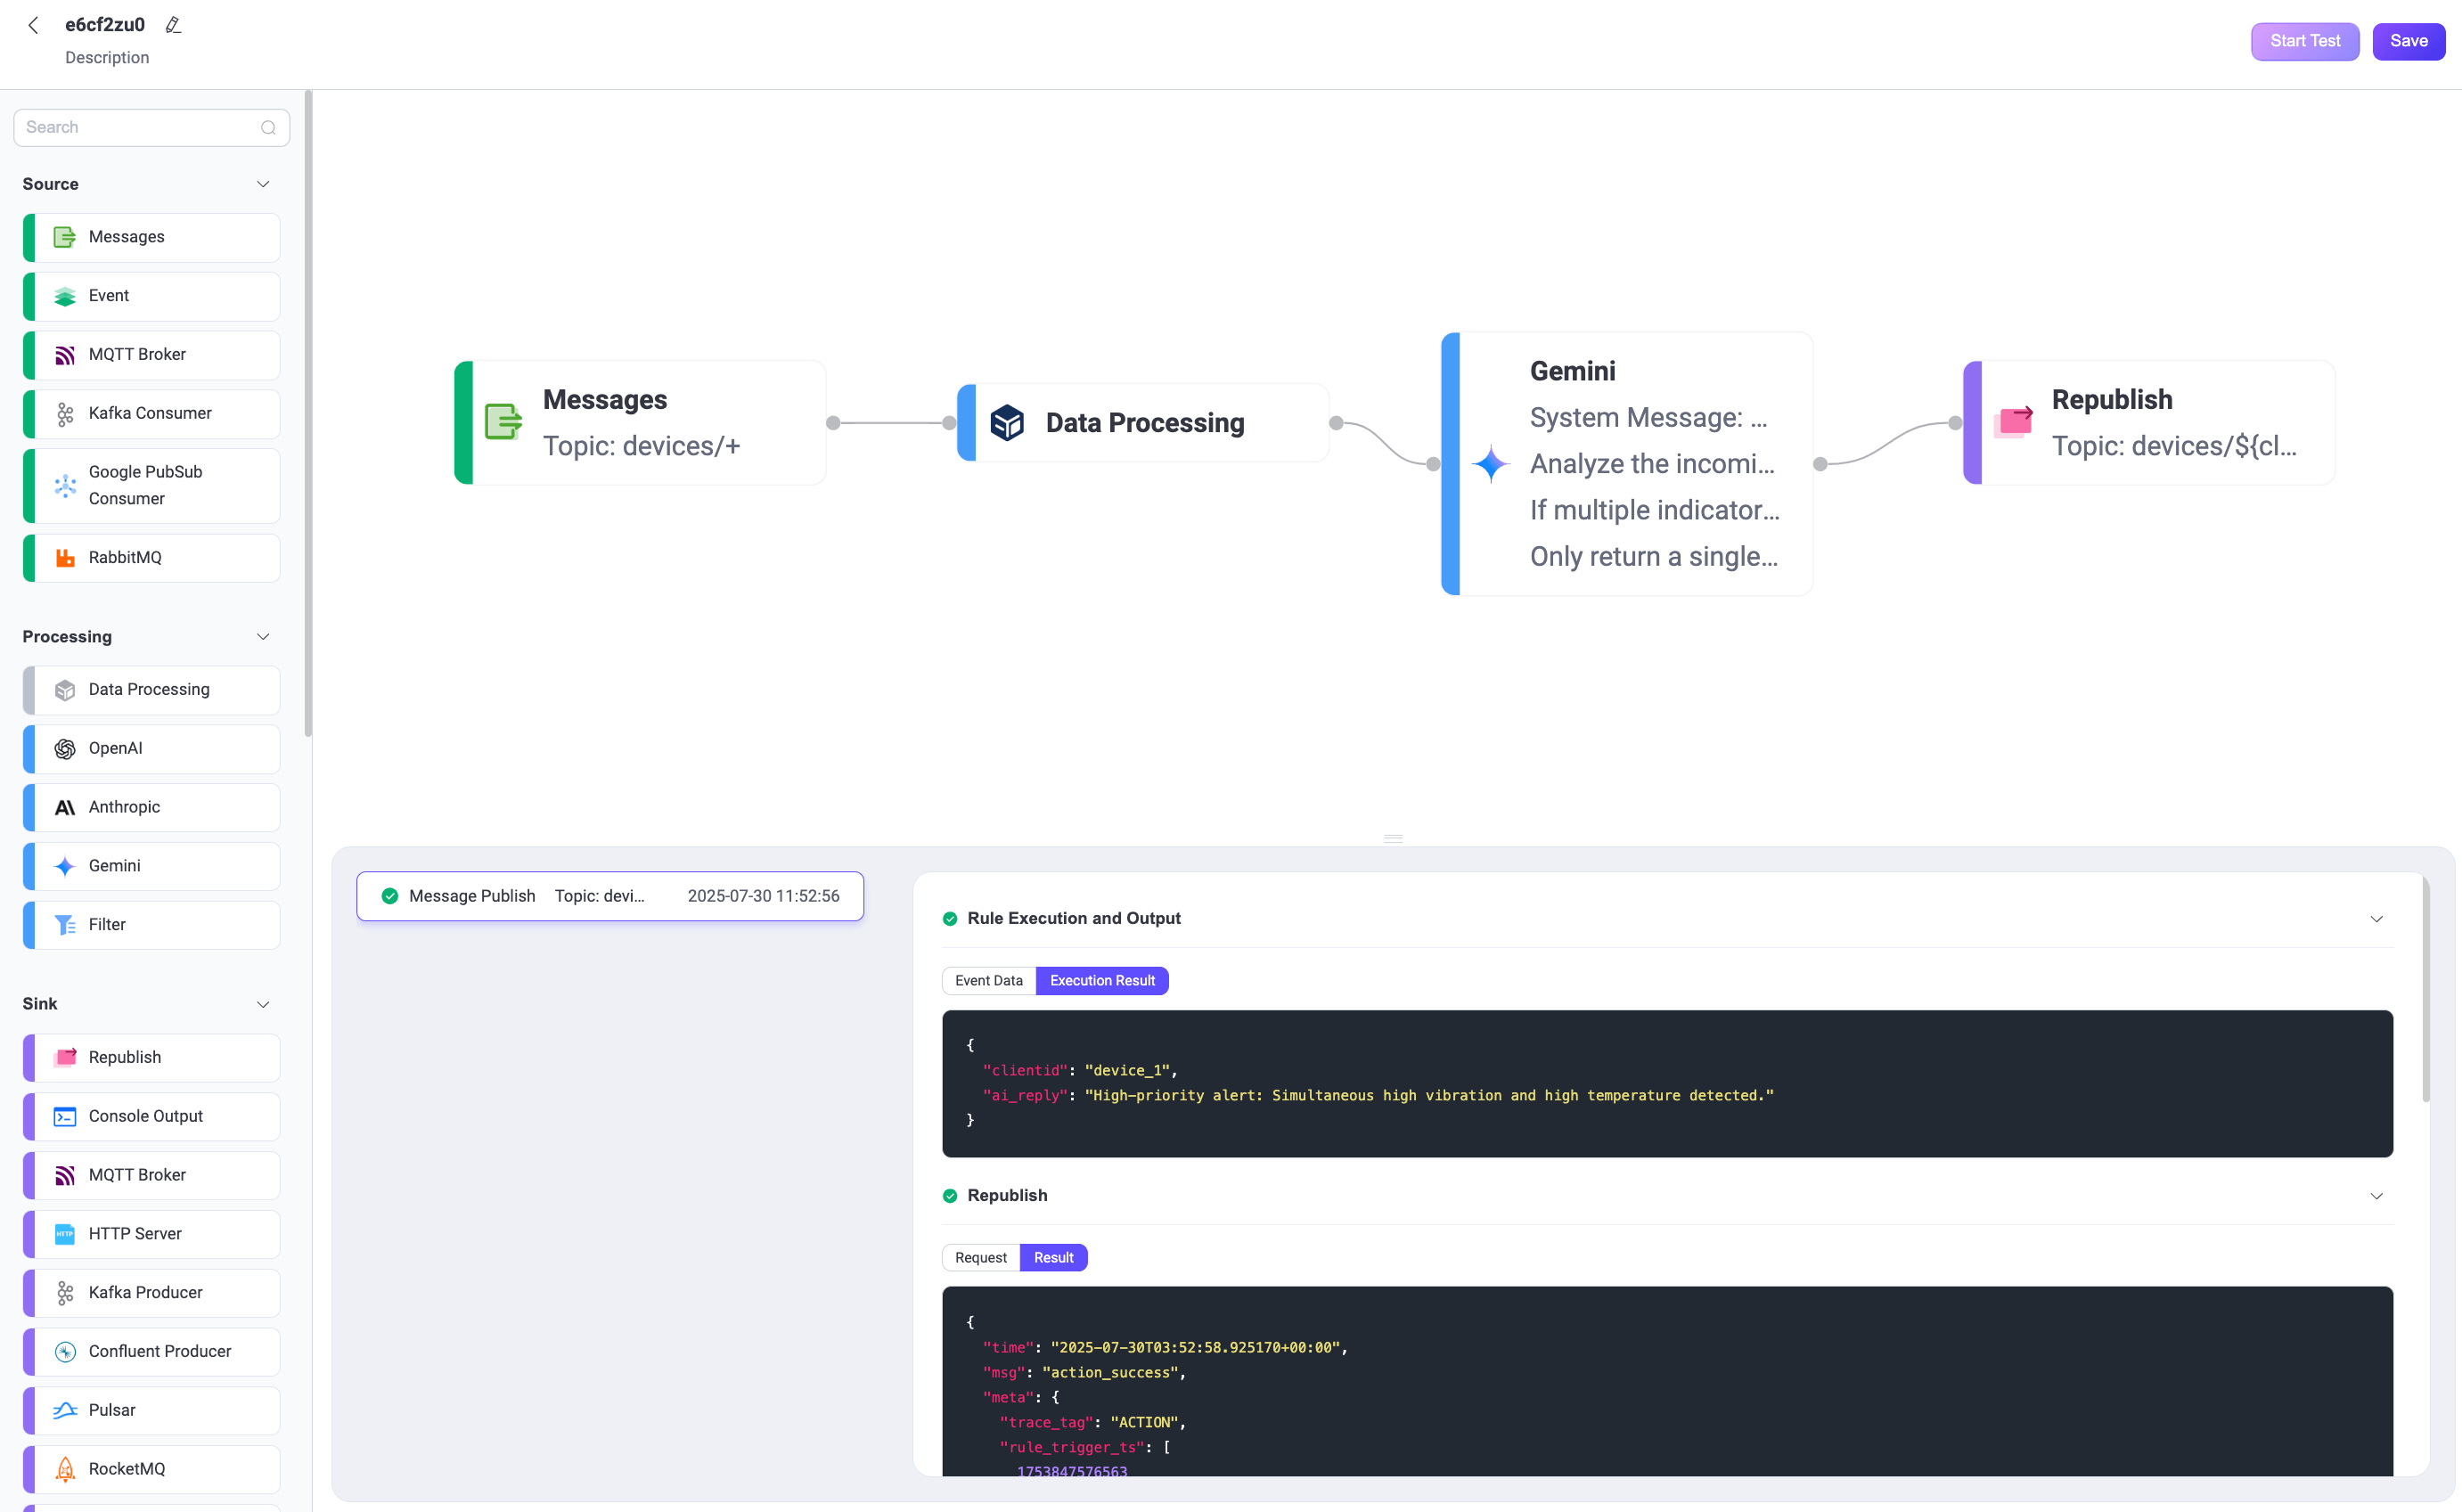
WebSocket Clientページに戻ると、以下のようなAI生成の要約メッセージを受信できます:
「High-priority alert: Simultaneous high vibration and high temperature detected.」
テストが失敗した場合は、エラーメッセージが表示されます。
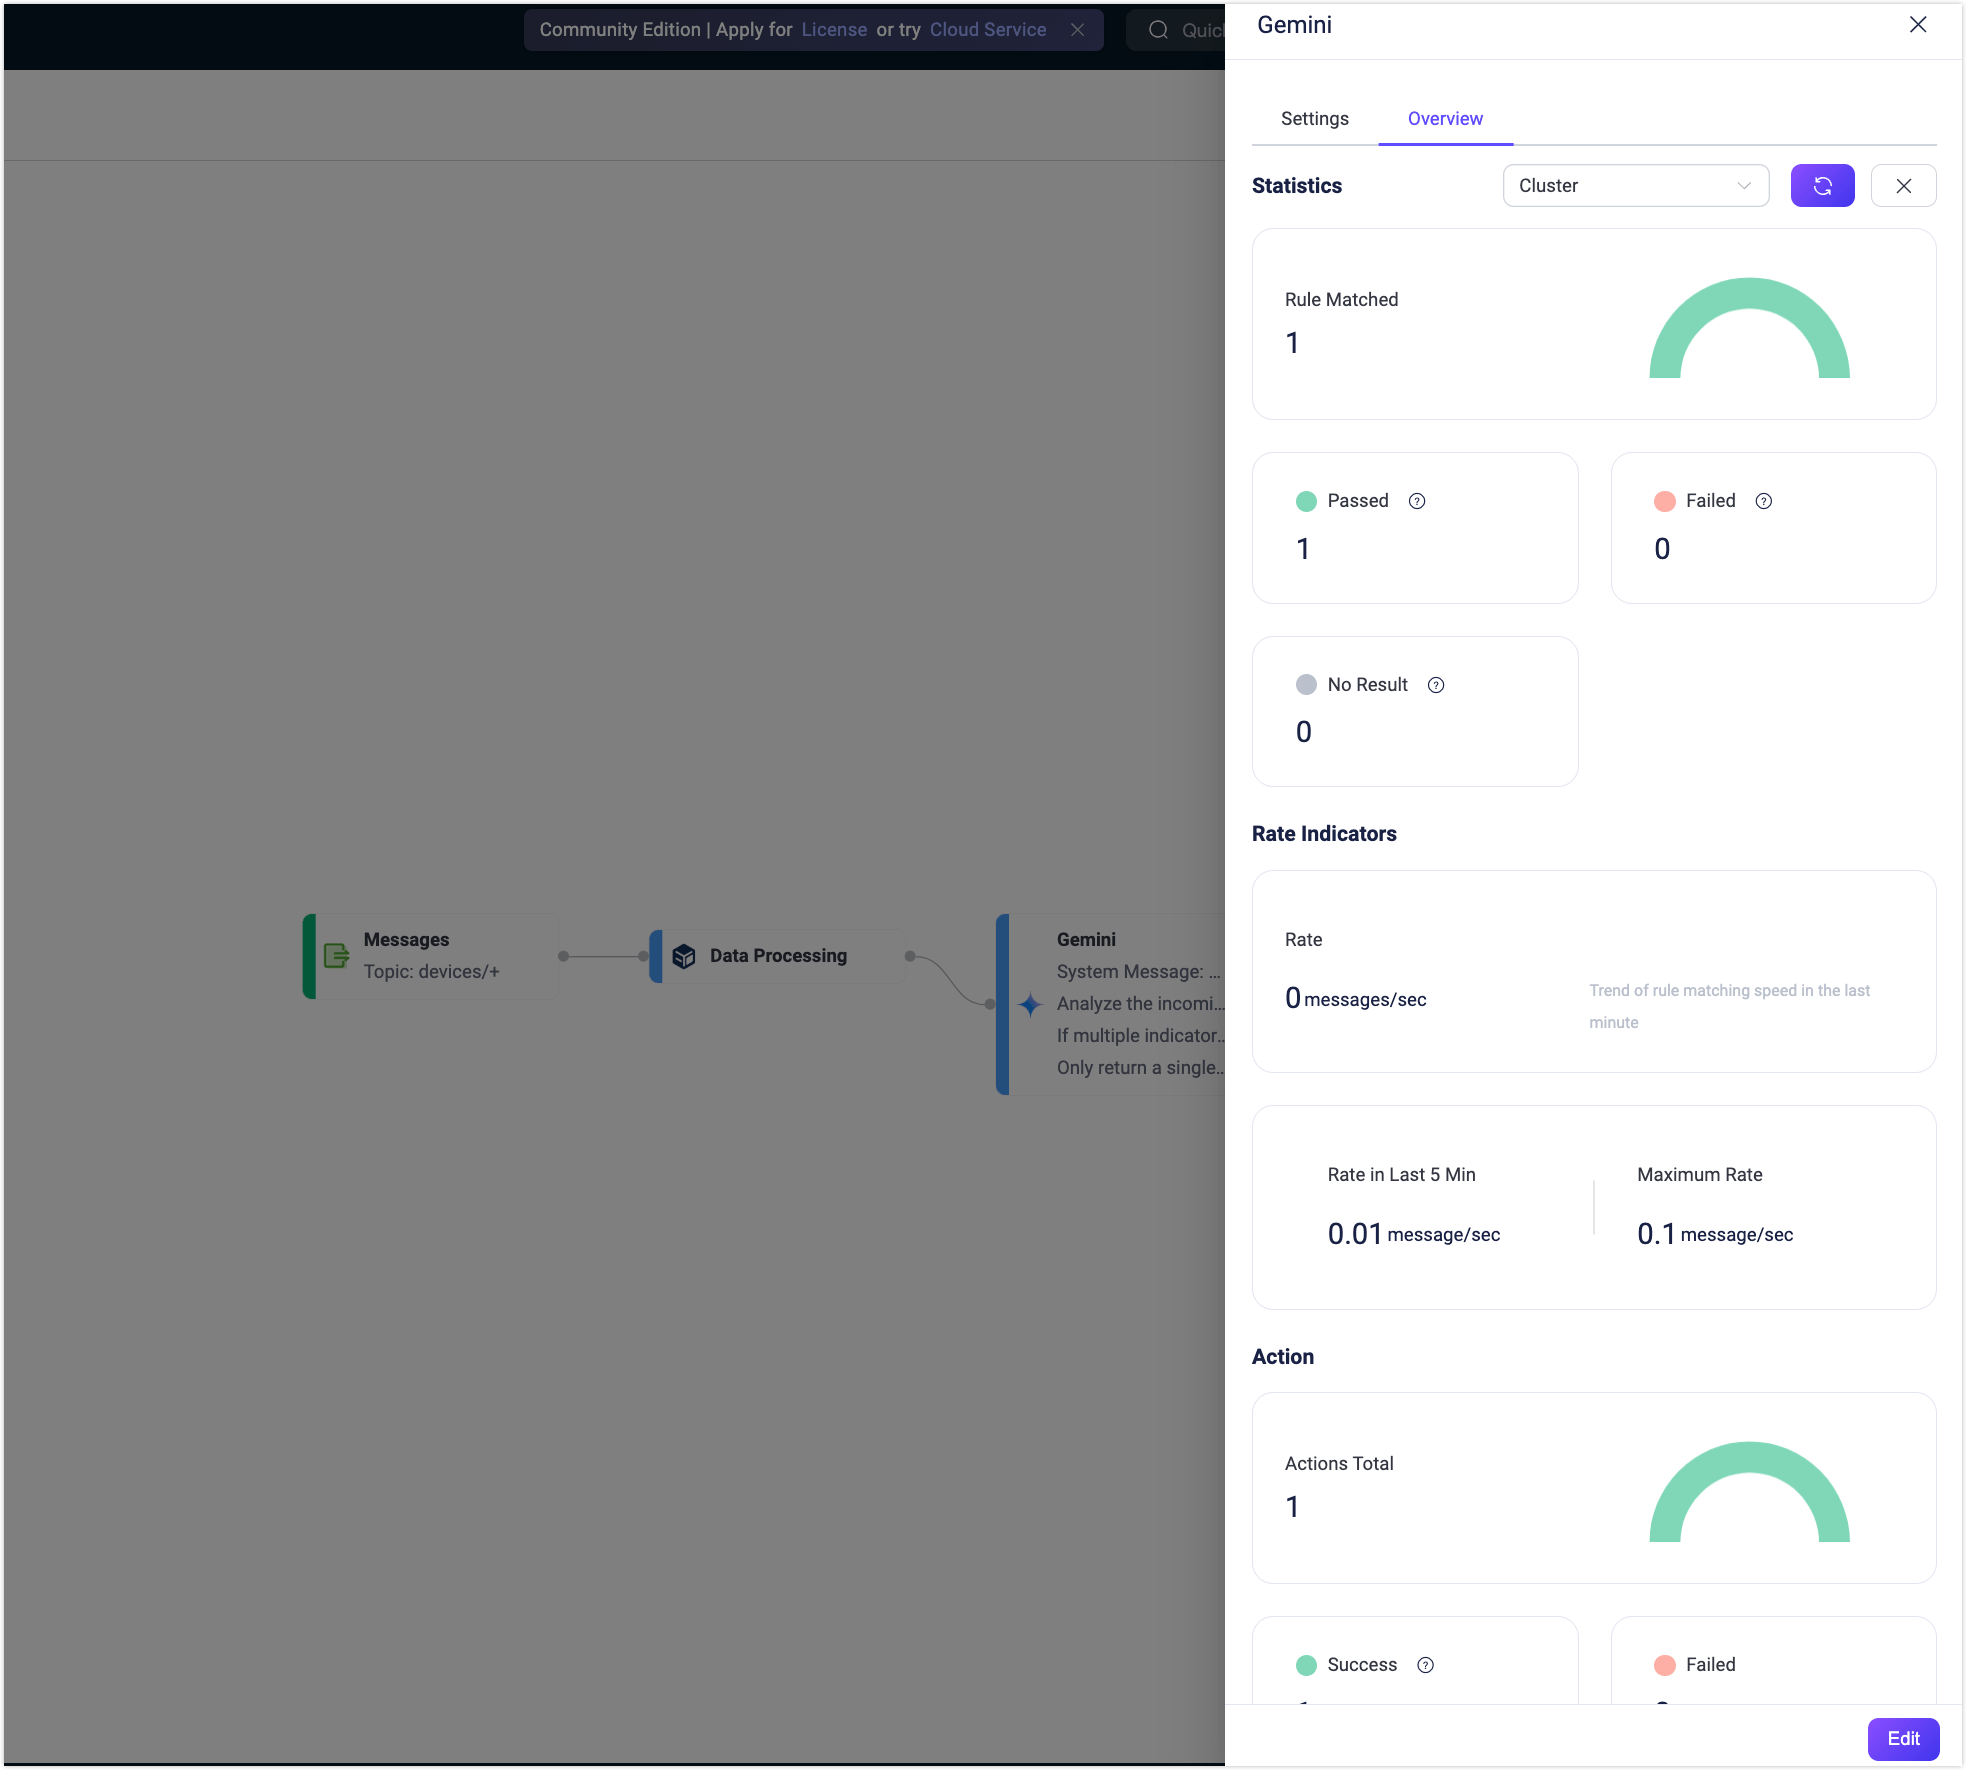
Geminiノードの稼働状況やメトリクスを確認するには、編集ページを閉じ、ノードをクリックして編集パネルを開き、Overviewタブをクリックします。