AlloyDB に MQTT データを取り込む
AlloyDB for PostgreSQL は、Google Cloud が提供する完全マネージドの PostgreSQL 互換データベースサービスであり、要求の厳しいエンタープライズワークロード向けに設計されています。EMQX は AlloyDB とのシームレスな統合をサポートしており、IoT デバイスからの MQTT データをリアルタイムで取り込み、保存することが可能です。EMQX の効率的なメッセージルーティングと AlloyDB の高スループットなトランザクション処理能力、さらに Hybrid Transactional/Analytical Processing(HTAP)エンジンによるリアルタイム分析を活用することで、デバイスの状態取得、イベントログ記録、洞察に富んだ分析を実現する強力なパイプラインを構築できます。
本ページでは、EMQX と AlloyDB 間のデータ統合について包括的に紹介し、データ統合の作成および検証に関する実践的な手順を提供します。
動作概要
EMQX における AlloyDB データ統合は組み込み機能であり、MQTT ベースの IoT データストリームを AlloyDB の高性能な PostgreSQL 互換データベースに直接取り込みます。組み込みのルールエンジン コンポーネントにより、EMQX から AlloyDB へのデータ取り込みが簡素化され、複雑なコーディングを不要にします。AlloyDB Sink を通じて、MQTT メッセージやクライアントイベントを AlloyDB に保存可能です。また、イベントにより AlloyDB 内のデータの更新や削除操作をトリガーでき、デバイスのオンライン状態や接続履歴などの情報を記録できます。
以下の図は、EMQX と AlloyDB 間のデータ統合の典型的なアーキテクチャを示しています。
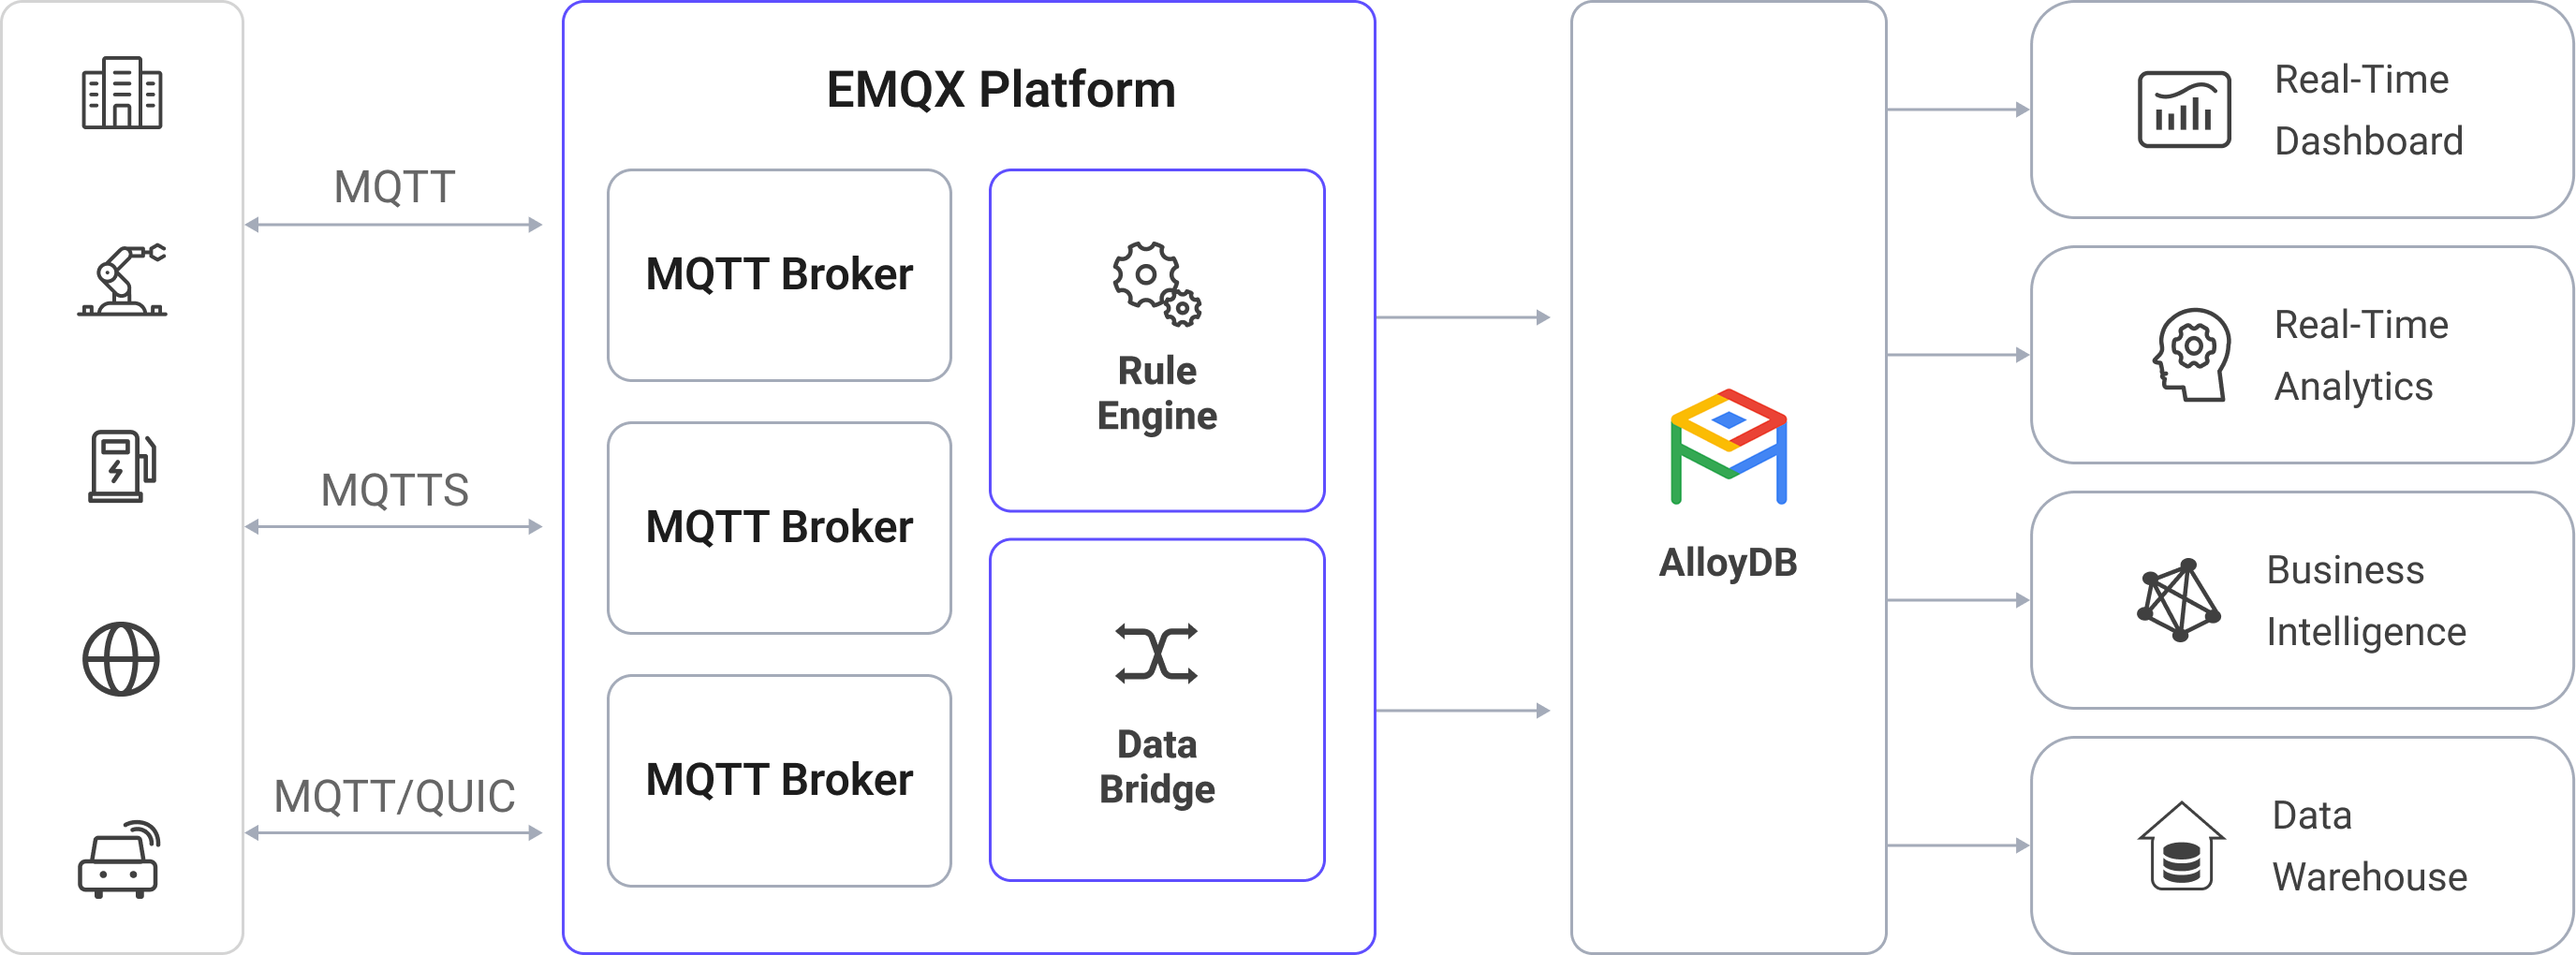
AlloyDB への MQTT データ取り込みの流れは以下の通りです。
- IoT デバイスが EMQX に接続:IoT デバイスが MQTT プロトコルを介して正常に接続されると、オンラインイベントがトリガーされます。イベントにはデバイスID、送信元IPアドレス、その他属性情報が含まれます。
- メッセージのパブリッシュと受信:デバイスは特定のトピックにテレメトリや状態データをパブリッシュします。EMQX はこれらのメッセージを受信すると、ルールエンジン内でマッチング処理を開始します。
- ルールエンジンによるメッセージ処理:EMQX のルールエンジンは、トピックやメッセージ内容に基づいて定義されたルールにマッチさせてイベントやメッセージを処理します。処理内容は、データ変換(例:JSON から SQL 用フォーマットへの変換)、フィルタリング、コンテキスト情報によるデータ強化などを含み、データベース挿入前に行われます。
- AlloyDB への書き込み:マッチしたルールは AlloyDB に対する SQL 実行をトリガーします。SQL テンプレートを用いて、処理済みのデータフィールドを AlloyDB のテーブルやカラムにマッピング可能です。AlloyDB は並列クエリ実行や組み込みのカラムナエンジンによる最適化ストレージをサポートしているため、データは高速に挿入されつつ即座に分析用にクエリ可能な状態となります。
イベントおよびメッセージデータが AlloyDB に書き込まれた後は、AlloyDB に接続して柔軟なアプリケーション開発が可能です。例えば:
- Grafana などの可視化ツールに接続してデータに基づくチャートを生成し、データの変化を表示する。
- AlloyDB をデバイス管理システムや分析モデルと統合し、デバイスの健全性監視、異常検知、アラート発動を行う。
- AlloyDB の HTAP 機能を活用し、ライブの IoT データに対して複雑な分析(集計、結合、時系列クエリ)を実行しつつ、新しいデバイステレメトリをリアルタイムで処理し続ける。
特長と利点
AlloyDB とのデータ統合は、以下のような特長とメリットをビジネスにもたらします。
- 柔軟なイベント処理:EMQX のルールエンジンを用いることで、デバイスのライフサイクルイベント(接続、切断、状態変化)を低レイテンシで AlloyDB に保存・処理可能です。AlloyDB の並列クエリ実行と独立スケール機能と組み合わせることで、リアルタイムにイベントデータを分析し、デバイス障害や異常、利用傾向を検知できます。
- メッセージ変換:メッセージは EMQX ルールを通じて高度に処理・変換されてから AlloyDB に書き込まれるため、保存や利用がより便利になります。
- SQL テンプレートによる柔軟なデータ操作:EMQX の SQL テンプレートマッピングにより、構造化された IoT データを AlloyDB のテーブル・カラムに挿入または更新可能です。AlloyDB の PostgreSQL 互換性は標準 SQL、JSONB ストレージ、インデックスをサポートし、AI 駆動のインデックス最適化によりクエリ性能がワークロードの変化に応じて自動的に向上します。
- 業務プロセスの統合:AlloyDB の PostgreSQL エコシステム互換性により、Google Cloud 上またはオンプレミスの ERP、CRM、GIS、カスタム業務システムと直接統合可能です。EMQX と組み合わせることで、複雑なデータパイプラインなしにイベント駆動の自動化や業務プロセスオーケストレーションを実現できます。
- 高度な地理空間機能:PostGIS などの PostgreSQL 拡張機能を通じて、AlloyDB は地理空間データの保存、インデックス作成、クエリをサポートし、ジオフェンシング、ルート追跡、位置情報分析を可能にします。EMQX の信頼性の高い MQTT 取り込みと組み合わせることで、車両追跡、資産監視、リアルタイム IoT-GIS ソリューションの構築が可能です。
- 組み込みのメトリクスと監視:EMQX は各 AlloyDB Sink のランタイムメトリクスを提供し、AlloyDB は Cloud Monitoring と連携してクエリ性能、ストレージ利用率、レプリカの健全性を監視可能であり、エンドツーエンドの可観測性を確保します。
はじめる前に
このセクションでは、AlloyDB 統合を作成する前に必要な準備について説明します。AlloyDB インスタンスの作成、データベースおよびデータテーブルの作成方法を含みます。
前提条件
AlloyDB でのデータベースおよびテーブル作成
EMQX で AlloyDB コネクターを作成する前に、AlloyDB インスタンスが利用可能であり、IoT データを保存するための必要なデータベースおよびテーブルが作成されていることを確認してください。
公式 AlloyDB クイックスタートガイド に従い、以下を実施します。
AlloyDB インスタンスを作成します。
このセットアップ中に、以下のようにデータベースユーザーの認証情報を定義します。
ユーザー名:
emqx_user(接続、挿入、更新、選択の権限を持つ必要があります)パスワード:
your_password_here
このユーザーはインスタンスのプロビジョニング時または後から SQL、Google Cloud コンソール、
gcloudCLI を使って作成可能です。
インスタンス内にデータベースを作成します。ここでは例として
emqx_dataとします。PostgreSQL 互換クライアント(例:
psql)を用いて上記の認証情報でデータベースに接続します。MQTT メッセージとクライアントイベントデータを保存するための2つのテーブルを
emqx_dataデータベース内に作成します。以下の SQL 文で、クライアントID、トピック、QoS、ペイロード、到着時間などのメタデータを持つ MQTT メッセージ保存用テーブル
t_mqtt_msgを作成します。sqlCREATE TABLE t_mqtt_msg ( id SERIAL primary key, msgid character varying(64), sender character varying(64), topic character varying(255), qos integer, retain integer, payload text, arrived timestamp without time zone );以下の SQL 文で、クライアントのオンライン/オフラインイベントをタイムスタンプ付きで保存するデータテーブル
emqx_client_eventsを作成します。sqlCREATE TABLE emqx_client_events ( id SERIAL primary key, clientid VARCHAR(255), event VARCHAR(255), created_at TIMESTAMP DEFAULT CURRENT_TIMESTAMP );
AlloyDB コネクターの作成
AlloyDB Sink を追加する前に、EMQX で AlloyDB コネクターを作成します。このコネクターは EMQX が Google Cloud 上の AlloyDB インスタンスに接続する方法を定義します。
EMQX ダッシュボードで、Integration -> Connector に移動します。
ページ右上の Create をクリックします。
Create Connector ページで AlloyDB を選択し、Next をクリックします。
コネクター名を入力します。名前は英数字で始まり、英数字、ハイフン、アンダースコアを含めることができます。例:
my_alloydb接続情報を入力します。
Server Host:Google Cloud 上の AlloyDB インスタンスのホスト名または IP アドレス
Database Name:EMQX がデータを書き込む AlloyDB 内の対象データベース名(例:
emqx_data)Username:認証および識別に使用する AlloyDB のデータベースユーザー名(例:
emqx_user)Password:
emqx_userのパスワードEnable TLS:暗号化接続を確立する場合はトグルをオンにします。TLS 接続の詳細は TLS for External Resource Access を参照してください。
高度な設定(任意):接続プールサイズ、アイドルタイムアウト、リクエストタイムアウトなどの追加設定を行います。
Test Connectivity をクリックして、EMQX が指定した設定で AlloyDB インスタンスに正常に接続できるか確認します。
Create をクリックしてコネクターを保存します。
作成後、以下のいずれかを選択できます。
Back to Connector List をクリックしてすべてのコネクターを表示
Create Rule をクリックして、このコネクターを使用するルールをすぐに作成
詳細な例については以下を参照してください。
メッセージ保存用 AlloyDB Sink を用いたルール作成
このセクションでは、ダッシュボード上でソース MQTT トピック t/# からのメッセージを処理し、処理済みデータを設定済み Sink を通じて AlloyDB のテーブル t_mqtt_msg に保存するルールの作成方法を示します。
ダッシュボードの Integration -> Rules ページに移動します。
ページ右上の Create をクリックします。
ルール ID に
my_ruleを入力し、SQL エディターにルールを入力します。ここではトピックt/#の MQTT メッセージを AlloyDB に保存するため、ルールの SELECT 部分で SQL テンプレートで使用するすべての変数を含むフィールドを選択してください。ルール SQL は以下の通りです。sqlSELECT * FROM "t/#"TIP
初心者の場合は SQL Examples と Enable Test をクリックして SQL ルールの学習とテストが可能です。
- Add Action ボタンをクリックして、ルールによってトリガーされるアクションを定義します。このアクションにより、EMQX はルールで処理したデータを AlloyDB に送信します。
Type of Action のドロップダウンから AlloyDB を選択し、Action ドロップダウンはデフォルトの
Create Actionのままにするか、既存の AlloyDB アクションを選択します。この例では新規 Sink を作成してルールに追加します。Sink の名前と説明をフォームに入力します。
Connector ドロップダウンから前に作成した
my_alloydbを選択します。新規コネクターはドロップダウン横のボタンから作成可能です。設定パラメータの詳細は AlloyDB コネクターの作成 を参照してください。SQL Template を設定します。以下の SQL 文を使ってデータを挿入します。
注意:これはプリプロセス済み SQL なので、フィールドは引用符で囲まず、文末にセミコロンを付けないでください。
sqlINSERT INTO t_mqtt_msg(msgid, sender, topic, qos, payload, arrived) VALUES( ${id}, ${clientid}, ${topic}, ${qos}, ${payload}, TO_TIMESTAMP((${timestamp} :: bigint)/1000) )フォールバックアクション(任意):メッセージ配信失敗時の信頼性向上のため、1つ以上のフォールバックアクションを定義可能です。詳細は フォールバックアクション を参照してください。
高度な設定(任意):詳細は Sink の機能 を参照してください。
Create をクリックする前に、Test Connectivity をクリックして Sink が AlloyDB インスタンスに接続可能かテストできます。
Create ボタンをクリックして Sink の設定を完了します。新しい Sink が Action Outputs に追加されます。
Create Rule ページで設定内容を確認し、Save ボタンをクリックしてルールを生成します。
ルールが正常に作成されると、Integration -> Rules ページで新規ルールを確認でき、Action (Sink) タブで新規 AlloyDB Sink も確認可能です。
また、Integration -> Flow Designer に移動するとトポロジーが表示され、トピック t/# のメッセージがルール my_rule によって解析され AlloyDB に書き込まれている様子を可視化できます。
イベント記録用 AlloyDB Sink を用いたルール作成
このセクションでは、クライアントのオンライン/オフライン状態を記録し、イベントデータを設定済み Sink を通じて AlloyDB のテーブル emqx_client_events に保存するルールの作成方法を示します。
手順はメッセージ保存用 AlloyDB Sink を用いたルール作成 とほぼ同様ですが、SQL テンプレートと SQL ルールが異なります。
オンライン/オフライン状態記録用の SQL ルール文は以下の通りです。
SELECT
  *
FROM
  "$events/client_connected", "$events/client_disconnected"
イベント記録用の SQL テンプレートは以下の通りです。
注意:これはプリプロセス済み SQL なので、フィールドは引用符で囲まず、文末にセミコロンを付けないでください。
INSERT INTO emqx_client_events(clientid, event, created_at) VALUES (
  ${clientid},
  ${event},
  TO_TIMESTAMP((${timestamp} :: bigint)/1000)
)
ルールのテスト
MQTTX を使ってトピック t/1 にメッセージを送信し、オンライン/オフラインイベントをトリガーします。
mqttx pub -i emqx_c -t t/1 -m '{ "msg": "hello AlloyDB" }'2つの Sink の稼働状況を確認します。メッセージ保存用 Sink には新規の受信メッセージと送信メッセージがそれぞれ1件ずつあるはずです。イベント記録用 Sink には2件のイベントレコードがあります。
t_mqtt_msg データテーブルにデータが書き込まれているか確認します。
emqx_data=# select * from t_mqtt_msg;
 id |              msgid               | sender | topic | qos | retain |            payload
        |       arrived
----+----------------------------------+--------+-------+-----+--------+-------------------------------+---------------------
  1 | 0005F298A0F0AEE2F443000012DC0002 | emqx_c | t/1   |   0 |        | { "msg": "hello AlloyDB" } | 2023-01-19 07:10:32
(1 row)
emqx_client_events テーブルにデータが書き込まれているか確認します。
emqx_data=# select * from emqx_client_events;
 id | clientid |        event        |     created_at
----+----------+---------------------+---------------------
  3 | emqx_c   | client.connected    | 2023-01-19 07:10:32
  4 | emqx_c   | client.disconnected | 2023-01-19 07:10:32
(2 rows)