Ingest MQTT Data into Redshift
Amazon Redshift is a fully managed, petabyte-scale cloud data warehouse designed for high-performance analytics. It is based on PostgreSQL and optimized for Online Analytical Processing (OLAP), enabling you to run complex queries and perform large-scale data analysis with exceptional speed. EMQX integrates directly with Amazon Redshift to ingest and store MQTT telemetry from IoT devices in near real time.
This page provides a comprehensive introduction to the data integration between EMQX and Redshift, with practical instructions on creating and validating the data integration.
How It Works
Redshift data integration in EMQX is a built-in feature that ingests MQTT-based IoT data streams directly into Amazon Redshift’s distributed, PostgreSQL-compatible data warehouse. With EMQX’s built-in rule engine, you can stream IoT data into Redshift for large-scale analytical processing without writing complex custom code.
The diagram below illustrates a typical architecture of data integration between EMQX and Redshift:
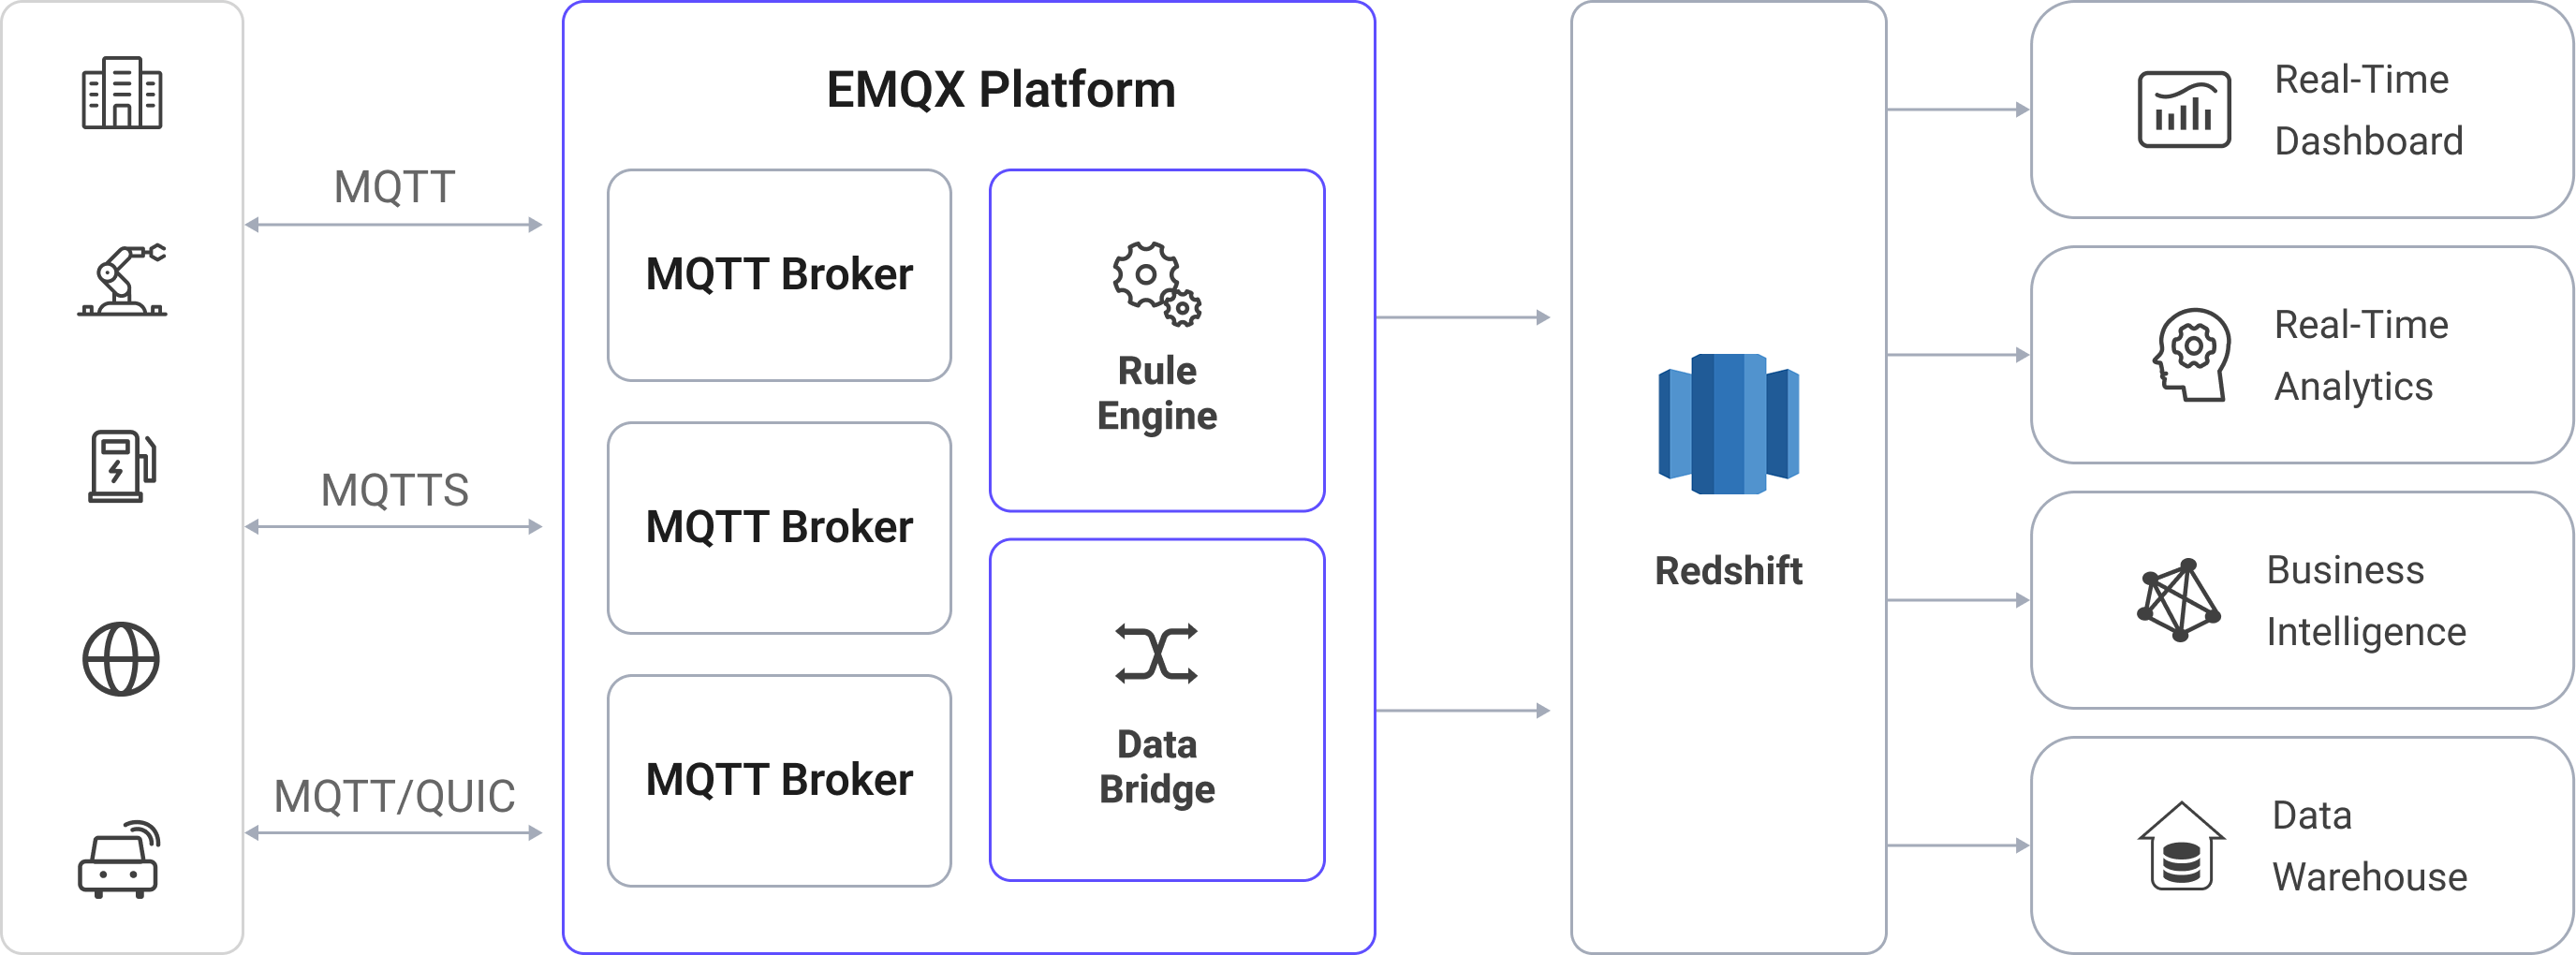
Ingesting MQTT data into Redshift works as follows:
- IoT devices connect to EMQX: After IoT devices are successfully connected through the MQTT protocol, online events will be triggered. The events include information such as device ID, source IP address, and other attributes.
- Message publication and reception: The devices publish telemetry and status data to specific topics. When EMQX receives these messages, it initiates the matching process within its rules engine.
- Rule Engine Processing Messages: EMQX’s rules engine processes events and messages by matching them to defined rules based on topics or message content. Processing can include data transformation (e.g., JSON to SQL-ready format), filtering, and data enrichment with contextual information before database insertion.
- Write to Redshift: The matched rule triggers SQL-based ingestion into Redshift. Using SQL templates, EMQX maps processed data fields to Redshift tables and columns. For high-throughput ingestion, the pipeline can leverage COPY from Amazon S3 or Redshift Streaming Ingestion to load data efficiently into the columnar store. Redshift’s query optimizer and Massively Parallel Processing (MPP) execution engine ensure the data is instantly available for analytical queries.
After the event and message data are written to Redshift, you can:
- Connect Redshift to tools such as Amazon QuickSight, Grafana, or Tableau to build dashboards that track IoT metrics and trends.
- Integrate Redshift data with AWS analytics and AI/ML services (e.g., Amazon SageMaker) to detect anomalies and forecast device behavior.
- Use Redshift’s parallel query execution to run aggregations, joins, and time-series analysis across massive IoT datasets, supporting both historical and near-real-time insights.
Features and Benefits
The data integration with Redshift can bring the following features and advantages to your business:
- Flexible Event Handling: Using the EMQX rules engine, Redshift can store and process device lifecycle events (connect, disconnect, status changes) with low latency. When paired with Redshift’s MPP query engine, event data can be aggregated and analyzed quickly to detect failures, anomalies, or long-term usage trends.
- Message Transformation: Messages can undergo extensive processing and transformation through EMQX rules before being written to Redshift, making stored data analytics-ready from the start. This preprocessing reduces query complexity and optimizes downstream usage.
- Flexible Data Operations with SQL Templates: Through EMQX’s SQL template mapping, structured IoT data can be inserted into Redshift tables and columns. Redshift supports PostgreSQL-compatible SQL, semi-structured data types like SUPER for JSON, and advanced indexing for query optimization. Queries are accelerated by columnar storage**, **data compression, and zone maps, reducing scan times for large datasets.
- Integration of Business Processes: Redshift integrates seamlessly with the AWS ecosystem, allowing you to connect IoT data to BI tools like Amazon QuickSight, analytics services like AWS Glue and AWS Data Pipeline, or AI/ML services like Amazon SageMaker.
- Advanced Geospatial Capabilities: Redshift supports geospatial data types and functions through the GEOMETRY and GEOGRAPHY types, enabling geofencing, location-based analytics, and route optimization. When paired with EMQX’s real-time ingestion, you can track assets, monitor fleets, or trigger location-based events in near real time.
- Built-in Metrics and Monitoring: EMQX provides runtime metrics for each Redshift sink while Redshift integrates with Amazon CloudWatch for cluster performance, query execution metrics, and storage usage. This ensures end-to-end observability of both ingestion and analytics performance.
Before You Start
This section describes the preparations you need to complete before you start to create the Redshift integration, including how to create a Redshift cluster and create a database and data tables.
Prerequisites
- Knowledge about EMQX data integration rules
- Knowledge about Data Integration
Create Database and Tables in Amazon Redshift
Before setting up a Redshift connector in EMQX, ensure your Amazon Redshift cluster (or Serverless workgroup) is running, and the schema is prepared to store IoT data.
Deploy a Redshift cluster or workgroup. Follow the Amazon Redshift cluster creation guide to launch your environment.
Configure database user credentials. When creating the initial cluster, specify admin credentials for the primary user (often
adminuser).Alternatively, create a dedicated database user for EMQX using Redshift SQL. This user must have permission to connect, create tables, and read/write data. For example:
sqlCREATE USER emqx_user PASSWORD 'YourStrongPassword1';For detailed steps, see the Redshift getting started guide and Users guide.
Keep the username (
emqx_user) and password for configuring the connector in EMQX later.Use any PostgreSQL-compatible client (such as
psql, SQL Workbench/J, or DBeaver) to connect to your Redshift endpoint using the hostname, port, an existing database name (e.g., the defaultdev), username, and password you configured.Once connected, create the target
emqx_datadatabase, which serves as the destination for incoming IoT data from EMQX.sqlCREATE DATABASE emqx_data;Connect to the
emqx_datadatabase and create two tables for storing MQTT messages and client event data.Use the following SQL statements to create a data table
t_mqtt_msgfor storing the client ID, topic, payload, and creation time of every message:sqlCREATE TABLE t_mqtt_msg ( id BIGINT GENERATED BY DEFAULT AS IDENTITY PRIMARY KEY, msgid VARCHAR(64), sender VARCHAR(64), topic VARCHAR(255), qos INTEGER, retain INTEGER, -- If payload is JSON, consider SUPER; otherwise, use a large VARCHAR payload SUPER, arrived TIMESTAMPTZ );Use the following SQL statements to create the
emqx_client_eventstable for storing client online/offline events with timestamps:sqlCREATE TABLE emqx_client_events ( id BIGINT GENERATED BY DEFAULT AS IDENTITY PRIMARY KEY, clientid VARCHAR(255), event VARCHAR(255), created_at TIMESTAMPTZ DEFAULT CURRENT_TIMESTAMP );
Create a Redshift Connector
Before adding a Redshift Sink, you must create a Redshift connector in EMQX. The connector defines how EMQX connects to your Amazon Redshift cluster or Serverless workgroup.
Note
If you are using Amazon Redshift Serverless, be aware that you may incur charges as soon as a connector is created and establishes a connection, even if no data is written. Consider deleting unused connectors or pausing resources to avoid unexpected costs.
In the EMQX Dashboard, navigate to Integration -> Connector.
Click Create in the upper right corner of the page.
On the Create Connector page, click to select Redshift, and then click Next.
Enter a name for the connector. The name must start with a letter or number and can contain letters, numbers, hyphens, or underscores. For example:
my_redshift.Fill in the fields with your Redshift connection details:
- Server Host: The hostname of your Redshift endpoint (e.g.,
redshift-cluster-1.abc123xyz.us-east-1.redshift.amazonaws.com). You can find this in the Clusters or Workgroups page of the AWS Redshift console. - Database Name: The target database to store EMQX data. For this example:
emqx_data. - Username: The database username with sufficient privileges to insert data. For this example:
emqx_user. - Password: The password for
emqx_user. - Enable TLS: Toggle on if your Redshift connection requires SSL/TLS encryption (recommended for all cloud service connections). See TLS for External Resource Access.
- Server Host: The hostname of your Redshift endpoint (e.g.,
Advanced settings (optional): Configure additional connection properties such as connection pool size, idle timeout, and request timeout. For details, see Features of Sink.
Click Test Connectivity to verify that EMQX can successfully connect to the Redshift cluster using the provided settings.
Click Create to save the connector.
After creation, you can either:
- Click Back to Connector List to view all connectors, or
- Click Create Rule to immediately create a rule that uses this connector to forward data to Redshift.
For detailed examples, see:
Create a Rule with Redshift Sink for Message Storage
This section demonstrates how to create a rule in the Dashboard for processing messages from the source MQTT topic t/#, and saving the processed data to the Redshift table t_mqtt_msg via the configured Sink.
Go to the Dashboard Integration -> Rules page.
Click Create in the upper right corner of the page.
Enter the rule ID
my_ruleand enter the rule in the SQL editor. Here we choose to store MQTT messages witht/#topic to Redshift, make sure that the fields selected by the rule (in the SELECT section) contain all the variables used in the SQL template, here the rule SQL is as follows:sqlSELECT * FROM "t/#"TIP
If you are a beginner user, click SQL Examples and Enable Test to learn and test the SQL rule.
Click the + Add Action button to define an action to be triggered by the rule. With this action, EMQX sends the data processed by the rule to Redshift.
Select Redshift from the Type of Action drop-down, leave the Action drop-down at the default
Create Actionoption, or you can select a previously created Redshift action from the Action drop-down box. This example will create a brand new Sink and add it to the rule.Enter the name and description of the Sink in the form below.
From the Connector dropdown box, select the
my_redshiftcreated before. You can also create a new Connector by clicking the button next to the dropdown box. For the configuration parameters, see Create a Redshift Connector.Configure the SQL Template. Use the SQL statements below to insert data.
Note: This is a preprocessed SQL, so the fields should not be enclosed in quotation marks, and do not write a semicolon at the end of the statements.
sqlINSERT INTO t_mqtt_msg ( msgid, topic, qos, payload, arrived ) VALUES ( ${id}, ${topic}, ${qos}, ${payload}, timestamp 'epoch' + (${timestamp} :: bigint / 1000) * interval '1 second' )Fallback Actions (Optional): If you want to improve reliability in case of message delivery failure, you can define one or more fallback actions. These actions will be triggered if the primary Sink fails to process a message. See Fallback Actions for more details.
Advanced settings (optional): For details, see Features of Sink.
Before clicking Create, you can click Test Connectivity to test that the Sink can be connected to the Redshift server.
Click the Create button to complete the Sink configuration. A new Sink will be added to the Action Outputs.
On the Create Rule page, verify the configured information. Click the Save button to generate the rule.
Now that you have successfully created the rule, you can click Integration -> Rules page to see the newly created rule and also see the newly created Redshift Sink in the Action (Sink) tab.
You can also click Integration -> Flow Designer to see the topology, through which you can visualize that the messages under topic t/# are being written to Redshift after being parsed by the rule my_rule.
Create a Rule with Redshift Sink for Events Recording
This section demonstrates how to create a rule for recording the clients' online/offline status and storing the events data in the Redshift table emqx_client_events via a configured Sink.
The steps are similar to those in Create a Rule with Redshift Sink for Message Storage, except for the SQL template and SQL rules.
The SQL rule statement for online/offline status recording is as follows:
SELECT
  *
FROM
  "$events/client_connected", "$events/client_disconnected"
The SQL template for event recording is as follows:
Note: This is a preprocessed SQL, so the fields should not be enclosed in quotation marks, and do not write a semicolon at the end of the statements.
INSERT INTO emqx_client_events(clientid, event, created_at) VALUES (
  ${clientid},
  ${event},
  TO_TIMESTAMP((${timestamp} :: bigint)/1000)
)
Test the Rules
Use MQTTX to send a message to topic t/1 to trigger an online/offline event.
mqttx pub -i emqx_c -t t/1 -m '{ "msg": "hello Redshift" }'Check the running status of the two sinks. For the message storage Sink, there should be one new incoming and one new outgoing message. For the events recording Sink, there are two event records.
Check whether the data is written into the t_mqtt_msg data table.
emqx_data=# select * from t_mqtt_msg;
 id |              msgid               | sender | topic | qos | retain |            payload
        |       arrived
----+----------------------------------+--------+-------+-----+--------+-------------------------------+---------------------
  1 | 0005F298A0F0AEE2F443000012DC0002 | emqx_c | t/1   |   0 |        | { "msg": "hello Redshift" } | 2023-01-19 07:10:32
(1 row)
Check whether the data is written into the emqx_client_events table.
emqx_data=# select * from emqx_client_events;
 id | clientid |        event        |     created_at
----+----------+---------------------+---------------------
  3 | emqx_c   | client.connected    | 2023-01-19 07:10:32
  4 | emqx_c   | client.disconnected | 2023-01-19 07:10:32
(2 rows)