Ingest MQTT Data into Amazon S3 Tables
Amazon S3 Tables is a purpose-built storage solution optimized for analytics workloads. It provides high-performance, scalable, and secure storage for tabular data, such as IoT sensor readings, in the Apache Iceberg format.
EMQX now supports seamless integration with Amazon S3 Tables, enabling efficient storage of MQTT messages into S3 table buckets. This integration allows for flexible and scalable IoT data storage, facilitating advanced analytics and processing using AWS services like Amazon Athena, Amazon Redshift, and Amazon EMR.
This page provides a detailed introduction to the data integration between EMQX and Amazon S3 Tables and offers practical guidance on the rule and Sink creation.
How It Works
EMQX’s Amazon S3 Tables integration is an out-of-the-box feature. This integration leverages EMQX’s rule engine and S3 Tables Sink to transform and stream MQTT messages directly into Apache Iceberg-formatted tables stored in S3 Table Buckets for long-term storage and downstream analysis.
In a typical IoT scenario:
- EMQX acts as the MQTT broker, handling device connectivity, message routing, and data processing.
- Amazon S3 Tables serves as the destination for durable, queryable storage of MQTT message data in tabular form.
- Amazon Athena is used to define Iceberg tables and run SQL queries against the stored data.
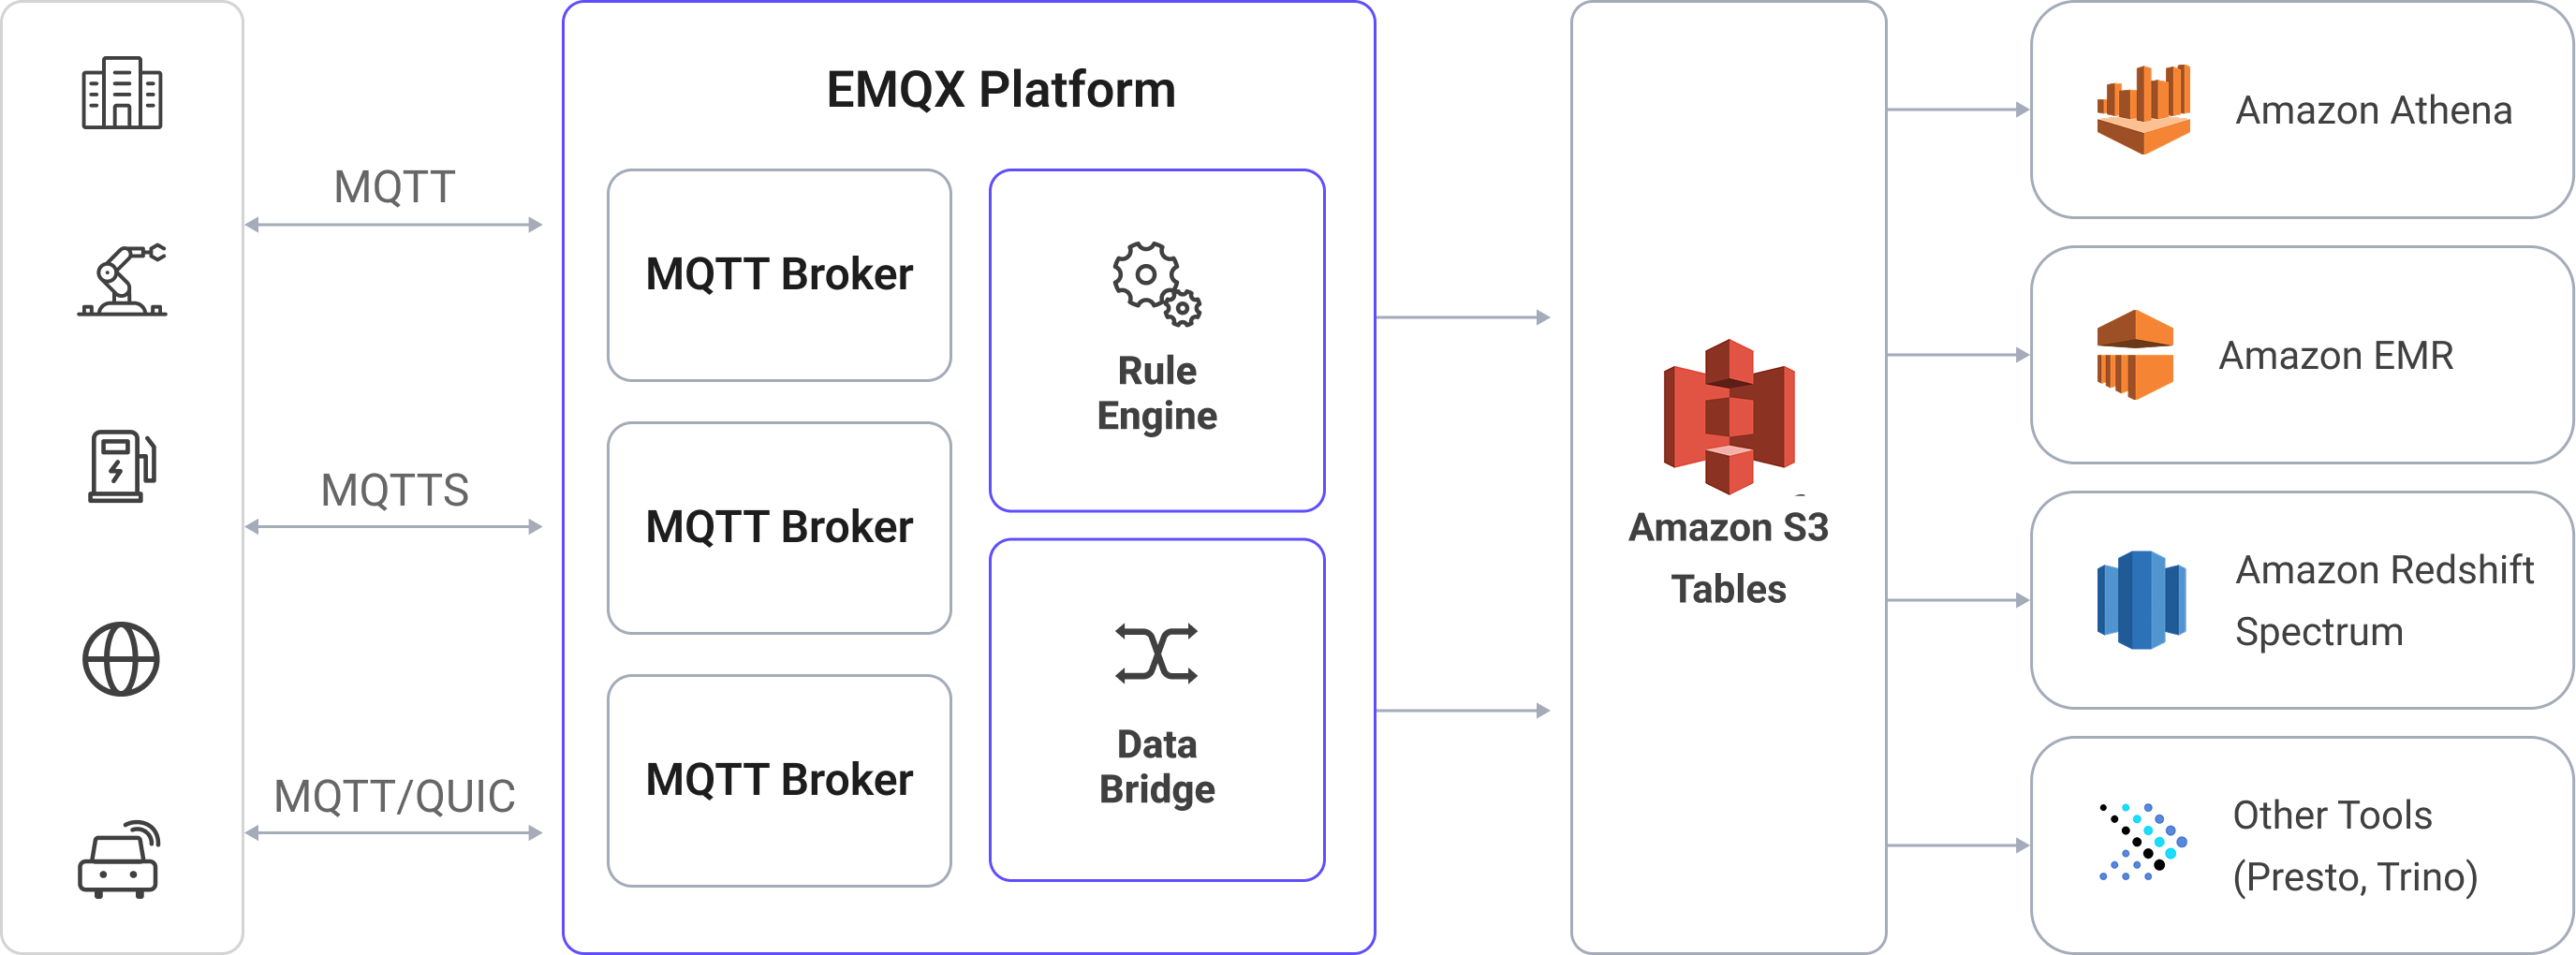
The workflow proceeds as follows:
- Device Connection to EMQX: IoT devices connect to EMQX via MQTT and begin publishing telemetry data.
- Message Routing and Rule Matching: EMQX uses its built-in rule engine to match incoming MQTT messages against defined topics and extract specific fields or values.
- Data Transformation: Rules in EMQX can filter, transform, or enrich message payloads to match the schema of the target Iceberg table.
- Writing to Amazon S3 Tables: The rule triggers the S3 Tables Sink action, which batches the transformed data and sends it to Amazon S3 Tables using the Iceberg-compatible write API. Data is persisted as Parquet files under Iceberg table partitions.
- Query and Analytics: Once ingested, data can be queried with Amazon Athena, joined with other datasets, or analyzed using Redshift Spectrum, Amazon EMR, or third-party analytics engines such as Presto and Trino.
Features and Benefits
Using Amazon S3 Tables data integration in EMQX can bring the following features and advantages to your business:
- Real-time Stream Processing: EMQX's rule engine allows real-time extraction, transformation, and conditional routing of MQTT messages before delivery to S3 Tables.
- Iceberg-Based Storage in S3: Messages are written to Apache Iceberg tables, eliminating the need for traditional databases while enabling SQL-like access patterns.
- Easy Integration with Analytics Tools: Once data is in S3 Tables, you can query it using Amazon Athena (SQL), Amazon EMR, Redshift Spectrum, or third-party engines like Presto, Trino, or Snowflake.
- Flexible and Cost-Efficient Storage: Amazon S3 provides highly durable, low-cost object storage, ideal for archiving, compliance, and time-series analytics on device-generated data.
Before You Start
This section introduces the preparations required for creating an Amazon S3 Tables Sink in EMQX.
Prerequisites
Before proceeding, make sure you are familiar with the following:
EMQX Concepts:
- Rule Engine: Understand how rules define the logic for extracting and transforming data from MQTT messages.
- Data Integration: Understand the concept of connectors and sinks in EMQX data integration.
AWS Concepts:
If you're new to AWS S3 Tables, review the following key terms:
- EC2: AWS’s virtual machine service (compute instances).
- IAM: AWS Identity and Access Management; an instance role can issue temporary credentials to programs running on that instance.
- IMDSv2: EC2’s Instance Metadata Service v2 for retrieving metadata/temporary credentials; token-based and more secure.
- Table Bucket: A specialized S3 bucket used for storing Iceberg-based table data and metadata in S3 Tables.
- Amazon Athena: A serverless query engine that lets you run SQL queries directly on data stored in Amazon S3. Athena supports standard SQL syntax, including Data Definition Language (DDL) statements such as
CREATE TABLEto define schema and structure for querying. - Catalog: A metadata container in Athena that organizes databases (namespaces) and tables.
- Database (Namespace): A logical group of tables under a catalog.
- Iceberg Table: A high-performance, transactional table format for data lakes. It supports schema evolution, partition pruning, and time travel queries.
Deployment Prerequisites and Credential Sources
The S3 Tables connector supports two ways to obtain credentials. Choose based on your EMQX deployment environment:
Option 1: Manually configure access keys When creating a connector, you need to provide the Access Key ID and Secret Access Key. These credentials must have the required permissions for the target S3 Tables and Athena. Suitable for local/container/Kubernetes/non-AWS clouds, or EC2 without an attached instance role.
To create and manage access keys for an IAM user, see the AWS documentation on managing access keys.
Option 2: Automatically obtain temporary credentials (EC2 only) If EMQX runs on an AWS EC2 instance and the instance has an attached IAM role with the necessary permissions, you can leave Access Key ID and Secret Access Key blank in the connector. EMQX will use IMDSv2 API to fetch temporary credentials associated with that role.
To learn how to assign an IAM role to an EC2 instance, see the AWS documentation on IAM roles for Amazon EC2.
Note
- Ensure the instance role has sufficient permissions to the target S3 Tables (bucket/table) and Athena; otherwise, Test Connectivity may fail.
- It’s recommended to use an IAM role attached to EC2 instance to manage temporary credentials; if you are not on EC2 or no role is attached, use Option 1 and enter access keys manually.
Prepare an S3 Tables Bucket
Before creating a Sink in EMQX, you need to prepare the destination of MQTT data in AWS S3 Tables, including:
- A Table Bucket to store the actual data files.
- A Namespace to logically group related tables.
- An Iceberg-based Table to receive structured MQTT data.
Log in to the AWS Management Console.
Go to the S3 service. In the left navigation pane, click Table buckets.
Click Create table bucket. Enter a name for your table bucket (e.g.,
mybucket) and click Create table bucket.After the bucket is created, click on it to go the the Tables list.
Click Create table with Athena. A pop-up should appear asking for the namespace.
Select Create a namespace. Provide a namespace name and confirm creation.
After the namespace is created, continue by clicking Create table with Athena again.
Define your Iceberg table schema:
Click Query table with Athena. In the Query editor:
- Select your Catalog (e.g.,
s3tablescatalog/mybucket, if your bucket is namedmybucket) from the Catalog selector. - Select the namespace you've just created from the Database selector.
- Select your Catalog (e.g.,
Execute the following DDL to create your table and ensure the table type is set to
ICEBERG. For example:sqlCREATE TABLE testtable ( c_str string, c_long int ) TBLPROPERTIES ('table_type' = 'ICEBERG');This defines an Iceberg-based table that will be used to store structured MQTT data from EMQX.
Verify the table. To ensure the table has been successfully created and is currently empty, run:
sqlselect * from testtableTIP
Make sure the correct Catalog and Database (namespace) are selected in Athena before executing any SQL. This ensures the table is created in the intended S3 Table Bucket.
Create a Connector
Before adding the S3 Tables Sink, you need to create the corresponding connector.
- Go to the Dashboard Integration -> Connector page.
- Click the Create button in the top right corner.
- Select S3 Tables as the connector type and click next.
- Enter a name for the connector. The name must start with a letter or number and can contain letters, numbers, hyphens, or underscores. In this example, enter
my-s3-tables. - Provide the required connection details:
- S3Tables ARN: Enter the Amazon Resource Name (ARN) of your S3 Table Bucket. You can find this in the Table buckets section in the AWS Console.
- Access Key ID and Secret Access Key (optional):
- Manual configuration: Enter AWS credentials associated with an IAM user or role that has permission to access S3 Tables and Athena.
- Automatic retrieval: If EMQX is deployed on an AWS EC2 instance and the instance is associated with an IAM role that has the required permissions, you can leave this field blank. EMQX will automatically obtain temporary credentials through IMDSv2. See Deployment Prerequisites and Credential Sources for details.
- Enable TLS: TLS is enabled by default when connecting to S3 Tables. For detailed TLS connection options, see TLS for External Resource Access.
- Health Check Timeout: Specify the timeout duration for the connector to perform automatic health checks on its connection with S3 Tables.
- Use the default values for the remaining settings.
- Before clicking Create, you can click Test Connectivity to test if the connector can connect to the S3 Tables service.
- Click the Create button at the bottom to complete the connector creation.
You have now completed the connector creation and will proceed to create a rule and Sink for specifying the data to be written into the S3 Tables service.
Create a Rule with Amazon S3 Tables Sink
This section demonstrates how to create a rule in EMQX to process messages from the source MQTT topic t/# and write the processed results to the mybucket bucket in S3 Tables through the configured Sink.
Go to the Dashboard Integration -> Rules page.
Click the Create button in the top right corner.
Enter the rule ID
my_rule, and input the following rule SQL in the SQL editor:sqlSELECT payload.str as c_str, payload.int as c_long FROM "t/#"TIP
If you are new to SQL, you can click SQL Examples and Enable Debug to learn and test the rule SQL results.
TIP
Ensure that the output fields match the schema defined in your Iceberg table. If a required column is missing or misnamed, data may fail to append to the table.
Add an action, select
S3 Tablesfrom the Action Type dropdown list, keep the action dropdown as the defaultcreate actionoption, or choose a previously created S3 Tables action from the action dropdown. Here, create a new Sink and add it to the rule.Provide a Sink name and an optional description.
Select the
my-s3-tablesconnector created earlier from the Connector dropdown. Alternatively, click the Create button next to the dropdown to quickly define a new connector. Refer to Create a Connector for the required configuration parameters.Configure the Sink settings:
- Namespace: The namespace where your table resides. If it includes multiple segments, use dot notation (e.g.,
my.name.space). - Table: The name of the Iceberg table to append data to (e.g.,
testtable). - Max Records: The maximum number of records to batch before writing to S3. Once reached, the batch is flushed and uploaded immediately.
- Time Interval: The maximum time (in milliseconds) to wait before flushing data, even if the record count has not reached the Max Records threshold.
- Data File Format: Defines the format of the data file used to store batched MQTT messages in S3. Supported values:
avro: (Default) Stores records in Avro format, which is row-based and ideal for streaming data and evolving schemas.parquet: Stores records in Apache Parquet format, which is column-based and optimized for analytical queries over large datasets.
- Namespace: The namespace where your table resides. If it includes multiple segments, use dot notation (e.g.,
Fallback Actions (Optional): If you want to improve reliability in case of message delivery failure, you can define one or more fallback actions. These actions will be triggered if the primary Sink fails to process a message. See Fallback Actions for more details.
Expand Advanced Settings and configure the advanced setting options as needed (optional). For more details, refer to Advanced Settings.
Use the default values for the remaining settings. Click the Create button to complete the Sink creation. After successful creation, the page will return to the rule creation, and the new Sink will be added to the rule actions.
Back on the rule creation page, click the Create button to complete the entire rule creation process.
You have now successfully created the rule. You can see the newly created rule on the Rules page and the new S3 Tables Sink on the Actions (Sink) tab.
You can also click Integration -> Flow Designer to view the topology. The topology visually shows how messages under the topic t/# are written into S3 Tables after being parsed by the rule my_rule.
Test the Rule
This section shows how to test the rule configured with the S3 Tables Sink.
Use MQTTX to publish a message to the topic
t/1:bashmqttx pub -i emqx_c -t t/1 -m '{ "str": "hello S3 Tables", "int": 123 }'This message contains a
payload.strfield and apayload.intfield, which match the rule SQL and the table schema you defined earlier.Monitor rule metrics and Sink status in the Rules page. There should be one new incoming and one new outgoing message.
Open the Athena query editor. Ensure the correct Catalog (e.g.,
s3tablescatalog/mybucket) and Database (namespace) are selected.Run the following SQL query:
sqlSELECT * FROM testtableYou should see a row like:
c_str c_long hello S3 Tables 123
Advanced Settings
This section delves into the advanced configuration options available for the S3 Tables Sink. In the Dashboard, when configuring the Sink, you can expand Advanced Settings to adjust the following parameters based on your specific needs.
| Field Name | Description | Default Value |
|---|---|---|
| Min Part Size | The minimum part size for multipart uploads. Uploaded data will be accumulated in memory until this size is reached. | 5 MB |
| Max Part Size | The maximum part size for multipart uploads. S3 uploader won't try to upload parts larger than this size. | 5 GB |
| Buffer Pool Size | Specifies the number of buffer worker processes, which are allocated to manage the data flow between EMQX and S3 Tables. These workers temporarily store and process data before sending it to the target service, crucial for optimizing performance and ensuring smooth data transmission. | 16 |
| Request TTL | The "Request TTL" (Time To Live) configuration setting specifies the maximum duration, in seconds, that a request is considered valid once it enters the buffer. This timer starts ticking from the moment the request is buffered. If the request stays in the buffer for a period exceeding this TTL setting or if it is sent but does not receive a timely response or acknowledgment from S3 Tables, the request is deemed to have expired. | 45 second |
| Health Check Interval | Specifies the time interval (in seconds) for the Sink to perform automatic health checks on its connection with S3 Tables. | 15 seconds |
| Health Check Interval Jitter | A uniform random delay added on top of the base health check interval to reduce the chance that multiple nodes initiate health checks at the same time. When multiple Actions or Sources share the same Connector, enabling jitter ensures their health checks are initiated at slightly different times. | 0 millisecond |
| Health Check Timeout | Specify the timeout duration for the connector to perform automatic health checks on its connection with S3 Tables. | 60 seconds |
| Max Buffer Queue Size | Specifies the maximum number of bytes that can be buffered by each buffer worker process in the S3 Tables Sink. The buffer workers temporarily store data before sending it to S3 Tables, acting as intermediaries to handle the data stream more efficiently. Adjust this value based on system performance and data transmission requirements. | 256 MB |
| Batch Size | Specifies the maximum size of data batches transmitted from EMQX to S3 Tables in a single transfer operation. By adjusting the size, you can fine-tune the efficiency and performance of data transfer between EMQX and S3 Tables. If the "Batch Size" is set to "1," data records are sent individually, without being grouped into batches. | 1000 |
| Query Mode | Allows you to choose between synchronous or asynchronous request modes to optimize message transmission according to different requirements. In asynchronous mode, writing to S3 Tables does not block the MQTT message publishing process. However, this may lead to clients receiving messages before they arrive at S3 Tables. | Asynchronous |
| In-flight Window | "In-flight queue requests" refer to requests that have been initiated but have not yet received a response or acknowledgment. This setting controls the maximum number of in-flight queue requests that can exist simultaneously during Sink communication with S3 Tables. When Request Mode is set to asynchronous, the "Request In-flight Queue Window" parameter becomes particularly important. If strict sequential processing of messages from the same MQTT client is crucial, then this value should be set to 1. | 100 |