NeuronEX Best Practice: Integrating MySQL Data into Your IIoT Platform
In the wave of industrial digitalization, the convergence of IT and OT has become an irreversible trend. While equipment data from the factory floor (OT data) is crucial, its full value is often unlocked only when combined with data from enterprise IT systems. These IT systems, such as Manufacturing Execution Systems (MES), Warehouse Management Systems (WMS), or Enterprise Resource Planning (ERP), typically use SQL databases (like MySQL) to store key business data, including production work orders, material information, quality standards, and personnel schedules.
Correlating this SQL data with real-time equipment data provides richer context, enabling more advanced applications, such as:
- Product Quality Traceability: Link equipment operating parameters with specific product batch work orders.
- Production Efficiency Analysis: Accurately calculate OEE by combining work order schedules with actual equipment output.
- Predictive Maintenance: Optimize maintenance schedules based on equipment maintenance records from ERP and real-time operational conditions.
NeuronEX, as an industrial edge gateway software, not only supports over 100 industrial protocols but can also collect data from various IT systems, including databases (like MES/WMS/ERP), Enterprise Service Bus (ESB), and RESTful APIs.
This article will detail how to use NeuronEX as a powerful edge data bridge to efficiently and reliably pull data from a MySQL database, process it, and seamlessly forward it to the EMQX Platform, thus breaking down the data silos between IT and OT.
Prerequisites
Before you begin, ensure you have the following environment set up. You can quickly deploy these services on your computer to follow along with this article by installing Docker Desktop.
- NeuronEX:
docker run -d --name neuronex -p 8085:8085 --log-opt max-size=100m --privileged=true emqx/neuronex:3.6.0- MySQL Database:
docker run -d --name mysql -p 3306:3306 -e MYSQL_ROOT_PASSWORD=123456 mysql:8.0- MQTTX:
MQTTX is a cross-platform MQTT 5.0 client used for testing and verifying data sent to the EMQX Platform. Download MQTTX here.
Practical Steps
We will complete the entire data link configuration through these core steps:
- Create Data in MySQL: Create a data table in MySQL and insert some data.
- Fetch Data from MySQL in NeuronEX: Create a data stream in NeuronEX to connect to and periodically query the MySQL database.
- Implement Incremental Query via Auto-Increment ID Field: Select and process the data obtained from MySQL.
- Implement Incremental Query via Timestamp Field: Send the processed data to EMQX via the MQTT protocol.
- Configure MQTT Sink to Forward Data to EMQX: Send the processed data to EMQX via the MQTT protocol.
- Configure Stream QoS and Checkpoint Interval for Automatic Recovery: Configure rule options to enable automatic rule recovery.
Step 1: Create Data in MySQL
After starting the MySQL service with the command above, we can enter the MySQL command-line mode with the following command, using the password 123456.
docker exec -it mysql mysql -u root -pCreate a database in MySQL to store the data to be collected.
CREATE DATABASE IF NOT EXISTS testdb;Use this database:
use testdb;Create a data table:
CREATE TABLE DeviceData (
id INT AUTO_INCREMENT PRIMARY KEY ,
Time TIMESTAMP NOT NULL ,
DeviceName VARCHAR(100) NOT NULL ,
Current INT ,
Voltage INT
);
Insert some data:
INSERT INTO DeviceData (Time, DeviceName, Current, Voltage) VALUES ('2025-07-23 09:00:00', 'moter_A', 100, 200);
INSERT INTO DeviceData (Time, DeviceName, Current, Voltage) VALUES ('2025-07-23 09:00:05', 'moter_B', 120, 210);
INSERT INTO DeviceData (Time, DeviceName, Current, Voltage) VALUES ('2025-07-23 09:00:10', 'moter_C', 150, 220);
You can view the inserted data in the table to confirm the operations were successful with the following command:
SELECT * FROM DeviceData;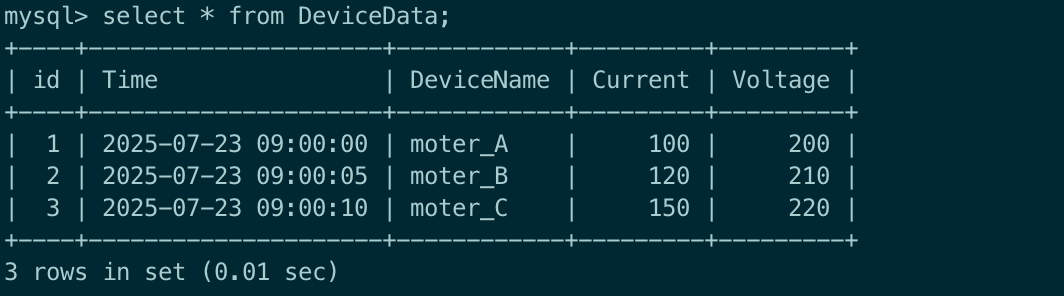
Step 2: Fetch Data from MySQL in NeuronEX
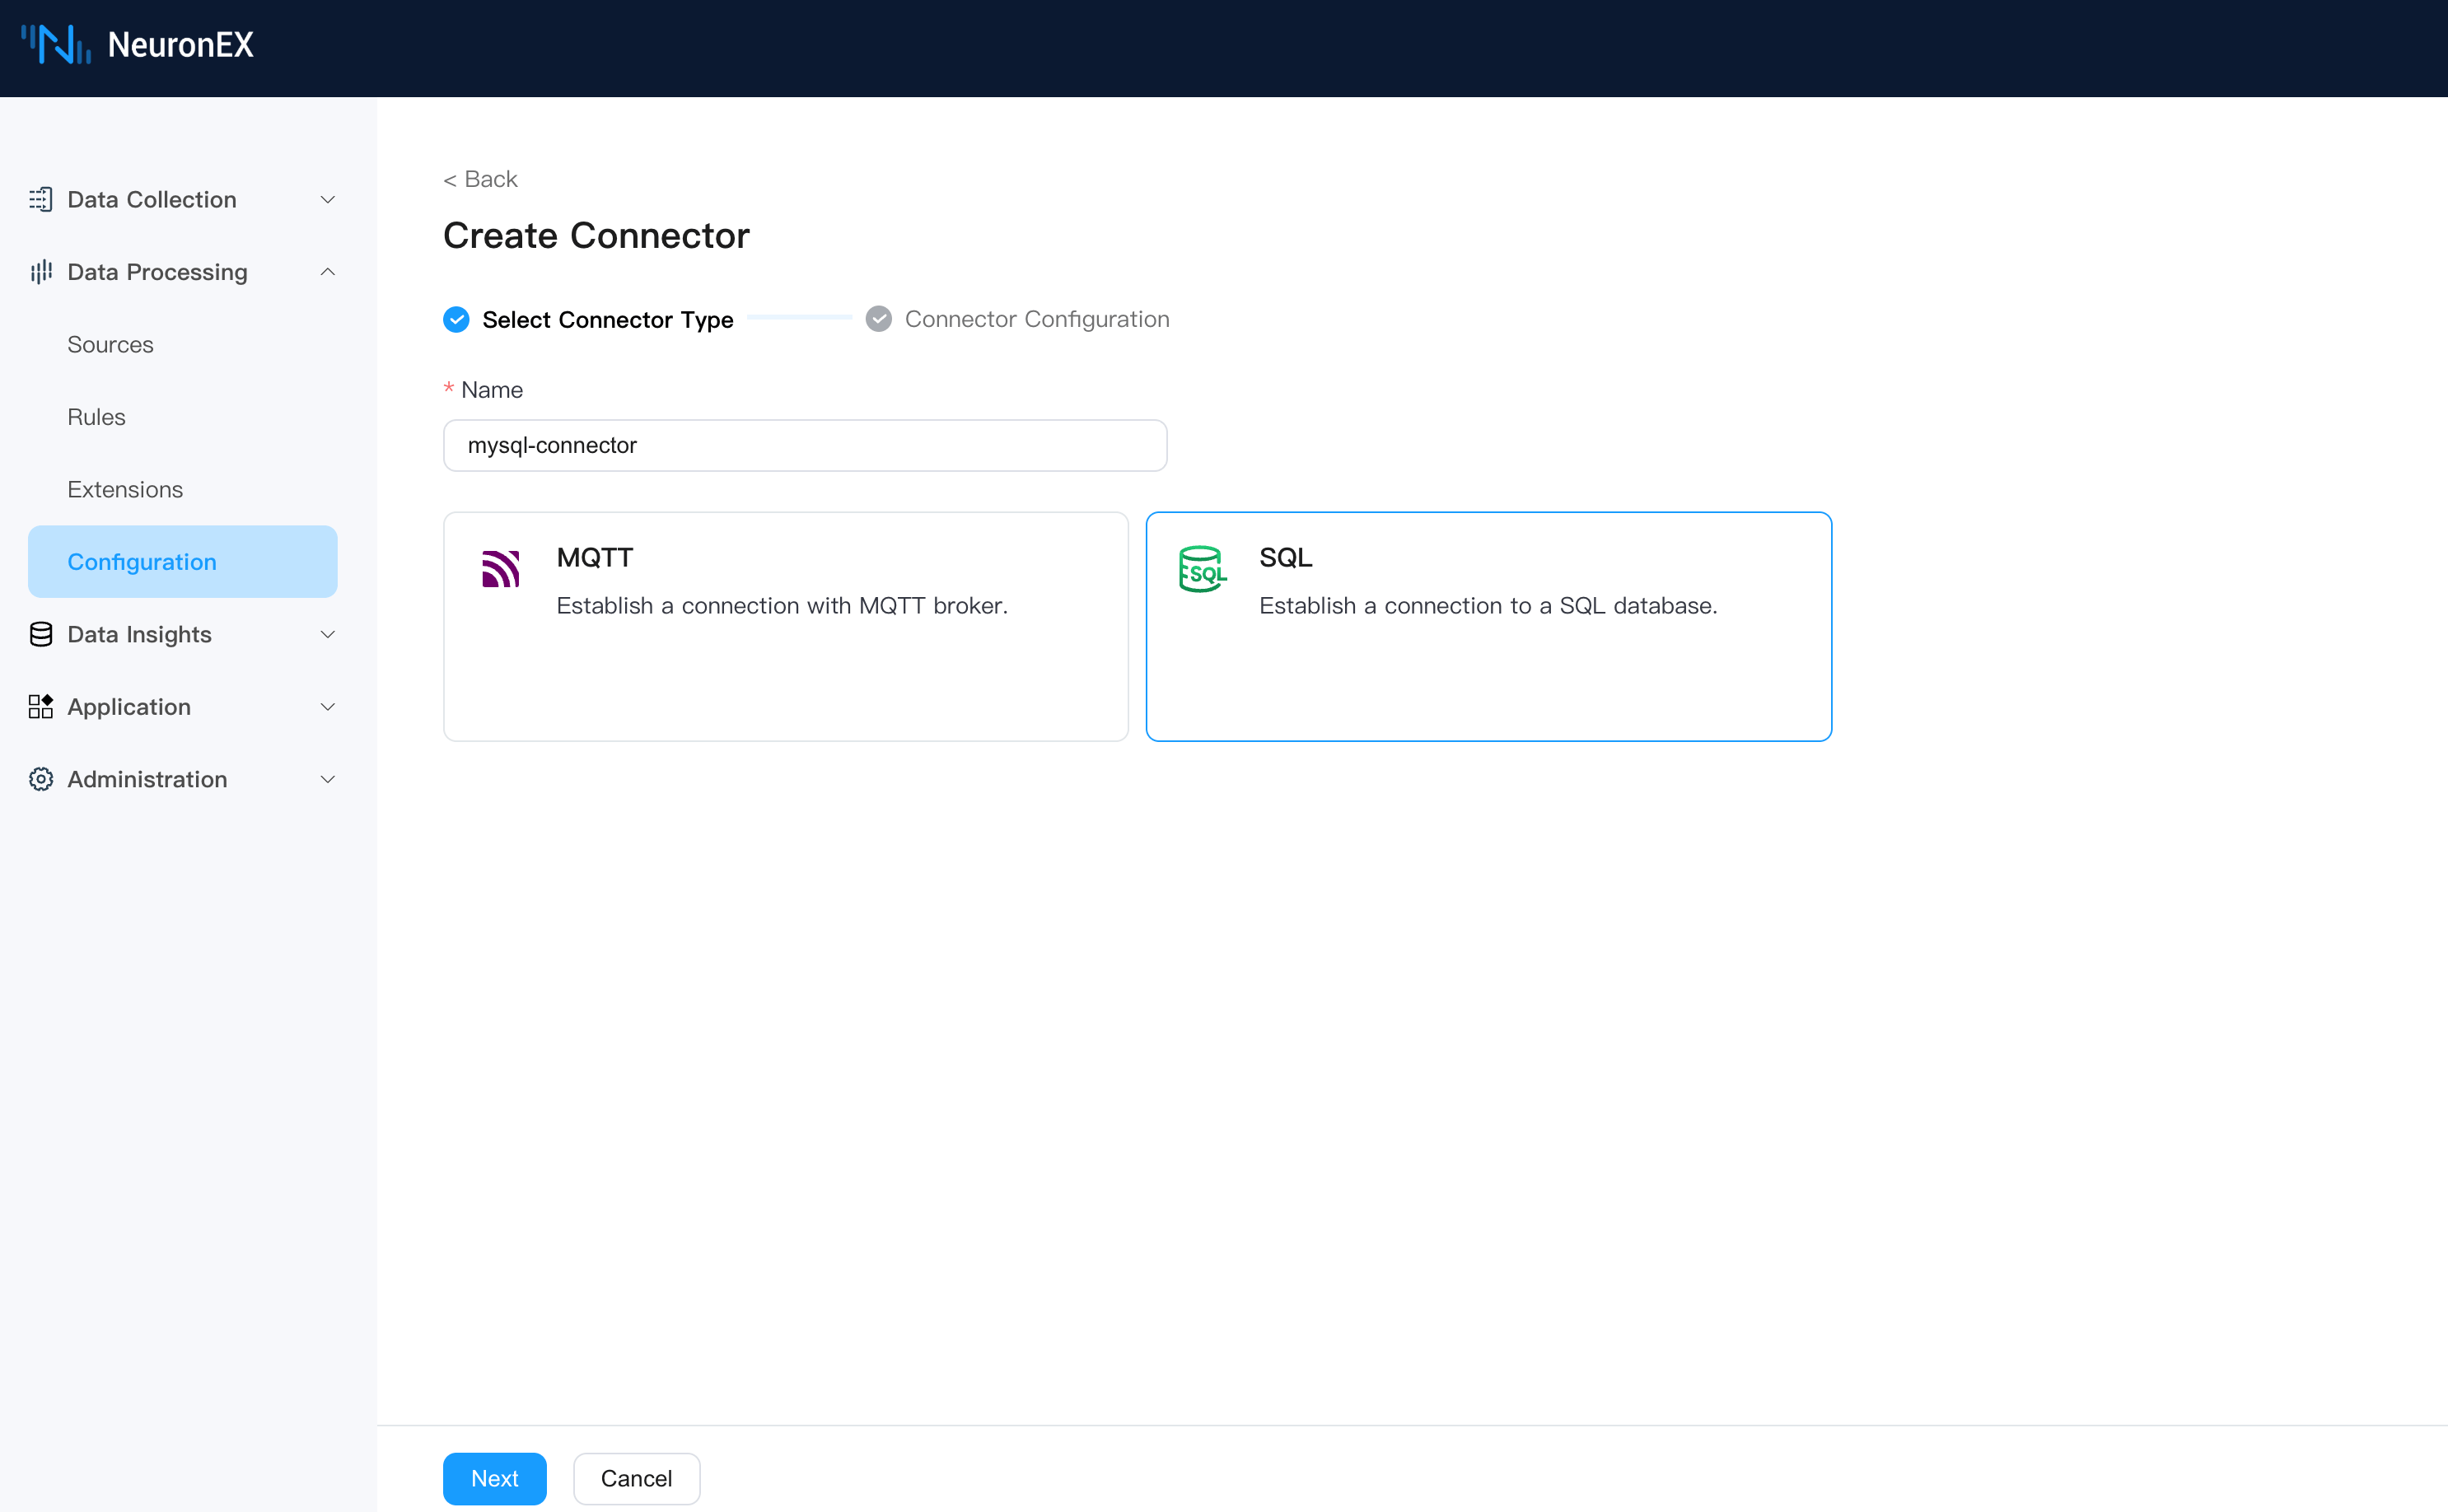
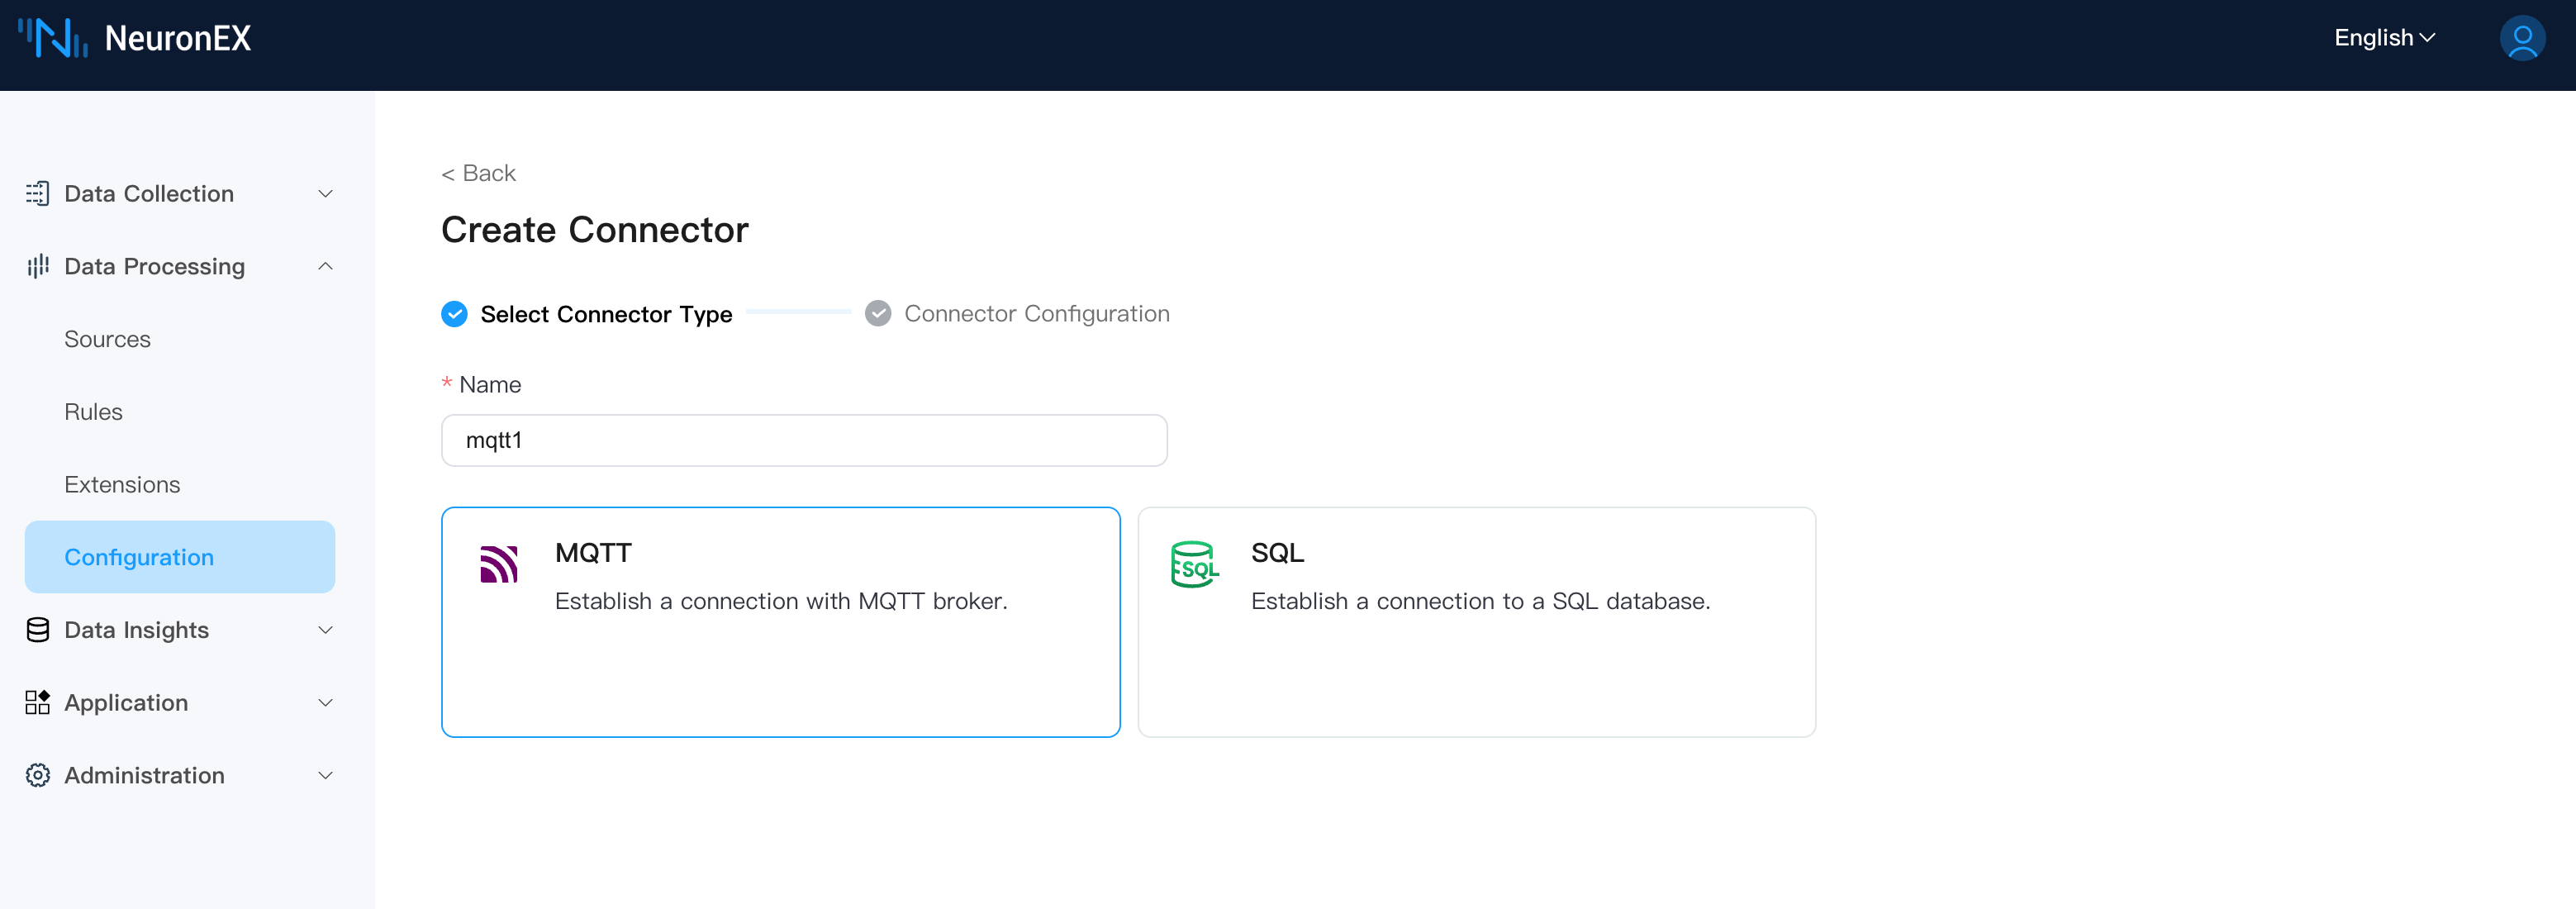
First, on the Data Processing -> Configuration page in NeuronEX, create a connector. Select the MySQL connector and fill in the following information:
- Database Address:
mysql://root:123456@192.168.1.43:3306/testdb?parseTime=true. This connects to the local MySQL database namedtestdbwith usernamerootand password123456.
TIP
Since NeuronEX and MySQL are deployed in separate containers, you cannot access the MySQL database using localhost. You must use an IP address. You need to replace 192.168.1.43 with your computer's actual IP address.
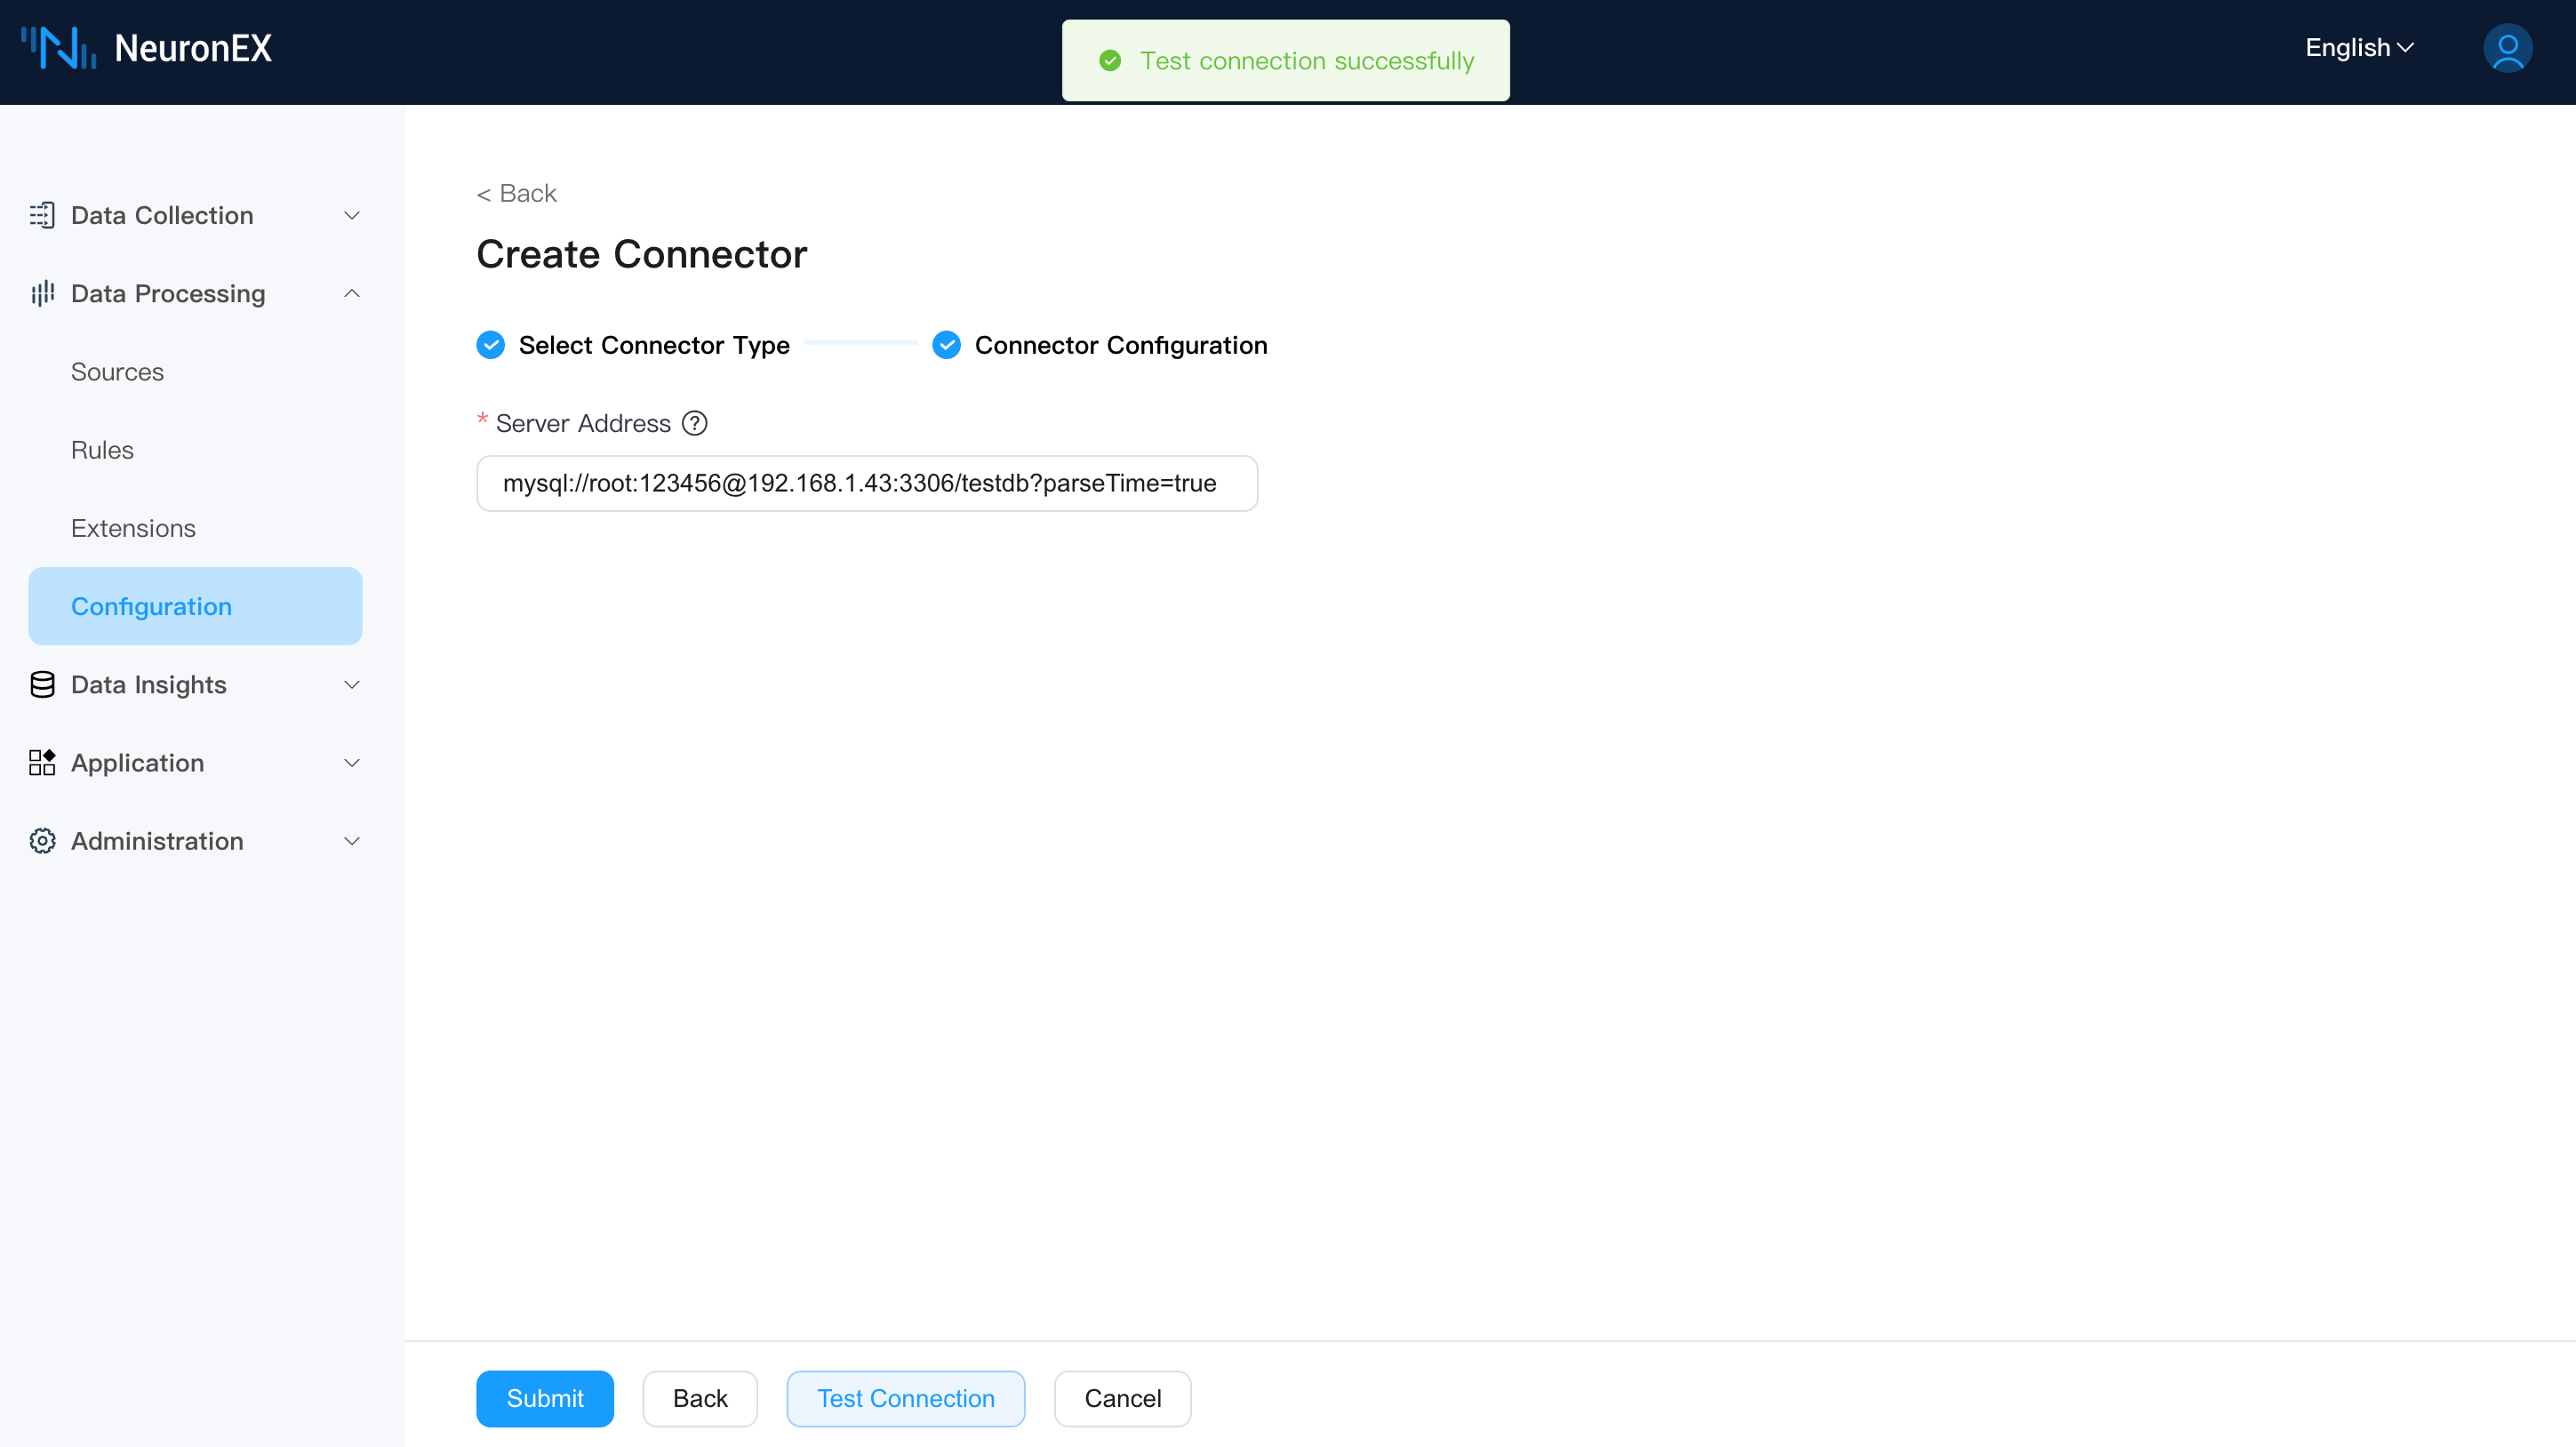
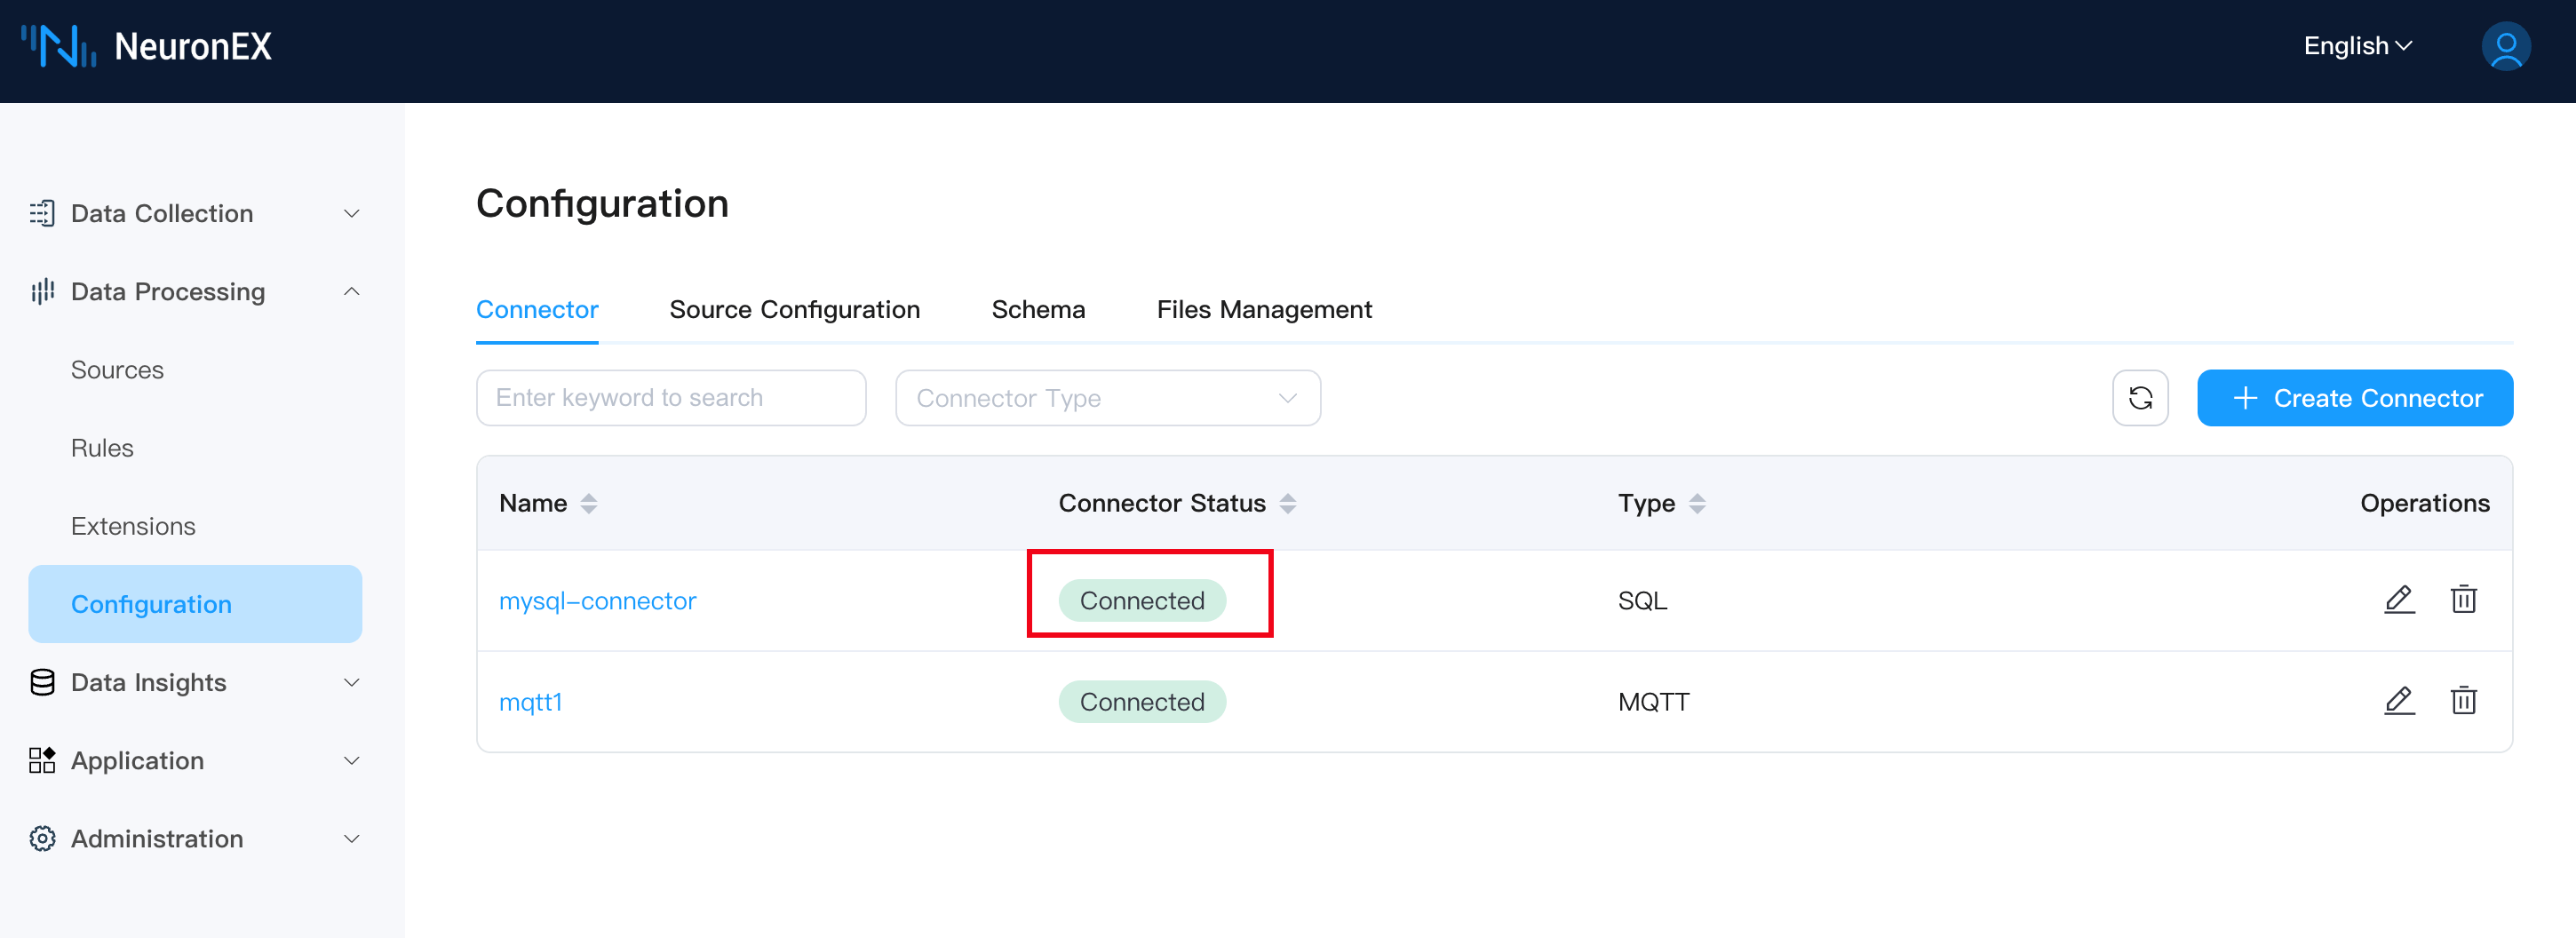
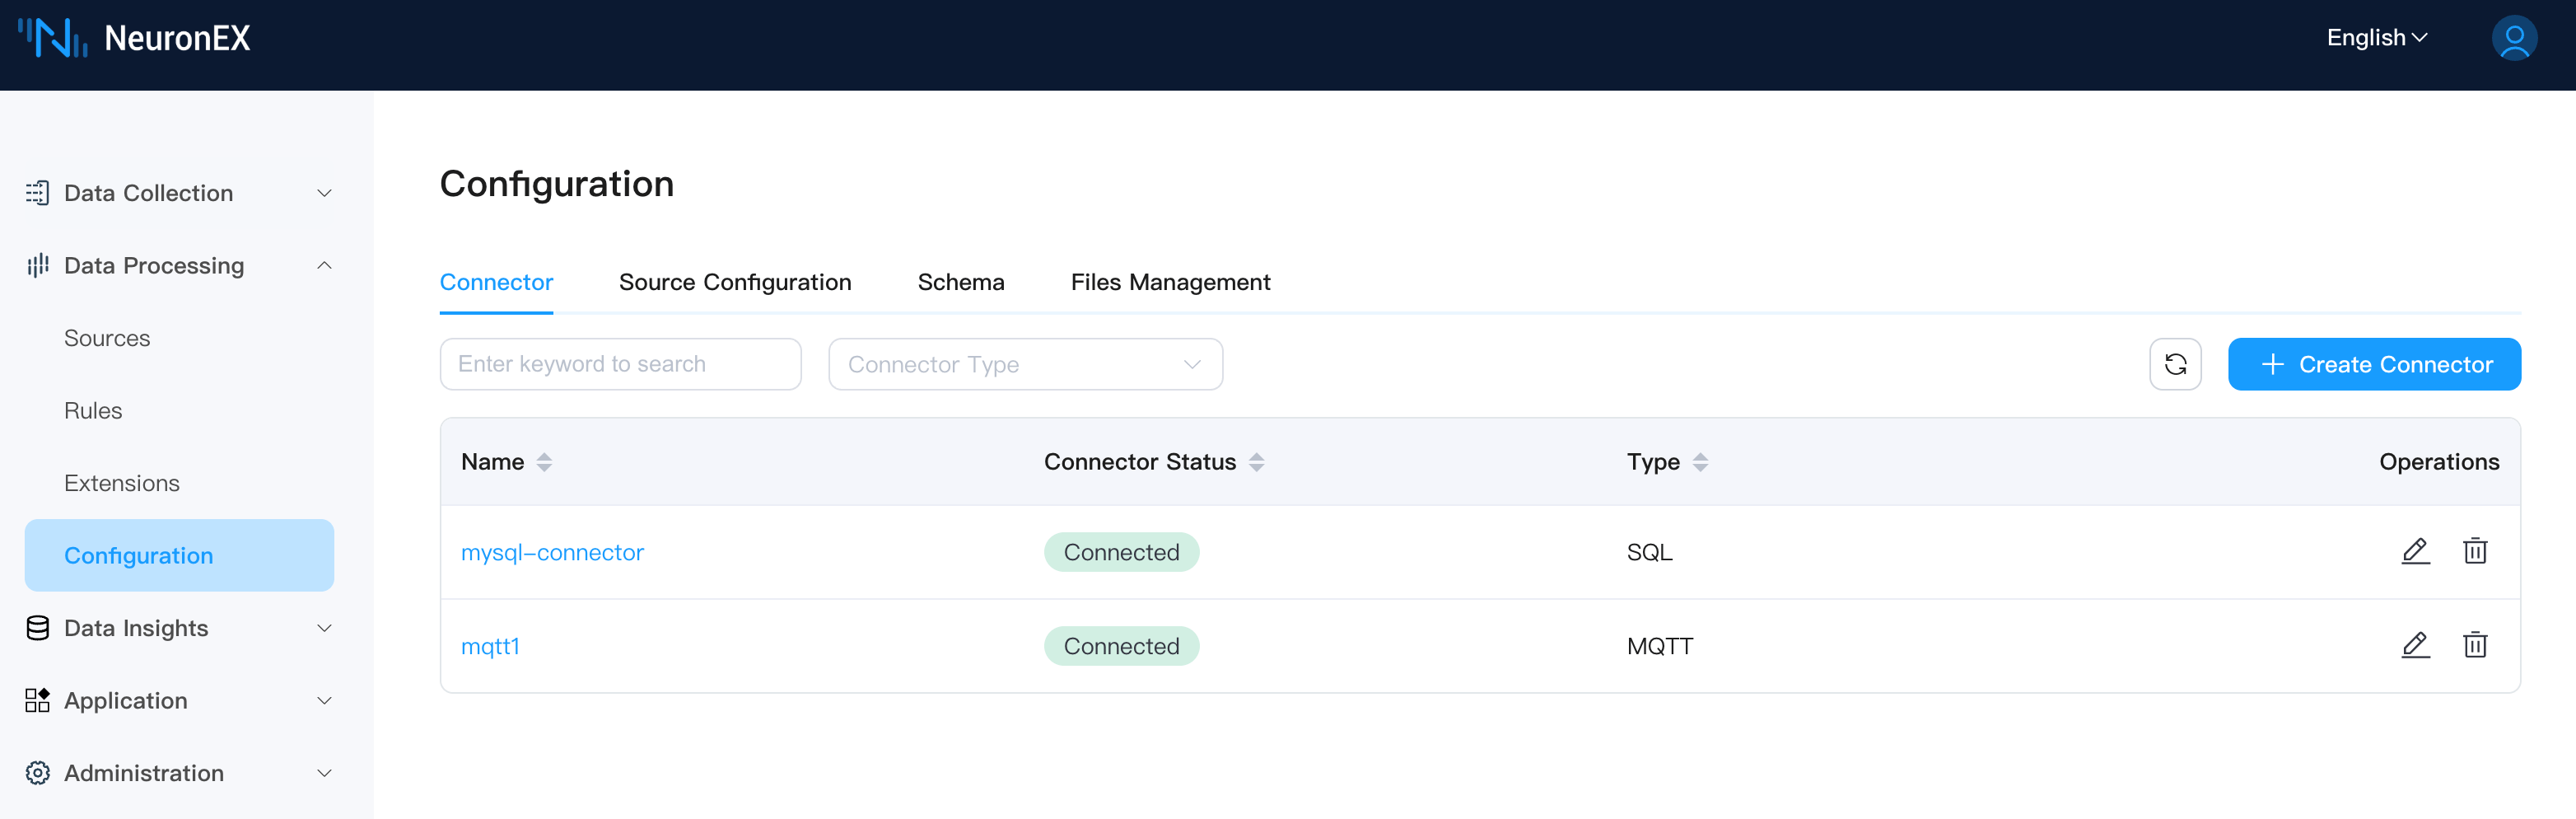
Once the connector is created successfully, the connection status will be Connected.
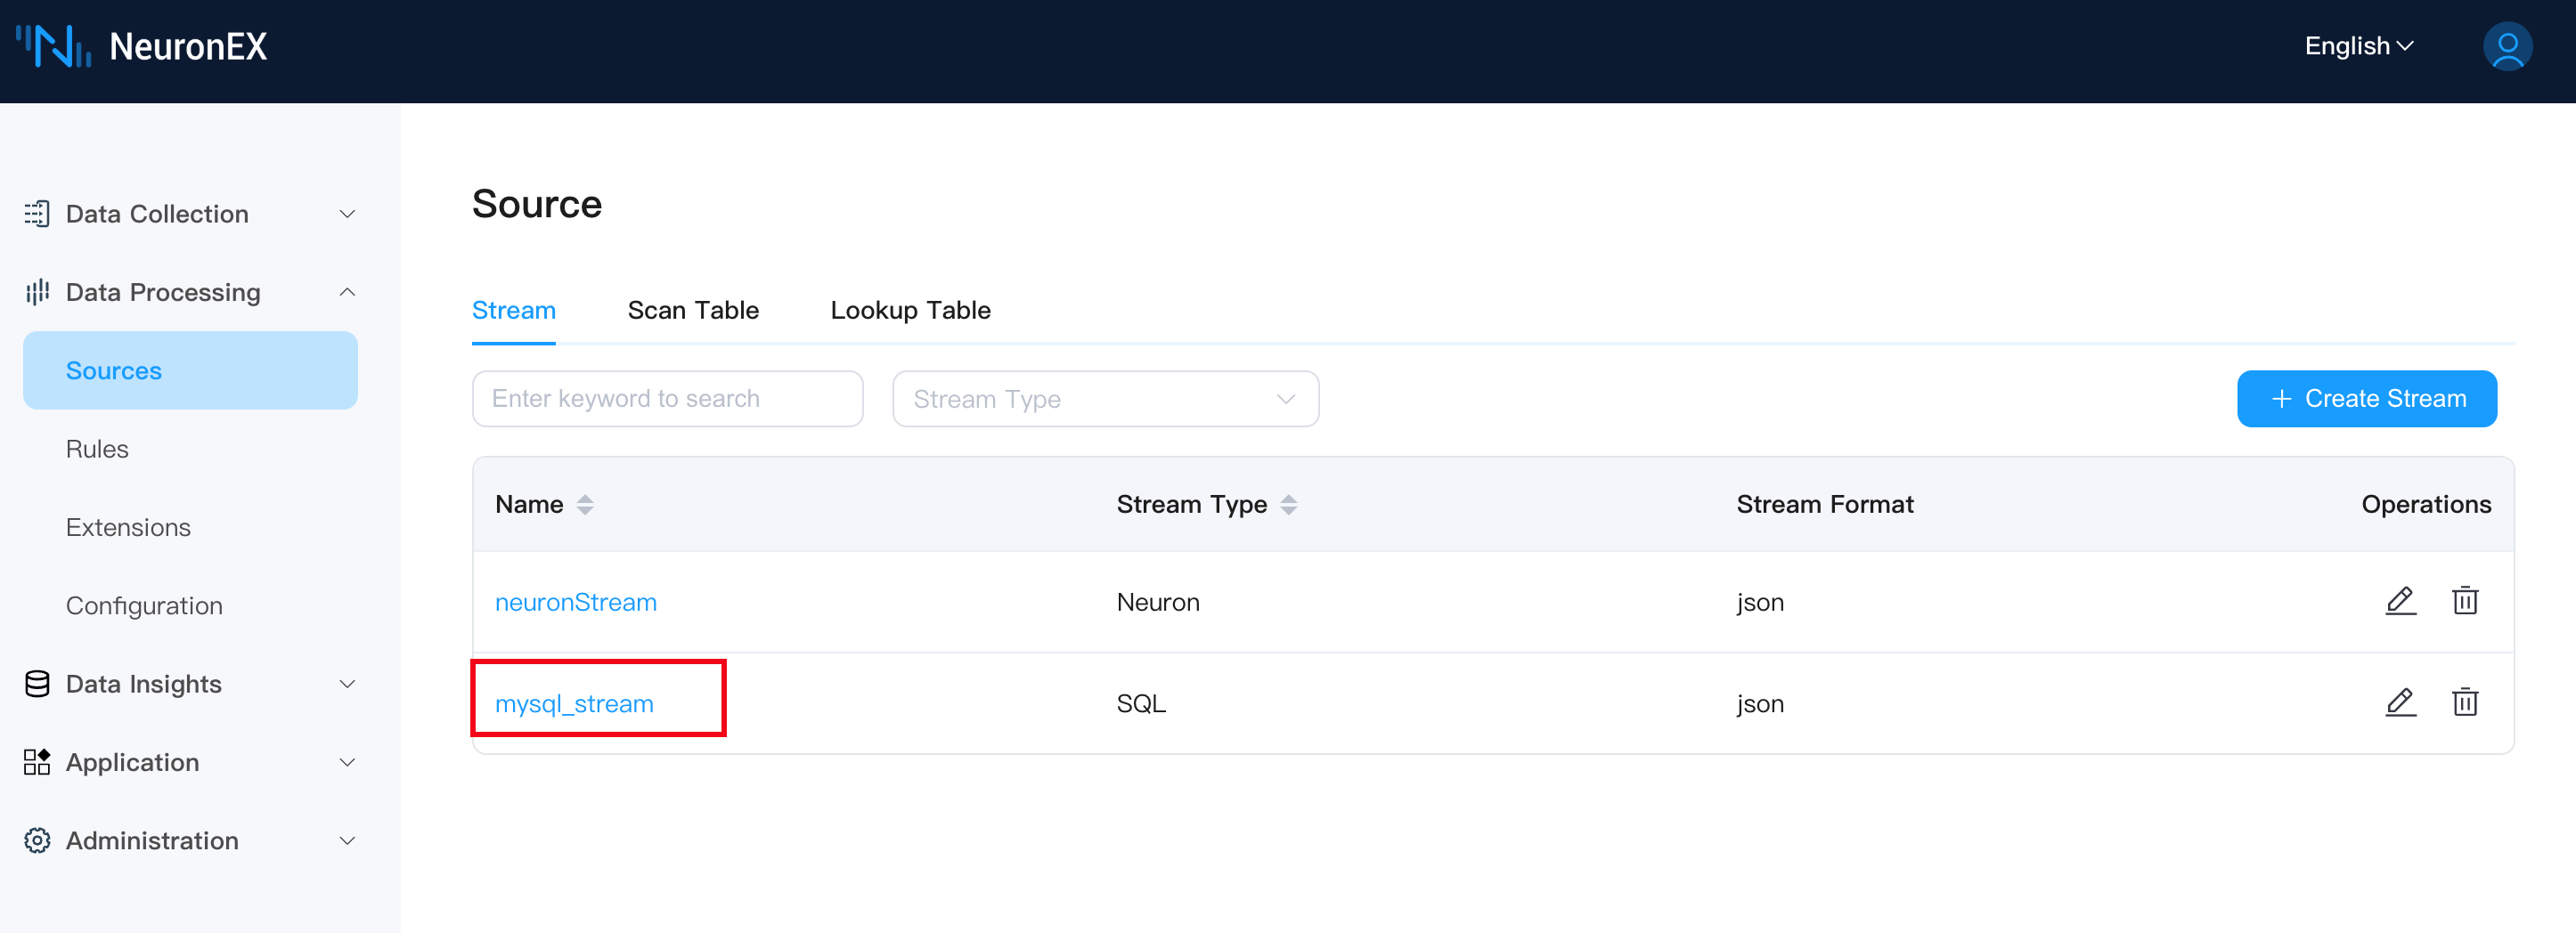
Next, we will create a data source using this connector. On the Data Processing -> Sources page in NeuronEX, click Create Stream, select the SQL source type, and fill in the following information:
- Stream Name:
mysql_stream, or any name you choose. - Source Configuration Group
- Name:
conf1 - Connector:
mysql-connector - Interval:
1s, meaning data is pulled from the database every 1 second. - Query Template:
SELECT * FROM DeviceData;. We'll start with a simple query, which can be modified later.
- Name:
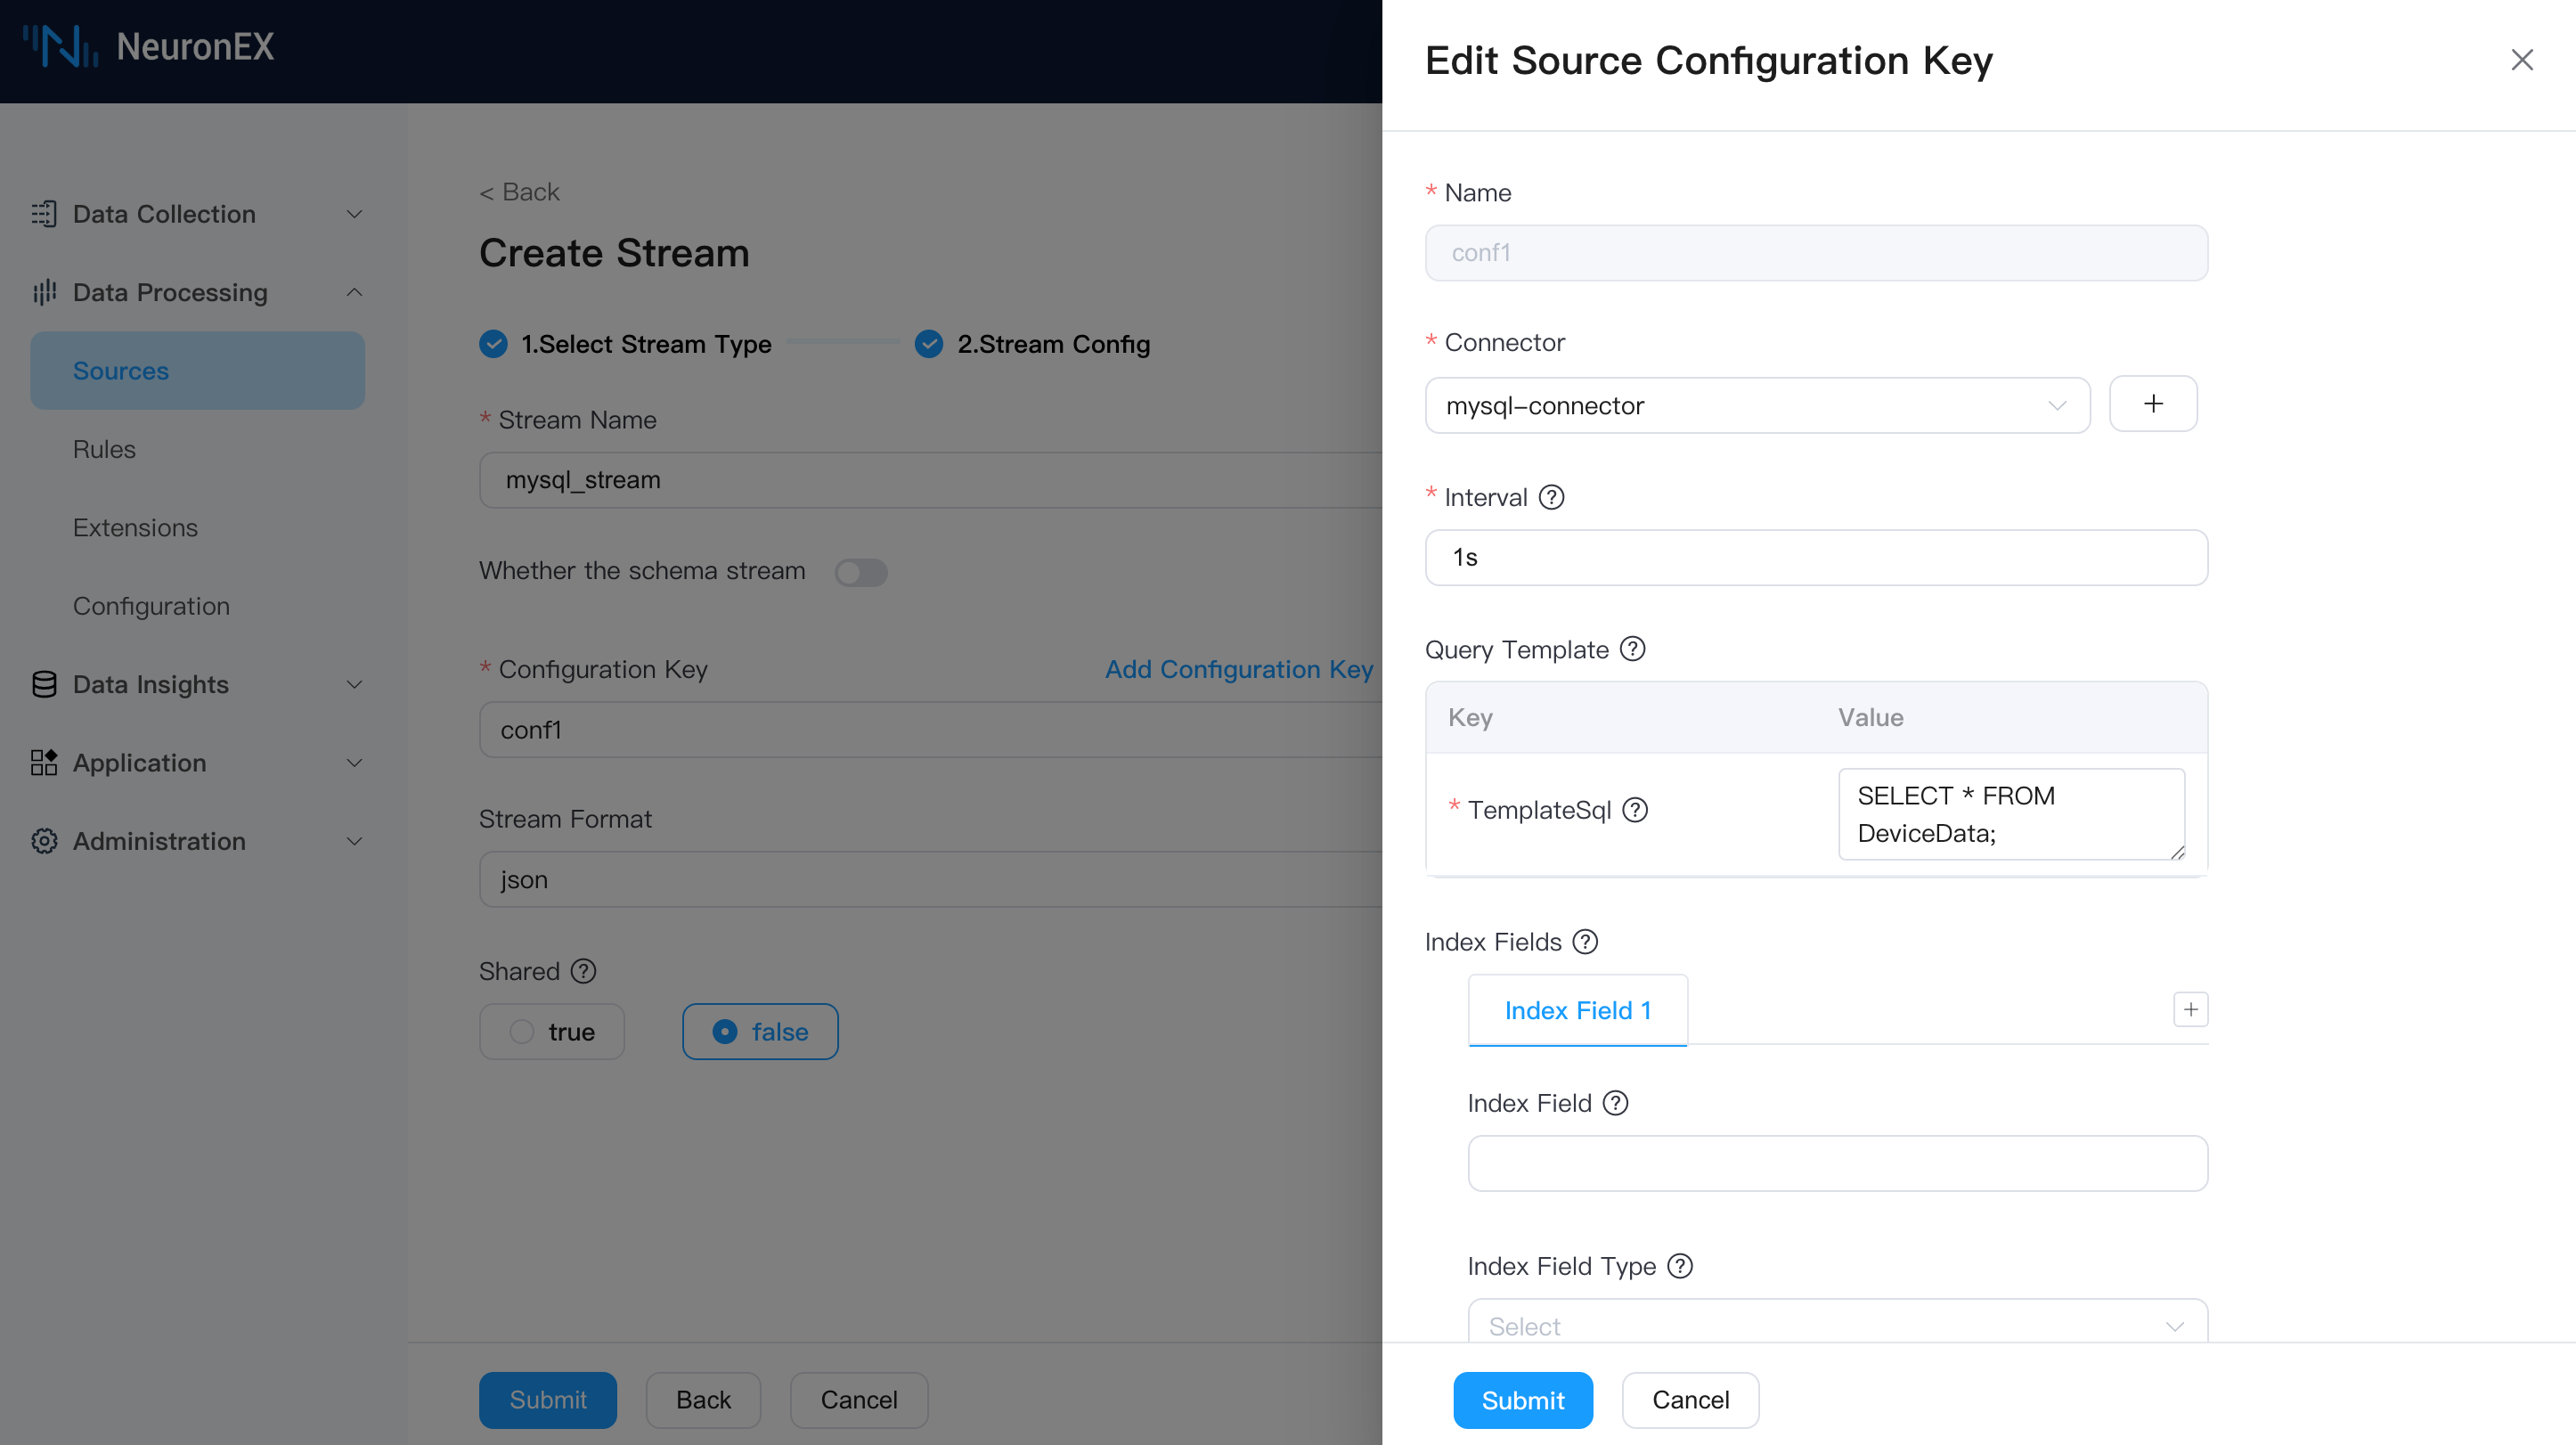
After creation, you will see the newly created mysql_stream on the Source Management page.
Next, on the Data Processing -> Rules page, click Create Rule. In the rule editor, enter the following SQL and click the Run Test button. You will see the data fetched from MySQL.
Once we configure the MQTT Sink later, the JSON formatted data displayed in the rule testing can be sent to EMQX.
SELECT
  *
FROM
  mysql_stream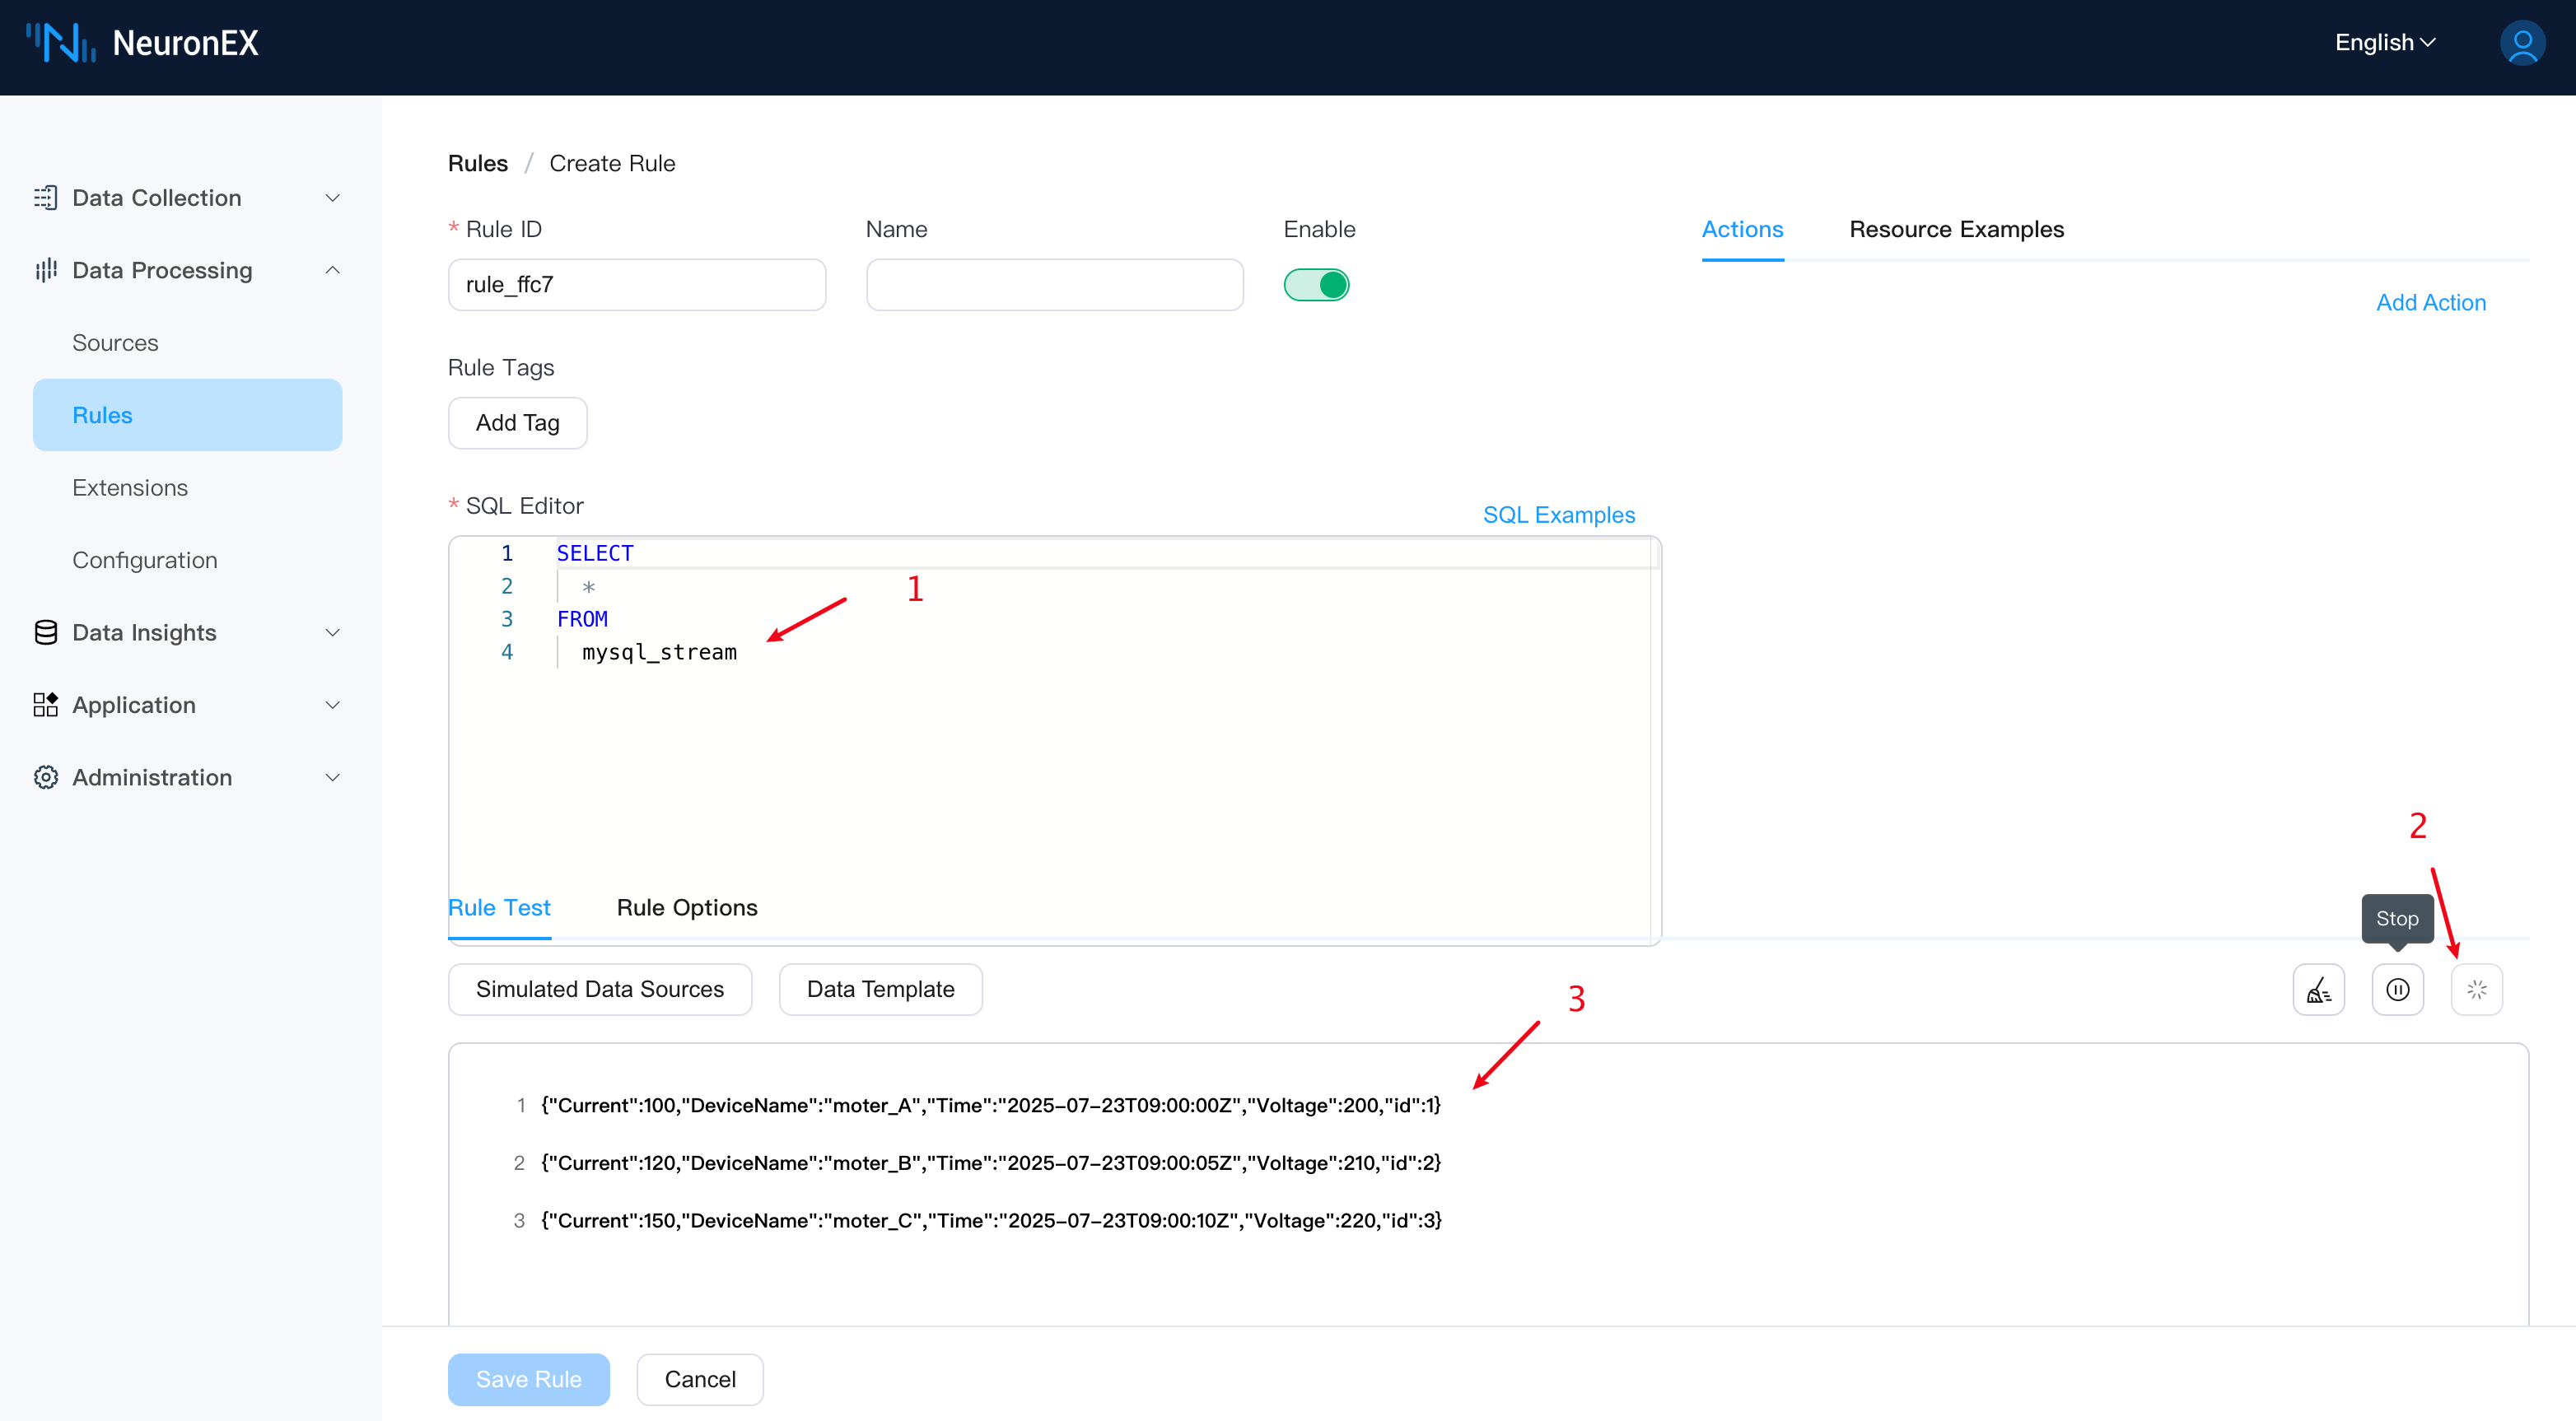
Step 3: Implement Incremental Query via Auto-Increment ID Field
In our MySQL table, the id field is auto-incrementing, so we can use it to perform incremental queries. This means NeuronEX will start each query from where the last one ended, achieving incremental data fetching.
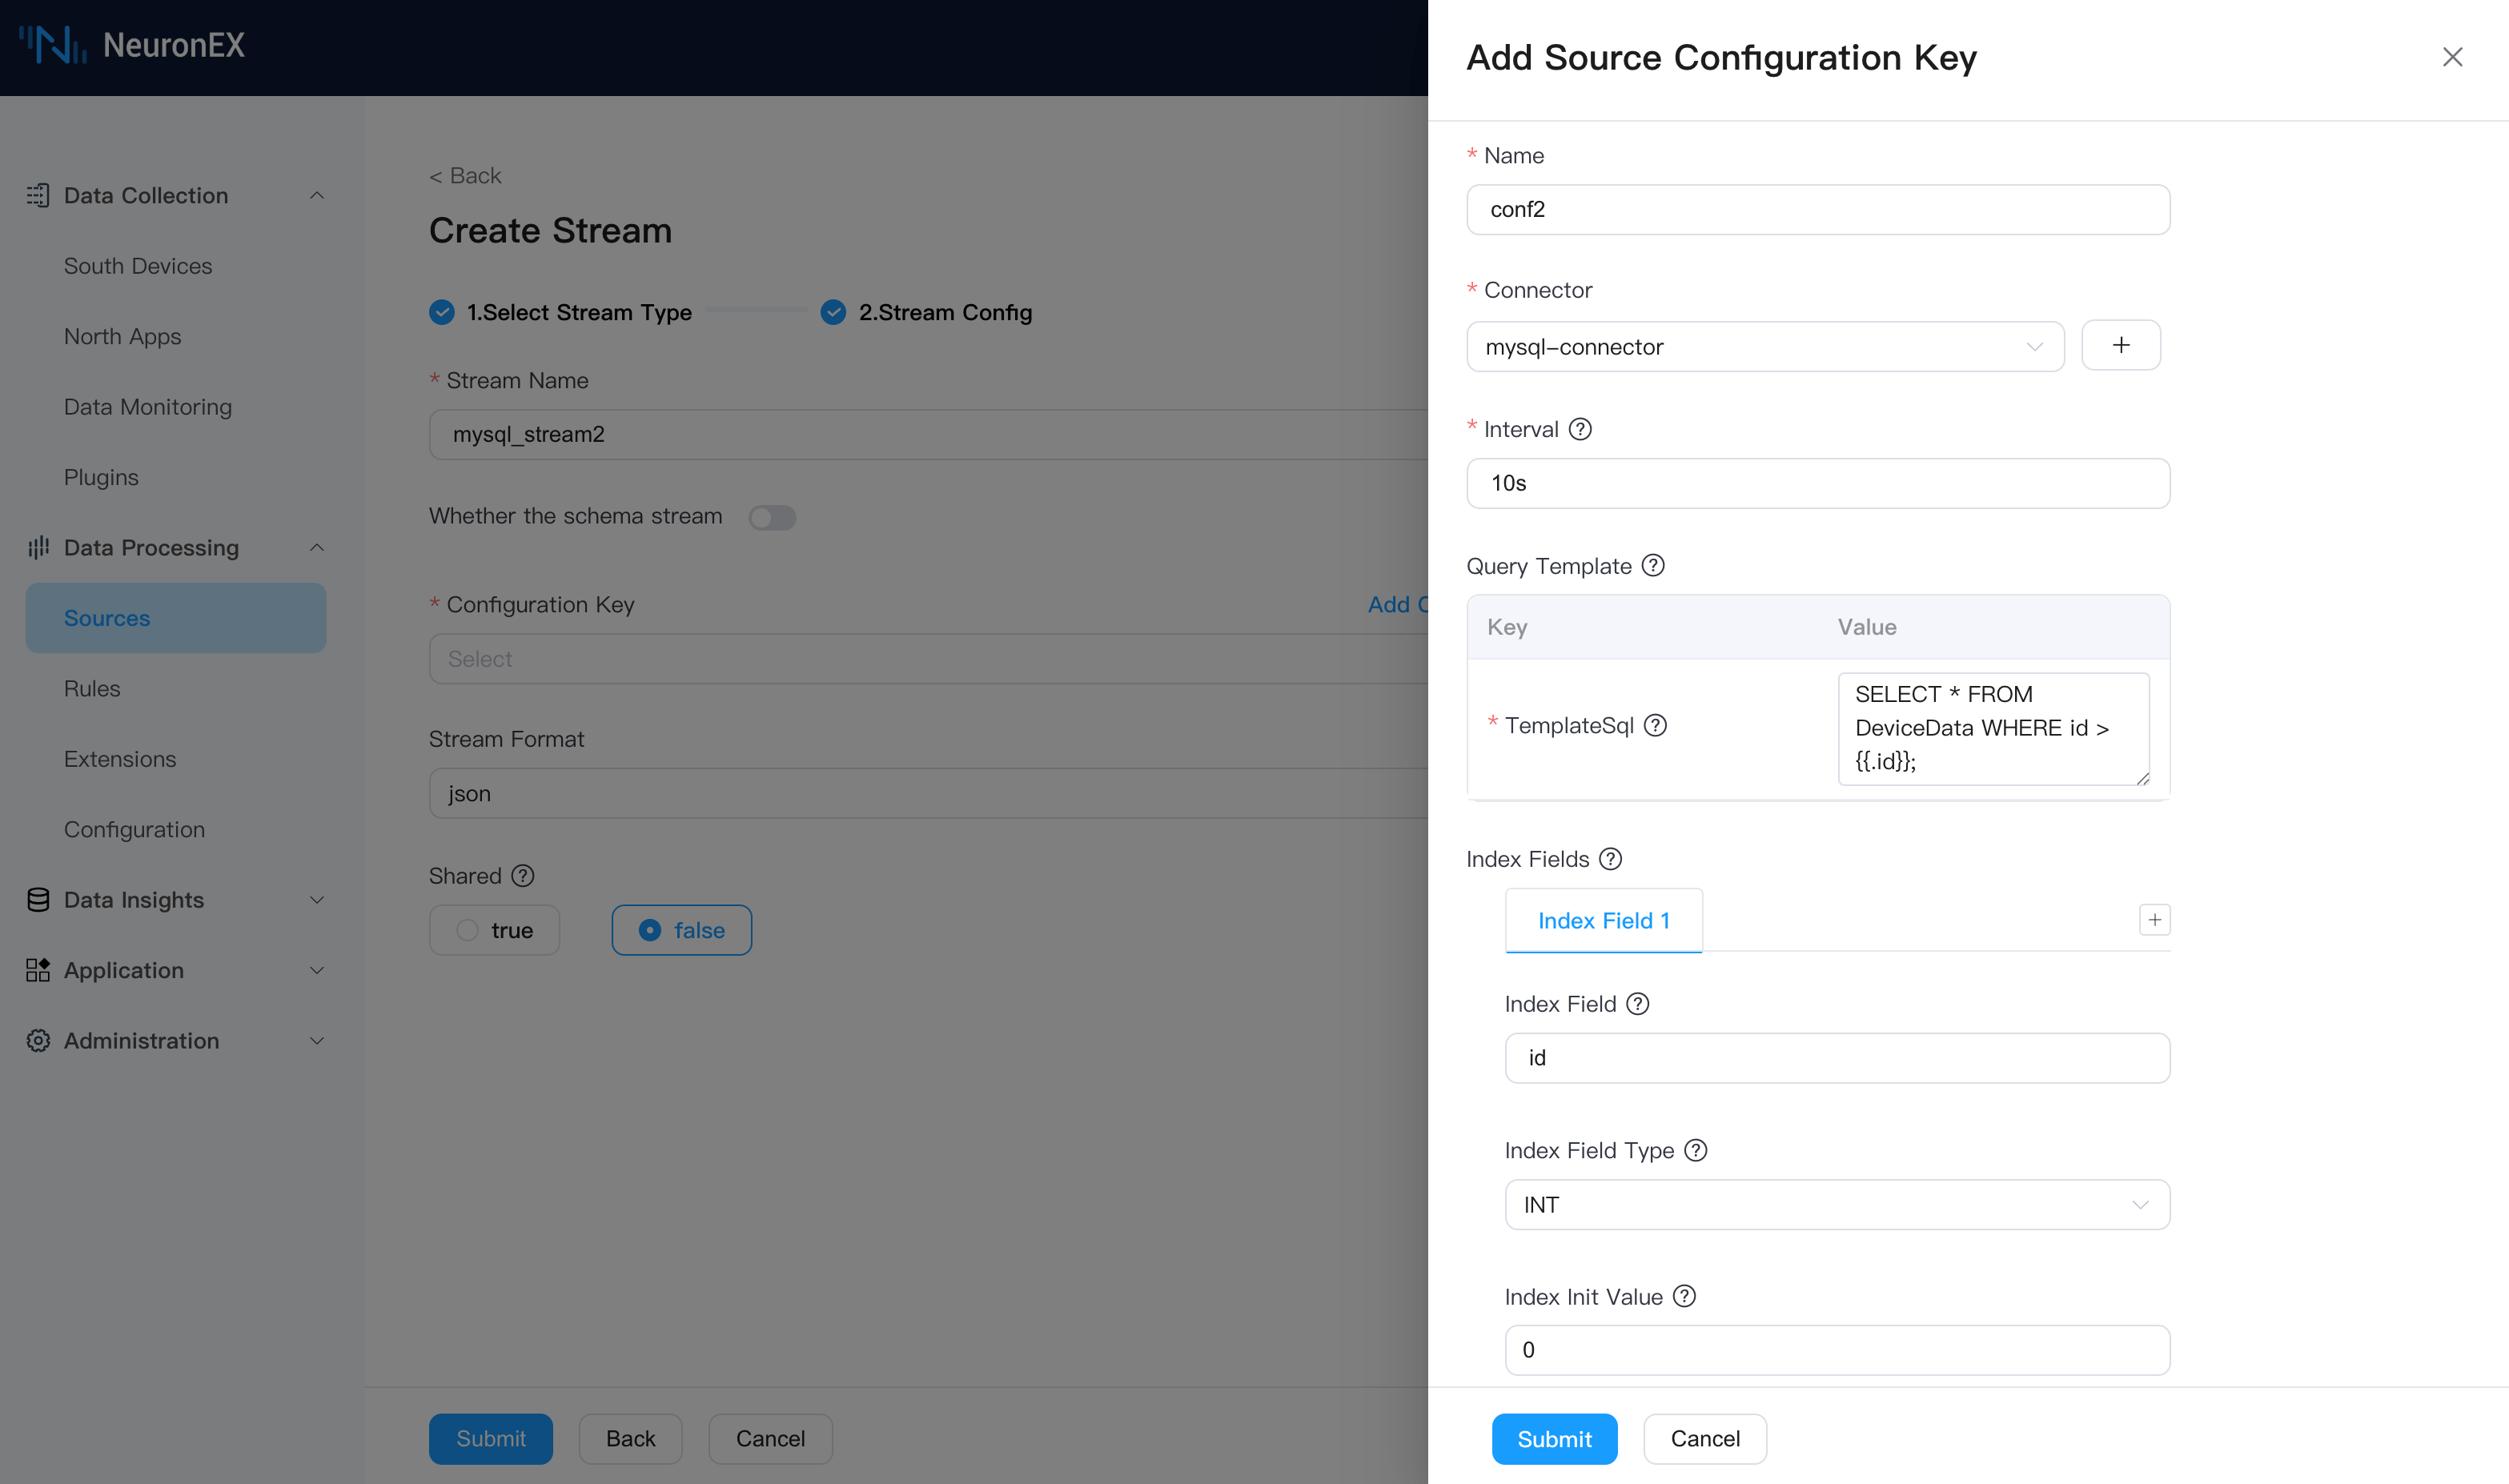
We will use the previously created mysql-connector. On the Data Processing -> Sources page, click Create Stream, select the SQL source type, and fill in the following:
Stream Name:
mysql_stream2, or any name.Source Configuration Group
- Name:
conf2, or any name. - Connector:
mysql-connector. - Interval:
10s. - Query Template: Use
.idto represent theidof the last record from the previous query.
sqlSELECT * FROM DeviceData WHERE id > {{.id}};- Index Field:
id. - Index Field Type:
INT. - Index Init Value:
0.
- Name:
With this configuration, go to the Data Processing -> Rules page, create a new rule, and enter the following SQL. When you debug, you'll see the fetched data. You will notice that if no new data is written to the DeviceData table, NeuronEX will not pull any duplicate data.
SELECT
  *
FROM
  mysql_stream2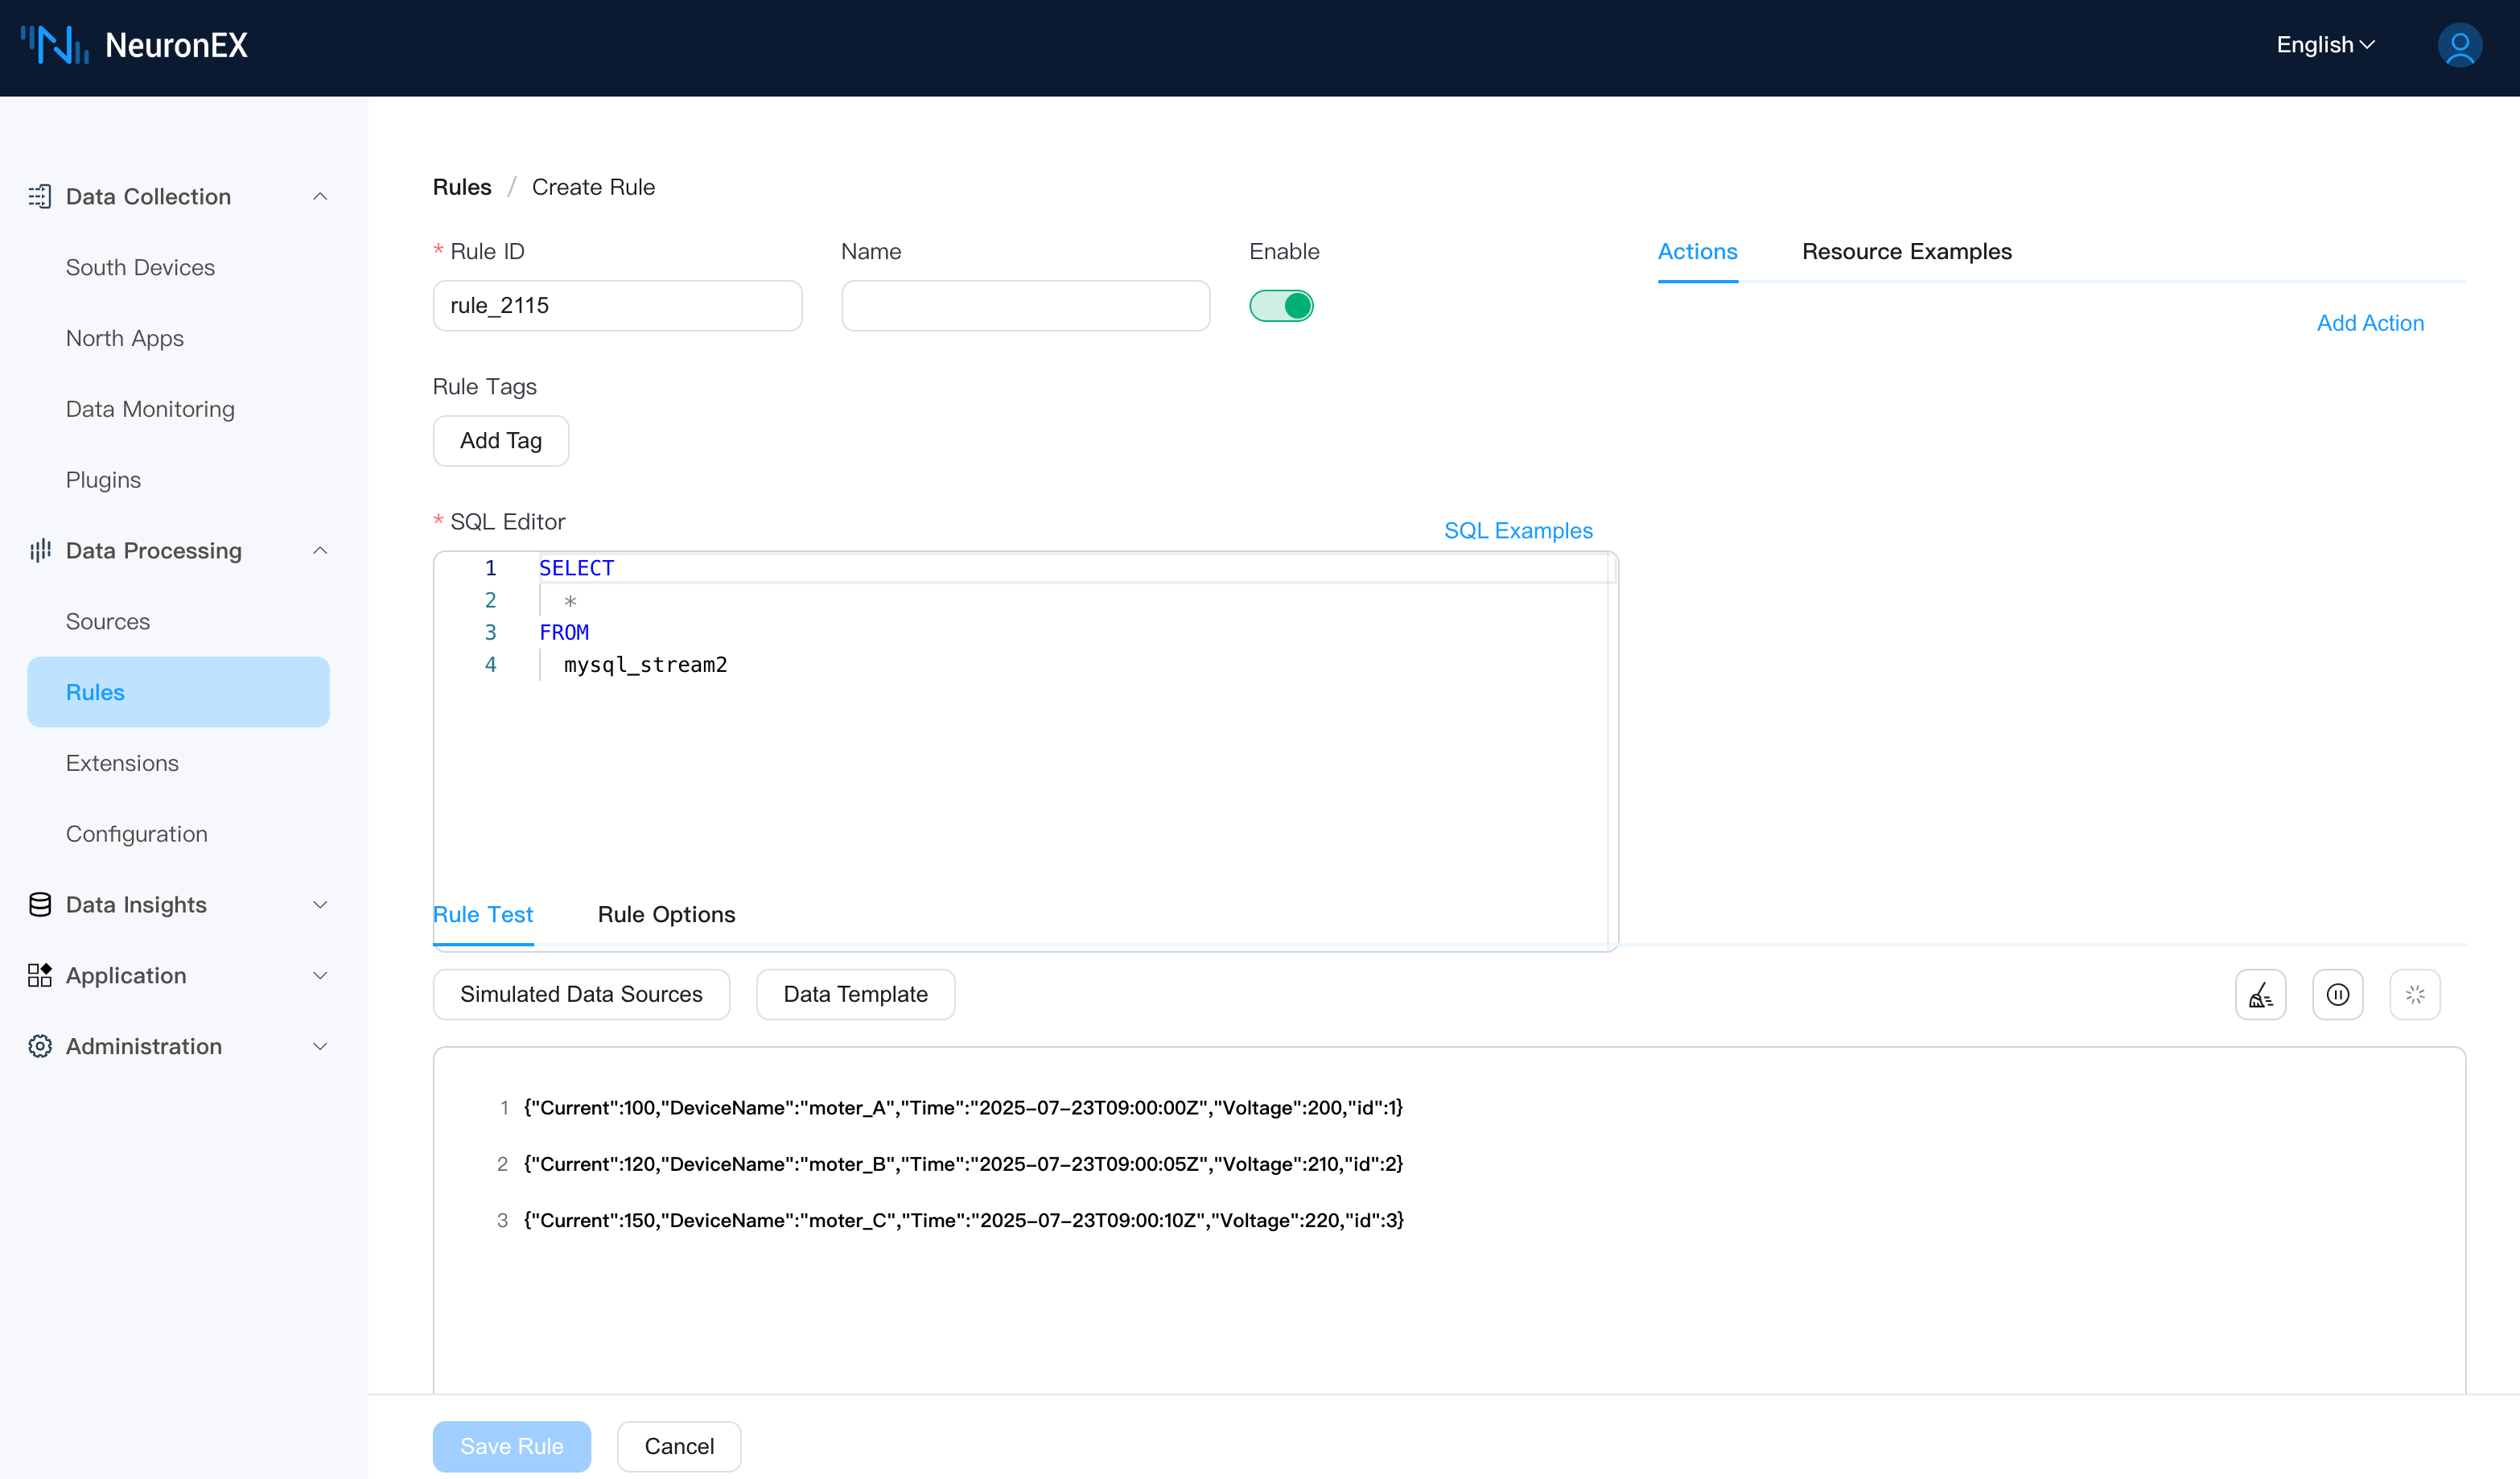
Now, insert a new record into the DeviceData table. NeuronEX will automatically fetch this new data and update the index value.
INSERT INTO DeviceData (Time, DeviceName, Current, Voltage) VALUES ('2025-07-23 09:00:15', 'moter_A', 150, 220);In the rule testing, you will see that NeuronEX has fetched this new record (without stopping the rule testing).
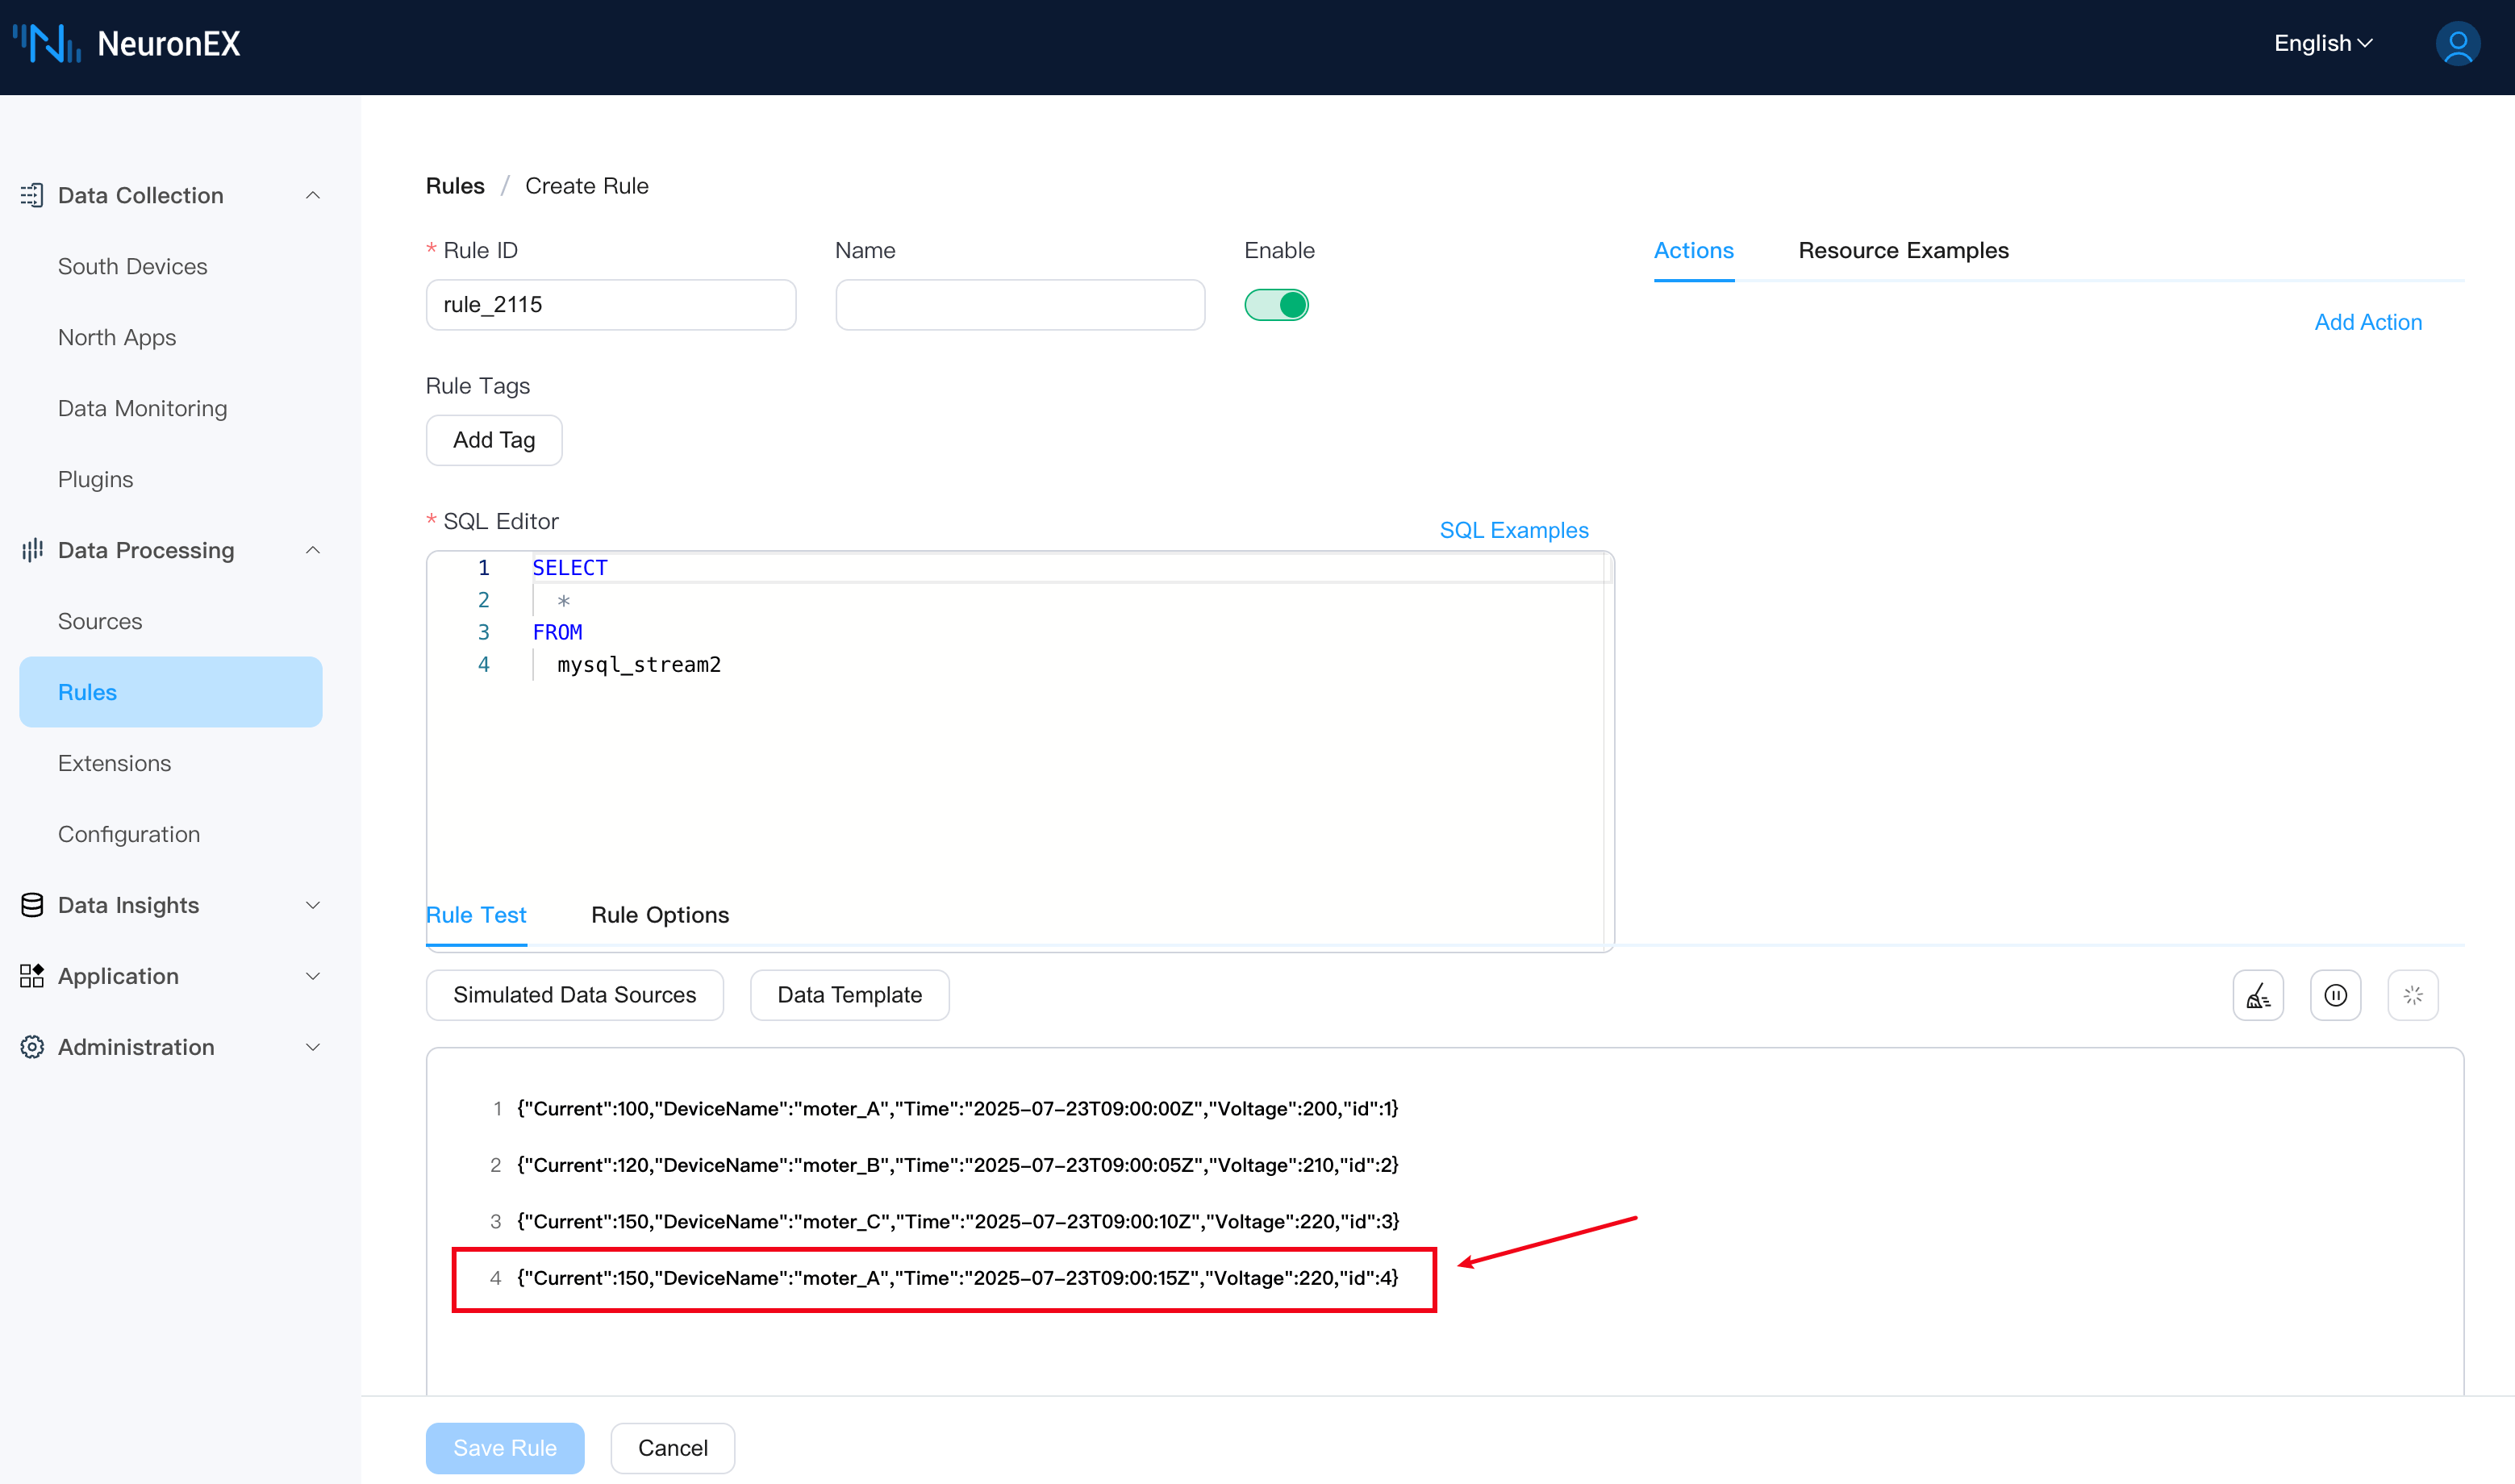
Through these steps, we've implemented incremental querying using an auto-incrementing id.
By combining Index Field, Index Field Type, and Index Init Value, NeuronEX efficiently performs incremental polling. It remembers the maximum id from the last query and only pulls new data with a larger id in the next query, significantly reducing database load and network overhead.
In practical applications, you can combine this data pulling with NeuronEX's powerful stream processing functions for more complex data cleaning, format conversion, or aggregation.
Step 4: Implement Incremental Query via Timestamp Field
Besides using an auto-incrementing ID, we can also use a timestamp field for incremental queries.
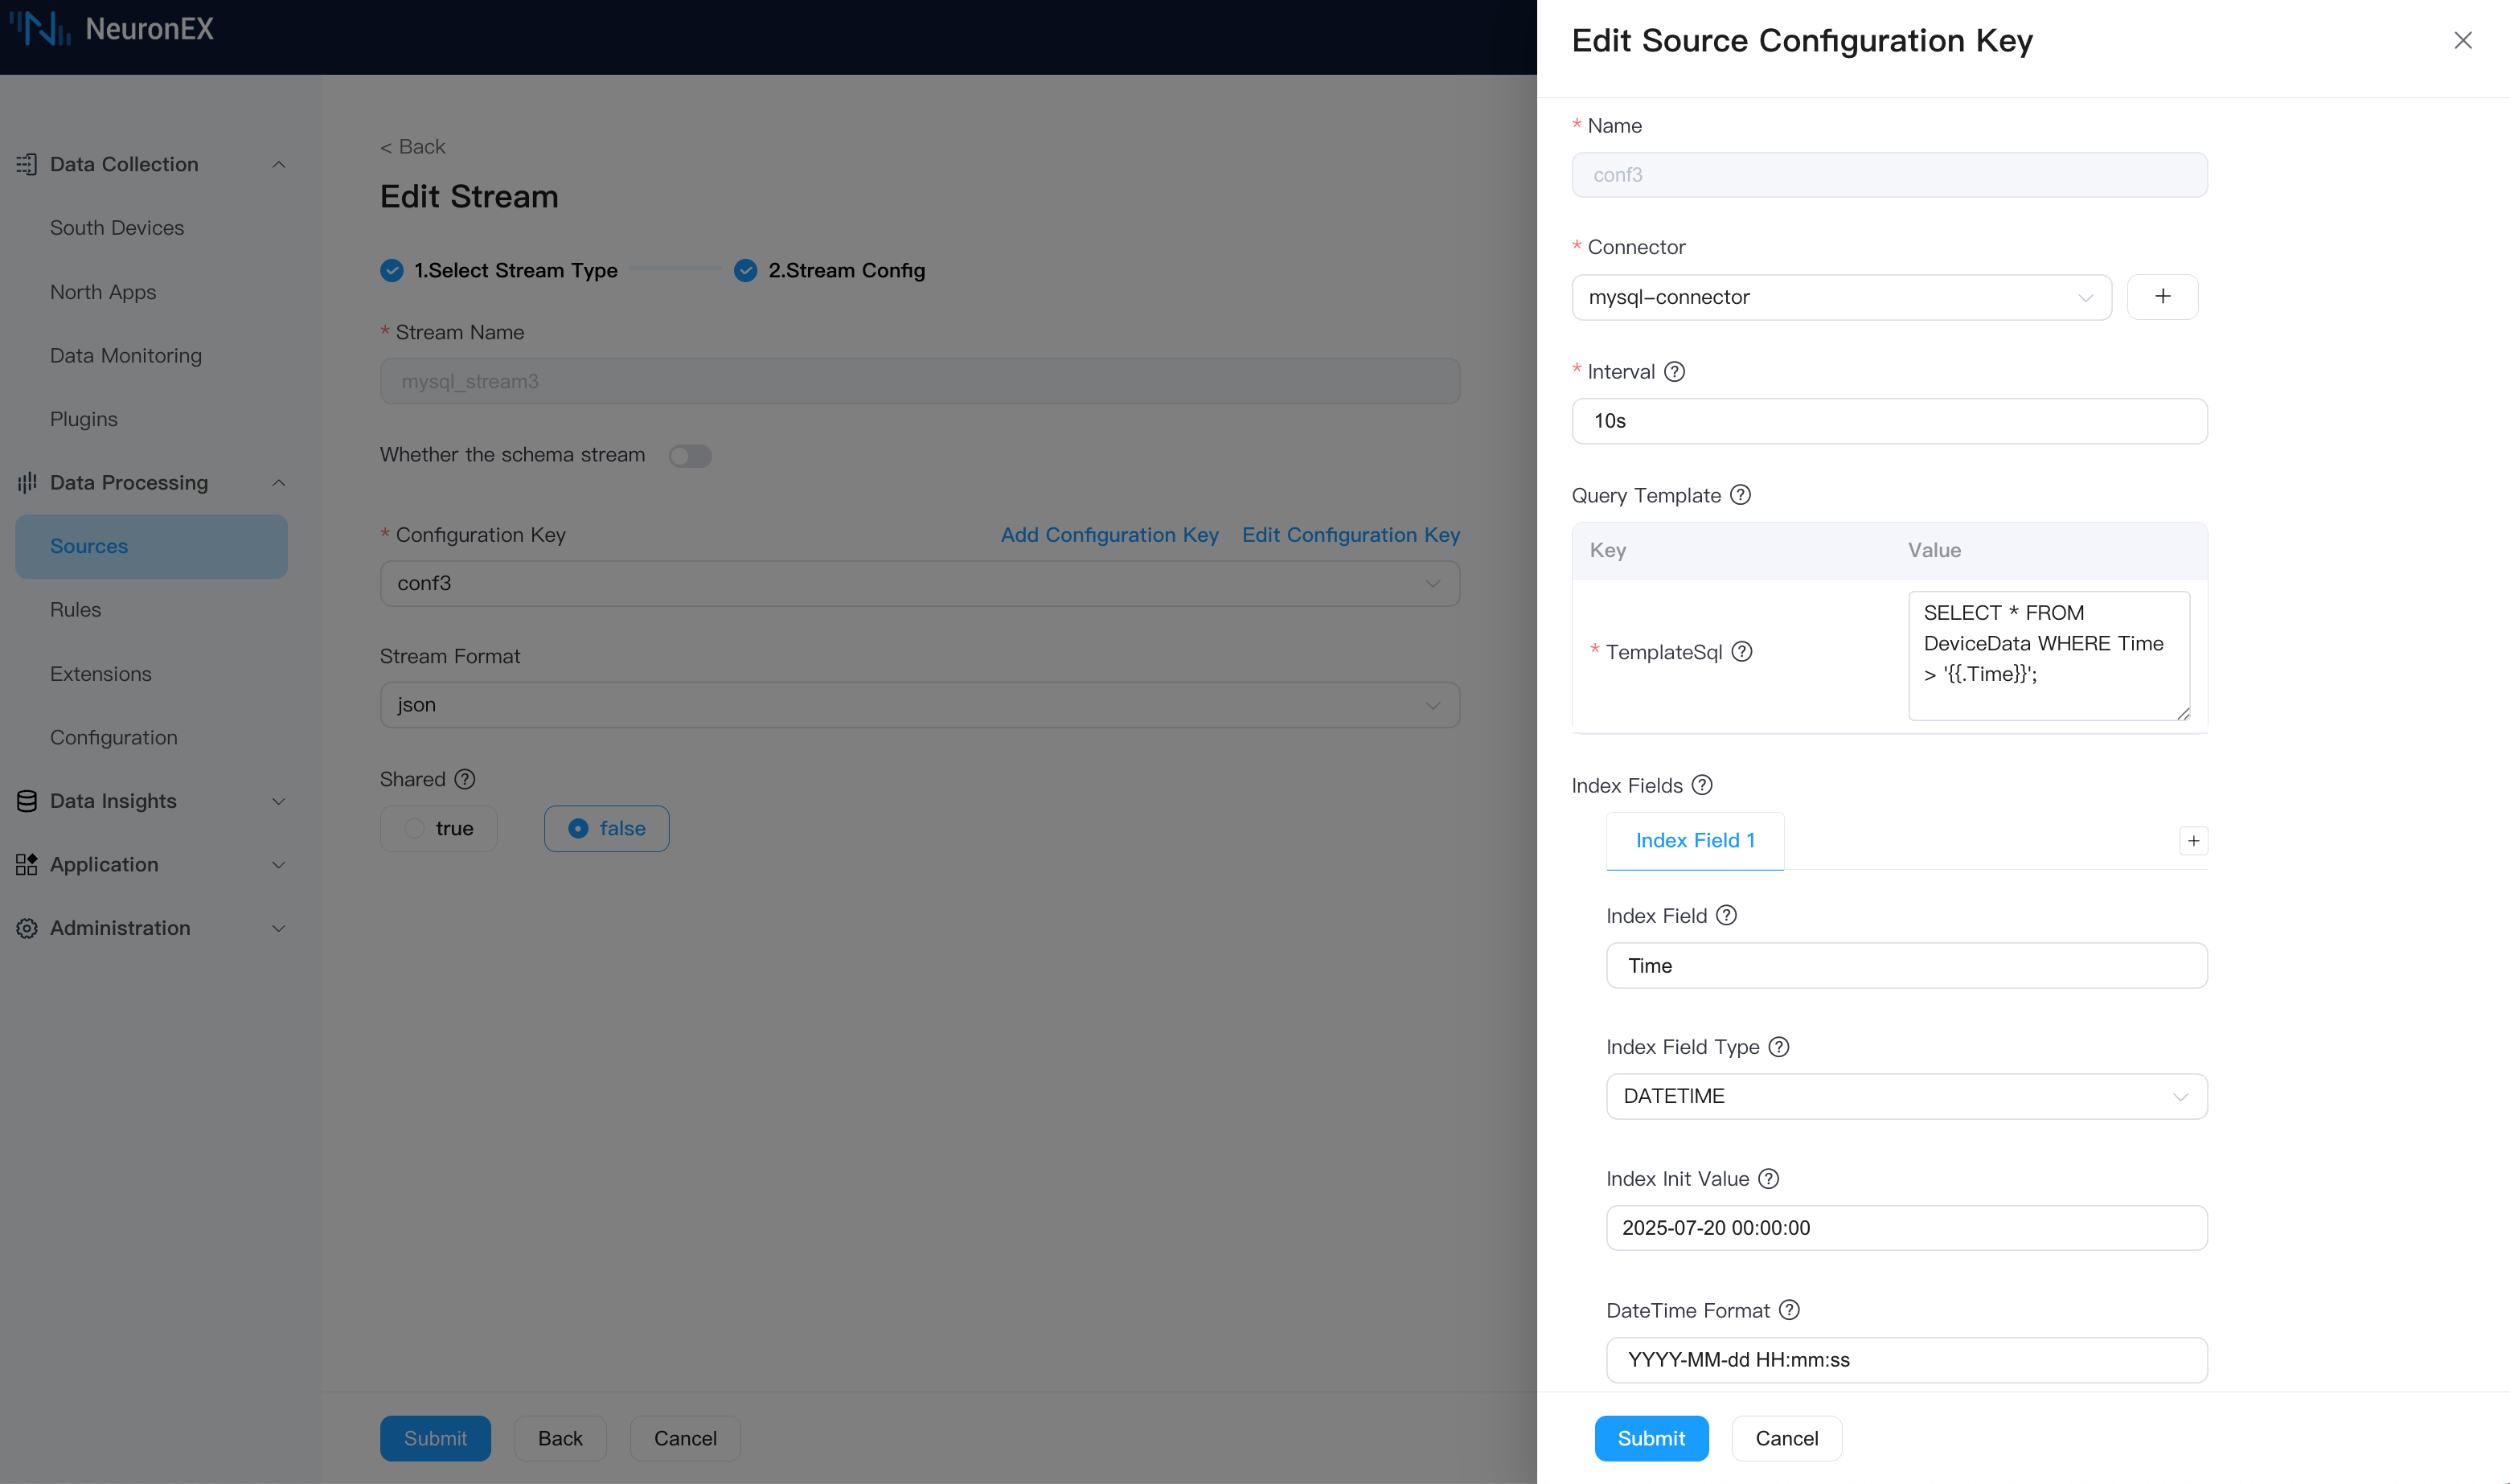
Again, using the mysql-connector, go to Data Processing -> Sources, click Create Stream, and configure as follows:
Stream Name:
mysql_stream3.Source Configuration Group
- Name:
conf3. - Connector:
mysql-connector. - Interval:
10s. - Query Template: Use
.Timeto represent theTimeof the last record.
sqlSELECT * FROM DeviceData WHERE Time > '{{.Time}}';- Index Field:
Time. - Index Field Type:
DATETIME. - Index Init Value:
2025-07-20 00:00:00. - DateTime Format:
YYYY-MM-dd HH:mm:ss.
- Name:
With this setup, create a new rule and debug it. Again, you will notice that NeuronEX does not pull duplicate data if there are no new entries in the DeviceData table.
SELECT
  *
FROM
  mysql_stream3
Now, insert a new record with a timestamp of 2025-07-23 09:00:20.
INSERT INTO DeviceData (Time, DeviceName, Current, Voltage) VALUES ('2025-07-23 09:00:20', 'moter_B', 333, 555);The rule testing will show that NeuronEX has fetched this new record.
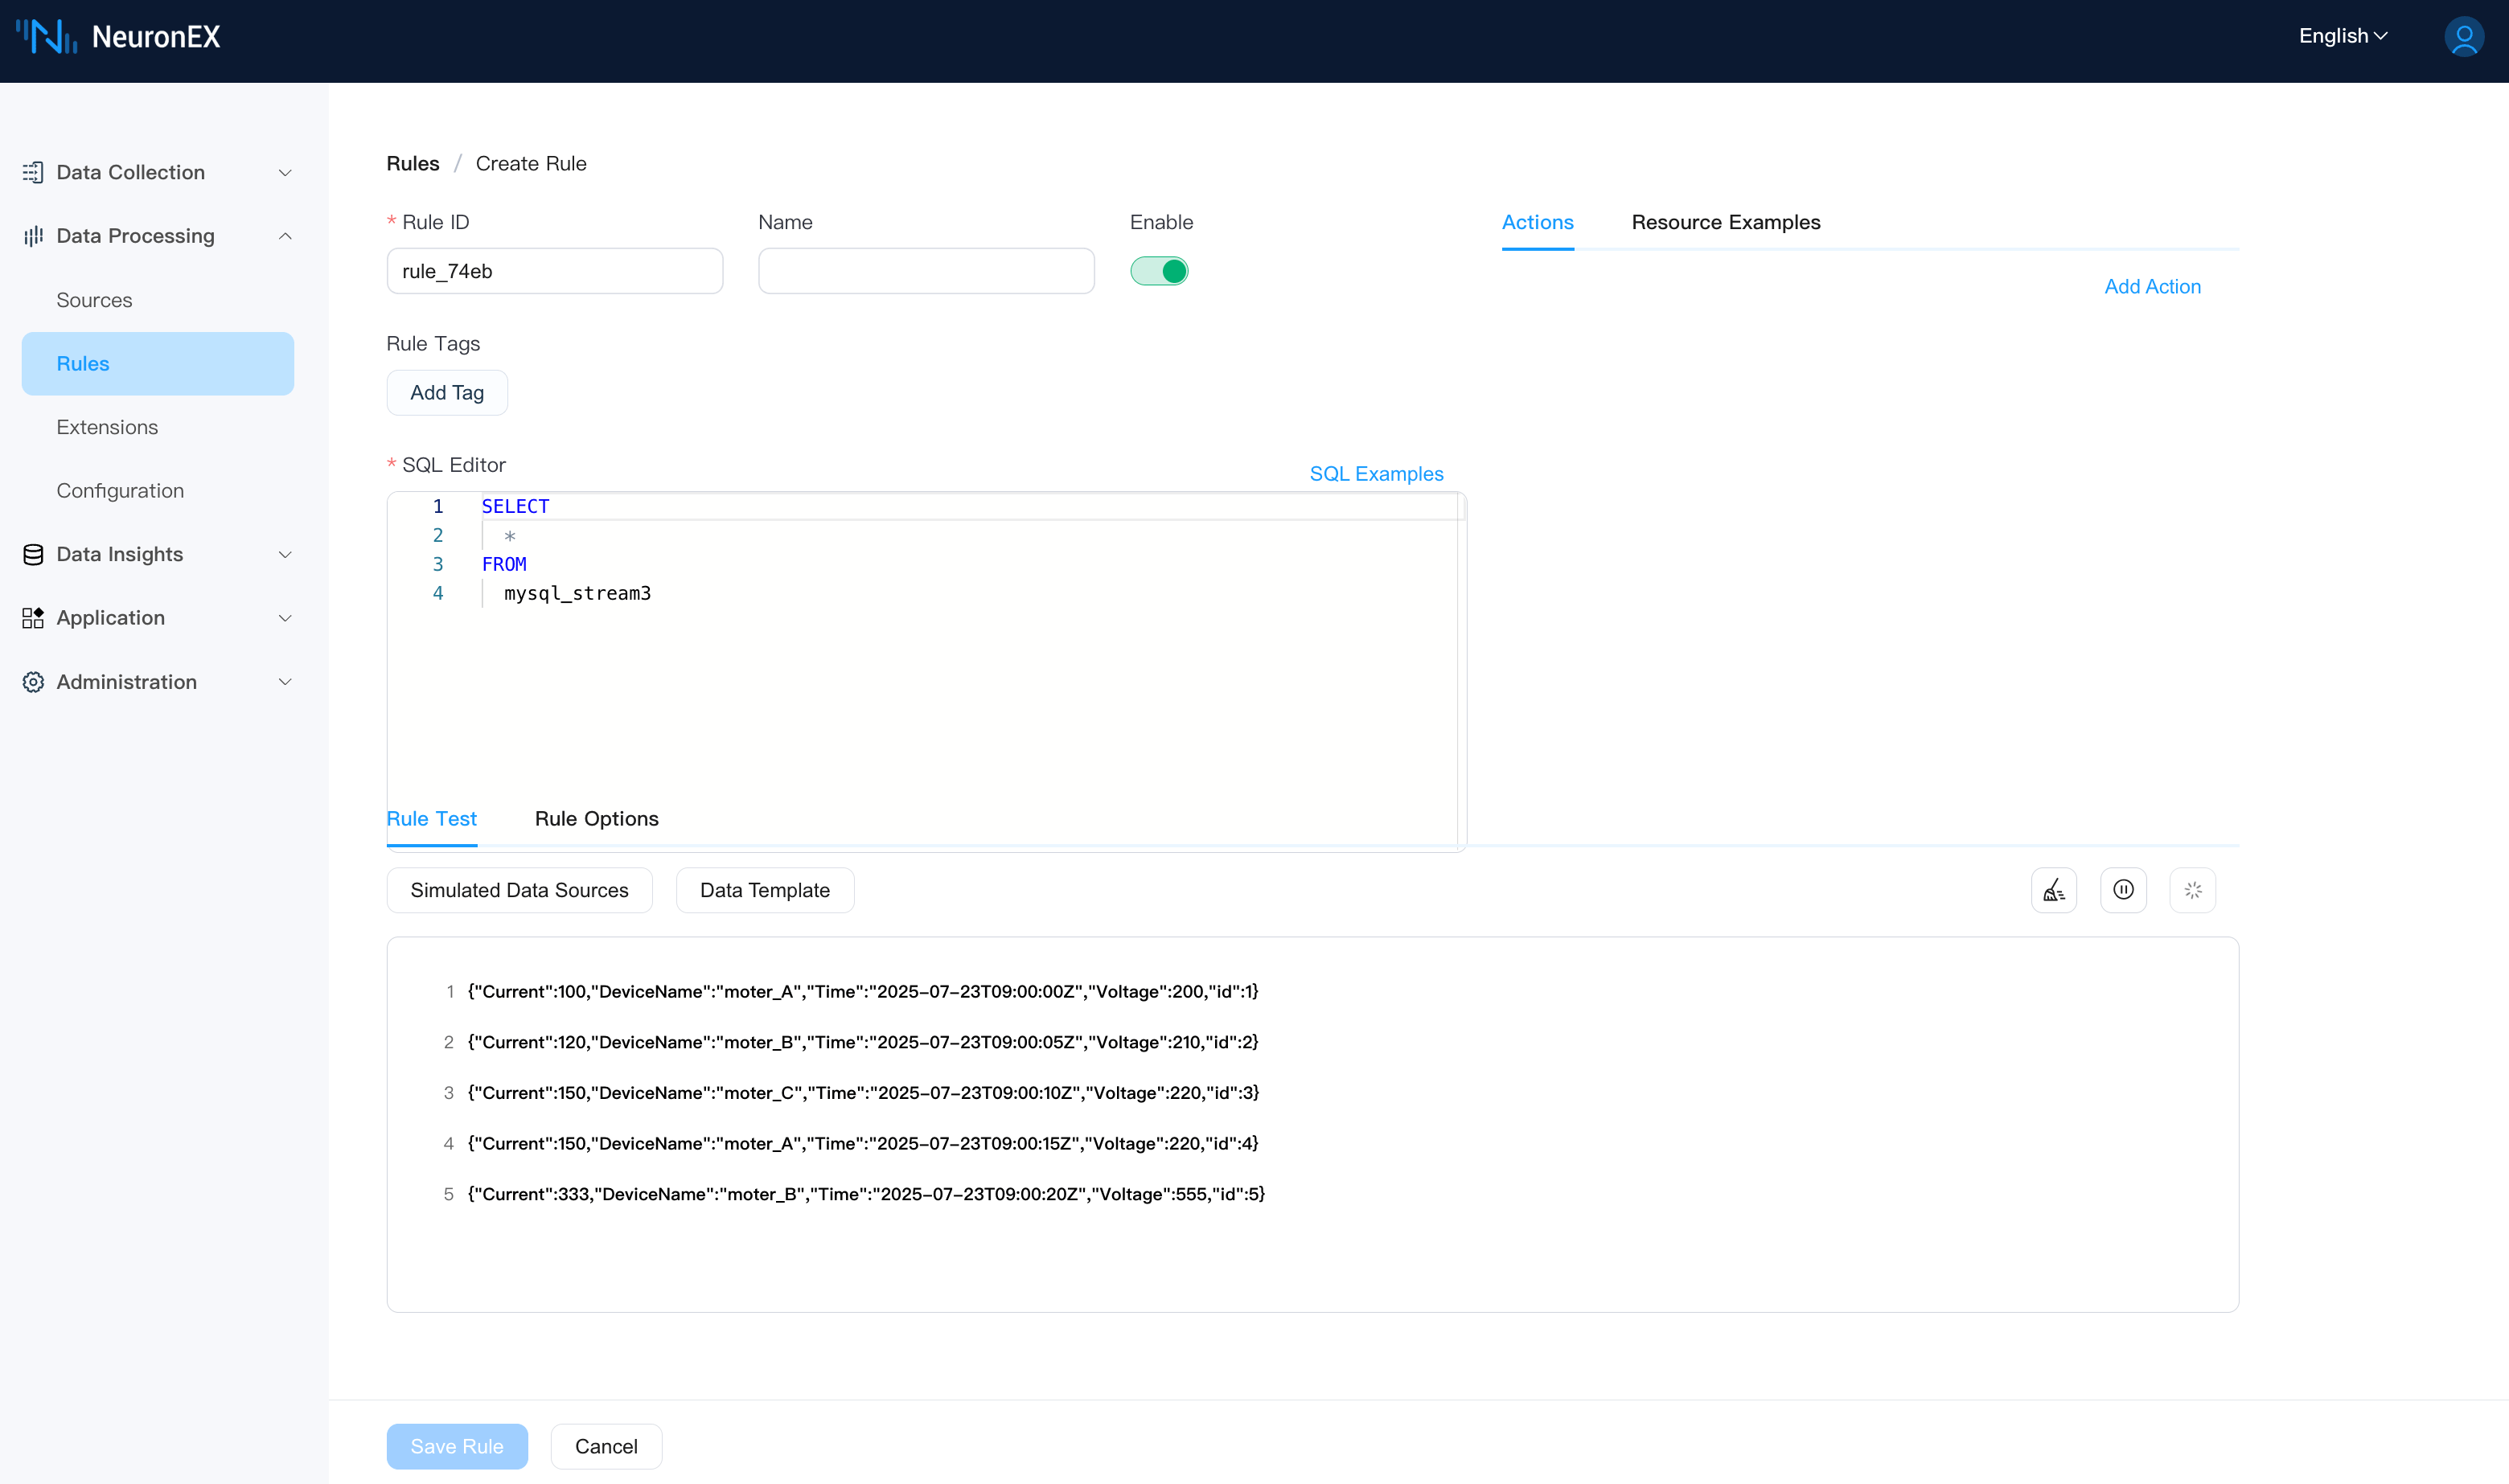
This demonstrates how to achieve efficient incremental polling using a timestamp field by combining Index Field, Index Field Type, Index Init Value, and DateTime Format.
Step 5: Configure MQTT Sink to Forward Data to EMQX
First, we need to create an MQTT connector. On the Data Processing -> Configuration page, create a new connector, select MQTT, and fill in the following:
- Broker Address:
tcp://broker.emqx.io:1883. Other fields can be left as default.
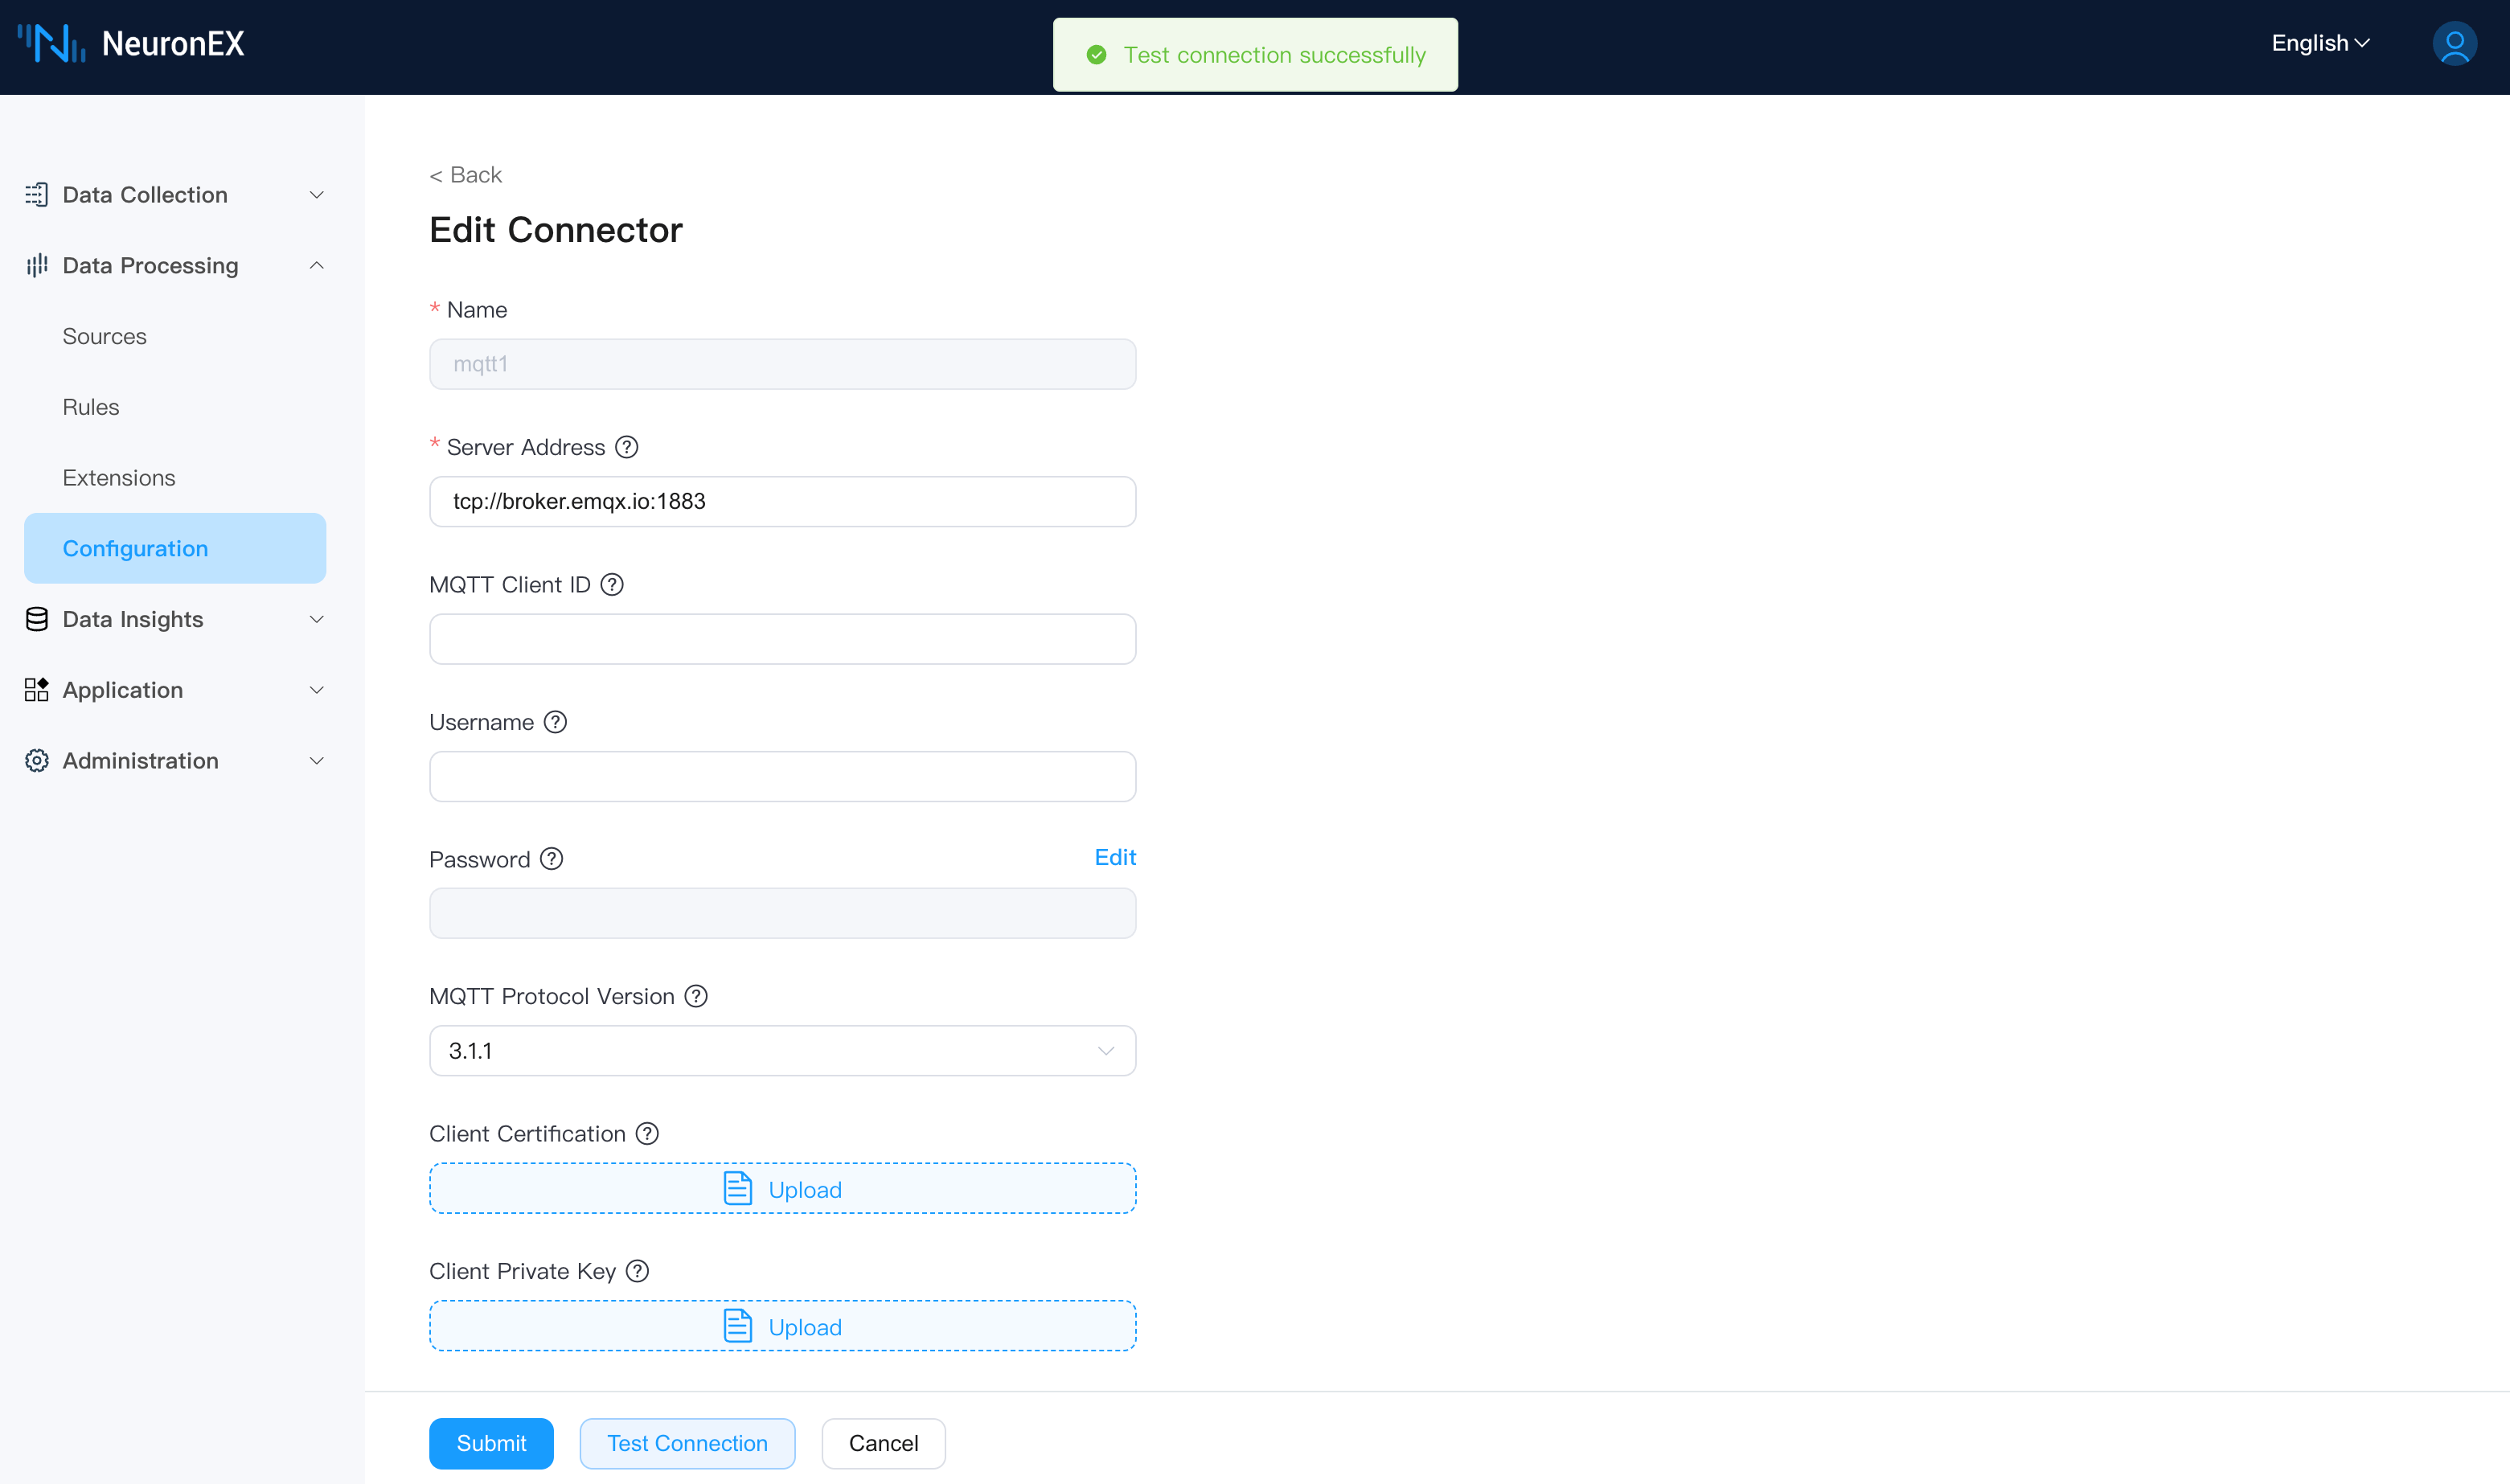
The connection status will be normal upon successful creation.
Now, create a new rule and add an MQTT Action to send the processed results to the EMQX MQTT Broker. The rule editor SQL is:
SELECT
  *
FROM
  mysql_stream3
Configure the MQTT action as follows: select the mqtt1 connector we just created, and set the Topic to topic/mysql.
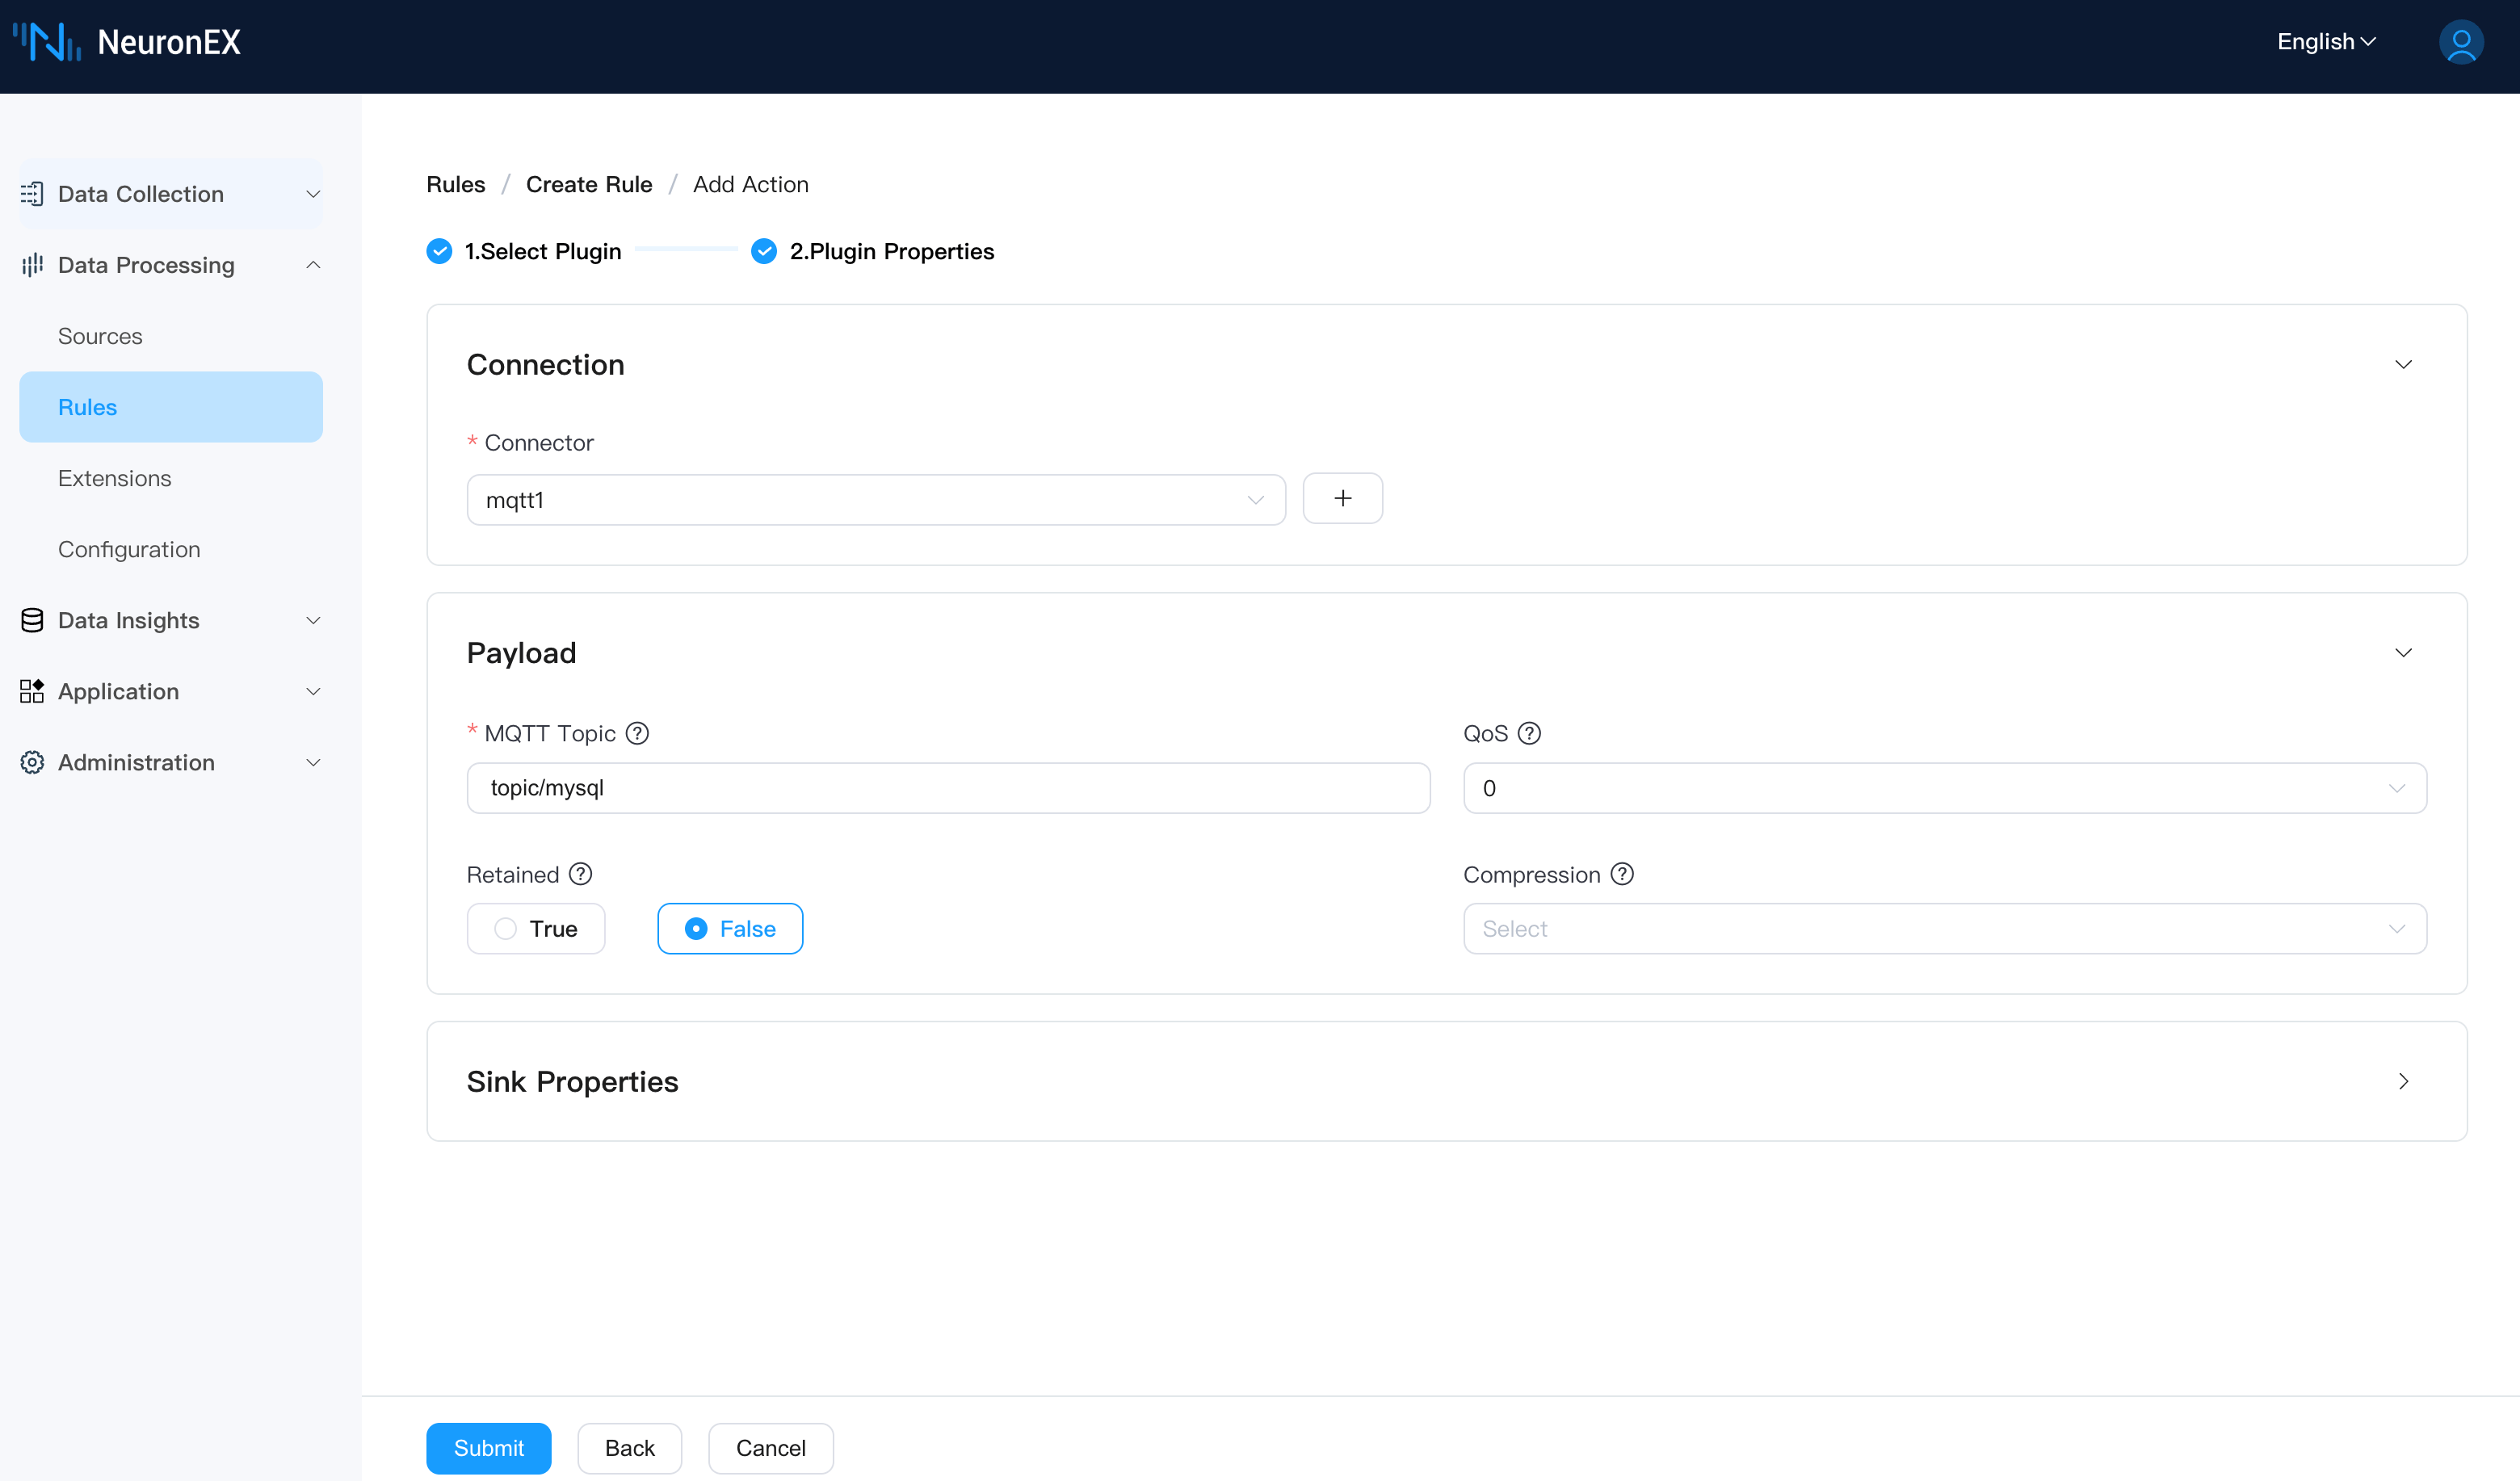
The rule will be in a running state after creation.

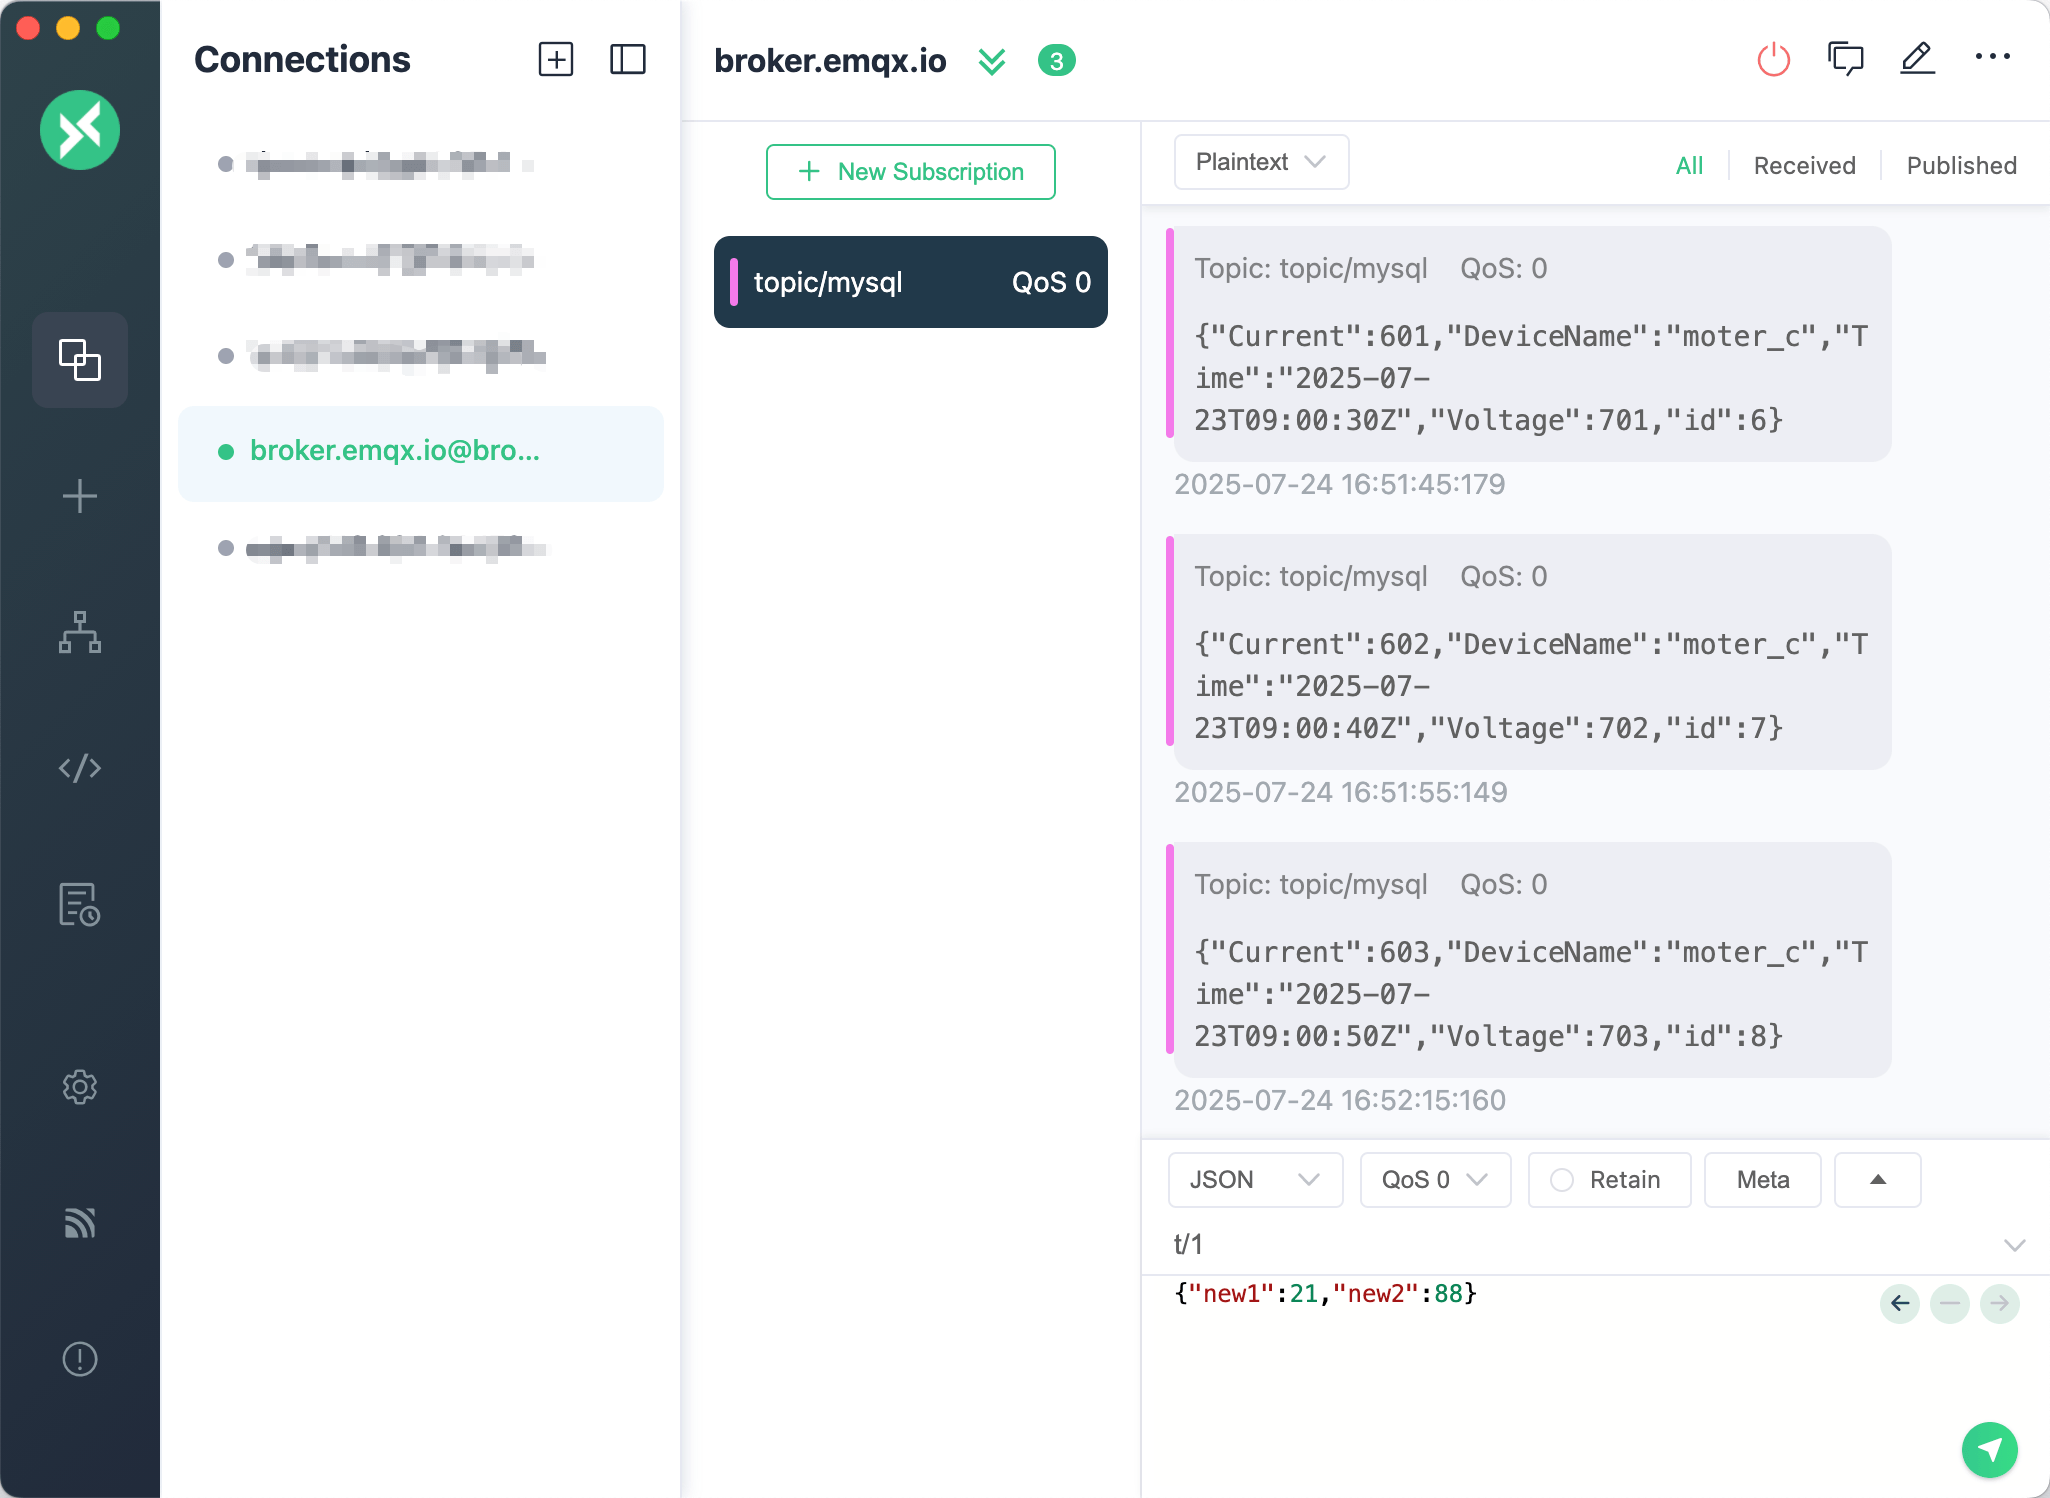
We can use the MQTTX client to subscribe to the topic topic/mysql to see if the data is being sent to EMQX. First, let's insert several more records into the database.
INSERT INTO DeviceData (Time, DeviceName, Current, Voltage) VALUES ('2025-07-23 09:00:30', 'moter_c', 601, 701);
INSERT INTO DeviceData (Time, DeviceName, Current, Voltage) VALUES ('2025-07-23 09:00:40', 'moter_c', 602, 702);
INSERT INTO DeviceData (Time, DeviceName, Current, Voltage) VALUES ('2025-07-23 09:00:50', 'moter_c', 603, 703);
You will now see the data arriving in the MQTTX client.
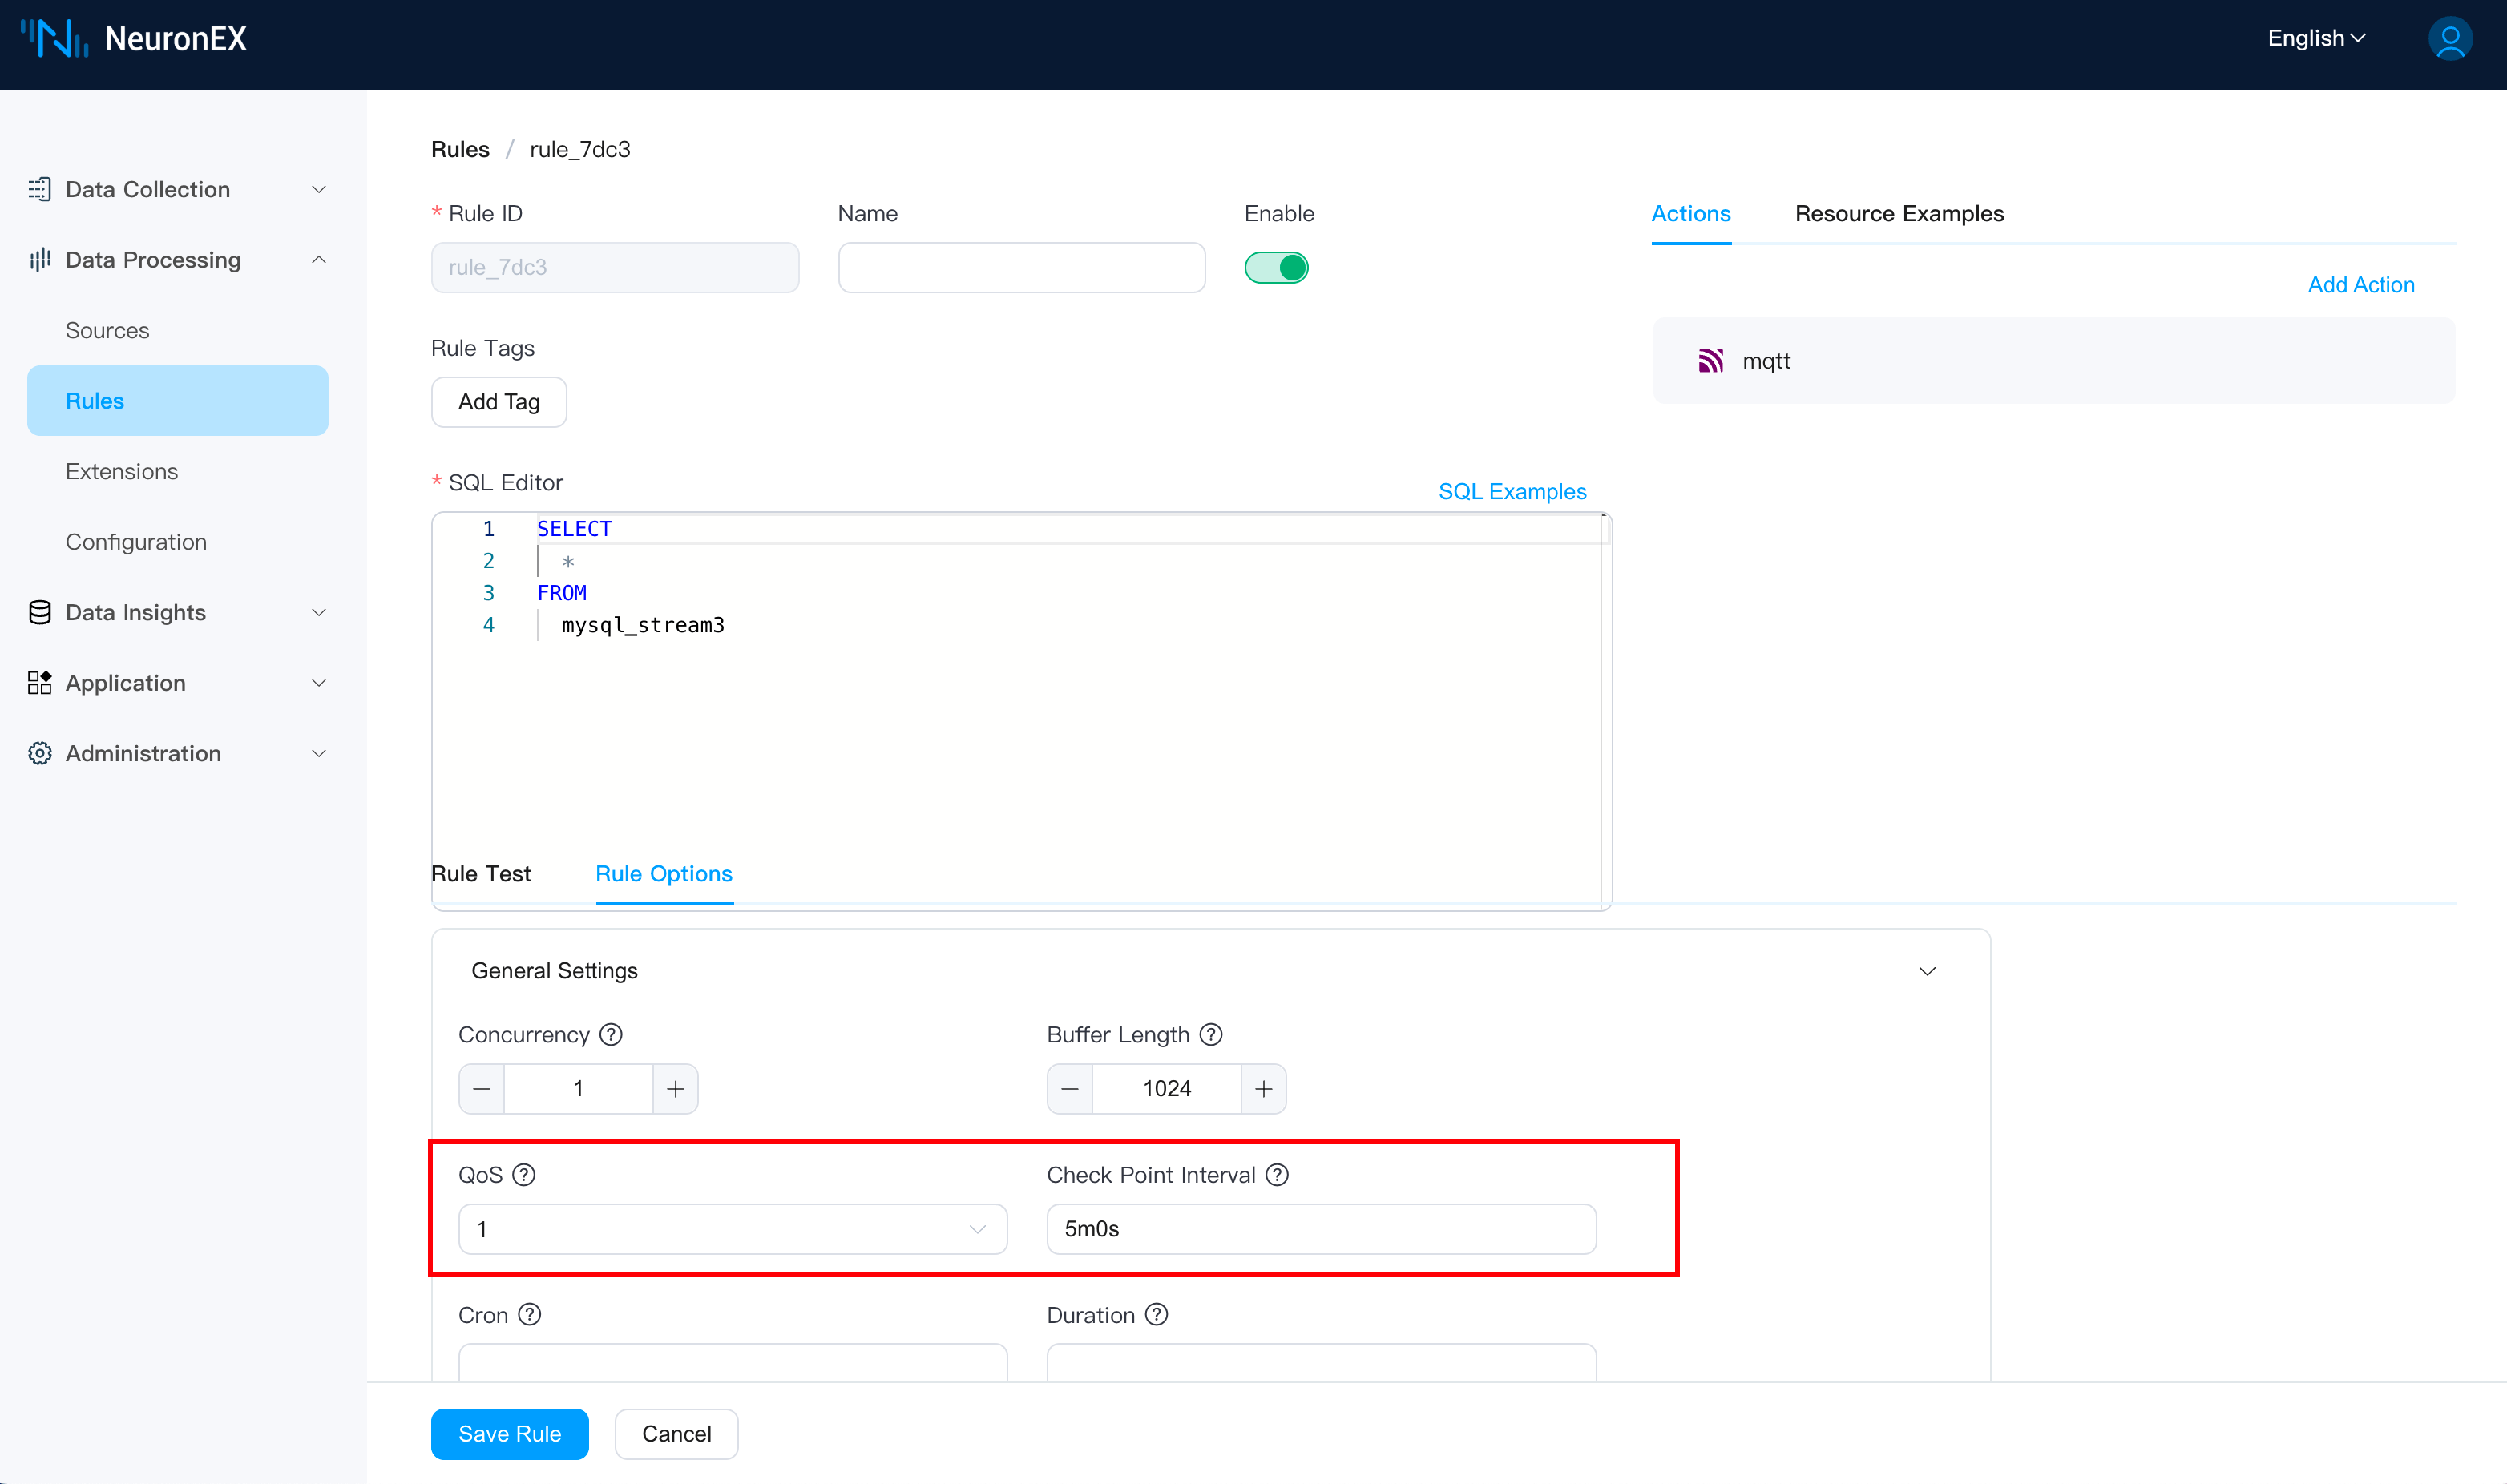
Step 6: Configure Stream QoS and Checkpoint Interval for Automatic Recovery
On the rule's page, by configuring the Stream QoS and Checkpoint Interval in the rule options, we can save the state of the Index Field for incremental data pulling. This ensures that if the rule is manually stopped or the NeuronEX service stops unexpectedly, the rule can automatically recover and continue pulling data from the last recorded index value.
- Stream QoS: Must be set to
1or2. - Checkpoint Interval: Defaults to 5m0s, meaning a checkpoint is saved every 5 minutes. Adjust this value according to your needs.
Conclusion
By following these steps, we have successfully built a real-time data bridge from a MySQL database to the EMQX Platform using NeuronEX. This solution is not only efficient and reliable but also fully utilizes NeuronEX's incremental query capabilities, minimizing the impact on the source database.
The ability to merge IT business data with real-time OT data at the edge or in the cloud is a key piece of infrastructure for achieving smart manufacturing and driving data-driven decisions. As a hub connecting everything, NeuronEX is helping more and more manufacturing enterprises break down data silos and unlock the true potential of their industrial data.