AWS Timestream for InfluxDB への MQTT データ取り込み
AWS Timestream for InfluxDB は、InfluxDB 2.x ワークロードを AWS 上で実行できるフルマネージドの時系列データベースサービスで、データ取り込みの簡素化とリアルタイム分析を実現します。EMQX 6.1 以降では、既存の InfluxDB Cloud、InfluxDB OSS、InfluxDB Enterprise との連携に加え、Amazon Timestream for InfluxDB とのネイティブ統合をサポートしています。
本ページでは、EMQX と Amazon Timestream for InfluxDB 間のデータ統合について包括的に解説し、設定およびデータフローの検証手順を実践的に説明します。
動作概要
Amazon Timestream for InfluxDB との統合は、EMQX のリアルタイムデータ処理およびルーティング機能と、Timestream のフルマネージドで高性能な InfluxDB エンジンを組み合わせたものです。
組み込みのルールエンジンと Timestream for InfluxDB Sink を利用し、EMQX は MQTT メッセージを変換してカスタムアプリケーションコードなしで直接 Timestream for InfluxDB DB インスタンスに書き込みます。
以下の図は、エネルギー貯蔵シナリオにおける EMQX と Amazon Timestream for InfluxDB 間の典型的なデータ統合アーキテクチャを示しています。
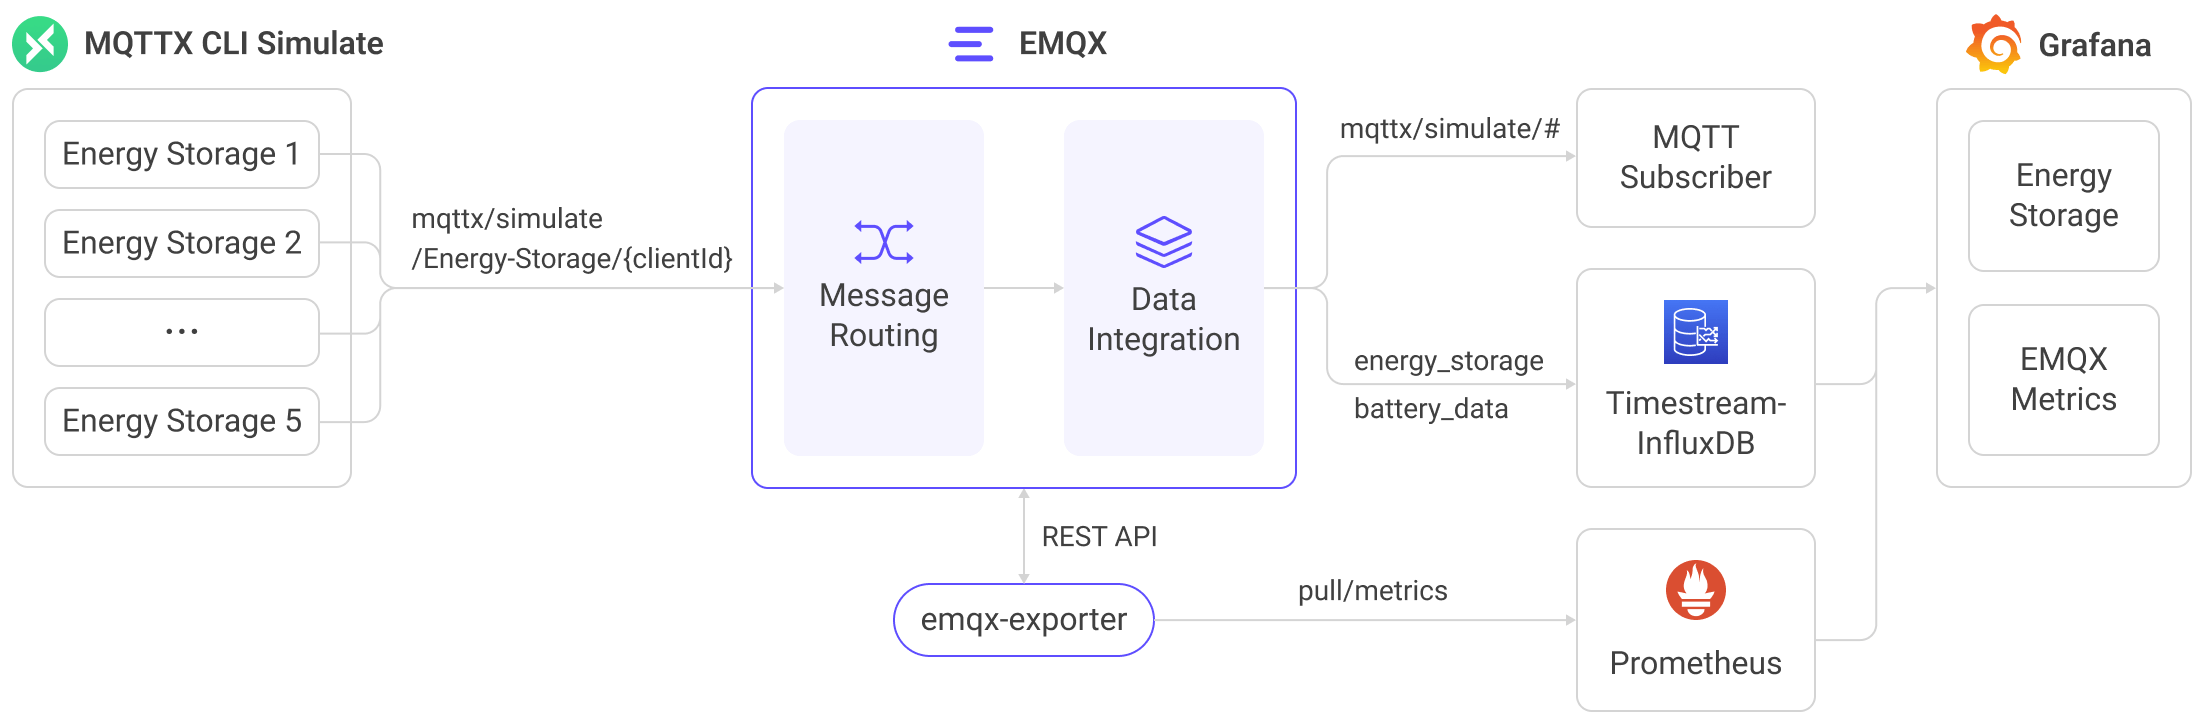
この統合は、リアルタイムのエネルギーモニタリングと分析のためのスケーラブルな IoT データパイプラインを提供します。EMQX は IoT メッセージング層としてデバイス接続とデータルーティングを担当し、Timestream for InfluxDB はマネージドな時系列ストレージとクエリ機能を提供します。ワークフローは以下の通りです:
- メッセージのパブリッシュと受信:デバイスは MQTT 経由で EMQX に接続し、テレメトリ(例:電力使用量、充放電メトリクス)をパブリッシュします。EMQX はこれらのメッセージを受信すると、ルールエンジン内でマッチング処理を開始します。
- メッセージ処理:ルールエンジンはトピックをマッチングし、フィルタリング、フィールド抽出、データ強化などの変換を適用し、ターゲットの Timestream for InfluxDB バケットへの取り込み用にペイロードを準備します。
- Timestream へのデータ取り込み:ルールが Amazon Timestream Sink をトリガーすると、EMQX は InfluxDB ラインプロトコルを用いてデータを書き込みます。テンプレートは MQTT フィールドをメジャメント、タグ、フィールドにマッピングする方法を定義します。
Timestream for InfluxDB に保存されたデータは、Flux/InfluxQL クエリ、InfluxUI、Grafana などのツールで電力メトリクスの可視化やビジネスシステムとの連携による監視・アラートに利用できます。
特長と利点
Amazon Timestream for InfluxDB 統合は以下の特長と利点を提供します:
- 効率的なデータ処理:EMQX は大規模な IoT 接続と高スループットの MQTT データを処理し、Timestream for InfluxDB は高速な取り込みとミリ秒単位のクエリ性能でリアルタイム分析を実現します。
- メッセージ変換:EMQX のルールは柔軟なフィルタリング、抽出、変換を提供し、MQTT メッセージを構造化 JSON マッピングまたはカスタム InfluxDB ラインプロトコルテンプレートとしてフォーマットしてから Timestream に書き込みます。
- マネージドスケーラビリティ:EMQX は大規模 IoT 展開に対応した水平クラスタリングをサポートし、Timestream for InfluxDB はマネージドインスタンスのスケーリング、自動バックアップ、シームレスなバージョンアップデートを提供します。
- 豊富なクエリ機能:Timestream for InfluxDB は Flux と InfluxQL を含む InfluxDB 2.x のクエリエコシステムを完全サポートし、強力な時系列分析と下流ツールとの統合を可能にします。
- 最適化されたストレージ:Timestream for InfluxDB は AWS 管理のストレージを使用し、事前設定された IOPS とスループット階層により、時系列データワークロードに対して効率的かつコスト最適化されたパフォーマンスを提供します。
はじめる前に
このセクションでは、データ統合を作成する前に必要な準備として、Amazon Timestream for InfluxDB 環境のセットアップと接続パラメータの取得方法を説明します。
前提条件
統合を設定する前に、以下を確認してください:
- EMQX が Timestream for InfluxDB へデータ書き込み時に使用する InfluxDB ラインプロトコル に関する理解。
- EMQX のデータ統合における ルール とルールエンジンが MQTT メッセージをどのように変換・ルーティングするかの理解。
- EMQX の データ統合 の基本知識、特に Sink の設定とトリガー方法。
Amazon Timestream for InfluxDB の準備
EMQX が Timestream for InfluxDB インスタンスにデータを送信できるよう、AWS 上で以下の準備を行います。
前提条件
Timestream for InfluxDB リソースの作成・管理権限を持つ AWS アカウントを用意してください。
Timestream for InfluxDB DB インスタンスの作成
AWS マネジメントコンソールにサインインし、Amazon Timestream for InfluxDB コンソールを開きます。
画面右上で DB インスタンスを作成する AWS リージョンを選択します。
ナビゲーションペインで InfluxDB Databases を選択します。
Create InfluxDB database をクリックします。
Engine settings でデプロイに使用する InfluxDB エンジンのバージョンを選択します。
注意
エンジンバージョンは後述の EMQX コネクター用認証情報の取得方法に影響します。ワークロードと統合要件に合ったバージョンを選択してください。

残りの設定(デプロイ設定、ストレージオプション、ネットワーク、ログなど)を要件に応じて完了します。各オプションの詳細は以下を参照してください:Create an InfluxDB DB Instance。
データベース作成後、インスタンス詳細ページを開き、AWS が生成したエンドポイント(例:
c5vasdqn0b-3ksj4dla5nfjhi.timestream-influxdb.us-east-1.on.aws)を取得します。EMQX コネクター設定時に必要です。
ネットワークおよびセキュリティグループの設定
EMQX が Timestream for InfluxDB インスタンスに接続できるよう、インスタンスの VPC セキュリティグループで以下の設定を行います。
- プロトコル:TCP
- ポート:8086(Timestream for InfluxDB が使用する InfluxDB API ポート)
- 送信元:EMQX がデプロイされている環境の IP アドレス範囲またはセキュリティグループ
EMQX が Timestream for InfluxDB と同一 VPC 内にある場合は、VPC 内のプライベートネットワーク経路を通じて接続可能です。EMQX が AWS 外部で稼働している場合は、セキュリティグループが EMQX の外部ネットワークからの接続を許可していることを確認してください。また、EMQX から Timestream エンドポイントへの HTTPS/TCP 8086 トラフィックをブロックするアウトバウンドファイアウォールルールがないことも確認してください。
接続要件やセキュリティに関する詳細は AWS ドキュメントを参照してください:Connecting to an Amazon Timestream for InfluxDB DB instance。
InfluxDB トークン、Organization、Bucket の取得
トークンおよび認証情報の取得方法は、Timestream for InfluxDB インスタンス作成時に選択した InfluxDB エンジンバージョン によって異なります。
InfluxDB v2 DB インスタンスの Influx UI へのアクセス
DB インスタンスのエンドポイントを使って Influx UI を開きます:
https://<endpoint>:8086DB インスタンスがパブリックアクセス不可の場合、同一 VPC 内のホスト(例:バスチオンホストや SSM ポートフォワーディング経由)からアクセスする必要があります。詳細は AWS ドキュメント を参照してください。
DB インスタンス作成時に設定したマスターユーザーの資格情報でログインします。
対象バケットへの書き込み権限を持つパーソナルアクセストークンを生成または取得します。
このトークンが EMQX の認証に使用されます。
注意
新規作成したトークンは一度しか表示されません。必ずコピーして保存してください。
インスタンスで設定された Organization と Bucket の値を確認します。EMQX 設定時にこれらの値と完全に一致させる必要があります。
詳細手順は AWS 公式ドキュメントを参照してください:Access the InfluxDB UI。
InfluxDB v3 DB インスタンスの認証トークン取得
InfluxDB v3 では InfluxDB UI から API トークンを発行しません。代わりに、DB インスタンス作成時に AWS が認証パラメータ(API トークン含む)を AWS Secrets Manager に保存します。
Timestream コンソールの DB クラスター詳細ページを開き、Authentication properties Secret manager ARN フィールドを確認します。
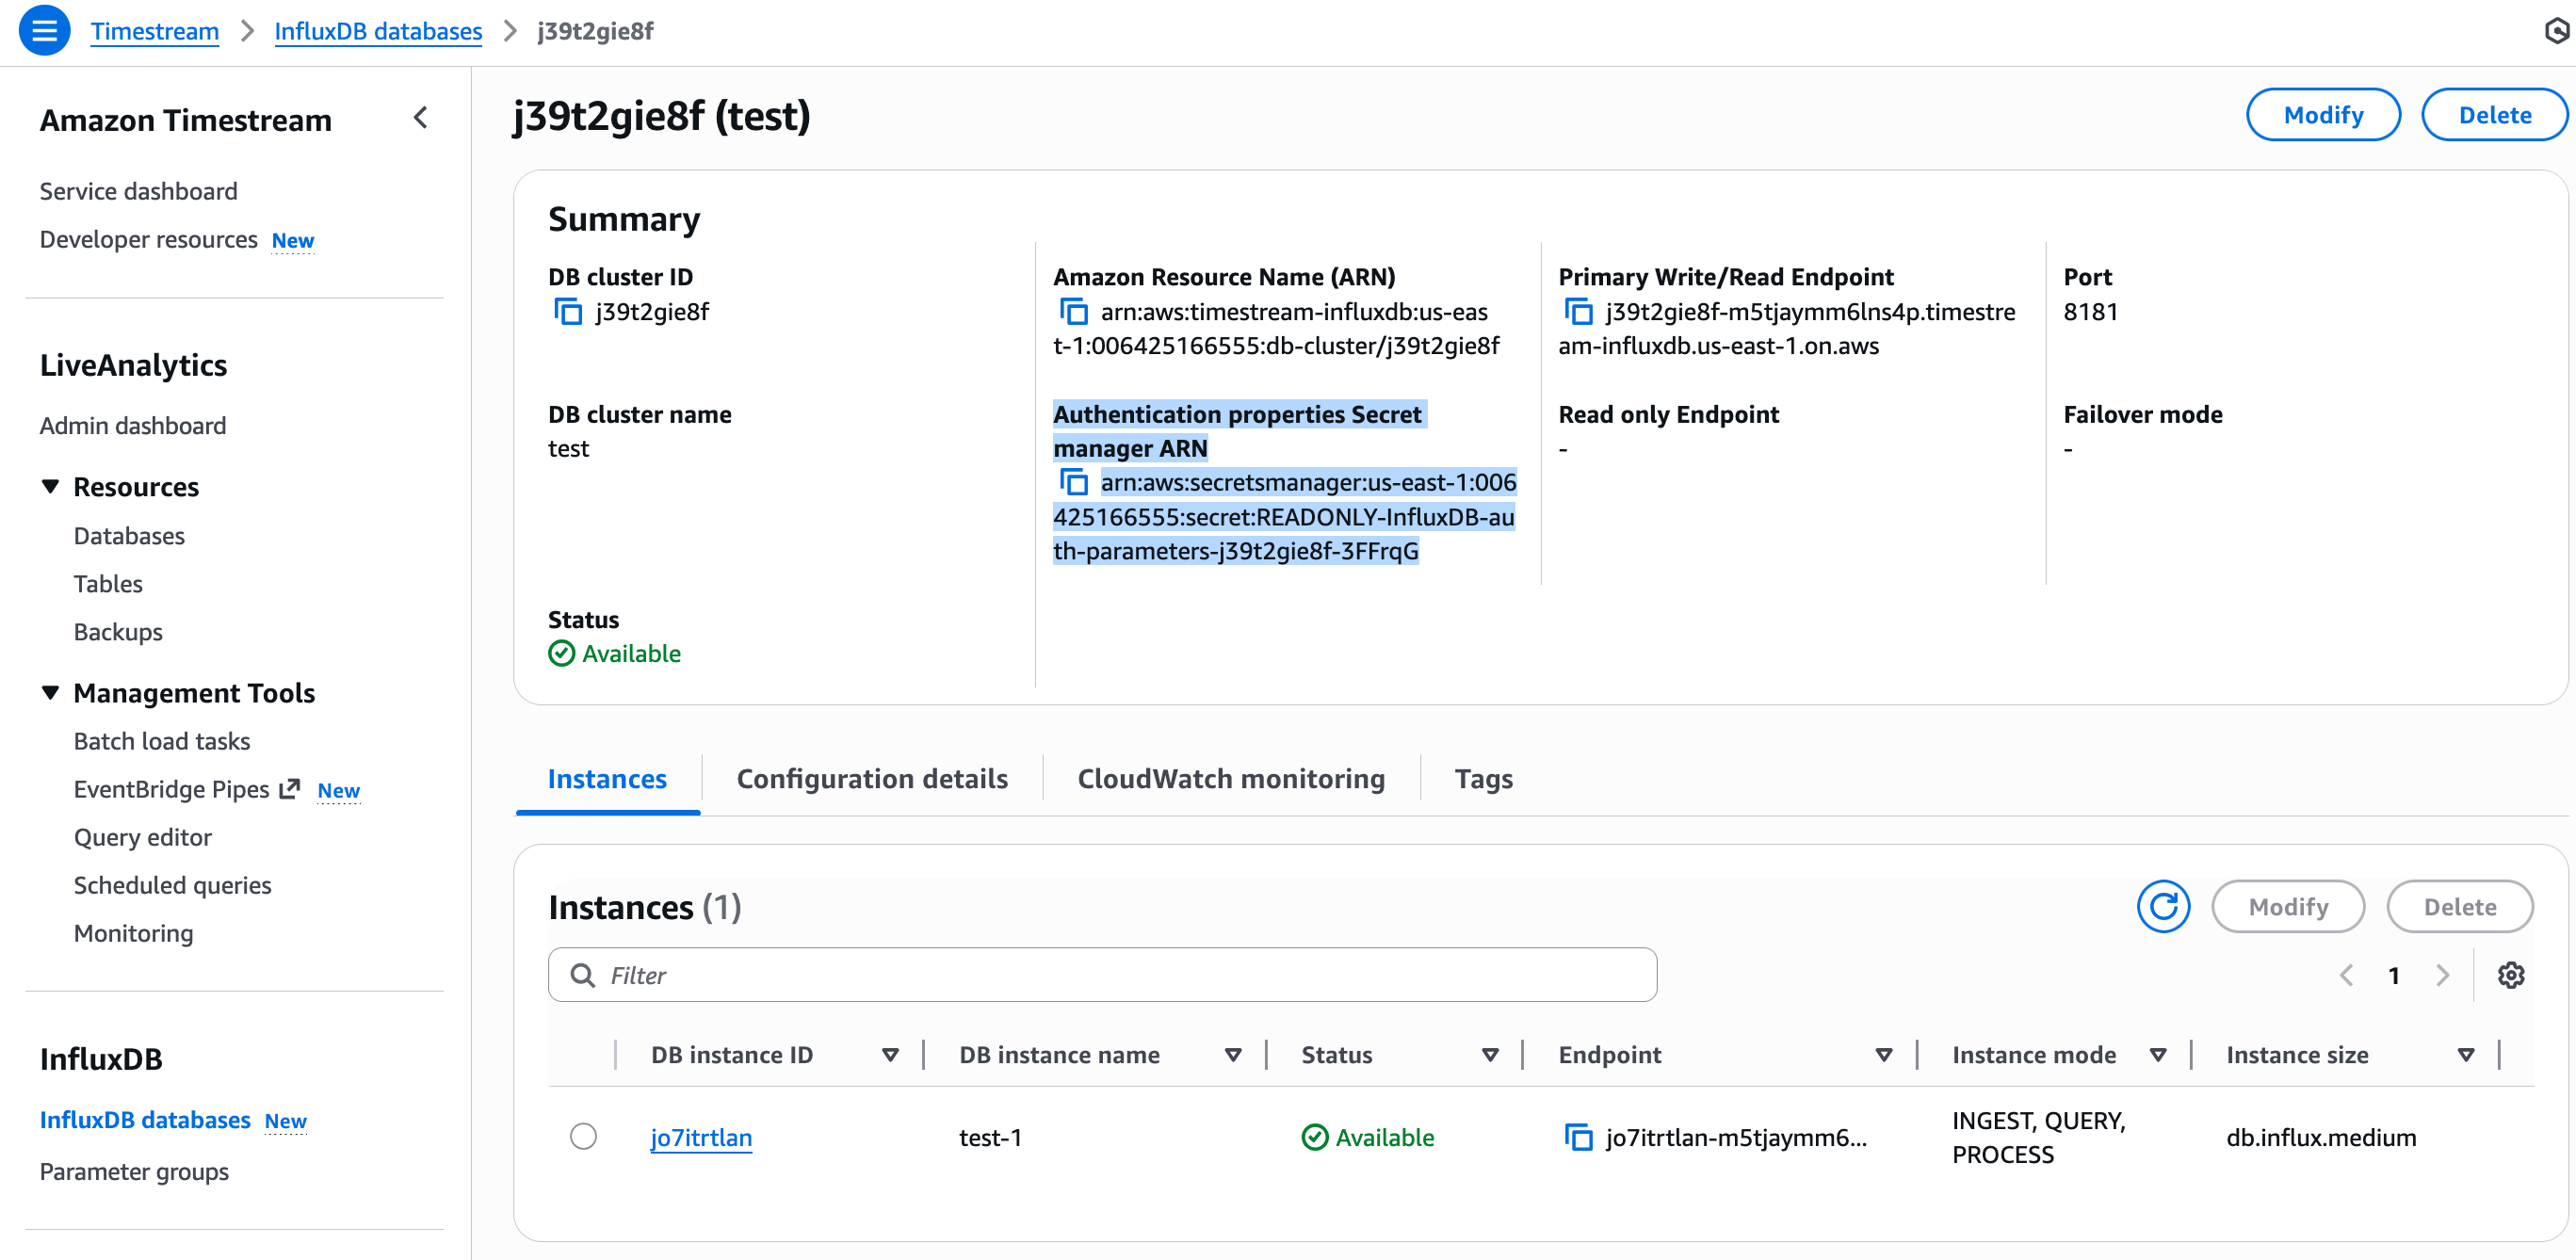
この ARN は EMQX が使用する認証情報が格納された Secrets Manager エントリを指します。
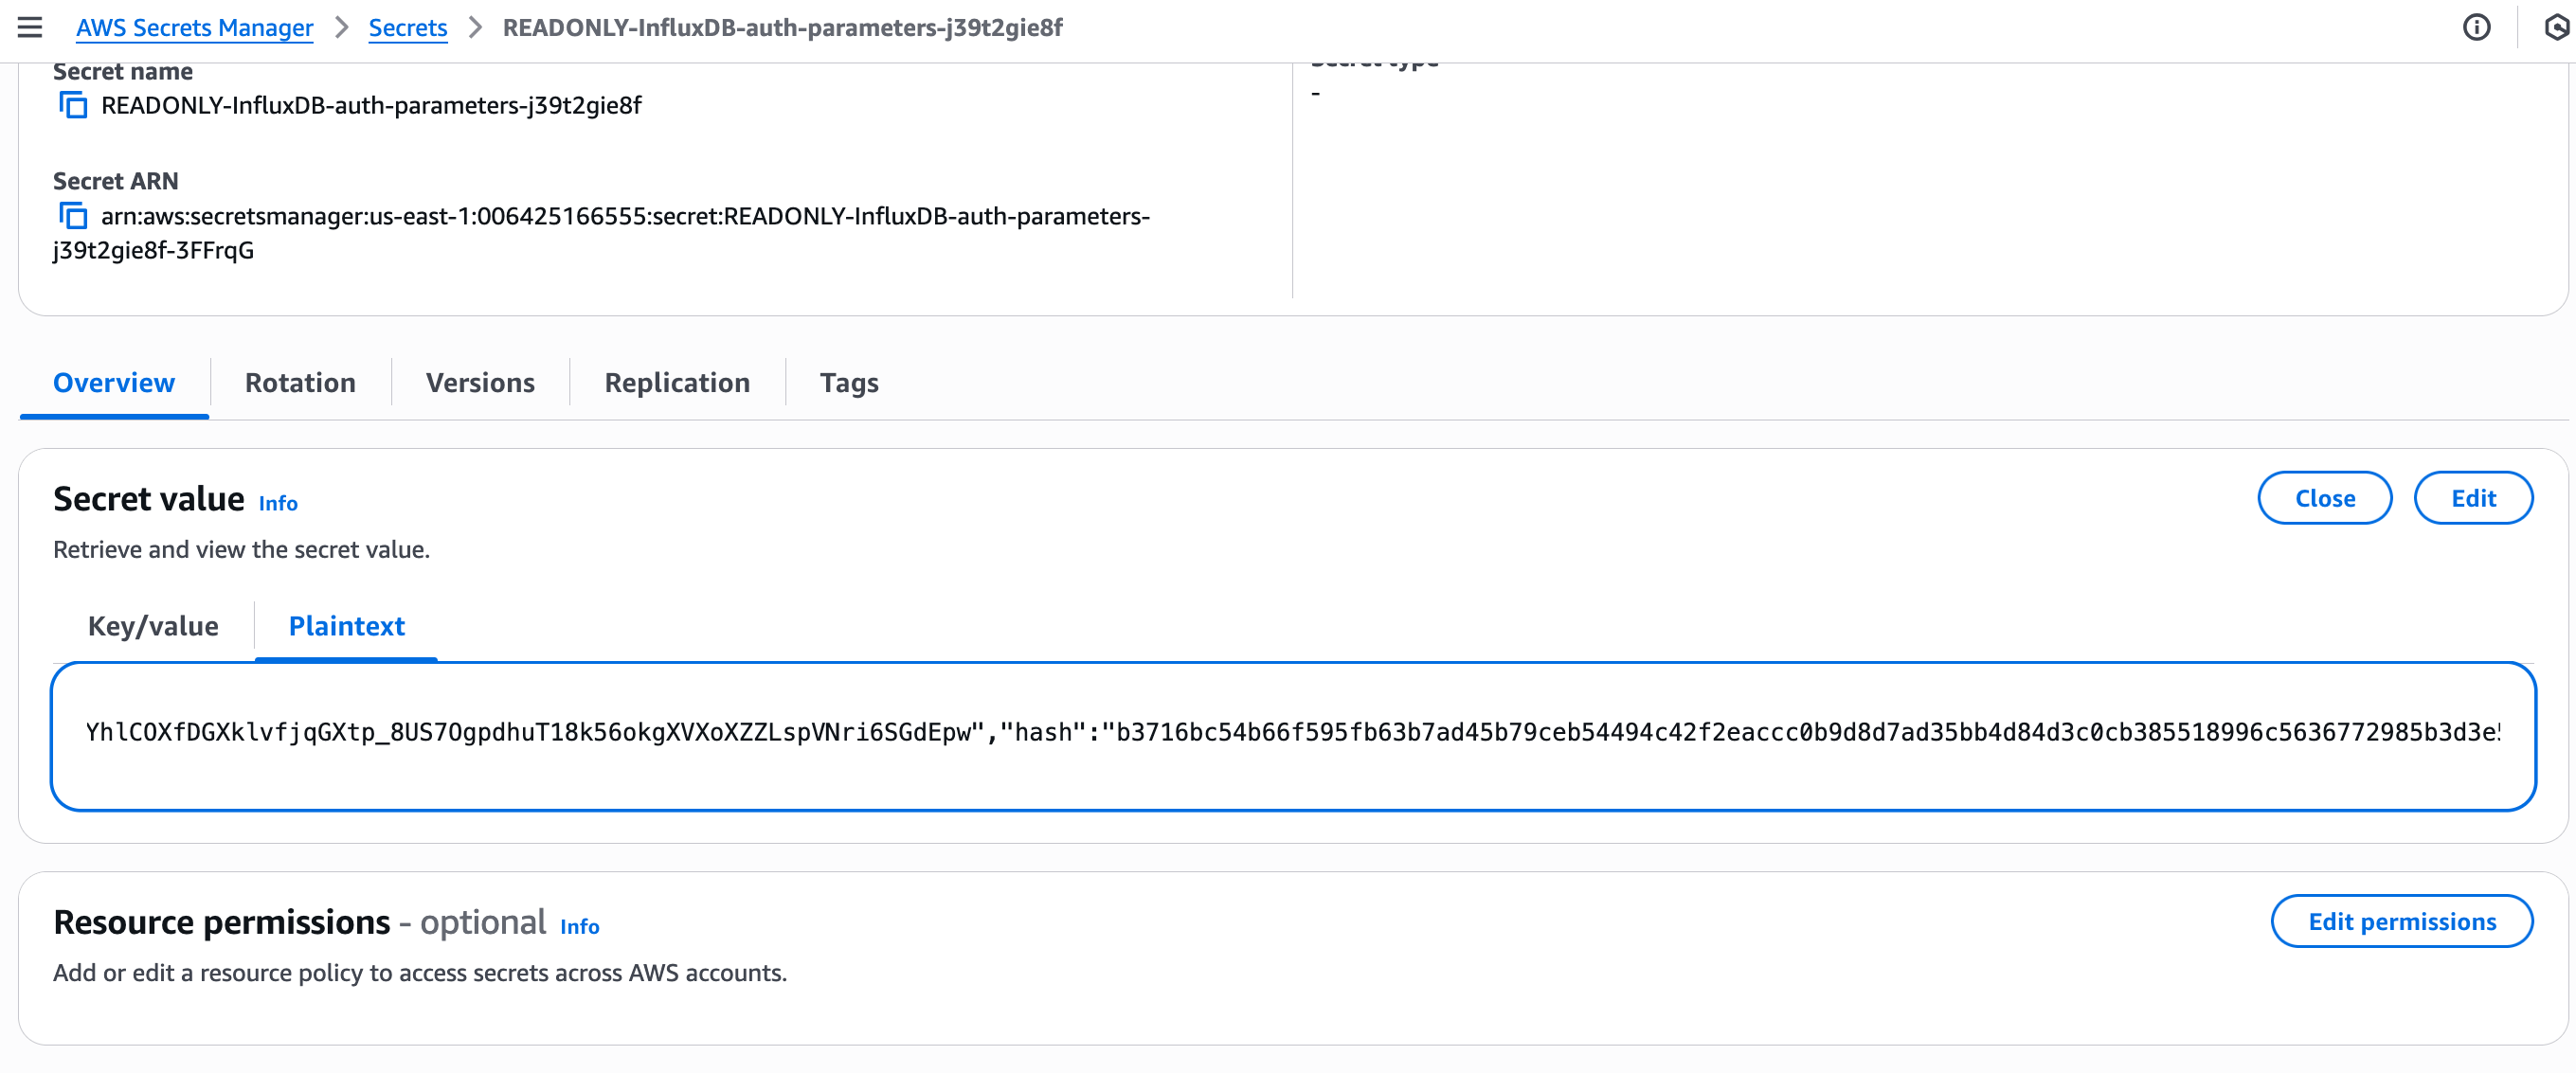
AWS Secrets Manager の Secrets で該当するシークレット名(例:
READONLY-InfluxDB-auth-parameters-<cluster-id>)を検索します。シークレットを開き、Plaintext ビューに切り替えて内容を取得します。
必須接続パラメータ
EMQX の Amazon Timestream for InfluxDB コネクター設定時には、Timestream インスタンスで使用している InfluxDB エンジンバージョンに応じて以下のパラメータを指定します。
| パラメータ | 説明 |
|---|---|
| Endpoint | InfluxDB インスタンスの AWS 生成エンドポイント例:xxxxxxx-yyyyyyyy.timestream-influxdb.<region>.on.aws |
| Port | 常に 8086。InfluxDB API エンドポイントのポート番号。 |
| Database Name | (InfluxDB v3)v3 DB インスタンス作成時に指定したデータベース名。 |
| Organization | (InfluxDB v2)InfluxDB UI で設定された Organization 名。 |
| Bucket | (InfluxDB v2)EMQX がテレメトリデータを書き込む Bucket 名。 |
| Token | EMQX が認証に使用するトークン: InfluxDB v2: InfluxDB UI で作成したパーソナルアクセストークン InfluxDB v3: AWS Secrets Manager から取得したトークン( token フィールド) |
コネクターの作成
このセクションでは、Sink を AWS Timestream for InfluxDB DB インスタンスに接続するコネクターの作成方法を説明します。
- EMQX ダッシュボードにログインし、Integration -> Connectors をクリックします。
- 画面右上の Create をクリックします。
- Create Connector ページで、Data Persistence タイプから Amazon Timestream を選択し、Next をクリックします。
- Configuration ステップで以下の項目を設定します:
- Connector Name:英数字で始まる名前。英数字、ハイフン、アンダースコアが使用可能。例:
my_timestream - Server Host:Timestream for InfluxDB インスタンスのエンドポイントとポートを入力(例:
<instance-endpoint>:8086) - Version of InfluxDB:Timestream インスタンスの設定に合うバージョンを選択
v2(デフォルト):InfluxDB トークン、Organization、Bucket の取得 で取得したパーソナルアクセストークン、Organization、Bucket を設定。設定値は InfluxDB 側と完全一致させる必要があります。v3:DB インスタンス作成時に指定したデータベース名と、InfluxDB v3 DB インスタンスのシークレット値取得 で取得したトークンを設定。
- TLS(任意):Timestream for InfluxDB エンドポイントが HTTPS を要求する場合に有効化(推奨)。TLS 接続オプションの詳細は TLS for External Resource Access を参照。
- Connector Name:英数字で始まる名前。英数字、ハイフン、アンダースコアが使用可能。例:
- Create をクリックする前に、Test Connectivity をクリックしてコネクターが Timestream InfluxDB DB インスタンスに接続可能かテストできます。
- ページ下部の Create ボタンをクリックしてコネクター作成を完了します。ポップアップで Back to Connector List または Create Rule を選択可能です。ルールと Sink の作成手順は Amazon Timestream Sink を使ったルール作成 を参照してください。
Amazon Timestream Sink を使ったルール作成
このセクションでは、EMQX でソース MQTT トピック t/# のメッセージを処理し、設定済み Sink を通じて AWS Timestream for InfluxDB に送信するルールの作成方法を説明します。
ルール SQL の定義
EMQX ダッシュボードで左メニューの Integration -> Rules をクリックします。
画面右上の Create をクリックします。
Create Rule ページで、ルール ID に
my_ruleを入力します。SQL Editor に以下の SQL 文を設定し、トピック
t/#以下のすべてのメッセージを転送します。sqlSELECT * FROM "t/#"TIP
独自の SQL を記述する場合、
SELECT句に Sink のデータフォーマットで参照するすべての変数を含めるよう注意してください。初心者の方は SQL Examples と Enable Test を使って SQL ルールを学習・テストできます。
ルールにアクション(Sink)を追加
ルール SQL を定義したら、Amazon Timestream Sink のアクションを作成してルールに紐付けます。これにより、EMQX はルールで処理したデータを Timestream for InfluxDB に送信します。
基本設定の構成
Create Rule ページで + Add Action をクリックし、ルールの出力を定義します。
Type of Action ドロップダウンから
Amazon Timestreamを選択します。Action ドロップダウンはデフォルトの
Create Actionのままにします。既存の Sink を選択することも可能ですが、本例では新規作成します。
Name と任意の Description を入力します。
Connector ドロップダウンから先に作成した
my_timestreamを選択します。必要に応じて新規コネクターも作成可能です。コネクターの作成を参照してください。Time Precision を指定します(デフォルトは
millisecond)。
データフォーマットの設定
EMQX が Timestream for InfluxDB に書き込む前にデータをシリアライズする方法として、Data Format に JSON または Line Protocol を選択します。
JSON フォーマット
構造化された設定フィールドを好む場合は JSON フォーマットを使用します。EMQX が自動的に InfluxDB ラインプロトコルに変換します。
Measurement:メジャメント名を指定(例:
sensor_data)。プレースホルダーも使用可能:
${topic}${payload.measurement}
Timestamp:(任意)数値またはプレースホルダーのタイムスタンプ。省略時は EMQX サーバー時刻を使用。
例:
${timestamp}${payload.ts}
Fields:各フィールドはキーと値のペア。すべての値は変数やプレースホルダーで指定可能で、InfluxDB ラインプロトコル に従った設定も可能。
例:
キー 値 temp ${payload.temp}hum ${payload.hum}count ${payload.count}iバッチ設定: 数百フィールドの大量リストは CSV インポートで設定可能。詳細は バッチ設定 を参照。
Tags:タグは常に文字列で、インデックスや高速クエリに使用。
例:
キー 値 device ${clientid}region us-east
ラインプロトコル
最終的な書き込み構文を完全に制御したい場合はラインプロトコルを使用します。Write Syntax ボックスに InfluxDB ラインプロトコル の構文でテンプレートを入力します:
<measurement>[,<tag-key>=<tag-value>...] <field-key>=<field-value>[,<field-key>=<field-value>...] <timestamp>例:
sensor_data,device=${clientid},region=us-east temp=${payload.temp},hum=${payload.hum},precip=${payload.precip}i ${timestamp}この例の意味:
sensor_dataはメジャメント名deviceとregionはタグtemp、hum、precipはフィールド${timestamp}はタイムスタンプで、実行時に置換されます
TIP
- InfluxDB 1.x/2.x に符号付き整数型を送る場合、プレースホルダーの後に
iを付けます(例:${payload.int}i)。詳細は InfluxDB 1.8 で整数値を書き込む方法 を参照。 - 符号なし整数型の場合は
uを付けます(例:${payload.int}u)。
バッチ設定
InfluxDB のデータエントリは通常数百フィールドを含み、データフォーマット設定が煩雑になるため、EMQX はフィールドのバッチ設定機能を提供しています。
JSON フォーマット設定時に、CSV ファイルからフィールドのキー・バリューを一括インポートできます。
Fields テーブルの Batch Setting ボタンをクリックし、Import Batch Setting ポップアップを開きます。
指示に従い、まずバッチ設定テンプレートファイルをダウンロードし、フィールドのキー・バリューを記入します。テンプレートのデフォルト内容例:
Field Value 備考(任意) temp ${payload.temp} hum ${payload.hum} precip ${payload.precip}i フィールド値の末尾に iを付けて整数として保存する指示。- Field:フィールドキー。定数または
${var}プレースホルダー形式をサポート。 - Value:フィールド値。定数またはプレースホルダーをサポートし、ラインプロトコルの型識別子を付加可能。
- Remarks:CSV 内の注釈用で、EMQX へのインポートには含まれません。
CSV ファイルの行数は最大 2048 行までです。
- Field:フィールドキー。定数または
記入したテンプレートファイルを保存し、Import Batch Setting ポップアップにアップロードして Import をクリックし、バッチ設定を完了します。
インポート後、Fields 設定テーブルでキー・バリューをさらに調整可能です。
アクション作成の完了
- Fallback Actions と Advanced Settings(任意)を設定します:
- Fallback Actions:メッセージ配信失敗時の信頼性向上のため、1つ以上のフォールバックアクションを定義可能です。詳細は Fallback Actions を参照してください。
- Advanced Settings:詳細は 高度な設定 を参照してください。
- Add Action ペイン下部の Test Connectivity をクリックし、Sink が Timestream for InfluxDB インスタンスに接続可能かテストします。
- Create をクリックしてアクション作成を完了します。保存後、ルールページの Action Outputs に Sink が表示されます。
ルール作成の完了
Create Rule ページで設定内容を確認し、Create ボタンをクリックしてルールを生成します。
これでルールが作成され、Rule ページに新規ルールが表示されます。Actions(Sink) タブをクリックすると、新しい Amazon Timestream Sink が確認できます。
また、Integration -> Flow Designer を開くとトポロジーが表示され、トピック t/# のメッセージがルール my_rule によって解析され、Amazon Timestream に送信・保存されている様子が確認できます。
ルールのテスト
統合作成後、EMQX が MQTT メッセージを正常に Timestream for InfluxDB インスタンスに転送しているか検証できます。
テスト MQTT メッセージのパブリッシュ
MQTTX などの MQTT クライアントを使い、ルールにマッチするトピック t/1 にメッセージをパブリッシュします:
mqttx pub -i emqx_c -t t/1 -m '{ "temp": "36.5", "hum": "70", "precip": "12" }'このメッセージによりルールがトリガーされ、設定済みの Timestream for InfluxDB Sink に送信されます。
EMQX で Sink 配信状況を確認
EMQX ダッシュボードでルール名をクリックし、ルール詳細ページを開きます。受信メッセージ数が 1、正常に配信された送信メッセージ数も 1 であることを確認してください。
Timestream for InfluxDB でデータを確認
InfluxDB v2 インスタンスの場合
InfluxDB UI を使用します:
InfluxDB UI
https://<endpoint>:8086を開きます。Data Explorer に移動します。
EMQX Sink で設定した Bucket を選択します。
最近のデータポイントをクエリまたは参照します。
選択したメジャメントに以下のフィールドを含む新しいポイントが表示されるはずです。
temphumprecip
InfluxDB v3 インスタンスの場合
InfluxDB v3 は UI によるデータ参照を提供しません。InfluxDB v3 SQL Query API を使って取り込んだデータを検証します。
例:
curl -G -k "https://<endpoint>:8181/api/v3/query_sql" \
  --header "Authorization: Bearer <your-token>" \
  --data-urlencode "db=<your-database-name>" \
  --data-urlencode "q=SELECT * FROM sensor_data" \
  --data-urlencode "format=jsonl"
期待される出力例:
{"temp":36.5,"hum":70,"precip":12,"device":"myclient","region":"us-east", ... }正常なレスポンスは挿入されたデータを JSONL 形式で返します。
詳細なクエリ例は InfluxDB の API ドキュメント を参照してください。
高度な設定
このセクションでは、Amazon Timestream コネクターおよび Sink の高度な設定オプションについて説明します。ダッシュボードでコネクターや Sink を設定する際、Advanced Settings にて以下のパラメータを調整し、要件に合わせて最適化できます。
| 項目 | 説明 | 推奨値 |
|---|---|---|
| Start Timeout | コネクター起動時にターゲットリソース(例:Timestream for InfluxDB インスタンス)が正常になるまで待機する最大時間(秒)。この時間内に準備できなければ作成要求は失敗します。 | 5 |
| Buffer Pool Size | Timestream for InfluxDB へ送信する前にデータを処理するバッファワーカープロセス数。書き込み負荷が高い場合は増やすとスループットが向上します。受信のみのシナリオでは 0 に設定可能。 | 4 |
| Request TTL | バッファ内で書き込みリクエストが有効な最大時間(秒)。この期間内に送信またはアックされなければ期限切れとして破棄されます。 | 45 |
| Health Check Interval | Sink が Timestream for InfluxDB エンドポイントの接続性と状態をチェックする間隔(秒)。 | 15 |
| Max Buffer Queue Size | 各バッファワーカーが送信待ちで保持できる最大データ量(バイト)。データバーストによる一時的なバックプレッシャー対策に増加可能。 | 1 |
| Max Batch Size | 1 回の書き込みリクエストで送信する最大レコード数。大きいほどスループットは向上しますがレイテンシは増加します。1 に設定するとバッチ処理を無効化し、レコードを個別送信します。 | 100 |
| Query Mode | 書き込み処理を非同期または同期で実行するか制御。Async モードでは Timestream への書き込みが MQTT メッセージパブリッシュ処理をブロックしませんが、クライアントがメッセージ到着前に受信する可能性があります。 | Async |
| Inflight Window | 同時に進行可能な書き込みリクエストの最大数。Query Mode が Async の場合の並行度制御。単一 MQTT クライアントからのメッセージ順序を厳密に保証するには 1 に設定します。 | 100 |