EMQX MCP ブリッジを使って IoT デバイスにアクセスする
本ガイドでは、EMQX MCP ブリッジを使用して、MCP対応モデルやAIエージェントとEMQXを連携させ、IoTデバイスへのアクセスおよび制御を可能にする方法を説明します。
前提条件
EMQXサーバーがバージョン5.7.0以降でインストールおよび稼働していること。
MCP ブリッジプラグインのインストールと設定
以下から最新のMCPブリッジプラグインをダウンロードします。
https://github.com/emqx/emqx_mcp_bridge/releases「プラグインのインストール」の手順に従い、EMQXサーバーにプラグインをインストールします。
プラグインの設定を行います:
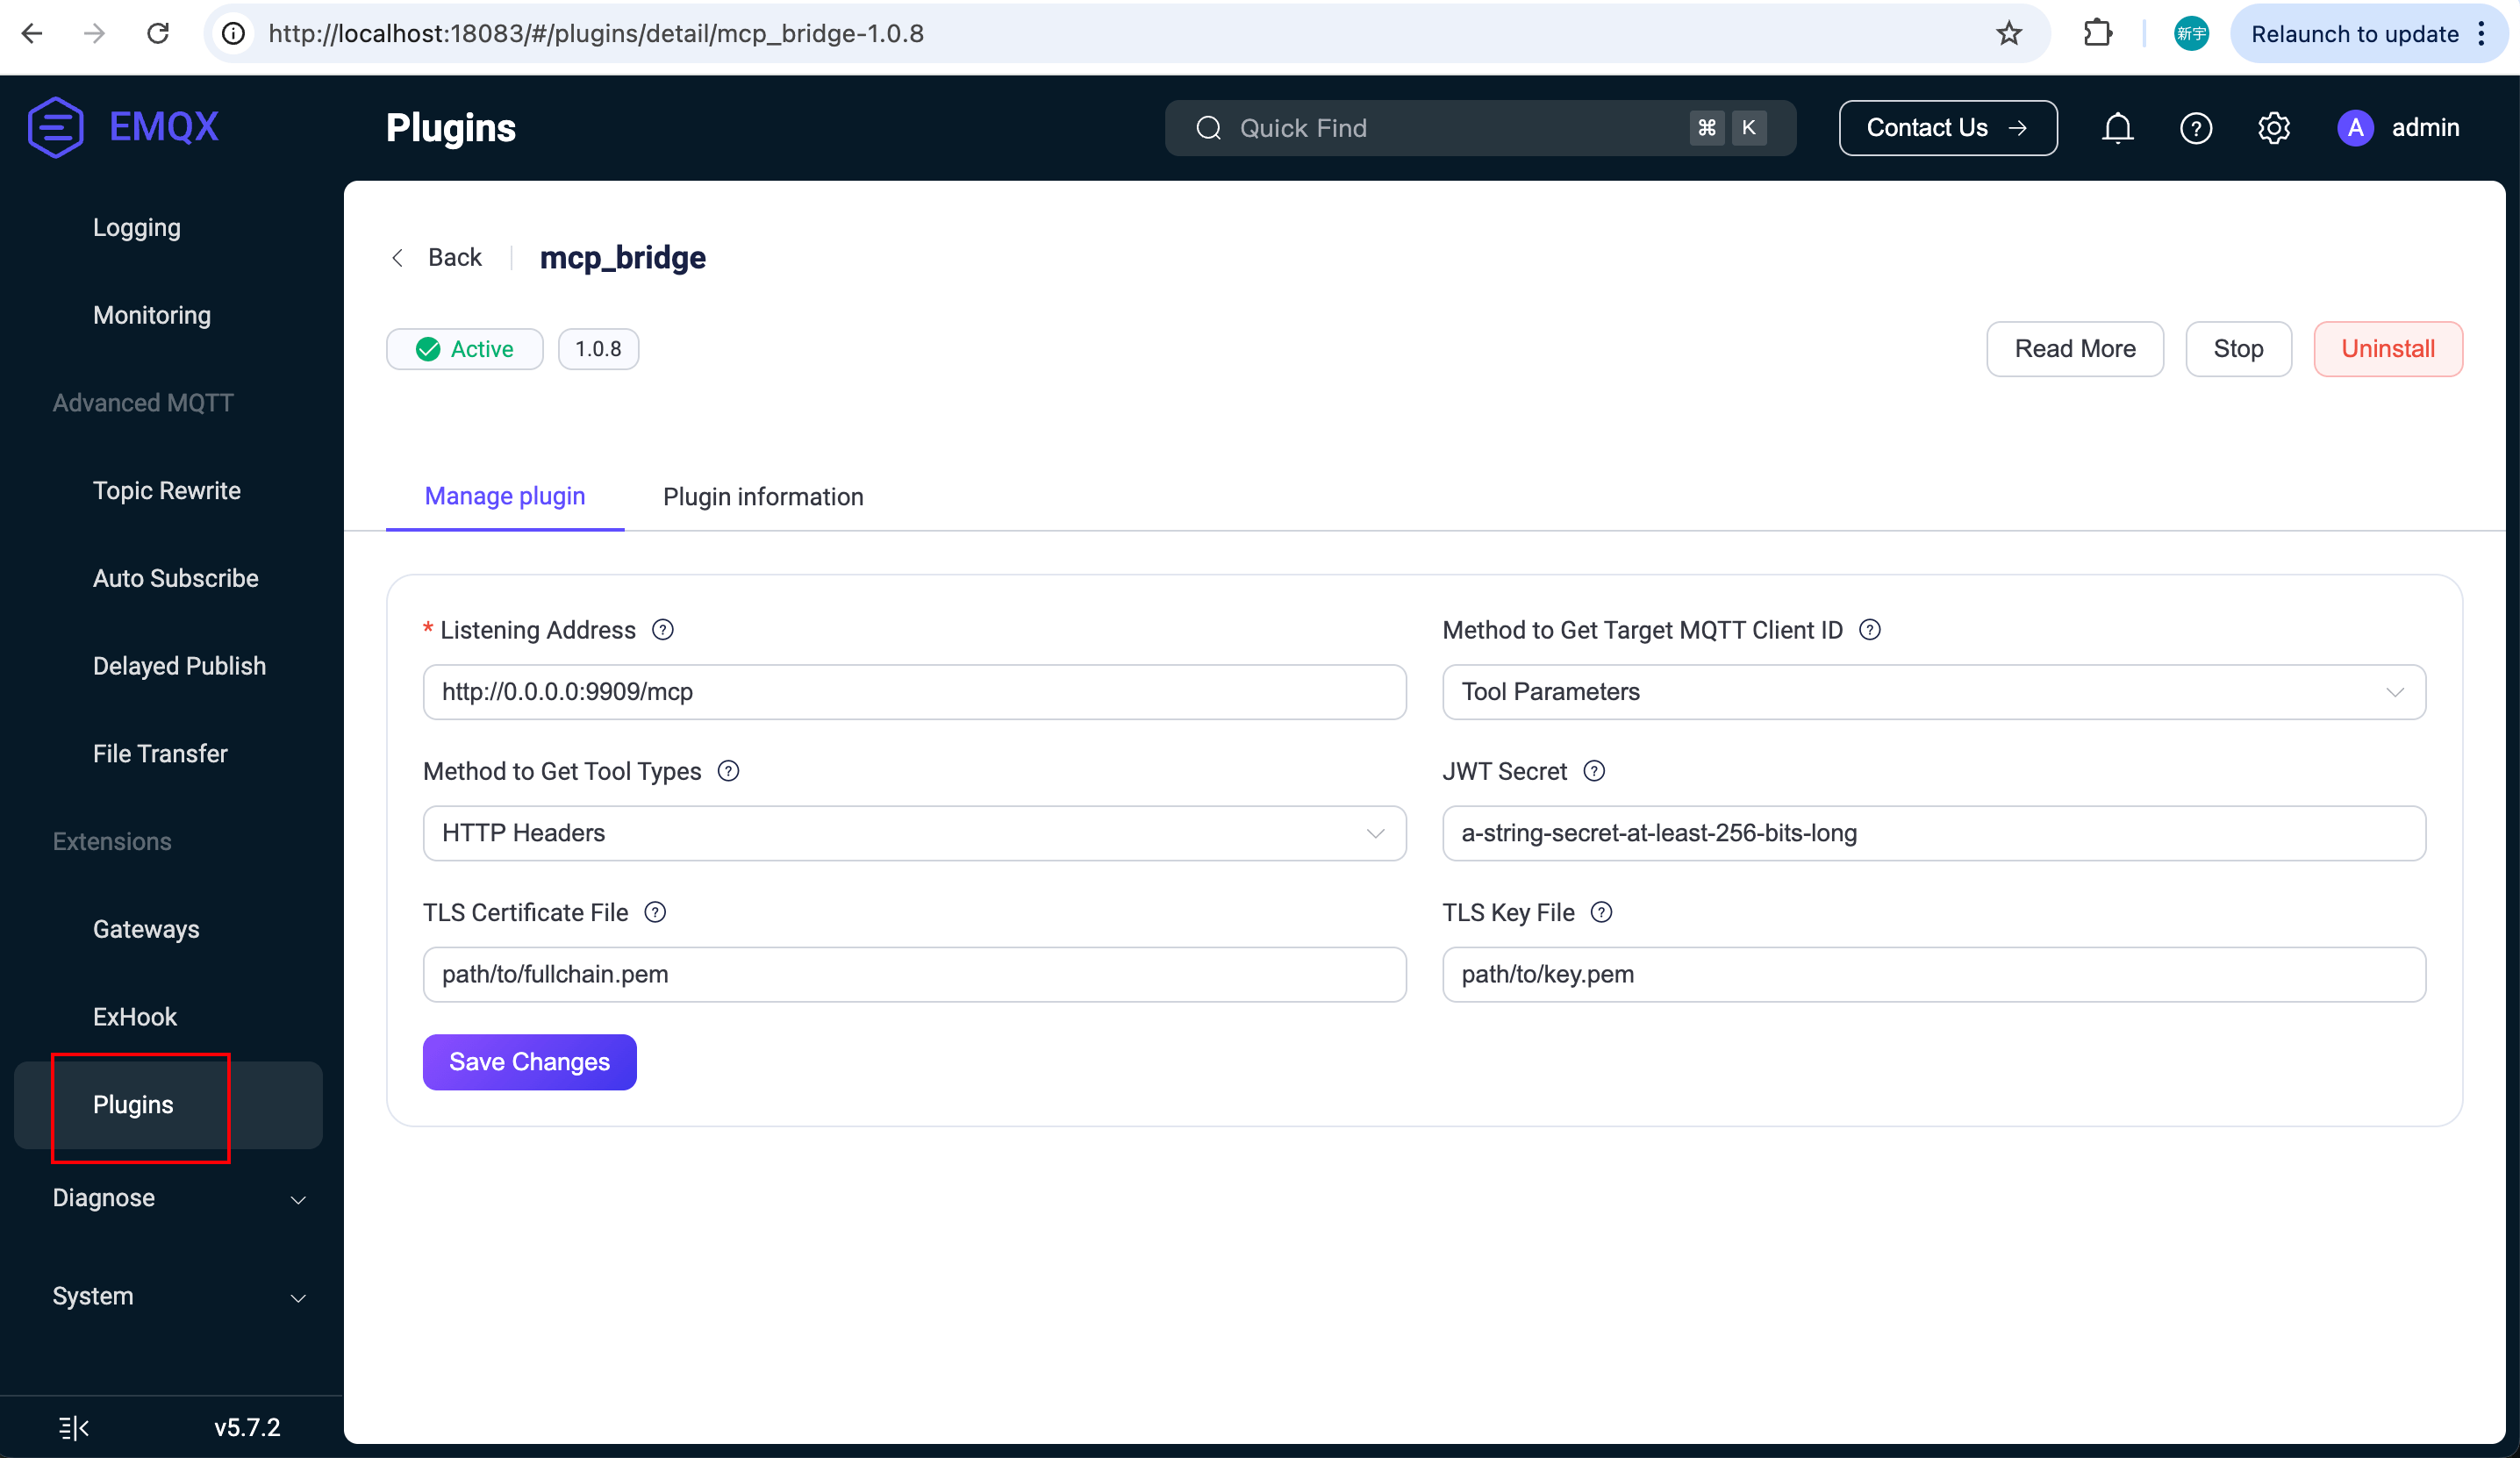
ブラウザで http://localhost:18083/#/plugins/ にアクセスし、MCPブリッジプラグインをクリックして設定ページを開きます。ここで、リッスンアドレスや証明書などの設定を変更できます。保存をクリックすると設定が自動的に適用され、プラグインの手動再起動は不要です。
リッスンアドレスを
https://your-hostname:9909/mcpに設定した場合、MCPプラグインは指定ポートで以下の2つのHTTPエンドポイントを起動します:/sse:SSEプロトコルを使用するMCP接続用/mcp:Streamable HTTPプロトコルを使用するMCP接続用
SSEプロトコルのみをサポートしたい場合は、リッスンアドレスを
https://your-hostname:9909/sseに設定できます。また、一部のモデルやAIエージェントではMCPサーバーへのHTTPSアクセスが必要な場合があります。その場合は、MCPブリッジプラグインに有効かつ信頼されたSSL証明書を設定し、URLが公開アクセス可能であることを確認してください。
ターゲットMQTTクライアントID取得方法をツールパラメータに設定してください。これにより、MCPクライアントはツール呼び出し時にデバイスのMQTTクライアントIDをパラメータとして渡し、接続確立時にHTTPヘッダーで固定のクライアントIDを指定する必要がなくなります。
MCP over MQTT SDKを使ったデバイスのシミュレーション
まず、MCP SDKのインストールガイドに従い、Python用MCP SDKをインストールします:
uv init smart_light
cd smart_light
uv add git+https://github.com/emqx/mcp-python-sdk --branch main
uv add "mcp[cli]"
source .venv/bin/activate
プロジェクトに以下の内容で smart_light.py ファイルを追加します:
# smart_light.py
import os
from mcp.server.fastmcp import FastMCP

status = "off"

# サーバー作成
mcp = FastMCP(
    "devices/light",
    log_level="DEBUG",
    mqtt_server_description="ライトデバイスを制御するシンプルなFastMCPサーバーです。ライトのオン・オフや明るさの変更が可能です。",
    mqtt_client_id = os.getenv("MQTT_CLIENT_ID"),
    mqtt_options={
        "username": "aaa",
        "host": "localhost",
        "port": 1883,
    },
)

@mcp.tool()
def change_brightness(level: int) -> str:
    """ライトの明るさを変更します。レベルは0から100の間で指定してください。"""
    if 0 <= level <= 100:
        return f"明るさを{level}に変更しました"
    return "無効な明るさレベルです。0から100の間で指定してください。"

@mcp.tool()
def turn_on() -> str:
    """ライトをオンにします。"""
    global status
    if status == "on":
        return "OKですが、ライトはすでにオンです"
    status = "on"
    return "ライトをオンにしました"

@mcp.tool()
def turn_off() -> str:
    """ライトをオフにします。"""
    global status
    if status == "off":
        return "OKですが、ライトはすでにオフです"
    status = "off"
    return "ライトをオフにしました"
上記のPythonコードは、MCP over MQTTプロトコルを使ってスマートライトデバイスをシミュレートするMCPサーバーを起動します。ライトのオン・オフや明るさ調整のMCPツールを公開しています。サーバー名は devices/light に指定しています。
次に、別々の2つのターミナルで以下のコマンドを実行し、デバイスIDがそれぞれ abc123 と abc456 の2台のMCPサーバーを起動します:
MQTT_CLIENT_ID=abc123 mcp run -t mqtt ./smart_light.py
MQTT_CLIENT_ID=abc456 mcp run -t mqtt ./smart_light.py
Cherry Studioクライアントでのテスト
ここでは、MCP対応のCherry StudioクライアントをMCPクライアントとして使用し、EMQX MCPブリッジプラグインをテストします。
Cherry Studioクライアントを、Cherry Studioのドキュメントに従ってインストールします:
https://docs.cherry-ai.com/Model Provider ページでLLMプロバイダーを追加し、モデルエンドポイント、APIキーなど必要な情報を設定します。
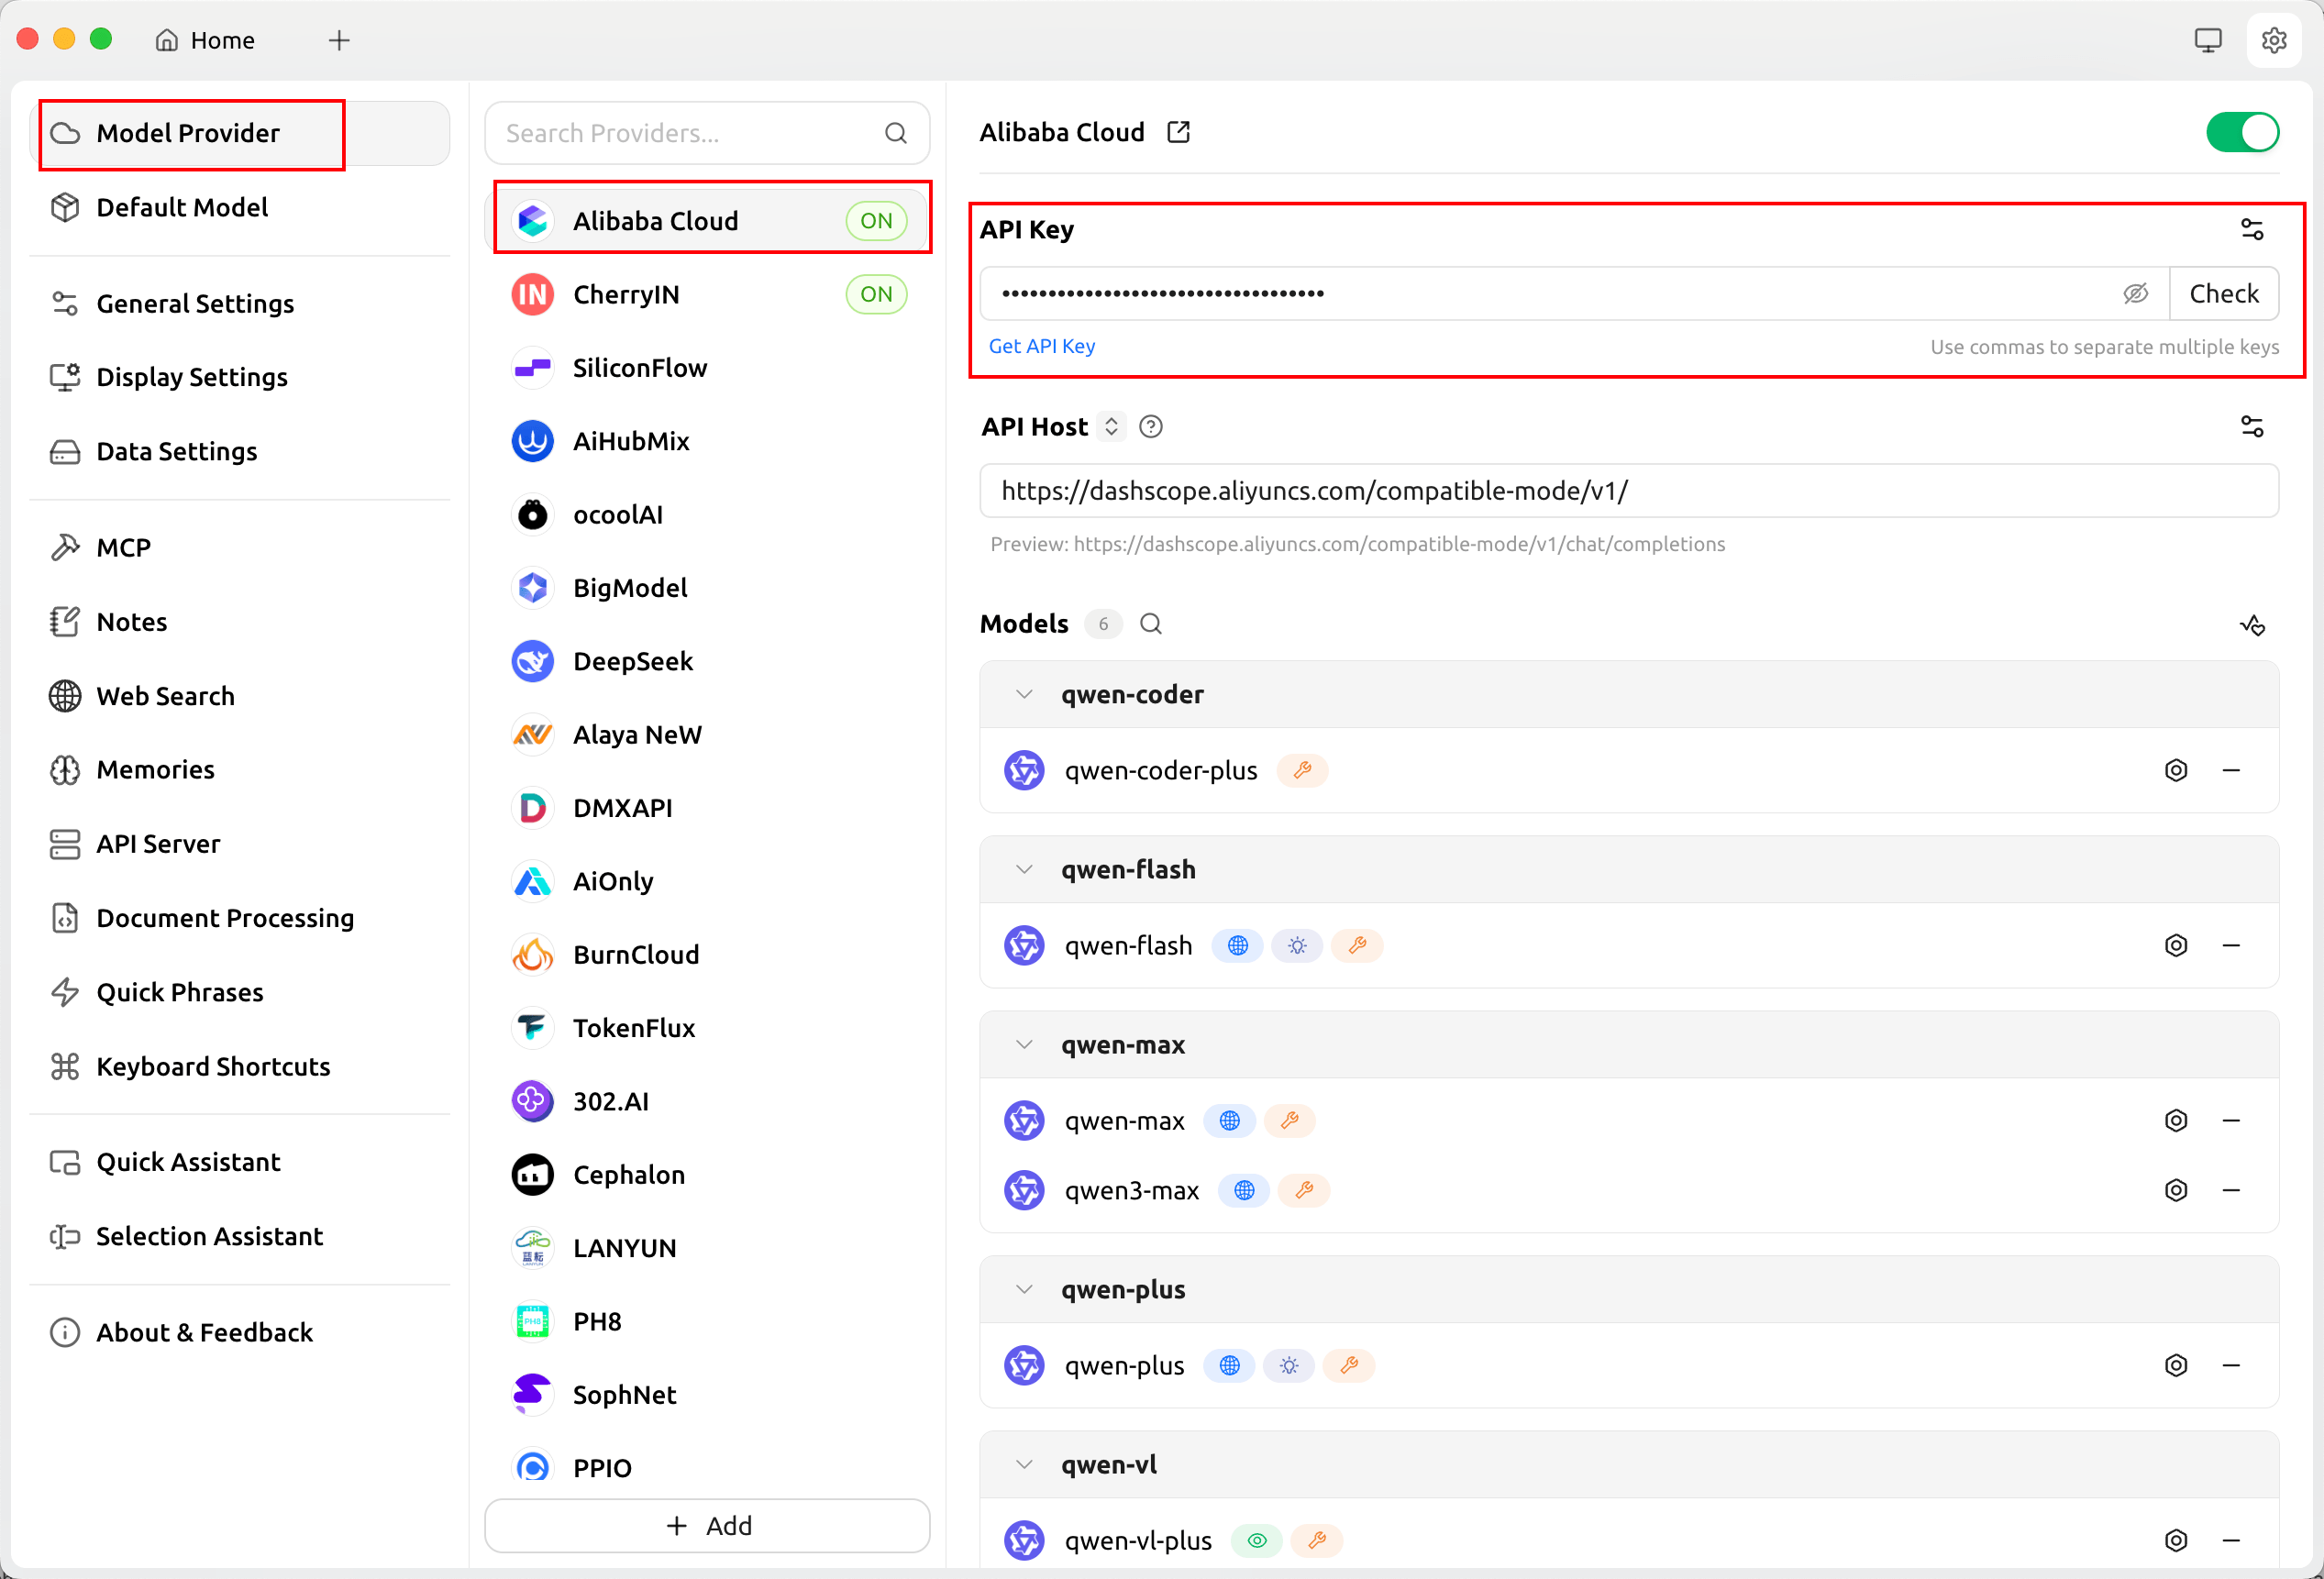
MCP ページで以下の設定でMCPサーバーを追加します:
名前:
MQTT MCP Toolsタイプ:SSE または Streamable HTTP(本例では Streamable HTTPを使用)
URL:MCPブリッジが提供するStreamable HTTPエンドポイント
http://localhost:9909/mcpヘッダー:モデルに不要なツールを多く公開しないように、
devices/lightタイプのツールのみを読み込むために以下のヘッダーを追加します:Tool-Types=devices/light
ここで
devices/lightは前述のPythonデバイス側コードで指定したMCPサーバー名です。Cherry StudioはHTTPおよびSSE両方のプロトコルをサポートしています。ローカルテストでは
http://localhost:9909/mcpを使用できます。
「Device Assistant」という新しいアシスタントを作成し、その中に「MQTT Device Control」という会話トピックを作成します。アシスタントと会話トピックのシステムプロンプトを以下のように設定します:
アシスタントのシステムプロンプト:
あなたはデバイスアシスタントです。デバイスのアクセスおよび制御に関する質問にのみ回答してください。それ以外の質問には「私はデバイスアシスタントであり、他の質問には答えられません」と直接回答してください。会話のシステムプロンプト:
私は以下のデバイスを持っています:
- リビングルームのライト、デバイスID:abc123
- 寝室のライト、デバイスID:abc456
会話設定でMCPツールを有効にし、
MQTT MCP Toolsサーバーを指定します。
最後に、ツール呼び出しに対応したモデル(例:
qwen-flash)を選択します。チャットボックスに以下のようなコマンドを入力して自然言語によるデバイス制御をテストできます:リビングルームのライトをオンにして。 寝室のライトの明るさを75%に設定して。システムプロンプトに基づき、デバイスアシスタントが正しいデバイスIDを特定し、対応するMCPツールを呼び出してデバイスを制御する様子が確認できます。