Ingest MQTT Data into ClickHouse
ClickHouse is a high-performance, column-oriented SQL database management system (DBMS) for online analytical processing (OLAP), that excels in processing and analyzing large volumes of data with minimal latency. It features excellent query performance, a flexible data model, and scalable distributed architecture, making it suitable for various data analytics scenarios. EMQX supports integration with ClickHouse, which enables you to ingest the MQTT messages and events data into ClickHouse for further analysis and processing.
How It Works
ClickHouse data integration is an out-of-the-box feature in EMQX designed to combine the MQTT's real-time data capturing and transmission capabilities with ClickHouse's powerful data processing functionality. With a built-in rule engine component, the integration simplifies the process of ingesting data from EMQX to ClickHouse for storage and analysis, eliminating the need for complex coding.
The diagram below illustrates a typical architecture of data integration between EMQX and ClickHouse.
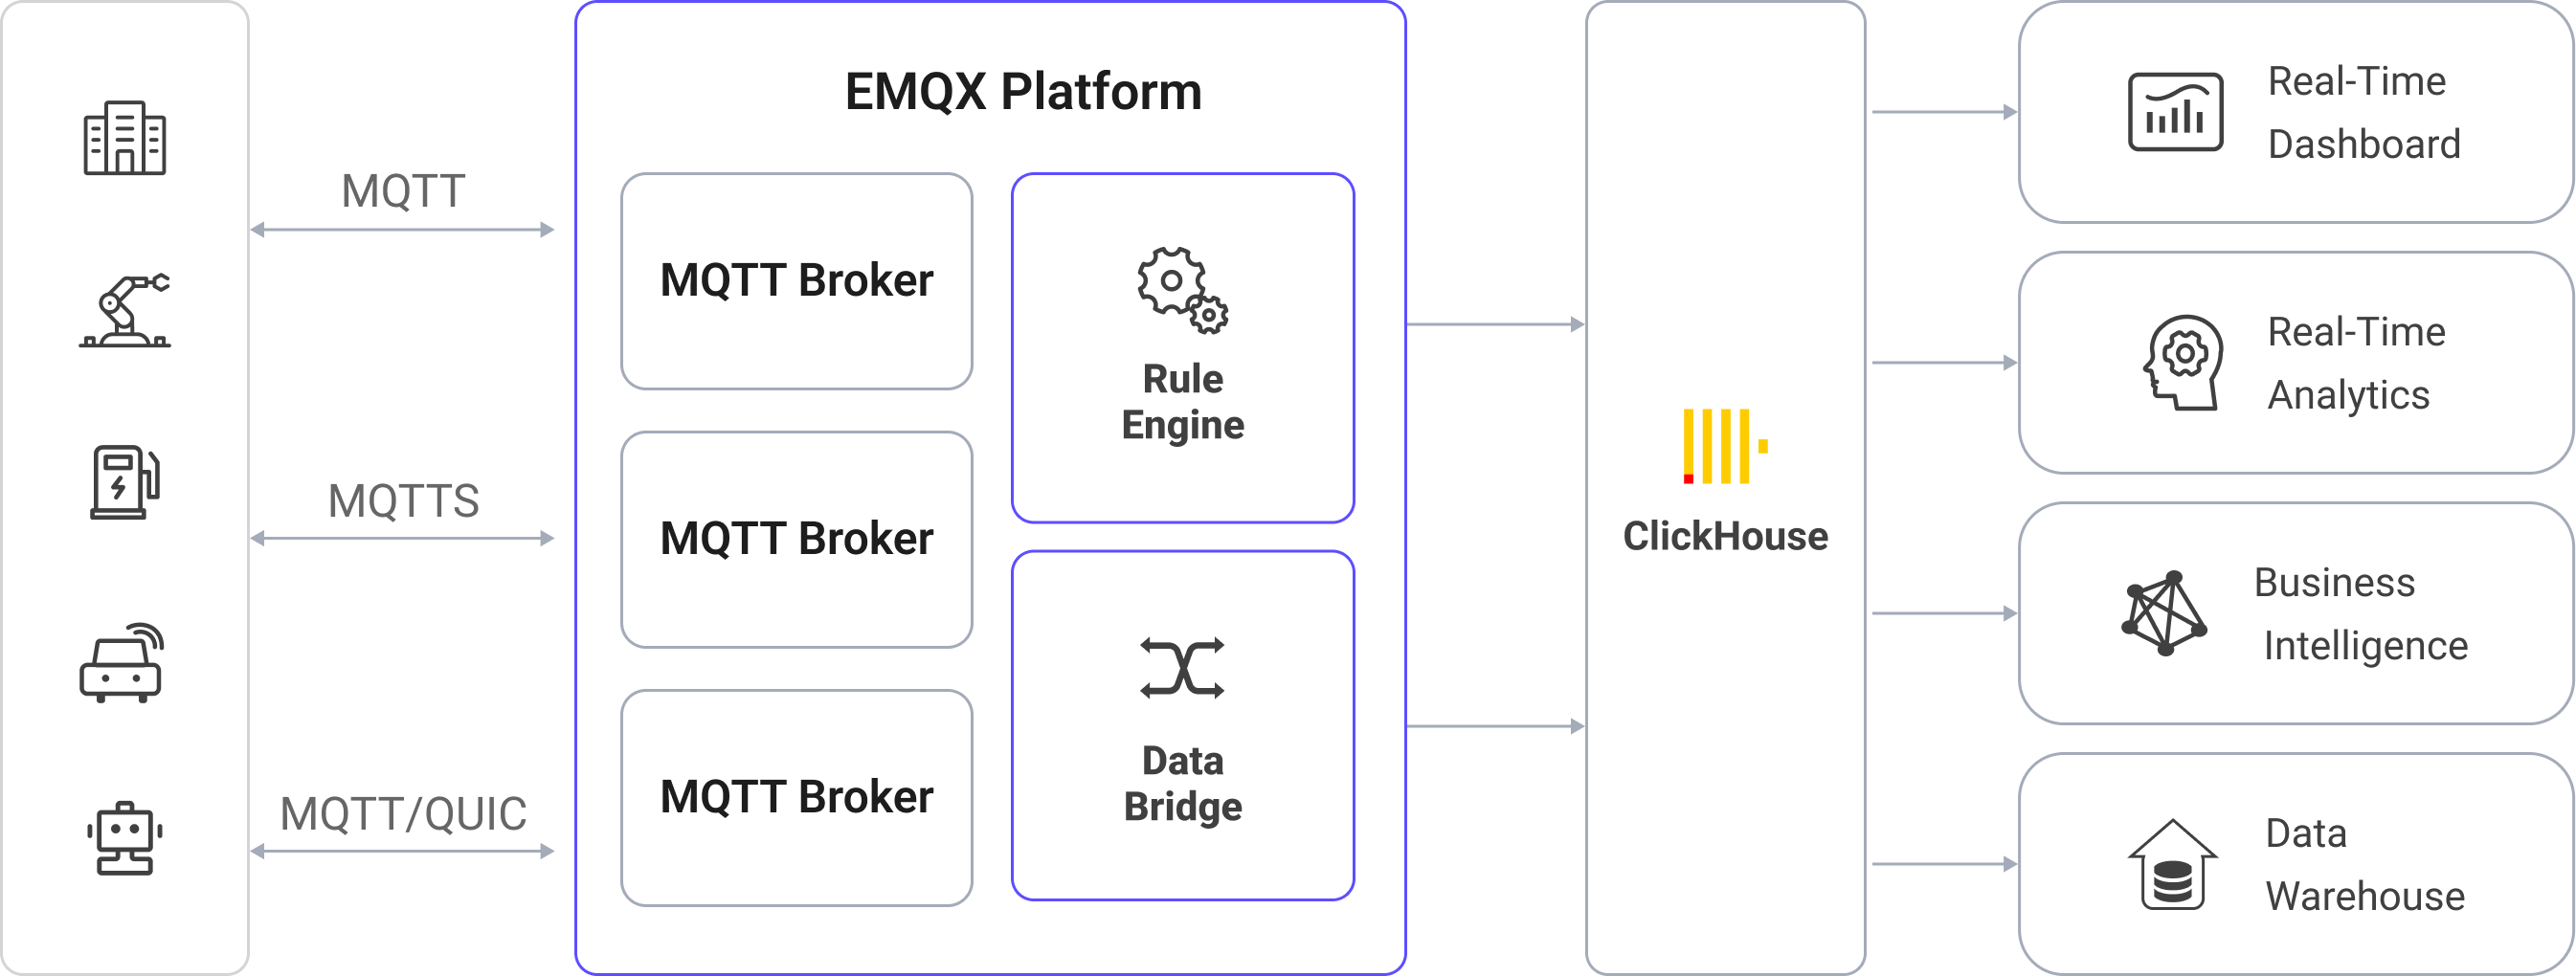
Ingesting MQTT data into ClickHouse works as follows:
- Message publication and reception: Industrial IoT devices establish successful connections to EMQX through the MQTT protocol and publish real-time MQTT data from machines, sensors, and product lines based on their operational states, readings, or triggered events to EMQX. When EMQX receives these messages, it initiates the matching process within its rules engine.
- Message data processing: When a message arrives, it passes through the rule engine and is then processed by the rule defined in EMQX. The rules, based on predefined criteria, determine which messages need to be routed to ClickHouse. If any rules specify payload transformations, those transformations are applied, such as converting data formats, filtering out specific information, or enriching the payload with additional context.
- Data ingestion into ClickHouse: Once the rule engine identifies a message for ClickHouse storage, it triggers an action of forwarding the messages to ClickHouse. Processed data will be seamlessly written into the collection of the ClickHouse database.
- Data Storage and Utilization: With the data now stored in ClickHouse, businesses can harness its querying power for various use cases. For instance, in logistics and supply chain management fields, data from IoT devices such as GPS trackers, temperature sensors, and inventory management systems can be monitored and analyzed for real-time tracking, route optimization, demand forecasting, and efficient inventory management.
Features and Benefits
The data integration with ClickHouse offers a range of features and benefits tailored to ensure efficient data transmission, storage, and utilization:
- Real-time Data Streaming: EMQX is built for handling real-time data streams, ensuring efficient and reliable data transmission from source systems to ClickHouse. It enables organizations to capture and analyze data in real-time, making it ideal for use cases requiring immediate insights and actions.
- High Performance and Scalability: EMQX's distributed architecture and ClickHouse's columnar storage format enable seamless scalability as data volumes increase. This ensures consistent performance and responsiveness, even with large datasets.
- Flexibility in Data Transformation: EMQX provides a powerful SQL-based Rule Engine, allowing organizations to pre-process data before storing it in ClickHouse. It supports various data transformation mechanisms, such as filtering, routing, aggregation, and enrichment, enabling organizations to shape the data according to their needs.
- Easy Deployment and Management: EMQX provides a user-friendly interface for configuring data sources, pre-processing data rules, and ClickHouse storage settings. This simplifies the setup and ongoing management of the data integration process.
- Advanced Analytics: ClickHouse's powerful SQL-based query language and support for complex analytical functions empower users to gain valuable insights from IoT data, enabling predictive analytics, anomaly detection, and more.
Before You Start
This section describes the preparations you need to complete before you start to create the ClickHouse data integration in EMQX Dashboard.
Prerequisites
Knowledge about EMQX data integration rules
Knowledge about data integration
Basic knowledge of UNIX terminal and commands
Start a ClickHouse Server
This section introduces how to start a ClickHouse server using Docker.
Create a file called
init.sqlusing the following initialization SQL statements. This file helps to initialize the database when the container starts up.bashcat >init.sql <<SQL_INIT CREATE DATABASE IF NOT EXISTS mqtt_data; CREATE TABLE IF NOT EXISTS mqtt_data.messages ( data String, arrived TIMESTAMP ) ENGINE = MergeTree() ORDER BY arrived; SQL_INITStart a ClickHouse server using the following command. The command defines the database name, port number, user name, and password. It will also mount the
init.sqlfile in the current directory to the docker directory.bashdocker run \ --rm \ -e CLICKHOUSE_DB=mqtt_data \ -e CLICKHOUSE_USER=emqx \ -e CLICKHOUSE_DEFAULT_ACCESS_MANAGEMENT=1 \ -e CLICKHOUSE_PASSWORD=public \ -p 18123:8123 \ -p 19000:9000 \ --ulimit nofile=262144:262144 \ -v $pwd/init.sql:/docker-entrypoint-initdb.d/init.sql \ clickhouse/clickhouse-server
You can find more information about running ClickHouse in docker on dockerhub.
Create a Connector
This section demonstrates how to create a Connector to connect the Sink to the ClickHouse server.
The following steps assume that you run both EMQX and ClickHouse on the local machine. If you have ClickHouse and EMQX running remotely, adjust the settings accordingly.
- Enter the EMQX Dashboard and click Integration -> Connectors.
- Click Create in the top right corner of the page.
- On the Create Connector page, select ClickHouse and then click Next.
- In the Configuration step, configure the following information:
- Connector name: Enter a name for the connector, which should be a combination of upper and lower-case letters and numbers, for example:
my_clickhouse. - Server URL:
http://127.0.0.1:18123 - Database Name:
mqtt_data - Username:
emqx - Password:
public
- Connector name: Enter a name for the connector, which should be a combination of upper and lower-case letters and numbers, for example:
- Advanced settings (optional): See Advanced Configurations.
- Before clicking Create, you can click Test Connectivity to test if the connector can connect to the ClickHouse server.
- Click the Create button at the bottom to complete the creation of the connector. In the pop-up dialog, you can click Back to Connector List or click Create Rule to continue creating rules and Sink to specify the data to be forwarded to ClickHouse. For detailed steps, see Create a Rule with ClickHouse Sink.
Create a Rule with Clickhouse Sink
This section demonstrates how to create a rule in Dashboard for processing messages from the source MQTT topic t/# and forwarding the processed results to ClickHouse via a configured Sink.
Go to EMQX Dashboard, and click Integration -> Rules from the left navigation menu.
Click Create on the top right corner of the page.
Enter the rule ID, for example,
my_rule.Enter the following statement in the SQL editor, which will forward the MQTT messages matching the topic pattern
t/#.sqlSELECT payload as data, now_timestamp() as timestamp FROM "t/#"Note: If you are a beginner user, click SQL Examples and Enable Test to learn and test the SQL rule.
Click the + Add Action button to define an action that will be triggered by the rule. With this action, EMQX sends the data processed by the rule to ClickHouse.
Select
ClickHousefrom the Type of Action dropdown list. Keep the Action dropdown with the defaultCreate Actionvalue. You can also select a ClickHouse Sink if you have created one. This demonstration will create a new Sink.Enter a name for the Sink. The name should combine upper/lower case letters and numbers.
Select the
my_clickhousejust created from the Connector dropdown box. You can also create a new Connector by clicking the button next to the dropdown box. For the configuration parameters, see Create a Connector.Keep the default value
,in the Batch Value Separator to distinguish multiple input items. This setting only needs to be changed if you enable batch mode for the data integration and if you specify an alternative format with ClickHouse's FORMAT syntax.Enter the following command in the SQL template (You can use the Rule Engine to ensure that strings in the input SQL statement are properly escaped to prevent SQL injection attacks):
sqlINSERT INTO messages(data, arrived) VALUES ('${data}', ${timestamp})Here,
${data}and${timestamp}represent the message content and timestamp, respectively, which will be configured later in the rules for message forwarding. EMQX will replace them with the corresponding content before forwarding the message.If a placeholder variable is undefined in the SQL template, you can toggle the Undefined Vars as Null switch above the SQL template to define the rule engine behavior:
Disabled (default): The rule engine can insert the string
undefinedinto the database.Enabled: Allow the rule engine to insert
NULLinto the database when a variable is undefined.TIP
If possible, this option should always be enabled; disabling the option is only used to ensure backward compatibility.
Fallback Actions (Optional): If you want to improve reliability in case of message delivery failure, you can define one or more fallback actions. These actions will be triggered if the primary Sink fails to process a message. See Fallback Actions for more details.
Advanced settings (optional): See Advanced Configurations.
Before clicking Create, you can click the Test Connectivity button to ensure that you can connect to the ClickHouse server.
Click the Create button to complete the Sink configuration. Back on the Create Rule page, you will see the new Sink appear under the Action Outputs tab.
On the Create Rule page, verify the configured information and click the Create button to generate the rule. The rule you created is shown in the rule list and the status should be connected.
Now you have successfully created the rule and you can see the new rule appear on the Rule page. Click the Actions(Sink) tab, you see the new ClickHouse Sink.
You can also click Integration -> Flow Designer to view the topology. You can see that the messages under topic t/# are sent and saved to ClickHouse after parsing by the rule my_rule.
Test the Rule
You can use the built-in WebSocket client in the EMQX dashboard to test if the rule works as expected.
Click Diagnose -> WebSocket Client in the left navigation menu of the Dashboard to access the WebSocket Client. Follow the steps below to set up a WebSocket client and send a message to the topic t/test:
Fill in the connection information for the current EMQX instance. If you are running EMQX locally, you can use the default values unless you have changed EMQX's default configuration (for example, you might have configured authentication which may require you to type in a username and password).
Click Connect to connect the client to the EMQX instance.
Scroll down to the publish area and type in the following:
- Topic:
t/test - Payload:
Hello World Clickhouse from EMQX - QoS: 2
- Topic:
Click Publish to send the message. An entry should have been inserted in the table
messagesin the databasemqtt_datain the ClickHouse server. You can check this by running the following command from a terminal:bashcurl -u emqx:public -X POST -d "SELECT * FROM mqtt_data.messages" http://localhost:18123If everything is working correctly the command above should print something like this (obviously, the timestamp will be different):
Hello World Clickhouse from EMQX 2024-01-17 09:40:06
Advanced Configurations
This section delves deeper into the advanced configuration options available for the EMQX ClickHouse Connector. When configuring the Connector in the Dashboard, navigate to Advanced Settings to tailor the following parameters to meet your specific needs.
| Fields | Descriptions | Recommended Value |
|---|---|---|
| Connection Pool Size | Specifies the number of concurrent connections that can be maintained in the connection pool when interfacing with the ClickHouse service. This option helps in managing the application's scalability and performance by limiting or increasing the number of active connections between EMQX and ClickHouse. Note: Setting an appropriate connection pool size depends on various factors such as system resources, network latency, and the specific workload of your application. Too large a pool size may lead to resource exhaustion, while too small a size may limit throughput. | 8 |
| Clickhouse Timeout | Specifies the maximum amount of time, in seconds, that the Connector will wait while attempting to establish a connection with the ClickHouse server. Note: A carefully chosen timeout setting is crucial for balancing system performance and resource utilization. It is advisable to test the system under various network conditions to find the optimal timeout value for your specific use case. | 15 |
| Start Timeout | Determines the maximum time interval, in seconds, that the Connector will wait for an auto-started resource to reach a healthy state before responding to resource creation requests. This setting helps ensure that the Connector does not proceed with operations until it verifies that the connected resource—such as a database instance in ClickHouse—is fully operational and ready to handle data transactions. | 5 |
| Buffer Pool Size | Specifies the number of buffer worker processes that will be allocated for managing data flow in egress-type sinks between EMQX and ClichHouse. These worker processes are responsible for temporarily storing and handling data before it is sent to the target service. This setting is particularly relevant for optimizing performance and ensuring smooth data transmission in egress (outbound) scenarios. For bridges that only deal with ingress (inbound) data flow, this option can be set to "0" as it is not applicable. | 16 |
| Request TTL | The "Request TTL" (Time To Live) configuration setting specifies the maximum duration, in seconds, that a request is considered valid once it enters the buffer. This timer starts ticking from the moment the request is buffered. If the request stays in the buffer for a period exceeding this TTL setting or if it is sent but does not receive a timely response or acknowledgment from ClickHouse, the request is deemed to have expired. | 45 |
| Health Check Interval | Specifies the time interval, in seconds, at which the Connector will perform automated health checks on the connection to ClickHouse. | 15 |
| Max Buffer Queue Size | Specifies the maximum number of bytes that can be buffered by each buffer worker in the ClickHouse Connector. Buffer workers temporarily store data before it is sent to ClickHouse, serving as an intermediary to handle data flow more efficiently. Adjust the value according to your system's performance and data transfer requirements. | 256 |
| Max Batch Size | Specifies the maximum size of data batches that can be transmitted from EMQX to ClickHouse in a single transfer operation. By adjusting the size, you can fine-tune the efficiency and performance of data transfer between EMQX and ClickHouse. If the "Max Batch Size" is set to "1," data records are sent individually, without being grouped into batches. | 1 |
| Query Mode | Allows you to choose asynchronous or synchronous query modes to optimize message transmission based on different requirements. In asynchronous mode, writing to ClickHouse does not block the MQTT message publish process. However, this might result in clients receiving messages ahead of their arrival in ClickHouse. | Async |
| Inflight Window | An "in-flight query" refers to a query that has been initiated but has not yet received a response or acknowledgment. This setting controls the maximum number of in-flight queries that can exist simultaneously when the Connector is communicating with ClickHouse. When the Query Mode is set to async (asynchronous), the "Inflight Window" parameter gains special importance. If it is crucial for messages from the same MQTT client to be processed in strict order, you should set this value to 1. | 100 |
More Information
Check out the following links to learn more:
Blogs: