Stream MQTT Data into Apache Pulsar
Apache Pulsar is a popular open-source distributed event streaming platform designed for the efficient transmission of real-time data streams between applications and systems. Apache Pulsar offers greater scalability, faster throughput, and lower latency. In IoT applications, data generated by devices is typically transmitted using a lightweight MQTT protocol. With data integration between Apache Pulsar and EMQX, users can effortlessly stream MQTT data into Apache Pulsar and connect it with other data systems for real-time processing, storage, and analysis of data generated by IoT devices.
This page provides a detailed overview of the data integration between EMQX and Pulsar with practical instructions on creating and validating the data integration.
How It Works
Apache Pulsar data integration is an out-of-the-box feature of EMQX that combines EMQX's device connectivity and message transmission capabilities with Pulsar's robust data processing capabilities. With the built-in rule engine component, the data streaming and processing process is simplified between the two platforms. This means that you can easily transmit MQTT data to Pulsar and leverage Pulsar's powerful features for data processing without the need for complex coding, making the management and utilization of IoT data more efficient and convenient.
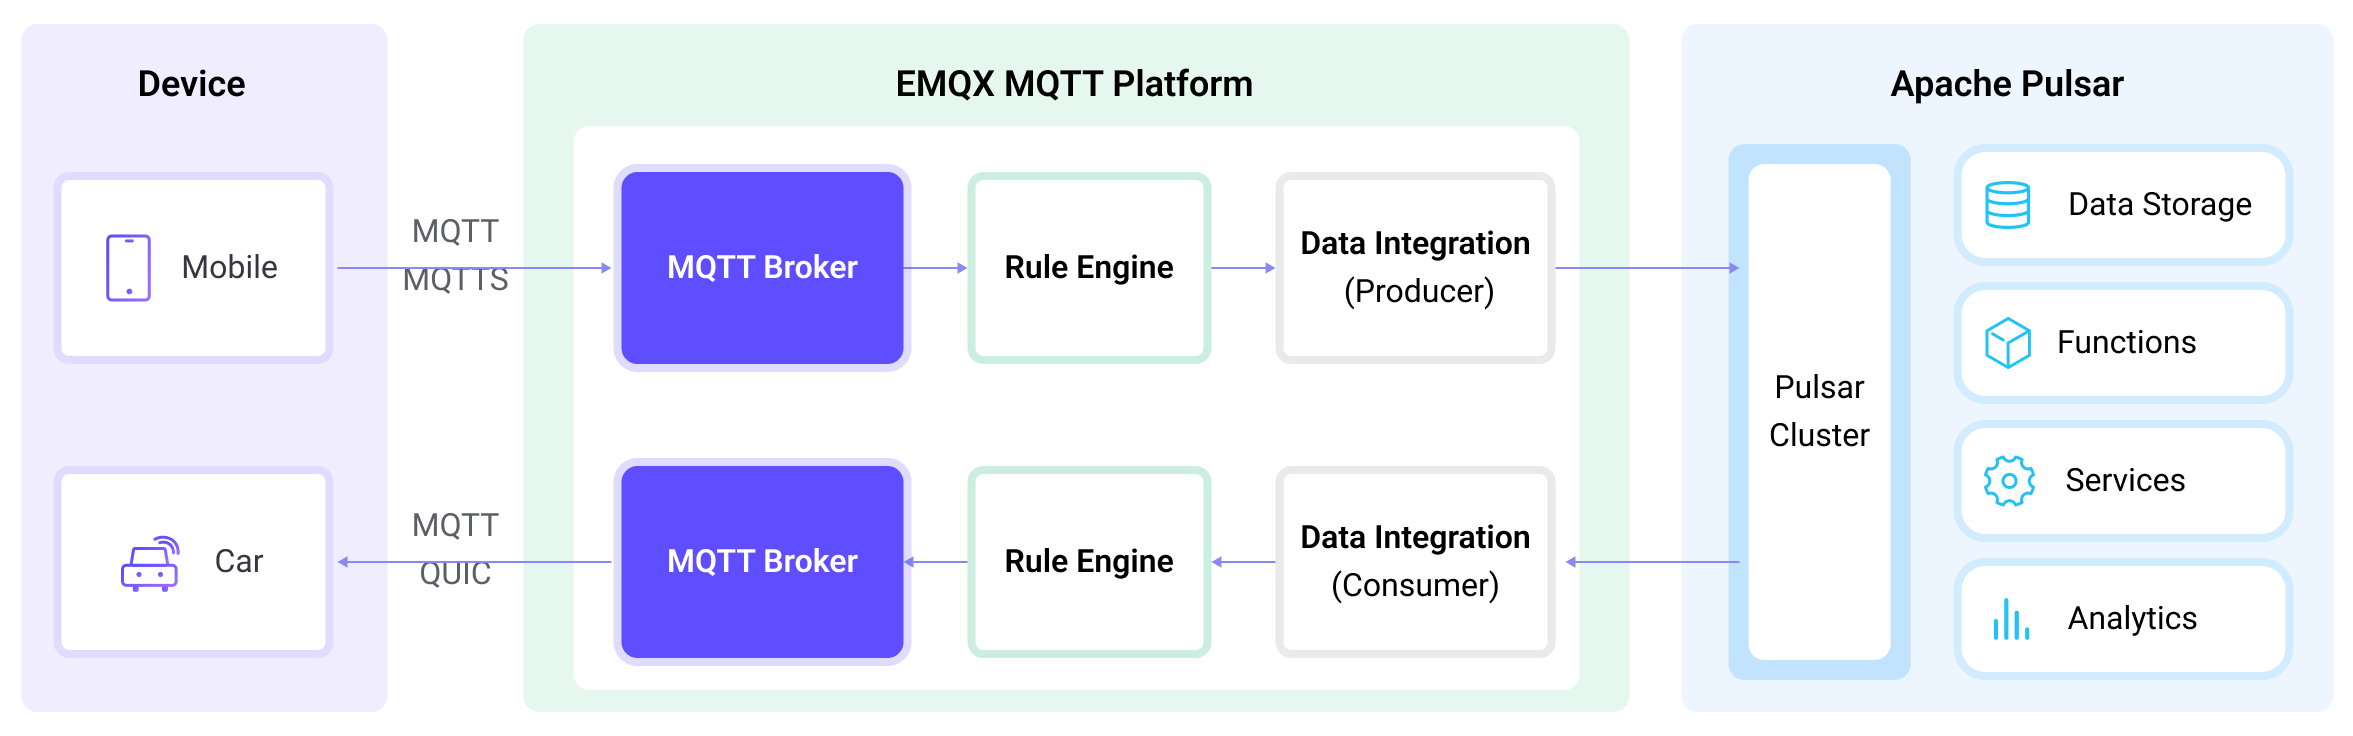
EMQX forwards MQTT data to Apache Pulsar through the rule engine and configured Sink, and the complete process is as follows:
- Message publication and reception: IoT devices establish successful connections through the MQTT protocol and subsequently publish telemetry and status data to specific topics. When EMQX receives these messages, it initiates the matching process within its rules engine.
- Rule engine processes messages: Using the built-in rule engine, MQTT messages from specific sources can be processed based on topic matching. The rule engine matches corresponding rules and processes messages, such as data format conversion, filtering specific information, or enriching messages with context information.
- Data streaming into Apache Pulsar: Rule triggers the action of forwarding messages to Pulsar where data can be easily configured to Pulsar message key and value. MQTT topics can also be mapped to Pulsar topics for better data organization and identification, facilitating subsequent data processing and analysis.
After MQTT message data is written to Apache Pulsar, you can engage in flexible application development, such as:
- Write Pulsar consumer applications to subscribe and process these messages. Depending on business needs, you can associate, aggregate, or transform MQTT data with other data sources, achieving real-time data synchronization and integration.
- Upon receiving specific MQTT messages, you can use Pulsar's rule engine component to trigger corresponding actions or events, enabling cross-system and application event-driven functionality.
- Analyze MQTT data streams in real-time within Pulsar, detect anomalies or specific event patterns, and trigger alert notifications or perform corresponding actions based on these conditions.
- Centralize data from multiple MQTT topics into a unified data stream and utilize Pulsar's computational capabilities for real-time aggregation, calculation, and analysis to gain more comprehensive data insights.
Features and Benefits
The data integration with Pulsar brings the following features and advantages to your business:
- Reliable IoT Data Message Delivery: EMQX can reliably batch and send MQTT messages to Pulsar, enabling the integration of IoT devices with Pulsar and application systems.
- MQTT Message Transformation: Using the rule engine, EMQX can filter and transform MQTT messages. Messages can undergo data extraction, filtering, enrichment, and transformation before being sent to Pulsar.
- Flexible Topic Mapping: The Pulsar Sink supports flexible mapping of MQTT topics to Pulsar topics, allowing easy configuration of keys (Key) and values (Value) for data in Pulsar messages.
- Flexible Partition Selection: The Pulsar Sink can select Pulsar partitions based on MQTT topics or clients using different strategies, providing flexibility in organizing and identifying data.
- Processing Capabilities in High-Throughput Scenarios: The Pulsar Sink supports both synchronous and asynchronous write modes, allowing for a flexible balance between latency and throughput according to different scenarios.
Before You Start
This section describes the preparations you need to complete before you start to create the Pulsar data integration in EMQX Dashboard.
Prerequisites
- Knowledge about EMQX data integration rules
- Knowledge about data integration
Install Pulsar
Run Pulsar in Docker.
docker run --rm -it -p 6650:6650 --name pulsar apachepulsar/pulsar:2.11.0 bin/pulsar standalone -nfw -nssRefer to the Quick Start section in Pulsar Documentation for detailed operation steps.
Create Pulsar Topic
Relevant Pulsar topics should be created before creating the data integration in EMQX. Use the commands below to create a topic called my-topic in Pulsar under the public tenant, default namespace, with 1 partition.
docker exec -it pulsar bin/pulsar-admin topics create-partitioned-topic persistent://public/default/my-topic -p 1Create a Connector
This section demonstrates how to create a Connector to connect the Sink to the Pulsar server.
The following steps assume that you run both EMQX and Pulsar on the local machine. If you have Pulsar and EMQX running remotely, adjust the settings accordingly.
- Enter the EMQX Dashboard and click Integration -> Connectors.
- Click Create in the top right corner of the page.
- On the Create Connector page, select Pulsar and then click Next.
- In the Configuration step, configure the following information:
- Enter the connector name, which should be a combination of upper and lower case letters and numbers, for example:
my_pulsar. - Bridge Role:
Produceris selected by default. - Configure the information for connecting to the Pulsar server and message writing:
- Servers: Enter
pulsar://localhost:6650for the Servers. If you have Pulsar and EMQX running remotely, adjust the settings accordingly. - Authentication: Select the authentication method:
none,Basic auth, ortoken. ForBasic auth, EMQX joinsUsernameandPasswordwith:to make the authentication string. - Enable TLS: If you want to establish an encrypted connection, click the toggle switch. For more information about TLS connection, see TLS for External Resource Access.
- Servers: Enter
- Enter the connector name, which should be a combination of upper and lower case letters and numbers, for example:
- Advanced settings (optional): See Advanced Configurations.
- Before clicking Create, you can click Test Connectivity to test if the connector can connect to the Pulsar server.
- Click the Create button at the bottom to complete the creation of the connector. In the pop-up dialog, you can click Back to Connector List or click Create Rule to continue creating rules and Sink to specify the data to be forwarded to Pulsar. For detailed steps, see Create a Rule with Pulsar Sink.
Create a Rule with Pulsar Sink
This section demonstrates how to create a rule in the Dashboard for processing messages from the source MQTT topic t/#, and saving the processed data to the Pulsar topic my-topic via a configured Sink.
Go to EMQX Dashboard, and click Integration -> Rules.
Click Create on the top right corner of the page.
Enter a rule ID, for example,
my_rule.Enter the following statement in the SQL Editor if you want to save the MQTT messages under topic
t/#to Pulsar.Note: If you want to specify your own SQL syntax, make sure that you have included all fields required by the Sink in the
SELECTpart.sqlSELECT * FROM "t/#"Note: If you are a beginner user, click SQL Examples and Enable Test to learn and test the SQL rule.
Click the + Add Action button to define an action that will be triggered by the rule. With this action, EMQX sends the data processed by the rule to Pulsar.
Select
Pulsarfrom the Action Type dropdown list.Keep the Action dropdown with the default
Create Actionvalue. You can also select a Sink if you have created one. This demonstration will create a new Sink.Enter a name for the Sink. The name should be a combination of upper/lower case letters and numbers.
Select the
my_pulsarjust created from the Connector dropdown box. You can also create a new Connector by clicking the button next to the dropdown box. For the configuration parameters, see Create a Connector.Configure the following options for the Sink:
Pulsar Topic Name: Enter
persistent://public/default/my-topic, the pulsar topic you created before. Note: Variables are not supported here.Partition Strategy: Select the way for the producer to dispatch messages to Pulsar partitions:
random,roundrobin, orkey_dispatch.Compression: Specify whether or not to use compression algorithms and which algorithms are used to compress/decompress the records in a Pulsar message. The optional values are:
no_compression,snappy, orzlib.Retention Period: Define how long messages published to Pulsar topics will be retained in those topics. This setting allows you to control the duration for which messages will be available for consumption by subscribers.The default setting is
infinitywhich means there is no automatic expiration of messages. If you specify a numerical value in seconds, messages that exceed this time limit will automatically expire and be removed from the topic.Message Key: Pulsar message key. Insert a string here, either a plain string or a string containing placeholders (${var}).
Message Value: Pulsar message value. Insert a string here, either a plain string or a string containing placeholders (${var}).
Fallback Actions (Optional): If you want to improve reliability in case of message delivery failure, you can define one or more fallback actions. These actions will be triggered if the primary Sink fails to process a message. See Fallback Actions for more details.
Advanced settings (optional): See Advanced Configurations.
Before clicking Create, you can click Test Connectivity to test that the Connector can connect to the Pulsar server.
Click the Create button to complete the Sink configuration. A new Sink will be added to the Action Outputs.
Back on the Create Rule page, verify the configured information. Click the Create button to generate the rule.
You have now successfully created the rule. You can see the newly created rule on the Integration -> Rules page. Click the Actions(Sink) tab and you can see the new Pulsar Sink.
You can also click Integration -> Flow Designer to view the topology and you can see that the messages under topic t/# are sent and saved to Pulsar.
Test the Rule
Use MQTTX to send messages to topic t/1:
mqttx pub -i emqx_c -t t/1 -m '{ "msg": "Hello Pulsar" }'Check the Sink running status, there should be one new incoming and one new outgoing message.
Check whether messages are written into the topic persistent://public/default/my-topic with the following Pulsar command:
docker exec -it pulsar bin/pulsar-client consume -n 0 -s mysubscriptionid -p Earliest persistent://public/default/my-topicAdvanced Configurations
This section describes some advanced configuration options that can optimize the performance of your Pulsar Sink and customize the operation based on your specific scenarios. When creating the Sink, you can unfold the Advanced Settings and configure the following settings according to your business needs.
| Fields | Descriptions | Recommended Values |
|---|---|---|
| Max Inflight | The maximum number of message batches that the producer can send to each partition before it must wait for a receipt. Setting a higher number can enhance throughput. | 10 |
| Sync Publish Timeout | The maximum amount of time the publisher will wait for a response or confirmation that the message has been successfully delivered in a synchronous publish operation. This timeout setting can be essential for ensuring data reliability, as it prevents the publisher from blocking indefinitely in case of delivery issues or network problems. | 3 second |
| Socket Send Buffer Size | Manages the size of socket buffers to optimize network transmission performance. | 1 MB |
| Batch Size | Specify the maximum number of individual requests to be batched within a Pulsar message. | 100 |
| Max Batch Bytes | The maximum size, in bytes, for collecting messages within a Pulsar batch. Typically, Pulsar brokers have a default batch size limit of 1 MB. However, EMQX's default value is intentionally set slightly lower than 1 MB to account for Pulsar message encoding overheads, particularly when individual messages are very small. A single message will still be sent as a separate batch if it exceeds this limit. | 900 KB |
| Query Mode | Allows you to choose asynchronous or synchronous query modes to optimize message transmission based on different requirements. In asynchronous mode, writing to Pulsar does not block the MQTT message publish process. However, this might result in clients receiving messages ahead of their arrival in Pulsar. | Async |
| Buffer Mode | Defines whether messages are stored in a buffer before being sent. Memory buffering can increase transmission speeds.memory: Messages are buffered in memory. They will be lost in the event of an EMQX node restart.disk: Messages are buffered on disk, ensuring they can survive an EMQX node restart.hybrid: Messages are initially buffered in memory. When they reach a certain limit (refer to the segment_bytes configuration for more details), they are gradually offloaded to disk. Similar to the memory mode, messages will be lost if the EMQX node restarts. | memory |
| Pulsar Per-partition Buffer Limit | Maximum allowed buffer size, in bytes, for each Pulsar partition. When this limit is reached, older messages will be discarded to make room for new ones by reclaiming buffer space. This option helps to balance memory usage and performance. | 2 GB |
| Segment File Bytes | This setting is applicable when the buffer mode is configured as disk or hybrid. It controls the size of segmented files used to store messages, influencing the optimization level of disk storage. | 100 MB |
| Memory Overload Protection | This setting applies when the buffer mode is configured as memory. EMQX will automatically discard older buffered messages when it encounters high memory pressure. It helps prevent system instability due to excessive memory usage, ensuring system reliability. Note: This configuration is effective only on Linux systems. | disabled |
| Start Timeout | Determines the maximum time interval, in seconds, that the Connector will wait for an auto-started resource to reach a healthy state before responding to resource creation requests. This setting helps ensure that the Connector does not proceed with operations until it verifies that the connected resource, such as an instance in Polar, is fully operational and ready to handle data transactions. | 5 second |
| Health Check Interval | The time interval for checking the running status of the Sink. | 1 second |