Use Node-RED with EMQX
Node-RED is a flow-based programming tool that provides a browser-based editor for wiring together hardware devices, APIs, and online services. It uses a visual, node-based interface where you connect pre-built nodes to create data flows. Node-RED supports MQTT natively through its built-in mqtt-in (subscribe) and mqtt-out (publish) nodes, making it a popular choice for processing IoT data from EMQX.
This page explains how to install Node-RED, connect it to EMQX, and build a data processing pipeline that parses, filters, and transforms MQTT messages.
Prerequisites
- Node.js 18 LTS or 20 LTS (for NPM installation)
- An EMQX deployment, or use the EMQX public broker for testing
- MQTTX or another MQTT client for sending test messages
Install Node-RED
Via NPM:
npm install -g --unsafe-perm node-redThen start Node-RED:
node-redVia Docker:
docker run -it -p 1880:1880 --name mynodered nodered/node-redAfter startup, open your browser and navigate to http://127.0.0.1:1880 to access the Node-RED editor.
For more installation options including Raspberry Pi and cloud deployment, see the Node-RED documentation.
MQTT Broker Setup
You need an MQTT broker for Node-RED to connect to. This guide uses EMQX, which supports MQTT 3.1, 3.1.1, and 5.0.
EMQX Public Broker (Testing)
For quick testing without deploying your own broker, you can use the EMQX public broker.
| Parameter | Value |
|---|---|
| Broker Address | broker.emqx.io |
| TCP Port | 1883 |
| SSL/TLS Port | 8883 |
| WebSocket Port | 8083 |
| Secure WebSocket Port | 8084 |
The public broker is intended for testing and demonstration purposes only.
EMQX Enterprise Deployment
For production scenarios, connect Node-RED to your own EMQX Enterprise deployment using the broker address, ports, and authentication credentials defined in your environment.
Typical configurations include:
- Custom broker hostname or IP address
- Username/password authentication or mutual TLS
- Access control rules (ACLs) applied to topics
Refer to your EMQX Enterprise listener and authentication configuration when setting up Node-RED broker connections.
In addition to self-managed EMQX Enterprise deployments, you can also connect Node-RED to the fully managed MQTT service EMQX Cloud (Serverless or Dedicated). Use the broker address, ports, and credentials provided by EMQX Cloud.
Build a Basic MQTT Flow
The following steps create a minimal flow that subscribes to one topic and forwards received messages to another topic.
Step 1: Add an MQTT Subscribe Node
In the Node-RED editor, drag an mqtt-in node from the left palette onto the canvas.
Double-click the node to open its properties.
Click the pencil icon next to the Server field to create a new broker connection.
Enter
broker.emqx.ioas the Server address and click Add.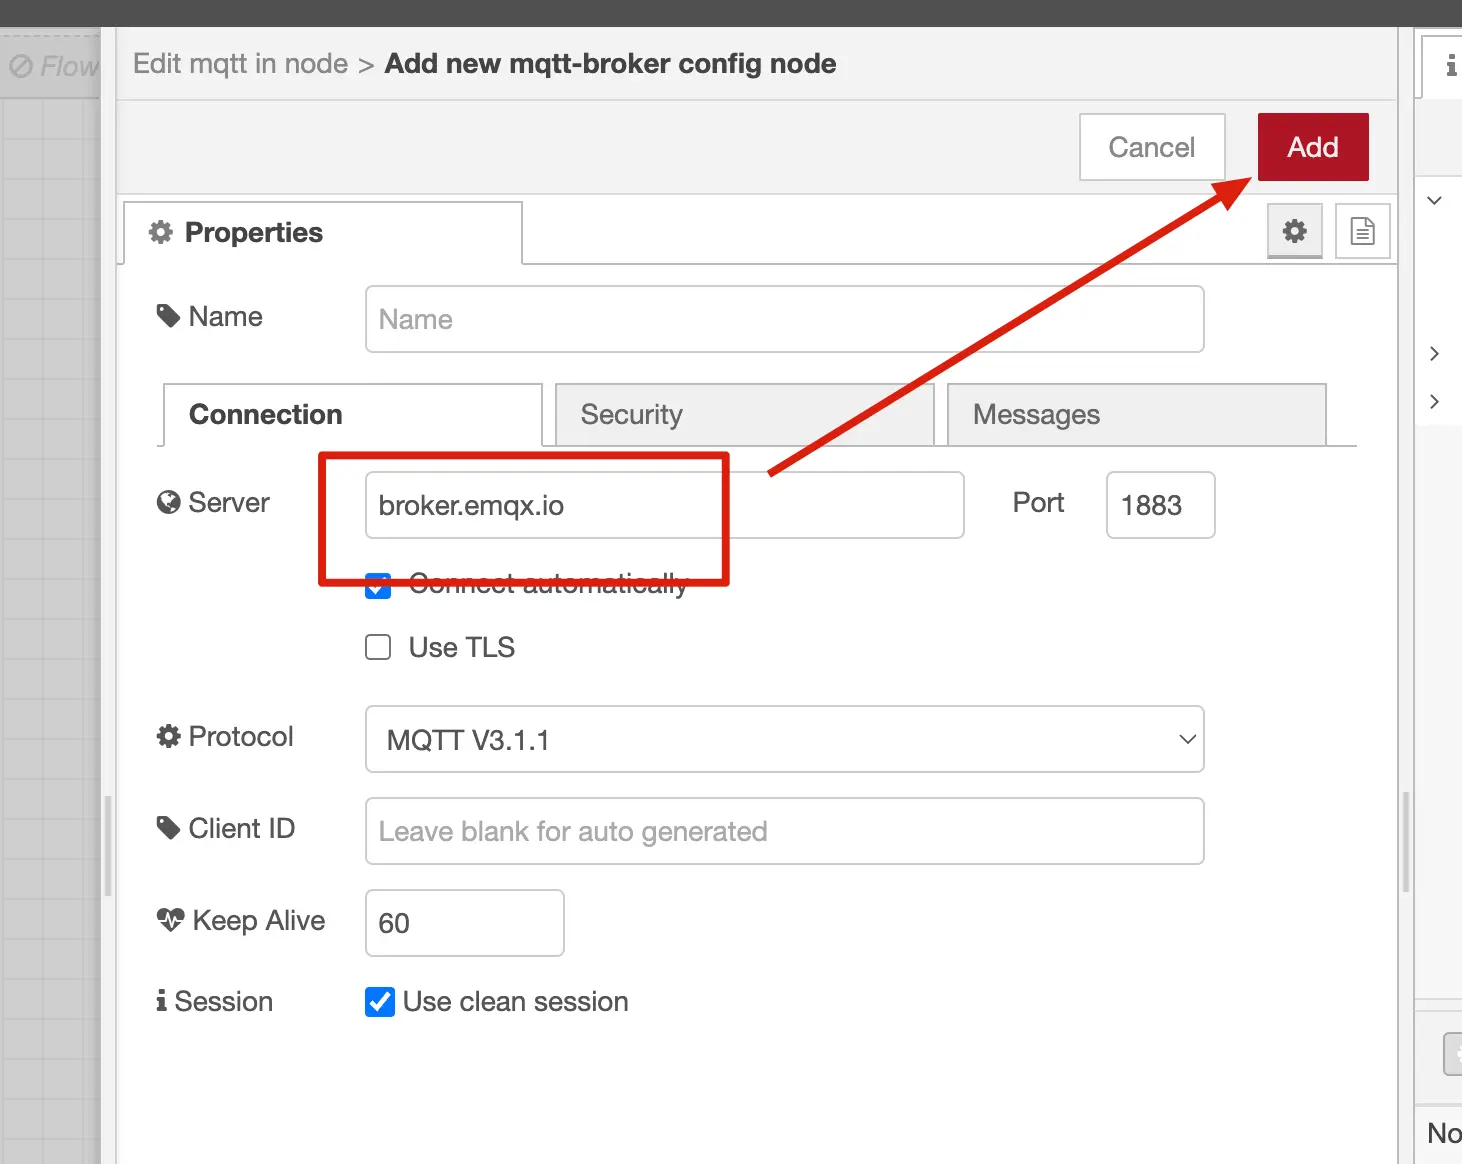
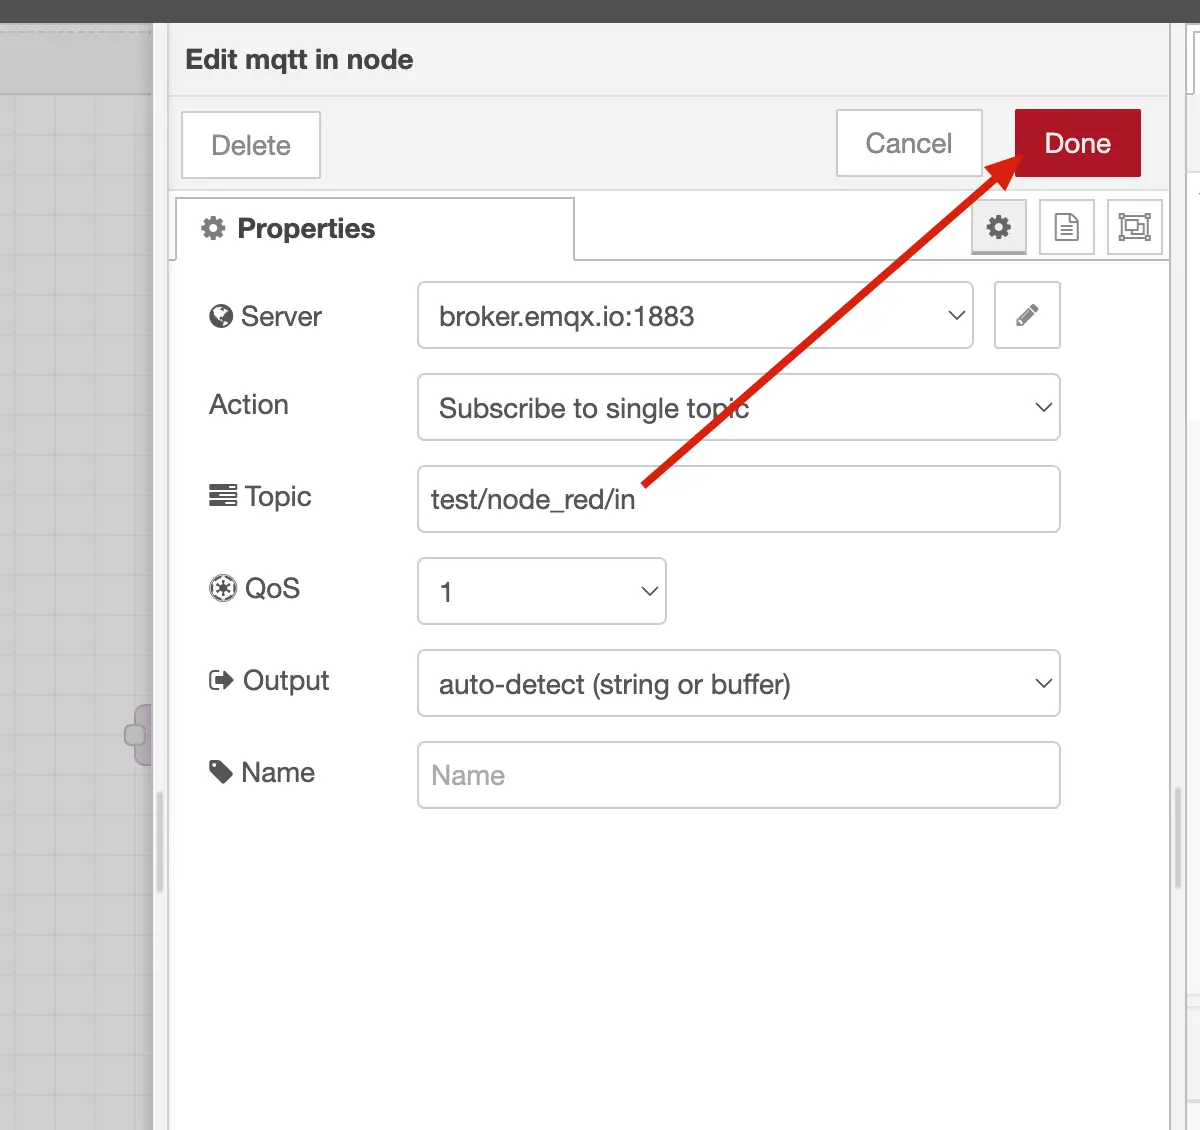
Set the Topic to
test/node_red/in.Set the QoS level as needed, then click Done.
Step 2: Add an MQTT Publish Node
Drag an mqtt-out node onto the canvas.
Double-click the node to open its properties.
Select the broker configured in Step 1 from the Server dropdown.
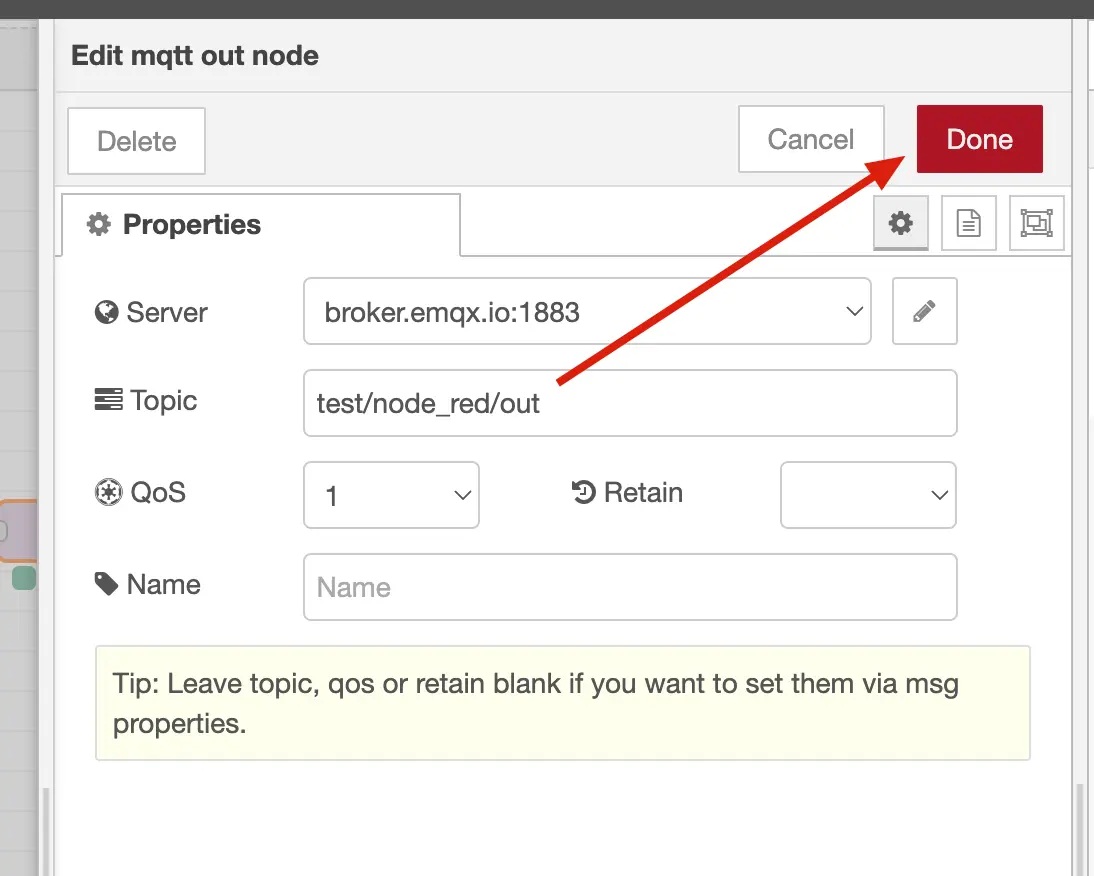
Set the Topic to
test/node_red/out.Configure QoS and Retain as needed, then click Done.
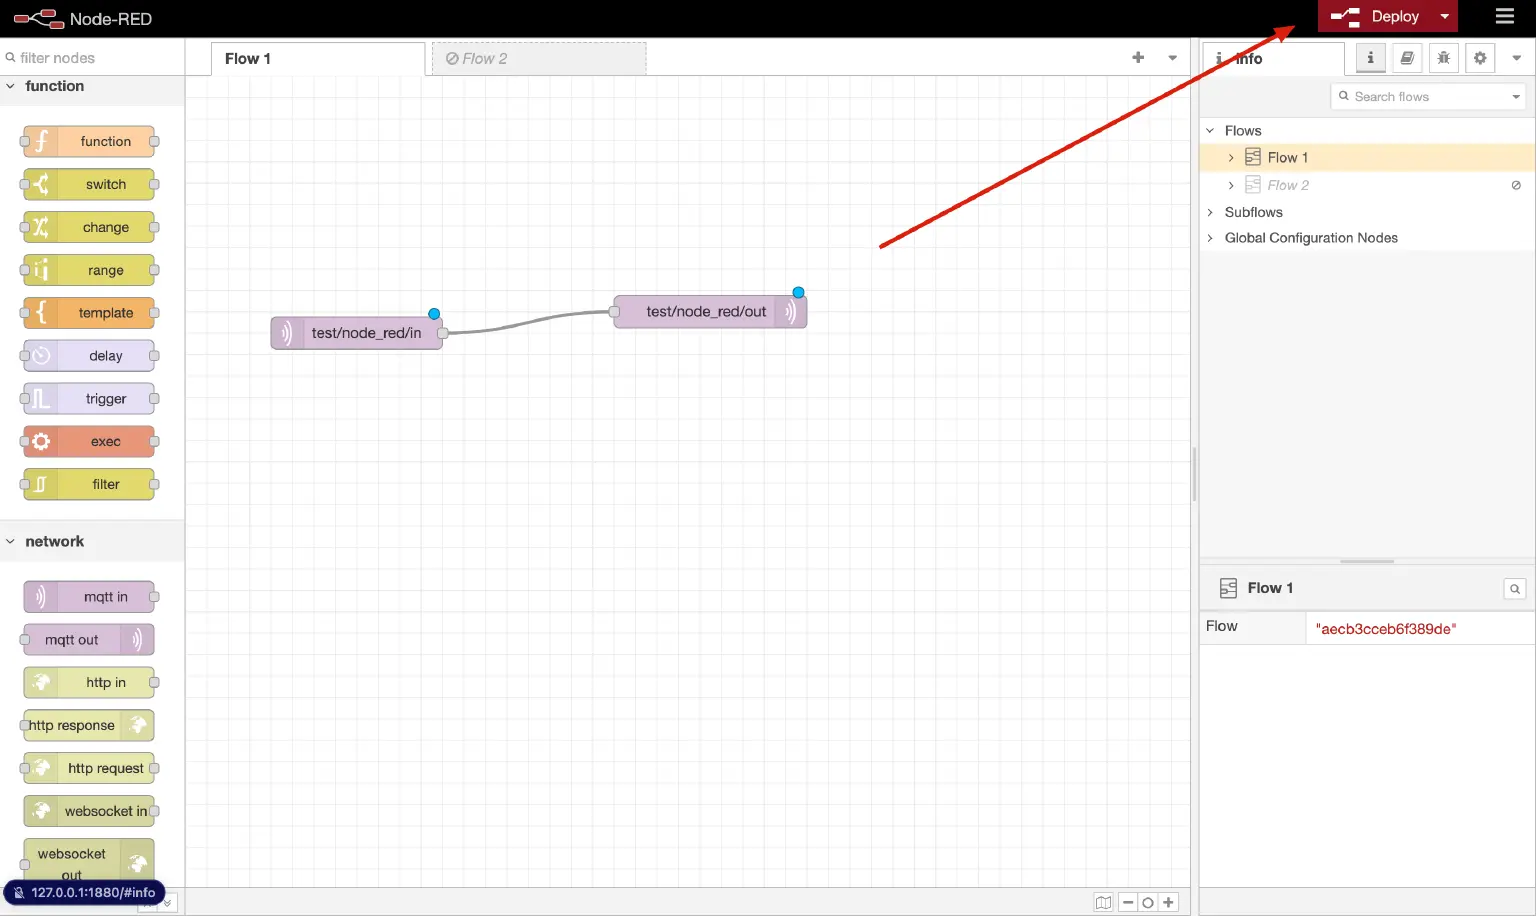
Step 3: Connect and Deploy
- Draw a wire from the output port of the mqtt-in node to the input port of the mqtt-out node.
- Click the Deploy button in the top-right corner.
- Verify that both nodes show a green connected status indicator.
You now have a flow that forwards all messages received on test/node_red/in to test/node_red/out.
Build an Advanced Data Processing Pipeline
Node-RED's real power comes from chaining multiple nodes to filter and transform data before republishing. The following example builds a pipeline that:
- Receives JSON-formatted sensor data via MQTT.
- Parses the raw payload into a JavaScript object.
- Filters out duplicate temperature readings.
- Formats the result and republishes it.
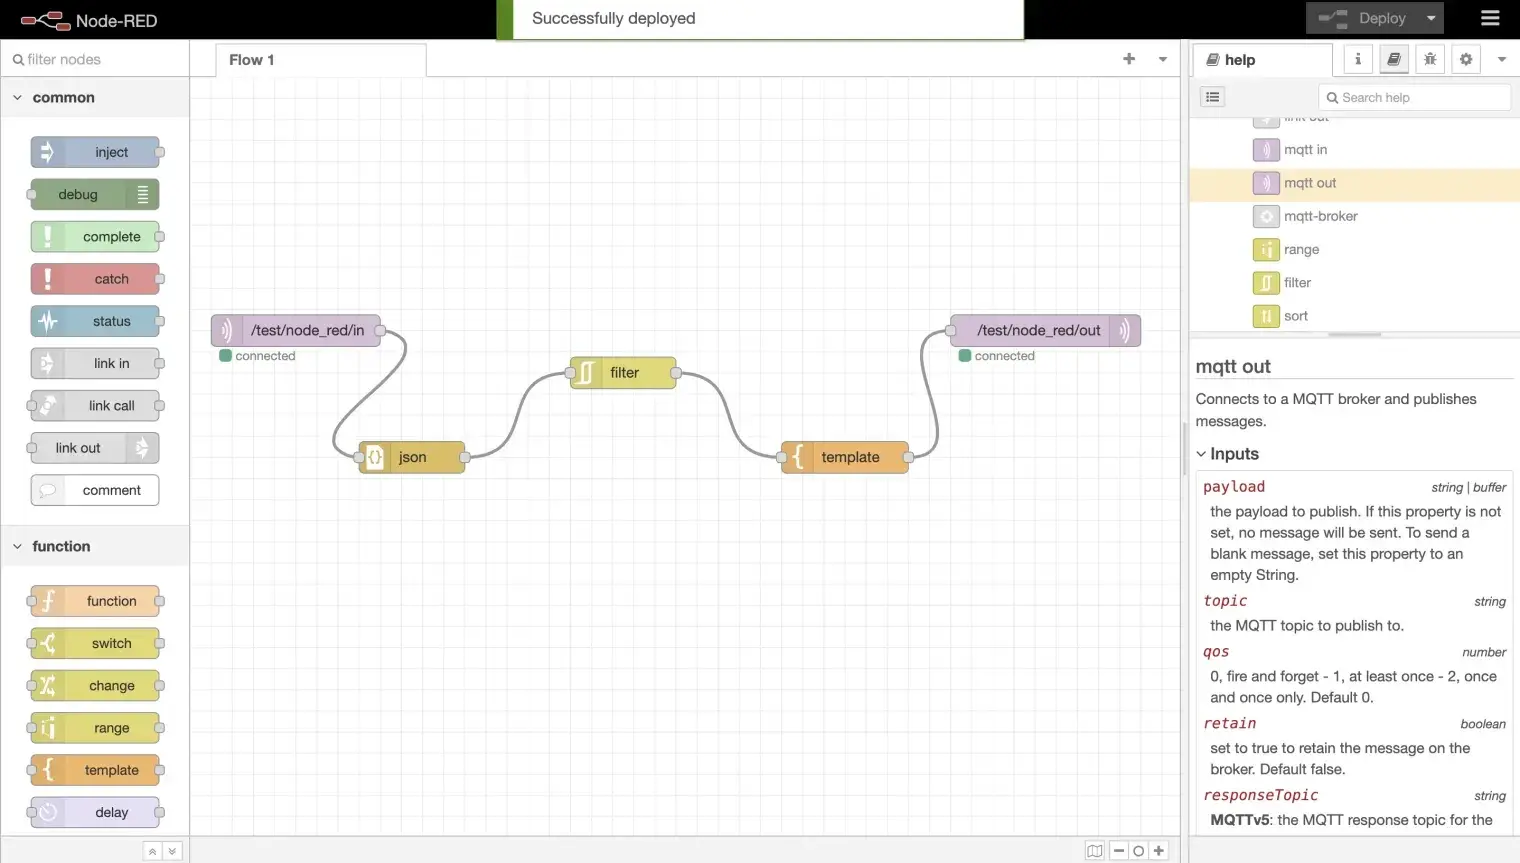
The complete flow is: mqtt-in -> json -> rbe -> template -> mqtt-out
Step 1: Add a JSON Node
- Drag a json node from the palette onto the canvas.
- Double-click to configure it and set Action to Always Convert to JavaScript Object.
- Click Done.
- Connect the output of mqtt-in to the input of the json node.
This ensures the incoming payload is parsed into a JavaScript object so downstream nodes can access individual fields such as msg.payload.temperature.

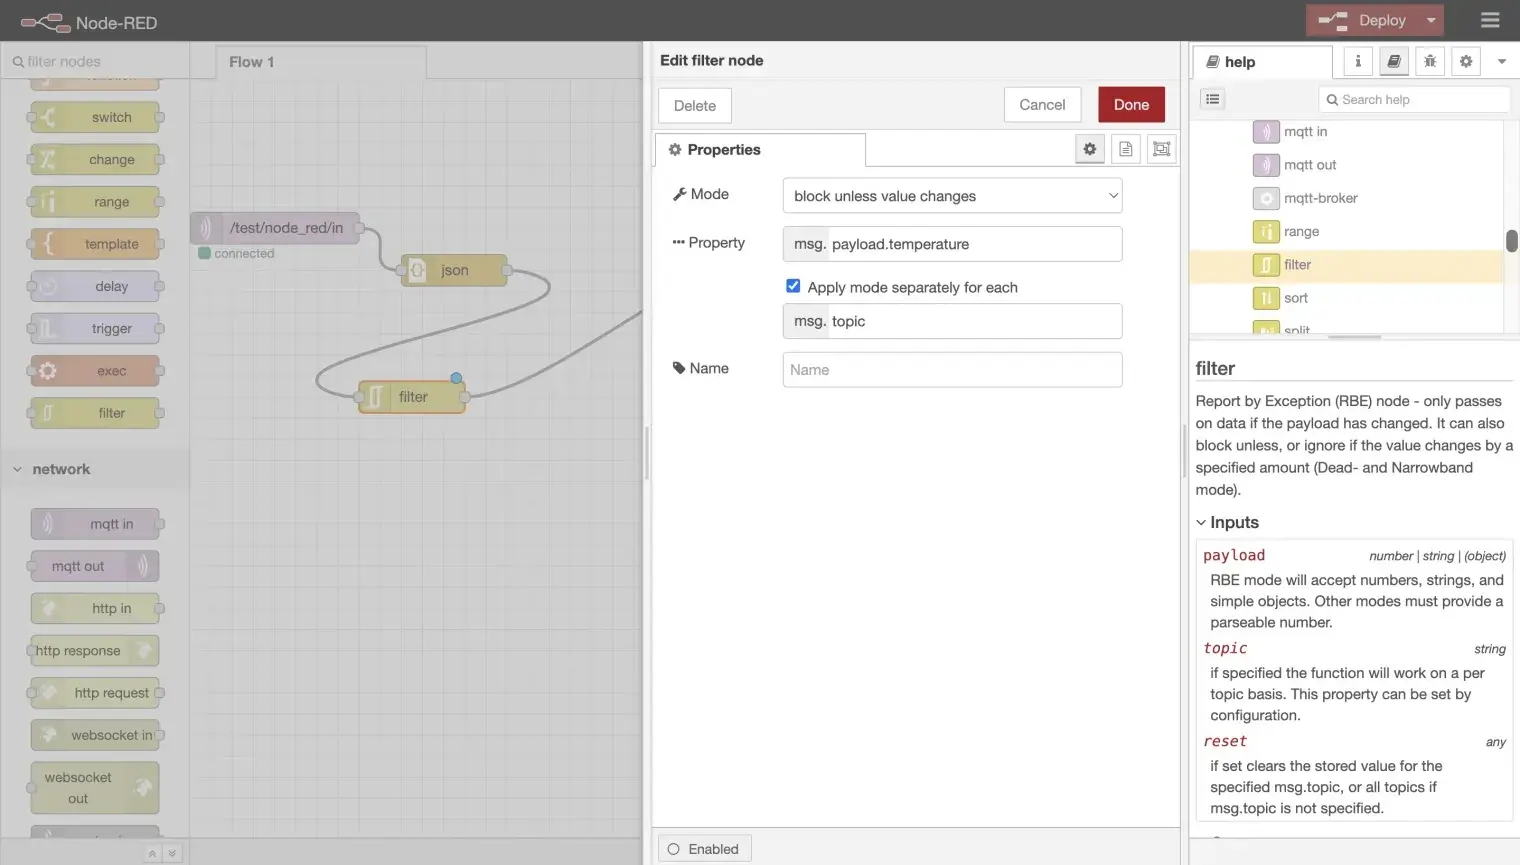
Step 2: Add a Filter Node
- Drag an rbe (report by exception) node onto the canvas.
- Double-click to configure it:
- Set Mode to block unless value changes.
- Set Property to
msg.payload.temperature.
- Click Done.
- Connect the output of the json node to the input of the rbe node.
The filter node blocks messages when the temperature field has not changed since the previous message, reducing unnecessary traffic from repeated identical readings.
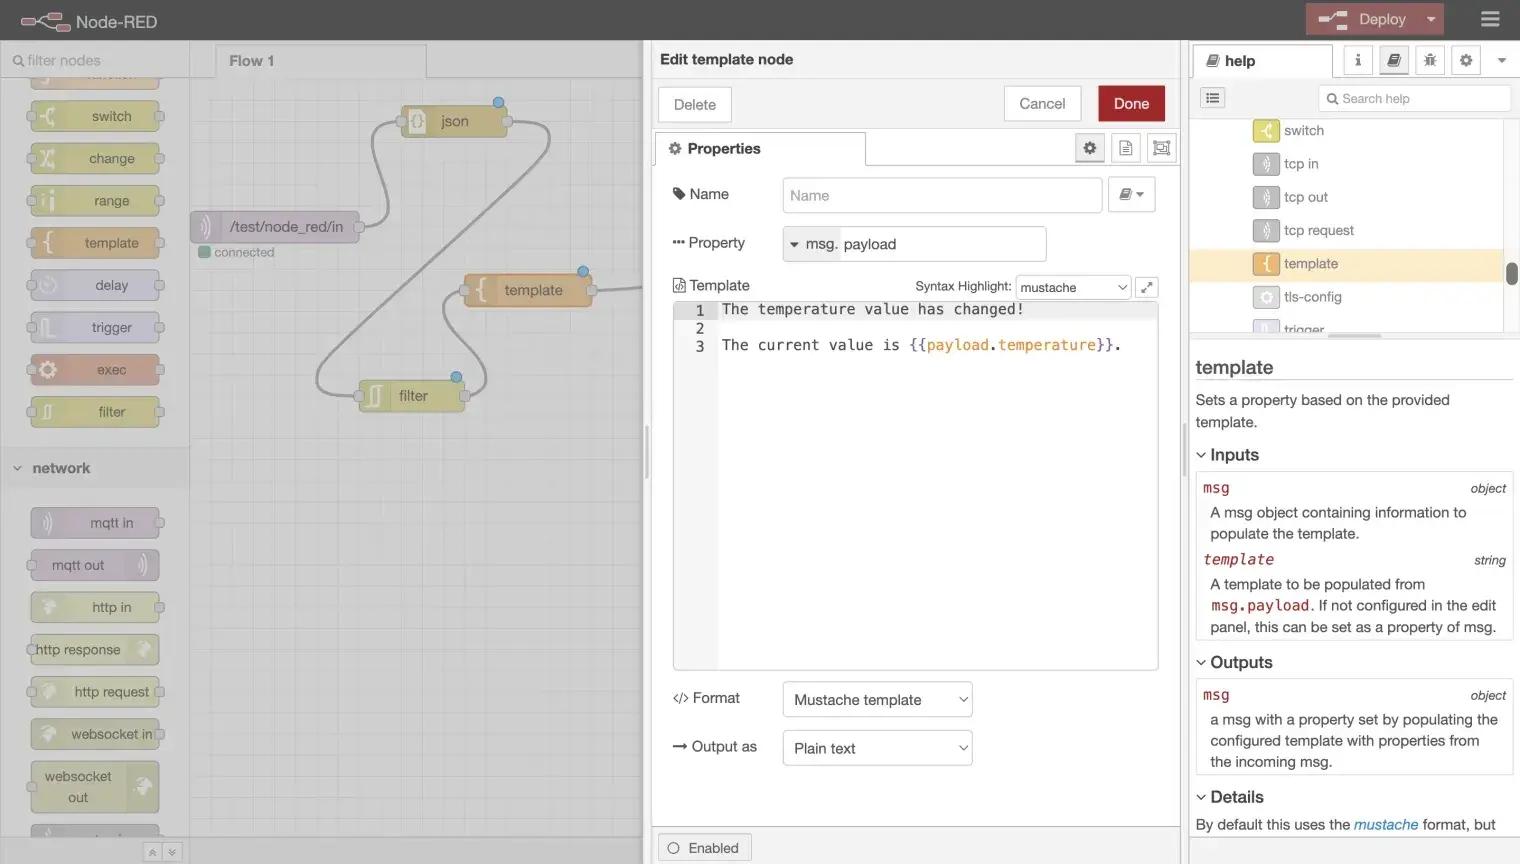
Step 3: Add a Template Node
Drag a template node onto the canvas.
Double-click to configure it and enter your desired output format using Mustache syntax, for example:
{"temperature": {{payload.temperature}}, "humidity": {{payload.humidity}}}Click Done.
Connect the output of the rbe node to the input of the template node.
Step 4: Connect the Output Node and Deploy
- Connect the output of the template node to the input of the mqtt-out node.
- Click Deploy.
- Verify that all nodes show a green connected status.
You can omit the template node if you want to republish the filtered data without reformatting. In that case, connect rbe directly to mqtt-out.
Test the Flow
Use MQTTX or any MQTT client to test the pipeline:
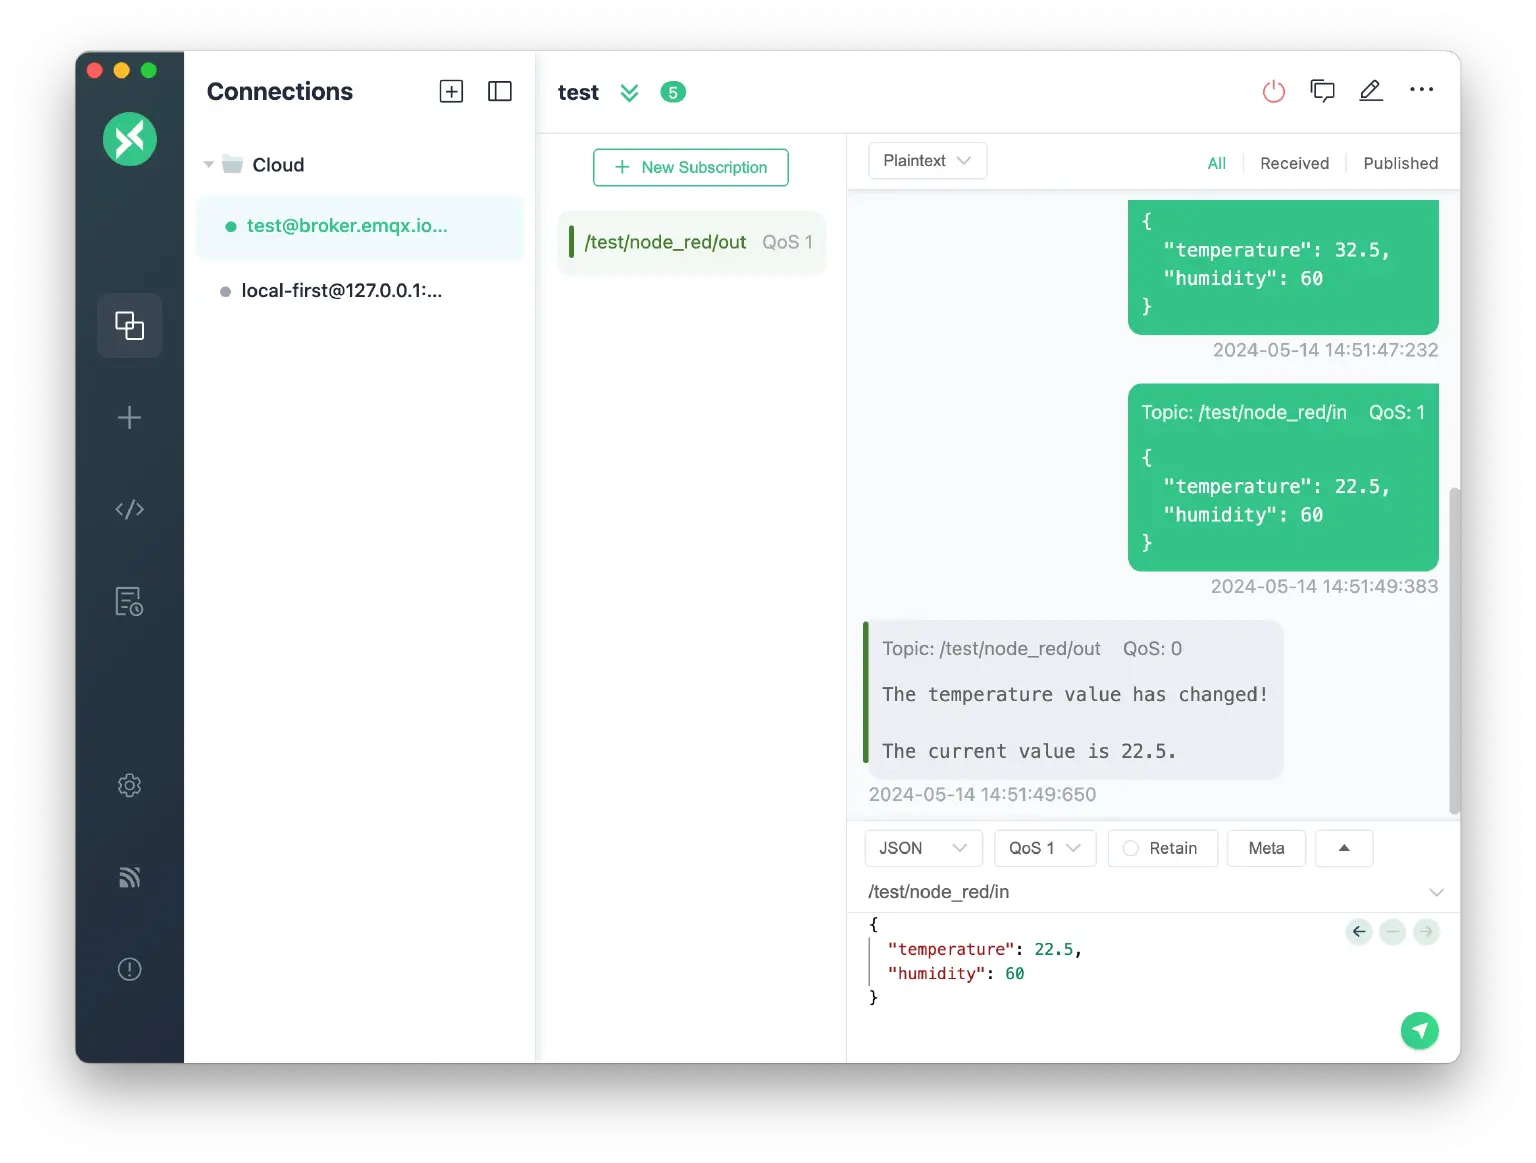
Subscribe to
test/node_red/outto observe the processed output.Publish a test message to
test/node_red/inwith a JSON payload, for example:json{"temperature": 25, "humidity": 60}Confirm that the message appears on the output topic.
Publish the same message again. The rbe filter should suppress this duplicate and no output should appear.
Publish with a changed temperature value:
json{"temperature": 26, "humidity": 60}Confirm that this message passes through the filter and appears on the output topic.
Troubleshooting
Node Shows "disconnected" Status
Description
- The mqtt-in or mqtt-out node shows a red disconnected indicator after deployment.
Possible causes
- Incorrect broker address or port
- Network firewall blocking port
1883or8883 - Broker is not running
Solution
- Double-click the node, click the pencil icon next to Server, and verify the broker address and port.
- Test basic connectivity to the broker from your machine using another MQTT client such as MQTTX.
- If using TLS, ensure the correct port (
8883) and CA certificate are configured.
Messages Not Received on the Input Topic
Description
- The mqtt-in node is connected but no messages arrive.
Possible causes
- Topic name mismatch between publisher and subscriber
- QoS level incompatibility
- ACL rules on the broker blocking the subscription
Solution
- Verify that the publisher is sending to the exact topic configured in the mqtt-in node (
test/node_red/in). - Use the Node-RED debug node to inspect messages at each stage of the flow.
- Check the broker's authentication and ACL configuration.
Filter Node Blocks All Messages
Description
- No messages appear on the output topic even when the temperature value changes.
Possible causes
- The rbe node property path is incorrect
- The JSON node is not parsing the payload before the filter
Solution
- Verify that the json node is placed before the rbe node and is set to Always Convert to JavaScript Object.
- Confirm the rbe node property is set to
msg.payload.temperature(notpayload.temperature). - Add a debug node after the json node to inspect
msg.payloadand confirm the structure.
Authentication Failed
Description
- Node shows disconnected immediately after deployment and broker logs show authentication errors.
Possible causes
- Missing or incorrect username and password in the broker configuration
- ACL restrictions on the topic
Solution
- Double-click the node, open the broker configuration, and enter the correct username and password under the Security tab.
- Verify authentication settings in EMQX.
More Information
For a detailed walkthrough with additional background and examples, see the blog post: Using Node-RED to Process MQTT Data.