Bridge with Azure Event Grid MQTT
Azure Event Grid is a fully managed event-routing service on Azure. Its MQTT broker capability enables bidirectional, standards-based MQTT communication between IoT devices and cloud applications at scale. EMQX provides a built-in connector for Azure Event Grid, enabling you to bridge MQTT data between EMQX and Azure Event Grid for seamless integration with Azure's cloud services ecosystem.
This page provides a detailed overview of the integration between EMQX and Azure Event Grid MQTT with practical instructions on creating and validating the Sink and Source.
How It Works
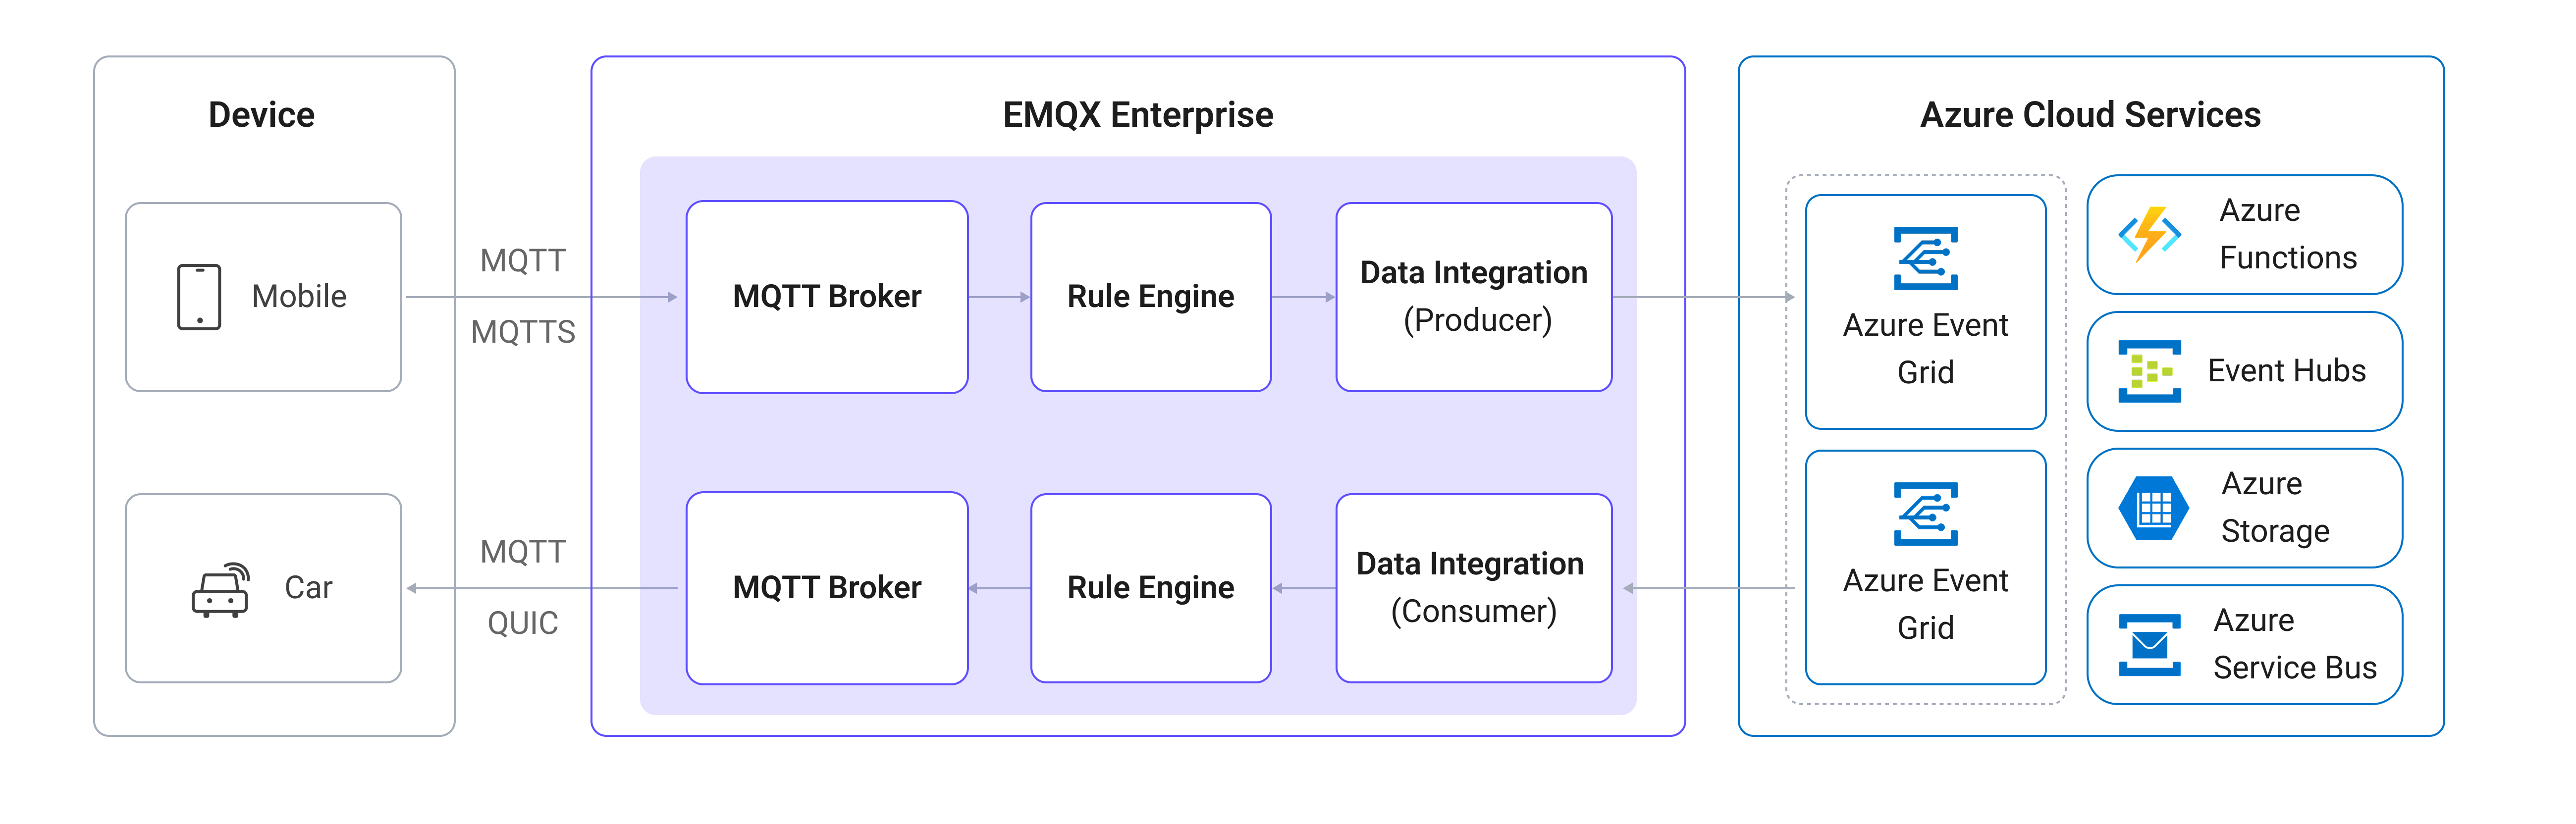
Azure Event Grid data integration is an out-of-the-box feature in EMQX that combines EMQX's device connectivity and message transmission capabilities with Azure Event Grid's cloud-native MQTT broker. EMQX connects to the Azure Event Grid MQTT broker as an MQTT client, enabling bidirectional message transmission:
- Outgoing Messages (Sink): EMQX publishes messages from local MQTT topics to specified topics on Azure Event Grid.
- Incoming Messages (Source): EMQX subscribes to topics on Azure Event Grid and forwards the received messages to local EMQX topics.
The diagram below illustrates a typical architecture of the integration:
Features and Benefits
The data integration with Azure Event Grid offers the following features and benefits:
- Standards-based MQTT bridging: Azure Event Grid supports MQTT 3.1.1 and MQTT 5.0, allowing EMQX to bridge with it using the standard MQTT protocol and interoperate with any MQTT-compatible client or service.
- Bidirectional data flow: Supports both publishing messages from EMQX to Azure Event Grid (Sink) and subscribing to Azure Event Grid topics and forwarding messages to EMQX (Source), enabling flexible IoT data routing.
- Secure connectivity: TLS is required by Azure Event Grid. The connector enables TLS by default and supports client certificate authentication, which is the recommended authentication method for production deployments.
- Flexible topic mapping: Through EMQX's rule engine, you can filter, transform, and route messages to specific Azure Event Grid topic spaces with dynamic topic mapping.
- Rich Azure ecosystem integration: Once data reaches Azure Event Grid, it can be routed to other Azure services such as Azure Functions, Azure Event Hubs, Azure Storage, and more for further processing and analysis.
Before You Start
Prerequisites
- Knowledge about EMQX data integration rules
- Knowledge about data integration
Set Up Azure Event Grid
Before creating the data integration in EMQX, you need to set up an Azure Event Grid namespace with MQTT broker support enabled. The following Microsoft documentation links provide step-by-step guidance:
- Quickstart: Publish and subscribe to MQTT messages using Azure Event Grid namespace
- Azure Event Grid MQTT broker overview
- How to authenticate MQTT clients using a certificate chain
After completing the setup, note the following connection details, which you will need when creating the connector in EMQX:
- Hostname: The MQTT broker hostname for your Event Grid namespace, in the format
<namespace>.ts.<region>.eventgrid.azure.net. The port is8883. - Client certificate and private key: Azure Event Grid requires client certificate authentication. Export the certificate and private key from your Azure Event Grid namespace, as you may need them when configuring TLS in the connector.
- Topic spaces: The topic spaces and permission bindings you configured in Azure Event Grid.
TIP
Consult the Azure Event Grid documentation for supported authentication methods and TLS requirements.
Create a Connector
This section demonstrates how to create a Connector to connect EMQX to Azure Event Grid.
Go to the EMQX Dashboard and click Integration -> Connectors.
Click Create in the top right corner of the page.
On the Create Connector page, select Azure Event Grid and then click Next.
Enter a name for the connector, which must be a combination of upper/lower case letters and numbers, for example,
my_azure_event_grid.Configure the connection information:
Server Host: Enter the MQTT broker endpoint of your Event Grid namespace, for example,
myns.northeurope-1.ts.eventgrid.azure.net:8883. The default port is8883.ClientID Prefix: (Optional) Specify a prefix for the client IDs generated by EMQX. EMQX automatically generates unique client IDs using the format
[prefix]:{connector name}{random string}:{pool index}. For more details, see Connection Pool and Client ID Generation Rules.Username and Password: Leave blank. Azure Event Grid MQTT does not use username/password authentication.
Keepalive: Specify the keepalive interval in seconds. The default is
160seconds.MQTT Version: Select the MQTT protocol version. Azure Event Grid supports both MQTT 3.1.1 (
v4) and MQTT 5.0 (v5).Static ClientId Entries: (Optional) Configure static client IDs for specific EMQX nodes. This is useful when Azure Event Grid requires pre-registered client IDs. See Configure Static Client IDs for details.
TIP
If static client ID entries are defined, only the EMQX nodes that have been explicitly assigned static client IDs will start MQTT connections.
Clean Start: Enabled by default. When enabled, EMQX starts a new session each time it connects to Azure Event Grid.
Enable TLS: Enable this option. Azure Event Grid requires TLS. If you are using client certificate authentication, configure the client certificate and private key here. For detailed TLS configuration options, see TLS for External Resource Access.
Advanced settings (optional): For details, see Connector Advanced Settings.
Before clicking Create, you can click Test Connectivity to verify that EMQX can connect to Azure Event Grid.
Click the Create button to complete the connector setup. A Created Successfully dialog appears asking whether to create a rule now. Click Create Rule to proceed directly to rule creation with the connector pre-selected, or click Back To Connector List to return and create a rule later.
Create a Rule with Azure Event Grid Sink
This section demonstrates how to create a rule to forward MQTT messages from the local EMQX topic t/# to Azure Event Grid.
If you clicked Create Rule in the previous step, the Add Action panel opens automatically with Type of Action set to
Azure Event Gridand the connector pre-selected. Skip to step 5.Otherwise, go to the EMQX Dashboard, click Integration -> Rules, click Create in the top right corner, then click + Add Action.
In the SQL Editor on the left, enter a rule ID and the following SQL to match messages from topic
t/#:Note: If you want to specify your own SQL syntax, make sure all fields required by the Sink are included in the
SELECTpart.sqlSELECT * FROM "t/#"TIP
If you are a beginner user, click SQL Examples and Enable Test to learn and test the SQL rule.
In the Add Action panel on the right, select
Azure Event Gridfrom the Type of Action dropdown list. Keep the Action dropdown with the defaultCreate Actionvalue.From the Connectors dropdown, select the
my_azure_event_gridconnector you just created. You can also create a new Connector by clicking the button next to the dropdown. For configuration parameters, see Create a Connector.Enter a name and optional description for the Sink.
Configure the Sink parameters for publishing messages to Azure Event Grid:
- Topic: The topic to publish to on Azure Event Grid. Supports
${var}placeholders. For example, enterdevices/${clientid}/messagesto dynamically set the topic based on the client ID. - QoS: The QoS level for the published message. Select
0,1, or2, or use a placeholder like${qos}to follow the QoS of the original message. - Retain: Select
true,false, or a placeholder like${flags.retain}to set the retain flag. - Payload: The message payload template. Leave blank to forward the full rule output, or enter a template such as
${payload}to forward only the payload.
- Topic: The topic to publish to on Azure Event Grid. Supports
Fallback Actions (Optional): Define one or more fallback actions to improve reliability in case of message delivery failure. See Fallback Actions for more details.
Advanced settings (optional): For details, see Sink Advanced Settings.
Before clicking Create, you can click Test Connectivity to test that the Sink can connect to Azure Event Grid.
Click the Create button to complete the Sink configuration. A new Sink will be added to the Action Outputs.
Back on the Create Rule page, verify the configured information and click the Save button to generate the rule.
You have now successfully created the rule. You can see the newly created rule on the Integration -> Rules page. Click the Actions(Sink) tab to see the new Azure Event Grid Sink.
You can also click Integration -> Flow Designer to view the topology and verify that messages under topic t/# are forwarded to Azure Event Grid after processing by rule my_rule.
Create a Rule with Azure Event Grid Source
This section demonstrates how to create a rule to subscribe to messages from Azure Event Grid and forward them to local EMQX topics.
Create an Azure Event Grid Source and Add It to the Rule
Go to the EMQX Dashboard and click Integration -> Rules, then click Create in the top right corner.
Enter
my_rule_sourceas the rule ID.Configure the trigger source for the rule. On the right side of the page, under the Data Inputs tab, delete the default Message input and click Add Input to create an Azure Event Grid Source.
In the Add Input dialog, select
Azure Event Gridfrom the Input Type dropdown. Keep the Source dropdown at the defaultCreate Sourcevalue.Enter a name and description for the Source.
Select the
my_azure_event_gridconnector from the dropdown.Configure the Source parameters for subscribing to Azure Event Grid:
Topic: The topic to subscribe to on Azure Event Grid. Supports
+and#wildcards.TIP
When EMQX is running in cluster mode, or the Connector is configured with a connection pool, use shared subscriptions to avoid duplicate messages. For example,
$share/group/devices/#.QoS: The subscription QoS. Select
0or1from the dropdown.
Click the Create button to complete the Source creation. The rule SQL will automatically update to:
sqlSELECT * FROM "$bridges/azure_event_grid:<source_name>"
Create a Republish Action
The subscribed messages from Azure Event Grid are not automatically forwarded to local EMQX topics. Create a Republish action to route the messages.
Switch to the Action Outputs tab on the right side of the Create Rule page and click Add Action.
Select
Republishfrom the Type of Action dropdown.Configure the republish parameters:
- Topic: Enter the target local topic, for example,
azure/${topic}, to add anazure/prefix to the original topic. - QoS: Select
${qos}to follow the original message QoS, or set a fixed value. - Retain: Select
falseor use a placeholder. - Payload: Enter
${payload}to forward only the payload, or leave blank to forward the full rule output.
- Topic: Enter the target local topic, for example,
Click Add to complete the action, then click Save to generate the rule.
Test the Rule
Test the Sink
Use MQTTX to publish a message to t/1 in EMQX:
mqttx pub -i emqx_c -t t/1 -m '{ "msg": "Hello Azure Event Grid" }'Check the running statistics of the Azure Event Grid Sink. There should be 1 new matching and 1 new outgoing message. Verify in the Azure portal or using an Azure Event Grid MQTT client that the message has been received.
Test the Source
Subscribe to the local EMQX topic
azure/#:bashmqttx sub -t azure/# -q 1 -vPublish a message to Azure Event Grid using an MQTT client configured with Azure Event Grid credentials:
bashmqttx pub -t devices/device1/messages -m "hello from azure" \ -h myns.northeurope-1.ts.eventgrid.azure.net -p 8883 \ --tls --cert /path/to/client.crt --key /path/to/client.keyYou should see the message forwarded to the
azure/devices/device1/messagestopic in EMQX:bashtopic: azure/devices/device1/messages payload: hello from azure
Advanced Settings
This section describes the advanced configuration options available for the Azure Event Grid connector and Sink. When configuring them in the Dashboard, you can expand Advanced Settings to adjust the following parameters based on your specific needs.
Connector Advanced Settings
| Field Name | Description | Default Value |
|---|---|---|
| Message Retry Interval | Time between retry attempts when a message delivery fails. | 15 seconds |
| Bridge Mode | When enabled, the connector uses MQTT bridge mode, which notifies the remote broker that the connection is a bridge. | Disabled |
| Max Inflight | Maximum number of unacknowledged messages in flight at any given time per connection. | 32 |
| Connection Pool Size | Number of concurrent MQTT connections to maintain to Azure Event Grid. Increase this value to improve throughput. | 8 |
| Connect Timeout | Maximum time to wait when establishing a TCP connection to Azure Event Grid. | 10 seconds |
| Start Timeout | Maximum time the connector waits for an auto-started resource to become healthy before accepting requests. | 5 seconds |
| Health Check Interval | How often the connector runs an automated health check on the connection. | 15 seconds |
| Health Check Timeout | Maximum time allowed for each health check to complete. | 60 seconds |
Sink Advanced Settings
| Field Name | Description | Default Value |
|---|---|---|
| Buffer Pool Size | Number of buffer worker processes that handle data flow between EMQX and Azure Event Grid. Increase this value to improve throughput under high load. | 16 |
| Request TTL | Maximum time a request remains valid in the buffer. Requests that exceed this duration, whether still queued or sent without acknowledgment, are discarded. | 45 seconds |
| Health Check Interval | How often the Sink runs an automated health check on the connection. | 15 seconds |
| Health Check Interval Jitter | Random delay added to the health check interval to prevent multiple nodes from checking simultaneously. Useful when multiple Actions or Sources share the same Connector. | 0 milliseconds |
| Health Check Timeout | Maximum time allowed for each Sink health check to complete. | 60 seconds |
| Max Buffer Queue Size | Maximum bytes each buffer worker can hold. Increase this value if your workload produces bursts that exceed default capacity. | 256 MB |
| Query Mode | async lets EMQX continue publishing without waiting for Azure Event Grid to confirm each write; sync waits for confirmation before proceeding. Async mode offers higher throughput but may result in out-of-order delivery. | Async |
| Inflight Window | Maximum number of unacknowledged requests allowed in flight at once. When Query Mode is async, set this to 1 to guarantee per-client message ordering. | 100 |
Source Advanced Settings
| Field Name | Description | Default Value |
|---|---|---|
| Health Check Interval | How often the Source runs an automated health check on the connection. | 15 seconds |
| Health Check Interval Jitter | Random delay added to the health check interval to prevent multiple nodes from checking simultaneously. Useful when multiple Actions or Sources share the same Connector. | 0 milliseconds |
| Health Check Timeout | Maximum time allowed for each Source health check to complete. | 60 seconds |