Ingest MQTT Data into Bigtable
Cloud Bigtable is a fully managed, wide-column NoSQL database service on Google Cloud. It is designed for large-scale, low-latency workloads, such as time series data, telemetry storage, event records, and high-throughput IoT data ingestion.
EMQX supports integration with Bigtable through the rule engine and a Bigtable Sink. You can process MQTT messages with rule SQL, map the selected fields to Bigtable row keys and cell mutations, and write the processed data to a Bigtable table in real time.
This page introduces how the Bigtable data integration works and provides a workflow for creating and testing the integration in the EMQX Dashboard.
How It Works
Bigtable data integration is an out-of-the-box feature of EMQX. It helps users stream MQTT data into Google Cloud and store device telemetry or event data in Bigtable for later query, analysis, or downstream processing.
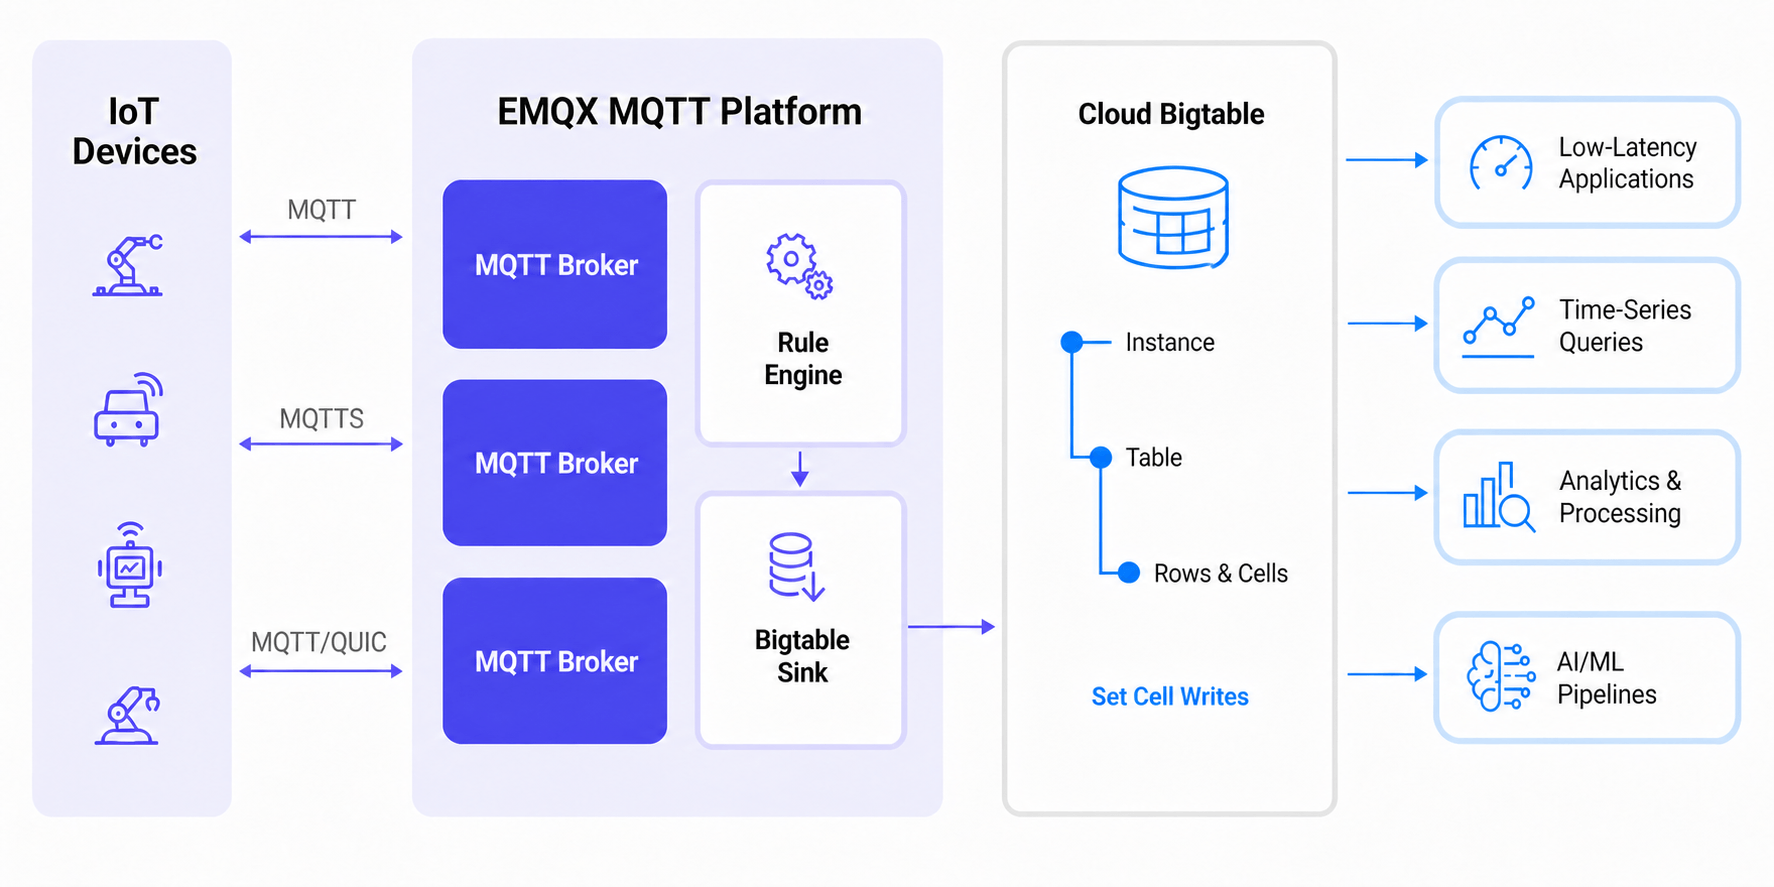
EMQX forwards MQTT data to Bigtable through the rule engine and Sink. The complete process is as follows:
- IoT Devices Publish Messages: Devices publish telemetry, status, or event data to MQTT topics.
- Rule Engine Processes Messages: The rule engine matches MQTT messages by topic and uses SQL to extract or transform the fields that Bigtable requires.
- Writing to Bigtable: The Bigtable Sink writes each rule output record to a Bigtable table as a row mutation, using the configured row key and
set_cellmutation fields. Downstream applications and services can then query or process the stored data for low-latency applications, time-series queries, analytics and processing, or AI/ML pipelines.
Features and Benefits
Integrating EMQX with Bigtable provides the following benefits:
- High-Throughput IoT Data Ingestion: Write MQTT messages to Bigtable for large-scale telemetry and event workloads.
- Flexible Field Mapping: Use rule SQL to explicitly select and alias the fields used as the Bigtable row key, column family, column qualifier, timestamp, and cell value.
- Batch and Asynchronous Writes: Use batch mode and asynchronous request mode to improve write throughput and reduce the impact on MQTT message publishing.
- Google Cloud Integration: Store MQTT data in Bigtable and use it with other Google Cloud services for analytics, processing, or application development.
Before You Start
This section describes the preparations you need to complete before creating the Bigtable data integration.
Prerequisites
- Knowledge about EMQX data integration rules
- Knowledge about Data Integration
- A Google Cloud project with Bigtable enabled
- A Bigtable instance, table, and at least one column family
- Authentication information required by the authentication method you plan to use:
- Service Account JSON: A service account key JSON file.
- Workload Identity Federation (WIF): A workload identity pool, provider, project ID, project number, service account email, and OAuth 2.0 client credentials from the external identity provider.
- Attached Service Account: An EMQX deployment running on GCP Compute Engine that meets the Attached Service Account prerequisites.
Create Service Account Key in GCP
To use Service Account JSON authentication, create a Google Cloud service account and generate a key in JSON format.
Create a Service Account in your GCP account.
Grant the service account permissions to write to the Bigtable instance and table. For example, assign a Bigtable role that allows data read/write operations on the target table.
Click the email address of the service account you created.
Click the Keys tab. In the Add key dropdown list, select Create new key and download the key in JSON format.
TIP
Store the service account key securely. You will use it later when creating the Bigtable connector.
Set Up Workload Identity Federation in GCP
Workload Identity Federation (WIF) allows EMQX to access GCP resources without a long-lived service account key file. EMQX exchanges a token from an external identity provider, such as Microsoft Azure, for a temporary GCP token through GCP Security Token Service, then uses it to impersonate a GCP service account. Token renewal is handled automatically.
To use WIF, complete the following in your GCP project before creating the connector:
- In the Google Cloud console, go to IAM & Admin -> Workload Identity Federation, create a workload identity pool, and note the Pool ID and Project Number.
- Add a provider to the pool and note the Provider ID. For OIDC-based authentication, obtain the OAuth 2.0 client credentials from your external identity provider, including the client ID, client secret, token endpoint URI, and request scope.
- Grant the workload identity pool permission to impersonate the GCP service account with access to the Bigtable instance and table. Note the service account email.
- Note the GCP Project ID of the project that contains the Bigtable resources.
TIP
See Configure Workload Identity Federation for detailed instructions.
Example: Microsoft Azure (Entra ID)
Register an application that exposes an API in Microsoft Entra ID and create a client secret for it. Use the following values when configuring the connector:
| Connector Field | Value |
|---|---|
| OAuth Token Endpoint URI | https://login.microsoftonline.com/<tenant-id>/oauth2/v2.0/token |
| OAuth Client ID | Application (client) ID, in the format api://<application-id> |
| OAuth Client Secret | Client secret generated for the application |
| OAuth Request Scope | api://<application-id>/.default |
::: note
The OAuth Request Scope must match the application's audience (aud) exactly, otherwise the token exchange with GCP STS fails. When granting service account access to the WIF pool, use the Object ID, not the application ID, as the subject identifier. The Object ID is available on the application's overview page under Enterprise applications in the Azure portal.
:::
Attached Service Account Prerequisites
To use Attached Service Account authentication, EMQX must run on a GCP Compute Engine instance with an attached service account. Make sure the instance's OAuth access scopes allow access to Bigtable. Google recommends using the cloud-platform scope (https://www.googleapis.com/auth/cloud-platform) and restricting the service account's permissions through IAM roles. The service account must have permission to access the target Bigtable instance and table. For more information, see Service accounts in the Google Cloud documentation.
The target Bigtable instance and table must be in the GCP project associated with the Compute Engine instance. In an EMQX cluster, every node must meet these requirements and run on a Compute Engine instance in that project.
When the connector starts, EMQX automatically retrieves the GCP project ID and an access token from the instance metadata endpoint. You do not need to upload a service account key file.
Create and Manage Bigtable Resources in GCP
Before configuring the Bigtable data integration in EMQX, create the target Bigtable resources in Google Cloud.
In the Google Cloud console, go to the Bigtable page.
Create or select a Bigtable instance. When creating an instance, Instance name is only used as the display name in the Google Cloud console. You can enter a readable name, such as
EMQX MQTT Messages. Instance ID is the value you will use later in EMQX, and should be a simple unique identifier, such asemqxinst.Create a table. Note the table ID, for example,
mqtt_messages.Create at least one column family in the table, for example,
cf.TIP
EMQX uses the Instance ID and Table ID, not the instance display name in the Google Cloud console or fully qualified resource names such as
projects/<project-id>/instances/<instance-id>.
Create a Bigtable Connector
Before adding a Bigtable Sink action, create a Bigtable connector to establish the connection between EMQX and Bigtable.
- Go to the EMQX Dashboard and click Integration -> Connectors.
- Click Create in the top right corner of the page, select Bigtable, and click Next.
- Enter a connector name and description, such as
my_bigtable. The name is used to associate the Bigtable Sink with the connector and must be unique within the cluster. - Configure the authentication options:
- Authentication: Select how EMQX authenticates with GCP.
- Service Account JSON: Upload the JSON service account key exported in Create Service Account Key in GCP to GCP Service Account Credentials. You can click Select file to upload the JSON file.
- Workload Identity Federation (WIF): Fill in the following fields. This method does not require a service account JSON file. For prerequisites, see Set Up Workload Identity Federation in GCP.
- GCP Project ID: GCP project ID of the resources accessed by the connector.
- GCP Project Number: GCP project number of the resources accessed by the connector.
- Service Account Email: Email address of the service account to impersonate.
- Workload Identity Pool ID: Workload identity pool ID used for WIF token exchange.
- Workload Identity Provider ID: Workload identity provider ID used for WIF token exchange.
- Credential Type: Credential type used by the external identity provider. Currently, OIDC client credentials are supported. After selecting this type, fill in the following fields:
- OAuth Client ID: Client ID used to request tokens from the OAuth server.
- OAuth Client Secret: Client secret used to request tokens from the OAuth server.
- OAuth Token Endpoint URI: OAuth token endpoint URI of the OIDC provider.
- OAuth Request Scope:
scopeused when requesting an access token from the OAuth server. Fill it in if required by the provider. - OAuth Request Audience:
audienceused when requesting an access token from the OAuth server. Fill it in if required by the provider.
- Attached Service Account: No additional fields are required. EMQX automatically retrieves the GCP project ID and an access token from the instance metadata endpoint. For prerequisites, see Attached Service Account Prerequisites.
- Enable TLS: Enable TLS if it is required by your deployment.
- Advanced Settings: Expand this section to configure advanced connection options.
- Authentication: Select how EMQX authenticates with GCP.
- Before clicking Create, you can click Test Connectivity to verify that EMQX can connect to Bigtable.
- Click the Create button to complete the connector setup. A Created Successfully dialog appears asking whether to create a rule now. Click Create Rule to proceed directly to rule creation with the connector pre-selected, or click Back To Connector List to return and create a rule later.
Create a Rule with Bigtable Sink
This section demonstrates how to create a rule that writes MQTT messages to Bigtable.
If you clicked Create Rule in the previous step, the Add Action panel opens automatically with Type of Action set to
Bigtableand the connector pre-selected. Skip to step 5 to configure the action first; after the action is created, return to the rule page and complete the rule ID and SQL settings. Otherwise, go to the Dashboard Integration -> Rules page and click Create in the top right corner.Enter
my_ruleas the rule ID.In the SQL Editor, enter the rule SQL. The Bigtable Sink uses field names configured in the Sink to look up values from the rule output. Therefore, the SQL must explicitly select and alias all fields required by the Bigtable mutation.
Example:
sqlSELECT clientid AS rk, 'cf' AS fn, '' AS cq, payload AS v, publish_received_at * 1000 AS tm FROM "t/bigtable"In this example:
rkis used as the Bigtable row key.fnis used as the column family name.cqis used as the column qualifier.tmis used as the timestamp in microseconds.vis used as the cell value.
TIP
The Bigtable Sink fields are key names that refer to rule output fields. They are not template expressions. If a required key is not selected by the rule SQL, the Sink cannot build the Bigtable mutation for that message.
Click Add Action. In the Add Action panel, select
Bigtablefrom the Type of Action dropdown list.Keep Action as
Create Action, or select an existing Bigtable Sink. If you entered rule creation from the connector success dialog, confirm that Type of Action is already set toBigtableand the connector is already pre-selected.In Name, enter a Sink name. You can also enter a description in Description.
In Connectors, select the Bigtable connector created in Create a Bigtable Connector if it is not already selected. You can click the plus icon to create a new connector from this panel.
Configure the Bigtable action parameters:
Field Description Example Instance ID Bigtable instance identifier. Use the simple ID, not the fully qualified projects/.../instances/...value.emqxinstTable ID Bigtable table identifier. Use the simple ID, not the fully qualified projects/.../instances/.../tables/...value.mqtt_messagesRow Key Key name that contains the message's row key. rkMutations List of cell mutations to apply for a single received message. Click Add to add a mutation. - Mutation Type Mutation operation type. The current integration supports Set Cell mutations. Set CellColumn Family Key name that contains the mutation's column family. fnColumn Qualifier Key name that contains the mutation's column qualifier. cqTimestamp (microseconds) Key name that contains the mutation's timestamp in microseconds. tmValue Key name that contains the mutation's value. vConfigure Fallback Actions if you want to improve reliability when message delivery fails. See Fallback Actions.
Configure Advanced Settings as needed. See Advanced Settings.
Before clicking Create, you can click Test Connectivity to verify that the Sink can connect to Bigtable.
Click Create to complete the Sink configuration.
Back on the Create Rule page, click Create to create the rule.
Test the Rule
Use MQTTX to publish a message to the topic
t/bigtable:bashmqttx pub -i emqx_c -t t/bigtable -m '{ "msg": "hello Bigtable" }'Check the rule and Sink metrics. The matched and successful counts should increase.
In Google Cloud, query the target Bigtable table and verify that a row was written with:
- Row key: the MQTT client ID, for example,
emqx_c - Column family:
cf - Column qualifier: empty string
- Cell value: the MQTT payload
- Row key: the MQTT client ID, for example,
Advanced Settings
This section describes common advanced settings for the Bigtable connector and Sink.
Connector Advanced Settings
| Field | Description | Default Value |
|---|---|---|
| Connection Pool Size | Number of connections in the connection pool for Bigtable. | 8 |
| Connect Timeout | Timeout for establishing a connection to Bigtable. | 5s |
| Start Timeout | Timeout for starting the connector. | 5s |
| Health Check Interval | Interval for checking the health of the Bigtable connection. | 15s |
| Health Check Timeout | Timeout for connector health checks. | 60s |
Sink Advanced Settings
| Field | Description | Default Value |
|---|---|---|
| Buffer Pool Size | Number of buffer worker processes used to process and send data to Bigtable. | 16 |
| Dispatch Strategy | Strategy for dispatching requests to buffer workers. The default strategy dispatches requests by MQTT client ID. | Per Client ID |
| Request TTL | Maximum time a request can stay valid after entering the buffer. If the request expires before it is sent or acknowledged, it is considered expired. | 45s |
| Health Check Interval | Interval for checking the health of the Bigtable connection. | 15s |
| Health Check Interval Jitter | Random jitter added to the health check interval. | 0ms |
| Health Check Timeout | Timeout for connector health checks. | 60s |
| Max Buffer Queue Size | Maximum buffer queue size for each buffer worker. | 256MB |
| Batch Size | Maximum number of records to write in one batch. Set it to 1 to disable batching. | 1000 |
| Query Mode | Request mode. In asynchronous mode, writing to Bigtable does not block MQTT message publishing. | Async |
| Inflight Window | Maximum number of in-flight requests in asynchronous mode. Set it to 1 if strict ordering is required for messages from the same MQTT client. | 100 |
For high-throughput deployments, tune Connection Pool Size, Buffer Pool Size, Dispatch Strategy, Batch Size, and Inflight Window together based on your expected cluster workload. For example, if the target workload is around 11,000,000 messages per 2 minutes across the cluster with 5,000 to 10,000 MQTT connections, validate the configuration with a representative benchmark before production use.