Stream MQTT Data into HStreamDB
HStreamDB is an open-source streaming data platform that enables you to efficiently ingest, store, process, and distribute all real-time messages, events, and other data streams in one unified platform. Through EMQX Cloud's integration with HStreamDB, you can save MQTT messages and client events to HStreamDB, achieving large-scale IoT data collection, transmission, and storage, and enabling real-time processing, monitoring, and analysis of data streams using standard SQL and materialized views.
This page provides a comprehensive introduction to the data integration between EMQX Cloud and HStreamDB with practical instructions on creating and validating the data integration.
How It Works
HStreamDB data integration is an out-of-the-box feature of EMQX Cloud that combines EMQX Cloud's device connectivity and message transmission capabilities with HStreamDB's robust data storage and processing capabilities. With the built-in rule engine component, the data streaming and processing process is simplified between the two platforms.
The diagram below illustrates a typical architecture of data integration between EMQX and HStreamDB:
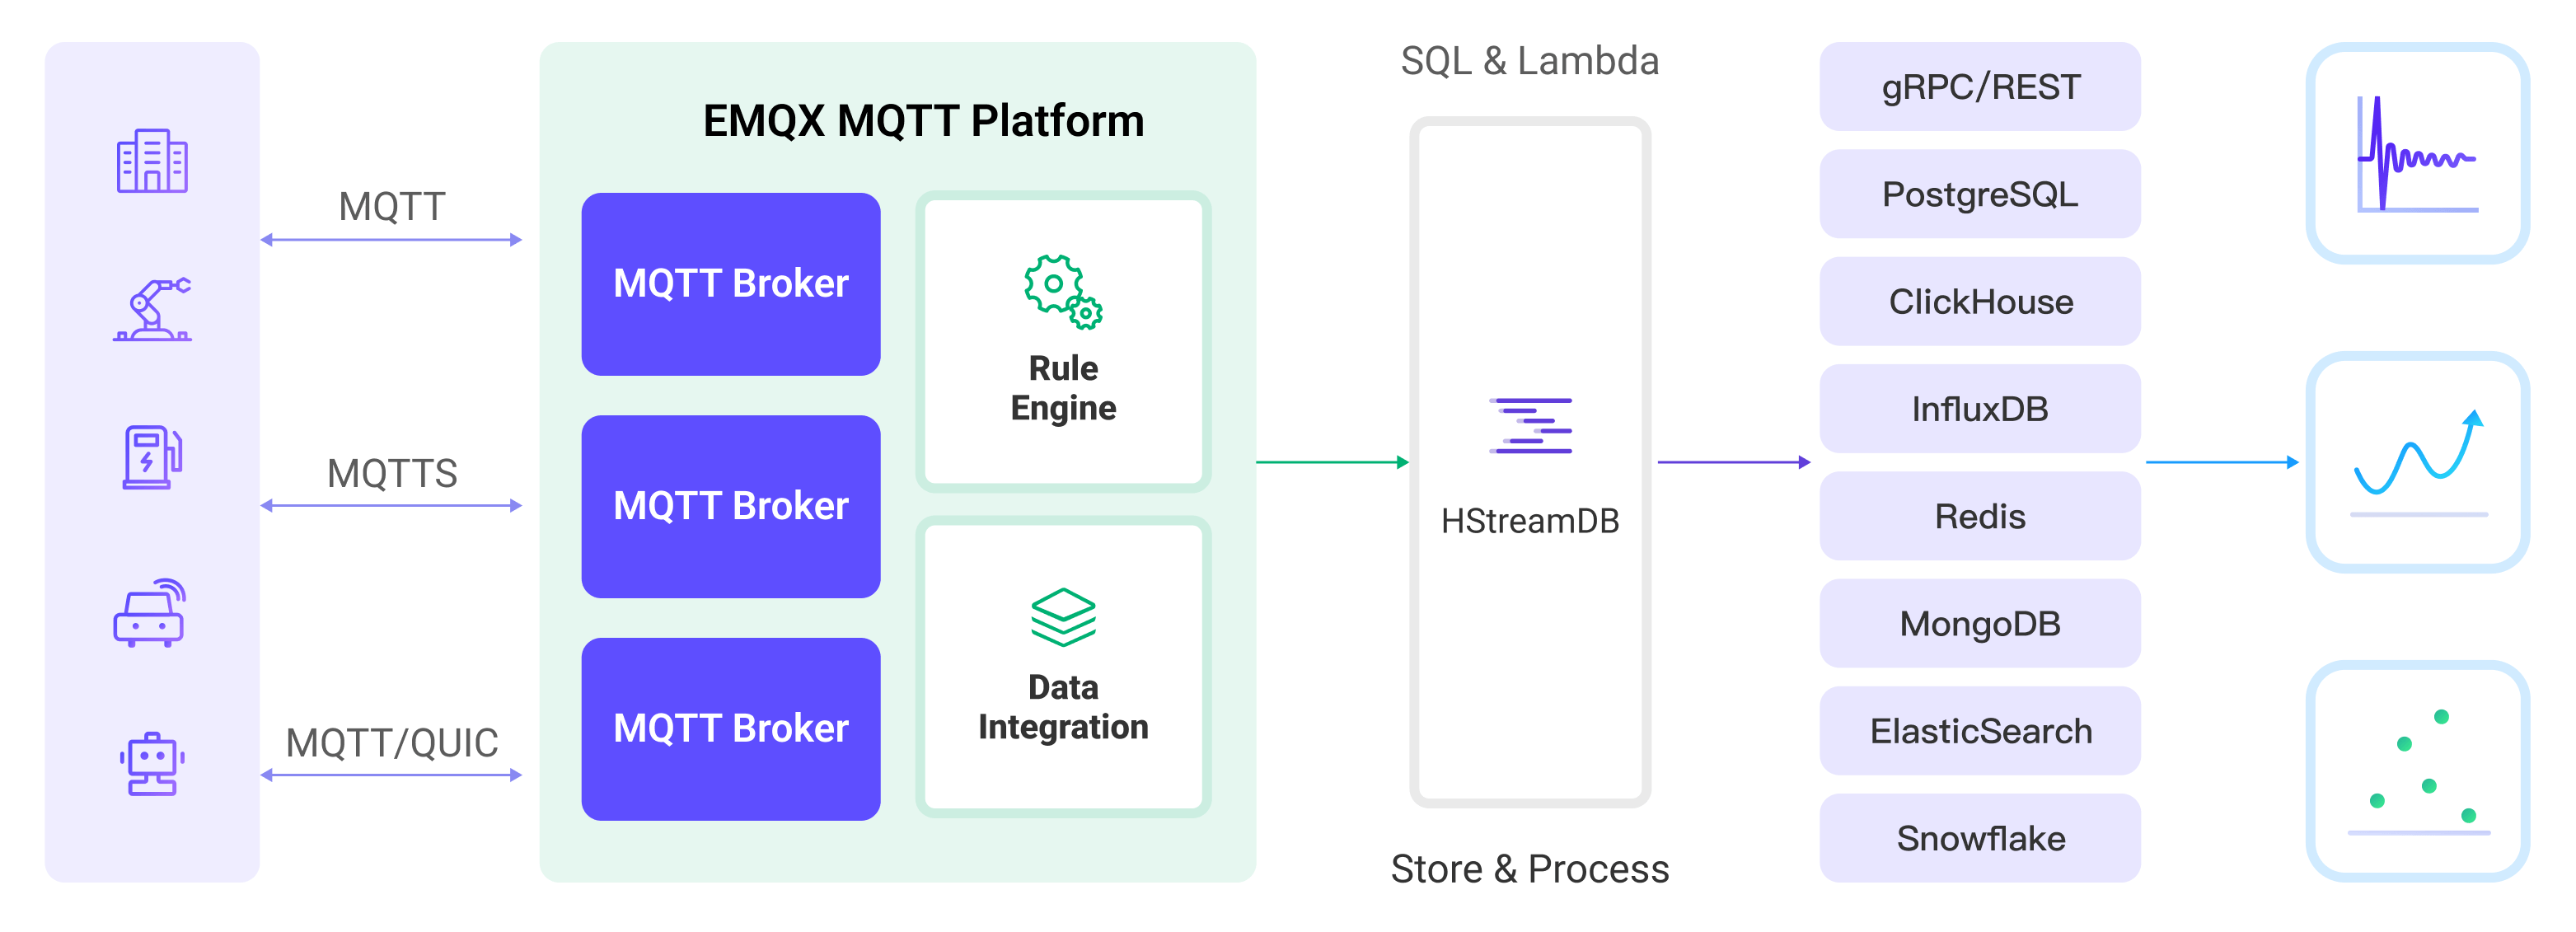
EMQX Cloud forwards MQTT data to HStreamDB through the rule engine and configured Sink, and the complete process is as follows:
- Message publication and reception: IoT devices establish successful connections through the MQTT protocol and subsequently publish telemetry and status data to specific topics. When EMQX Cloud receives these messages, it initiates the matching process within its rules engine.
- Rule engine processes messages: Using the built-in rule engine, MQTT messages from specific sources can be processed based on topic matching. The rule engine matches corresponding rules and processes messages, such as data format conversion, filtering specific information, or enriching messages with context information.
- Data streaming into HStreamDB: Rule triggers the action of forwarding messages to HStreamDB where data can be easily configured to HStreamDB stream name, partition key and record, facilitating subsequent data processing and analysis.
After MQTT message data is written to Apache HStreamDB, you can engage in flexible application development, such as:
- Upon receiving specific MQTT messages, you can use HStreamDB's rule engine component to trigger corresponding actions or events, enabling cross-system and application event-driven functionality.
- Analyze MQTT data streams in real-time within HStreamDB, detect anomalies or specific event patterns, and trigger alert notifications or perform corresponding actions based on these conditions.
- Centralize data from multiple MQTT topics into a unified data stream and utilize HStreamDB's computational capabilities for real-time aggregation, calculation, and analysis to gain more comprehensive data insights.
Features and Benefits
The data integration with HStreamDB brings the following features and advantages to your business:
- Reliable IoT Data Message Delivery: EMQX Cloud can reliably batch and send MQTT messages to HStreamDB, enabling the integration of IoT devices with HStreamDB and application systems.
- MQTT Message Transformation: Using the rule engine, EMQX Cloud can filter and transform MQTT messages. Messages can undergo data extraction, filtering, enrichment, and transformation before being sent to HStreamDB.
- Large-Scale Data Stream Storage: HStreamDB supports the reliable storage of millions of data streams in a specially designed distributed, fault-tolerant log storage cluster. It can replay or push real-time data stream updates to applications as needed. Perfectly integrating with EMQX's message model, it achieves large-scale IoT data collection, transmission, and storage.
- Cluster and Scalability: Built with a cloud-native architecture, EMQX and HStreamDB support online scaling and dynamic expansion and contraction of clusters, allowing flexible horizontal scaling to meet growing business demands.
- Flexible Processing Capabilities: In HStreamDB, you can use familiar SQL to filter, transform, aggregate, and join multiple data streams. It also supports real-time processing, monitoring, and analysis of data streams using standard SQL and materialized views, providing real-time data insights.
- Processing Capabilities in High-Throughput Scenarios: HStreamDB data integration supports both synchronous and asynchronous write modes, allowing for a flexible balance between latency and throughput according to different scenarios.
Before You Start
This section describes the preparations you need to complete before you start to create a HStreamDB data integration, including how to start HStreamDB services and create streams.
The sub-sections below describe how to install and connect to HStreamDB on Linux/MacOS using Docker images. Make sure you have installed Docker and use Docker Compose v2 if possible. For other installation methods of HStreamDB and HStreamDB Platform, please refer to Quickstart with Docker-Compose and Getting Started with HStream Platform.
Prerequisites
- Understand rules.
- Understand data integration.
Set up Network
Before configuring data integration, you must create an EMQX Cloud deployment and ensure network connectivity between EMQX Cloud and the target service.
For Dedicated Flex deployments:
Create a VPC Peering Connection between the EMQX Cloud VPC and the target service VPC. After the peering connection is established, EMQX Cloud can access the target service through its private IP address.
If access through a public IP is required, configure a NAT Gateway to enable outbound connectivity.
For BYOC (Bring Your Own Cloud) deployments:
Create a VPC peering connection between the VPC where the BYOC deployment is running and the VPC hosting the target service. Once peering is in place, the target service can be accessed via its private IP address.
If the target service must be accessed through a public IP, configure a NAT Gateway in the BYOC VPC using your cloud provider’s console.
Start HStreamDB TCP Service and Create Streams
This section describes how to start a single-node HStreamDB TCP service in your local Docker environment and then create Streams in HStreamDB.
Note
Once HStreamDB resources are in a connected state, if you perform operations on Streams in HStreamDB, such as deleting and recreating a Stream, you need to reconnect to HStreamDB, which means restarting HStreamDB resources.
Create a
docker-compose-tcp.yamlfile with the following contents. Please replace< server ip >with your server IP address.docker-compose-tcp.yamlyamlversion: '3.9' services: hserver: image: hstreamdb/hstream:v0.17.0 container_name: quickstart-tcp-hserver depends_on: - zookeeper - hstore ports: - '127.0.0.1:6570:6570' expose: - 6570 networks: - quickstart-tcp volumes: - /var/run/docker.sock:/var/run/docker.sock - /tmp:/tmp - data_store:/data/store command: - bash - '-c' - | set -e /usr/local/script/wait-for-storage.sh hstore 6440 zookeeper 2181 600 \ /usr/local/bin/hstream-server \ --bind-address 0.0.0.0 --port 6570 \ --internal-port 6571 \ --server-id 100 \ --seed-nodes "$$(hostname -I | awk '{print $$1}'):6571" \ --advertised-address < server ip > \ --metastore-uri zk://zookeeper:2181 \ --store-config /data/store/logdevice.conf \ --store-admin-host hstore --store-admin-port 6440 \ --store-log-level warning \ --io-tasks-path /tmp/io/tasks \ --io-tasks-network quickstart-tcp hstore: image: hstreamdb/hstream:v0.17.0 container_name: quickstart-tcp-hstore networks: - quickstart-tcp volumes: - data_store:/data/store command: - bash - '-c' - | set -ex # N.B. "enable-dscp-reflection=false" is required for linux kernel which # doesn't support dscp reflection, e.g. centos7. /usr/local/bin/ld-dev-cluster --root /data/store \ --use-tcp --tcp-host $$(hostname -I | awk '{print $$1}') \ --user-admin-port 6440 \ --param enable-dscp-reflection=false \ --no-interactive zookeeper: image: zookeeper:3.8.1 container_name: quickstart-tcp-zk expose: - 2181 networks: - quickstart-tcp volumes: - data_zk_data:/data - data_zk_datalog:/datalog networks: quickstart-tcp: name: quickstart-tcp volumes: data_store: name: quickstart_tcp_data_store data_zk_data: name: quickstart_tcp_data_zk_data data_zk_datalog: name: quickstart_tcp_data_zk_datalogRun the following shell command to start the HStreamDB TCP service.
bashdocker compose -f docker-compose-tcp.yaml up --buildEnter the HStream container and create a Stream named
temp_hu.TIP
You can also use HStreamDB interactive SQL CLI to create Stream. Use
hstream --helpto get more information about usinghstreamcommand.Command for entering HStreamDB container and creating Stream
bash$ docker container exec -it quickstart-tcp-hserver bash # create Stream `temp_hum` root@ed6a64e65ac0:/# hstream stream create temp_hum +-------------+---------+----------------+-------------+ | Stream Name | Replica | Retention Time | Shard Count | +-------------+---------+----------------+-------------+ | temp_hum | 1 | 604800 seconds | 1 | +-------------+---------+----------------+-------------+ # list all Stream root@ed6a64e65ac0:/# hstream stream list +-------------+---------+----------------+-------------+ | Stream Name | Replica | Retention Time | Shard Count | +-------------+---------+----------------+-------------+ | temp_hum | 1 | 604800 seconds | 1 | +-------------+---------+----------------+-------------+
Start HStreamDB TLS Service and Create Streams
This section describes how to start a dual-node HStreamDB TCP service in your local Docker environment and then create Streams in HStreamDB.
Note
Once HStreamDB resources are in a connected state, if you perform operations on Streams in HStreamDB, such as deleting and recreating a Stream, you need to reconnect to HStreamDB, which means restarting HStreamDB resources.
About Docker Network Environment and Certificate Files
- Please be aware not to set default environment variables like
http_proxy,https_proxy,all_proxy, etc., for containers, as these environment variables may affect communication between different containers in HStream in the current version. Refer to Docker Network Proxy. - Root certificates and self-signed certificates are generated automatically using the smallstep/step-ca container.
- If you have other certificate requirements, please mount the certificate files into the HStreamDB container yourself or refer to Configuring step-ca.
- Certificates generated by step-ca under default settings are only valid for one day. If you want to change the certificate validity period, delete the certificates in the
cadirectory and modify the certificate validity according to step-ca-configuration-options.
- Certificates generated by step-ca under default settings are only valid for one day. If you want to change the certificate validity period, delete the certificates in the
Create a directory
tls-deploy/cato store certificates.bashmkdir tls-deploy/cabash$ cd tls-deploy # To grant write permissions to the "ca" directory. $ sudo chmod 777 caCreate a
docker-compose-tcp.yamlfile with the following contents undertls-deploy. Please replace< server ip >with your server IP address.docker-compose-tls.yamlyamlversion: '3.9' services: step-ca: image: smallstep/step-ca:0.23.0 container_name: quickstart-tls-step-ca networks: - quickstart-tls volumes: - ${step_ca}:/home/step environment: - DOCKER_STEPCA_INIT_NAME=HStream - DOCKER_STEPCA_INIT_DNS_NAMES=step-ca generate-hstream-cert: image: smallstep/step-ca:0.23.0 container_name: quickstart-tls-generate-hstream-cert depends_on: step-ca: condition: service_healthy networks: - quickstart-tls volumes: - ${step_ca}:/home/step command: - bash - '-c' - | sleep 1 if [ -f hstream.crt ]; then exit 0; fi step ca certificate "hstream" hstream.crt hstream.key \ --provisioner-password-file secrets/password --ca-url https://step-ca:9000 \ --root certs/root_ca.crt \ --san localhost \ --san 127.0.0.1 \ --san < server ip > hserver0: image: hstreamdb/hstream:v0.19.3 container_name: quickstart-tls-hserver-0 depends_on: - generate-hstream-cert - zookeeper - hstore ports: - '6570:6570' - '6571:6571' - '26570:26570' expose: - 6571 - 26570 networks: - quickstart-tls #quickstart-tls: # ipv4_address: 172.100.0.10 volumes: - /var/run/docker.sock:/var/run/docker.sock - /tmp:/tmp - data_store:/data/store - ${step_ca}:/data/server command: - bash - '-c' - | set -e /usr/local/script/wait-for-storage.sh hstore 6440 zookeeper 2181 600; \ timeout=60; \ until ( \ [ -f /data/server/hstream.crt ] && [ -f /data/server/hstream.key ] \ ) >/dev/null 2>&1; do >&2 echo 'Waiting for tls files ...' sleep 1 timeout=$$((timeout - 1)) [ $$timeout -le 0 ] && echo 'Timeout!' && exit 1; done; \ /usr/local/bin/hstream-server \ --bind-address 0.0.0.0 --port 6570 \ --internal-port 6571 \ --server-id 100 \ --seed-nodes "hserver0:6571,hserver1:6573" \ --advertised-address < server ip > \ --metastore-uri zk://zookeeper:2181 \ --store-config /data/store/logdevice.conf \ --store-admin-host hstore --store-admin-port 6440 \ --io-tasks-path /tmp/io/tasks \ --io-tasks-network quickstart-tls \ --tls-cert-path /data/server/hstream.crt \ --tls-key-path /data/server/hstream.key \ --enable-tls \ --advertised-listeners l1:hstream://< server ip >:26570 \ --listeners-security-protocol-map l1:plaintext # NOTE: # advertised-listeners ip addr should same as container addr for tls listener hserver1: image: hstreamdb/hstream:v0.19.3 container_name: quickstart-tls-hserver-1 depends_on: - generate-hstream-cert - zookeeper - hstore ports: - '6572:6572' - '6573:6573' - '26572:26572' expose: - 6573 - 26572 networks: - quickstart-tls #quickstart-tls: # ipv4_address: 172.100.0.11 volumes: - /var/run/docker.sock:/var/run/docker.sock - /tmp:/tmp - data_store:/data/store - ${step_ca}:/data/server command: - bash - '-c' - | set -e /usr/local/script/wait-for-storage.sh hstore 6440 zookeeper 2181 600; \ timeout=60; \ until ( \ [ -f /data/server/hstream.crt ] && [ -f /data/server/hstream.key ] \ ) >/dev/null 2>&1; do >&2 echo 'Waiting for tls files ...' sleep 1 timeout=$$((timeout - 1)) [ $$timeout -le 0 ] && echo 'Timeout!' && exit 1; done; \ /usr/local/bin/hstream-server \ --bind-address 0.0.0.0 --port 6572 \ --internal-port 6573 \ --server-id 101 \ --seed-nodes "hserver0:6571,hserver1:6573" \ --advertised-address < server ip > \ --metastore-uri zk://zookeeper:2181 \ --store-config /data/store/logdevice.conf \ --store-admin-host hstore --store-admin-port 6440 \ --io-tasks-path /tmp/io/tasks \ --io-tasks-network quickstart-tls \ --tls-cert-path /data/server/hstream.crt \ --tls-key-path /data/server/hstream.key \ --enable-tls \ --advertised-listeners l1:hstream://< server ip >:26572 \ --listeners-security-protocol-map l1:plaintext # NOTE: # advertised-listeners ip addr should same as container addr for tls listener hserver-init: image: hstreamdb/hstream:v0.19.3 container_name: quickstart-tls-hserver-init depends_on: - hserver0 - hserver1 networks: - quickstart-tls command: - bash - '-c' - | timeout=60 until ( \ /usr/local/bin/hadmin server --host hserver0 --port 26570 status && \ /usr/local/bin/hadmin server --host hserver1 --port 26572 status \ ) >/dev/null 2>&1; do >&2 echo 'Waiting for servers ...' sleep 1 timeout=$$((timeout - 1)) [ $$timeout -le 0 ] && echo 'Timeout!' && exit 1; done; \ /usr/local/bin/hadmin server --host hserver0 --port 26570 init hstore: image: hstreamdb/hstream:v0.19.3 container_name: quickstart-tls-hstore networks: - quickstart-tls volumes: - data_store:/data/store command: - bash - '-c' - | set -ex /usr/local/bin/ld-dev-cluster --root /data/store \ --use-tcp --tcp-host $$(hostname -I | awk '{print $$1}') \ --user-admin-port 6440 \ --no-interactive zookeeper: image: zookeeper:3.8.1 container_name: quickstart-tls-zk expose: - 2181 networks: - quickstart-tls volumes: - data_zk_data:/data - data_zk_datalog:/datalog networks: quickstart-tls: #ipam: # driver: default # config: # - subnet: "172.100.0.0/24" name: quickstart-tls volumes: data_store: name: quickstart_tls_data_store data_zk_data: name: quickstart_tls_data_zk_data data_zk_datalog: name: quickstart_tls_data_zk_datalog
Now the directory structure should be:
$ tree tls-deploy
tls-deploy
├── ca
└── docker-compose-tls.yaml

2 directories, 1 file
Enter the directory
tls-deployand run the following shell command to start an HStreamDB TLS service.bash# Launch in the same folder env step_ca=$PWD/ca docker compose -f docker-compose-tls.yaml up --build # Backstage start-up env step_ca=$PWD/ca docker compose -f docker-compose-tls.yaml up -d --buildEnter HStreamDB container and create a Stream named
temp_hum.TLS connection command options
Similar to the HStreamDB TCP service, here you only need to add the
--tls-ca [CA_PATH]option to the command line. Please note that if you want to execute the command on nodequickstart-tls-hserver-1, you need to specify the--port 6572option additionally to ensure consistency with the port specified in the docker-compose file.Command for entering HStreamDB container and creating Stream
bash$ docker container exec -it quickstart-tls-hserver-0 bash # Create Stream `temp_hum` root@9aa62aef0910:/# hstream --tls-ca /data/server/certs/root_ca.crt stream create temp_hum +-------------+---------+----------------+-------------+ | Stream Name | Replica | Retention Time | Shard Count | +-------------+---------+----------------+-------------+ | temp_hum | 1 | 604800 seconds | 1 | +-------------+---------+----------------+-------------+ # List all Streams root@9aa62aef0910:/# hstream --tls-ca /data/server/certs/root_ca.crt stream list +-------------+---------+----------------+-------------+ | Stream Name | Replica | Retention Time | Shard Count | +-------------+---------+----------------+-------------+ | temp_hum | 1 | 604800 seconds | 1 | +-------------+---------+----------------+-------------+
Create an HStreamDB Connector
Before creating data integration rules, you need to first create an HStreamDB connector to access the HStreamDB server.
Go to your deployment. Click Data Integration from the left-navigation menu.
If it is the first time for you to create a connector, select HStreamDB under the Data Persistence category. If you have already created connectors, select New Connector and then select HStreamDB under the Data Persistence category.
Enter the connection information:
- Server URL: IP address and port of the server.
- gRPC Timeout: Specify the maximum amount of time the system will wait for a response from the HStreamDB server when a gRPC request is made. The default value is
30seconds. - You can click the toggle switch to enable the TLS connection if required. When TLS is enabled, disable TLS Verify. Upload the certificates and key generated under the
tls-deploy/cadirectory:- Upload
ca/hstream.crtto TLS Cert. - Upload
ca/hstream.keyto TLS Key. - Upload
ca/certs/root_ca.crtto CA Cert.
- Upload
Advanced settings (optional).
Click the Test button. If the HStreamDB service is accessible, a success prompt will be returned.
Click the New button to complete the creation.
Create a Rule
Next, you need to create a rule to specify the data to be written and add corresponding actions in the rule to forward the processed data to Cassandra.
Click New Rule in Rules area or click the New Rule icon in the Actions column of the connector you just created.
Enter the rule matching SQL statement in the SQL Editor. In the following rule, we read the time when the message was reported
up_timestamp, client ID, payload viatemp_hum/emqxtopic. Also, we can read temperature and humidity from this topic.sqlSELECT timestamp as up_timestamp, clientid as client_id, payload.temp as temp, payload.hum as hum FROM "temp_hum/emqx"TIP
If you are a beginner user, click SQL Examples and Try It Out to learn and test the SQL rule.
Click Next to add an action.
Select the connector you just created from the Connector dropdown box.
Configure HStream Record Template for forwarding messages to the specific topic by using the template below for data insert:
bash{ "up_timestamp": ${up_timestamp}, "client_id": ${client_id}, "temp": ${temp}, "hum": ${hum} }Advanced settings (optional).
Click the Confirm button to complete the rule creation.
In the Successful new rule pop-up, click Back to Rules, thus completing the entire data integration configuration chain.
Test the Rules
You are recommended to use MQTTX to simulate temperature and humidity data reporting, but you can also use any other client.
Use MQTTX to connect to the deployment and send messages to the following Topic.
topic:
temp_hum/emqxpayload:
json{ "temp": "27.5", "hum": "41.8" }
Check if the message has been forwarded to Kafka.
bash# Enter `Control-C` to stop after reading Stream `temp_hum` root@7f963b999883:/# hstream stream read-stream temp_hum timestamp: "1711442849073", id: 2241614080977213-21474836481-0, key: "", record: {"up_timestamp": 1711442848921, "client_id": mqttx_3f5a2868, "temp": 27.5, "hum": 41.8}View operational data in the console. Click the rule ID in the rule list, and you can see the statistics of the rule and the statistics of all actions under this rule.