Configure TLS/SSL in BYOC Plan
To protect the confidentiality of data transmission within your MQTT ecosystem, the EMQX BYOC Plan supports establishing secure and encrypted communication channels using SSL and TLS encryption protocols. This page introduces how to enable TSL/SSL communication in both one-way and two-way authentication modes to ensure secure communication within the MQTT system..
The following table provides an overview of different certification requirements in one-way and two-way authentication modes.
| Certification Mode | Self-signed Certificate | Server Certificate | Certificate Chain | Private Key | Client CA Certificate |
|---|---|---|---|---|---|
| One-way Authentication | Yes | Required | Required | Required | Not required |
| Two-way Authentication | Yes | Required | Required | Required | Required |
One-Way Authentication Mode
One-way authentication ensures that the server (EMQX MQTT broker) presents a valid certificate to clients (devices or applications) during the TLS/SSL handshake. Clients verify the authenticity of the server by checking the presented certificate against a trusted Certificate Authority (CA).
In the BYOC plan, only certificates signed by a trusted CA are accepted. This enhances security and prevents unauthorized access to your MQTT clusters.
Required Certificate Components
To configure TLS/SSL for your BYOC deployment, you need to prepare a single PEM file that contains the following components. This PEM file is crucial for enabling secure one-way authentication between your MQTT clients and the EMQX MQTT broker.
Server Certificate: Issued by a trusted Certificate Authority (CA), this certificate enables the EMQX MQTT broker to establish secure connections with clients.
Certificate Chain: Include the complete chain of certificates leading up to the trusted root CA certificate. This allows client devices to verify the server certificate's authenticity.
Private Key: The private key associated with the server certificate is essential for decrypting communication between clients and the EMQX MQTT broker.
Certificate Format and Standard Guidelines
When preparing your certificate for TLS/SSL configuration, consider the following guidelines:
Certificates must specify encryption algorithms and key sizes. EMQX BYOC supports 1024-bit RSA (RSA_1024) and 2048-bit RSA (RSA_2048) algorithms.
Certificates must adhere to the SSL/TLS X.509 version 3 standard. They should contain the public key, the fully qualified domain name (FQDN) or IP address of the website, and publisher information.
Certificates can be self-signed using your private key or the issuing CA's private key. If signed by a CA, the certificate chain must be included when importing the certificate.
Certificates must be valid and should not be imported within 30 days prior to the start or conclusion of their validity period.
Certificates, private keys, and certificate chains must use PEM encoding.
Private keys must be passwordless and support PKCS#1 and PKCS#8.
The certificate's encryption algorithm must match the signing CA's encryption algorithm. For instance, if the signing CA uses RSA, the certificate's key type should also be RSA.
These guidelines ensure the proper configuration and secure deployment of TLS/SSL for your BYOC environment.
Use PEM File in "byoc create" Command
During the BYOC deployment, make sure that the PEM file is copied to your Ubuntu environment directory and can be easily accessed before initiating the ./byoc create command. When using the ./byoc create command to deploy your BYOC environment, you need to specify the absolute path where the PEM file is located in the parameter --sslCertPath. For more information on how to configure the parameter, see Run Deployment.
Configure Two-Way TLS/SSL
The following instructions guide you to configure two-way TLS/SSL in EMQX Cloud Console and test the client connection with TLS/SSL configured. You can also watch Two-Way TLS/SSL Tutorial for each step of the setup.
- Login to the EMQX Cloud Console.
- On your deployment Overview page, click the +TLS/SSL Config button to configure the certificate. You can upload the file or fill in the certificate contents directly.
- TLS/SSL Type: Select two-way (client and server verify each other's certificates).
- Certificate and Certificate Chain: Custom server-side certificate.(Including certificate chain, which is provided by a third-party organization when issuing the certificate.)
- Certificate Private Key: Private secret key.
- Client CA Certificate : When choosing two-way, you need to provide the client CA certificate.
- After filling in all the fields, click on Confirm. On your deployment overview page, you should see the certificate information in TLS/SSL Config.
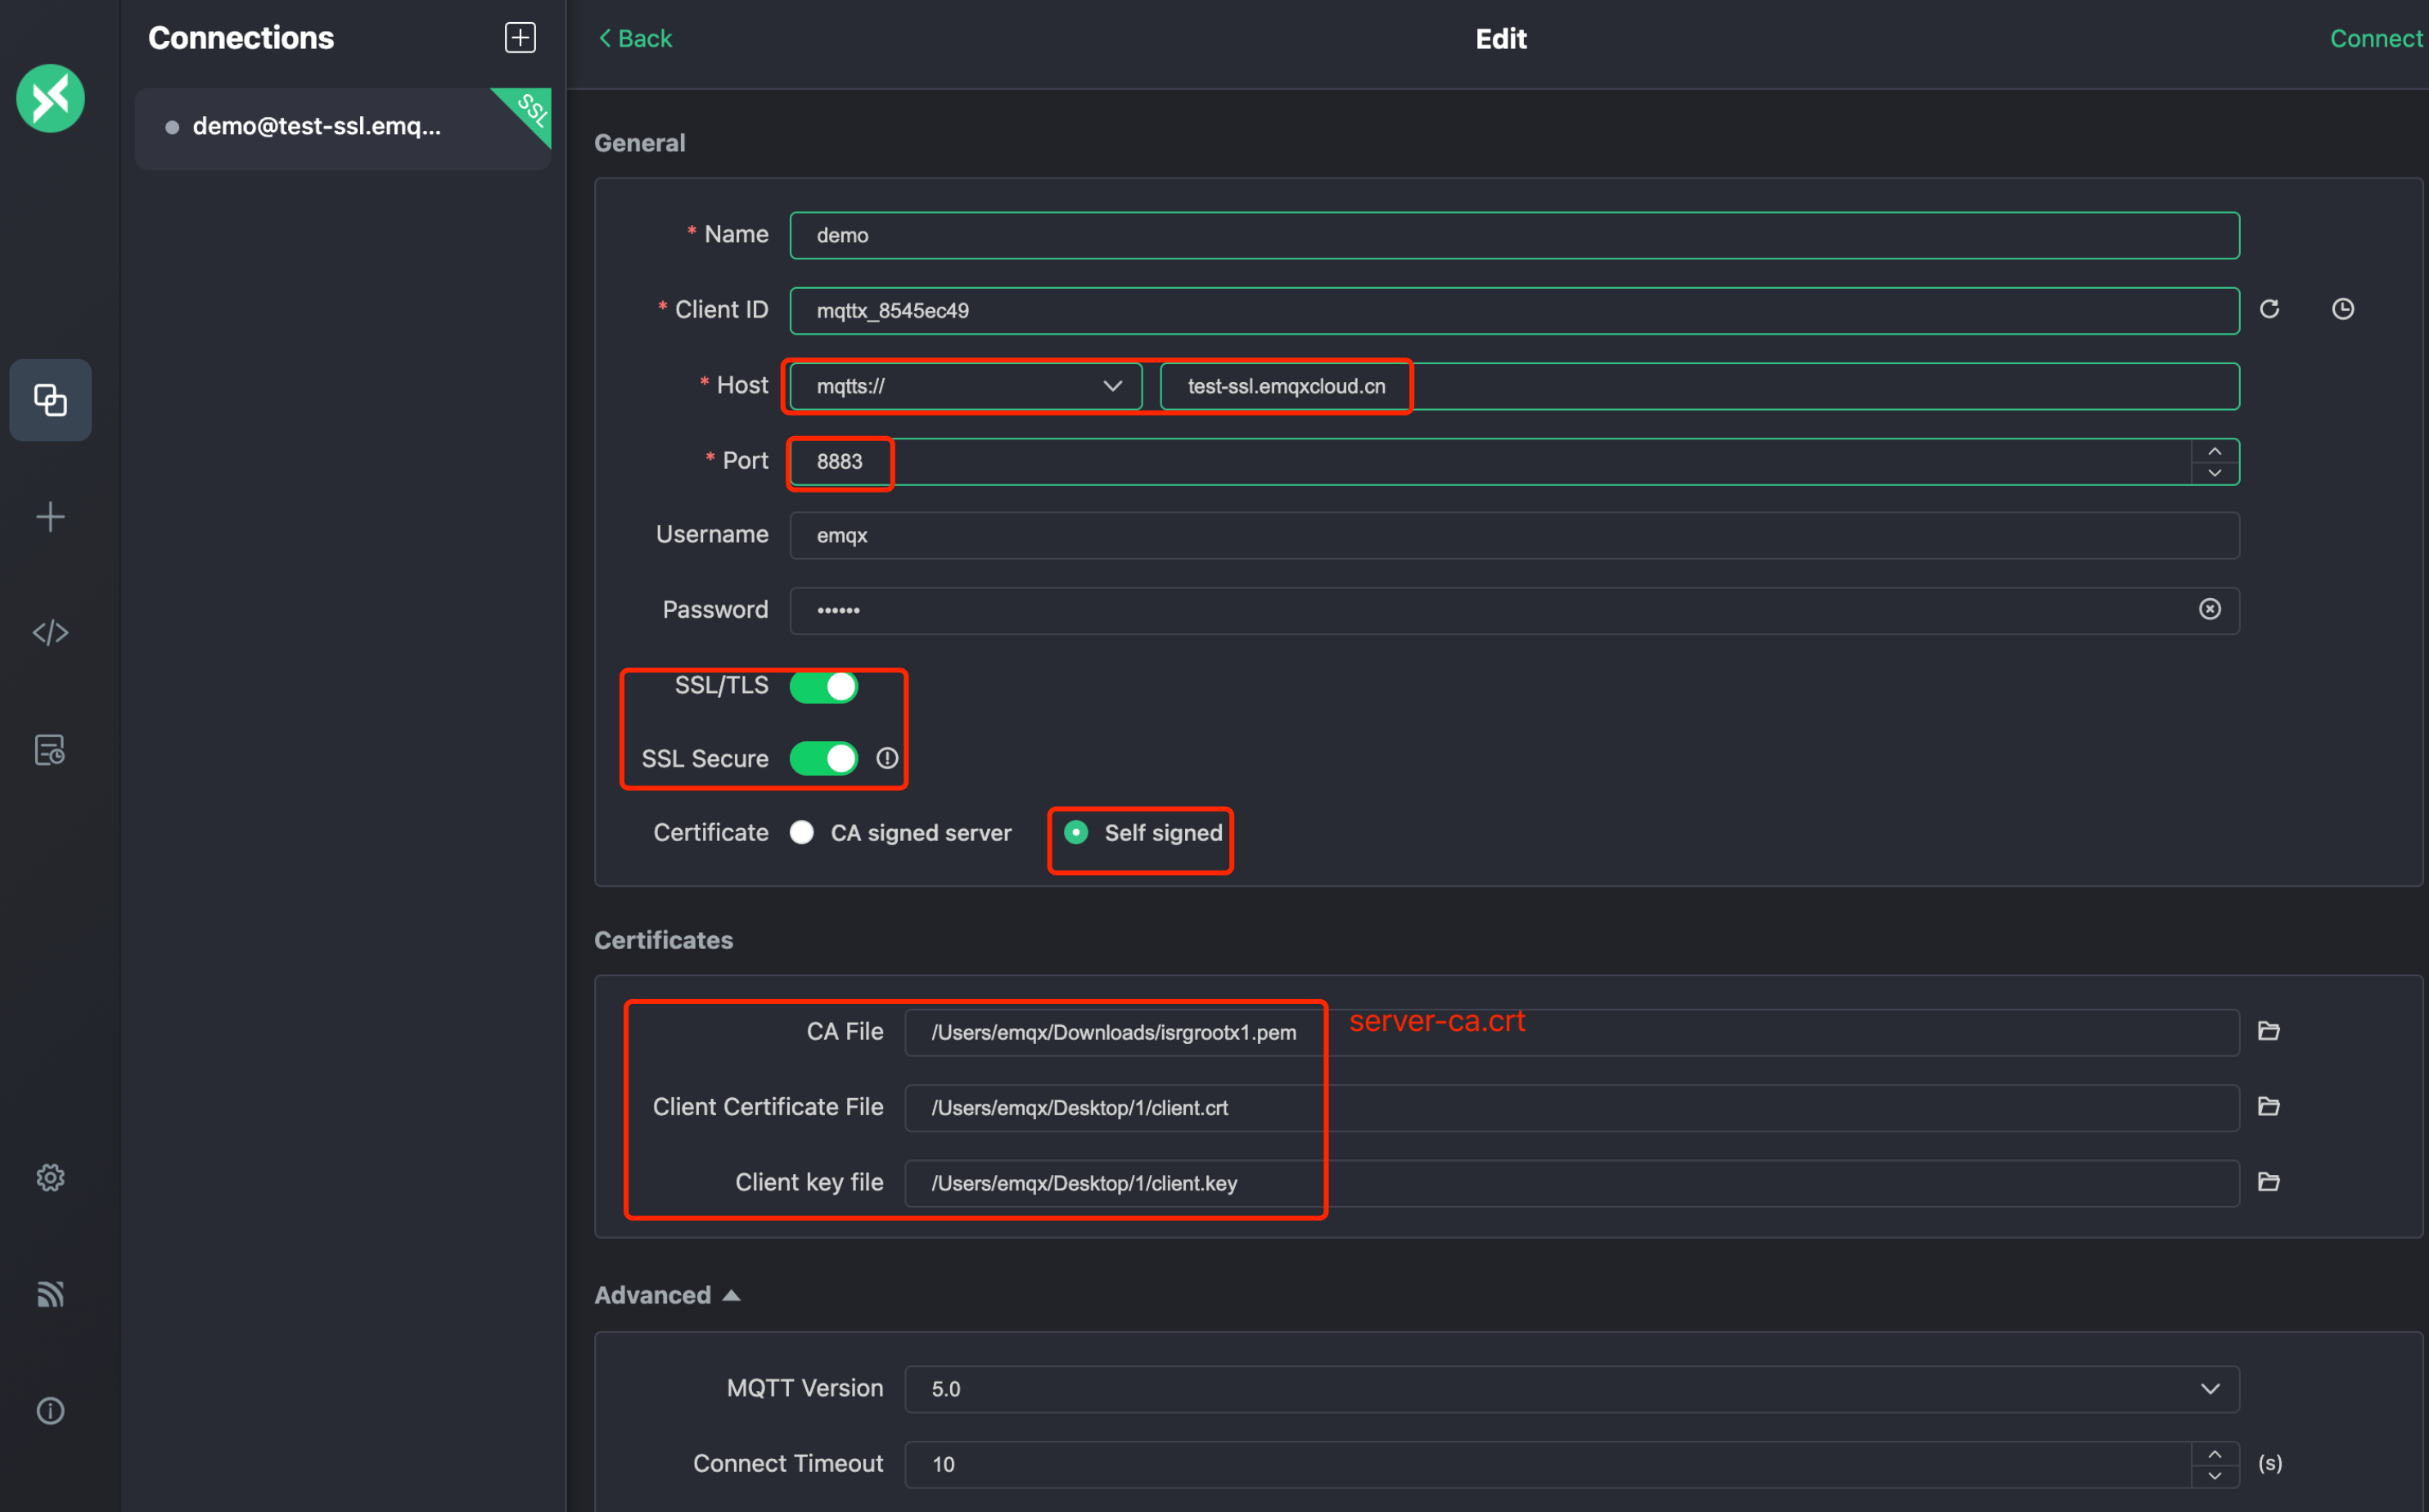
Test Two-Way TLS with MQTTX Client
Before testing, make sure that you have created authentication information, refer to Authentication. You can use MQTTX Client to connect to EMQX Cloud and test the TLS/SSL configuration.
In MQTTX Client, create a new connection.
In the General section, fill in the information as follows:
Name: Type the name of the connection.
Client ID: The client ID is randomly generated. You can click the refresh button to regenerate the id.
Host: Select the protocol from the drop-down list and fill in the deployed connection address and port.
- If you use MQTT over TLS, select ports
mqtts://and8883. - If you use WebSocket over TLS, select ports
wss://and8084.
- If you use MQTT over TLS, select ports
Username and Password: Type the authentication information you have created.
SSL/TLS: Click the toggle switch to enable SSL/TLS.
SSL Secure: Click the toggle switch to enable SSL Secure.
Certificate: Select the certification as needed.
- If it is a server-side CA certified by CA authority, click Self signed and fill in the certificate in CA File field. For information on how to create self-signed TSL/SSL certificate, see Create Self-Signed TSL/SSL Certificate.
- If it is self-signed server-side certificate, click Self signed to provide self-signed server-side CA certificate.
- Two-way TLS also needs to fill in the client certificate file and client key file.
Click Connect.
Create Self-Signed TSL/SSL Certificate
The following instructions guide you to create self-signed TSL/SSL certificates. You can also watch Create a self-signed TLS/SSL certificate tutorial for each step of the setup.
Prerequisite
Make sure you have installed OpenSSL.
Generate Server-Side CA Certificate
You can use the following statement to generate a server-side CA certificate. You should adjust subj to actual use.
openssl req \
    -new \
    -newkey rsa:2048 \
    -days 365 \
    -nodes \
    -x509 \
    -subj "/C=CN/O=EMQ Technologies Co., Ltd/CN=EMQ CA" \
    -keyout server-ca.key \
    -out server-ca.crt
Create a Server-Side Certificate
- Generate server-side secret key
server.key.
openssl genrsa -out server.key 2048- Create
openssl.cnffile. Replace the IP.1 or DNS.1 address with your deployment address.
cat << EOF > ./openssl.cnf
[policy_match]
countryName             = match
stateOrProvinceName     = optional
organizationName        = optional
organizationalUnitName  = optional
commonName              = supplied
emailAddress            = optional

[req]
default_bits       = 2048
distinguished_name = req_distinguished_name
req_extensions     = req_ext
x509_extensions    = v3_req
prompt             = no

[req_distinguished_name]
commonName          = Server

[req_ext]
subjectAltName = @alt_names

[v3_req]
subjectAltName = @alt_names

[alt_names]
# EMQX deployment connections address
# IP.1 = <IP Connect Address>
DNS.1 = <Domain Connect Address>
EOF- Generate the server-side certificate request file
server.csr.
openssl req -new -key server.key -config openssl.cnf -out server.csr- Sign the server-side certificate with a CA certificate
server.crt.
openssl x509 -req \
    -days 365 \
    -sha256 \
    -in server.csr \
    -CA server-ca.crt \
    -CAkey server-ca.key \
    -CAcreateserial -out server.crt \
-extensions v3_req -extfile openssl.cnf- View server-side certificate information.
openssl x509 -noout -text -in server.crt- Verify the certificate.
openssl verify -CAfile server-ca.crt server.crtCreate a Client Certificate
For two-way authentication, you need to generate the client CA certificate first.
Generate Client CA Certificate
You can use the following statement to generate a client CA certificate. You should adjust subj to actual use.
openssl req \
    -new \
    -newkey rsa:2048 \
    -days 365 \
    -nodes \
    -x509 \
    -subj "/C=CN/O=EMQ Technologies Co., Ltd/CN=EMQ CA" \
    -keyout client-ca.key \
-out client-ca.crt- Generate client-side secret key
client.key.
openssl genrsa -out client.key 2048- Generate the client-side certificate request file
client.csr.
openssl req -new -key client.key -out client.csr -subj "/CN=Client"- Sign the client-side certificate with a CA certificate
client.crt.
openssl x509 -req -days 365 -sha256 -in client.csr -CA client-ca.crt -CAkey client-ca.key -CAcreateserial -out client.crt- View client-side certificate information.
openssl x509 -noout -text -in client.crt- Verify the certificate.
openssl verify -CAfile client-ca.crt client.crtUpdate Certificate
When a certificate is about to expire or needs to be replaced, you can update the existing TLS/SSL certificate on the deployment overview page.
- Login to the EMQX Cloud Console.
- On the deployment details page, locate the certificate to update in the TLS/SSL Config section and click the edit icon in the Actions column.
- In the TLS/SSL Config dialog, fill in the new certificate contents. You can upload a file or paste the content directly:
- TLS/SSL Type: The certificate type cannot be changed and matches the existing certificate.
- Certificate and Certificate Chain: Enter the new server certificate content, including the certificate chain.
- Certificate Private Key: Enter the private key corresponding to the new certificate.
- Client CA Certificate: For two-way TLS, also enter the client CA certificate.
- Click Confirm.
Delete Certificate
Note
Deleting a TLS/SSL certificate is only supported in BYOC v4 deployments. BYOC v5 deployments do not support this operation.
Deleting the certificate will disconnect the client from 8883 and 8084. Make sure that the deletion does not affect your business.
- Login to the EMQX Cloud Console.
- Click the delete icon for the certificate in the TLS/SSL Config section.
- Click OK in the dialog to complete the deletion.