Ingest MQTT Data into HTTP Server
The HTTP Service Data Integration in EMQX Cloud offers a quick way to integrate EMQX with external HTTP services. It supports flexible configuration of request methods and request data formats, offers secure communication through HTTPS, and provides authentication mechanisms. It can efficiently and flexibly transmit client messages and event data in real-time, enabling scenarios such as IoT device state notifications, alert notifications, and data integration.
This page provides a detailed introduction to the functional features of HTTP Service Data Integration. It also offers practical guidance for creating the data integration, including creating an HTTP Server connector, creating rules, and testing rules.
How It Works
HTTP Service Data Integration is an out-of-the-box feature in EMQX Cloud that can be easily configured for integrating EMQX with external services. With HTTP Services, users can write code in their preferred programming languages and frameworks to implement custom, flexible, and complex data processing logic.
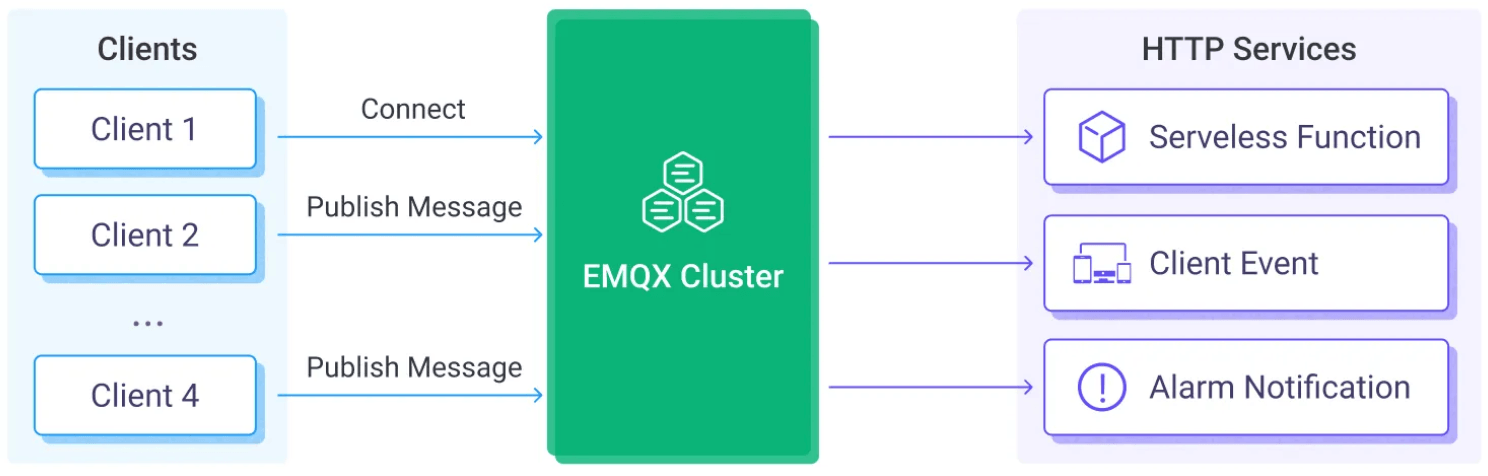
EMQX Cloud forwards device events and data to HTTP services through configured data integration, with the following workflow:
- Device Connects to EMQX Cloud: When IoT devices successfully connect, an online event is triggered, including information such as the device ID, source IP address, and other attributes.
- Device Publishes Messages: Devices report telemetry and status data to EMQX Cloud and trigger rules by publishing messages to specific topics through the MQTT protocol.
- Rule Engine Processes Messages: The built-in rule engine can process messages and events from specific sources based on topic matching. The rule engine matches the corresponding rules and processes messages and events, such as converting data formats, filtering specific information, or enriching messages with context information.
- Sent to HTTP Service: The triggering of rules sends messages to HTTP service events. Users can extract data from the results of rule processing, dynamically construct request headers, bodies, or even URLs, achieving flexible integration of data with external services.
After events and message data are sent to the HTTP service, you can flexibly process them, such as:
- Implementing device status updates and event recording, and developing device management systems based on data.
- Writing message data into databases to achieve lightweight data storage functionality.
- For abnormal data filtered by rule SQL, you can directly call the alarm notification system through the HTTP service for device anomaly monitoring.
Features and Advantages
Using EMQX Cloud’s HTTP Service Integration brings the following advantages to your business:
- Pass data to more downstream systems: HTTP services can easily integrate MQTT data into more external systems, such as analytics platforms, cloud services, etc., realizing multi-system data distribution.
- Real-time response and triggering of business processes: Through HTTP services, external systems can receive MQTT data in real-time and trigger business processes for rapid response. For example, receiving alarm data and triggering business workflows.
- Custom data processing: External systems can perform secondary processing of received data as needed, implementing more complex business logic, unrestricted by EMQX's capabilities.
- Loosely coupled integration: HTTP services use simple HTTP interfaces, offering a loosely coupled system integration method.
In summary, HTTP services provide real-time, flexible, and customizable data integration capabilities, meeting the needs of flexible and rich application development.
Before You Start
This section introduces the preparatory work needed to create HTTP Service Data Integration in EMQX Cloud.
Prerequisites
- Understand rules.
- Understand data integration.
Set up Network
Before configuring data integration, you must create an EMQX Cloud deployment and ensure network connectivity between EMQX Cloud and the target service.
For Dedicated Flex deployments:
Create a VPC Peering Connection between the EMQX Cloud VPC and the target service VPC. After the peering connection is established, EMQX Cloud can access the target service through its private IP address.
If access through a public IP is required, configure a NAT Gateway to enable outbound connectivity.
For BYOC (Bring Your Own Cloud) deployments:
Create a VPC peering connection between the VPC where the BYOC deployment is running and the VPC hosting the target service. Once peering is in place, the target service can be accessed via its private IP address.
If the target service must be accessed through a public IP, configure a NAT Gateway in the BYOC VPC using your cloud provider’s console.
Set up a Simple HTTP Service
Use the following example to create a simple web server.
from http.server import HTTPServer, BaseHTTPRequestHandler

class SimpleHTTPRequestHandler(BaseHTTPRequestHandler):
    def do_GET(self):
       self.send_response(200)
       self.end_headers()
       self.wfile.write(b'Hello, world!')

    def do_POST(self):
       content_length = int(self.headers['Content-Length'])
       body = self.rfile.read(content_length)
       print("Received POST request with body: " + str(body))
       self.send_response(201)
       self.end_headers()

httpd = HTTPServer(('0.0.0.0', 8080), SimpleHTTPRequestHandler)
httpd.serve_forever()
Create an HTTP Server Connector
Before creating data integration rules, you need to create an HTTP Server connector for accessing HTTP services.
- Go to your deployment. Click Data Integration from the left-navigation menu.
- If it is the first time for you to create a connector, select HTTP Server under the Web Service category. If you have already created connectors, select New Connector and then select HTTP Server under the Web Service category.
- On the New Connector page, configure the following options:
- Connector Name: The system will automatically generate a connector name, or you can name it yourself. In this example, you can use
my_httpserver. - URL: Fill in the URL, ensuring your Web service can be normally accessed through the network.
- Use default values for other settings. You can configure the keys and values of the HTTP request header as needed.
- Connector Name: The system will automatically generate a connector name, or you can name it yourself. In this example, you can use
- Click the Test button to test connection. If the Web service is accessible, a success prompt will be returned.
- Click the New button to complete the creation.
Create a Rule
Next, you need to create a rule to specify the data to be written and add corresponding actions in the rule to forward the processed data to the HTTP Server.
Click New Rule in Rules area or click the New Rule icon in the Actions column of the connector you just created.
Enter the rule matching SQL statement in the SQL Editor. The following SQL example reads the message reporting time, client ID, message body (Payload), and temperature and humidity from the body from messages sent to the
temp_hum/emqxtopic.sqlSELECT timestamp as up_timestamp, clientid as client_id, payload.temp as temp, payload.hum as hum FROM "temp_hum/emqx"You can use Try It Out to simulate data input and test the results.
Click Next to add an action.
Select the connector you just created from the Connector dropdown box.
Configure the following information:
Action Name: The system will automatically generate an action name, or you can name it yourself.
Method: Select
POSTfor the HTTP request method.URL Path: You can configure a separate request path for the action, which will be appended to the connector's URL configuration to create the complete URL. This option allows the use of templates with variables. First, define the relevant variable in the rule SQL, such as
select clientid as device_id. You can then incorporate the variable${device_id}in the URL path of the HTTP action.Headers: The action can have its own request headers set, or use the connector's configured headers directly.
Body: Set the request body as the following message content template, adding the fields output from the rule into the action's request body.
json{"up_timestamp": ${up_timestamp}, "client_id": ${client_id}, "temp": ${temp}, "hum": ${hum}}
Click the Confirm button to complete the rule creation.
In the Successful new rule pop-up, click Back to Rules, thus completing the entire data integration configuration chain.
Test the Rule
You are recommended to use MQTTX to simulate temperature and humidity data reporting, but you can also use any other client.
Use MQTTX to connect to the deployment and send messages to the following Topic.
topic:
temp_hum/emqxpayload:
json{ "temp": "27.5", "hum": "41.8" }
Check if the message has been forwarded to the HTTP service:
bashpy server.py Received POST request with body: b'[\n "temp": "27.5",\n "hum": "41.8"\n)127.0.0.1 - -[18/Dec/2023 14:50:44]"POST HTTP/1.1" 201 -View the operational data in the console. Click the rule ID in the rule list, and you can see the statistics of the rule and the statistics of all actions under this rule.