Rules
Rules, also known as the rule engine, are an SQL-based data processing component built into EMQX. They are used in conjunction with Connectors to enable code-free IoT data extraction, filtering, transformation, storage, and processing, accelerating application integration and business innovation.
How Rules Work
Rules specify how to retrieve data from a data source, perform data transformations, and the actions that should be applied to the results.

Data Source: The data source of a rule can be a message, event, or external data system. The
FROMclause in the rule's SQL specifies the data source, while theWHEREclause adds additional constraints on which messages the rule processes.For more information on the various types of supported data sources and fields that can be referenced in the
WHEREclause, see SQL Data Sources and Fields.Data Transformation: Data transformations describe the process of transforming an input message. The
SELECTpart of the SQL extracts and transforms data from the input message. Embedded SQL sample statements can be used to implement advanced transformations, such as adding a timestamp to the output message.For a detailed explanation of the syntax and built-in SQL functions, see Rule SQL Reference and Built-in SQL Functions. To learn more about SQL functions, you can also refer to jq Functions.
Actions: Actions solve the problem of "where to send the processed data". They tell EMQX Broker how to handle the data produced by the rule. After the input is processed according to the specified rules, one or more actions can be defined to process the SQL execution results. The rule engine will sequentially perform corresponding actions. Currently, rules support the following two types of actions:
- Built-in Actions: Currently, you can republish the processing results to another MQTT topic through Message Republish.
- Store the processing results in a database: Send data to various target services through predefined Connectors.
Rule SQL Example
SQL statements are used to specify the data source of a rule and define data processing. Here's an example of an SQL statement:
SELECT
    payload.data as d
FROM
    "t/#"
WHERE
    clientid = "foo"
In the above SQL statement:
- Data Source: Messages from topics
t/#; - Data Processing: If the client ID of the message sender is
foo, select thedatafield from the message content and assign it to the new variabled.
TIP
The "." syntax requires the data to be in JSON or Map format. If it is in another data type, SQL functions must be used for data type conversion.
For detailed information on the format and usage of Rule SQL statements, refer to the Rule SQL Reference.
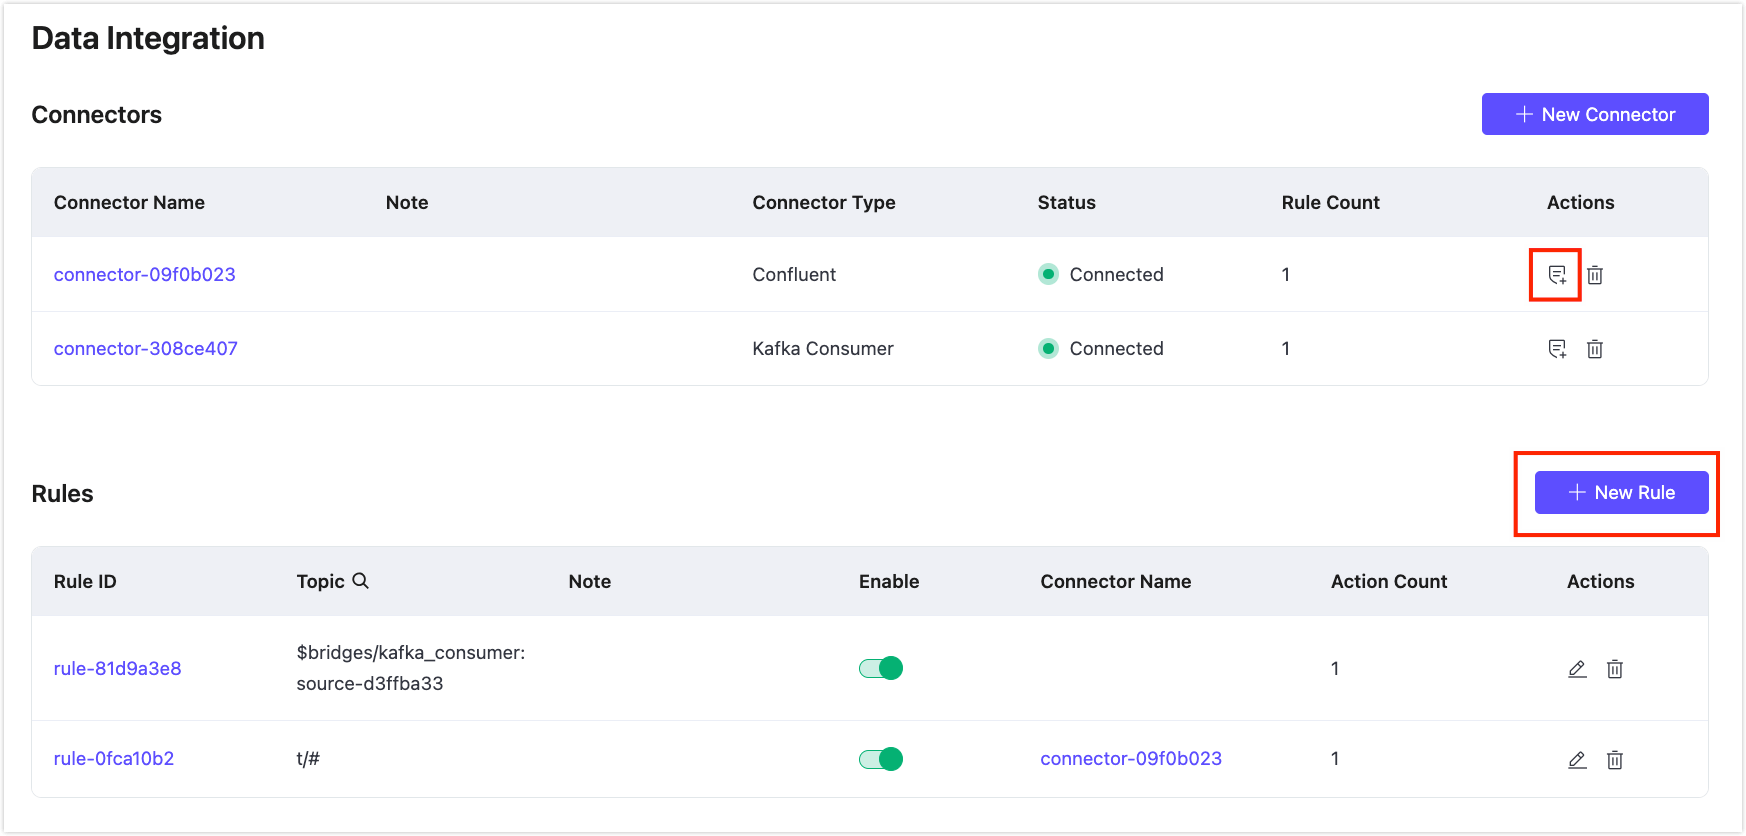
Create Rules
Go to your deployment and click Data Integration from the left-navigation menu to enter the Data Integration page. When you first access the initial page of data integration, you can select the type of data integration as needed, and create a connector to connect to the target service by clicking the corresponding icon. For specific steps on creating a connector, refer to Create a Connector and specific data integration instructions in the Data Integration section.
TIP
You can return to the data integration initial page by clicking New Connector.
When you have created a Connector for connecting to the cloud resources, click New Rule in the upper left corner of the Rule List to enter the New Rule page. You can also create a new rule by clicking the rule creation button in the Connector list.
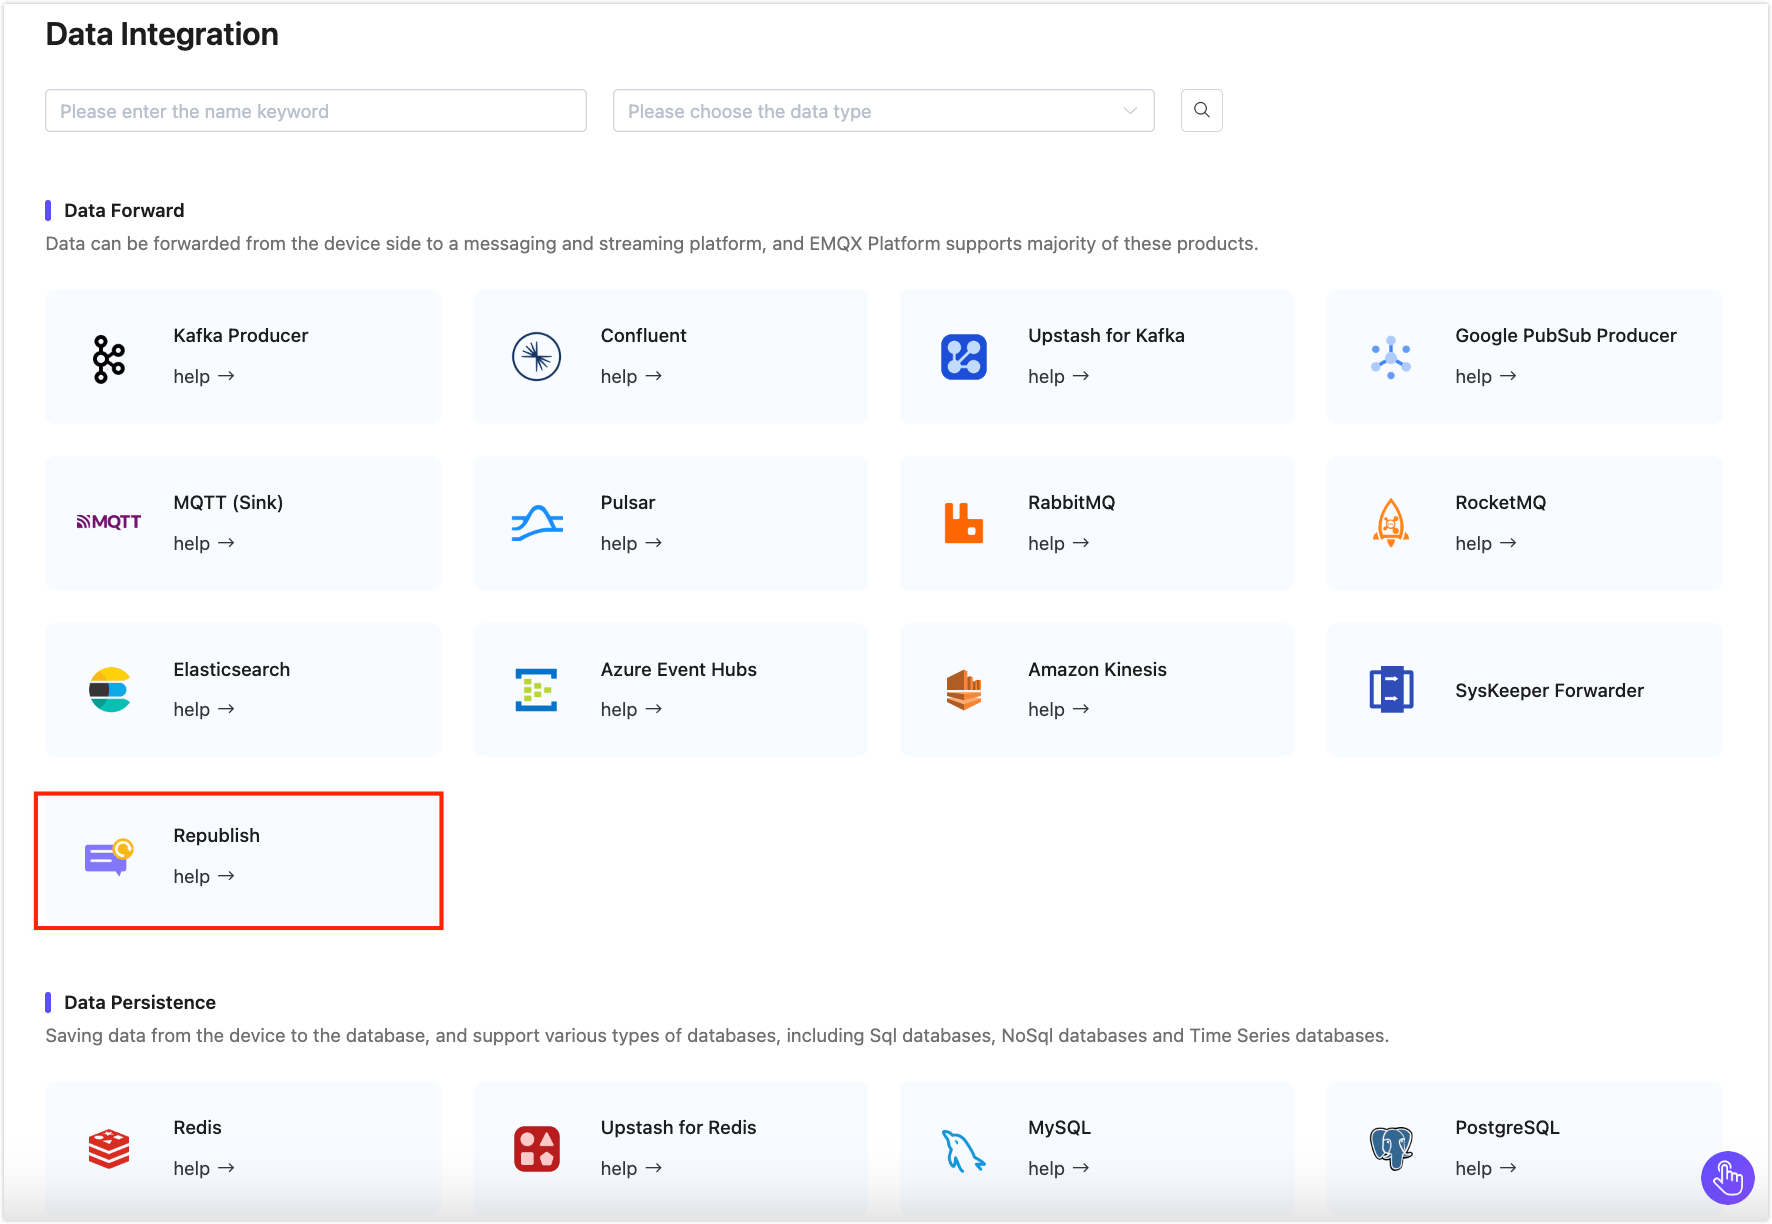
If you want to create a rule for message republish, click Republish from the Data Forward category to start the rule creation process.
You can also click Do Nothing (debug) under the Debug category to enter the rule creation process. An empty action is configured only with rules and does not associate with any actions, which can be used specifically for debugging rules. For more details, refer to Empty Action (Debug).
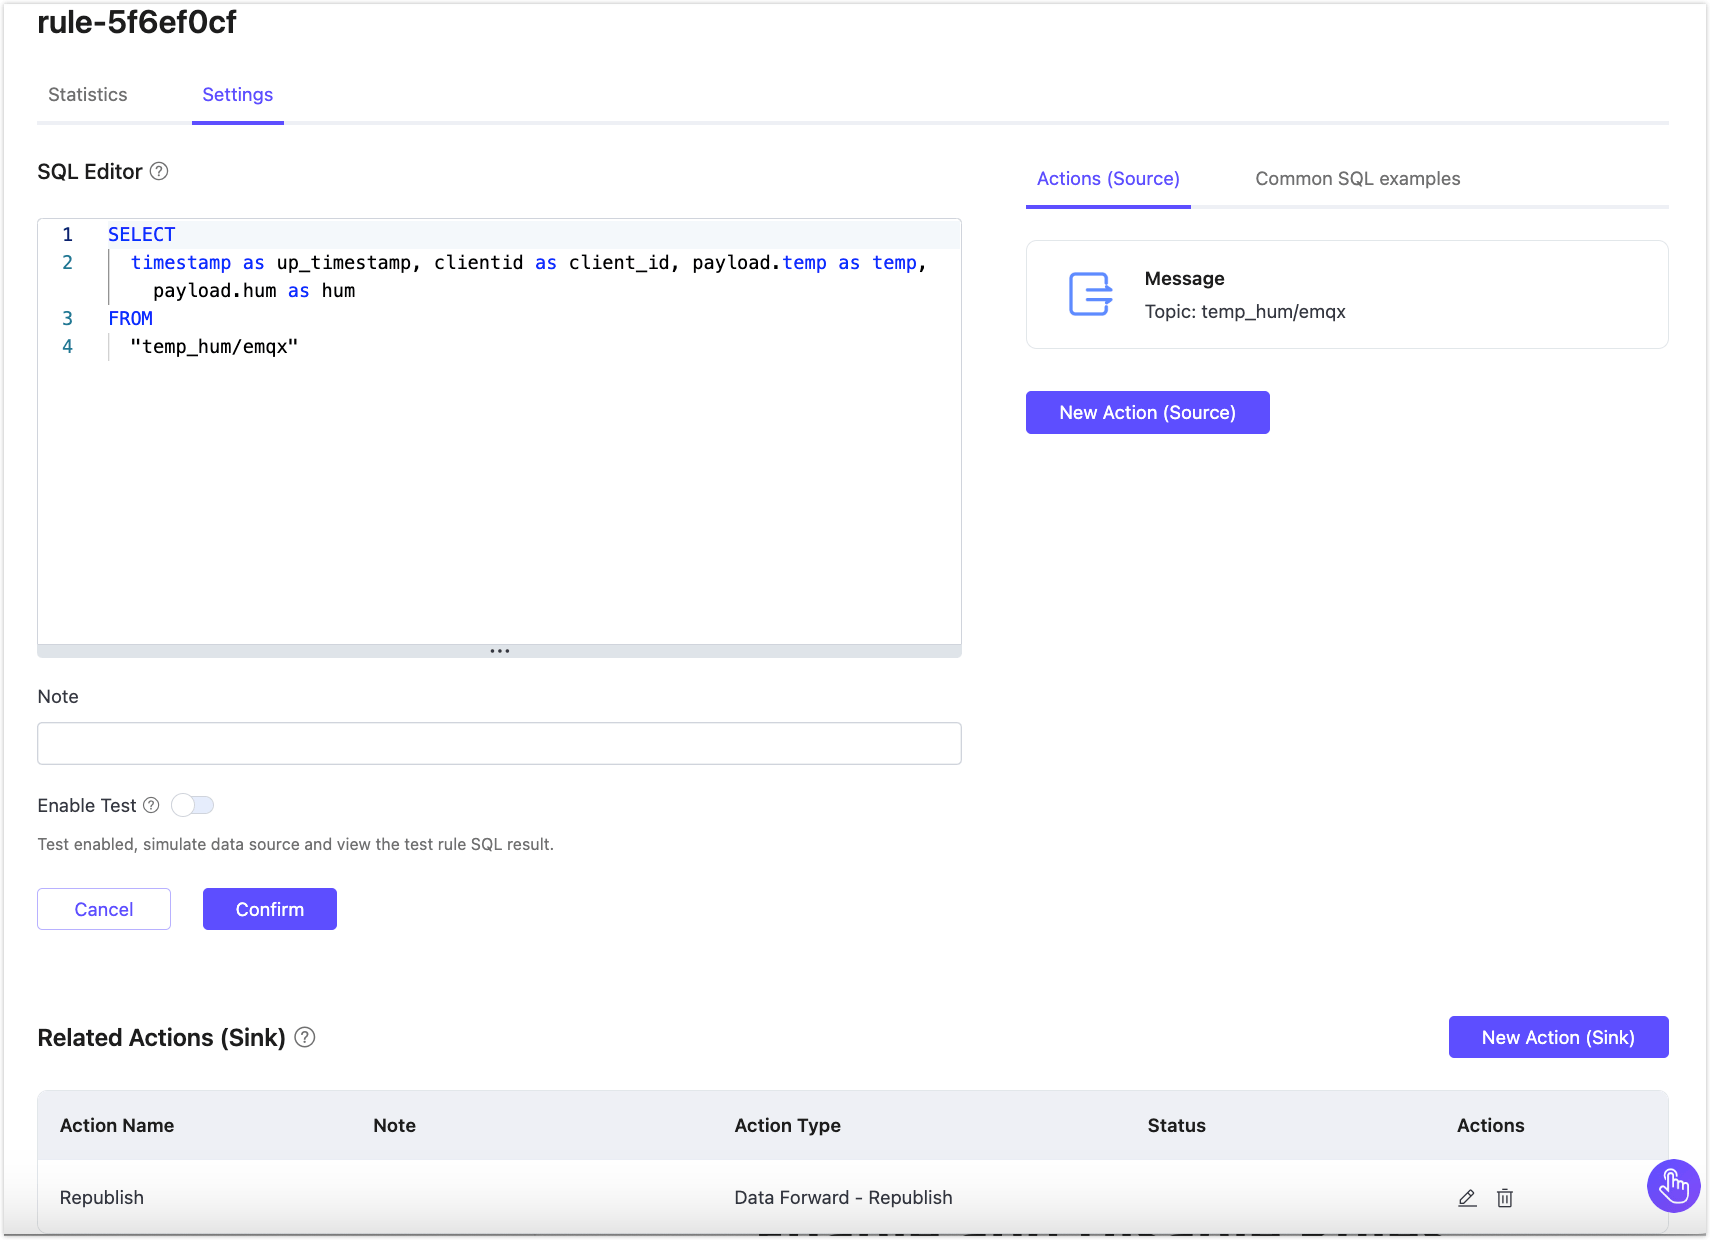
Define a Data Source
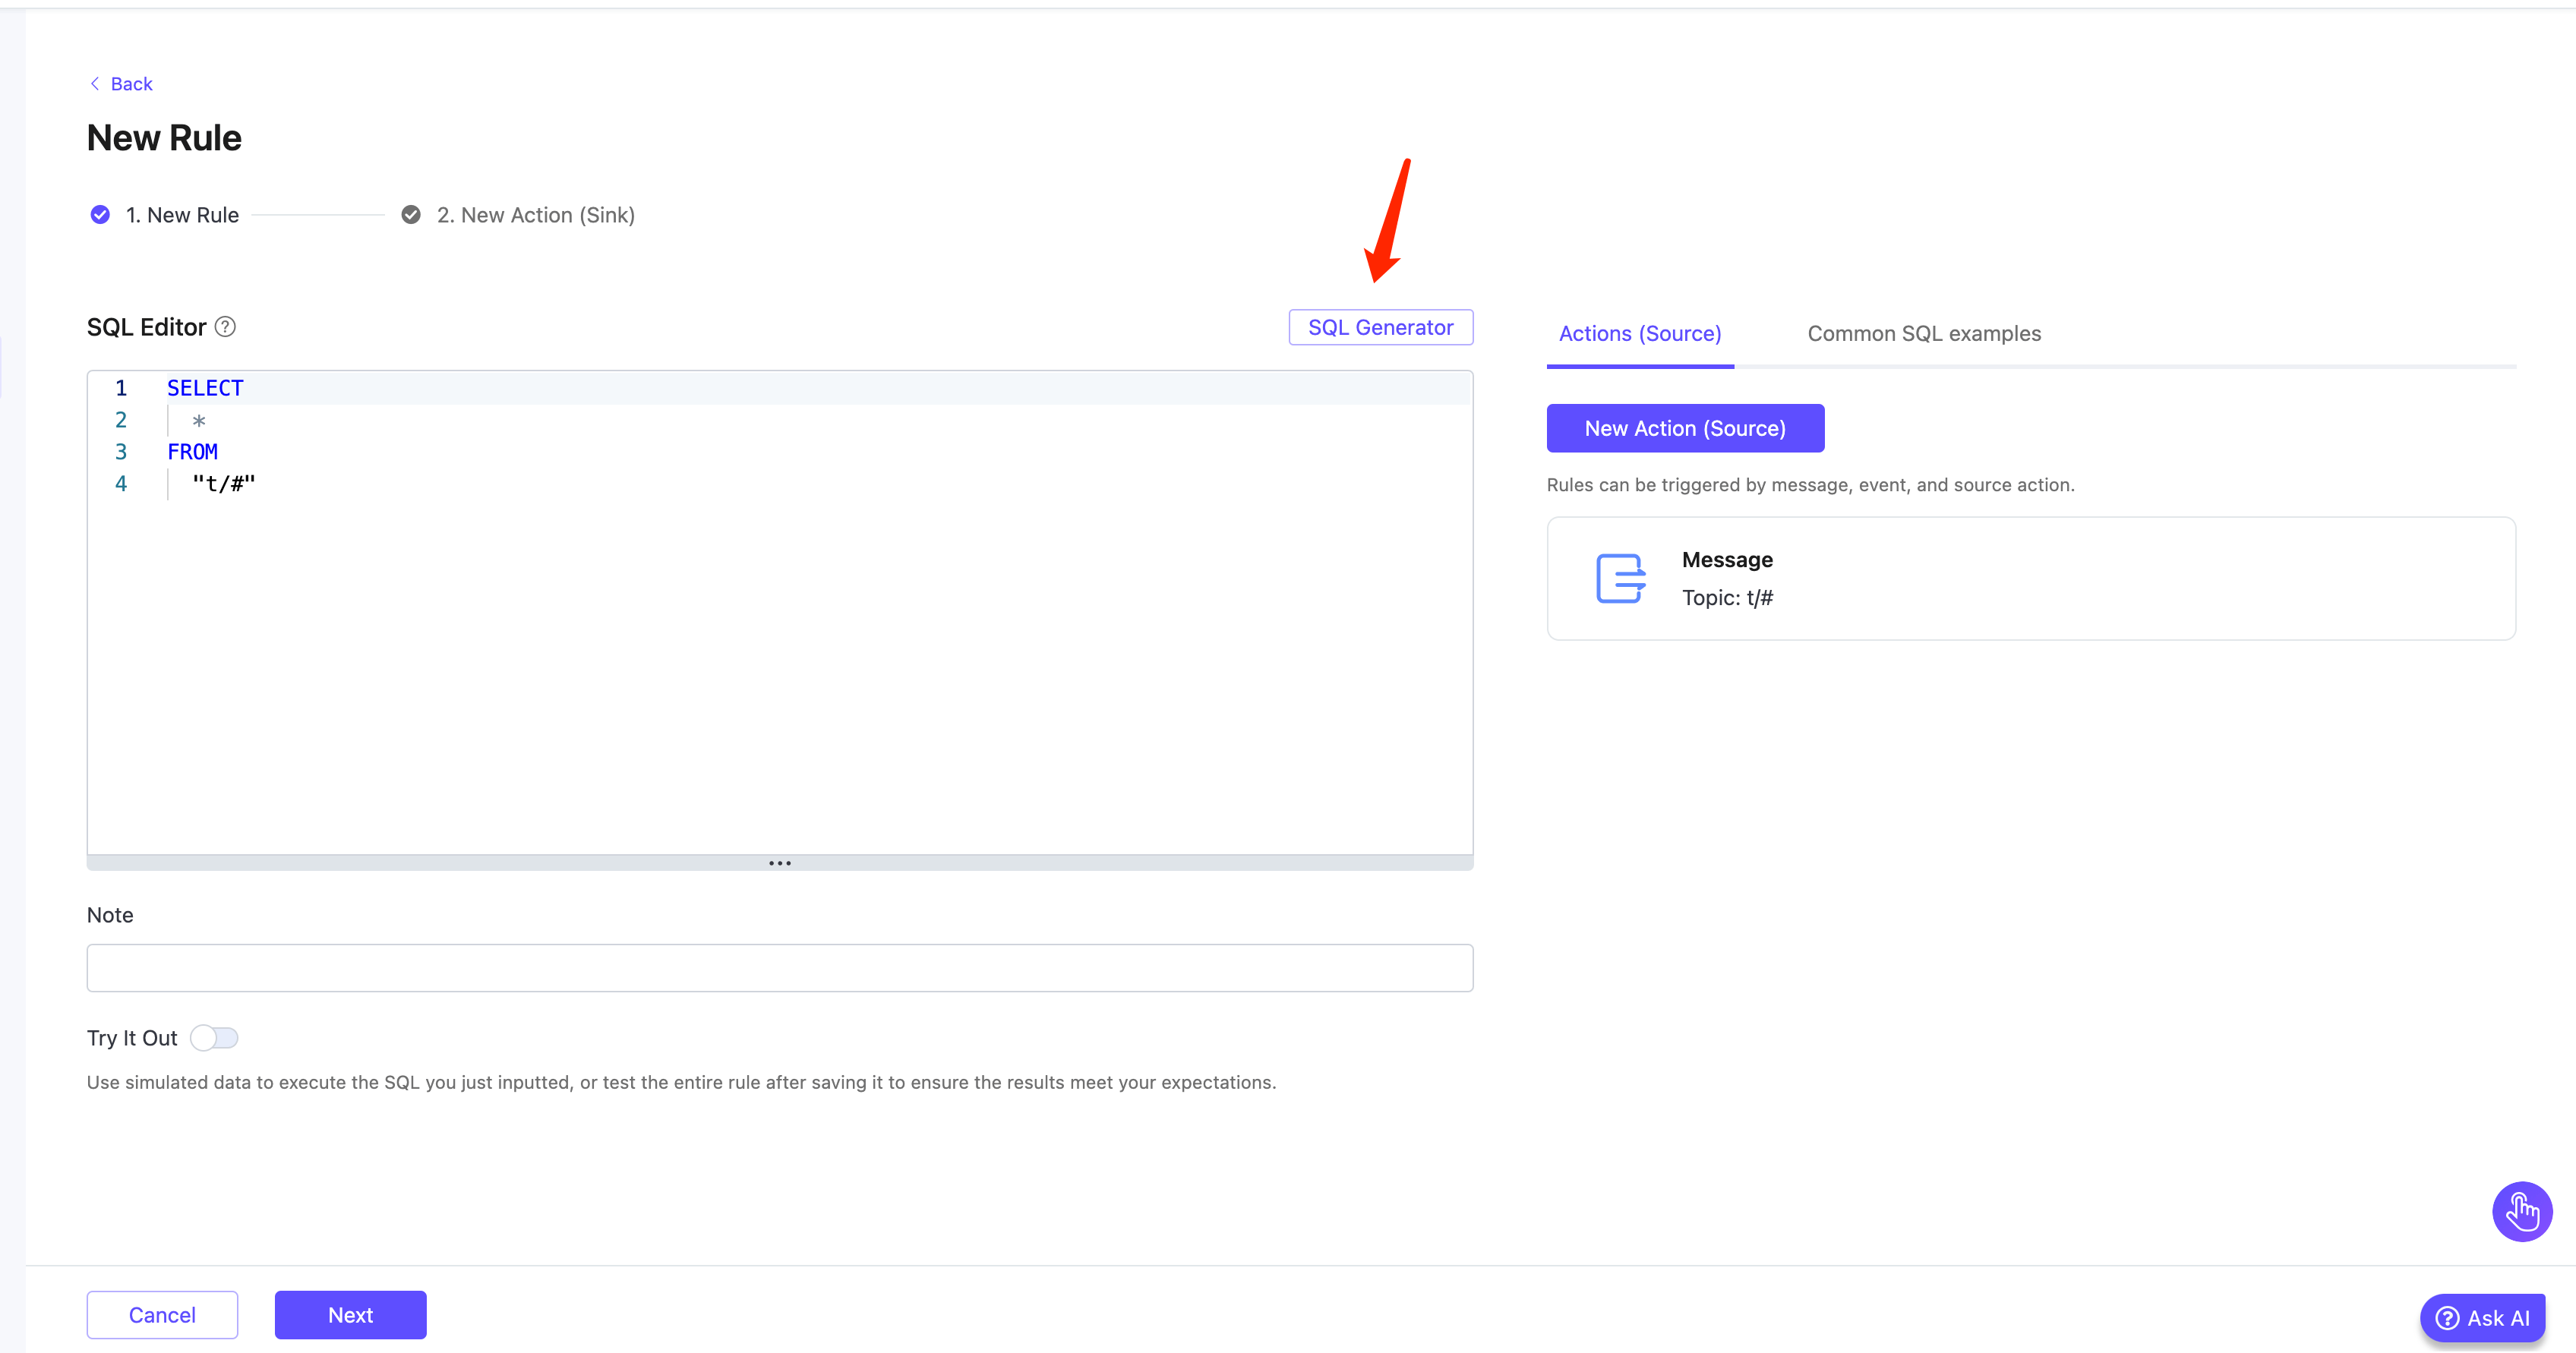
On the New Rule page, enter a name for your rule and add a note to facilitate future management.
In the SQL Editor, you can customize the statements to add a data source that suits your business needs. For this demonstration, enter the SQL statement below:
SELECT
  timestamp as up_timestamp, clientid as client_id, payload.temp as temp, payload.hum as hum
FROM
  "temp_hum/emqx"
By specifying this SQL statement, the rule reads the reported timestamp, clientid, and temperature and humidity contained in the payload of the message published to the temp_hum/emqx topic.
SQL Generator
Starting from EMQX 5.91 in the Dedicated Flex edition, the SQL Editor supports generating rule SQL using natural language through an AI-powered SQL Generator. This feature allows you to describe their intent in natural language, and the system will automatically generate the appropriate SQL statement for your rule.
To use this feature:
On the New Rule page, navigate to the SQL Editor section.
Click the SQL Generator button to open the Generate SQL with AI dialog.
Specify the following fields in the dialog:
Task Description (required): Describe in natural language what you want the SQL to do.
Example: "Extract
clientidfrom the MQTT message metadata, and extractdevice_idandtemperaturefrom the payload. Only apply to messages from topicsensors/temperaturewhere the temperature is greater than 30."Related Topics (optional): Specify topic filters such as
sensors/temperature.Input Example (JSON) (optional but recommended): Provide a sample MQTT message payload to help the AI understand your data structure. Example:
json
{
  "device_id": "sensor001",
  "temperature": 32.5,
  "unit": "C"
}
Output Example (JSON) (optional): Specify the expected result format. Example:
json
{
  "clientid": "client_a1b2c3",
  "device_id": "sensor001",
  "temperature": 32.5
}
TIP
Including input/output examples improves the accuracy of the generated SQL.
Click Generate to preview the generated SQL.
In the preview dialog, you can:
- Review and manually edit the generated SQL.
- Click Apply SQL to insert it into the SQL Editor.
- Or click Back to revise your input and regenerate the SQL.
If you insert it into the SQL Editor, the SQL will automatically appear in the SQL Editor, where you can review and edit it.
Example Output
Using the sample task and input above, the generated SQL might be:
SELECT
  clientid,
  payload.device_id AS device_id,
  payload.temperature AS temperature
FROM
  "sensors/temperature"
WHERE
  payload.temperature > 30
This rule extracts the clientid, device_id, and temperature fields from messages on the sensors/temperature topic where the temperature is greater than 30.
When to Use the SQL Generator
The SQL Generator is especially useful when:
- You are unfamiliar with EMQX SQL syntax.
- You want to quickly prototype a rule.
- You're working with structured JSON payloads.
For more customization and syntax options, see the Rule SQL Syntax documentation.
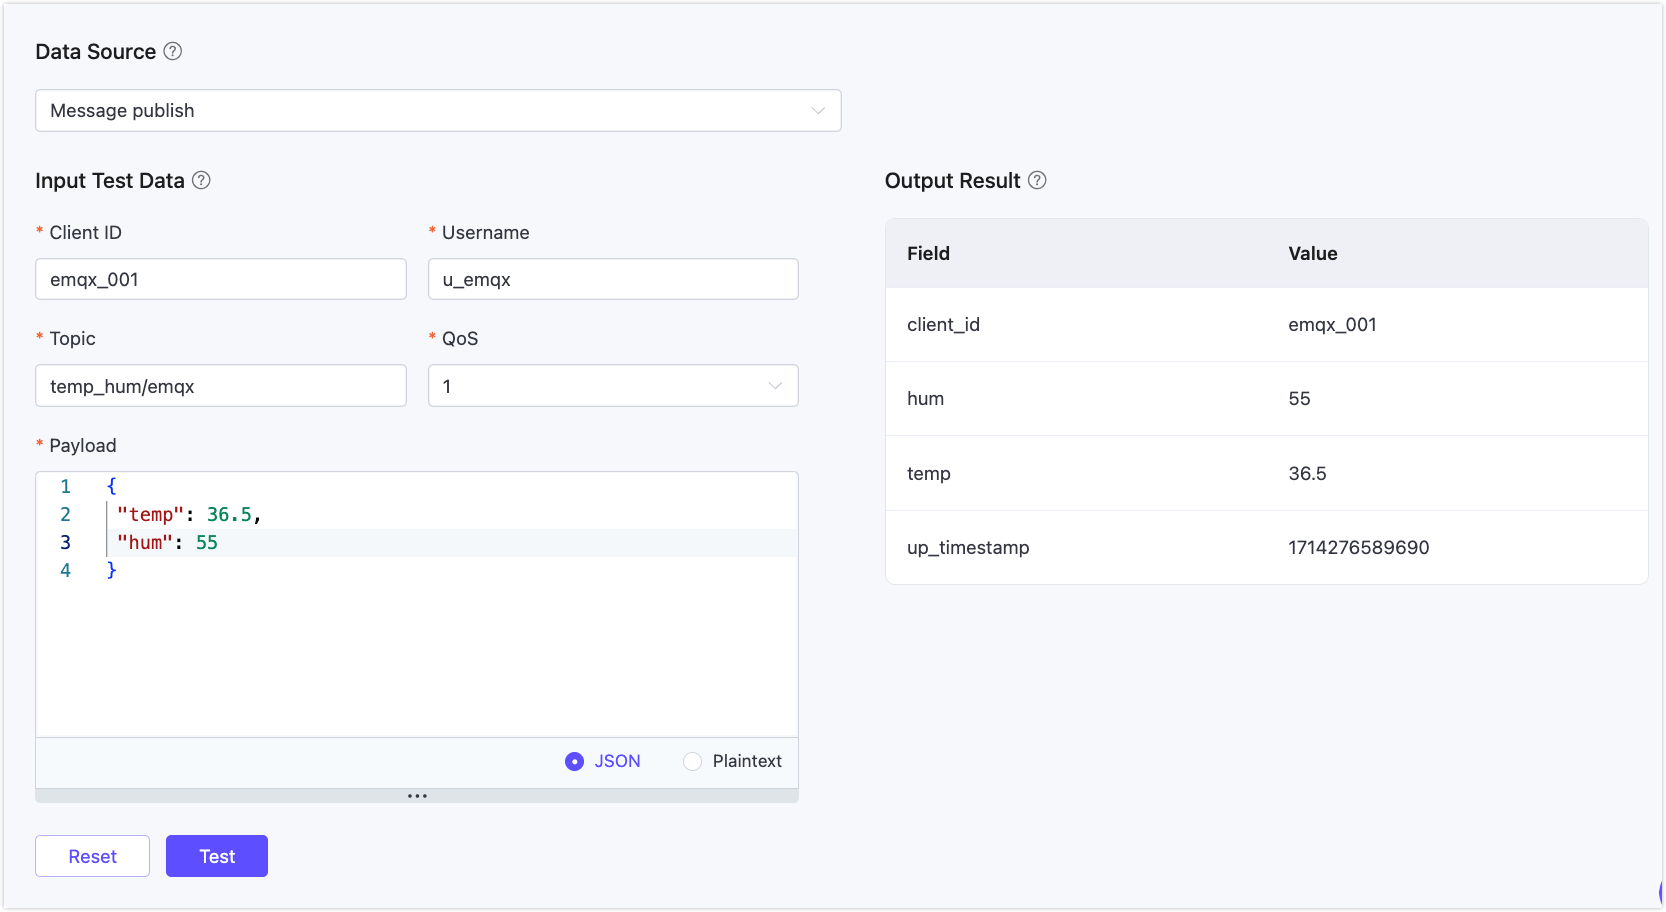
Test the SQL Statements
Click the Try It Out toggle switch to create a new test SQL. Fill in the appropriate test parameters, and click the Test button.
In the Output Result, you can see the expected data processing results.
Add Actions
After you have created the rule, you can append actions to the rule. For details, see Actions.
Test Rules
Note
This feature is only available with the EMQX Dedicated and Dedicated Flex edition.
The rule engine provides a rule testing feature, which allows you to trigger rules using simulated data or real client data, execute rule SQL, and perform all actions added to the rule, obtaining the execution results for each step.
By testing rules, you can verify whether the rules work as expected, and quickly identify and solve any issues. This not only speeds up the development process but also ensures that the rules can run as expected in real environments, avoiding failures in production.
Testing Steps
- Toggle the Try It Out switch and select Rule as the test target. Note that before starting the test, you need to save the rule.
- Click the Start Test button to begin the test. The browser will wait for the current rule to be triggered to generate the test results.
- Trigger the rule for testing. The following 2 methods are supported:
- Use simulated data: Click the Input Simulated Data button, select the Data Source that matches the SQL in the pop-up window, and ensure it matches the specified source in the rule (FROM clause). EMQX provides default values for all fields, such as Client ID, Username, Topic, QoS, Payload, etc. Modify them as needed, and click the Submit Test button to trigger the rule for testing once.
- Use real device data: Keep the current page open, connect to EMQX using a real client or MQTT client tool, trigger the corresponding events, and perform testing.
- View the test results: When the rule is triggered, the execution results will be output to the Console, displaying detailed execution results for each step.
Testing Example
You can use MQTTX to test the rule with the republish action. Create one client, and use this client to subscribe to the a/1 topic and send a t/1 message. You will see in the dialog box that this message is republished to the topic a/1.
For details on how to build the connection between the MQTTX client tool and EMQX, see MQTTX - Get Started.
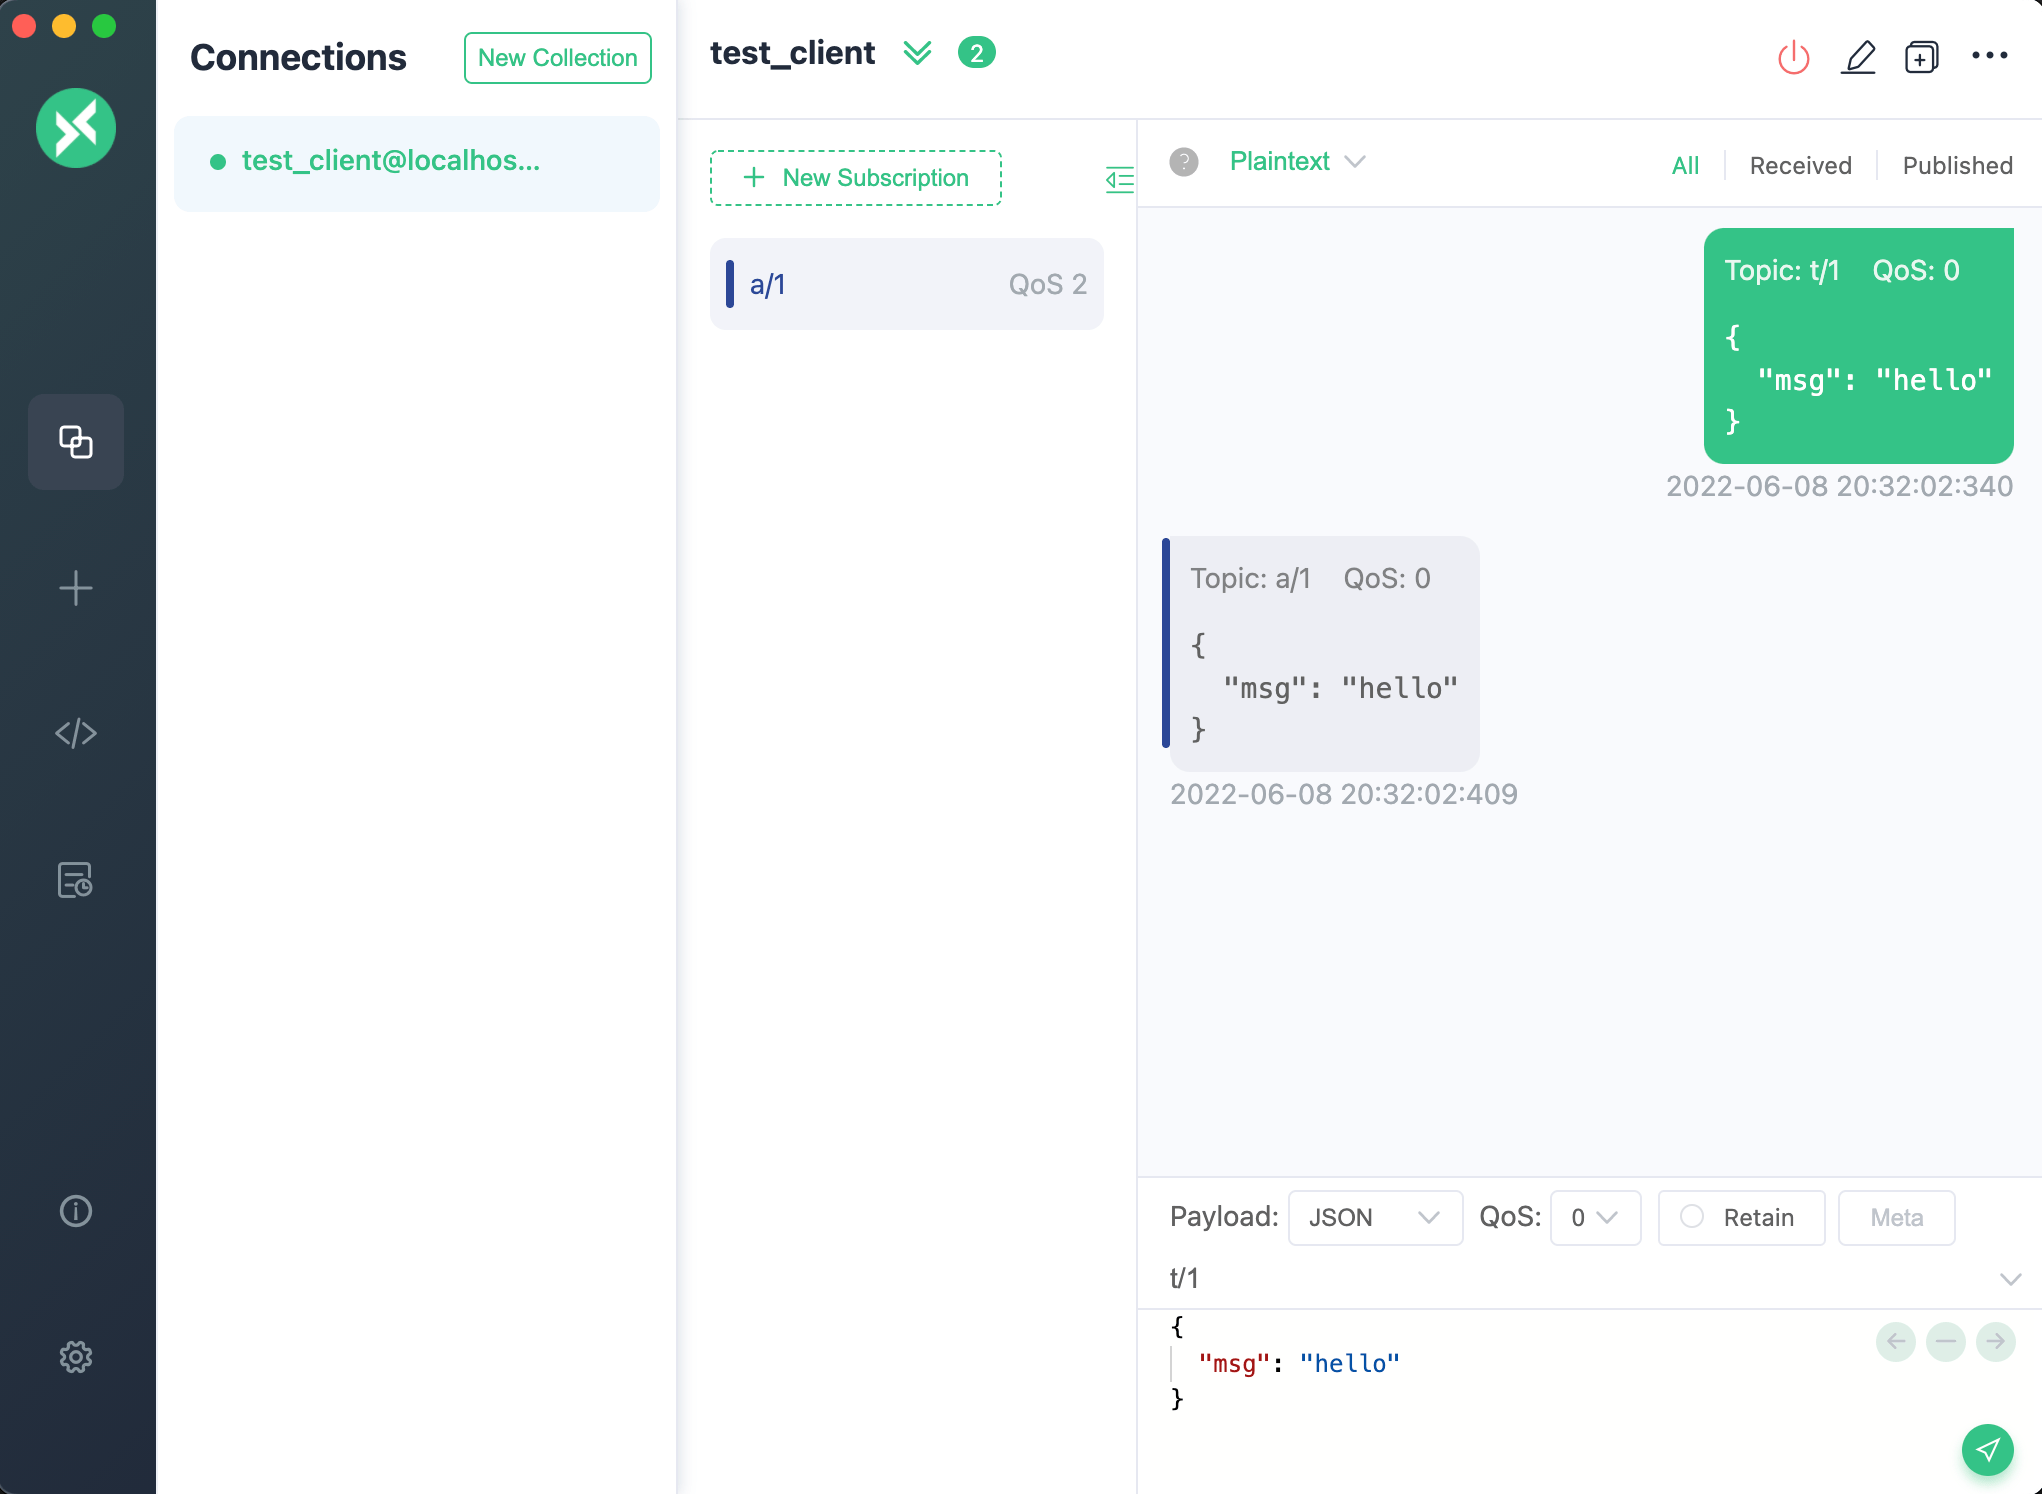
Correspondingly, on the Console, the execution results of the entire rule will be displayed, with the following contents:
- On the left are the rule execution records. Each time the rule is triggered, a record is generated. Clicking on it can switch to the corresponding message or event details.
- On the right is the list of actions recorded by the selected rule. Clicking on it can expand to view the action execution results and logs.
When the execution of the rule SQL or any action fails, the entire rule record will be marked as failed. You can select the record to view the corresponding action's error information for troubleshooting.
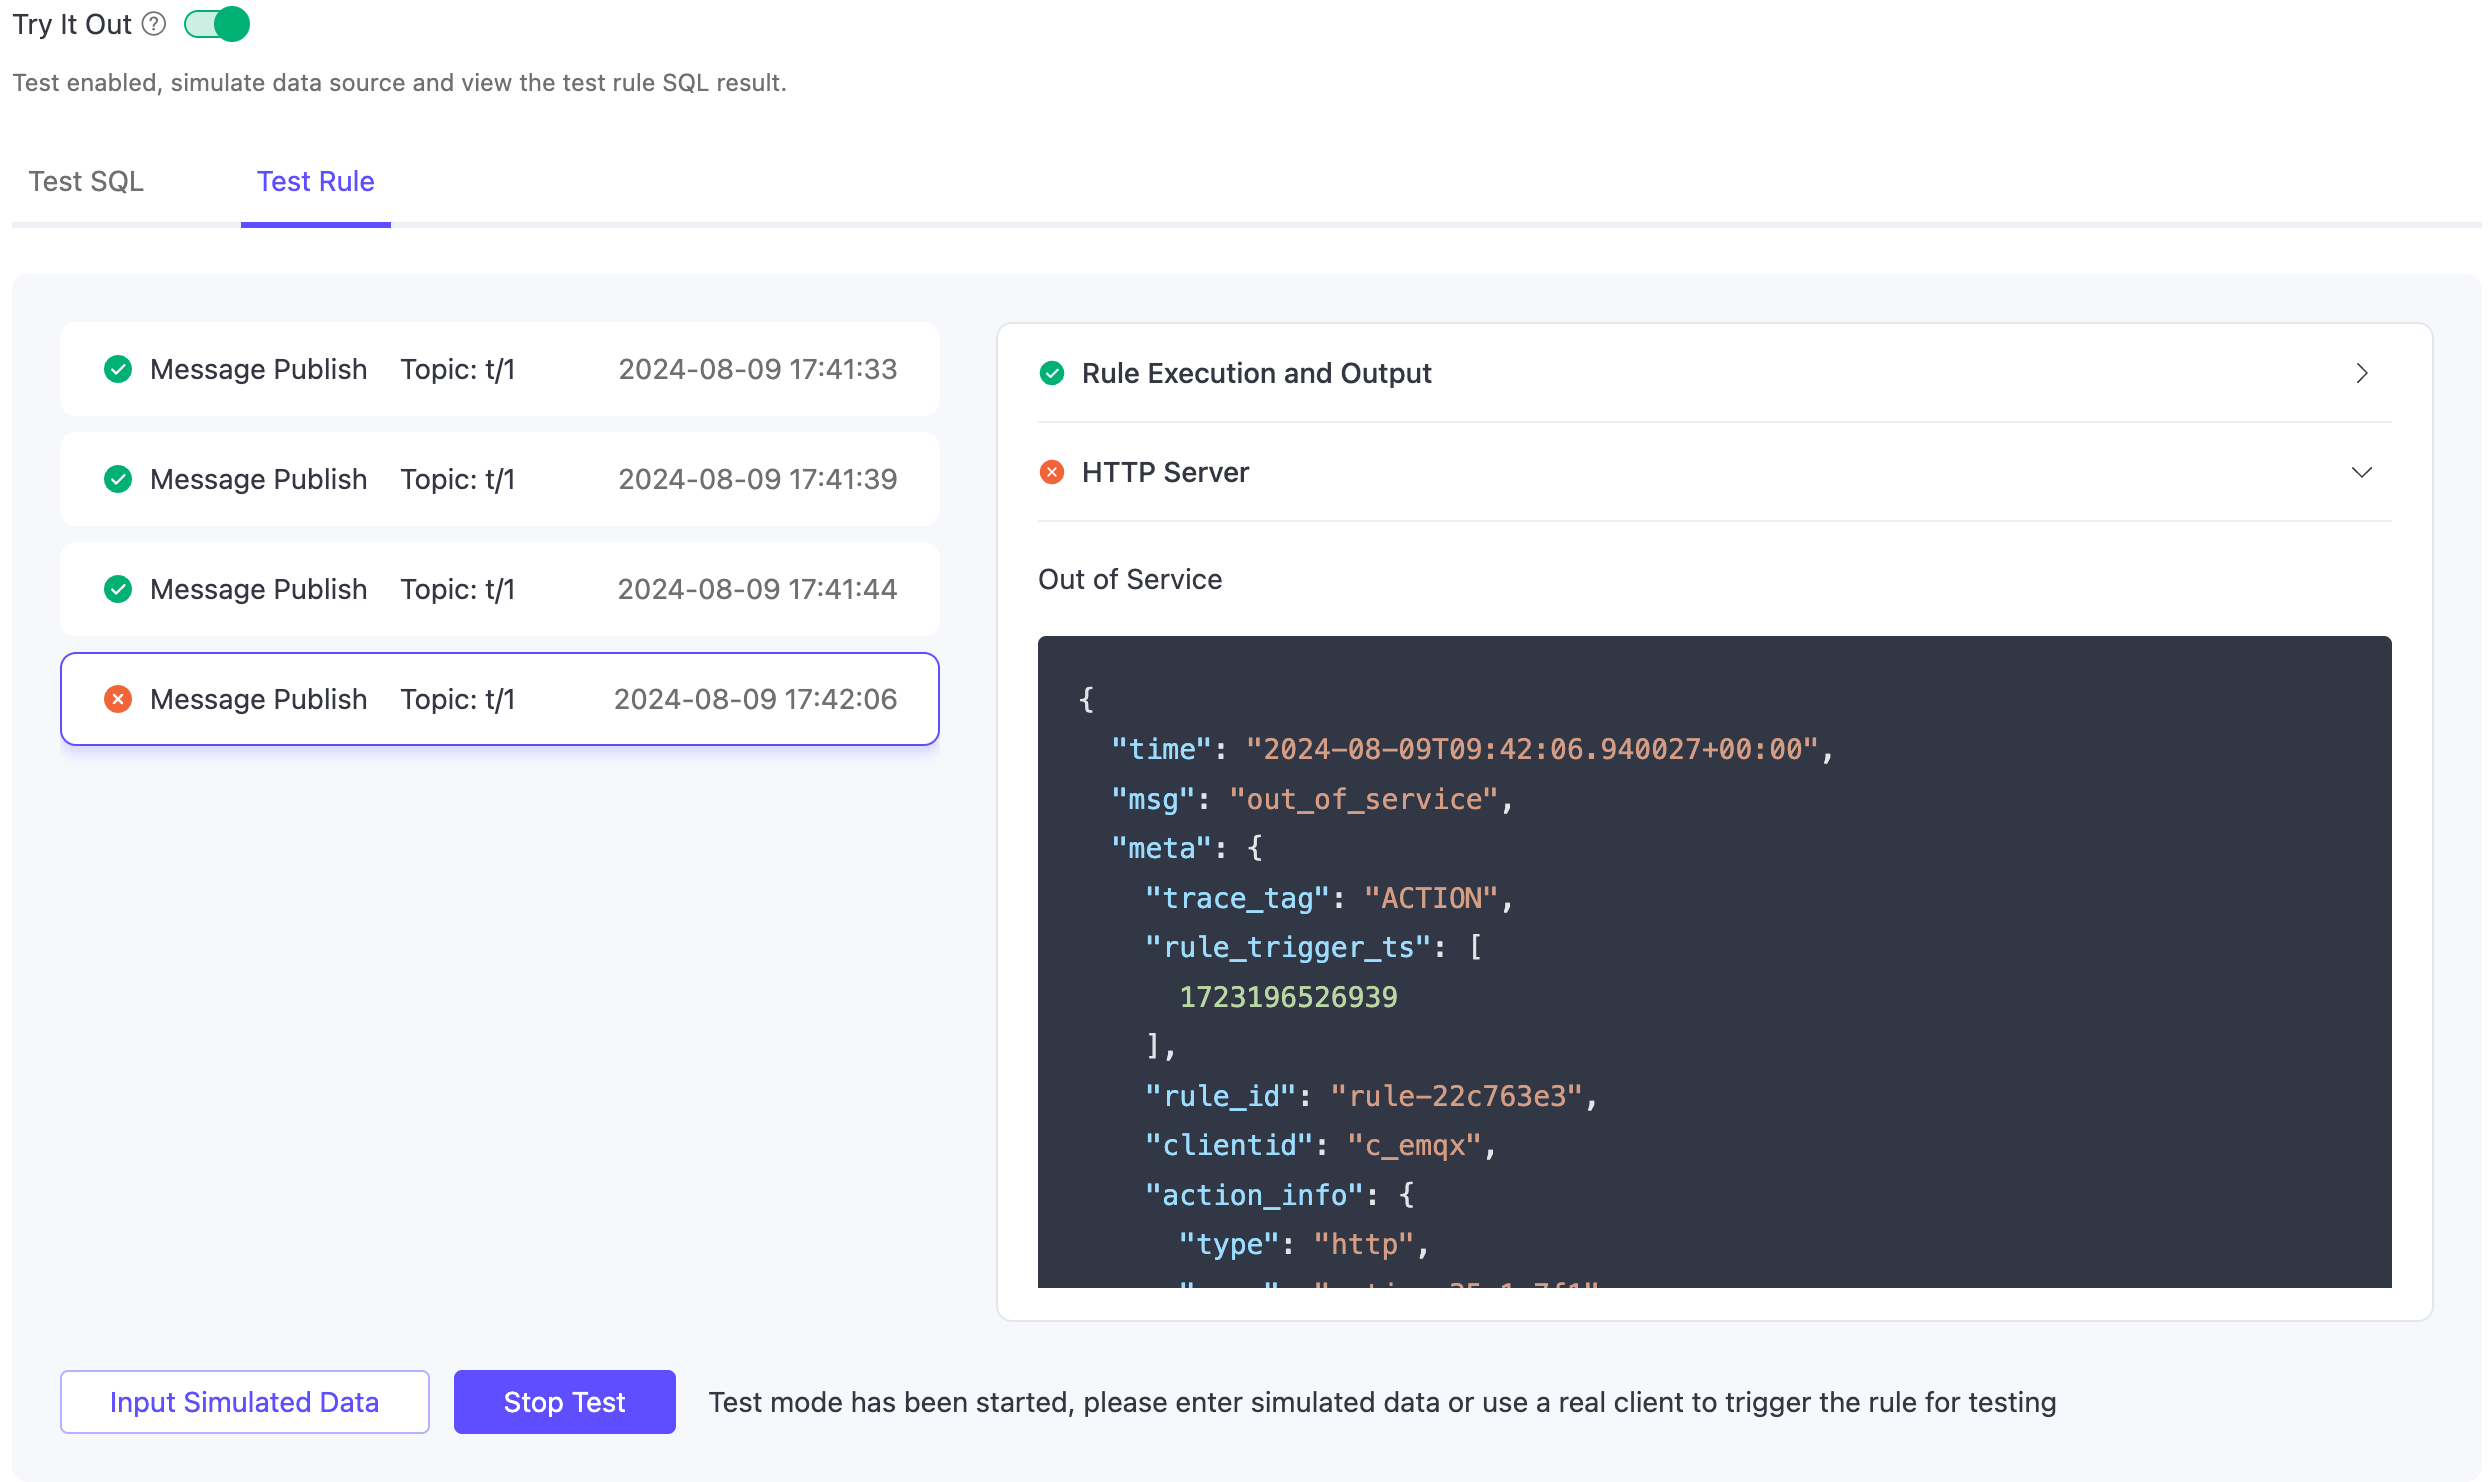
From the above example, it can be seen that the rule was triggered 4 times, with 3 times the rule execution being completely successful. The 4th time failed due to the HTTP Server action execution failure, with the error reason being service unavailable.
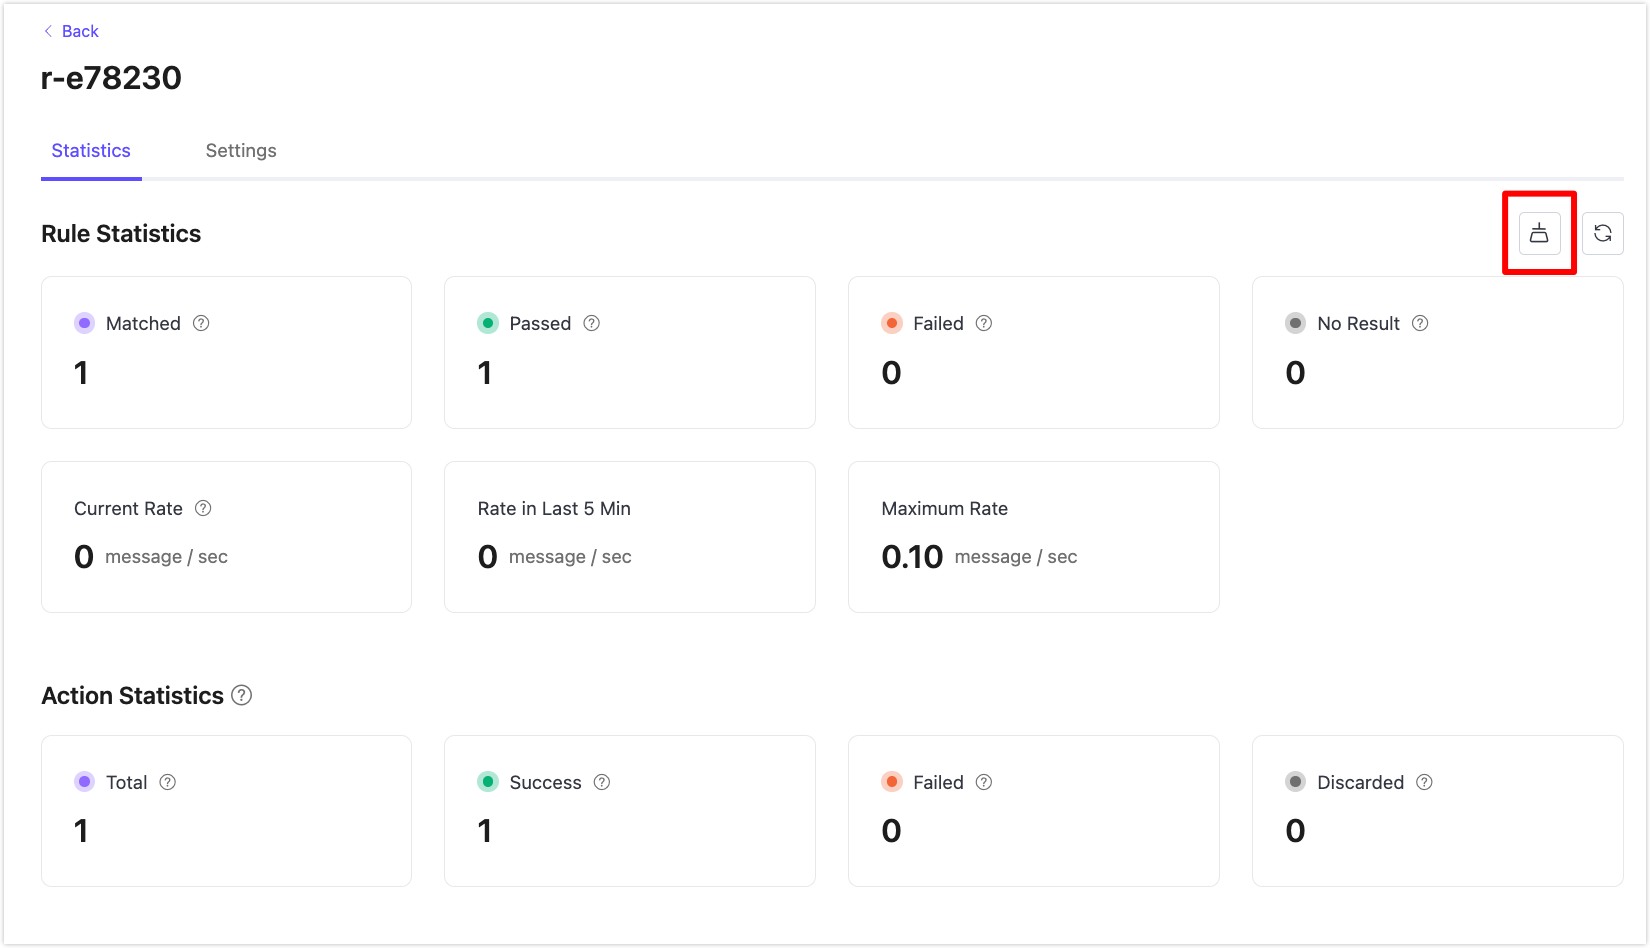
View Rule Statistics
Send a message to the temp_hum/emqx topic for verification.
{
  "temp": "27.5",
  "hum": "41.8"
}
Click the rule ID in the Rule List to view the rule's statistics and the statistics of all actions under this rule on the run statistics page. Click the reset button in the upper right corner of the page to reset the metrics data.
TIP
Serverless deployments do not support metrics reset.
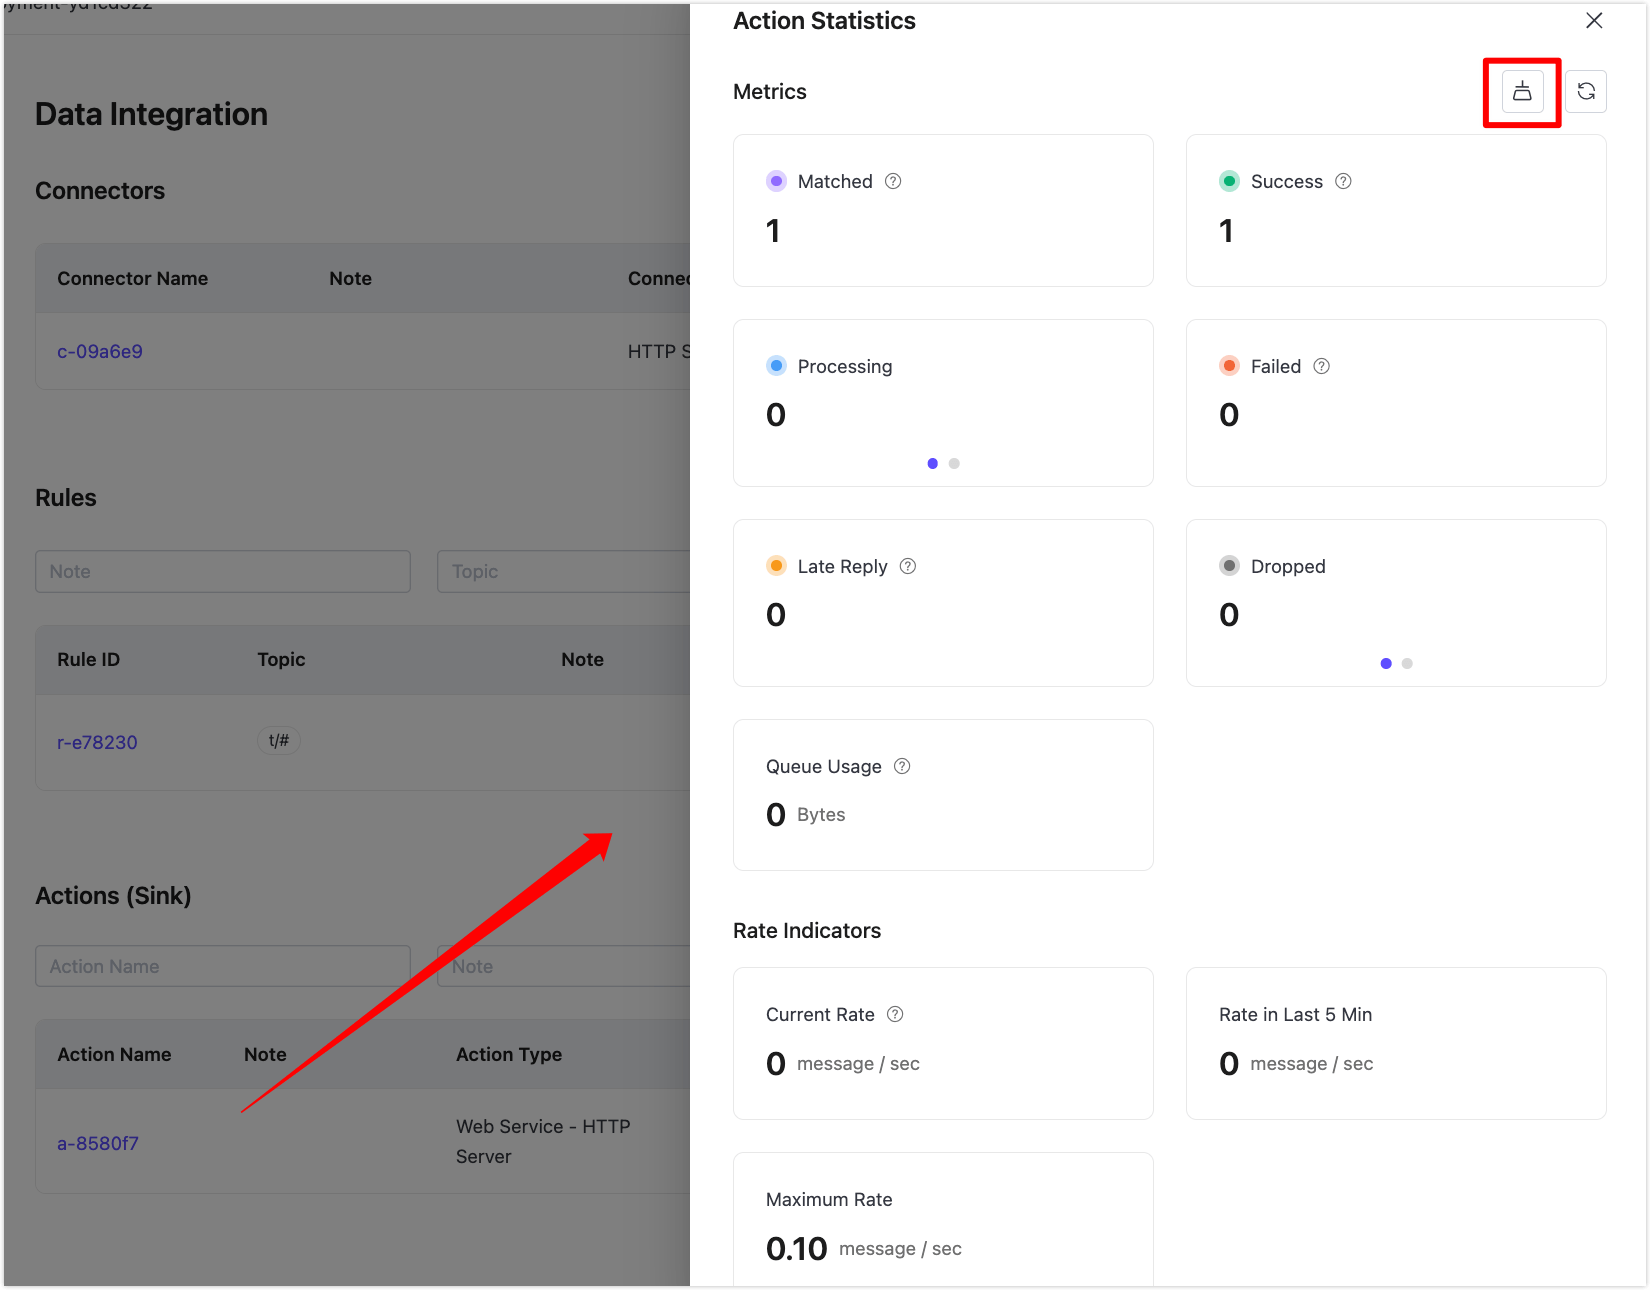
View Action Statistics
Click the action ID in the Output Action List. On the Action Statistics pane, you can view the Metrics and Rate Indicators for this action. Click the reset button in the upper-right corner to reset the metrics data.
TIP
Currently, only the Dedicated and Dedicated Flex version v5 deployments support viewing the metrics of individual actions.
Edit Rule
You can directly click the edit icon on the Rules list to edit the rule, or you can click on the rule ID and then select the Settings tab to edit the rule. On the settings page, you can edit the SQL template of the rule, and also edit or add actions.
Enable and Disable Rules
You can enable and disable rules in the rule list. Click the toggle switch in the Enable column to activate or deactivate the rule.
Delete Rules
You can delete rules in the rule list. Click the delete button and enter the rule ID to delete the rule.
Enable and Disable Actions
Note
This feature is only available with the EMQX Dedicated and Dedicated Flex edition.
Actions can be enabled or disabled on the actions list. Simply click the Enable toggle switch to turn an action on or off.
Edit and Delete Actions
In the Actions area, you can click the name in the Action Name column or the edit button in the Actions column to edit the action. Click the Delete button to delete the action.