Configure TLS/SSL in Dedicated Flex Plan
EMQX Dedicated Flex edition recommends customized certificate validation and provides both one-way/two-way TLS/SSL. This section introduces the certification validation, including instructions on configuring the TSL/SSL protocol in your deployment and testing if the configuration is successful.
The following table provides an overview of different certification requirements in one-way and two-way authentication modes.
| Certification Mode | Self-signed Certificate | Server Certificate | Certificate Chain | Private Key | Client CA Certificate |
|---|---|---|---|---|---|
| One-way Authentication | Yes | Required | Required | Required | Not required |
| Two-way Authentication | Yes | Required | Required | Required | Required |
Certificate Requirements
The certificate must specify the encryption algorithm and key size. EMQX Cloud supports the following algorithms:
- 1024 bit RSA (RSA_1024)
- 2048 bit RSA (RSA_2048)
- 256 bit ECDSA (ECC)
- 384 bit ECDSA (ECC)
Certificate (including certificate chain, if applicable): The EMQX Cloud supports uploading certificates in x509 format. Please merge your certificate (.crt or .pem) and any related certificate chain files into one file and upload it. If your certificate is issued by a certificate authority, it is important to include the certificate chain to ensure that it is correctly recognized.
The certificate must be valid. The certificate cannot be imported within 60 days before the beginning and end of the validity period.
The certificate, private key and certificate chain must use PEM encoding.
The private key must be password-less.
The private key support PKCS#1 and PKCS#8.
The encryption algorithm of the certificate must match the encryption algorithm of the signing CA. For example, if the key type of the signing CA is RSA, the key type of the certificate must also be RSA.
Format description:
- Certificate format
bash-----BEGIN CERTIFICATE----- Base64–encoded certificate -----END CERTIFICATE------ Private key format
bash-----BEGIN (RSA/EC) PRIVATE KEY----- Base64–encoded private key -----END (RSA/EC) PRIVATE KEY-----
Configure One-Way TLS/SSL
The following instructions guide you to configure one-way TLS/SSL in EMQX Cloud Console and test the client connection with TLS/SSL configured. You can also watch One-Way TLS/SSL Tutorial for each step of the setup.
- Login to the EMQX Cloud Console.
- On your deployment Overview page, click the +TLS/SSL Config button to configure the certificate. You can upload the file or fill in the certificate contents directly.
- TLS/SSL Type: Choose one-way (only the client verifies the server-side certificate).
- Certificate and Certificate Chain: Custom server-side certificate.(Including certificate chain, which is provided by a third-party organization when issuing the certificate.)
- Certificate Private Key: Private secret key.
- After filling in all the fields, click Confirm. On your deployment overview page, you should see the certificate information in TLS/SSL Config.
Test One-Way TLS with MQTTX Client
Before testing, make sure that you have created authentication information, refer to Authentication. You can use MQTTX Client to connect to EMQX Cloud and test the TLS/SSL configuration.
In MQTTX Client, create a new connection.
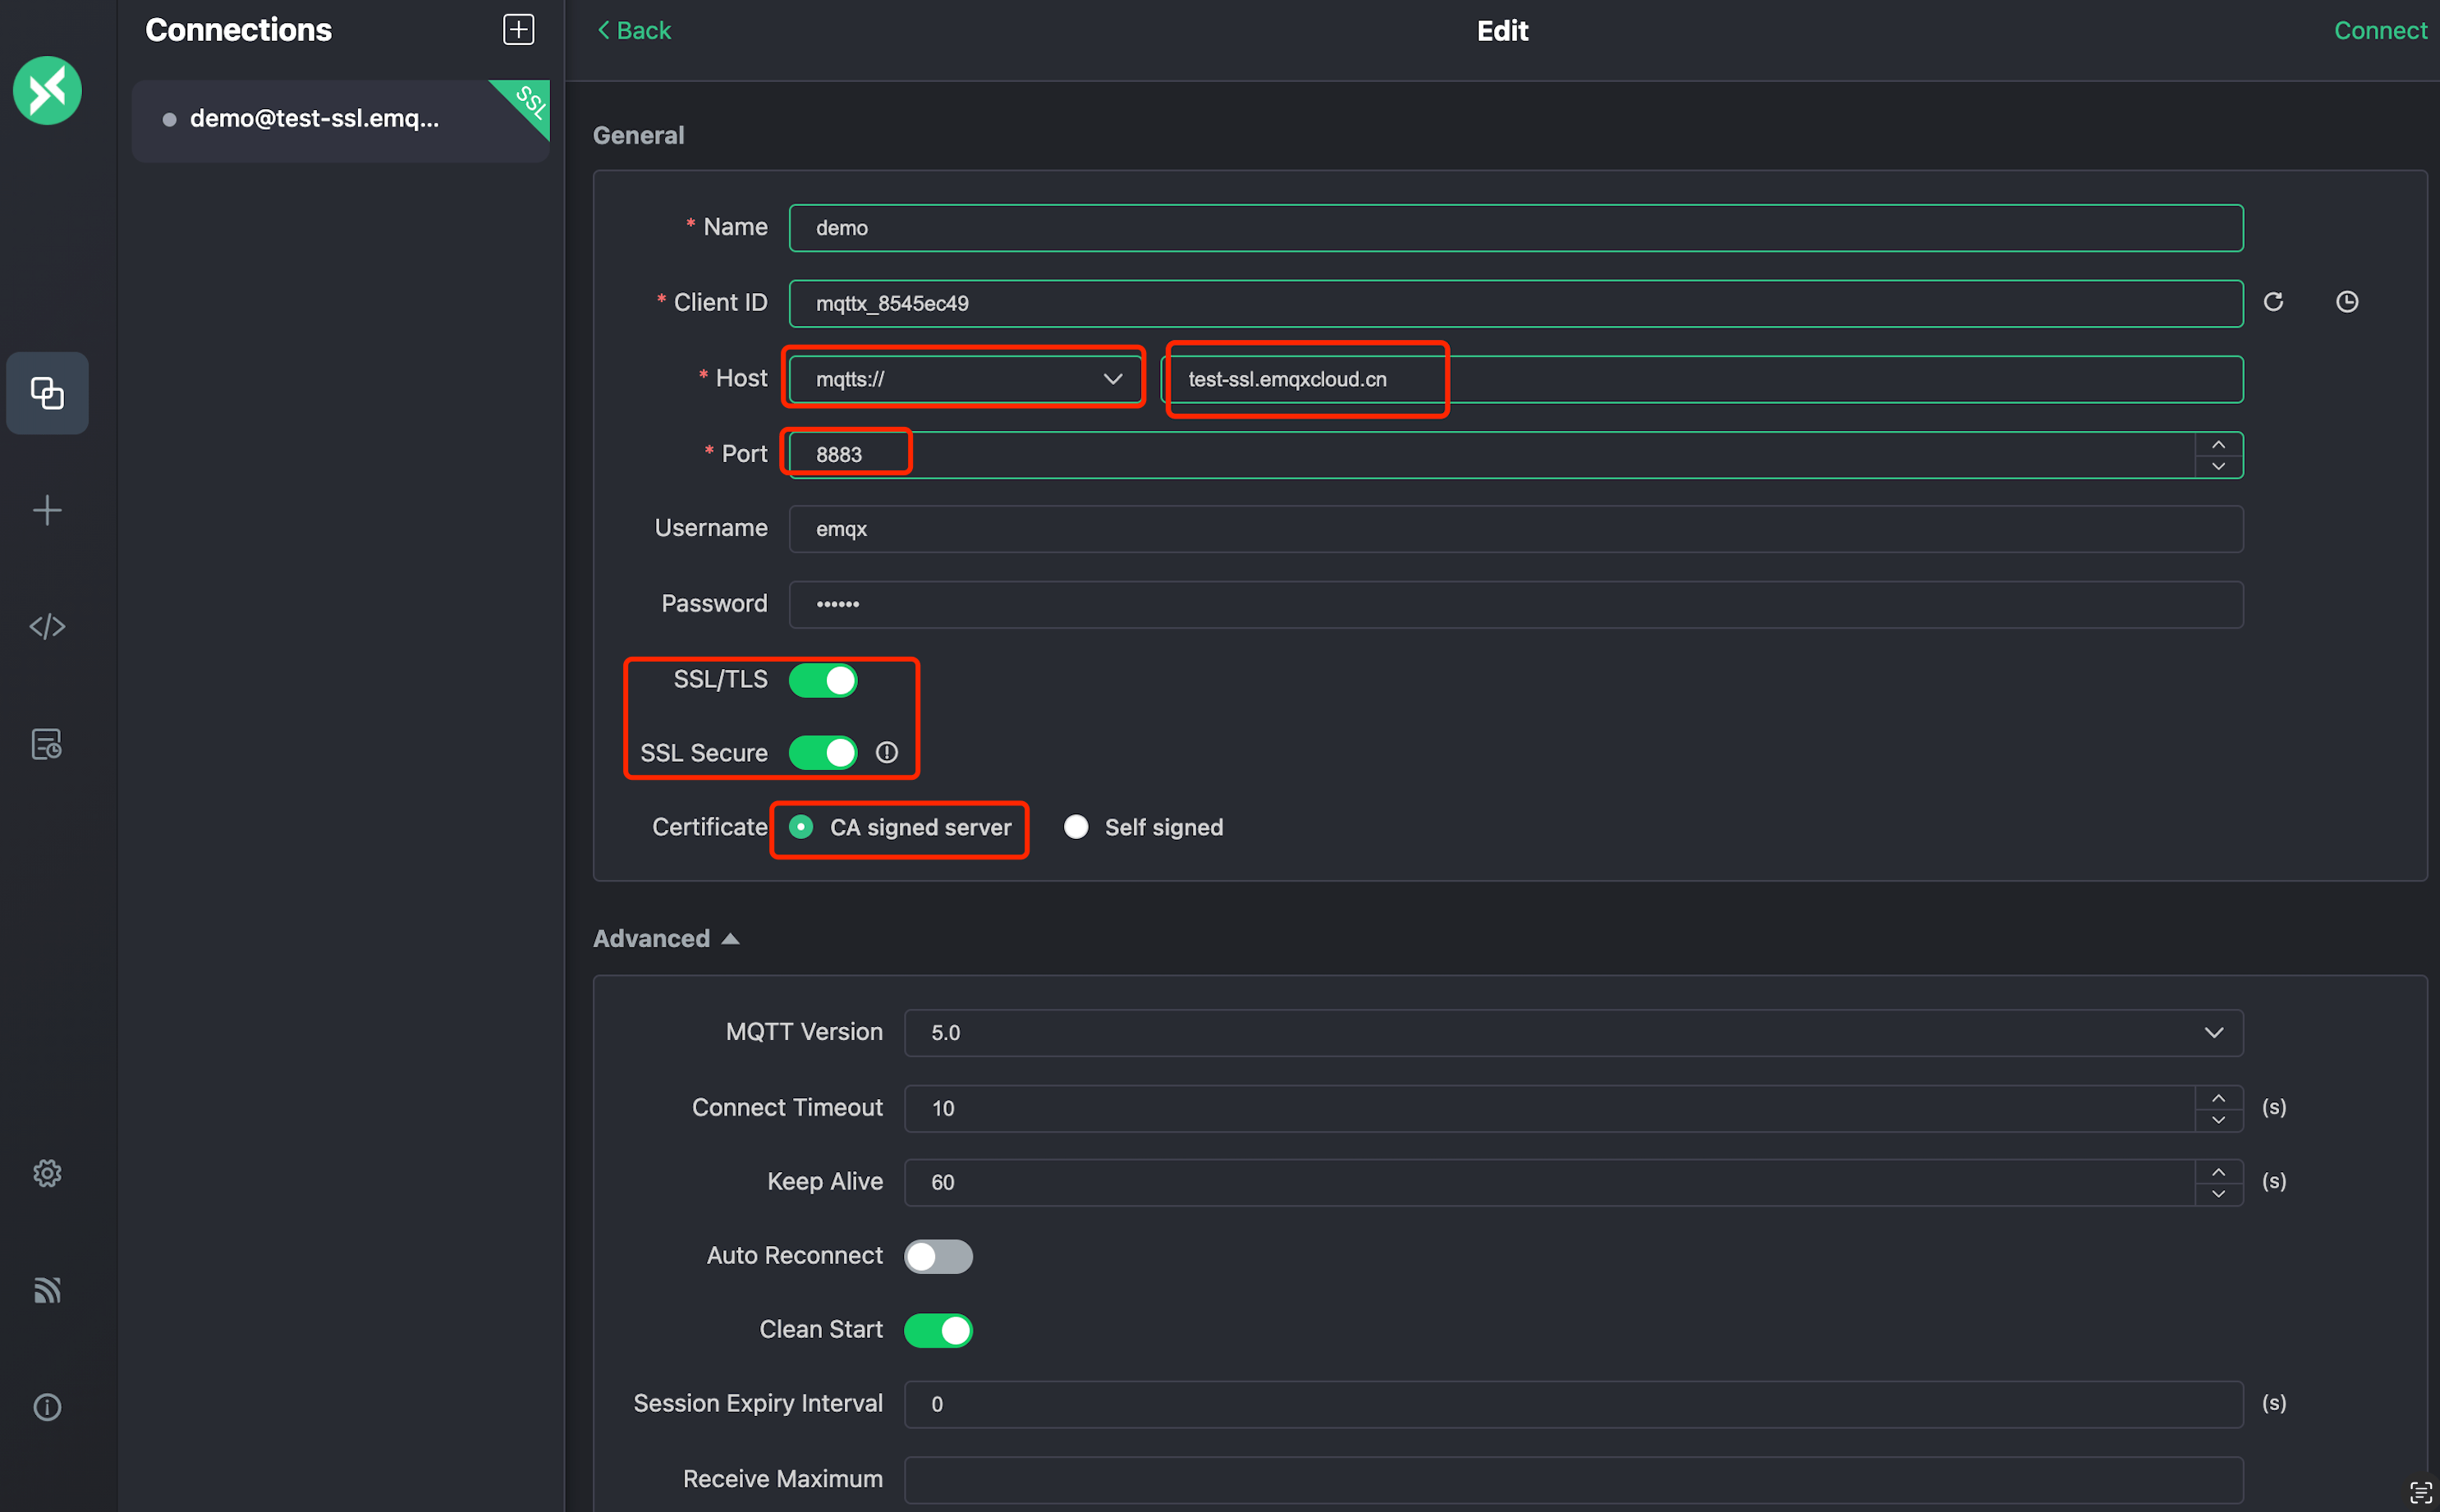
In the General section, fill in the information as follows:
Name: Type the name of the connection.
Client ID: The client ID is randomly generated. You can click the refresh button to regenerate the id.
Host: Select the protocol from the drop-down list and fill in the deployed connection address and port.
- If you use MQTT over TLS, select ports
mqtts://and8883. - If you use WebSocket over TLS, select ports
wss://and8084.
- If you use MQTT over TLS, select ports
Username and Password: Type the authentication information you have created.
SSL/TLS: Click the toggle switch to enable SSL/TLS.
SSL Secure: Click the toggle switch to enable SSL Secure.
Certificate: Select the certification as needed.
- If it is a certificate certified by CA authority, click CA signed server.
- If it is self-signed certificate, click Self signed to provide self-signed server-side CA certificate. For information on how to create self-signed TSL/SSL certificate, see Create Self-Signed TSL/SSL Certificate.
Click Connect.
Configure Two-Way TLS/SSL
The following instructions guide you to configure two-way TLS/SSL in EMQX Cloud Console and test the client connection with TLS/SSL configured. You can also watch Two-Way TLS/SSL Tutorial for each step of the setup.
- Login to the EMQX Cloud Console.
- On your deployment Overview page, click the +TLS/SSL Config button to configure the certificate. You can upload the file or fill in the certificate contents directly.
- TLS/SSL Type: Select two-way (client and server verify each other's certificates).
- Certificate and Certificate Chain: Custom server-side certificate.(Including certificate chain, which is provided by a third-party organization when issuing the certificate.)
- Certificate Private Key: Private secret key.
- Client CA Certificate : When choosing two-way, you need to provide the client CA certificate.
- After filling in all the fields, click on Confirm. On your deployment overview page, you should see the certificate information in TLS/SSL Config.
Test Two-Way TLS with MQTTX Client
Before testing, make sure that you have created authentication information, refer to Authentication. You can use MQTTX Client to connect to EMQX Cloud and test the TLS/SSL configuration.
In MQTTX Client, create a new connection.
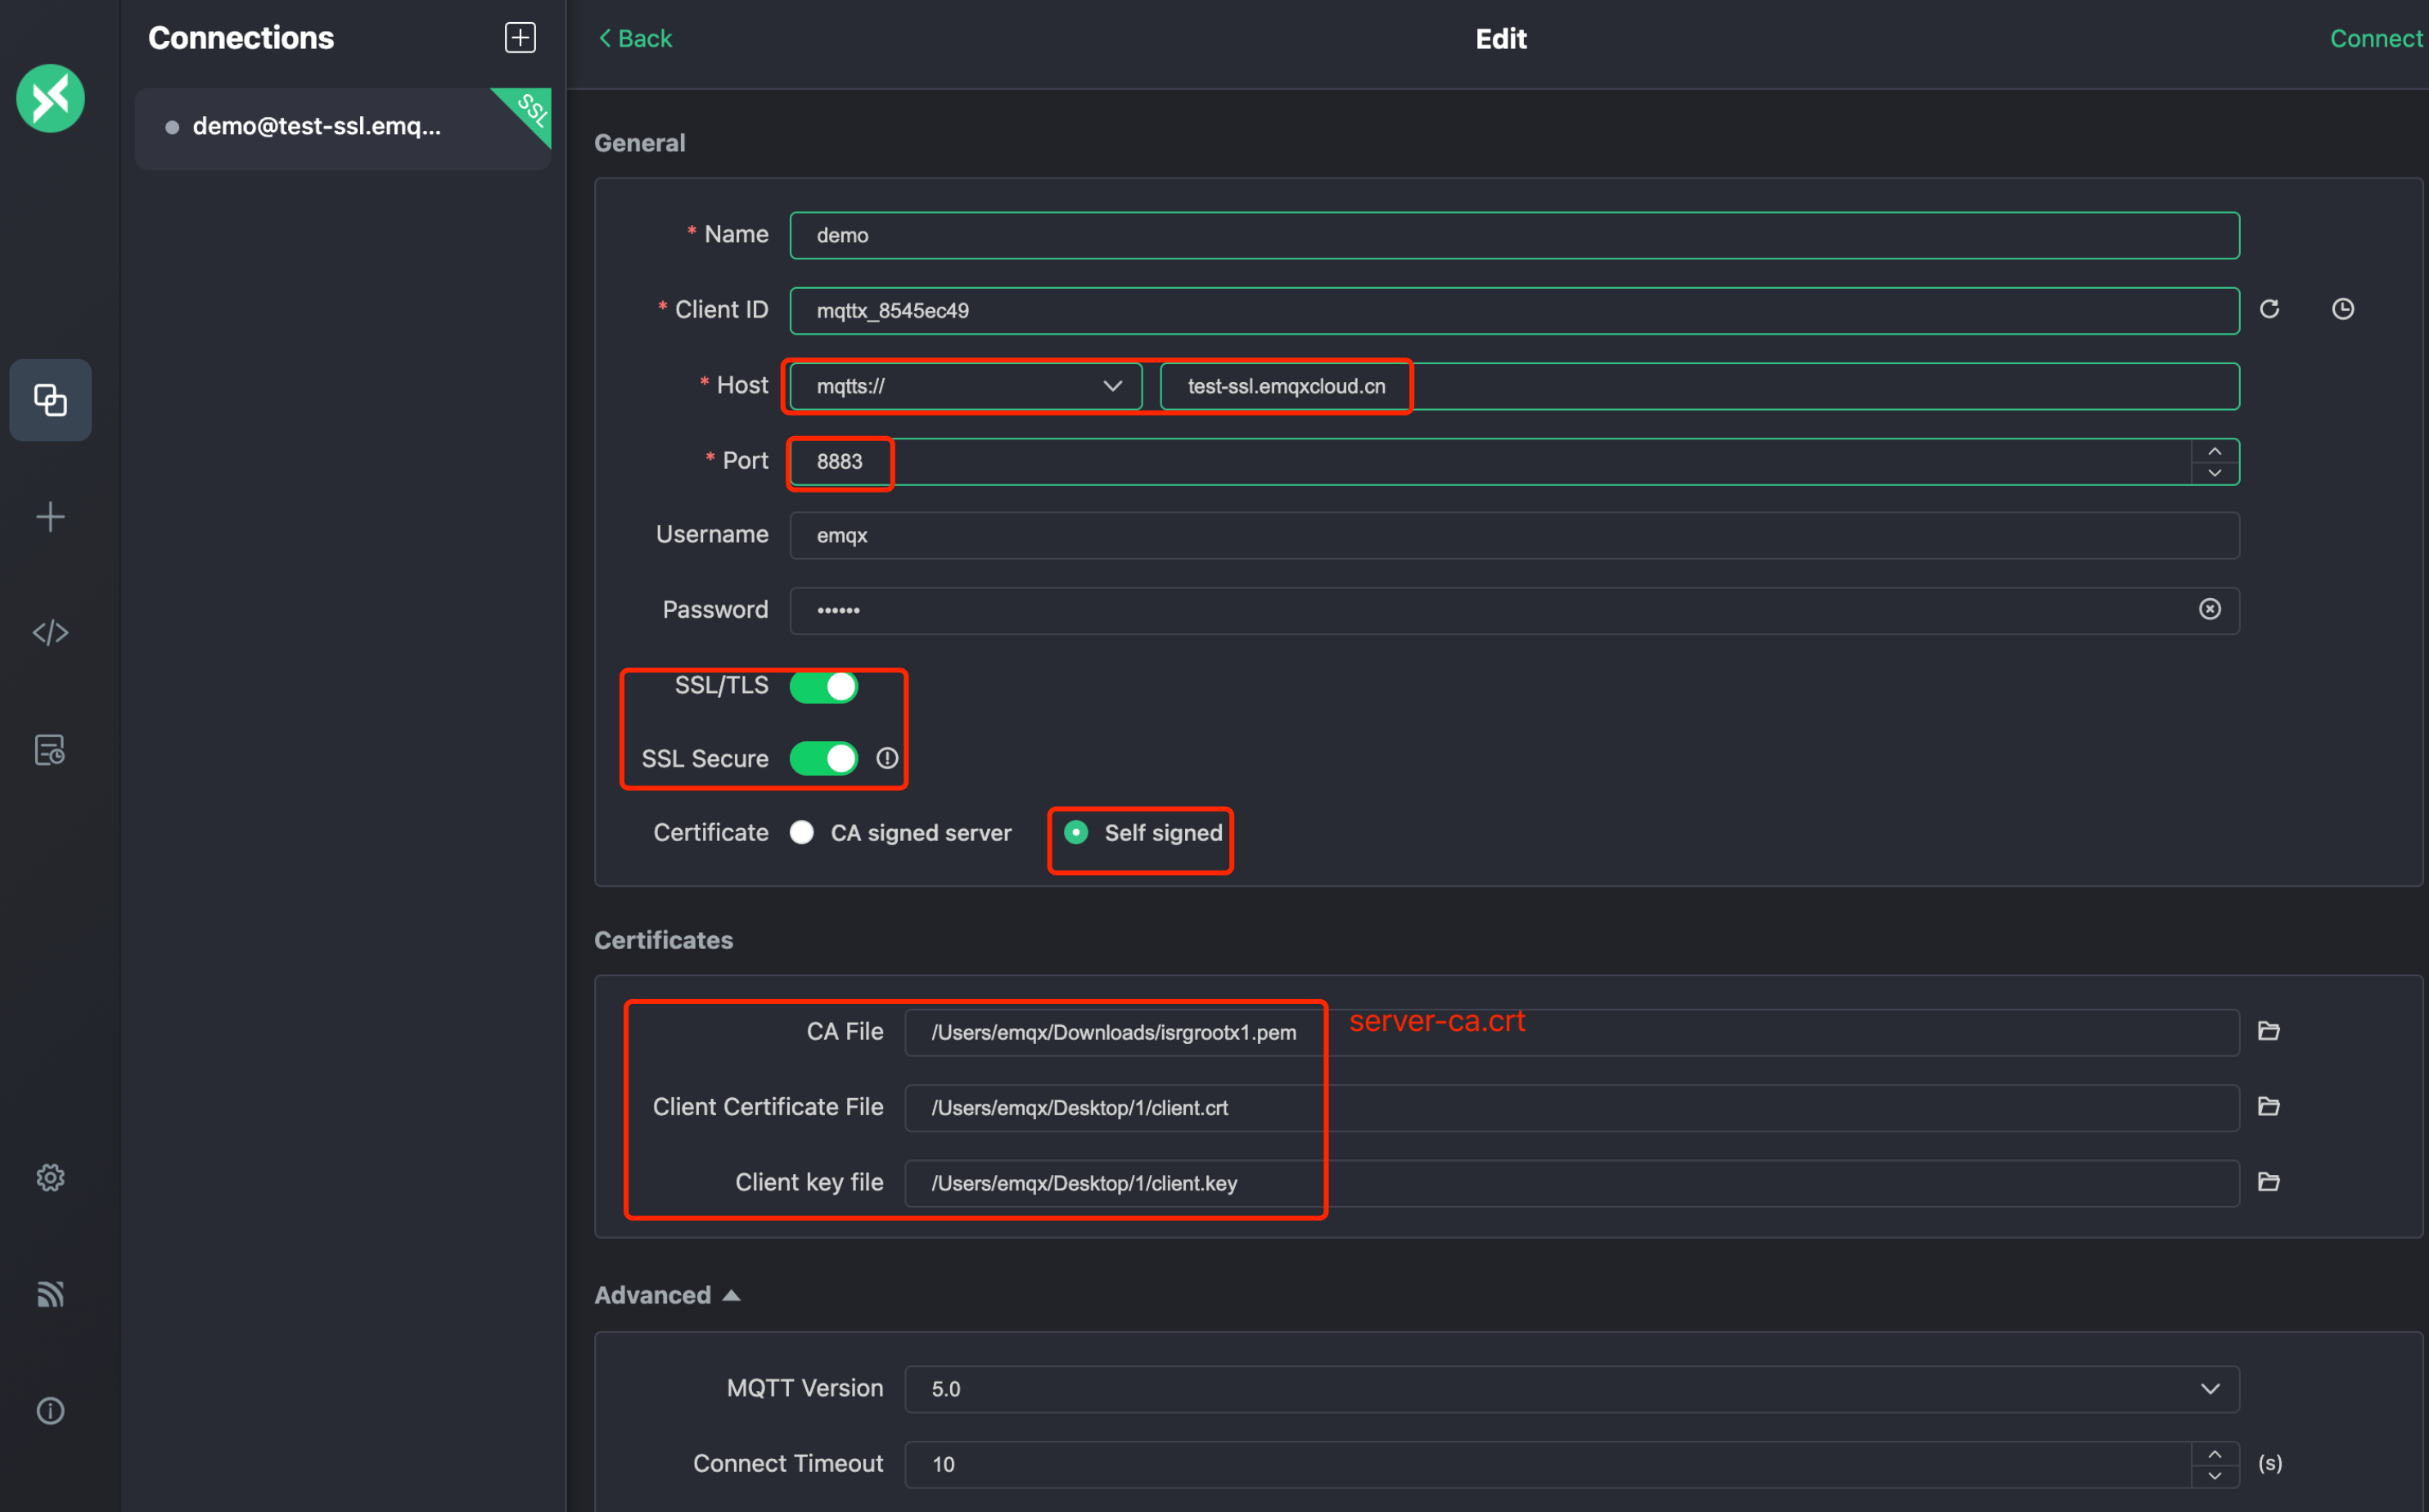
In the General section, fill in the information as follows:
Name: Type the name of the connection.
Client ID: The client ID is randomly generated. You can click the refresh button to regenerate the id.
Host: Select the protocol from the drop-down list and fill in the deployed connection address and port.
- If you use MQTT over TLS, select ports
mqtts://and8883. - If you use WebSocket over TLS, select ports
wss://and8084.
- If you use MQTT over TLS, select ports
Username and Password: Type the authentication information you have created.
SSL/TLS: Click the toggle switch to enable SSL/TLS.
SSL Secure: Click the toggle switch to enable SSL Secure.
Certificate: Select the certification as needed.
- If it is a server-side CA certified by CA authority, click Self signed and fill in the certificate in CA File field. For information on how to create self-signed TSL/SSL certificate, see Create Self-Signed TSL/SSL Certificate.
- If it is self-signed server-side certificate, click Self signed to provide self-signed server-side CA certificate.
- Two-way TLS also needs to fill in the client certificate file and client key file.
Click Connect.
Create Self-Signed TSL/SSL Certificate
The following instructions guide you to create self-signed TSL/SSL certificates. You can also watch Create a self-signed TLS/SSL certificate tutorial for each step of the setup.
Prerequisite
Make sure you have installed OpenSSL.
Generate Server-Side CA Certificate
You can use the following statement to generate a server-side CA certificate. You should adjust subj to actual use.
openssl req \
    -new \
    -newkey rsa:2048 \
    -days 365 \
    -nodes \
    -x509 \
    -subj "/C=CN/O=EMQ Technologies Co., Ltd/CN=EMQ CA" \
    -keyout server-ca.key \
    -out server-ca.crt
Create a Server-Side Certificate
- Generate server-side secret key
server.key.
openssl genrsa -out server.key 2048- Create
openssl.cnffile. Replace the IP.1 or DNS.1 address with your deployment address.
cat << EOF > ./openssl.cnf
[policy_match]
countryName             = match
stateOrProvinceName     = optional
organizationName        = optional
organizationalUnitName  = optional
commonName              = supplied
emailAddress            = optional

[req]
default_bits       = 2048
distinguished_name = req_distinguished_name
req_extensions     = req_ext
x509_extensions    = v3_req
prompt             = no

[req_distinguished_name]
commonName          = Server

[req_ext]
subjectAltName = @alt_names

[v3_req]
subjectAltName = @alt_names

[alt_names]
# EMQX deployment connections address
# IP.1 = <IP Connect Address>
DNS.1 = <Domain Connect Address>
EOF- Generate the server-side certificate request file
server.csr.
openssl req -new -key server.key -config openssl.cnf -out server.csr- Sign the server-side certificate with a CA certificate
server.crt.
openssl x509 -req \
    -days 365 \
    -sha256 \
    -in server.csr \
    -CA server-ca.crt \
    -CAkey server-ca.key \
    -CAcreateserial -out server.crt \
-extensions v3_req -extfile openssl.cnf- View server-side certificate information.
openssl x509 -noout -text -in server.crt- Verify the certificate.
openssl verify -CAfile server-ca.crt server.crtCreate a Client Certificate
For two-way authentication, you need to generate the client CA certificate first.
Generate Client CA Certificate
You can use the following statement to generate a client CA certificate. You should adjust subj to actual use.
openssl req \
    -new \
    -newkey rsa:2048 \
    -days 365 \
    -nodes \
    -x509 \
    -subj "/C=CN/O=EMQ Technologies Co., Ltd/CN=EMQ CA" \
    -keyout client-ca.key \
-out client-ca.crt- Generate client-side secret key
client.key.
openssl genrsa -out client.key 2048- Generate the client-side certificate request file
client.csr.
openssl req -new -key client.key -out client.csr -subj "/CN=Client"- Sign the client-side certificate with a CA certificate
client.crt.
openssl x509 -req -days 365 -sha256 -in client.csr -CA client-ca.crt -CAkey client-ca.key -CAcreateserial -out client.crt- View client-side certificate information.
openssl x509 -noout -text -in client.crt- Verify the certificate.
openssl verify -CAfile client-ca.crt client.crtDelete Certificate
Deleting the certificate will disconnect the client from 8883 and 8084. Make sure that the deletion does not affect your business.
- Login to the EMQX Cloud Console.
- Click the delete icon for the certificate in the TLS/SSL Config section.
- Click OK in the dialog to complete the deletion.
FAQ
A Certificate Contains Multiple Certificates
Purchased certificates contain intermediate certificates, which open the certificate in text form, and multiple certificates in the order of User Certificate - Intermediate Certificate - Root Certificate. Generally, a certificate contains a user certificate and several intermediate certificates, you need to separate the user certificate from the intermediate certificate and fill in the certificate chain with the intermediate certificate.
-----BEGIN CERTIFICATE-----

User Certificate

-----END CERTIFICATE-----

-----BEGIN CERTIFICATE-----

Intermediate Certificate

-----END CERTIFICATE-----

-----BEGIN CERTIFICATE-----

Root Certificate

-----END CERTIFICATE-----
Lack of Certificate Chain
Certificate chain completion: https://myssl.com/chain_download.html
Can I Disable Username/Password Authentication When Using Two-Way TLS or Mutual TLS (mTLS)?
Yes, you can disable username and password authentication when using mutual TLS (mTLS). However, we strongly recommend keeping both authentication methods enabled for security reasons. If a device certificate is compromised, unauthorized devices could use it to connect to EMQX Cloud.
If you still wish to disable username/password authentication, v5 Dedicated deployments can do this directly in the Console via Ports Management. For other deployment types, please submit a support ticket. Our SRE team can assist you in disabling it for ports 8883 and 8084 in your deployment.
For a complete end-to-end setup guide, see mTLS Best Practices for Device Connection.
Can I Map the Certificate CN to the Username or Client ID?
Yes, EMQX Cloud allows you to map the certificate Common Name (CN) to either the username or the client ID. To enable this mapping, please submit a support ticket, and our SRE team will configure it for you.
Important Considerations:
- Mapping CN to the client ID: Ensure that each CN is unique. If multiple clients share the same CN, they will disconnect each other due to client ID conflicts.
- Mapping CN to the username: This is generally safer, as it prevents connection conflicts while still enabling identity verification.
When Disabling Username/Password Authentication and Map CN to the Username, How to Block a Compromised Certificate from Connecting ?
If a certificate is leaked and CN is mapped to the username, you can prevent the compromised device from connecting by adding the corresponding username to the blacklist.
Can One-Way and Mutual TLS Connections be Used Simultanouely?
Yes. Each deployment in EMQX can only use a single set of TLS/SSL certificates, but different types of TLS connections can be supported through different listeners. If mutual TLS authentication is already enabled in the deployment, you can also enable an additional one-way TLS port. It's important to note that both the mutual TLS and one-way TLS ports must use the same server certificate to ensure that certificate updates do not cause service interruptions.