Ingest MQTT Data into Couchbase
Couchbase is a versatile distributed database that combines the advantages of relational databases (such as SQL and ACID transactions) with the flexibility of JSON. Couchbase's architecture is high-performance and scalable, widely used across industries for user profiles, dynamic product catalogs, generative AI applications, vector searches, caching, and more.
This page provides a comprehensive introduction to integrating EMQX Cloud with Couchbase and offers practical guidance for creating and validating data integration.
How It Works
Couchbase data integration is an out-of-the-box feature in EMQX Cloud, designed to combine the real-time data capture and transmission capabilities of MQTT with the powerful data processing capabilities of Couchbase. Through the built-in rules engine component, this integration simplifies the process of importing data from EMQX Cloud into Couchbase for storage and analysis, without complex coding.
The diagram below illustrates a typical architecture for EMQX Cloud and Couchbase data integration.
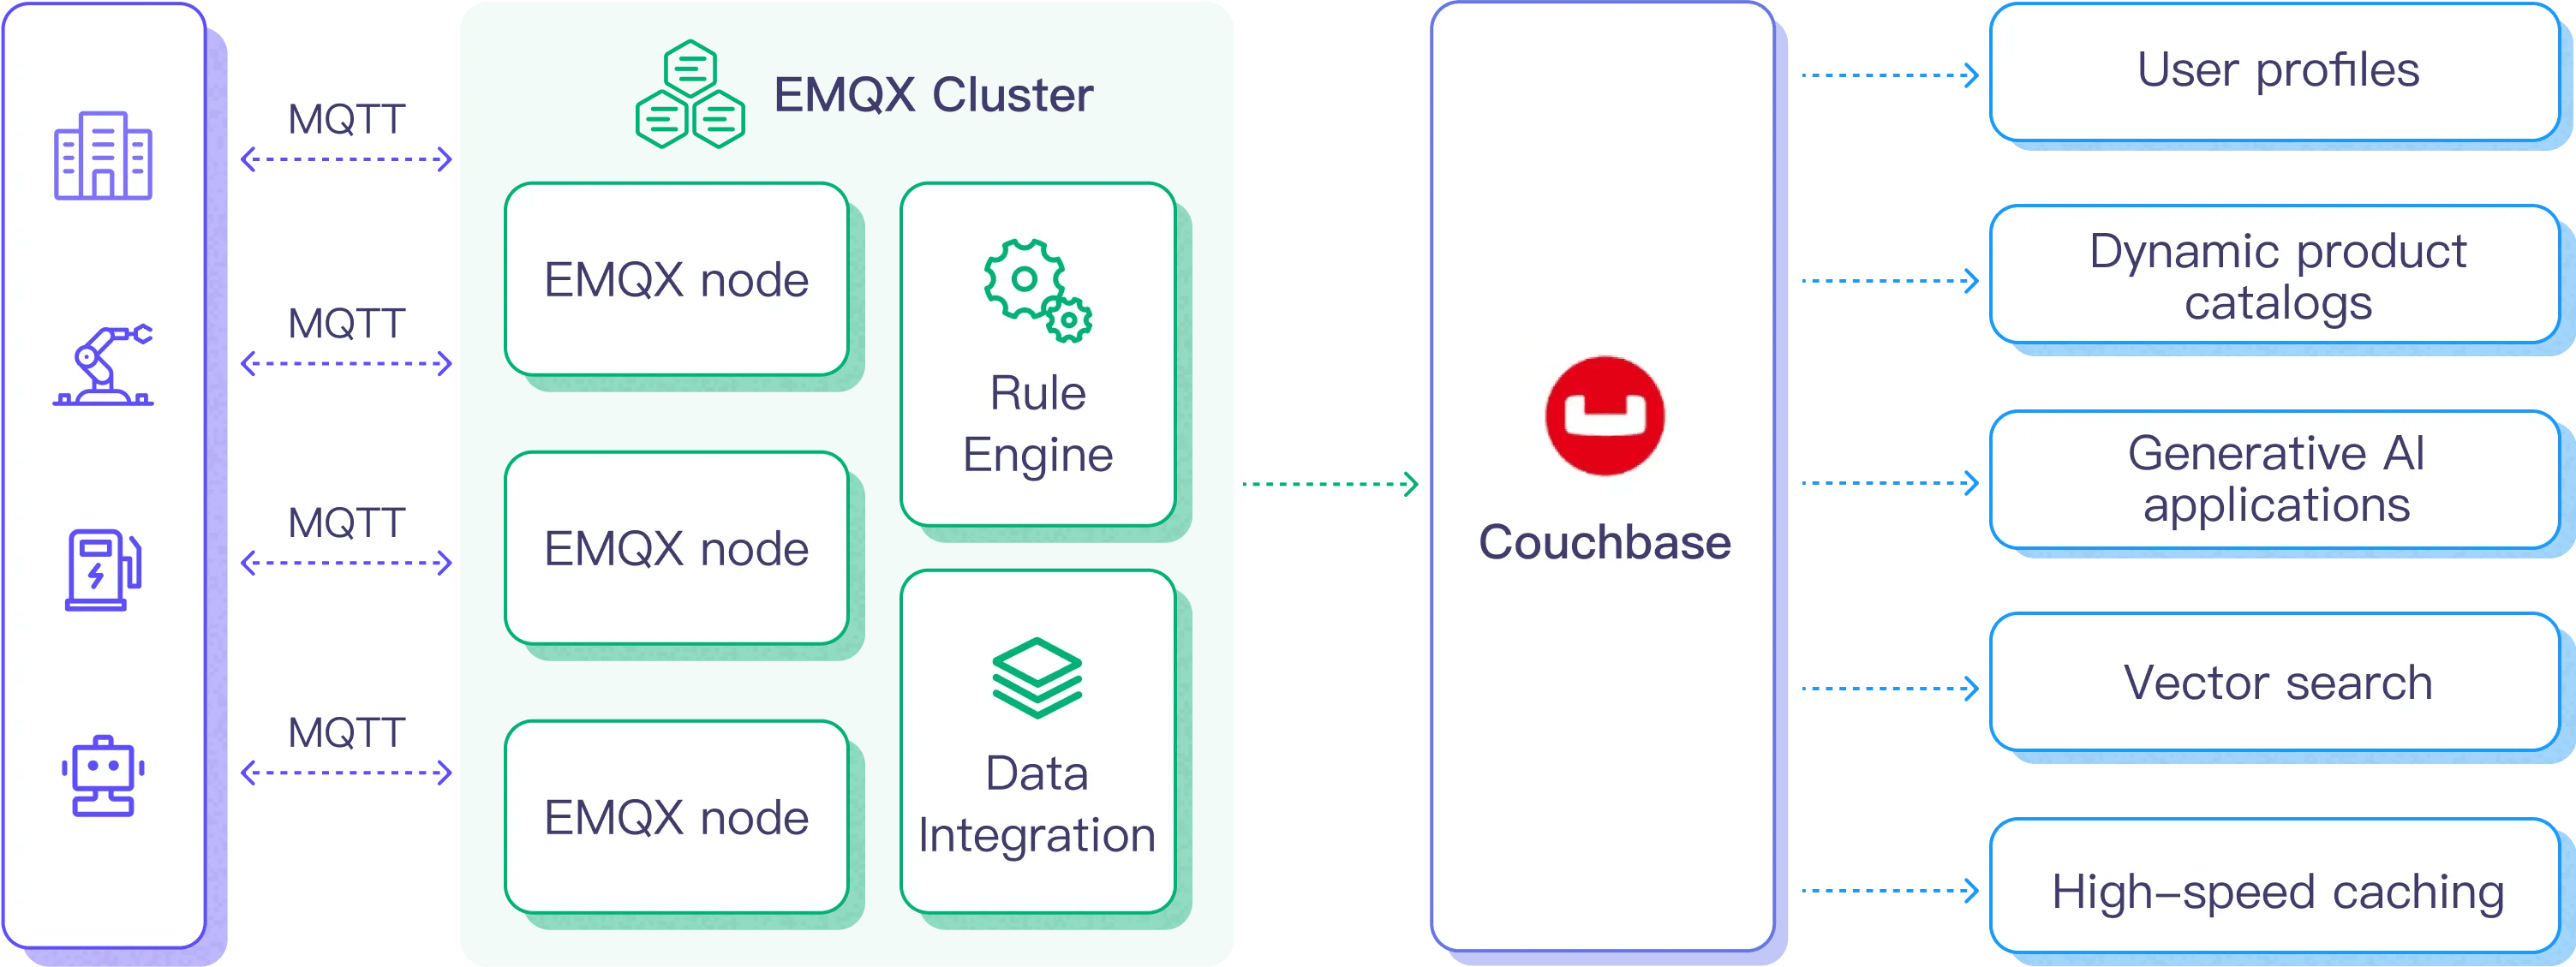
The workflow for importing MQTT data into Couchbase is as follows:
- Message Publishing and Receiving: Industrial IoT devices successfully connect to the EMQX Cloud via the MQTT protocol and publish real-time MQTT data from machines, sensors, and production lines to the EMQX Cloud based on their operational status, readings, or triggered events. When the EMQX Cloud receives these messages, it initiates the matching process in its rules engine.
- Message Data Processing: Once a message arrives, it is processed through the rules engine based on rules defined in the EMQX Cloud. These rules, based on predefined conditions, determine which messages should be routed to Couchbase. If a rule specifies a payload transformation, appropriate conversions such as data format conversion, filtering specific information, or enriching the payload with additional context are applied.
- Data Import to Couchbase: When the rules engine identifies a message that needs to be stored in Couchbase, it triggers an action to forward the message to Couchbase. The processed data is seamlessly written into the Couchbase database's dataset.
- Data Storage and Utilization: Once stored in Couchbase, businesses can leverage its powerful query capabilities to support various use cases. For example, in the dynamic product catalog scenario, companies can efficiently manage and retrieve product information using Couchbase, support real-time inventory updates, and provide personalized recommendations to customers, enhancing the shopping experience and increasing sales.
Features and Benefits
Couchbase data integration has the following features and benefits:
- Real-time Data Stream: EMQX Cloud is designed for handling real-time data streams, ensuring efficient and reliable data transfer from source systems to Couchbase. This enables organizations to capture and analyze data in real time, making it ideal for use cases that require immediate insights and actions.
- High Performance and Scalability: The distributed architecture of EMQX and the columnar storage format of Couchbase allow for seamless scalability as data volumes increase. This ensures consistent performance and responsiveness even when processing large datasets.
- Flexibility in Data Transformation: EMQX Cloud provides a powerful SQL-based rules engine that allows organizations to preprocess data before storing it in Couchbase. It supports various data transformation mechanisms such as filtering, routing, aggregation, and enrichment, helping organizations tailor data according to their needs.
- Ease of Deployment and Management: EMQX Cloud offers a user-friendly interface for configuring data sources, preprocessing data rules, and Couchbase storage settings, simplifying the setup and ongoing management of the data integration process.
- Advanced Analytics Capabilities: Couchbase’s powerful SQL-based query language and support for complex analytical capabilities enable users to gain valuable insights from IoT data, facilitating predictive analytics, anomaly detection, and more.
Before You Start
This section outlines the preparations needed before creating Couchbase data integration in the EMQX Cloud.
Prerequisites
- Understand Data Integration.
- Familiarize yourself with Rules.
Set up Network
Before configuring data integration, you must create an EMQX Cloud deployment and ensure network connectivity between EMQX Cloud and the target service.
For Dedicated Flex deployments:
Create a VPC Peering Connection between the EMQX Cloud VPC and the target service VPC. After the peering connection is established, EMQX Cloud can access the target service through its private IP address.
If access through a public IP is required, configure a NAT Gateway to enable outbound connectivity.
For BYOC (Bring Your Own Cloud) deployments:
Create a VPC peering connection between the VPC where the BYOC deployment is running and the VPC hosting the target service. Once peering is in place, the target service can be accessed via its private IP address.
If the target service must be accessed through a public IP, configure a NAT Gateway in the BYOC VPC using your cloud provider’s console.
Install Couchbase
You can choose to install Couchbase using Docker, or you can create a Couchbase service with the Couchbase Cloud.
Install Couchbase via Docker
You can find more information about running Couchbase in Docker on the official documentation page.
Start the Couchbase server with the following command. The server needs to have these ports open: 8093 (for connecting and inserting data), and 8091 (for accessing the Web UI).
bashdocker run -t --name db -p 8091-8096:8091-8096 -p 11210-11211:11210-11211 couchbase/server:enterprise-7.2.0When you run this command, Docker will download and install the Couchbase server. After the Couchbase server starts in the Docker virtual environment, you should see the following message:
bashStarting Couchbase Server -- Web UI available at http://<ip>:8091 and logs available in /opt/couchbase/var/lib/couchbase/logsOpen the Couchbase Web console in your browser at http://x.x.x.x:8091.
Click Setup New Cluster and name your cluster. For ease of getting started, set the full admin credentials to admin and password.
Then accept the terms and conditions and click Finish with Defaults to complete the configuration using default values.
After entering the configuration information, click the Save & Finish button at the bottom right. This will set up the server according to the configuration and open the Couchbase Web console dashboard.
In the left navigation panel, select Buckets, then click the ADD BUCKET button, enter a name for the bucket, such as
emqx, and click Create to create the bucket.Create a primary index for the default collection:
bashdocker exec -t db /opt/couchbase/bin/cbq -u admin -p password -engine=http://127.0.0.1:8091/ -script "create primary index on default:emqx._default._default;"
Create a Couchbase Service with Couchbase Cloud
Log in to Couchbase Cloud.
Open the Couchbase UI, click Create Cluster on the Operational page, and select a Project.
On the Create Cluster page, choose the cluster type, enter the cluster name, select the cloud provider, keep other options as default, and click continue to create the cluster.
After creating the cluster, go to the Home page, click on the cluster name to access management, and create a Bucket, Scope, and Collection on the Data Tools page.
Click Connect, find the Public Connection String, and record it for connection.
Go to Cluster Access, fill in the Cluster access name and Password for authentication, then click Bucket-Level Access to grant appropriate permissions to the Bucket created in step four.
Navigate to Allowed IP Addresses, click Add Allowed IP, and add an IP whitelist.
Now, you have successfully created a Couchbase Cloud instance.
Create a Couchbase Connector
Before creating the rules for data integration, you need to create a Couchbase connector to access the Couchbase server.
In the deployment menu, select Data Integration, then choose Couchbase service under the data persistence services category. If you have already created other connectors, click New Connector, then select Couchbase service under the data persistence services category.
Connector Name: The system will automatically generate a name for the connector.
Enter the connection information:
- Server Address: Fill in the server's IP address and port. For Couchbase Cloud instances, remove the
couchbases://prefix. The default port is18093, and TLS must be enabled. - Authentication Information: Complete the Username and Password settings according to the installation of Cosuchbase.
- Advanced Settings (Optional): Refer to Advanced Configuration.
- Server Address: Fill in the server's IP address and port. For Couchbase Cloud instances, remove the
Click the Test Connection button; if the Couchbase service can be accessed normally, a success message will be returned.
Click the Create button to complete the creation of the connector.
Create a Rule
Next, you need to create a rule that specifies the data to be written and add response actions to forward the processed data to Couchbase.
Click the new rule icon under the Actions column in the connector list or click New Rule in the Rules List to enter the Create New Rule step page.
In the SQL editor, enter the rule SQL. For example, to make the rule engine triggered when clients send temperature and humidity messages to the
temp_hum/emqxtopic, you can enter the SQL as follows:sqlSELECT timestamp, clientid, payload.temp as temp, payload.hum as hum FROM "temp_hum/emqx"TIP
If you're new to SQL, you can click SQL Examples and Try It Out to learn and test the results of the rule SQL.
Click Next to start creating actions.
From the Use Connector dropdown, select the connector you previously created.
In the SQL template, enter the following command:
bashinsert into emqx(key, value) values(${.clientid}, {"Timestamp": ${.timestamp}, "Temp": ${.temp}, "Hum": ${.hum}})Configure advanced settings options as needed (optional), details can be found in Advanced Settings.
Click the Confirm button to complete the action configuration.
In the popup success message box, click Return to Rule List to complete the entire data integration configuration link.
Test the Rule
It is recommended to use MQTTX to simulate temperature and humidity data reporting, but you can also use any other client to complete this.
Use MQTTX to connect to the deployment and send messages to the following Topic.
topic:
temp_hum/emqxpayload:
json{ "temp": "27.5", "hum": "41.8" }
Click the publish button to send the message. An entry should now be inserted into the
emqxbucket in the Couchbase server. You can verify this by running the following command in the terminal:bashdocker exec -t db /opt/couchbase/bin/cbq -u admin -p password -engine=http://127.0.0.1:8091/ -script "SELECT * FROM emqx._default._default LIMIT 5;"If everything is working correctly, the command should output something similar to the following (the
requestIDand metrics may vary):bash{ "requestID": "858b9a9a-986e-467f-b9ed-9d585bce43be", "signature": { "*": "*" }, "results": [ { "_default": { "Hum": "41.8", "Temp": "27.5", "Timestamp": 1727322935145 } } ], "status": "success", "metrics": { "elapsedTime": "2.662873ms", "executionTime": "2.590901ms", "resultCount": 1, "resultSize": 133, "serviceLoad": 12 } }Check the runtime data in the EMQX Cloud Console. Click on the rule ID in the rules list, and you can view the statistics of the rule and all actions under this rule on the runtime statistics page.