Flow Designer
Note
Flow Designer is not available with the EMQX Serverless edition.
The Flow Designer is a powerful visual tool to create and edit data processing workflows (Flows). It simplifies and streamlines the configuration of data processing and integration. You can also test the created data processing workflows.
Rules created in the Data Integration and Flow Designer are interoperable. This means you can create a rule in Flow Designer and view its SQL and related configurations in the Data Integration, or create the rule in the SQL Editor in the Data Integration and then view the rule’s data flow processing configurations in the Flow Designer.
Main Features
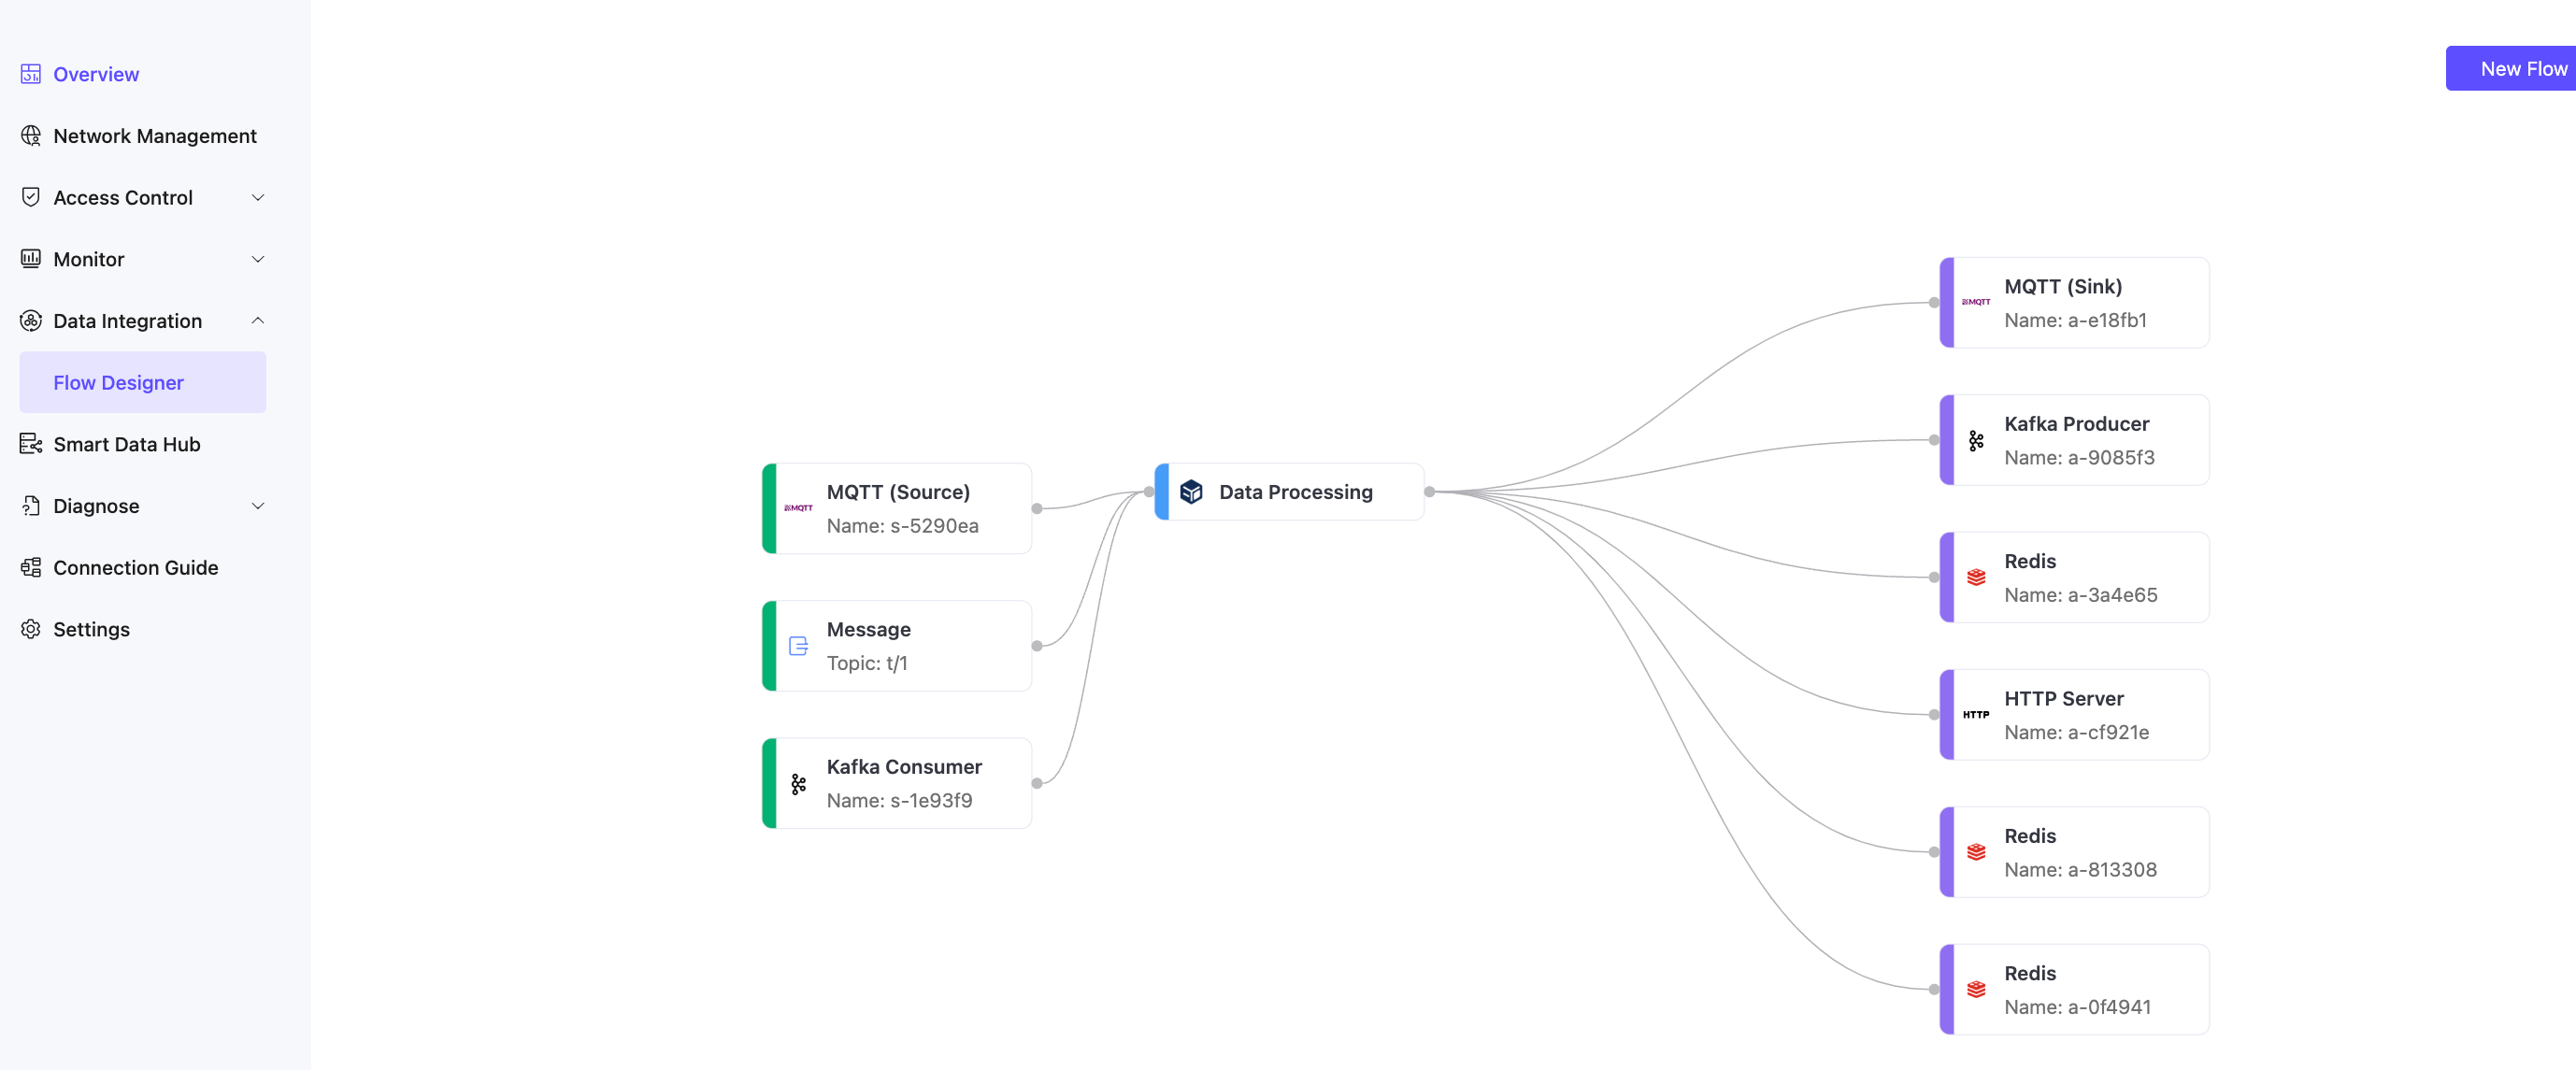
To access the Flow Designer in the EMQX Cloud Console, go to your deployment and click Data Integration -> Flow Designer from the left menu. If you have already created rules or data integrations, you will see a directed acyclic graph composed of multiple nodes. Each node represents a data processing step, such as reading data from a topic, event, or Source, transforming data through rules, and forwarding data using a Sink.
The page displays all data processing workflows created using the Rules and Flow Designer. You can visualize how data flows—from devices or clients through rule processing to external data systems, or vice versa, from external data systems through rule processing back to devices. Refreshing the page updates it with the latest changes in rules and data integrations.
Clicking the New Flow button allows you to enter the Flow creation page for visual configuration. You can drag and drop to select the nodes needed for each step and connect them to implement the workflow.
Source
The Source supports messages, events, or messages flowing from external data systems. A Flow must contain at least one Source node and multiple data input nodes can be supported simultaneously. Currently, supported Source nodes include:
- Messages: Specified through topics and topic wildcards for client-published messages.
- Event: Supports all client events within EMQX; refer to Client Events.
- External Data Systems:
Processing
In Processing, you can use function and filter nodes for data processing and filtering. This step is optional, and a Flow can support at most one function and one filter node:
- Data Processing: Supports all Built-in SQL functions of the rule engine.
- Filter: Supports comparison filtering for data fields coming from the Source; supported comparison operations include
>, <, <=, >=, <>, !=, =, =~
In addition to visual form editing, Processing nodes also support switching to expression mode to edit using Rule SQL syntax. Filter nodes can only be connected after functions, meaning data must first be processed and then filtered.
Sink
The Sink outputs the data sources and processing results to specific nodes and external data systems. A Flow must contain at least one Sink node, and supported Sink nodes include:
- Republish: Publishes messages to locally specified MQTT topics.
- External Data Systems: Supports over 40 types of data systems, such as MySQL and Kafka; refer to Data Integration.
Flow Editing and Testing
When a Flow is created, the system will randomly generate an ID for it. Click the edit icon next to the ID to modify the Flow's description.
To delete a node in the Flow, hover over the node and click the delete icon in the upper right corner of the node. Click on a node to enter the editing mode, you can modify its configuration details and save the changes, then, click Save to save the entire Flow. Click the Start Test button to input simulated data or test the Flow with a real client to verify if it executes correctly.
Advantages
Flow Designer is a feature-rich and user-friendly tool that helps users process and integrate data more efficiently, drive business innovation, and improve the visibility and control of data management. Its main features and advantages include:
- Intuitive Visual Interface: Users can easily create, adjust, and customize data processing workflows using a straightforward drag-and-drop interface, making complex data integration logic accessible even to those without programming experience.
- Fast Real-time Processing: Flow Designer enables users to establish real-time processing workflows for messages and events within minutes. This helps businesses respond more quickly to emerging data and events, supporting real-time business needs.
- Extensive Integration Capabilities: Seamlessly integrates with over 40 data systems, offering flexible data connection and exchange options.
- Unified Management and Monitoring: Users can clearly manage the entire data integration process through a unified view, understanding the status and performance of each processing node. This helps in real-time monitoring and tracking of data flows, ensuring high reliability and integrity of data.
- EMQX Data Processing Capabilities: Leverages the rule SQL and Sink/Source capabilities of EMQX, inheriting its robust data processing and performance advantages. Users can switch between the UI and SQL editor, combining the flexibility of SQL editing with a simpler and faster user experience, facilitating business innovation and data-driven decision-making without needing in-depth knowledge of EMQX rule SQL syntax.
Quick Start
This section demonstrates how to quickly create and test a Flow in the Flow Designer through a sample use case.
This demonstration shows you how to create a data processing workflow to handle high-temperature alerts. The workflow will receive data from temperature and humidity sensors via MQTT topics, set up data filtering and transformation rules, and republish alert messages to a new topic, alert, if the temperature exceeds 40°C. It also demonstrates how to validate the effectiveness of the rules and the results of data processing through testing.
Scenario Description
Assume a device contains a temperature and humidity sensor that sends data to the MQTT topic sensor/temperature every 5 seconds. The EMQX Cloud rule engine will process this data, involving the following steps:
- Data Filtering: Only process data where the temperature is greater than 40°C.
- Data Transformation:
- Extract the device ID.
- Extract the temperature information.
- Use a built-in function to convert the timestamp in the payload to a readable date format.
- Message Republish: Format the processed data into an alert message and publish it to a new topic,
alert.
Sample data to be republished:
{
  "device_id": "device123",
  "temperature": 22.5,
  "humidity": 60
}
Create the Flow
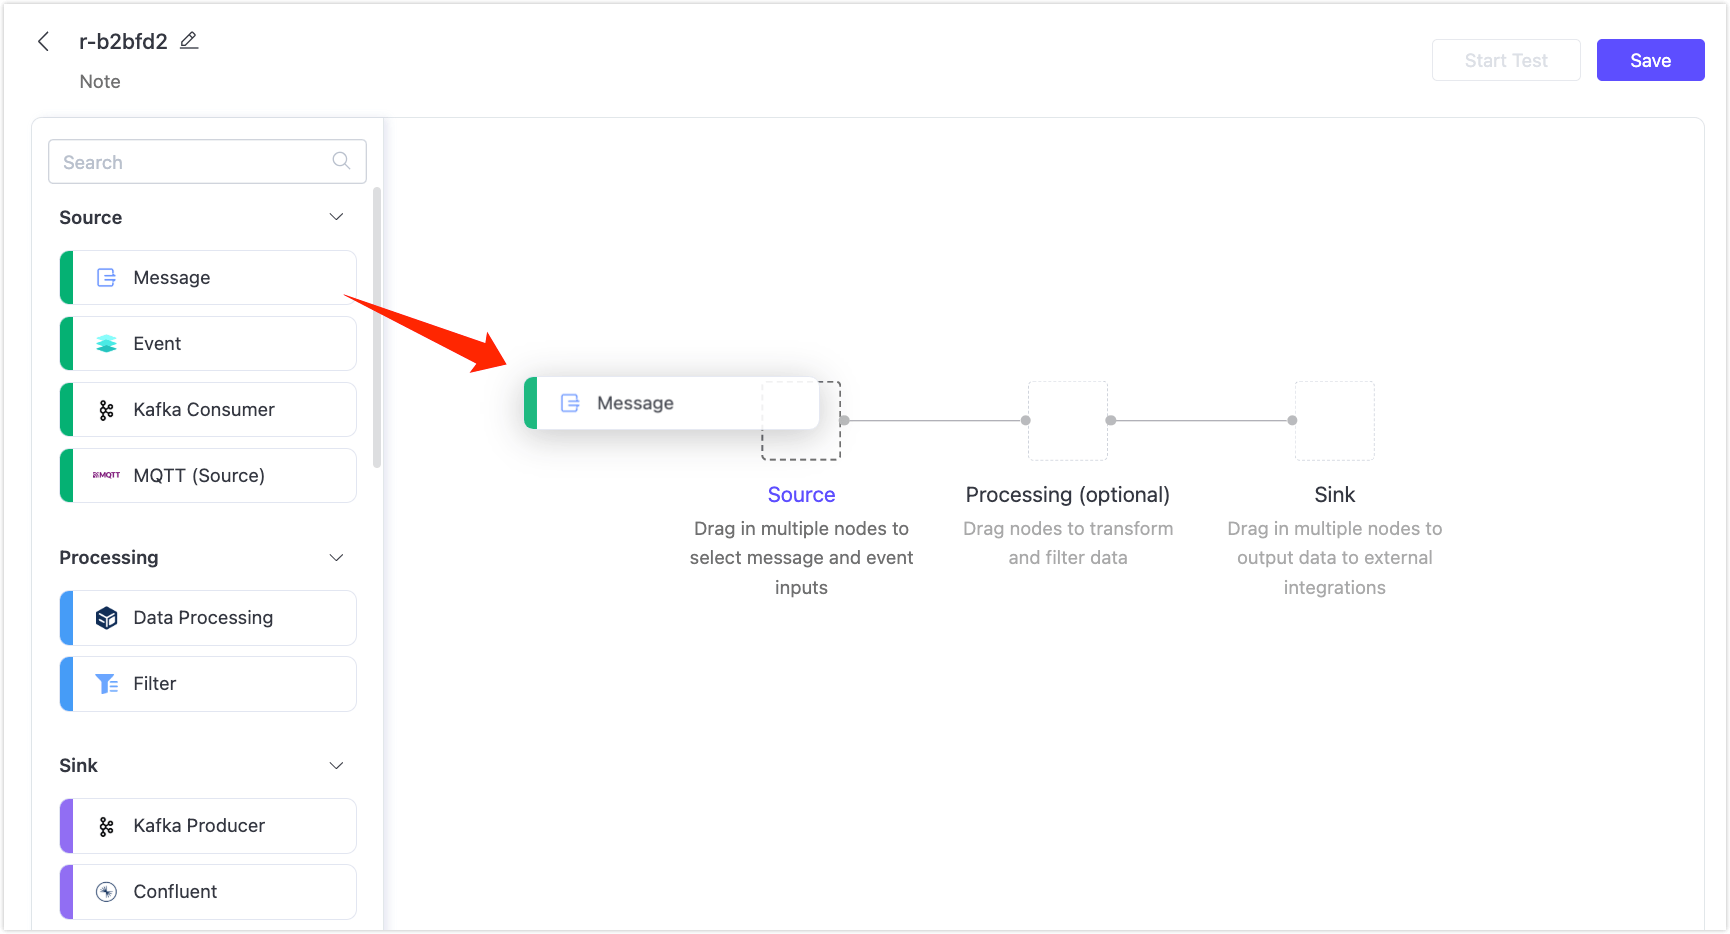
Click the New Flow button on the Flow Designer page.
Drag a Message node from the Source section onto the canvas and configure a message source topic, such as
sensor/temperature. Click Save. This step specifies the source of the messages published by the client.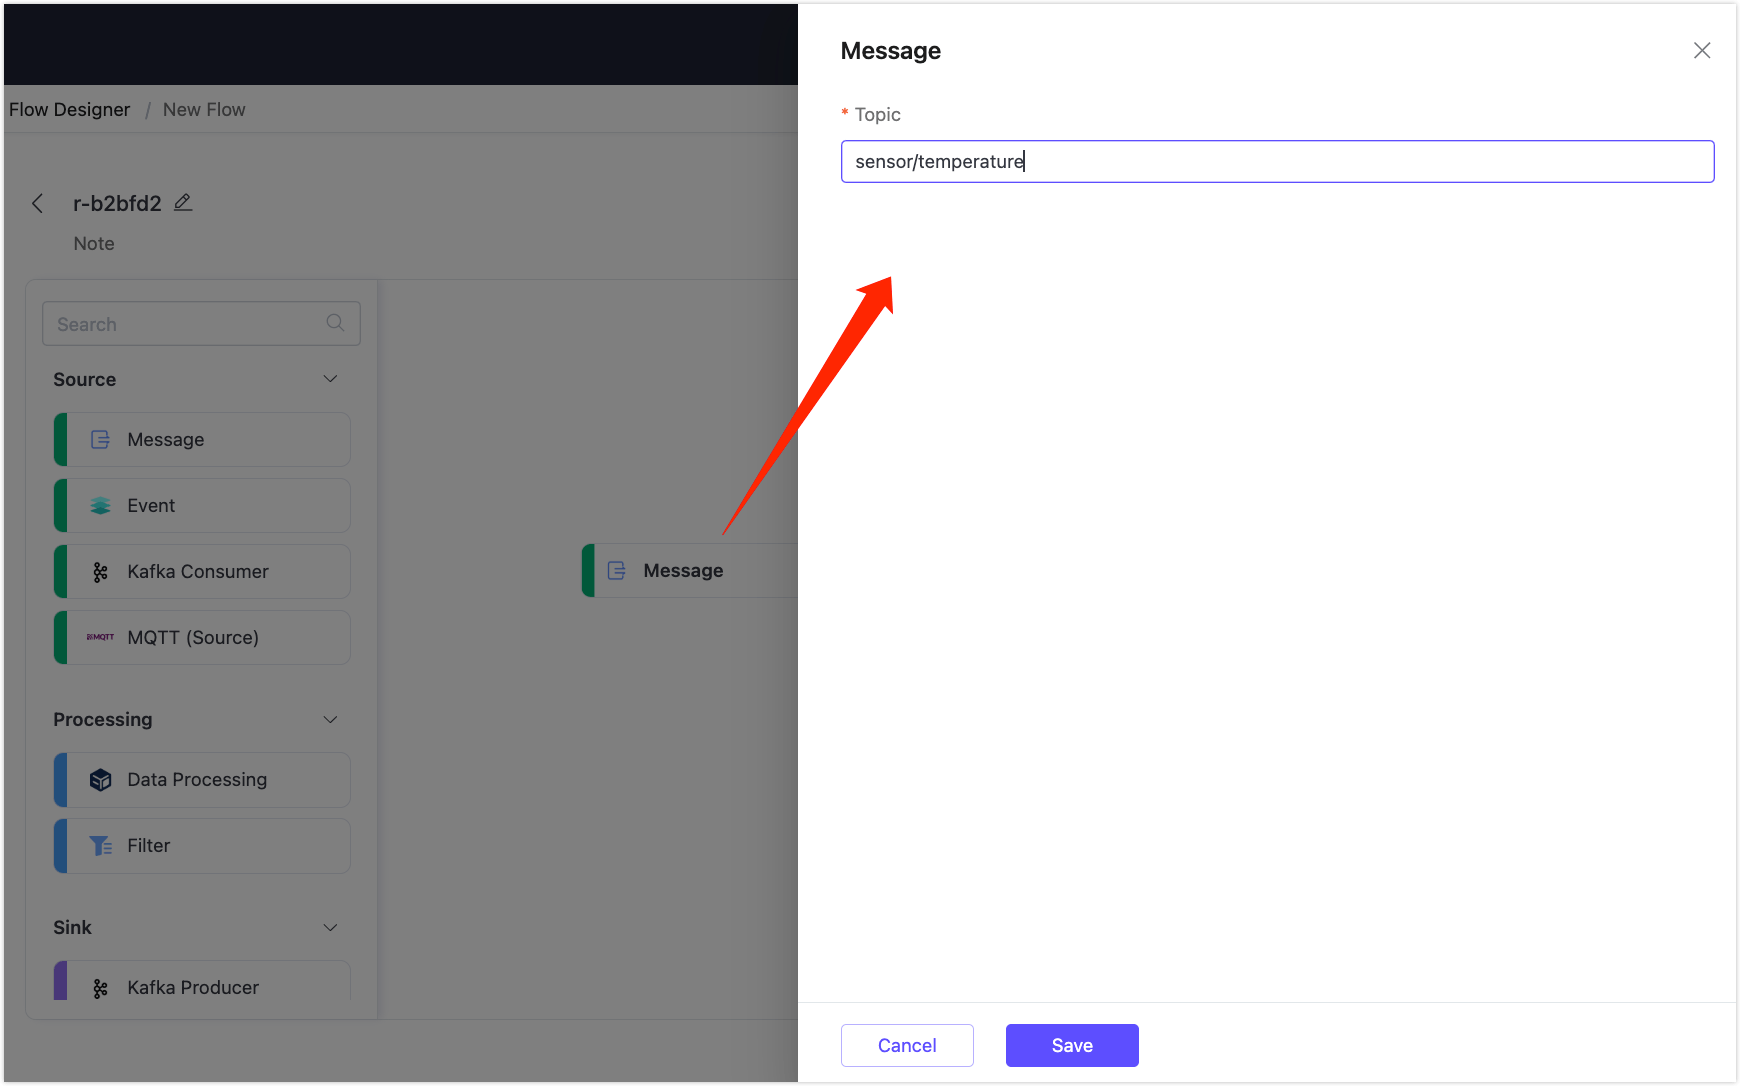
Drag a Data Processing node from the Processing section onto the canvas and configure data processing rules to extract the following fields from the message:
payload.device_id: Alias it asdevice_id.payload.temperature: Alias it astemperature.timestamp: Use theformat_datefunction to convert the message timestamp to a readable date and time format. Alias it asdate.Time Unit: Selectmillisecond.Time Offset: Enter+08:00.Data Format: Enter%Y-%m-%d %H:%M:%S.%6N%z. Refer to Date and Time Conversion Functions.Timestamp: Entertimestamp.
Click Save when done.

Drag a Filter node from Processing and configure a filter condition to implement a data filtering rule. Add a filter item, enter
payload.temperature, select the operator>=, enter40, and click Save.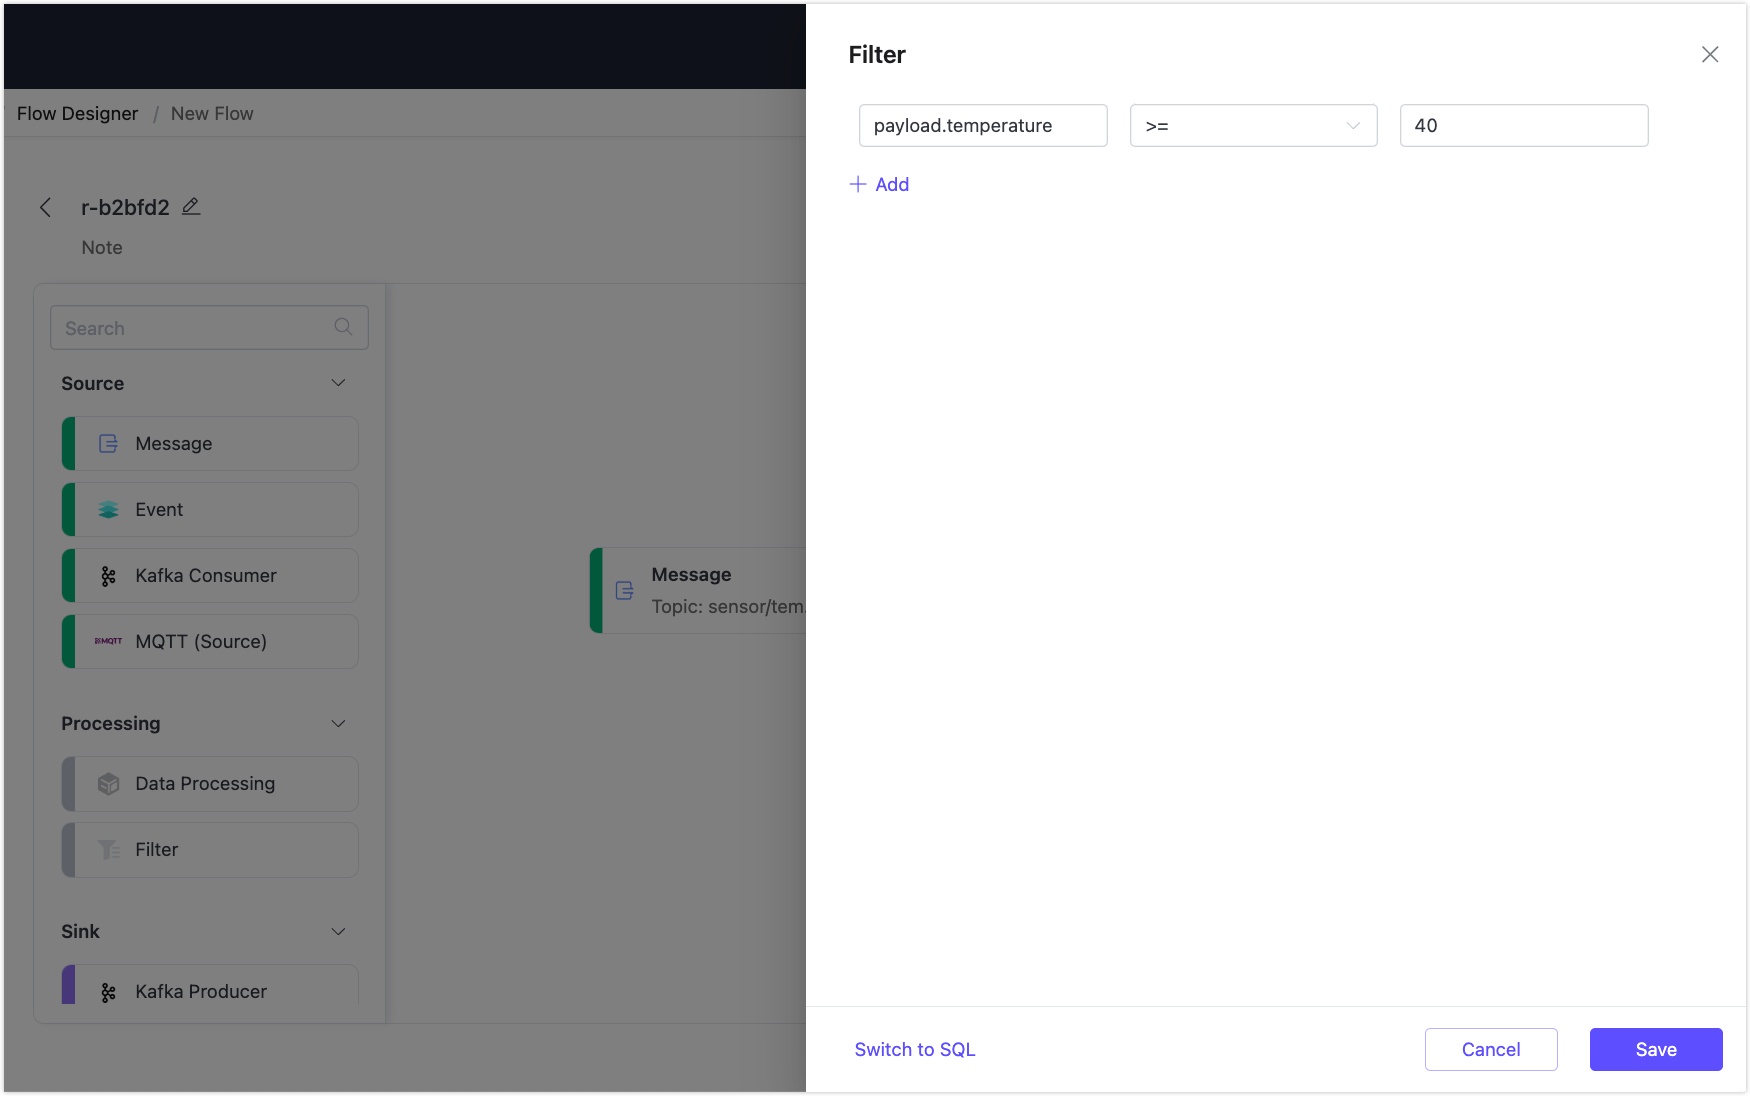
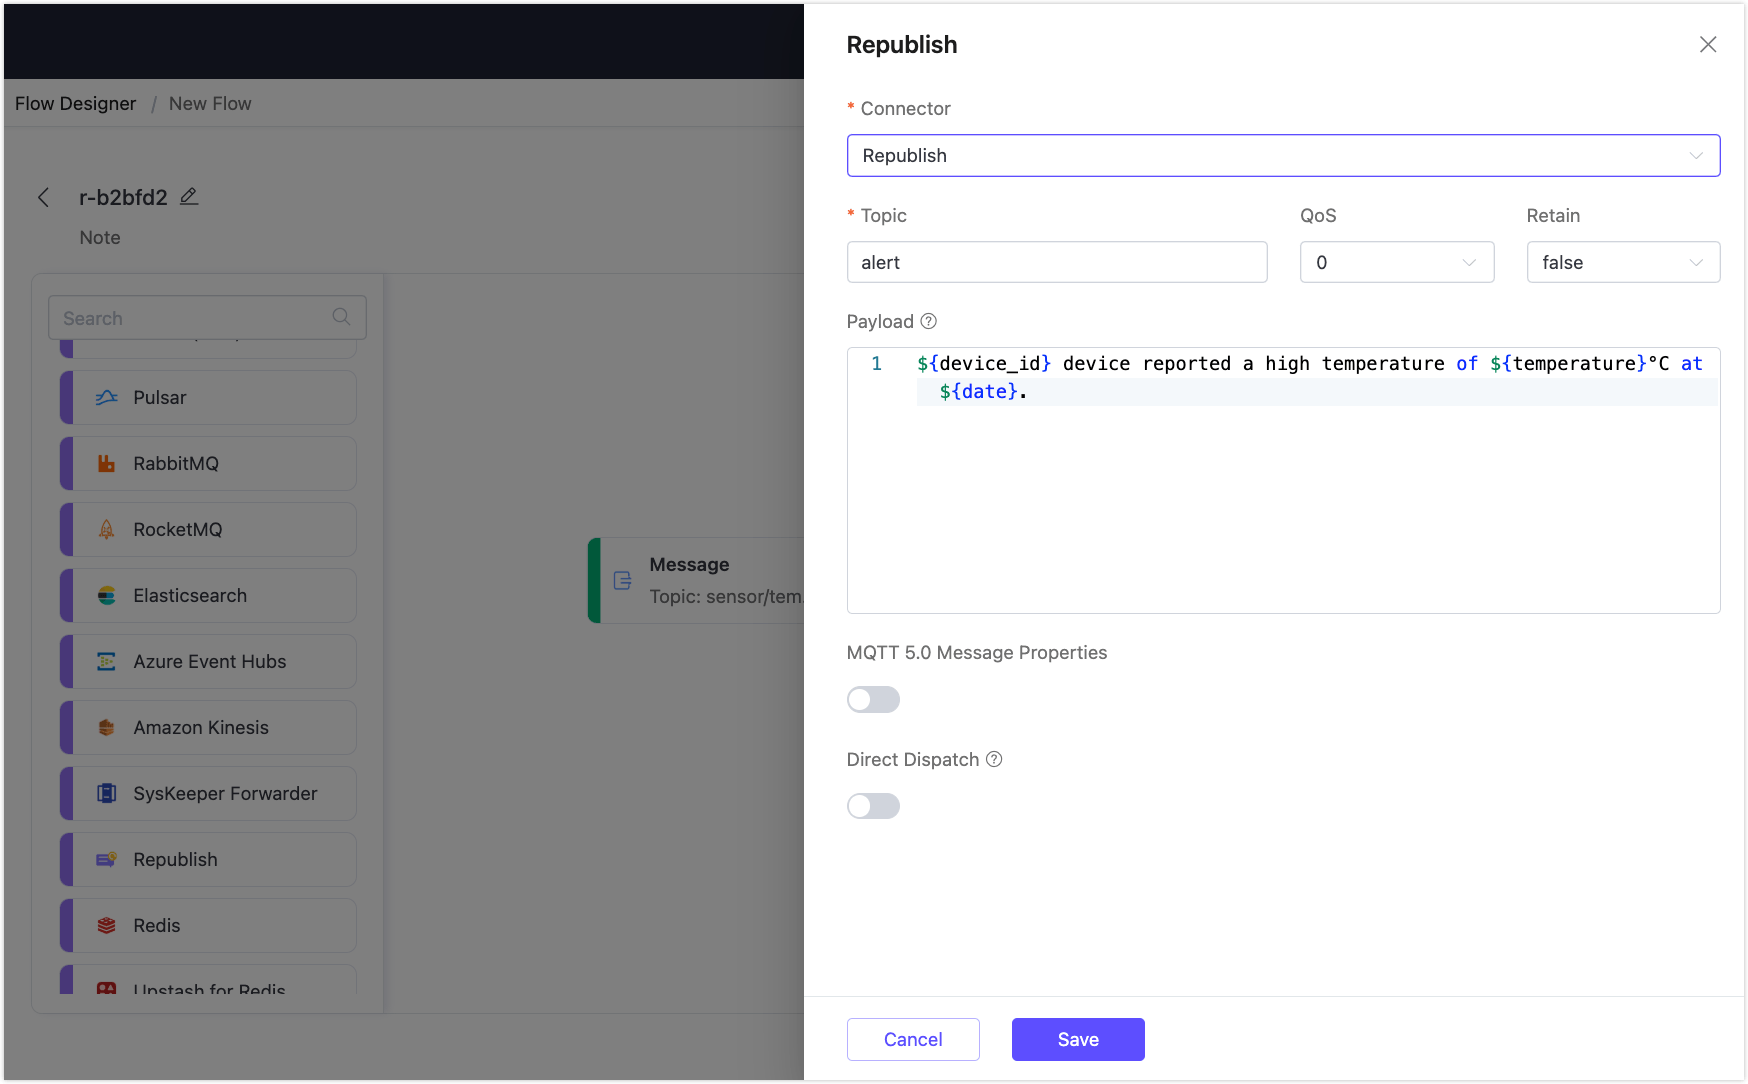
Select a Republish node from Sink and configure the topic for forwarding messages, setting it to
alert. Format the processed and transformed data into an alert message with the following payload:bash${device_id} device reported a high temperature of ${temperature}°C at ${date}.Click Save.
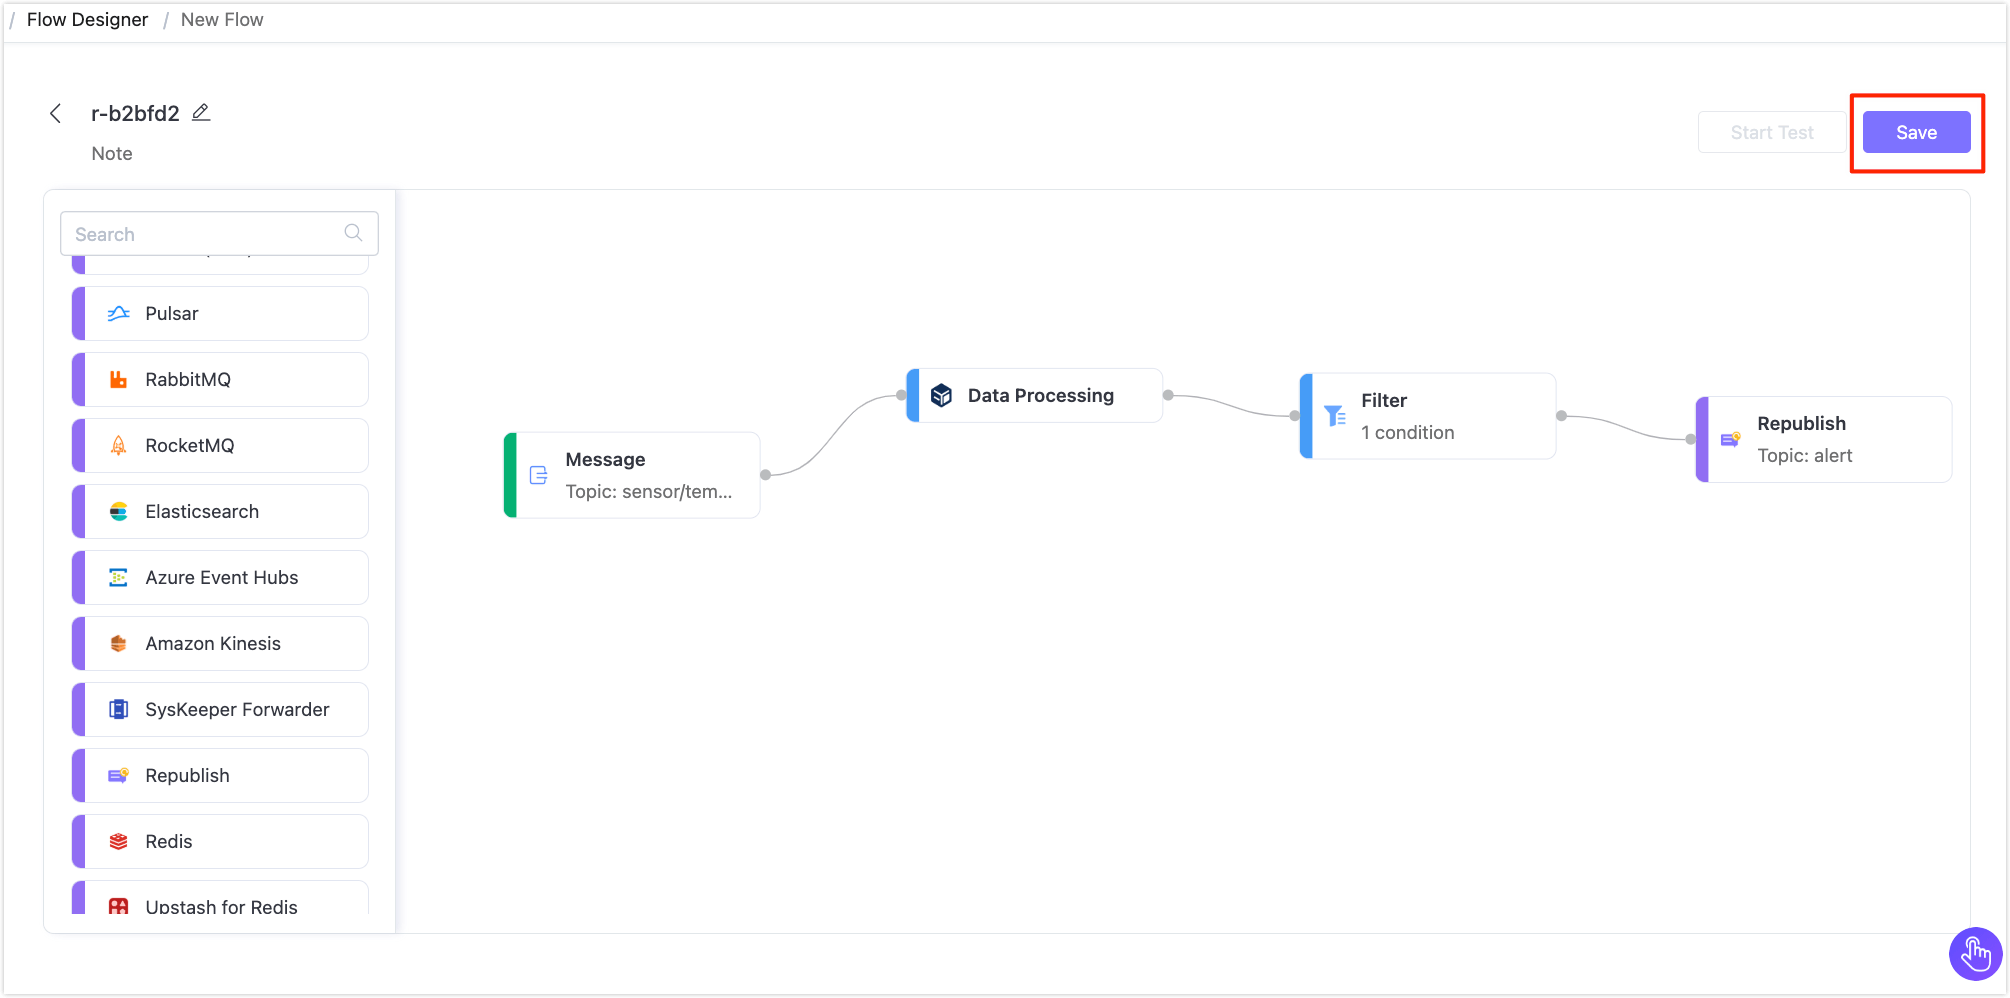
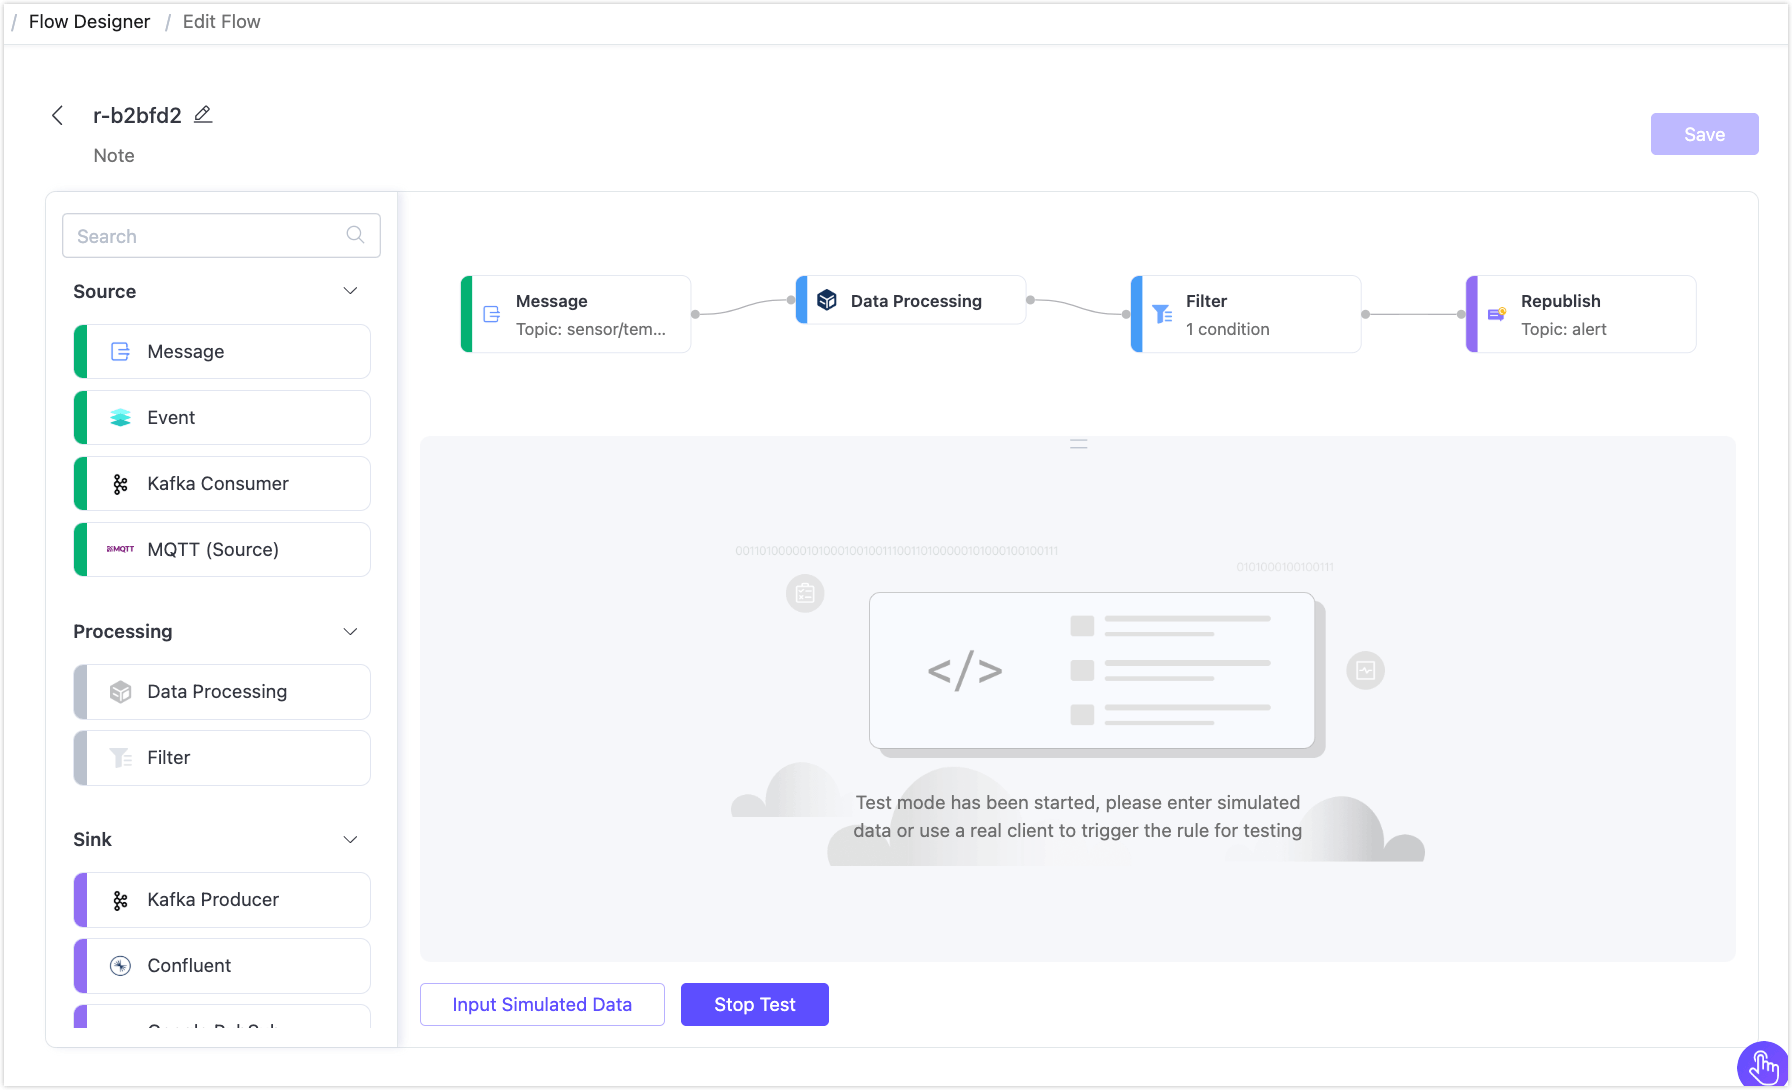
You will see the newly created Flow on the page. Click Save in the upper right corner to save the Flow.
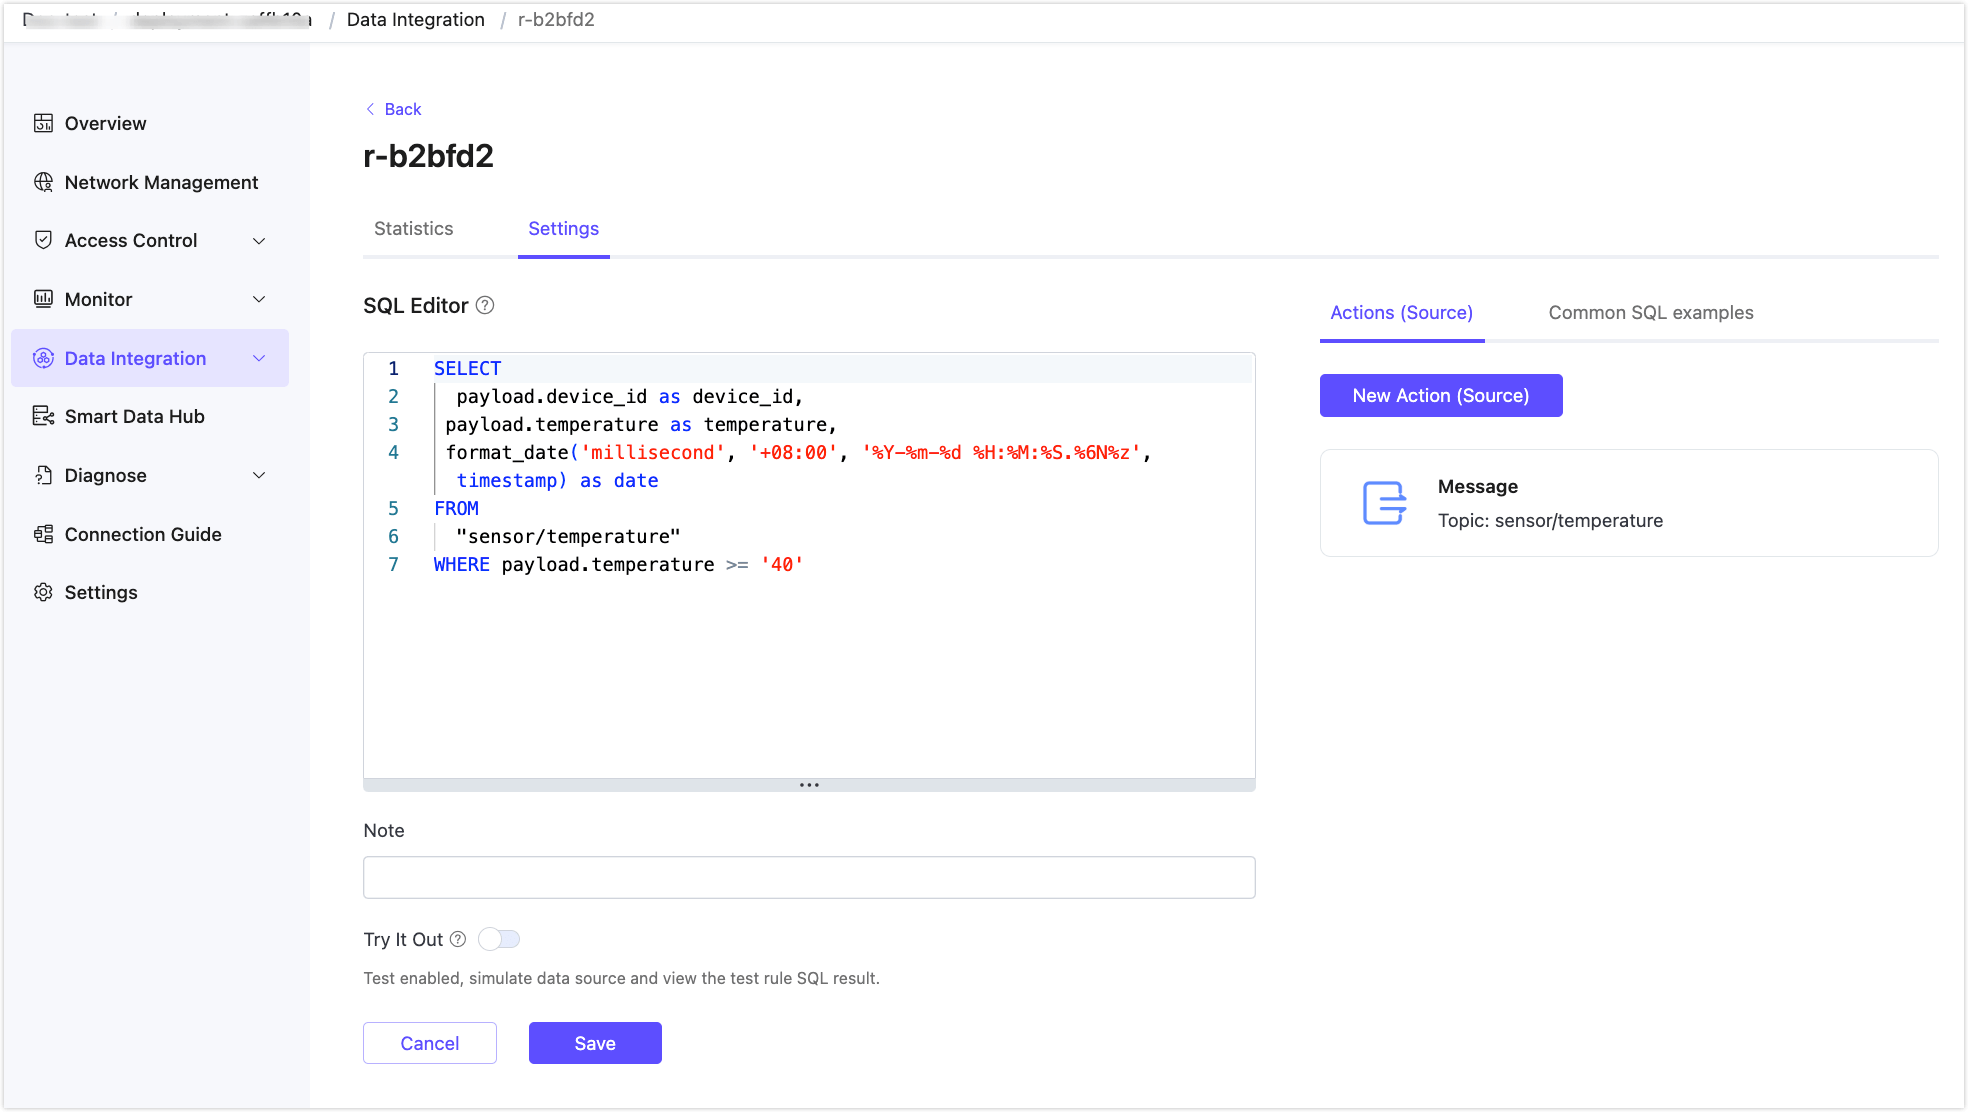
Flows and form rules are interoperable. You can also find the created rule in the Rules section on the Data Integration page. Clicking the rule ID to view the SQL and related configurations of the rule.
Test the Flow
In the Flow Designer, click any node of the Flow to open an editting panel. Click the Edit Flow button at the end of the panel.
Click Start Test next to the Save button to open a bottom pop-up.
You can click Input Simulated Data to enter simulated data in the pop-up panel or use a real client to publish messages to see the results. This demonstration will use MQTTX to publish real data.
Open the MQTTX Web. Click the New Connection to create a client connection as a publisher. Configure the following fields:
- Name: Enter
device1. - Host: Enter the address in the MQTT Connection Information section on your deployment Overview page.
- Port: Enter
8084. - Username and Password: Configure the authentication information in your deployment's Access Control -> Authentication page and enter the credentials here.
Leave other settings as default and click Connect.
- Name: Enter
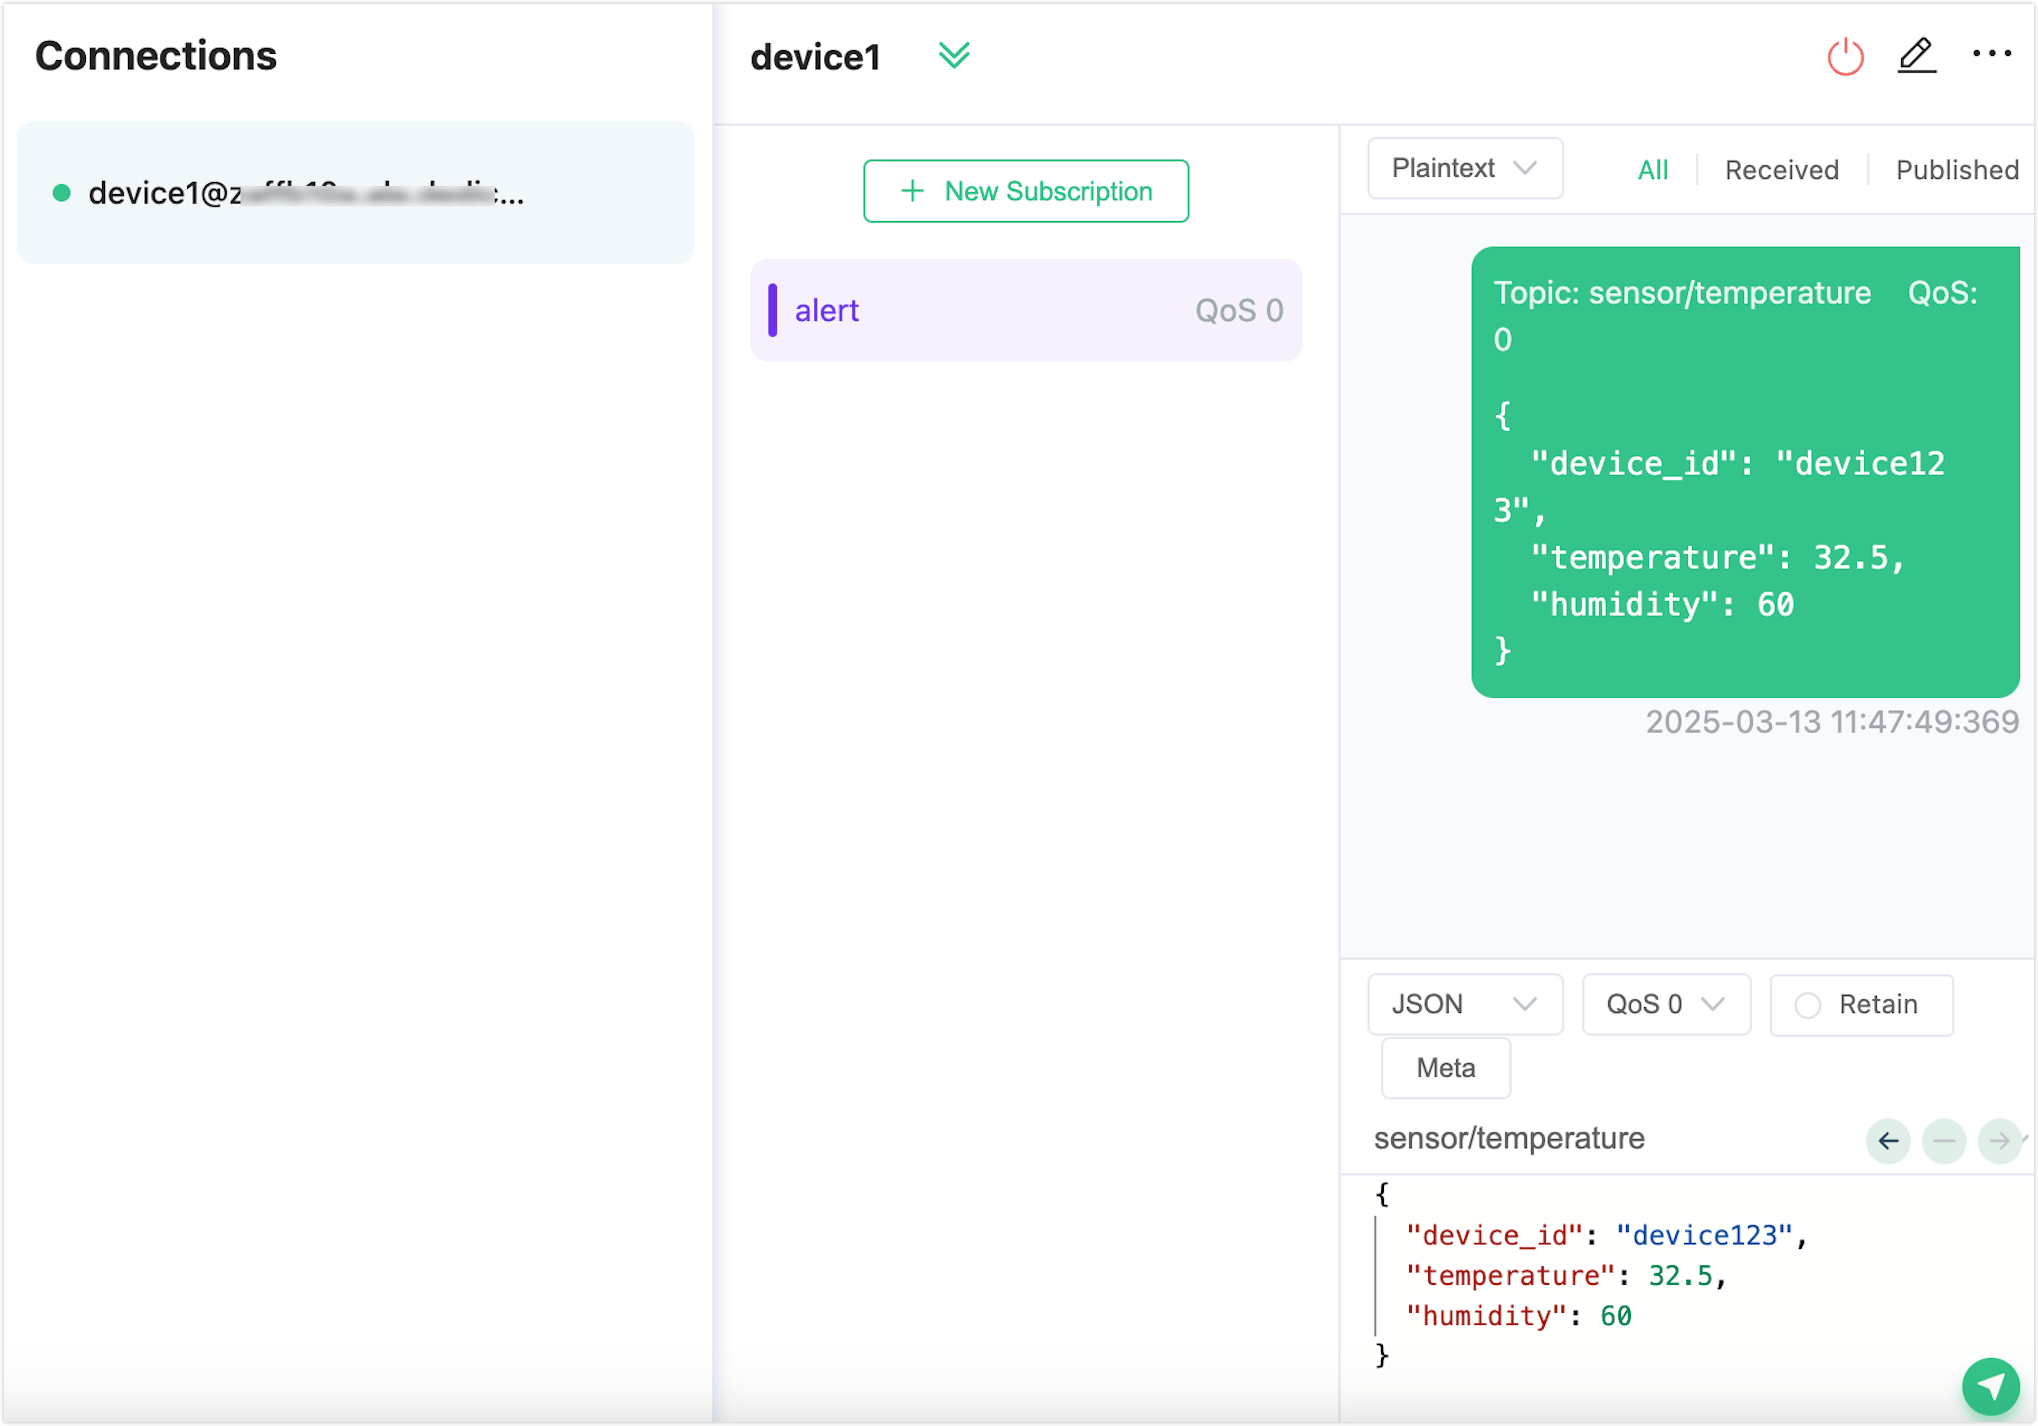
Create a new subscription. Set the topic as
alert.Publish a message with a temperature below 40°C. You will see that the message does not meet the condition and the rule SQL does not execute.
Publish a message with a temperature above 40°C. You will see the
alerttopic receiving the alert message.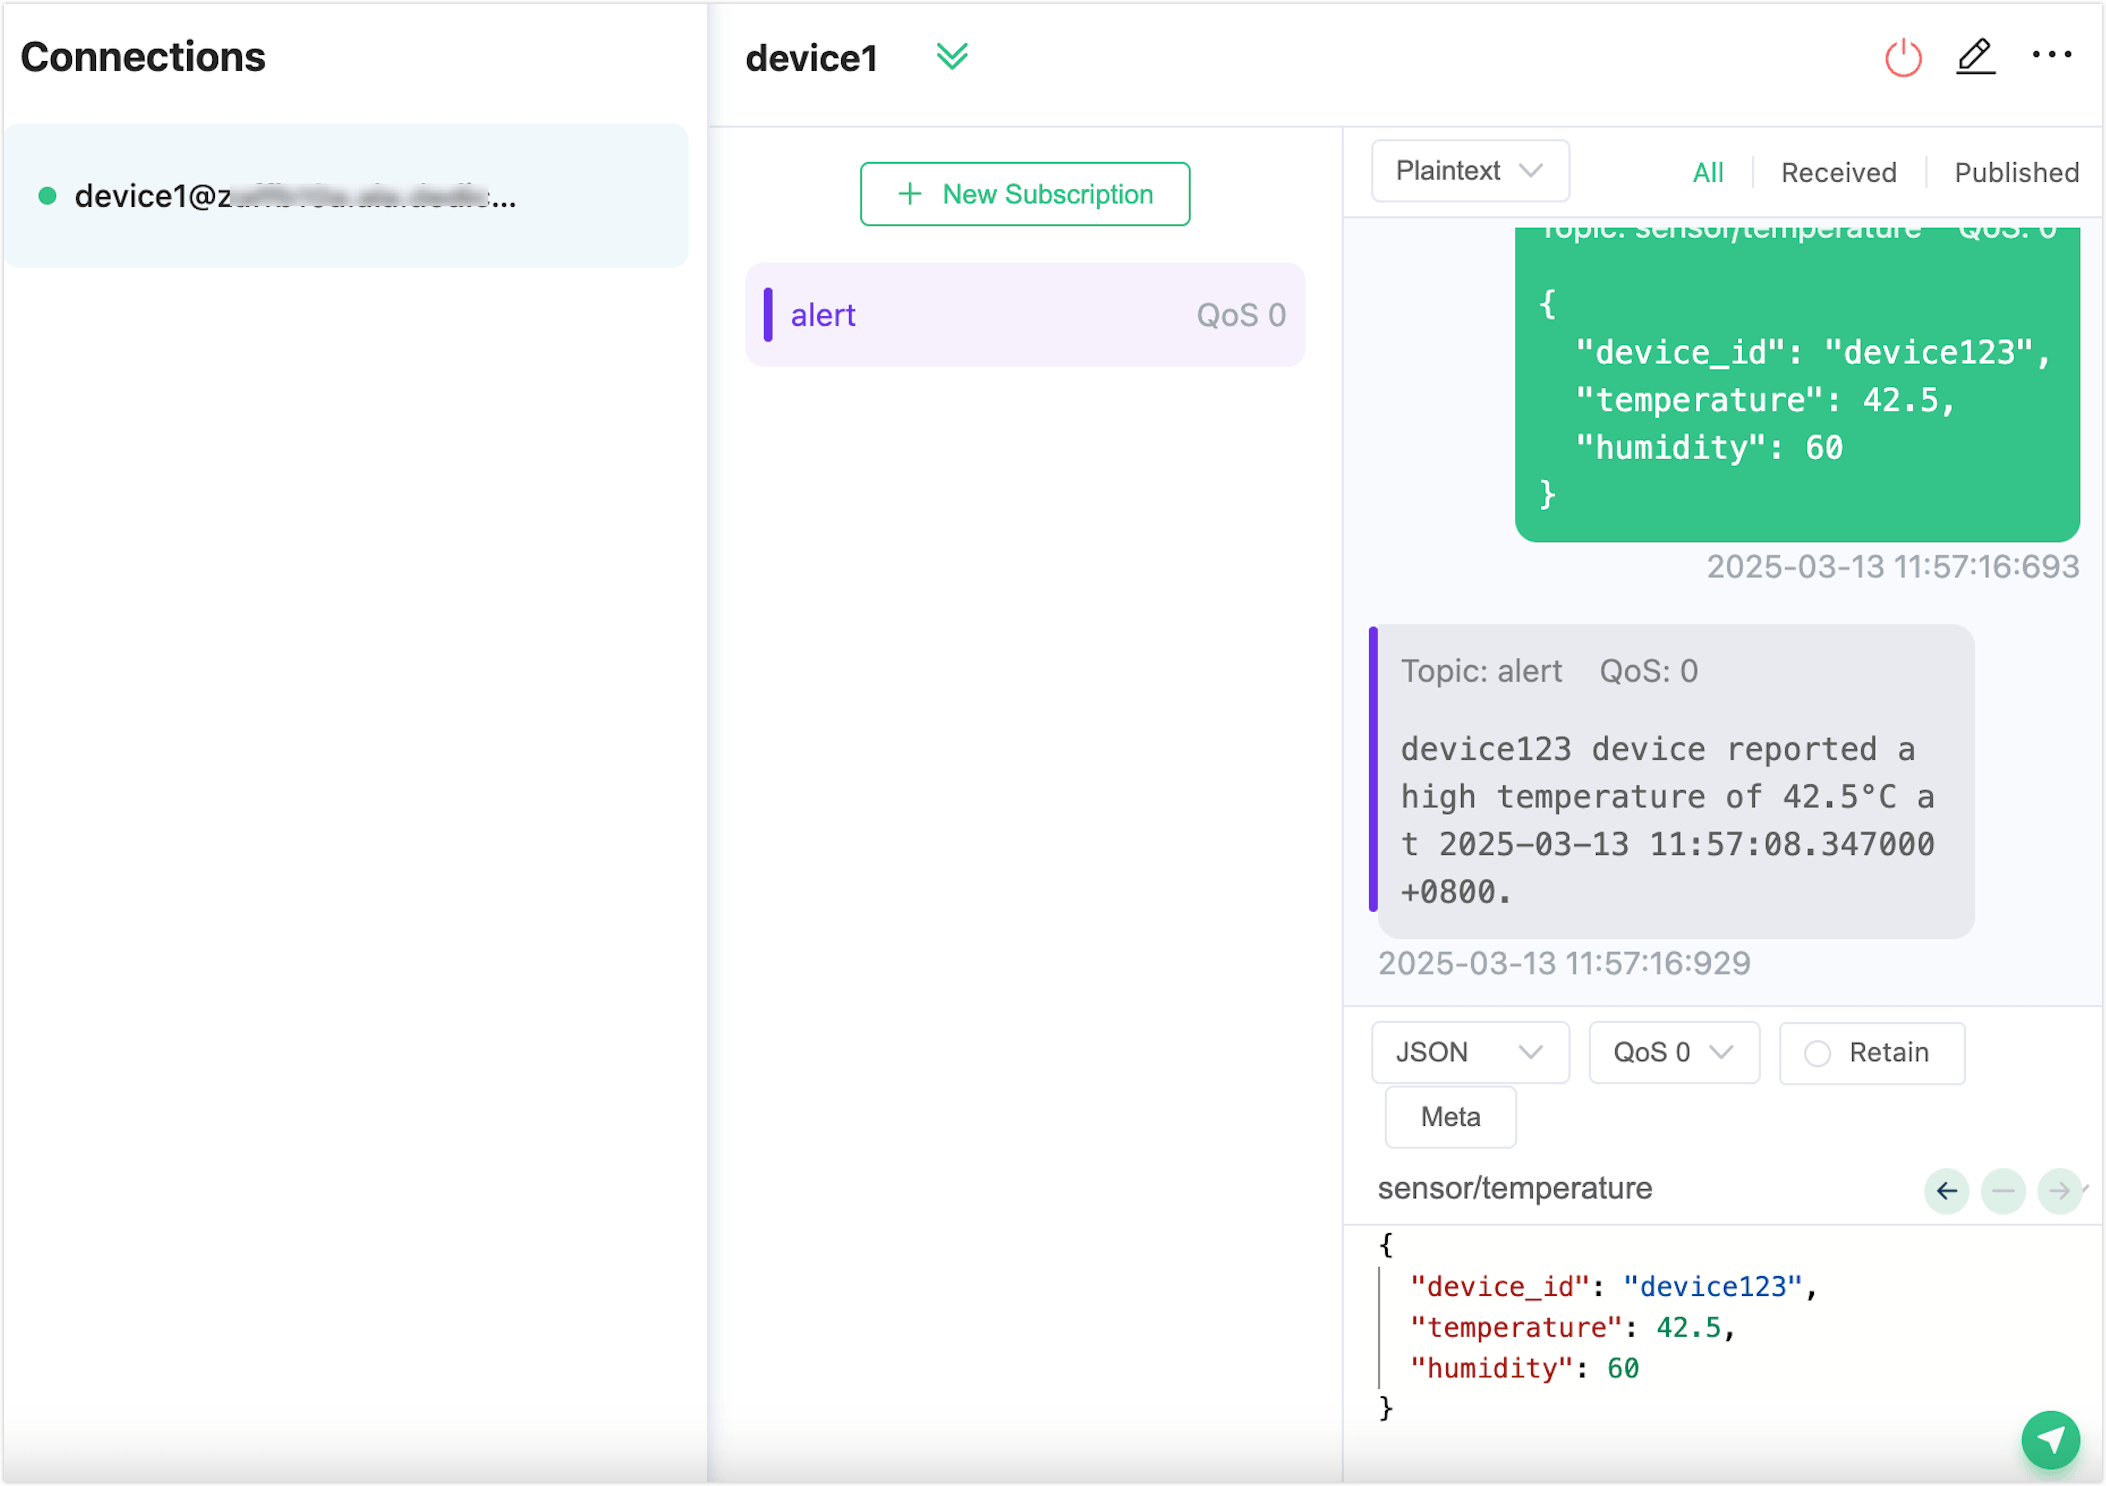
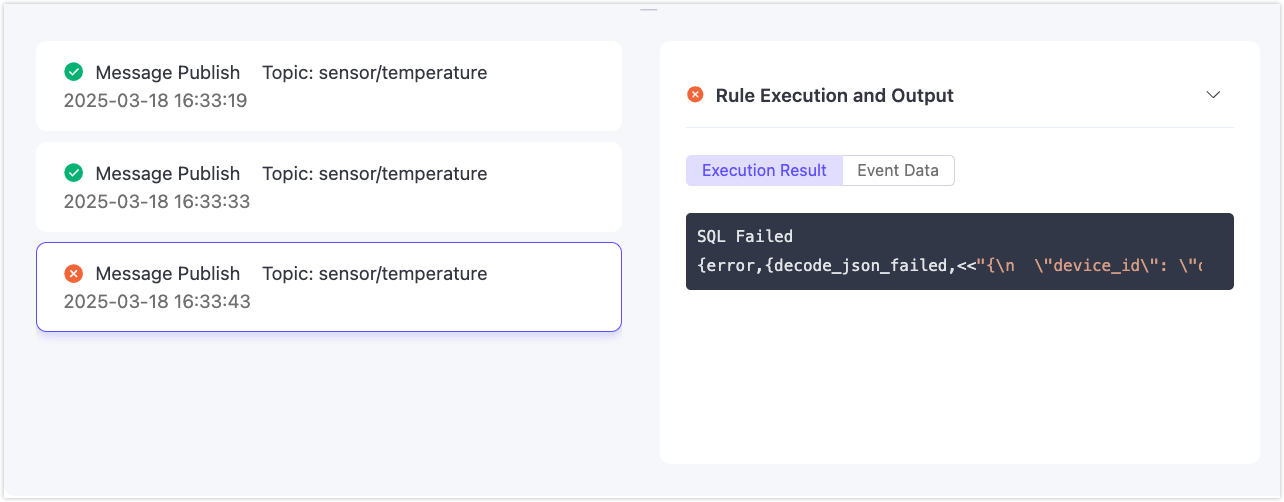
Return to the testing page to view the successful test results.
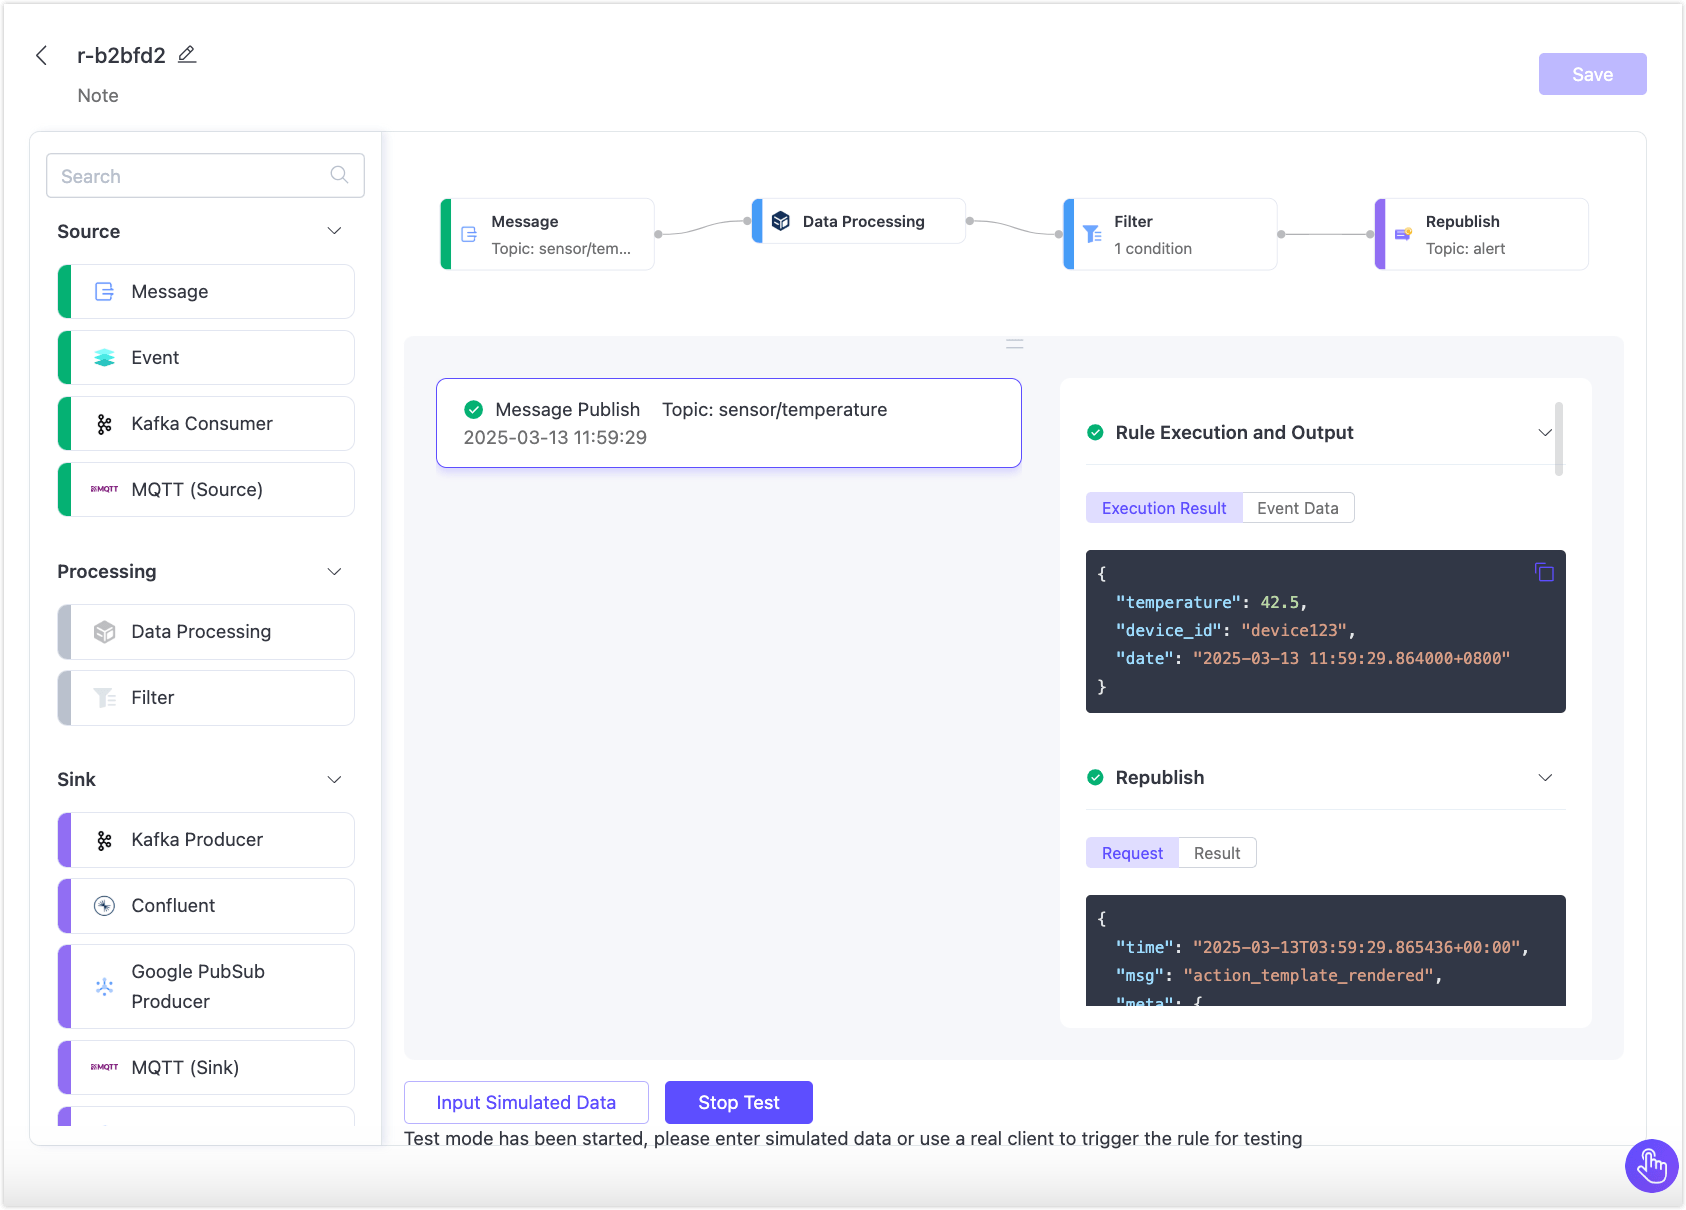
If the test results are unsuccessful, error messages will be displayed accordingly.