Create a BYOC Deployment
The EMQX Cloud Bring Your Own Cloud (BYOC) plan supports creating deployments in your own cloud infrastructure to ensure that data is kept in your environment. This deployment improves data security and control while avoiding risks such as data leakage. In addition, EMQX BYOC deployment can provide better performance and scalability to meet the needs of different scenarios. This page describes how to create and use a BYOC deployment.
Prerequisites
Before you create a BYOC deployment, check your BYOC creation status in the Console. On the deployment creation page, select BYOC and check the button on the right: Contact Us means approval is required, and New Deployment means your account is approved.
You must also prepare an account corresponding to the public cloud, plan cloud resources, and apply for an EMQX BYOC product license. For more information, see Deployment Prerequisites.
Create a Deployment
Log in to your account and enter the EMQX Cloud Console.
If this is your first time using the platform, you need to start by creating a project. For detailed steps, see Create a Project. If you’ve already created a project, you can skip this step.
You can either click New Deployment on the Overview page of the Console to start the creation process directly, or click the project card where you want to create the deployment, and then click New Deployment on the project page to proceed.
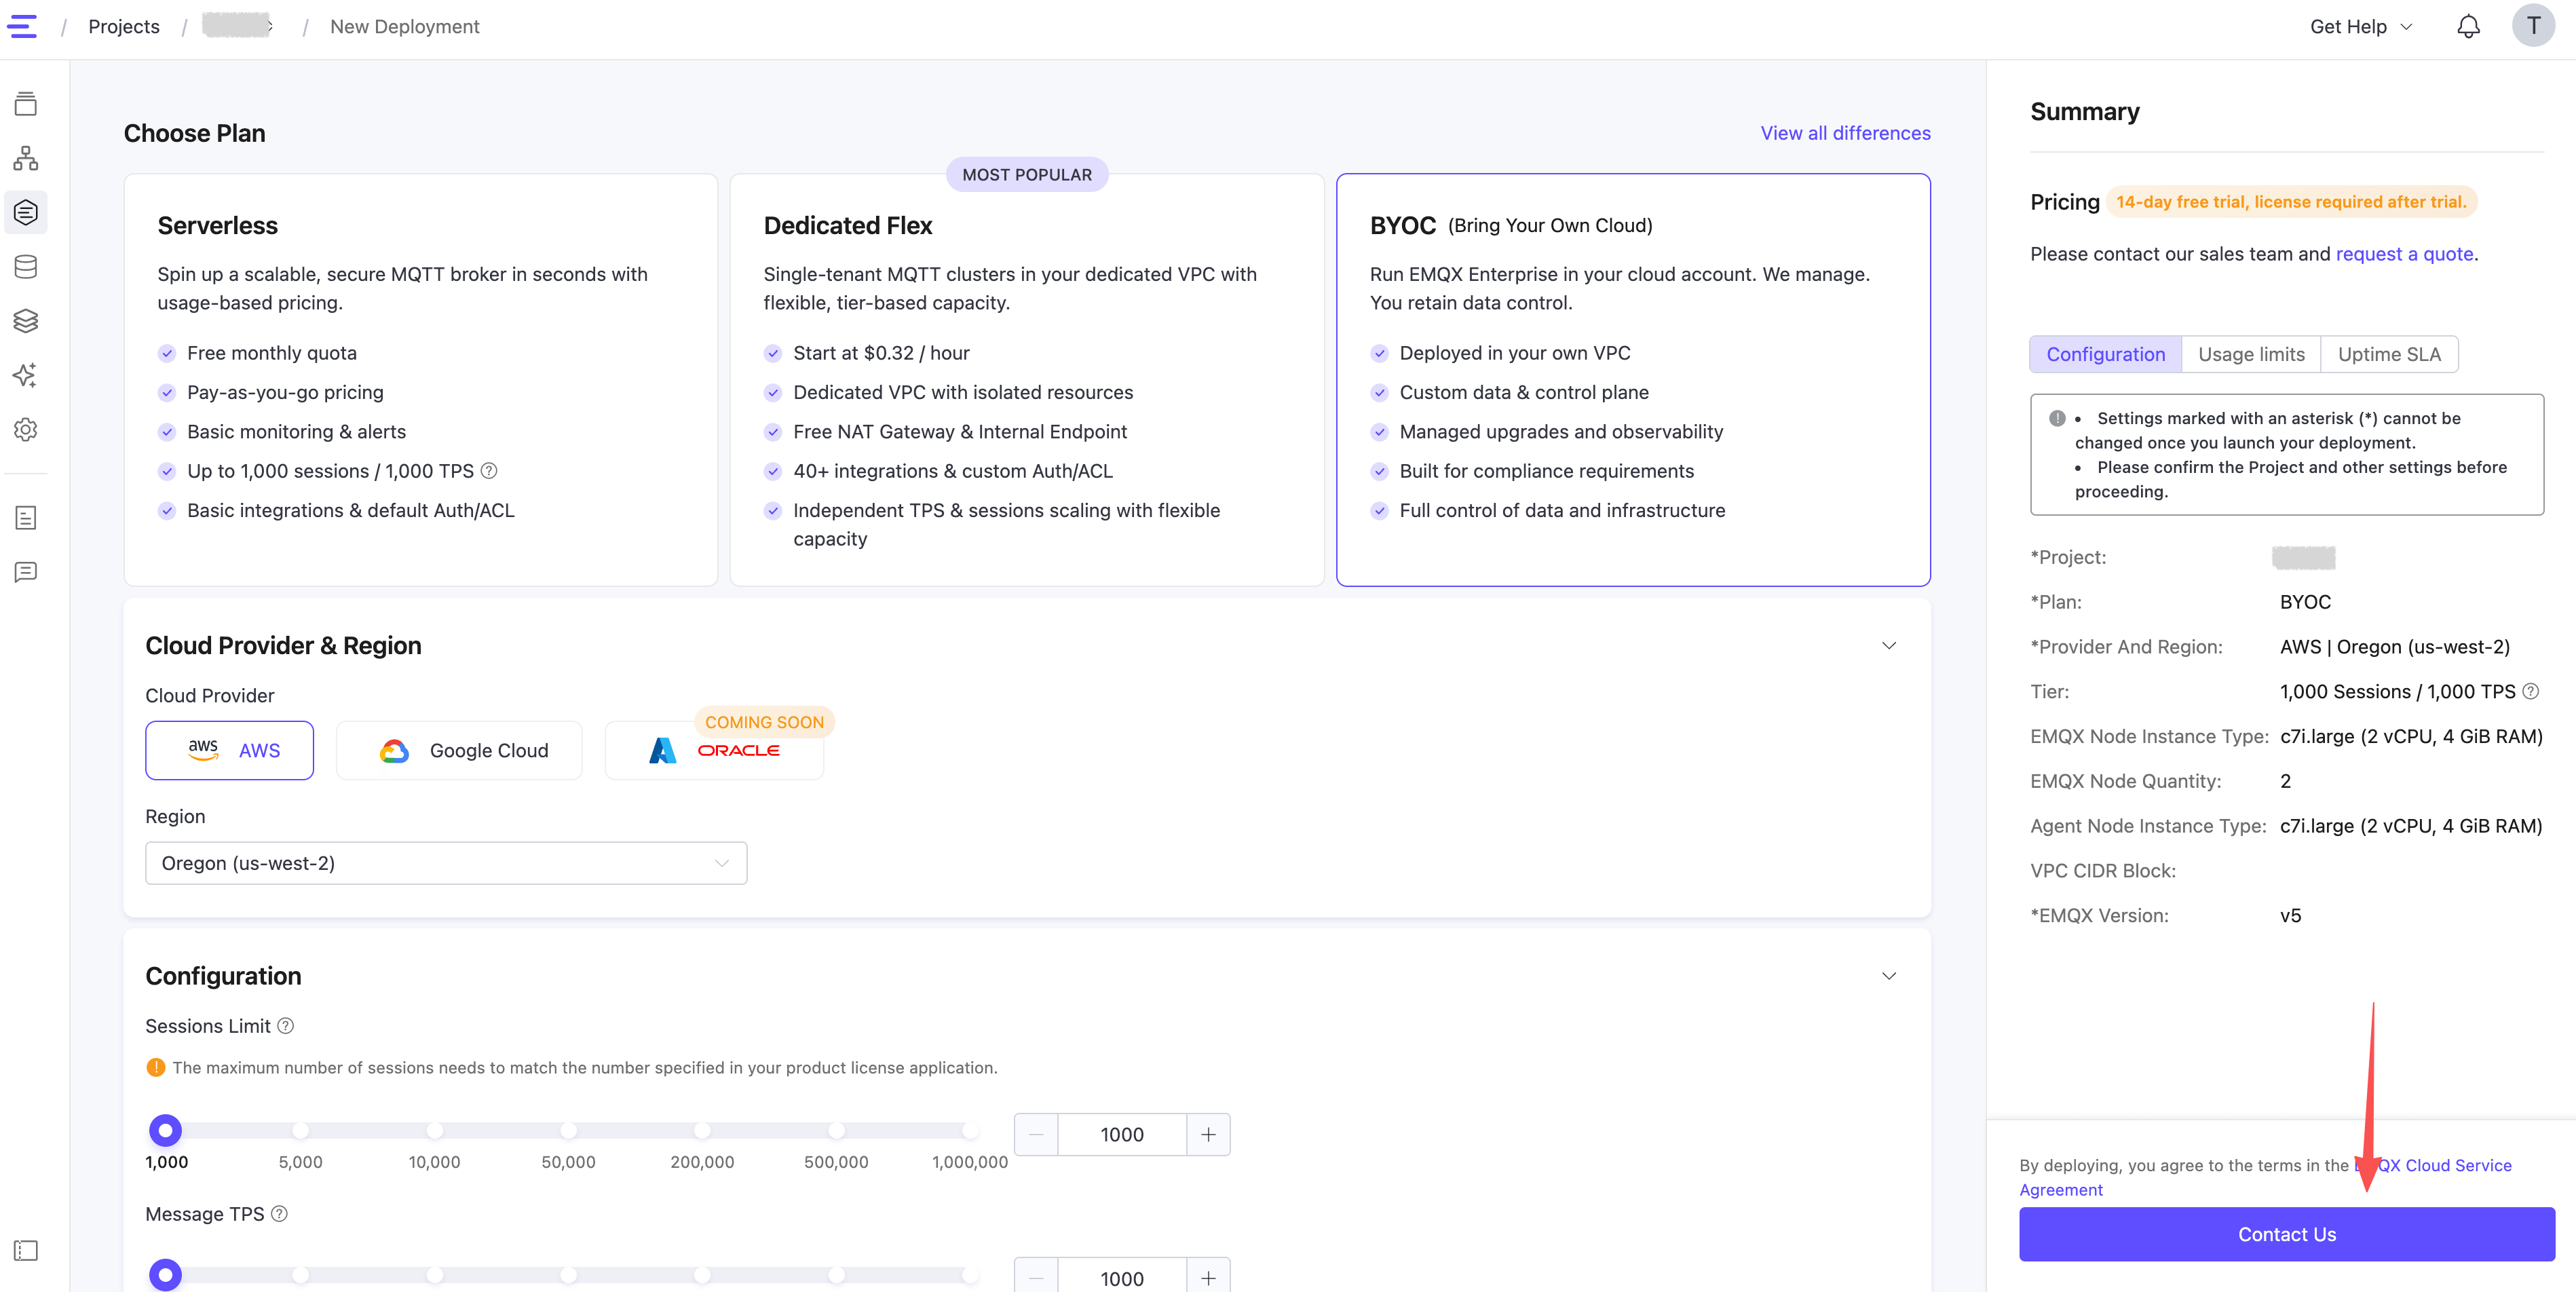
In Choose Plan, select BYOC.
Configure the settings for the BYOC plan according to your needs.
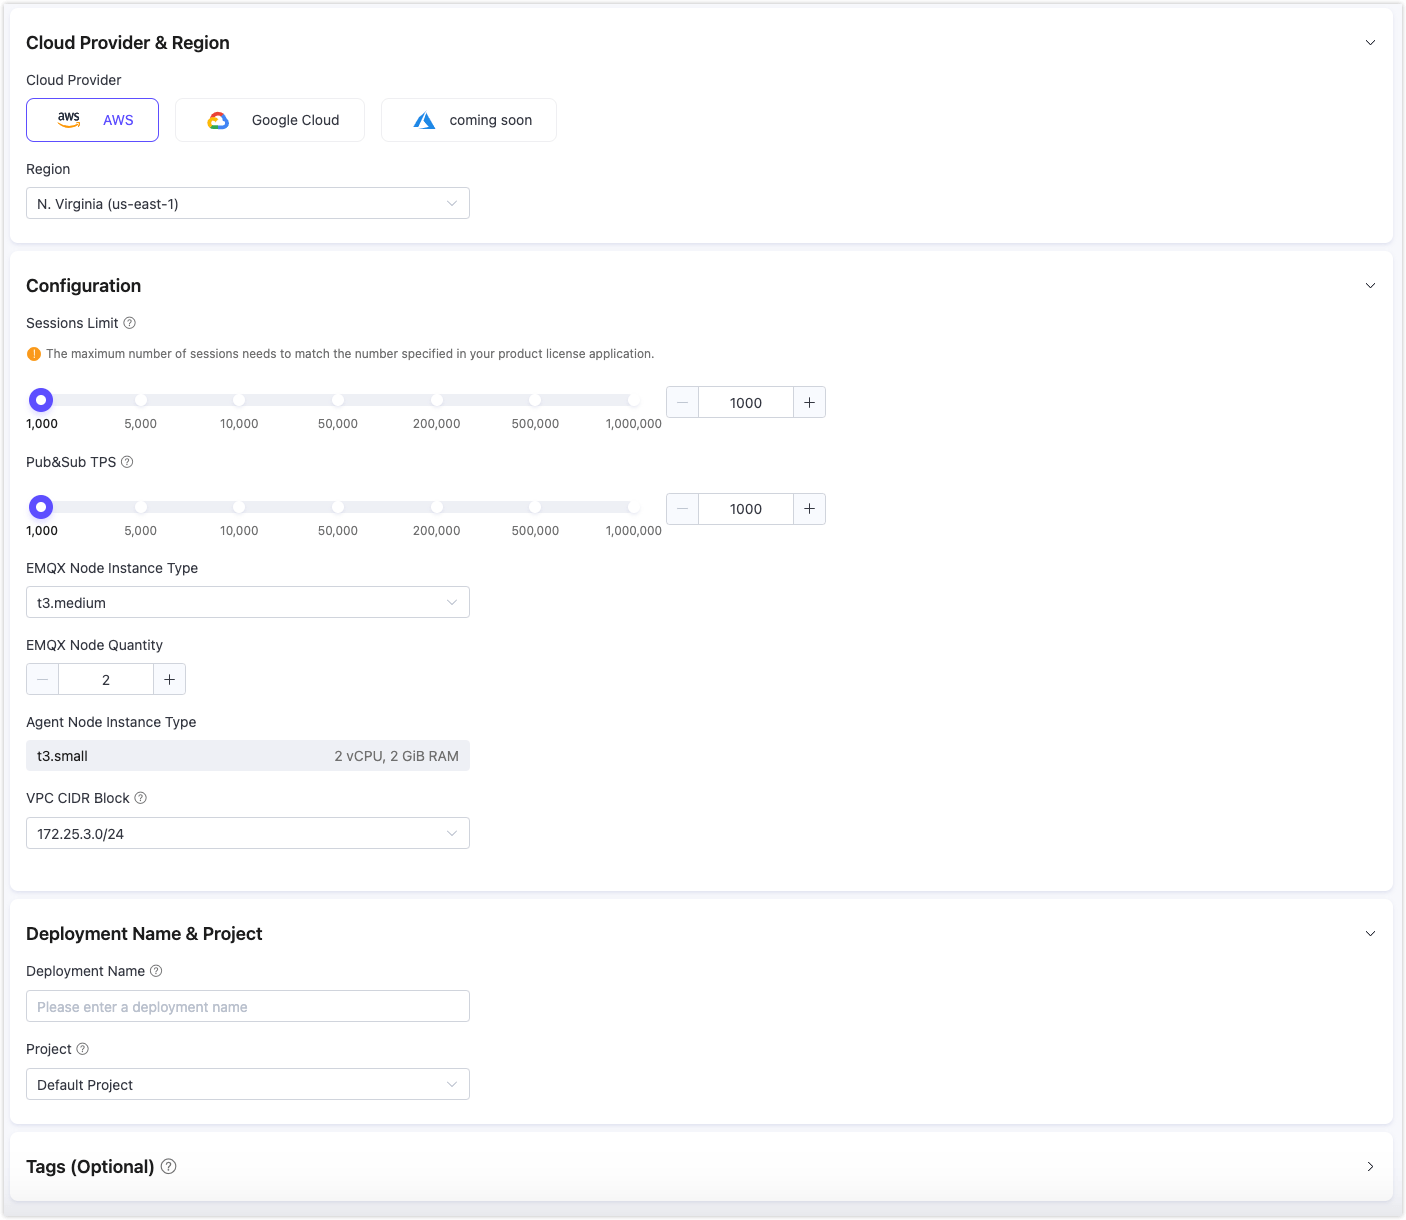
Cloud Provider & Region Configuration:
Choose Cloud Platform: Select AWS or Google Cloud.
If you want to deploy on other cloud platforms, you can contact us through a ticket or email.
Choose Region: Select the region to be deployed.
If you want to deploy in other regions, you can contact us through a ticket or email.
Configuration (for EMQX Cluster):
TIP
The maximum number of sessions must match the number specified in the EMQX BYOC license you request. After the deployment is complete, if you need to modify the sessions limit, you can contact us through a ticket.
Sessions Limit: Specify the maximum number of concurrent sessions for MQTT devices connected at any given time.
Pub&Sub TPS: Specify the maximum number of transactions per second (TPS) for the messages sent and received.
EMQX Node Instance Type: Automatically selected based on the sessions limit and Pub&Sub TPS; You can also modify the instance type based on your actual business needs.
EMQX Node Quantity: Automatically filled based on the sessions limit and Pub&Sub TPS; You can also modify the number of nodes (2-5 nodes) based on your actual business needs.
VPC CIDR Block: Select the private IP address range used to create the Virtual Private Cloud (VPC).
Deployment Name & Project:
- Deployment Name: Enter a deployment name that has business meaning.
- Project: Select the appropriate project. The project defaults to the last project you accessed. You can switch to a different project by clicking the project name at the top of the page. Note that the project cannot be changed after the deployment is created.
Tags (Optional): Add cloud resource tags according to your needs for resource management, with up to 10 tags supported.
After confirming the deployment information, use the button on the right:
- Contact Us: Your account is not approved for BYOC creation. Click the button, then click Confirm in the pre-filled ticket window. After approval, return to this page and continue creating the BYOC deployment.
- New Deployment: Your account is approved for BYOC creation. Click the button to continue.
Review the popped-up BYOC Deployment Guide, and click Get Started.
Next, you can start the deployment by following the steps in the Run Deployment section.
Run Deployment
On the Deployment Overview page, the deployment status should be Waiting to be Deployed. At this point, the MQTT Connection Information will not display any deployment details. Click the Deploy button, and a Deployment Guide sidebar will pop up to guide you through the deployment process. You can also follow the steps below to complete the deployment.
The instructions below show how to complete the deployment in an Ubuntu 20.04 (AMD64) environment with a public network connection. Before you start, copy your TLS/SSL certificates and BYOC license files required for deployment to your Ubuntu environment directory.
Add DNS Record
When the deployment resources is created, the system returns the following information. Based on the returned IP address, you can add a domain name resolution record to the DNS service to bind the deployed public IP address to your domain name. For basic concepts such as DNS and domain name resolution, refer to DNS Concepts.
Apply complete! Resources: 45 added, 0 changed, 0 destroyed.

Outputs:

cloud_register_data = <sensitive>
jwt_token = <sensitive>
lb_address = "<Your Deployment IP>"
password = "<EMQX Dashboard Password>"
username = "<EMQX Dashboard Username>"
vpc_id = "vpc-bp1n1dwiv2srgkgle4rlu"
*****************************
You need add a record to your DNS service provider.
IP address: 112.124.9.12
Domain: <Your Custom Domain>
*****************************
Checking if <Your Custom Domain> is resolved to the 112.124.9.12 of the load balancer
You can choose DNS resolution services provided by your cloud platforms or other managed DNS providers. Taking Cloud DNS of Google Cloud Platform as an example, you can follow the instruction: Add, modify, and delete records | Cloud DNS | Google Cloud.
When the DNS record takes effect, the system returns HTTPS listener is ready.
HTTPS listener is readyComplete Deployment
After the domain name resolution is completed, the Ubuntu command line interface will output the following to indicate that the deployment is successful.
Deployment successful! Here is the service information:
--------------------------------------------------------
EMQX service connection address: <Your Custom Doamin>
EMQX Dashboard address: https://<Your Custom Doamin>:18084
EMQX Dashboard username: <EMQX Dashboard Username>
EMQX Dashboard password: <EMQX Dashboard Password>
You can log in to the EMQX Cloud Console(https://cloud.emqx.com/console) to manage your deployment.
--------------------------------------------------------
Thank you for choosing our service. Happy IoT!
Please securely save the EMQX Dashboard username and password, as it will be used for logging into the management console and for cluster management. This information will not be displayed again in the future.
View Deployment Information
Return and refresh the deployment overview page to obtain real-time status and connection information:
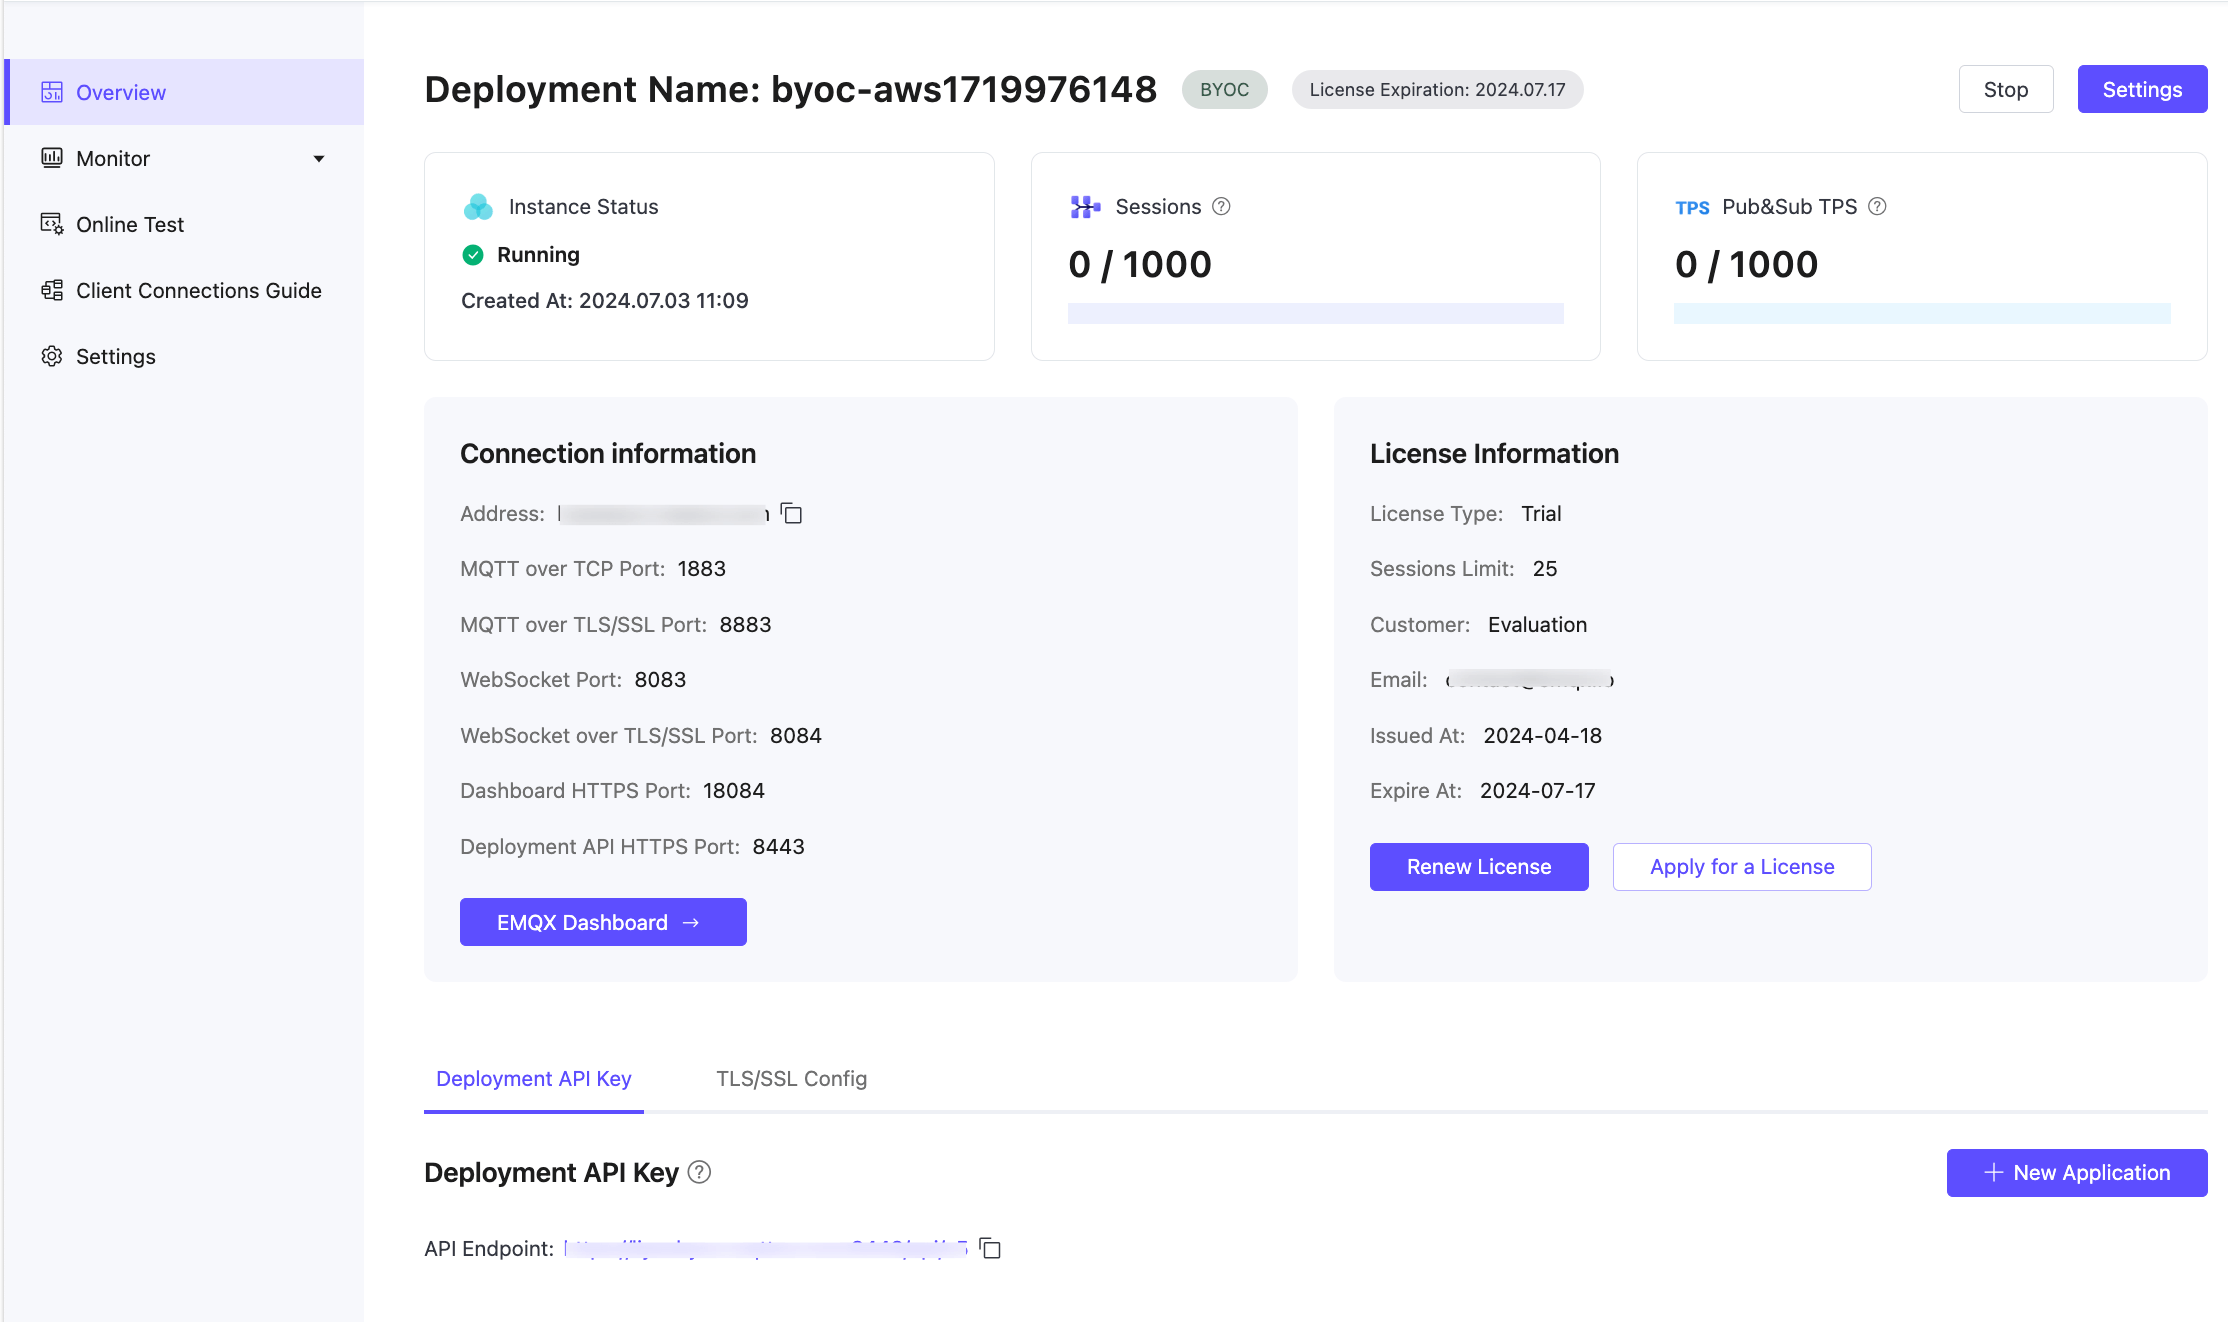
Real-time Status:
- Deployment Name: The name of the deployment, which also serves as the prefix for cloud resources, making it easier to quickly locate in the public cloud console.
- Instance Status: Running status and creation time.
- Sessions: Current number of connections and the maximum allowed.
- Pub&Sub TPS: The current number of messages sent and received per second in the deployment, along with the TPS limit.
Connection Information:
- Address: The domain name specified by the user during deployment.
- Connection Ports: By default, ports 1883 (mqtt), 8883 (mqtts), 8083 (ws), and 8084 (wss) are opened for MQTT protocol access; 18084 (https) and 8443 (https) are used for Dashboard login and REST API access, respectively.
If you wish to customize the ports, please contact us via support ticket or email (cloud-support@emqx.io).
License Information:
Includes basic license information and expiration date. For more details about the license, refer to BYOC License.
Advanced Network Settings
VPC Peering Configuration
A Virtual Private Cloud (VPC) peering is a network connection between two VPCs that allows two VPCs in different networks to communicate with each other. This feature is provided by a cloud service provider and supports peering connections between the VPC where the BYOC is deployed and other VPCs in the same cloud service provider. To configure the VPC peering, refer to the VPC Peering documentation for each public cloud: Working with VPC Peering - Amazon Web Service and VPC Network Peering - Google Cloud.
NAT Gateway Configuration
The NAT gateway provided by the public cloud platform can provide network address translation services and provide BYOC deployments with the ability to access public network resources without the need for VPC peering connections. You can add NAT gateways in the VPC where BYOC is deployed. For more information, refer to the public cloud NAT gateway documentation: NAT Gateways - Amazon Web Service and Cloud NAT - Google Cloud.
Connect to the Deployment
You can connect to the deployment using any MQTT client tool for testing, for example, the recommended MQTTX.