GCP Pub/Sub Integration
Google Cloud Pub/Sub is an asynchronous messaging service designed to achieve extremely high reliability and scalability. EMQX Cloud supports seamless integration with Google Cloud Pub/Sub for real-time extraction, processing, and analysis of MQTT data. It can push data to various Google Cloud services such as Cloud Functions, App Engine, Cloud Run, Kubernetes Engine, and Compute Engine. Alternatively, it can distribute data from Google Cloud to MQTT, helping users rapidly build IoT applications on GCP.
This page provides a comprehensive introduction to the data integration between EMQX Cloud and GCP Pub/Sub, with practical instructions on creating and validating both producer (Sink) and consumer (Source) integrations.
How It Works
GCP Pub/Sub data integration is an out-of-the-box feature of EMQX Cloud designed to help users seamlessly integrate MQTT data streams with Google Cloud and leverage its rich services and capabilities for IoT application development.
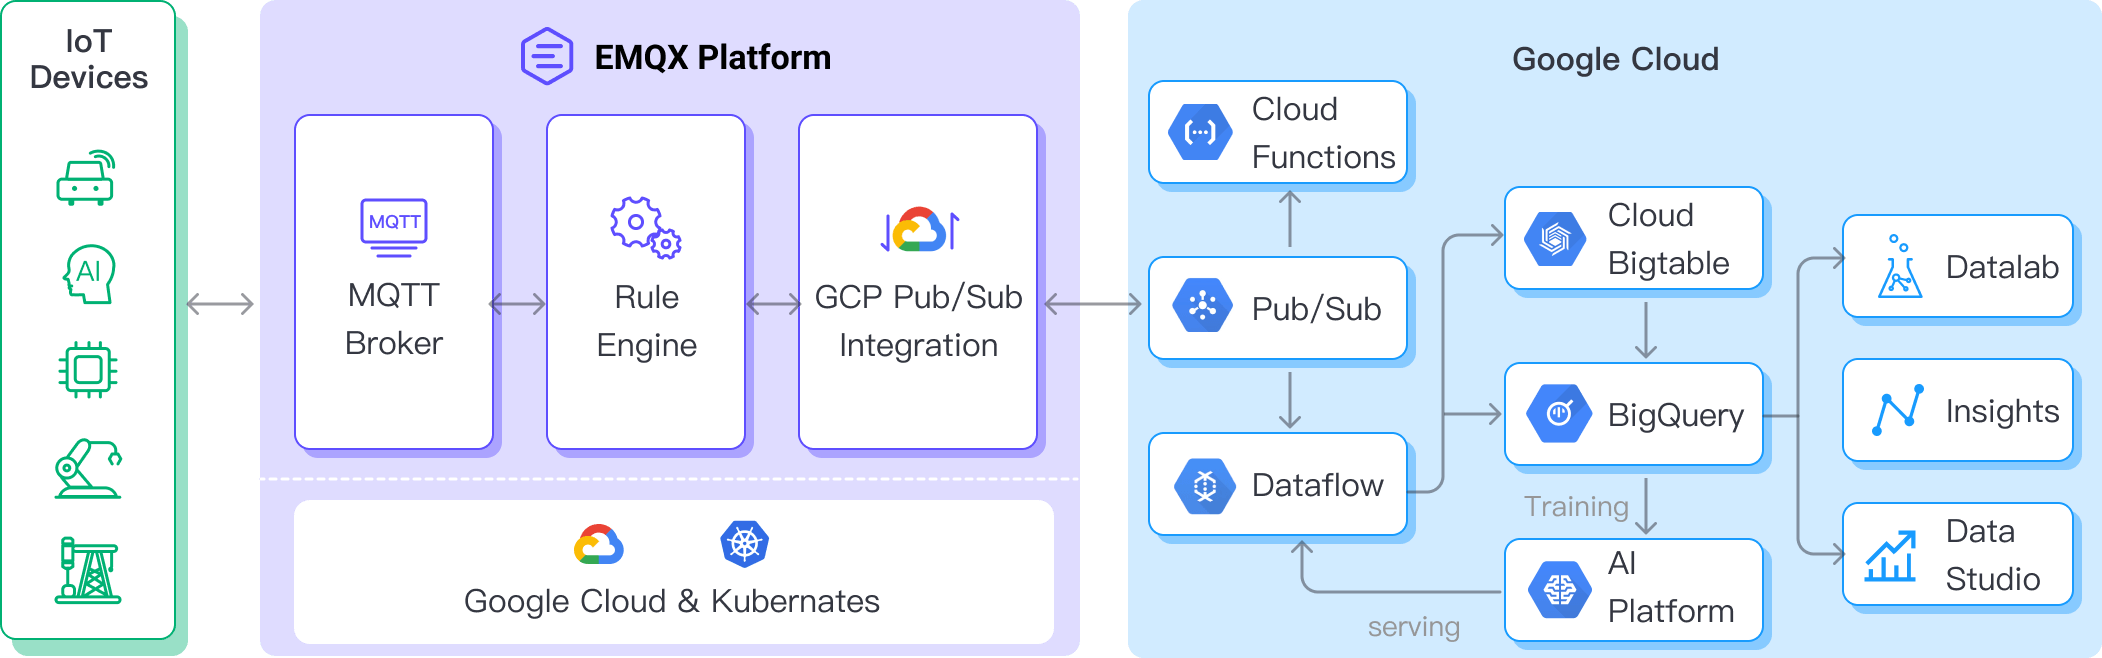
EMQX Cloud forwards MQTT data to GCP Pub/Sub through the rule engine and Sink. Taking the example of a GCP Pub/Sub producer role, the complete process is as follows:
- IoT Devices Publish Messages: Devices publish telemetry and status data through specific topics, triggering the rule engine.
- Rule Engine Processes Messages: Using the built-in rule engine, MQTT messages from specific sources are processed based on topic matching. The rule engine matches corresponding rules and processes messages, such as converting data formats, filtering specific information, or enriching messages with contextual information.
- Bridging to GCP Pub/Sub: The rule triggers the action of forwarding messages to GCP Pub/Sub, allowing easy configuration of data properties, ordering keys, and mapping of MQTT topics to GCP Pub/Sub topics. This provides richer context information and order assurance for data integration, enabling flexible IoT data processing.
After MQTT message data is written to GCP Pub/Sub, you can perform flexible application development, such as:
- Real-time Data Processing and Analysis: Utilize powerful Google Cloud data processing and analysis tools like Dataflow, BigQuery, and Pub/Sub's own streaming capabilities to perform real-time processing and analysis of message data, obtaining valuable insights and decision support.
- Event-Driven Functionality: Trigger Google Cloud event handling, such as Cloud Functions and Cloud Run, to achieve dynamic and flexible function triggering and processing.
- Data Storage and Sharing: Transmit message data to Google Cloud storage services like Cloud Storage and Firestore for secure storage and management of large volumes of data. This allows you to share and analyze this data with other Google Cloud services to meet various business needs.
Features and Advantages
The data integration with GCP Pub/Sub offers a range of features and benefits:
- Robust Messaging Service: Both EMQX and GCP Pub/Sub possess high availability and scalability features, ensuring the reliable reception, delivery, and processing of large-scale message streams. They support IoT data sequencing, message quality assurance, and persistence, ensuring the dependable transmission and handling of messages.
- Flexible Rules Engine: With the built-in rules engine, specific source messages and events can be processed based on topic matching. Messages and events can be manipulated, such as data format conversion, filtering out specific information, or enriching messages with context information. Combining this with GCP Pub/Sub allows for further processing and analysis.
- Rich Contextual Information: Through the GCP Pub/Sub data integration, you can add richer contextual information to messages, mapping client attributes to Pub/Sub attributes, sorting keys, and more. This aids in performing more precise analysis and processing in subsequent application development and data handling.
In summary, integrating EMQX Cloud and GCP Pub/Sub enables highly reliable, scalable message delivery, along with extensive tools and services for data analysis and integration. This empowers you to build robust IoT applications and implement flexible business logic based on event-driven capabilities.
Before You Start
This section describes the preparations you need to complete before you start to create the GCP Pub/Sub data integration.
Prerequisites
- Understand rules.
- Understand data integration.
Set up Network
Before you start, you need to create a deployment (EMQX cluster) on the EMQX Cloud and configure the network.
- For Dedicated Flex deployment users: If your VPC is hosted on Google Cloud Platform (GCP), you can transfer data directly without establishing a VPC Peering Connection. For VPCs located on other cloud platforms, please set up a NAT Gateway to access the target connector through a public IP.
- For BYOC (Bring Your Own Cloud) deployment users: Establish a peering connection between the VPC where BYOC is deployed and the VPC where the target connector is located. After creating the peering connection, you can access the target connector via the internal network IP. If you need to access resources via a public IP address, configure a NAT gateway for the VPC where BYOC is deployed in the public cloud console.
Create a Service Account Key in GCP
You need to create a service account and a service account key to use the GCP PubSub service.
Create a Service Account in your GCP account. Ensure that the Service Account has Pub/Sub Editor permission for the topic of interest.
Click the email address for the service account you created. Click the Key tab. In the Add key drop-down list, select Create new key to create a Service Account key for that account and download it in JSON format.
Create and Manage Topics in GCP
Before configuring the GCP Pub/Sub data integration on EMQX, you need to create a topic and be familiar with the basic management operation in GCP.
In the Google Cloud console, go to the Pub/Sub ->Topics page. For detailed instructions, see Create and manage topics.
TIP
The Service Account must have permission to publish that topic.
In the Topic ID field, enter an ID for your topic. Click Create topic.
Go to the Subscriptions page. Click the Topic ID in the list. Create a subscription to the topic.
- Select Pull in Delivery type.
- Select 7 Days for Message retention duration.
For detailed instructions, see GCP Pub/Sub Subscription.
Click Subscription ID -> Messages -> Pull can view the message sent to the topic.
Stream MQTT Data into GCP Pub/Sub
This section demonstrates how to forward MQTT messages from an EMQX Cloud deployment to GCP Pub/Sub using a producer (Sink) connector. The content includes creating a connector, creating a rule, and testing the rule.
Create a Connector
Before creating data integration rules, you need to first create a Google PubSub connector to access the server.
- Go to your deployment. Click Data Integration from the left-navigation menu.
- If it is the first time for you to create a connector, select Google PubSub under the Data Forward category. If you have already created connectors, select New Connector and then select Google PubSub under the Data Forward category.
- On the New Connector page, configure the following options:
- Connector Name: The system will automatically generate a connector name.
- GCP Service Account Credentials: Upload the Service Account credentials in JSON format that you exported in Create a Service Account Key in GCP.
- Use default values for other settings, or configure them according to your business needs.
- Click Test to verify connectivity. If the Google PubSub service is accessible, a success prompt will be returned.
- Click New to complete the connector setup. A Created Successfully dialog appears asking whether to create a rule now. Click New Rule to proceed directly to rule creation, or click Back to Connectors to return and create a rule later.
Create a Rule
Next, you need to create a rule to specify the data to be written and add corresponding actions in the rule to forward the processed data to GCP PubSub.
If you clicked New Rule in the previous step, the rule editing page opens automatically. Otherwise, click the New Rule icon in the Actions column of the connector, or click New Rule in the Rules section.
Enter the rule-matching SQL statement in the SQL editor. The following SQL example reads the message reporting time
up_timestamp, client ID, and message body (Payload) from messages sent to thetemp_hum/emqxtopic, extracting temperature and humidity.sqlSELECT timestamp as up_timestamp, clientid as client_id, payload.temp as temp, payload.hum as hum FROM "temp_hum/emqx"You can use Try It Out to simulate data input and test the results.
Click Next to add an action.
Select the connector you just created from the Connector dropdown box.
Configure the following information:
Action Name: The system will automatically generate an action name, or you can name it yourself.
GCP PubSub Topic: Enter the topic ID xxx you created in Create and Manage Topic in GCP.
Payload Template: Leave it blank or define a template.
- If left blank, it will encode all visible inputs from the MQTT message using JSON format, such as clientid, topic, payload, etc.
- If using the defined template, placeholders of the form ${variable_name} will be filled with the corresponding value from the MQTT context. For example, ${topic} will be replaced with my/topic if such is the MQTT message topic.
In this example, you can use the following GCP Pub/Sub topic and message template.
text# GCP Pub/Sub message template {"up_timestamp": ${up_timestamp}, "client_id": ${client_id}, "temp": ${temp}, "hum": ${hum}}Attributes Template and Ordering Key Template (optional): Similarly, you can define templates for formatting the attributes and/or ordering key of the outgoing message.
- For Attributes, both keys and values may use placeholders of the form ${variable_name}. Such values will be extracted from the MQTT context. If a key template resolves to an empty string, that key is omitted from the outgoing message to GCP PubSub.
- For Ordering Key, placeholders of the form
${variable_name}may be used. If the resolved value is an empty string, the orderingKey field will not be set for the GCP PubSub outgoing message.
Advanced settings (optional): Use default values for other settings, or configure them according to your business needs.
Click Confirm to complete the rule creation.
In the Successful new rule pop-up, click Back to Rules to finish.
After successful creation, the Rules list shows the new rule. You can view the associated Actions (Sink) under the Actions section.
Test the Rule
You are recommended to use MQTTX to simulate temperature and humidity data reporting, but you can also use any other client.
Use MQTTX to connect to the deployment and send messages to the following Topic.
topic:
temp_hum/emqxpayload:
json{ "temp": "27.5", "hum": "41.8" }
Go to GCP Pub/Sub -> Subscriptions, click MESSAGES tab. You should see the message.
View operational data in the console. Click the rule ID in the rule list, and you can see the statistics of the rule and the statistics of all actions under this rule.
Consume Messages from GCP Pub/Sub
This section demonstrates how an EMQX Cloud deployment can consume messages from GCP Pub/Sub and republish them to an MQTT topic through configured data integration.
TIP
GCP PubSub Consumer is available for Dedicated Flex deployments running EMQX version 5.10.3 or later.
Create a GCP PubSub Consumer Connector
Before adding a consumer rule, you need to create a GCP PubSub Consumer connector to establish a connection between the EMQX Cloud deployment and GCP Pub/Sub.
Go to your deployment. Click Data Integration from the left-navigation menu.
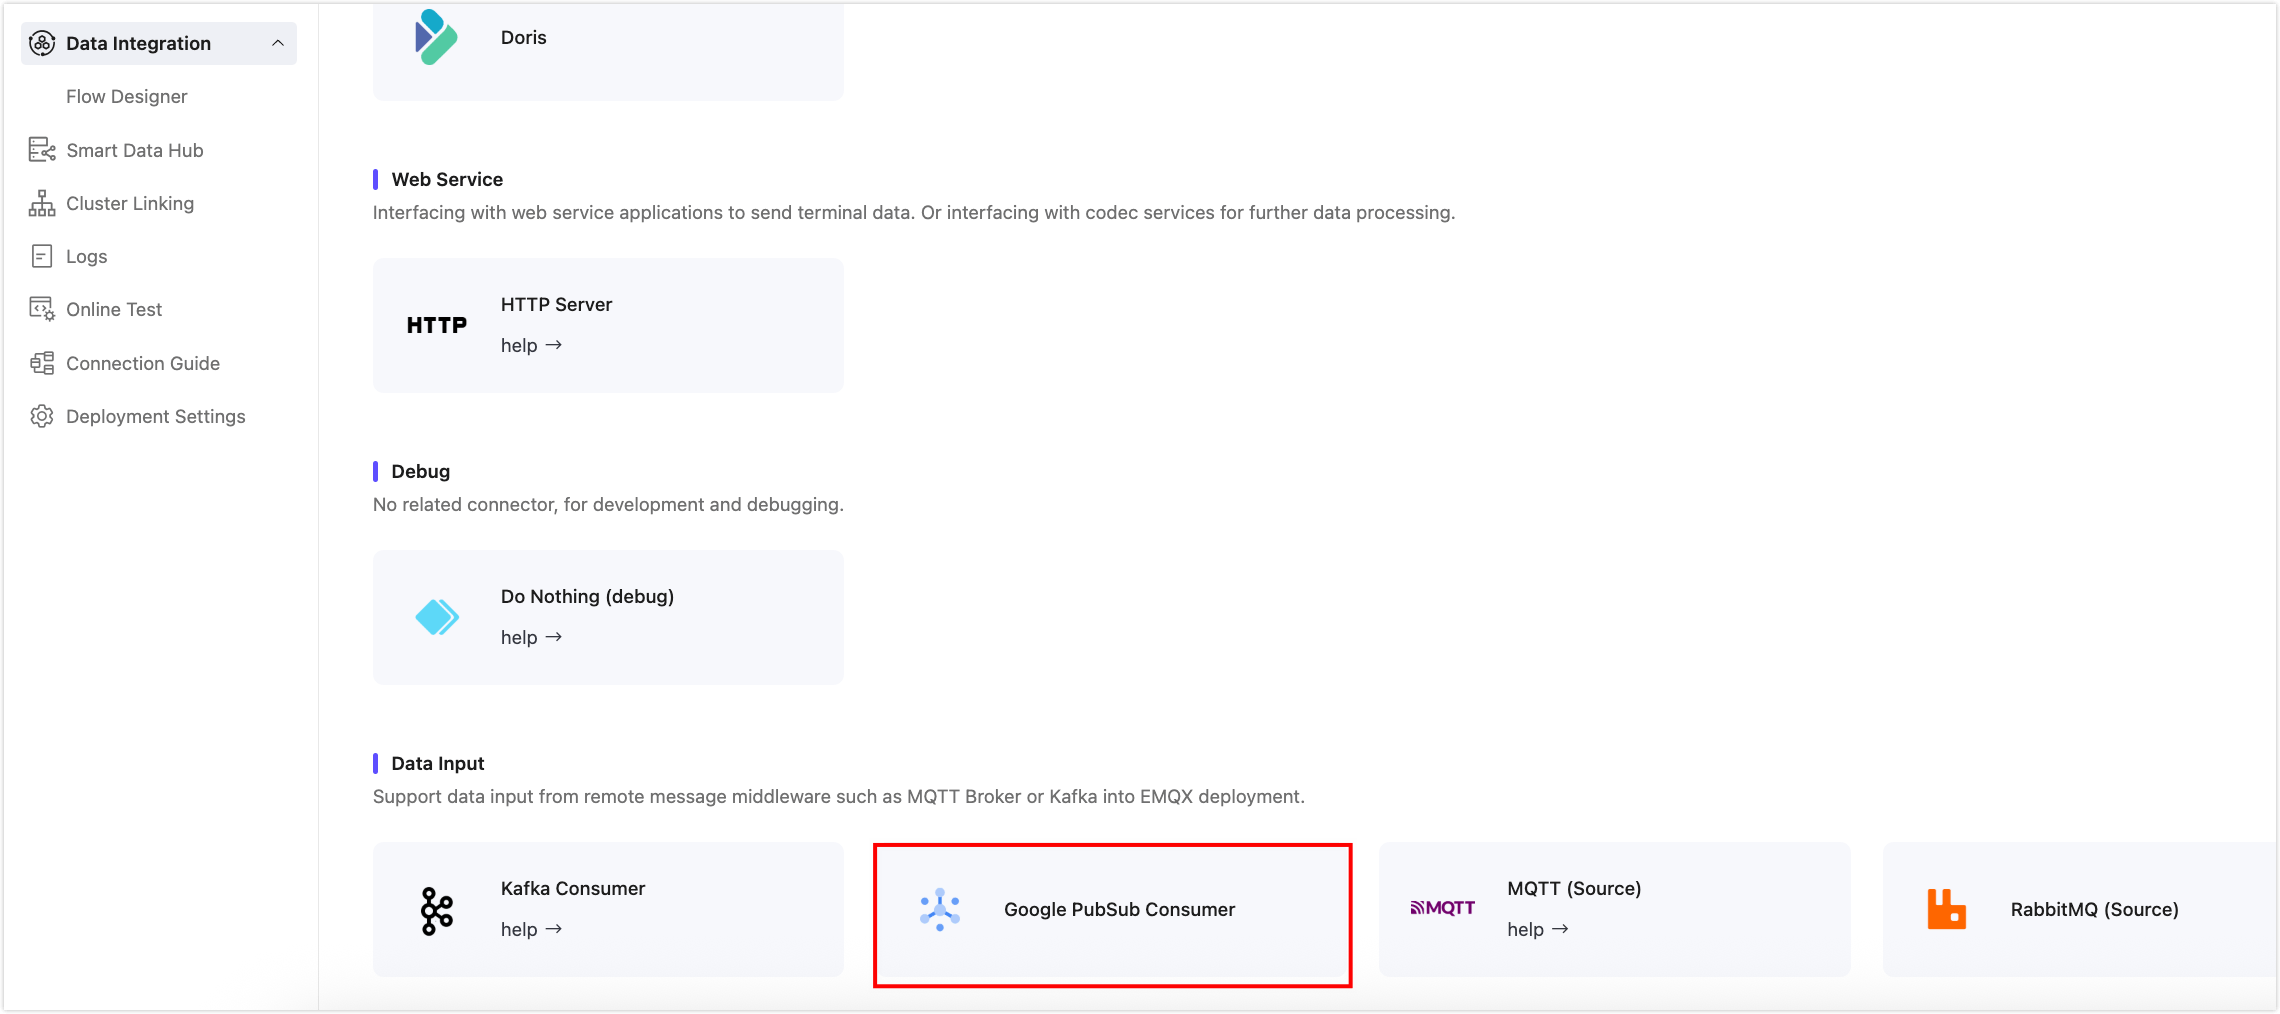
If it is the first time for you to create a connector, find Google PubSub Consumer under the Data Input category. If you have already created connectors, click + New Connector and then select Google PubSub Consumer under the Data Input category.
On the New Connector page, configure the following options:
- Connector Name: The system will automatically generate a connector name.
- GCP Service Account Credentials: Upload the Service Account credentials in JSON format that you exported in Create a Service Account Key in GCP. You can paste the JSON content directly or click Select file to upload the file.
- Use default values for other settings, or configure them according to your business needs.
Click Test to verify connectivity. If the GCP Pub/Sub service is accessible, a success prompt is returned.
Click New to complete the connector setup. A Created Successfully dialog appears asking whether to create a rule now. Click New Rule to proceed directly to rule creation, or click Back to Connectors to return and create a rule later.
Create a Rule
Next, create a rule to specify the data source and add an output action to forward the consumed messages to an MQTT topic.
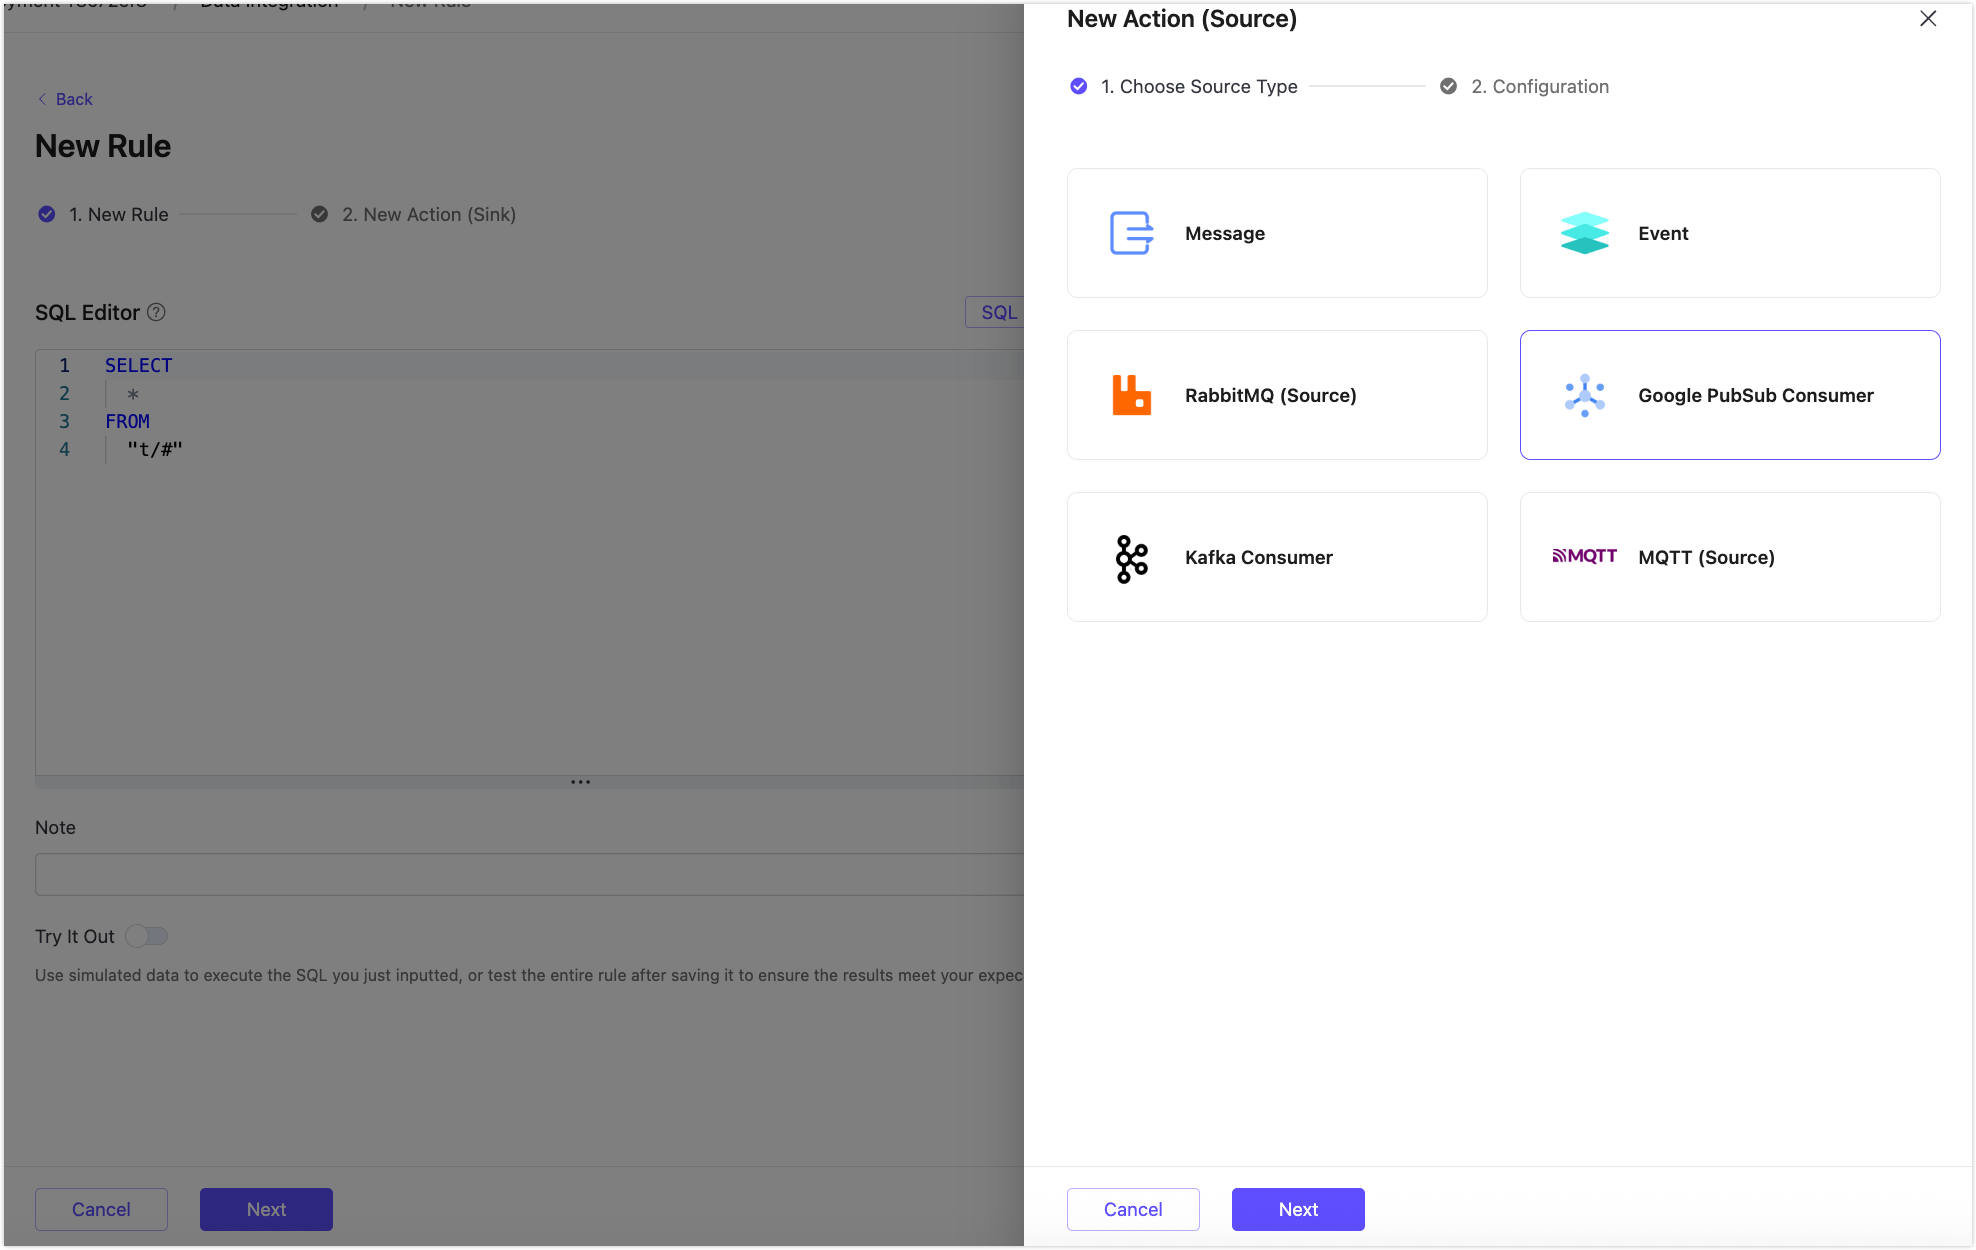
If you clicked New Rule in the previous step, the rule editing page opens automatically. Otherwise, click the New Rule icon in the Actions column of the connector, or click New Rule in the Rules section.
The rule editing page automatically opens the action source configuration panel. Select Google PubSub Consumer as the source type and click Next.
Configure the source:
- Connector: Select the GCP PubSub Consumer connector you just created.
- GCP PubSub Topic: Enter the name of the GCP Pub/Sub topic to consume from, for example,
my-iot-topic. - Maximum Messages to Pull: Set the maximum number of messages to pull per request. Use the default or adjust according to your throughput needs.
- Use default values for other settings, or configure them according to your business needs.
Click Confirm to complete the source configuration.
The SQL editor updates automatically with the data source. You can adjust the
SELECTfields as needed. For example:sqlSELECT * FROM "$bridges/gcp_pubsub_consumer:<source-name>"The following fields are available from the GCP Pub/Sub message:
Field Description message_idThe message ID assigned by GCP Pub/Sub. publish_timeThe timestamp when the message was published. topicThe GCP Pub/Sub topic the message was read from. valueThe message payload. attributesKey-value attributes attached to the message. ordering_keyThe ordering key of the message, if set. Click Next and add an output action.
Select Republish as the action type and configure the following:
- Topic: The MQTT topic to publish to, for example
gcp/messages. You can use placeholders such as${topic}to derive the topic dynamically. - QoS: Select
0,1, or2explicitly. If you need to set QoS dynamically, add aqosfield in the rule SQL first and reference it in the action. - Retain: Choose
trueorfalseexplicitly. If you need to set Retain dynamically, add a corresponding field in the rule SQL first and reference it in the action. - Message Template: Leave blank to forward all rule output fields, or enter
${.}to include all fields, or${value}to forward only the message payload.
- Topic: The MQTT topic to publish to, for example
Click Confirm to complete the rule creation.
In the Successful new rule pop-up, click Back to Rules to finish.
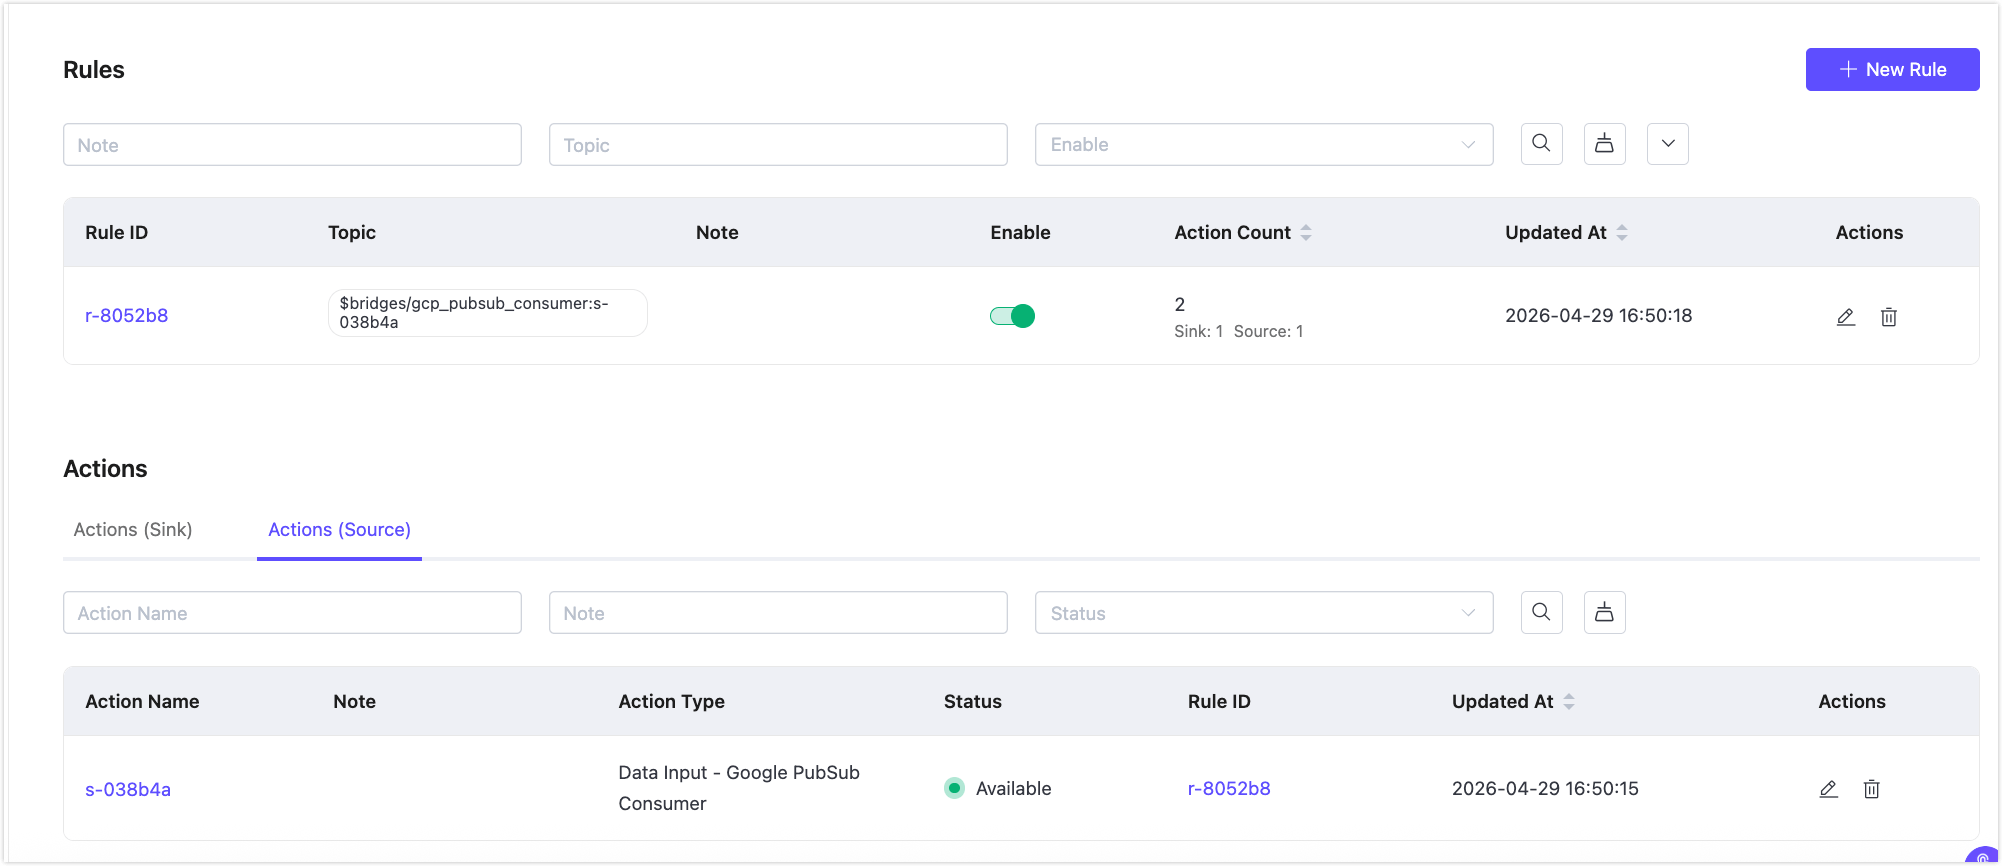
After successful creation, the Rules list shows the new rule. You can view the associated Actions (Source) under the Actions section. Republish actions can be viewed by clicking the rule edit button.
Test the Rule
You can publish messages to the GCP Pub/Sub topic and subscribe to the forwarding MQTT topic in the deployment to verify the rule.
Use MQTTX (or any MQTT client) to subscribe to the MQTT topic you configured in the Republish action, for example
gcp/messages.Publish a message to your GCP Pub/Sub topic using the GCP Console or the
gcloudCLI:bashgcloud pubsub topics publish my-iot-topic --message='{"temp": 27.5, "hum": 41.8}'Check that the MQTT client receives the message on the subscribed topic.
View rule statistics in the console. Click the rule ID in the Rules list to see the rule execution statistics and the statistics of all actions associated with the rule.