Cluster Linking
Note
The Cluster Linking feature is only available for EMQX versions 5.8.6 and later in the Dedicated and Dedicated Flex edition.
Cluster Linking is a feature that connects multiple, separate EMQX clusters, facilitating communication between clients on different, often geographically dispersed clusters. Compared to traditional MQTT bridging, Cluster Linking is more efficient, reliable, and scalable. It minimizes bandwidth requirements and tolerates network interruptions.
This page introduces the Cluster Linking feature and how to use and configure it in Dedicated Flex deployments.
Feature Overview
A single deployment can serve thousands of geographically distributed MQTT clients effectively. However, when clients are spread globally, issues with high latency and poor network connectivity arise. Creating multiple deployments in different regions can mitigate these problems by serving clients locally, but it introduces a new challenge: enabling seamless communication between clients connected to different deployments.
The traditional solution involves adding an MQTT bridge to each deployment, which forwards all messages between deployments. This approach leads to excessive bandwidth usage and can increase message latency, as many forwarded messages might not be relevant to clients on the other side of the bridge.
Cluster Linking addresses these issues by forwarding only relevant messages between deployments. This optimization reduces bandwidth usage and ensures efficient communication, even during network interruptions.
Create Cluster Linking
Note
Currently, creating or managing Cluster Linking via API is not supported in EMQX Cloud. Cluster links can be configured through the Console.
Cluster Linking supports multiple use cases. Depending on your deployment environment, you can link:
- Dedicated Flex deployments under the same EMQX Cloud account
- Dedicated Flex deployments under different EMQX Cloud accounts
- A Dedicated Flex deployment to a self-hosted (local) EMQX broker
Each scenario requires slightly different setup steps, which are detailed below.
Prerequisites
Before configuring Cluster Linking, ensure the following requirements are met:
- Create Dedicated Flex deployments. For example, you might create two deployments in different regions:
deployment-usanddeployment-eu. For more information on how to create Dedicated Flex deployments, see Create a Dedicated Flex Deployment. - Ensure public network access via NAT Gateway:
- Each deployment must set up the NAT Gateway.
- The NAT Gateway must be in the
Runningstate to allow external connections.
TIP
A NAT Gateway is required for Cluster Linking in EMQX Cloud.
However, if the target is a self-hosted EMQX instance, the Dedicated Flex deployment must be able to access the target node via the public internet.
These prerequisites apply even when connecting a cloud deployment to a self-hosted (local) EMQX broker. The Dedicated Flex deployment must be able to connect to the target broker over the public network.
Scenario 1: Link Deployments in the Same Account
This is the most straightforward scenario. You can select the target deployment from a dropdown, and most fields will be automatically filled.
Open the Cluster Linking page in the Console for
deployment-us.Click New to create a new cluster link.
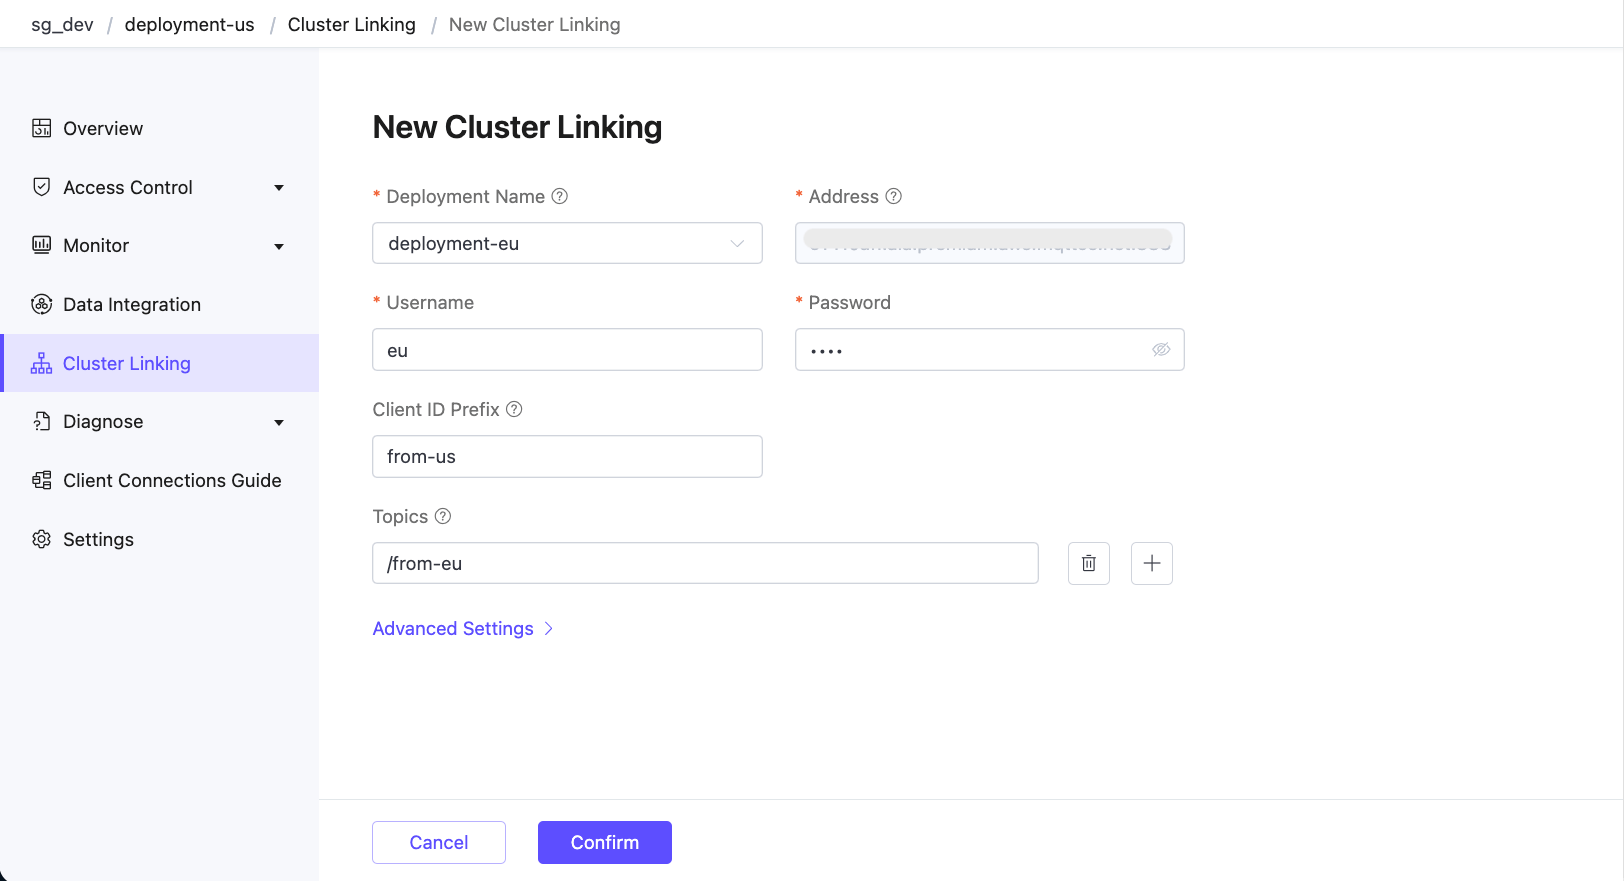
On the New Cluster Linking page, configure the following options:
Deployment Name: Select the deployment name of the Dedicated Flex deployment that you want to link to. In this demonstration, it is
deployment-eu.Address: The MQTT host and port of the deployment to be linked. It is auto-filled based on the selected deployment.
Username / Password: Use valid credentials configured in the target deployment.
Client ID Prefix: Define a prefix for Client IDs used by MQTT connections to the
deployment-eu, for example,from-us.TIP
Depending on the cluster size and configuration, multiple MQTT client connections might be established to the remote cluster, and each client must have a unique ClientID. You can control how these ClientIDs are allocated by setting the Client ID Prefix for these connections.
Topics: List of MQTT topic filters that specify which messages the current deployment will receive from the remote deployment, for example,
/from-eu. You can click the plus icon to add more topics.TIP
These are the topics that the local cluster expects to receive messages for from the remote cluster. If left empty, the local cluster will not receive any messages from the remote cluster.
Advanced Settings: Configure additional settings such as MQTT protocol parameters.
Click Confirm. You will be redirected to the Cluster Linking page, where the new entry will appear and be enabled by default.
Repeat the process on
deployment-euto create a reverse link back todeployment-us.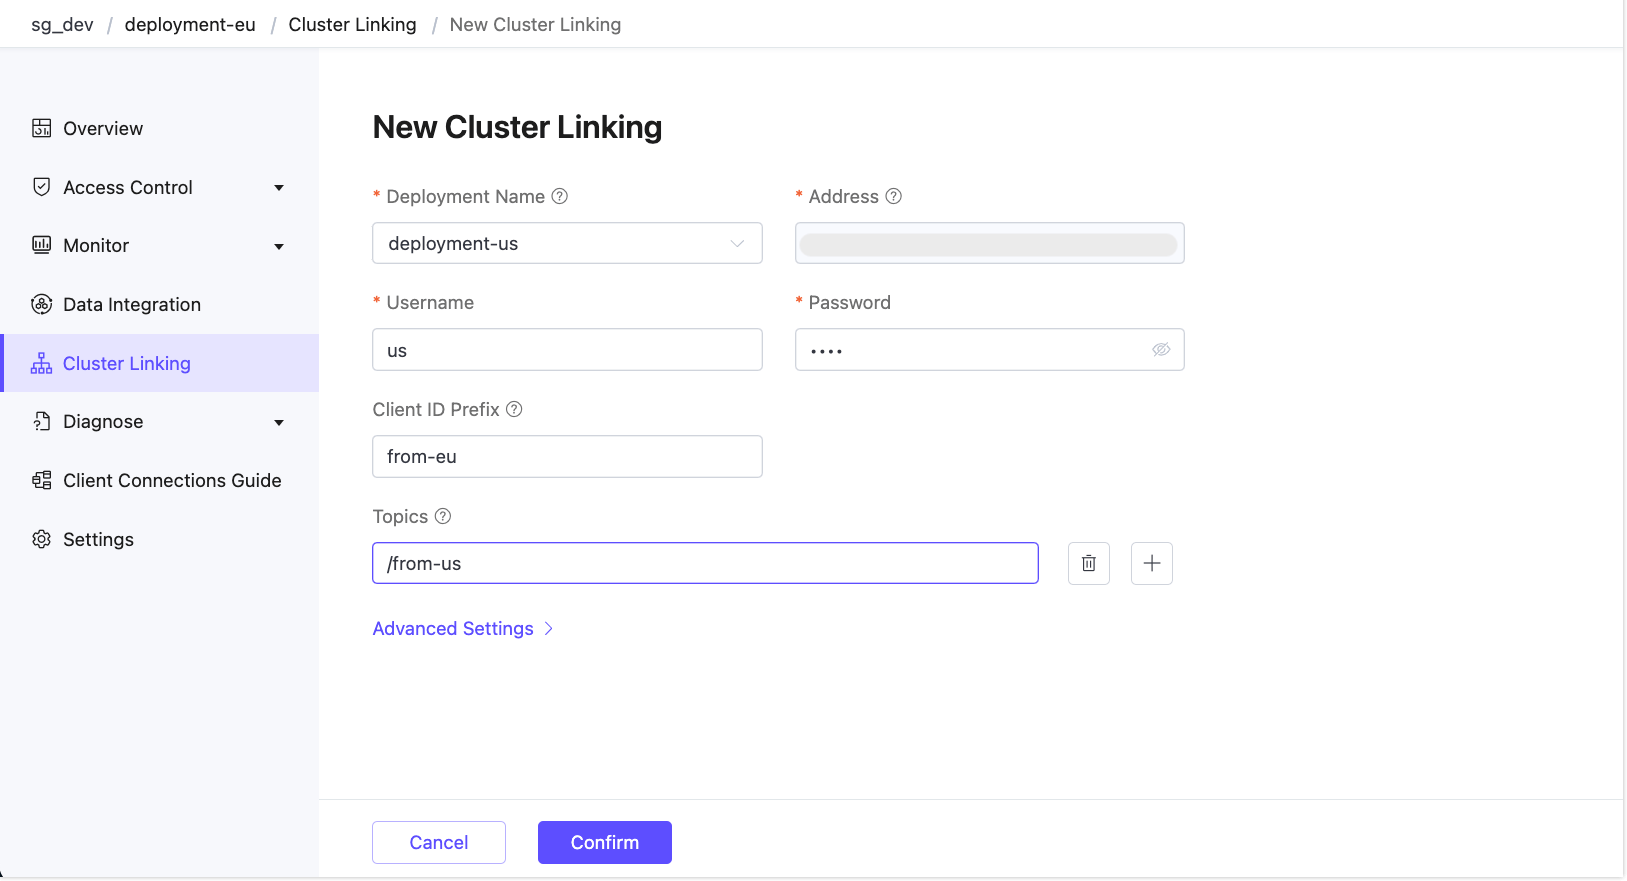
Scenario 2: Link Deployments Across Accounts
In this scenario, both deployments are hosted on the EMQX Cloud, but under different accounts. You'll need to manually enter more information.
Open the Cluster Linking page in the Console for
deployment-us.Click New to create a new cluster link.
On the New Cluster Linking page, configure the following options:
- Cluster Name: Enter the deployment ID of the target deployment. It can be found on the target deployment’s Settings page.
- Address: Enter the MQTT over TLS/SSL address of the remote deployment.
- Username / Password: Use credentials configured in the target deployment.
- Client ID Prefix: Define a prefix for Client IDs used by MQTT connections to the
deployment-eu, for example,from-us. - Topics: List of MQTT topic filters that specify which messages the current deployment will receive from the remote deployment, for example,
/from-eu. You can click the plus icon to add more topics. - Advanced Settings: Configure additional settings such as MQTT protocol parameters.
Click Confirm. You will be redirected to the Cluster Linking page, where the new entry will appear and be enabled by default.
Repeat the process on
deployment-euunder the remote account to create a reverse link back todeployment-us.
Scenario 3: Link to a Local (Self-Hosted) Broker
You can also link a cloud deployment with a locally deployed EMQX broker (e.g., self-hosted in a private data center or on a virtual machine).
TIP
The local deployment must be accessible from the public network and support MQTT over TLS/SSL. It is recommended to use a valid certificate.
In your deployment, go to Cluster Linking and click New.
On the New Cluster Linking page, configure the following options:
- Cluster Name: Enter the value of
cluster.namefrom the local EMQX configuration file. - Address: Enter the address and port of the local EMQX instance (e.g.,
<your-host>:8883). - Username / Password: Provide the username and password that the local deployment accepts for connections.
- Client ID Prefix: Define a prefix for Client IDs used by MQTT connections to the local EMQX, for example,
from-us. - Topics: List of MQTT topic filters that specify which messages the current deployment will receive from the local EMQX deployment, for example,
/from-local. - Advanced Settings: Configure additional settings such as MQTT protocol parameters.
- Cluster Name: Enter the value of
Click Confirm. You will be redirected to the Cluster Linking page, where the new entry will appear and be enabled by default.
Repeat the process on the local EMQX to create a reverse link back to your deployment. You can refer to Configure and Manage Cluster Linking via Dashboard for details.
Verify Cluster Linking
You can verify if the cluster linking is created successfully using the MQTTX.
- Create a new connection named
us-clientin MQTTX and connect todeployment-us. Create a subscription to the topic/from-eu. - Create a new connection named
eu-clientin MQTTX and connect todeployment-eu. Create a subscription to the topic/from-us. - Use the client
us-clientto send a message to the topic/from-uswith the payload asfrom us. - Verify that the client
eu-clientreceives the message. - Use the client
eu-clientto send a message to the topic/from-euand the clientus-clientshould also receive the message.
Create Asymmetrical Links
To create an asymmetrical link, you just need to modify the cluster linking configuration by setting the Topics field empty and keeping other settings the same as before.
For example, you can delete the topics in the cluster linking settings in deployment-us. This means that deployment-us is now not interested in any messages from deployment-eu. This makes the cluster link asymmetrical, which is useful for one-way message forwarding between clusters.
If you repeat the message publishing and subscribing steps in Verify Cluster Linking, you will notice that the message published from deployment-eu is not received by the subscriber on deployment-us.
Manage Cluster Linking
You can view the basic information of the cluster links listed on the Cluster Linking page.
By clicking the deployment name, you can view metrics and statistics for the cluster linking execution and message transmission on the Overview tab. If you want to reset the metrics, you can click the "Reset" button in the upper right corner, and you will be prompted to confirm the reset.
By clicking the Settings tab, you can modify the configurations. Alternatively, you can also click the editing icon in the Actions column.
Clicking the delete icon in the Actions column will delete the selected cluster linking entry.