Stream MQTT Data into Azure Event Hubs
Azure Event Hubs is a fully managed event streaming service from Microsoft designed for real-time data ingestion at scale. EMQX Cloud integrates with Azure Event Hubs to provide reliable, high-throughput streaming of MQTT data into the Azure ecosystem.
This document introduces how to integrate EMQX Cloud with Azure Event Hubs. It walks through creating connectors, defining rules, and testing the integration, using a simple example that streams simulated temperature and humidity data from MQTT clients into Azure Event Hubs.
How It Works
EMQX Cloud integrates with Azure Event Hubs through its Kafka-compatible endpoint, utilizing SASL/PLAIN authentication over TLS. The integration leverages EMQX’s rule engine and sink mechanism to forward data, enabling MQTT data to be streamed securely and efficiently into the Azure ecosystem.
The end-to-end workflow is as follows:
- Devices Publish MQTT Messages: IoT devices publish telemetry data to specific MQTT topics on EMQX Cloud.
- Rule Engine Processes Data: The rule engine filters and transforms incoming MQTT messages based on topic matching and SQL rules. Data can be extracted, reformatted, or enriched with additional context.
- Data Is Forwarded to Azure Event Hubs: Matched rules trigger actions that send processed messages to Azure Event Hubs via the Kafka protocol. MQTT topics and user properties can be mapped to Event Hubs message headers, and message keys can be configured to ensure ordering where required.
Once data is ingested into Azure Event Hubs, it can be seamlessly consumed by downstream Azure services such as Stream Analytics, Blob Storage, or custom applications running on Azure virtual machines, enabling real-time processing, storage, and event-driven application development.
Features and Advantages
High-Performance Message Throughput
EMQX Cloud can ingest and forward millions of MQTT messages per second to Azure Event Hubs with low latency, supporting high-throughput IoT workloads.
Flexible Data Mapping
MQTT topics and user properties can be flexibly mapped to Azure Event Hubs events and headers, enabling richer context and controlled message ordering.
Elastic Scalability
Both EMQX Cloud and Azure Event Hubs scale elastically to handle data volumes ranging from megabytes to terabytes without architectural changes.
Rich Azure and Kafka Ecosystem Integration
By combining MQTT device connectivity with Azure Event Hubs’ support for Azure services, SDKs, and the Kafka ecosystem, the integration enables seamless end-to-end IoT data ingestion and processing.
Before You Start
This section describes the prerequisites and preparations required before configuring data integration. Before creating connectors and rules in EMQX Cloud, ensure that networking, Azure resources, and access credentials are properly set up.
Prerequisites
- Basic understanding of rules in EMQX Cloud.
- Familiarity with data integration.
Set Up Network
Before configuring data integration, you must create an EMQX Cloud deployment and ensure network connectivity between EMQX Cloud and the target service.
For Dedicated Flex deployments:
Create a VPC Peering Connection between the EMQX Cloud VPC and the target service VPC. After the peering connection is established, EMQX Cloud can access the target service through its private IP address.
If access through a public IP is required, configure a NAT Gateway to enable outbound connectivity.
For BYOC (Bring Your Own Cloud) deployments:
Create a VPC peering connection between the VPC where the BYOC deployment is running and the VPC hosting the target service. Once peering is in place, the target service can be accessed via its private IP address.
If the target service must be accessed through a public IP, configure a NAT Gateway in the BYOC VPC using your cloud provider’s console.
Set Up Azure Event Hubs Namespace
You must create an Azure Event Hubs namespace to receive data from EMQX Cloud. If you already have a namespace, you can skip this step and proceed to creating a private endpoint.
In the Azure portal, navigate to Event Hubs, and select Create.
On the Basics tab:
Subscription: Select your Azure Subscription.
Resource group: Select an existing resource group or create a new one.
Namespace name: Enter a unique name for the namespace.
Region: Select the same region as your EMQX Cloud deployment.
Pricing Tier: Choose Standard, Premium, or Dedicated.
The Basic tier does not support Apache Kafka and cannot be used.
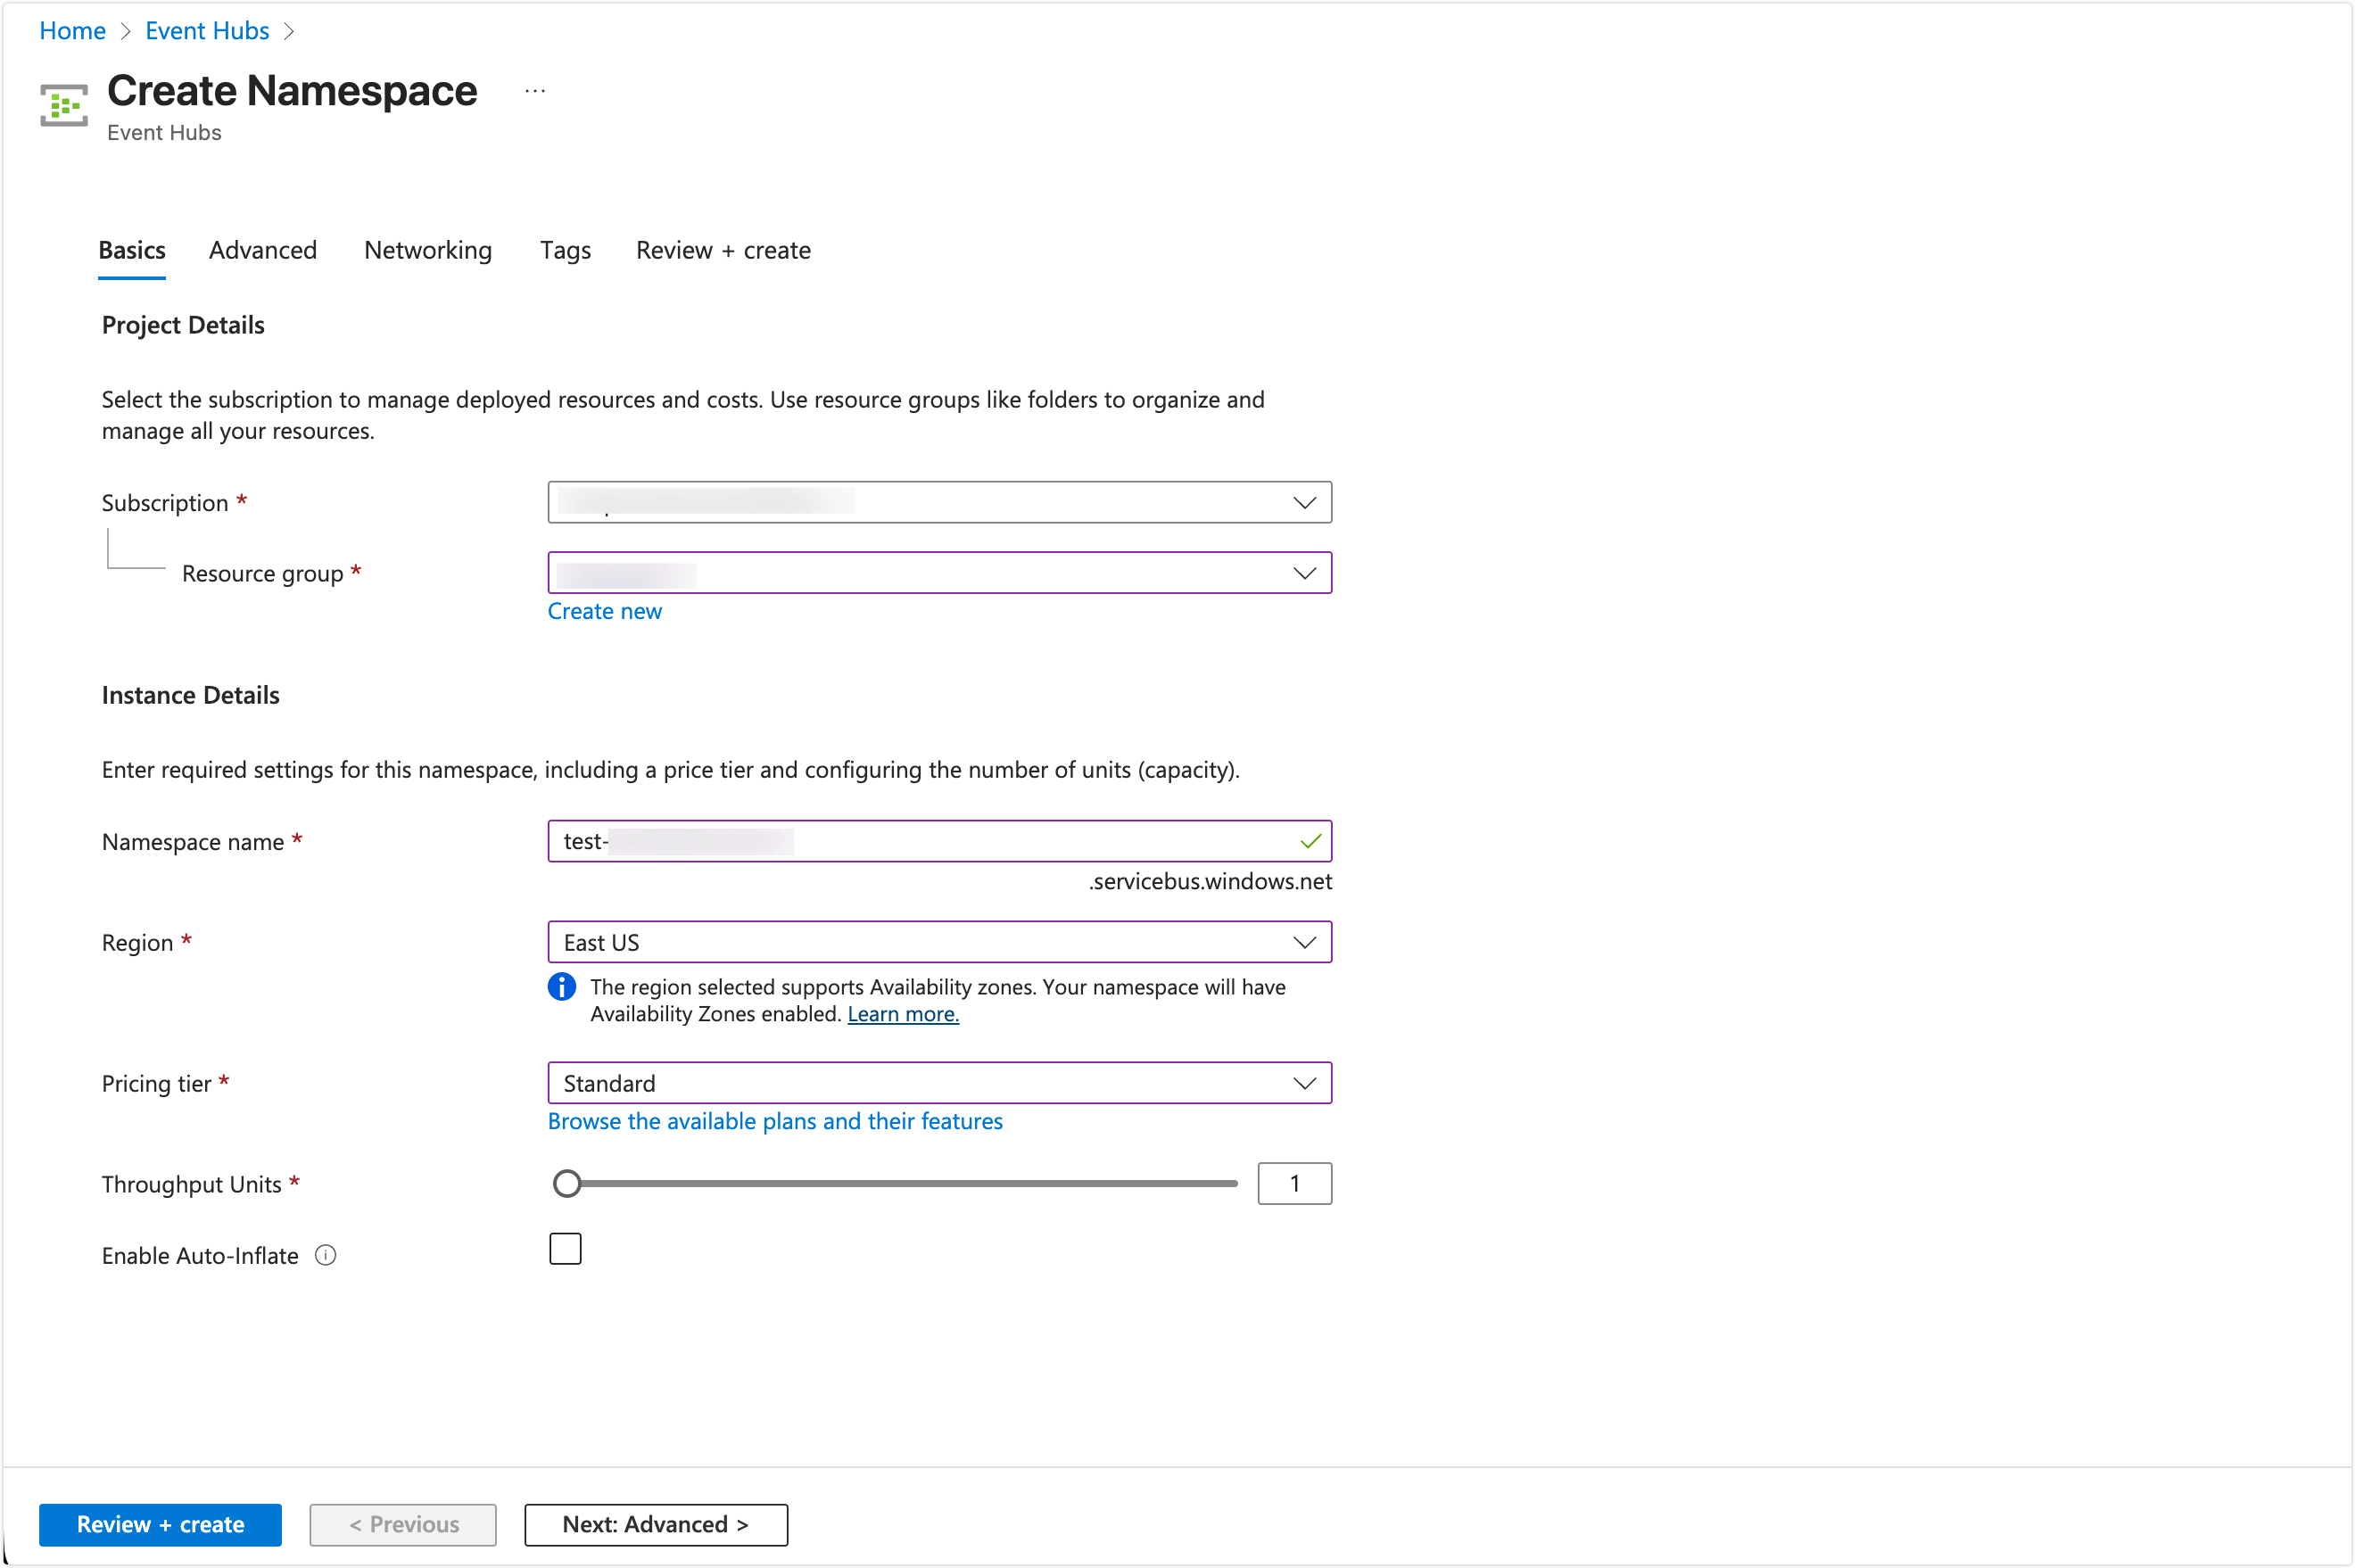
Click Next: Advanced and keep the default settings.
Click Next: Networking to continue.
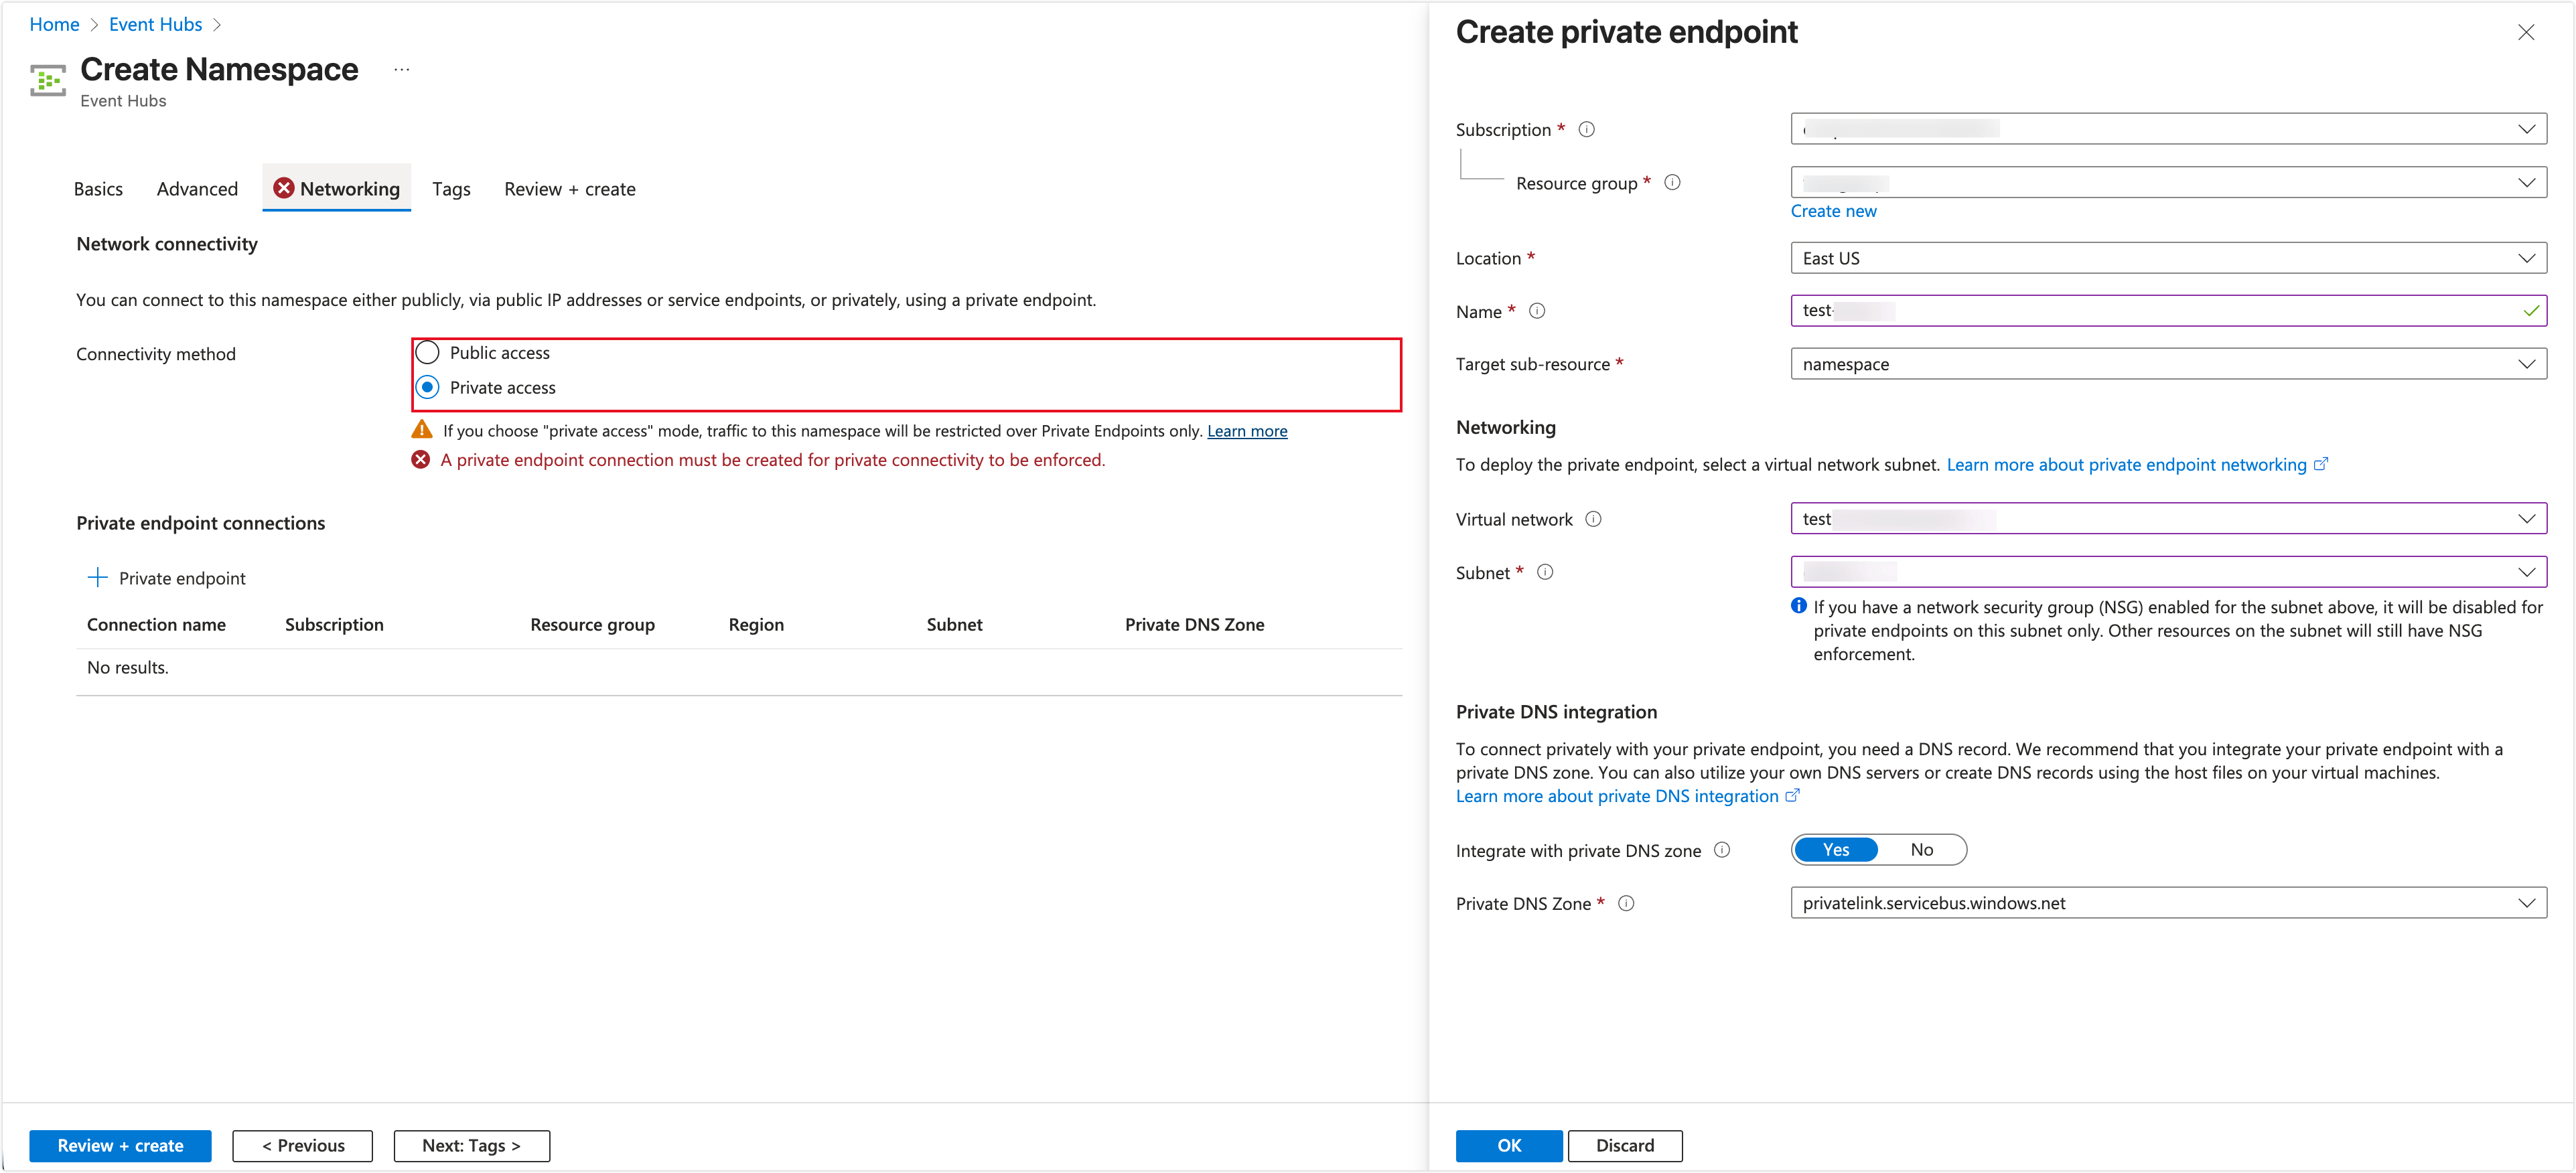
Create a Private Endpoint
To allow EMQX Cloud to securely access Azure Event Hubs, you must configure a private endpoint for the namespace.
- If you are creating a new namespace, select Private access as the connectivity method on the Networking tab, then click + Private endpoint.
- If the namespace already exists, go to Overview -> Networking -> Private access -> + Private endpoint.
In the Create private endpoint panel:
- Select the Subscription and Resource group.
- Set Target sub-resource to
namespace. - Choose the Virtual network and Subnet used for private connectivity.
Under Private DNS integration, keep Integrate with private DNS zone set to Yes and use the default private DNS zone.
Click OK to create the private endpoint.
Once the private endpoint is created and its status shows Succeeded, go to Private endpoint -> DNS configuration.
Record the following information:
- FQDN (for example:
xxx.servicebus.windows.net) - Private IP address
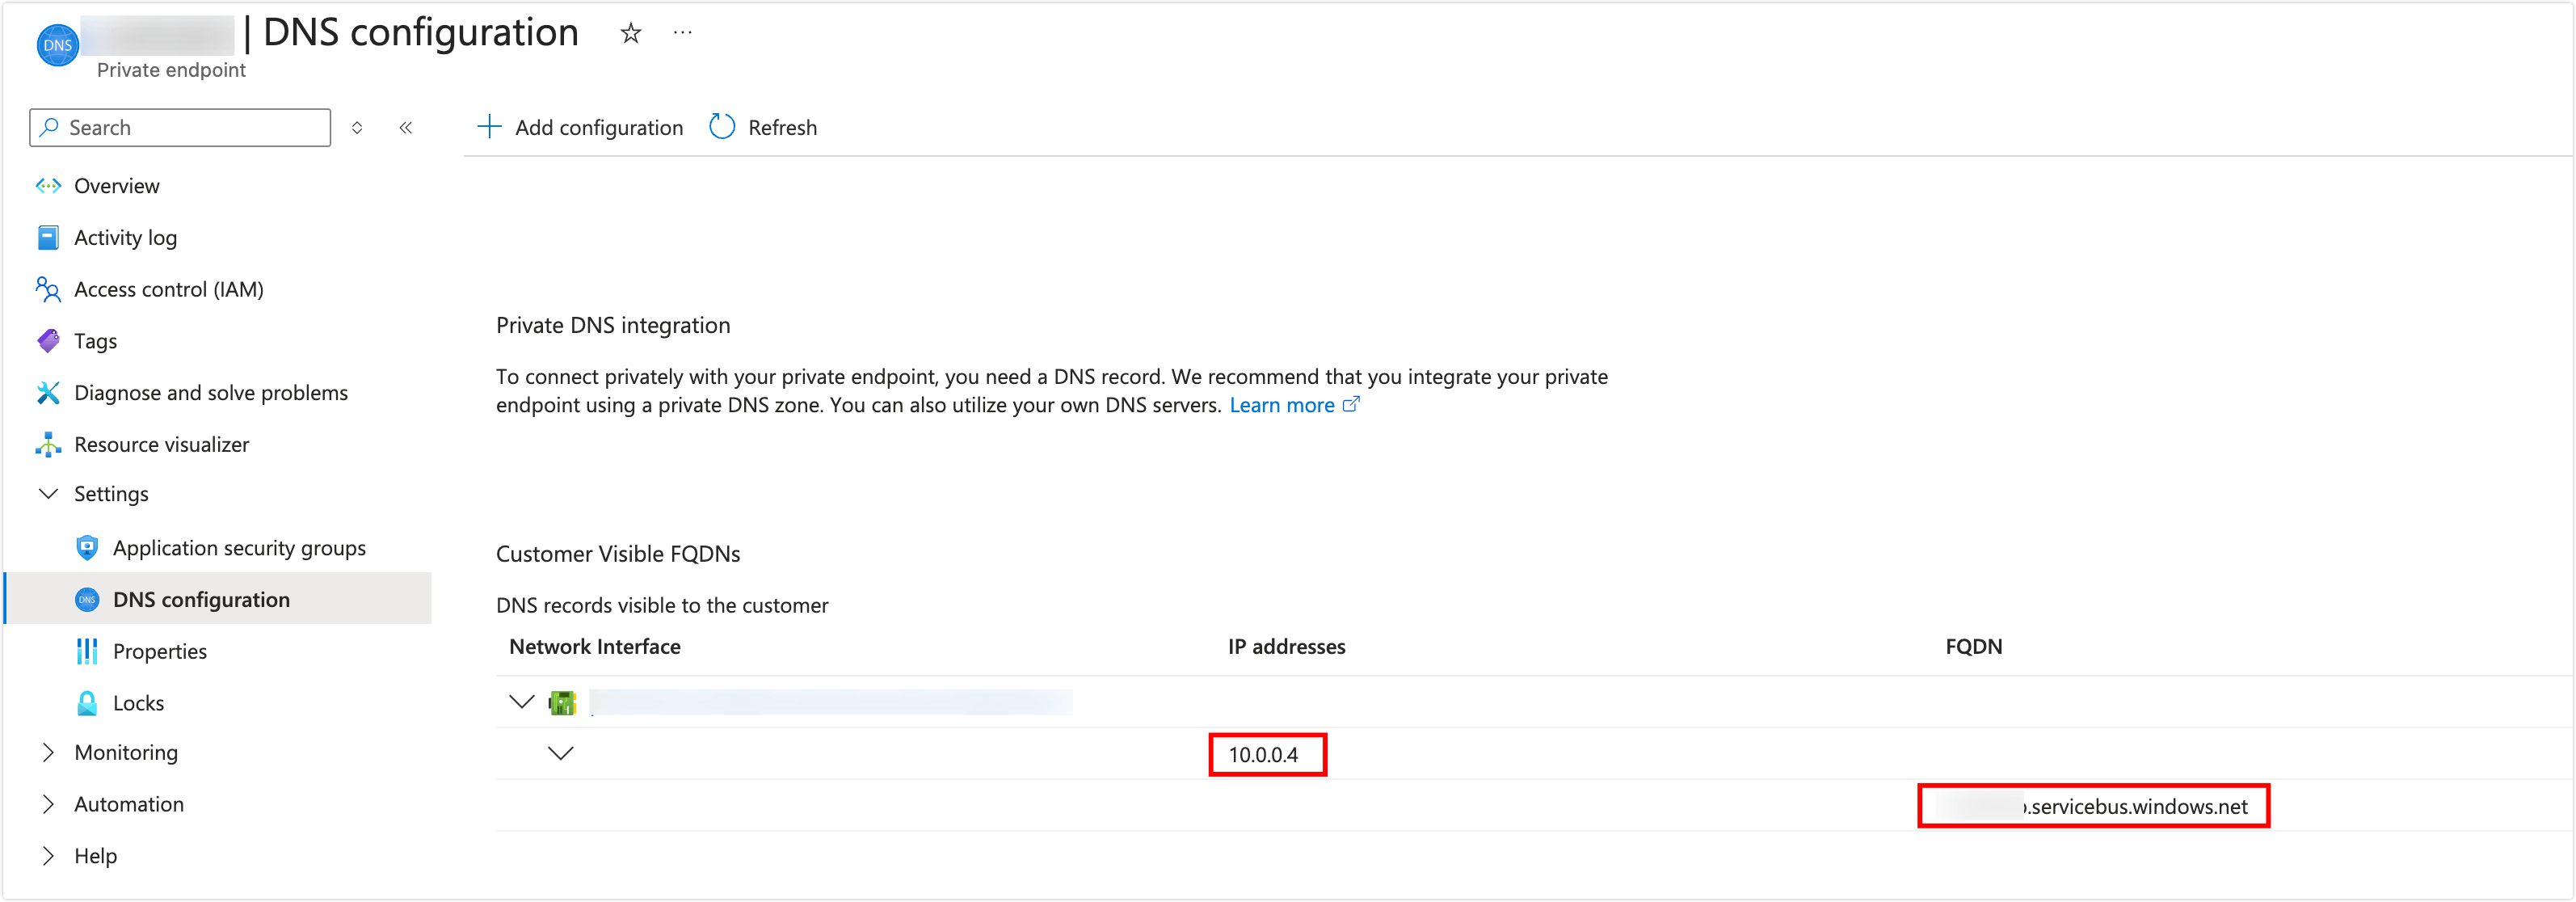
- FQDN (for example:
Submit the FQDN and IP address to EMQX Cloud through a support ticket. The EMQX Cloud SRE team will complete the DNS resolution configuration for your deployment.
Set Up Azure Event Hubs and Access Policy
After the namespace is ready, create an Event Hub and obtain the connection string required by EMQX Cloud.
On the Event Hubs Namespace page, click + Event Hub.
Enter the Event Hub name and keep other settings as default, then click Review + create.
After the Event Hub is created, open it and navigate to Settings -> Shared access policies.
Click + Add, enter a policy name, and assign the required permissions (for example, Send or Manage).
Save the policy and copy the Primary connection string.
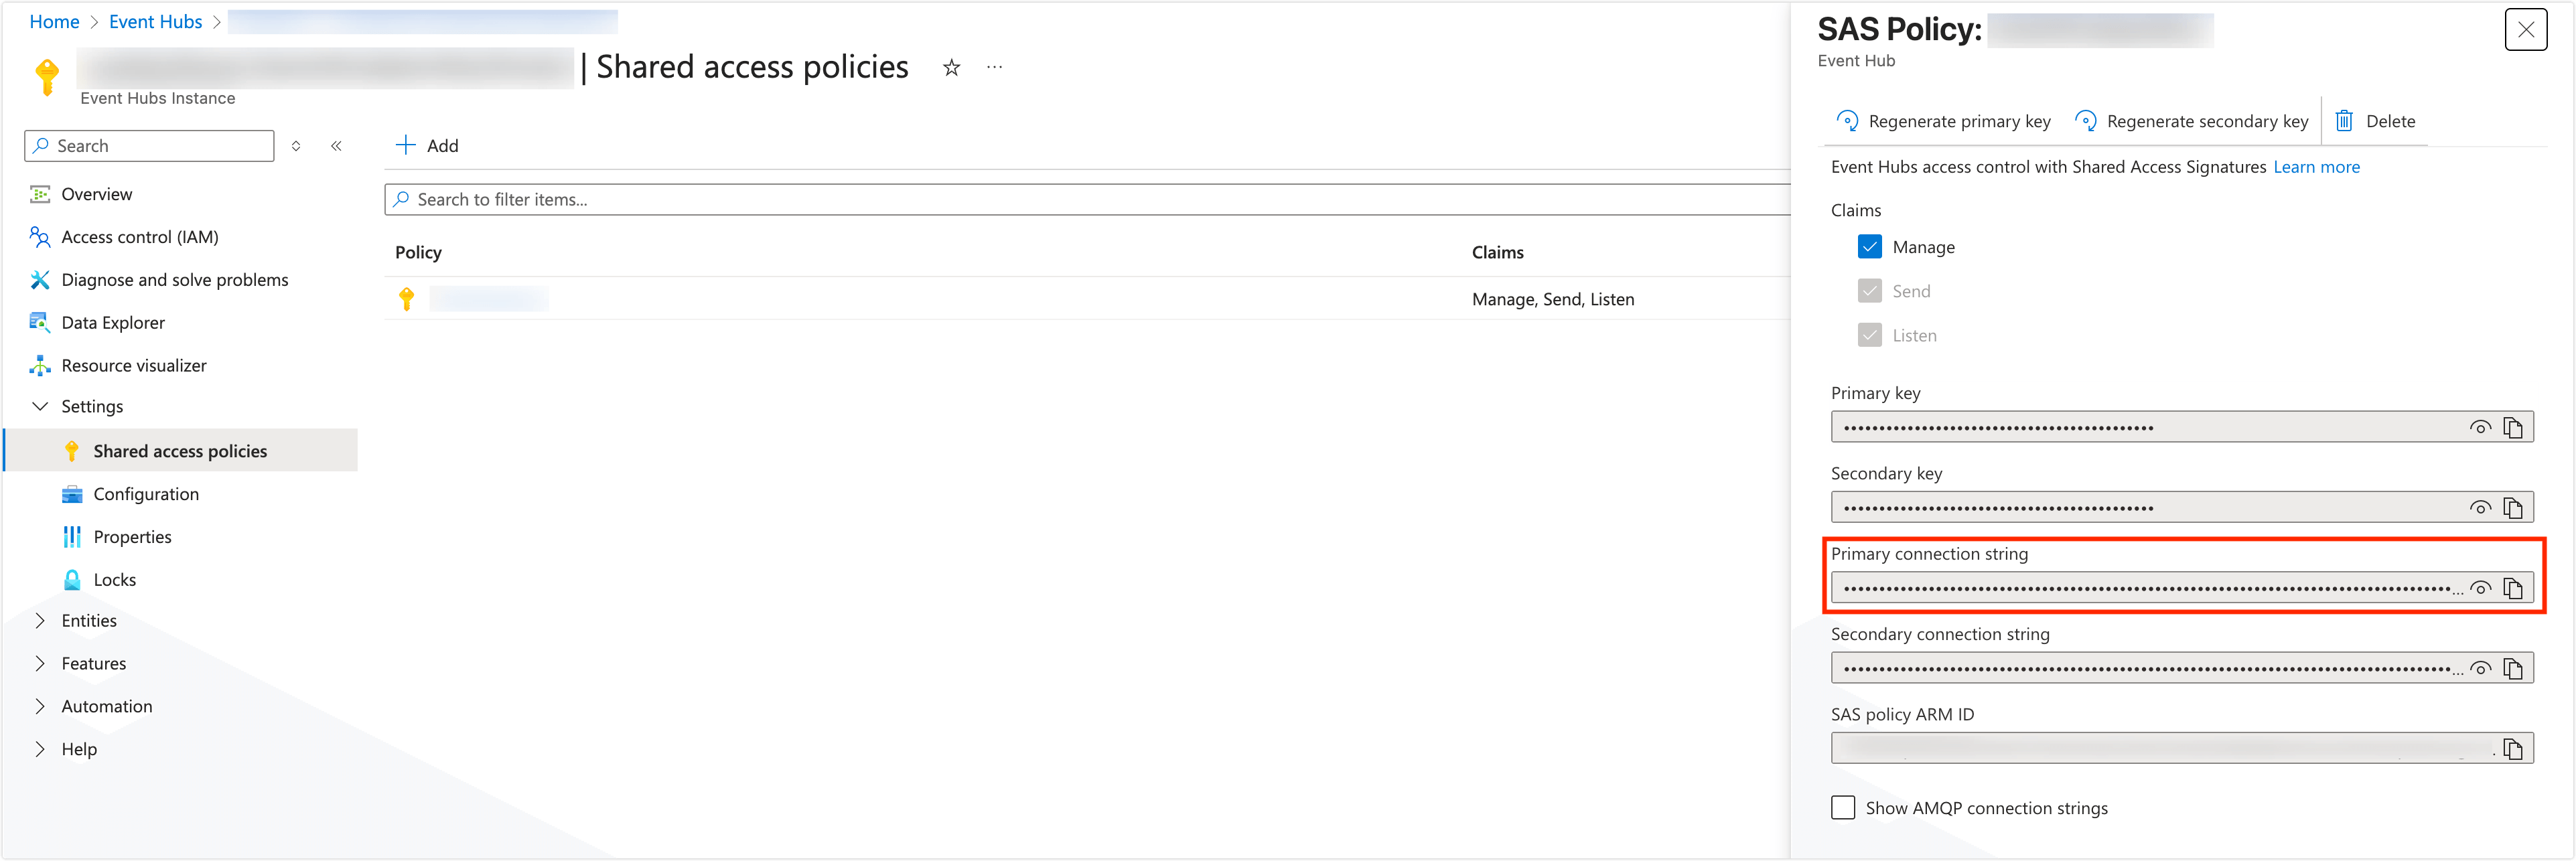
You will use this connection string later when creating the Azure Event Hubs connector in EMQX Cloud.
Create a Connector
Azure Event Hubs provides a Kafka-compatible endpoint that allows EMQX Cloud to publish data using the Apache Kafka protocol. To forward MQTT data to Azure Event Hubs, you must first create an Azure Event Hubs connector in EMQX Cloud.
Before proceeding, make sure you have obtained the Primary connection string from the Event Hubs namespace shared access policy.
- Go to your deployment. Click Data Integration from the left-navigation menu.
- Create a connector:
- If no connector exists, select Azure Event Hubs under the Data Forward category.
- If connectors already exist, click New Connector and then select Azure Event Hubs under Data Forward.
- On the New Connector page, configure the following options:
- Connector Name: Automatically generated; modify if needed.
- Bootstrap Hosts: Enter the namespace hostname (for example,
xxx.servicebus.windows.net:9093). - Connection String: Paste the Primary connection string from the namespace shared access policy.
- Enable TLS: Enabled by default and required for connecting to Azure Event Hubs.
- Click Test to verify connectivity. A success message indicates that EMQX Cloud can access the Azure Event Hubs service.
- Click New to create the connector.
Once the connector is created, it can be reused by multiple rules to forward MQTT data to Azure Event Hubs.
Create a Rule
After creating the Azure Event Hubs connector, create a rule to define which MQTT data should be forwarded and how it should be written to Azure Event Hubs.
Create a new rule:
- In Data Integration -> Rules, click New Rule,
- Or click the New Rule icon in the Actions column of the Azure Event Hubs connector.
In the SQL Editor, enter a rule to match and process incoming MQTT messages.
The following example reads messages from the
temp_hum/emqxtopic and extracts the timestamp, client ID, temperature, and humidity values:sqlSELECT timestamp as up_timestamp, clientid as client_id, payload.temp as temp, payload.hum as hum FROM "temp_hum/emqx"You can use Try It Out to simulate data input and verify the query result.
Click Next to add an action.
In the Action configuration:
Connector: Select the Azure Event Hubs connector you created.
Event Hub Name: Enter the name of the target Event Hub (variables are not supported).
Azure Event Hub Headers: Specify placeholders to map MQTT data to Event Hubs message headers.
Azure Event Hub Header value encode mode: Choose how header values are encoded (for example,
noneorjson).Extra Azure Event Hub headers: (Optional) Add additional key-value header pairs.
Message Key: Define the message key as a fixed string or using placeholders (for example,
${client_id}) to control message ordering.Message Value: Define the message payload. You can use placeholders to insert extracted fields:
json{"temp": ${temp}, "hum": ${hum}}Message Timestamp: Select the timestamp type to be used for the Event Hubs message.
(Optional) Configure Advanced Settings, such as:
- Max Batch Bytes
- Required Acks
- Partition Strategy
Click Confirm to create the rule.
In the success dialog, click Back to Rules to complete the configuration.
Once the rule is enabled, matching MQTT messages will be automatically processed and forwarded to Azure Event Hubs.
Test the Rule
After the rule is created, you can verify the data integration by publishing MQTT messages and confirming that they are delivered to Azure Event Hubs.
Publish Test Data
You can use any MQTT client to publish test messages. The following example uses MQTTX.
Connect MQTTX to your EMQX Cloud deployment.
Publish a message to the following topic:
Topic:
temp_hum/emqxPayload:
json{ "temp": "27.5", "hum": "41.8" }
Verify Data in Azure Event Hubs
Use any Kafka-compatible consumer to read messages from the Event Hub.
It is recommended to use the official Azure Event Hubs Kafka samples, such as the Python consumer provided in the Azure GitHub repository:
bashpython consumer.py <consumer-group> <topic.1> <topic.2> ... <topic.n>This allows you to verify that messages published to EMQX Cloud are successfully received through the Kafka endpoint.
For more details on consuming messages using Kafka tools, see the Azure documentation on using the Kafka CLI with Azure Event Hubs.
Monitor Rule Execution
You can also verify rule execution status in the EMQX Cloud console:
- Go to Data Integration -> Rules.
- Click the rule ID to view runtime statistics, including message throughput and action execution results.
Successful message delivery and increasing rule metrics indicate that the data integration is working as expected.