Ingest MQTT Data into Microsoft SQL Server
SQL Server is one of the leading relational commercial database solutions, widely used in enterprises and organizations of various sizes and types. EMQX Cloud supports integration with SQL Server, enabling you to save MQTT messages and client events to SQL Server. This facilitates the construction of complex data pipelines and analytical processes for data management and analysis, or for managing device connections and integrating with other enterprise systems such as ERP, CRM, and BI.
This page provides a detailed overview of the data integration between EMQX Cloud and Microsoft SQL Server with practical instructions on creating and validating the data integration.
How It Works
Microsoft SQL Server data integration is an out-of-the-box feature in EMQX Cloud, combining EMQX Cloud's device connectivity and message transmission capabilities with the powerful data storage capabilities of Microsoft SQL Server. Through the built-in rule engine component, you can store MQTT messages and client events in Microsoft SQL Server. Additionally, events can trigger updates or deletions of data within Microsoft SQL Server, enabling the recording of information such as device online status and connection history. This integration simplifies the process of ingesting data from EMQX Cloud to SQL Server for storage and management, eliminating the need for complex coding.
The diagram below illustrates a typical architecture of data integration between EMQX and SQL Server:
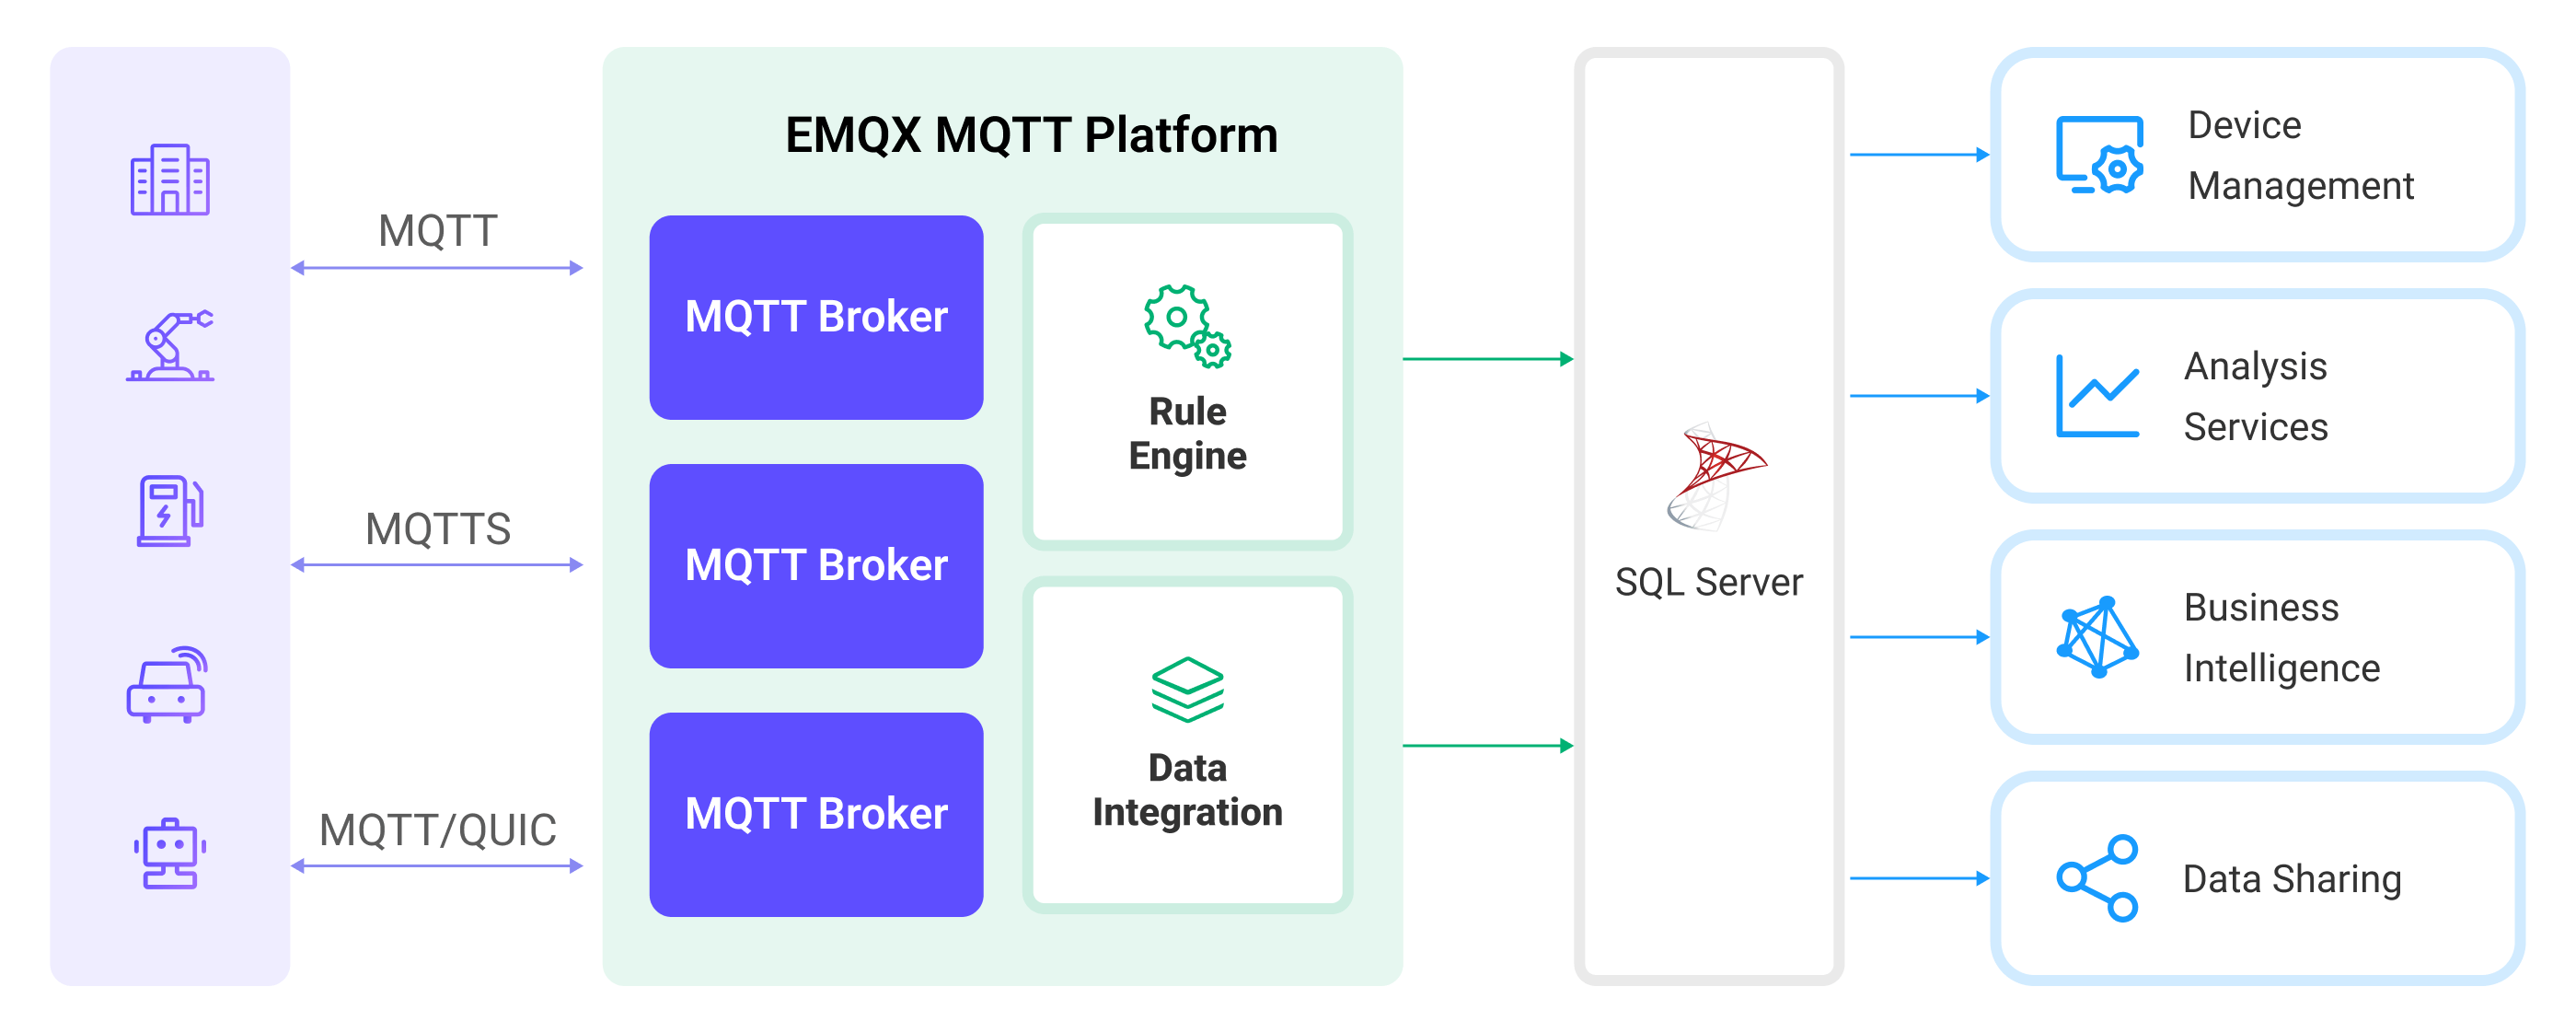
Ingesting MQTT data into Microsoft SQL Server works as follows:
- Message publication and reception: Industrial IoT devices establish successful connections to EMQX Cloud through the MQTT protocol and publish real-time MQTT data from machines, sensors, and product lines based on their operational states, readings, or triggered events to EMQX Cloud. When EMQX Cloud receives these messages, it initiates the matching process within its rules engine.
- Message data processing: When a message arrives, it passes through the rule engine and is then processed by the rule defined in EMQX Cloud. The rules, based on predefined criteria, determine which messages need to be routed to Microsoft SQL Server. If any rules specify payload transformations, those transformations are applied, such as converting data formats, filtering out specific information, or enriching the payload with additional context.
- Data ingestion into SQL Server: The rule triggers the writing of messages to Microsoft SQL Server. With the help of SQL templates, users can extract data from the rule processing results to construct SQL and send it to SQL Server for execution, so that specific fields of the message can be written or updated into the corresponding tables and columns of the database.
- Data Storage and Utilization: With the data now stored in Microsoft SQL Server, businesses can harness its querying power for various use cases.
Features and Benefits
The data integration with Microsoft SQL Server offers a range of features and benefits tailored to ensure efficient data transmission, storage, and utilization:
- Real-time Data Streaming: EMQX Cloud is built for handling real-time data streams, ensuring efficient and reliable data transmission from source systems to Microsoft SQL Server. It enables organizations to capture and analyze data in real-time, making it ideal for use cases requiring immediate insights and actions.
- High Performance and Scalability: Both EMQX Cloud and Microsoft SQL Server feature expandability and reliability, suitable for handling large-scale IoT data. They can undergo uninterrupted horizontal and vertical expansion as demands grow, ensuring the continuity and reliability of IoT applications.
- Flexibility in Data Transformation: EMQX Cloud provides a powerful SQL-based Rule Engine, allowing organizations to pre-process data before storing it in Microsoft SQL Server. It supports various data transformation mechanisms, such as filtering, routing, aggregation, and enrichment, enabling organizations to shape the data according to their needs.
- Advanced Analytics: Microsoft SQL Server offers powerful analytical capabilities, such as building multi-dimensional data models through Analysis Services to support complex data analysis and data mining. It also enables the creation and publication of reports through Reporting Services, presenting insights and analysis results of IoT data to stakeholders.
Before You Start
This section describes the preparations you need to complete before you start to create the Microsoft SQL Server data integration, including how to install and connect to the Microsoft SQL Server, create database and data tables, and install and configure the ODBC driver.
Prerequisites
- Understand rules.
- Understand data integration.
Set up Network
Before configuring data integration, you must create an EMQX Cloud deployment and ensure network connectivity between EMQX Cloud and the target service.
For Dedicated Flex deployments:
Create a VPC Peering Connection between the EMQX Cloud VPC and the target service VPC. After the peering connection is established, EMQX Cloud can access the target service through its private IP address.
If access through a public IP is required, configure a NAT Gateway to enable outbound connectivity.
For BYOC (Bring Your Own Cloud) deployments:
Create a VPC peering connection between the VPC where the BYOC deployment is running and the VPC hosting the target service. Once peering is in place, the target service can be accessed via its private IP address.
If the target service must be accessed through a public IP, configure a NAT Gateway in the BYOC VPC using your cloud provider’s console.
Install and Connect to Microsoft SQL Server
This section describes how to start Microsoft SQL Server 2019 on Linux/MacOS using Docker images and use sqlcmd to connect to Microsoft SQL Server. For other installation methods of Microsoft SQL Server, please refer to Microsoft SQL Server Installation Guide.
Install Microsoft SQL Server via Docker, and then start the docker image with the command below. Use
mqtt_public1as the password. For the password policy of Microsoft SQL Server, see Password Complexity.Note: By starting a Docker container with the environment variable
ACCEPT_EULA=Yyou agree to the terms of Microsoft EULA, see also MICROSOFT SOFTWARE LICENSE TERMS MICROSOFT SQL SERVER 2019 STANDARD(EN_US).bash# To start the Microsoft SQL Server docker image and set the password as `mqtt_public1` $ docker run --name sqlserver -p 1433:1433 -e ACCEPT_EULA=Y -e MSSQL_SA_PASSWORD=mqtt_public1 -d mcr.microsoft.com/mssql/server:2019-CU19-ubuntu-20.04Access the container.
bashdocker exec -it sqlserver bashEnter the preset password to connect to the server in the container. The characters are not echoed when entering the password. Click
Enterdirectly after entering the password.bash$ /opt/mssql-tools/bin/sqlcmd -S 127.0.0.1 -U sa $ Password: 1>TIP
The
mssql-toolshave been installed in the Microsoft SQL Server container provided by Microsoft, but the executable file is not in$PATH. Therefore, you need to specify the executable file path formssql-toolsbefore proceeding. As for the Docker deployment in this example, the file path should beopt.For more information on how to use
mssql-tools, see sqlcmd-utility.
So far, the Microsoft SQL Server 2019 instance has been deployed and can be connected.
Create Database and Data Tables
This section describes how to create a database and data table in Microsoft SQL Server.
Create a database
emqxin Microsoft SQL Server using the connection created from the previous section.bash... Password: 1> USE master 2> GO Changed database context to 'master'. 1> CREATE DATABASE emqx; 2> GOUse the following SQL statements to create a data table.
Use the following SQL command to create temp_hum table, and this table will be used for storing the temperature and humidity data reported by devices.
sqlCREATE TABLE temp_hum( client_id VARCHAR(64) NULL, temp NVARCHAR(100) NULL, hum NVARCHAR(100) NULL, up_timestamp DATETIME NOT NULL DEFAULT CURRENT_TIMESTAMP ); GO;
Create a Microsoft SQL server Connector
Before creating data integration rules, you need to first create a Microsoft SQL server connector to access the Microsoft SQL server server.
Go to your deployment. Click Data Integration from the left-navigation menu.
If it is the first time for you to create a connector, select Microsoft SQL server under the Data Persistence category. If you have already created connectors, select New Connector and then select Microsoft SQL server under the Data Persistence category.
Connector name: The system will automatically generate a connector name.
Enter the connection information:
- Server Host: IP address and port of the server.
- Database Name: Enter
emqx. - Username: Enter
sa. - Password: Enter the preset password
mqtt_public1, or use the actual password. - SQL Server Driver Name: Enter
ODBC Driver 17 for SQL Server, which is installed in EMQX Cloud by default.
Click the Test button. If the Microsoft SQL server service is accessible, a success prompt will be returned.
Click the New button to complete the creation.
Create a Rule
Next, you need to create a rule to specify the data to be written and add corresponding actions in the rule to forward the processed data to Microsoft SQL server.
Click New Rule in Rules area or click the New Rule icon in the Actions column of the connector you just created.
Enter the rule-matching SQL statement in the SQL editor. In the following rule, we read the time when the message was reported
up_timestamp, client ID, payload viatemp_hum/emqxtopic. Also, we can read temperature and humidity from this topic.sqlSELECT timestamp as up_timestamp, clientid as client_id, payload.temp as temp, payload.hum as hum FROM "temp_hum/emqx"TIP
If you are a beginner user, click SQL Examples and Try It Out to learn and test the SQL rule.
Click Next to add an action.
Select the connector you just created from the Connector dropdown box.
Configure the SQL Template based on the feature to use. Note: This is a preprocessed SQL, so the fields should not be enclosed in quotation marks, and do not write a semicolon at the end of the statements:
sqlINSERT INTO temp_hum(client_id, temp, hum) VALUES ( ${client_id}, ${temp}, ${hum} )If a placeholder variable is undefined in the SQL template, you can toggle the Undefined Vars as Null switch above the SQL template to define the rule engine behavior:
Disabled (default): The rule engine can insert the string
undefinedinto the database.Enabled: Allow the rule engine to insert
NULLinto the database when a variable is undefined.TIP
If possible, this option should always be enabled; disabling the option is only used to ensure backward compatibility.
Advanced Settings (Optional).
Click the Confirm button to complete the rule creation.
In the Successful new rule pop-up, click Back to Rules, thus completing the entire data integration configuration chain.
Test the Rule
You are recommended to use MQTTX to simulate temperature and humidity data reporting, but you can also use any other client.
Use MQTTX to connect to the deployment and send messages to the following Topic.
topic:
temp_hum/emqxpayload:
json{ "temp": "27.5", "hum": "41.8" }
Check if the message has been forwarded to Microsoft SQL Server.
bash1> SELECT * FROM temp_hum ORDER BY up_timestamp; 2> GO client_id temp hum up_timestamp ---------------------------------------------------------------- ------------ ------------ ----------------------- test_client 27.50 41.80 2024-03-25 05:49:21.237View operational data in the console. Click the rule ID in the rule list, and you can see the statistics of the rule and the statistics of all actions under this rule.