Azure PrivateLink
Note
This feature is only available with the EMQX Dedicated and Dedicated Flex edition.
This page provides instructions on enabling the PrivateLink feature for the EMQX Broker deployment on the Microsoft Azure platform. Once the PrivateLink is enabled, the EMQX Broker deployment can access Azure PaaS Services and Azure-hosted customer-owned/partner services through a private connection in your virtual network. In the private connection, the EMQX Broker deployment's Virtual Private Cloud (VPC) functions as the service user, sending requests to the VPC where your cloud-based resources reside, namely, the service provider's VPC.
The following contents are demonstrated on this page:
- Create a Private Link Service Using the Azure Portal
- Enable PrivateLink in Your Deployment
- Test PrivateLink Connection
- Remove PrivateLink
Create a Private Link Service Using the Azure Portal
To access the Azure services through a private connection from the EMQX Cloud, you need to create a Private Link Service in Azure and expose the service to EMQX Cloud. This section demonstrates how to create a private link service by using the Azure portal.
Prerequisites
This demonstration assumes that you already have an Azure account and have created your own virtual network. For more information about creating the virtual network, see the Azure documentation.
Create Load Balancer
Create an internal load balancer that load balances virtual machines.
During the creation of the load balancer, you configure:
- Frontend IP address
- Backend pool
- Inbound load-balancing rules
- Sign in to the Azure portal.
- In the search box at the top of the portal, enter Load balancer. Click Load balancers in the search results.
- In the Load balancer page, click + Create.
- In the Basics tab of the Create load balancer page, enter or select the following informtaion:
- Subscription: Select your Azure subscription.
- Resource Group: Select the name you configured when you created the virtual network.
- Name: Enter a name for the load balancer.
- Type: Select
Internalas the network type. - Leave other options as default.
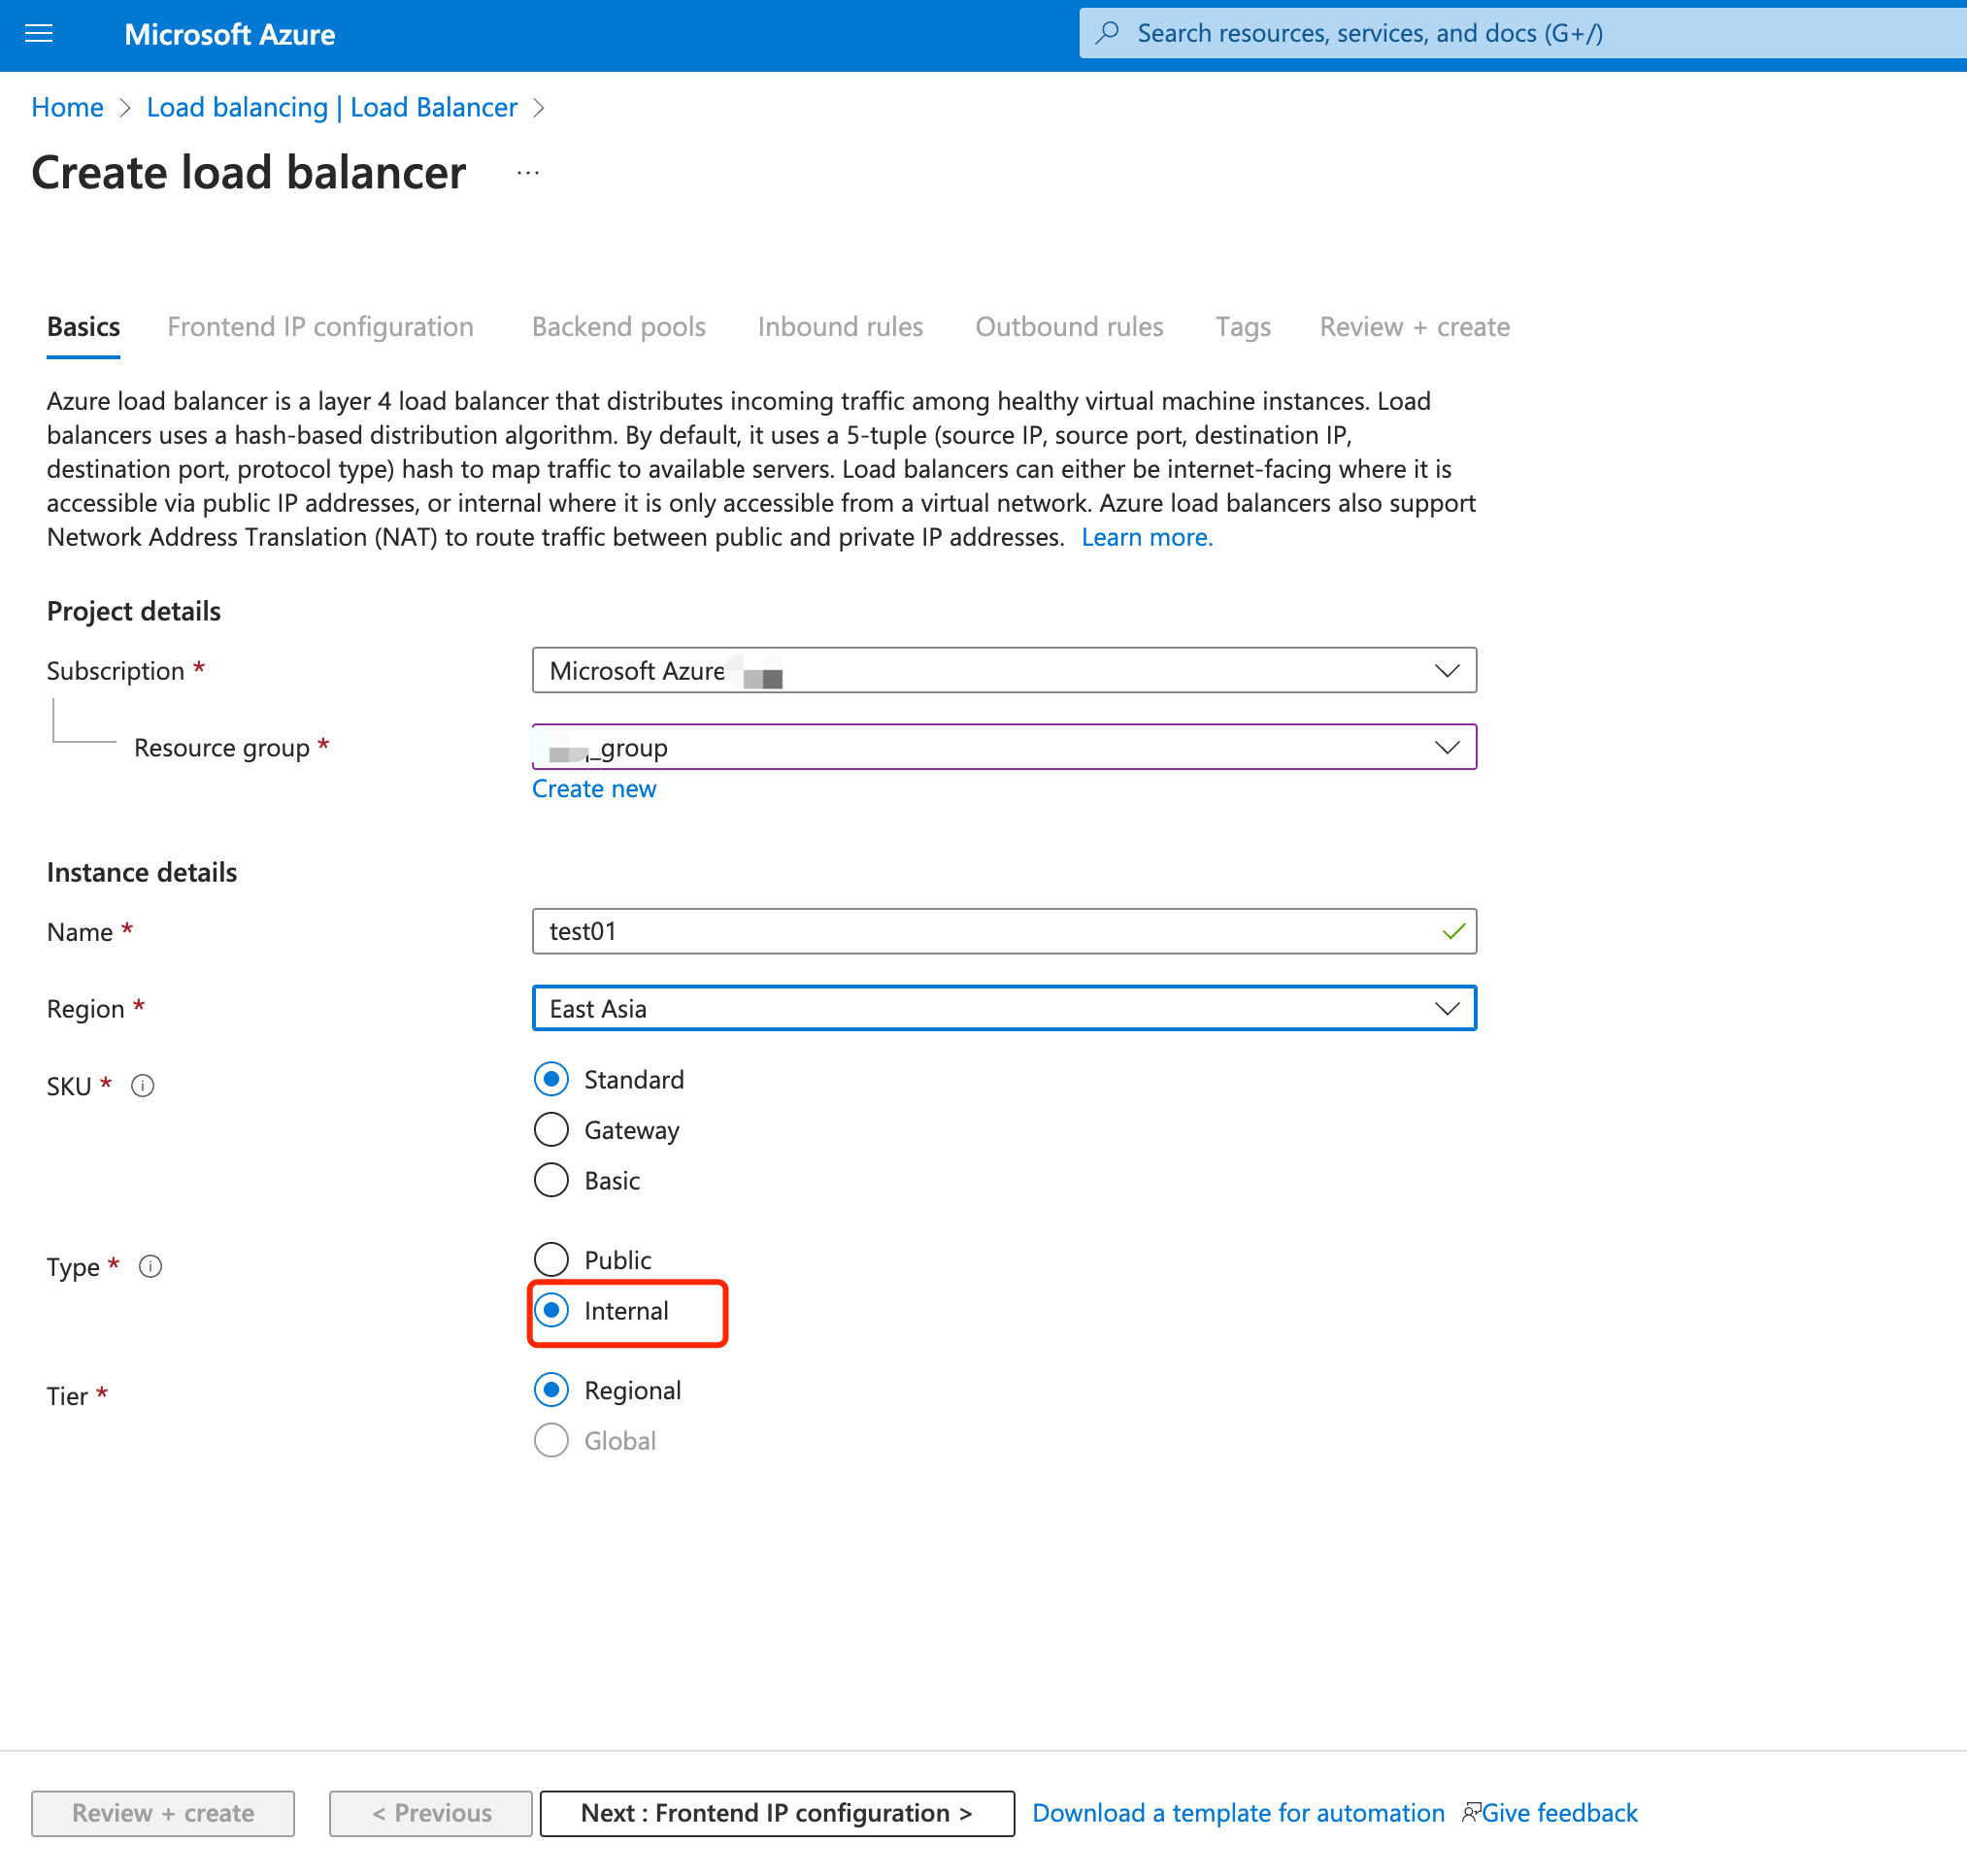
Click Next: Frontend IP configuration.
In Frontend IP configuration, click + Add a frontend IP configuration and configure the following settings:
Name: Enter a name for the front IP configuration.
TIP
The name
demo-redisis used in this demonstration to associate with the testing on the private connection in Test the PrivateLink Connection.Virtual network: Select your own virtual work.
Subnet: Select the subnet of your virtual network.

- Click Add.
- Click Next: Backend pools.
- In Backend pools, click + Add a backend pool.
- Select
NICfor Backend Pool Configuration. Click +Add to associate to the backend virtual machine server. Selectdemo-redisas the virtual machine.
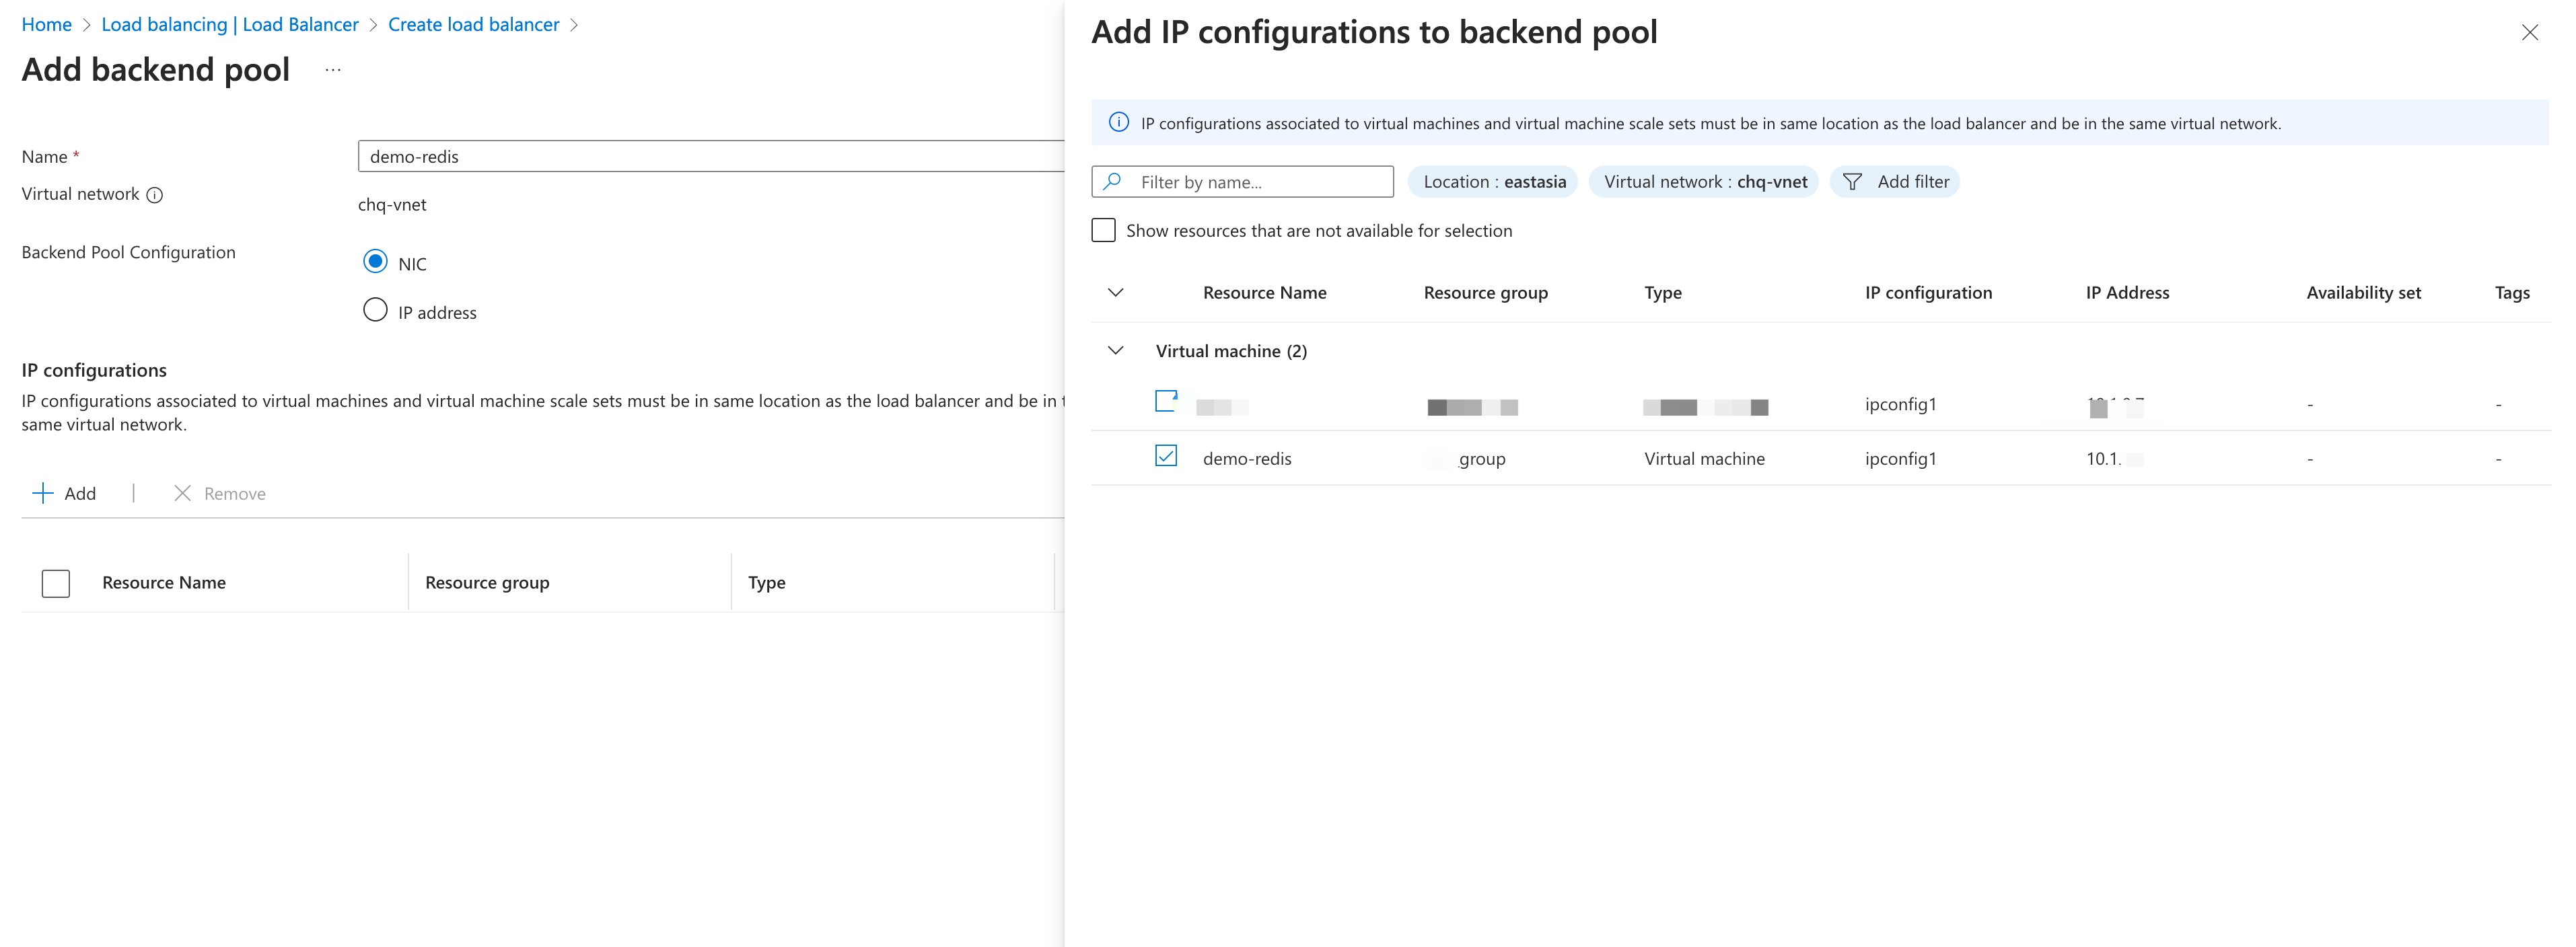
Click Save.
Click Next: Inbound rules.
In Inbound rules, click + Add an Inbound nat rule to configure the rule for port forwarding.
TIP
The Network Address Translation (NAT) rule defines how to redirect external traffic from a specific port to a specific port on a virtual machine, allowing external users to access services on the virtual machine.
- Frontend IP configuration: Select the name you configured in the Frontend IP configuration tab.
- Frontend Port and Backend port:
6379is used in the demonstration to facilitate the testing in Test the PrivateLink Connection. If you use other resources in data integration for testing, the port should be changed. - Configure other settings according to your real case.
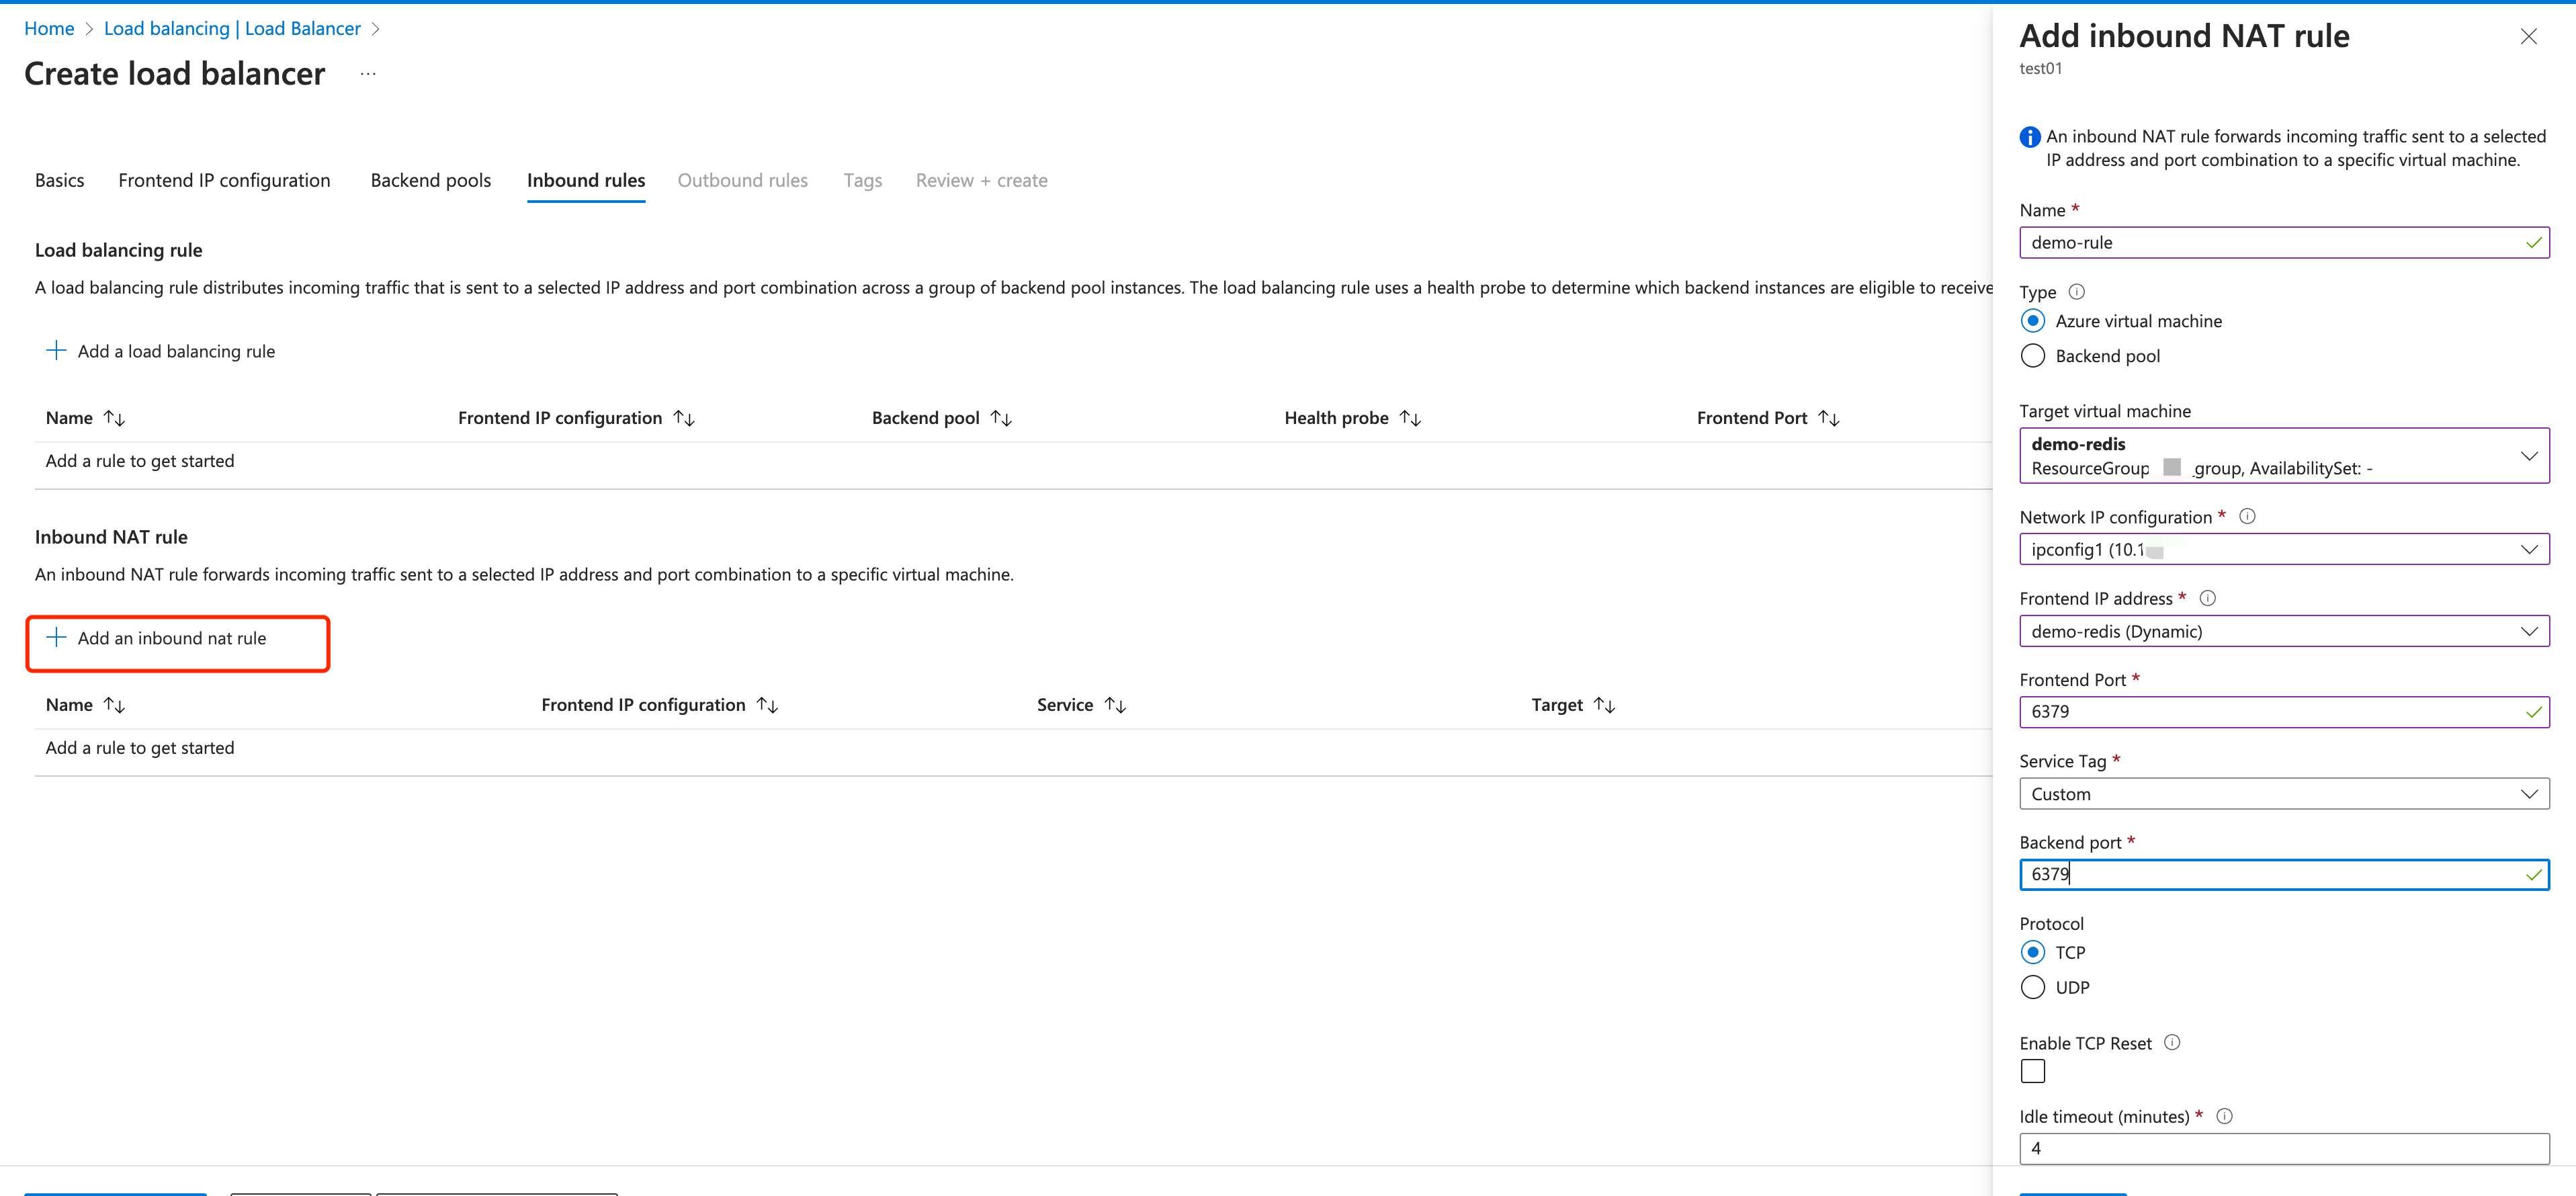
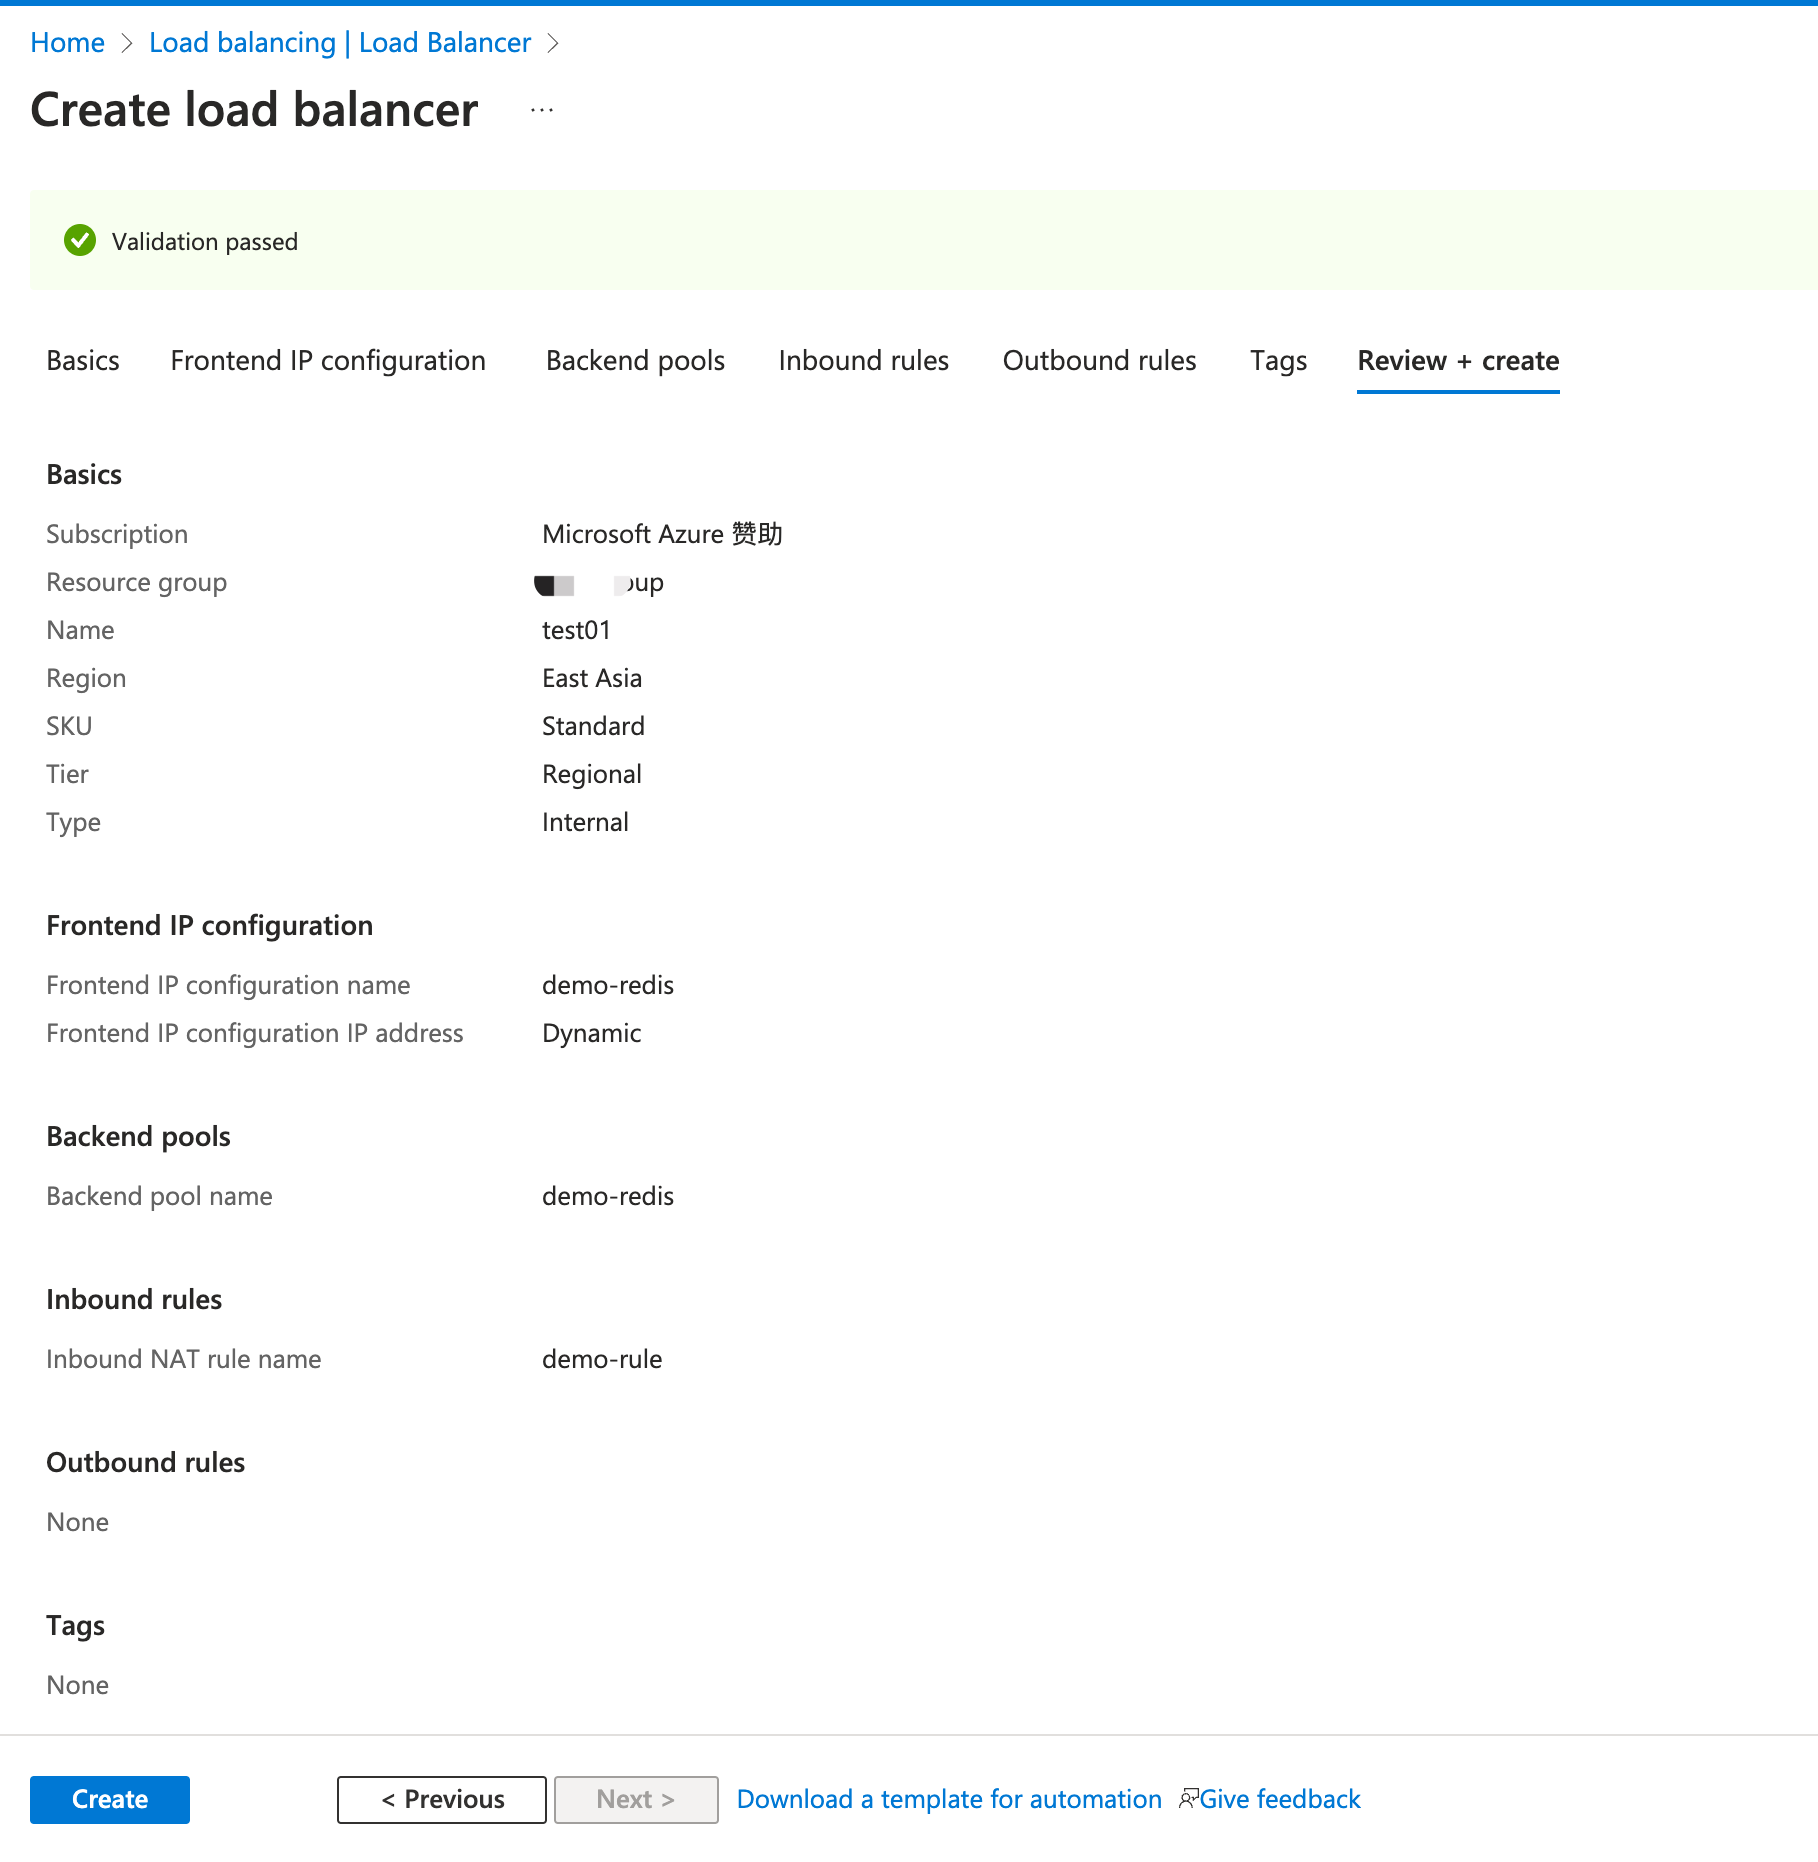
Click the blue Review + create button.
Click Create.
Create a Private Link Service
Create a Private Link service behind the load balancer you created in the previous section.
In the search box at the top of the portal, enter Private link. Select Private link services in the search results.
Select + Create.
In the Basics tab of the Create private link service page, select the resource group you previously created. Enter
demoas the private link service name.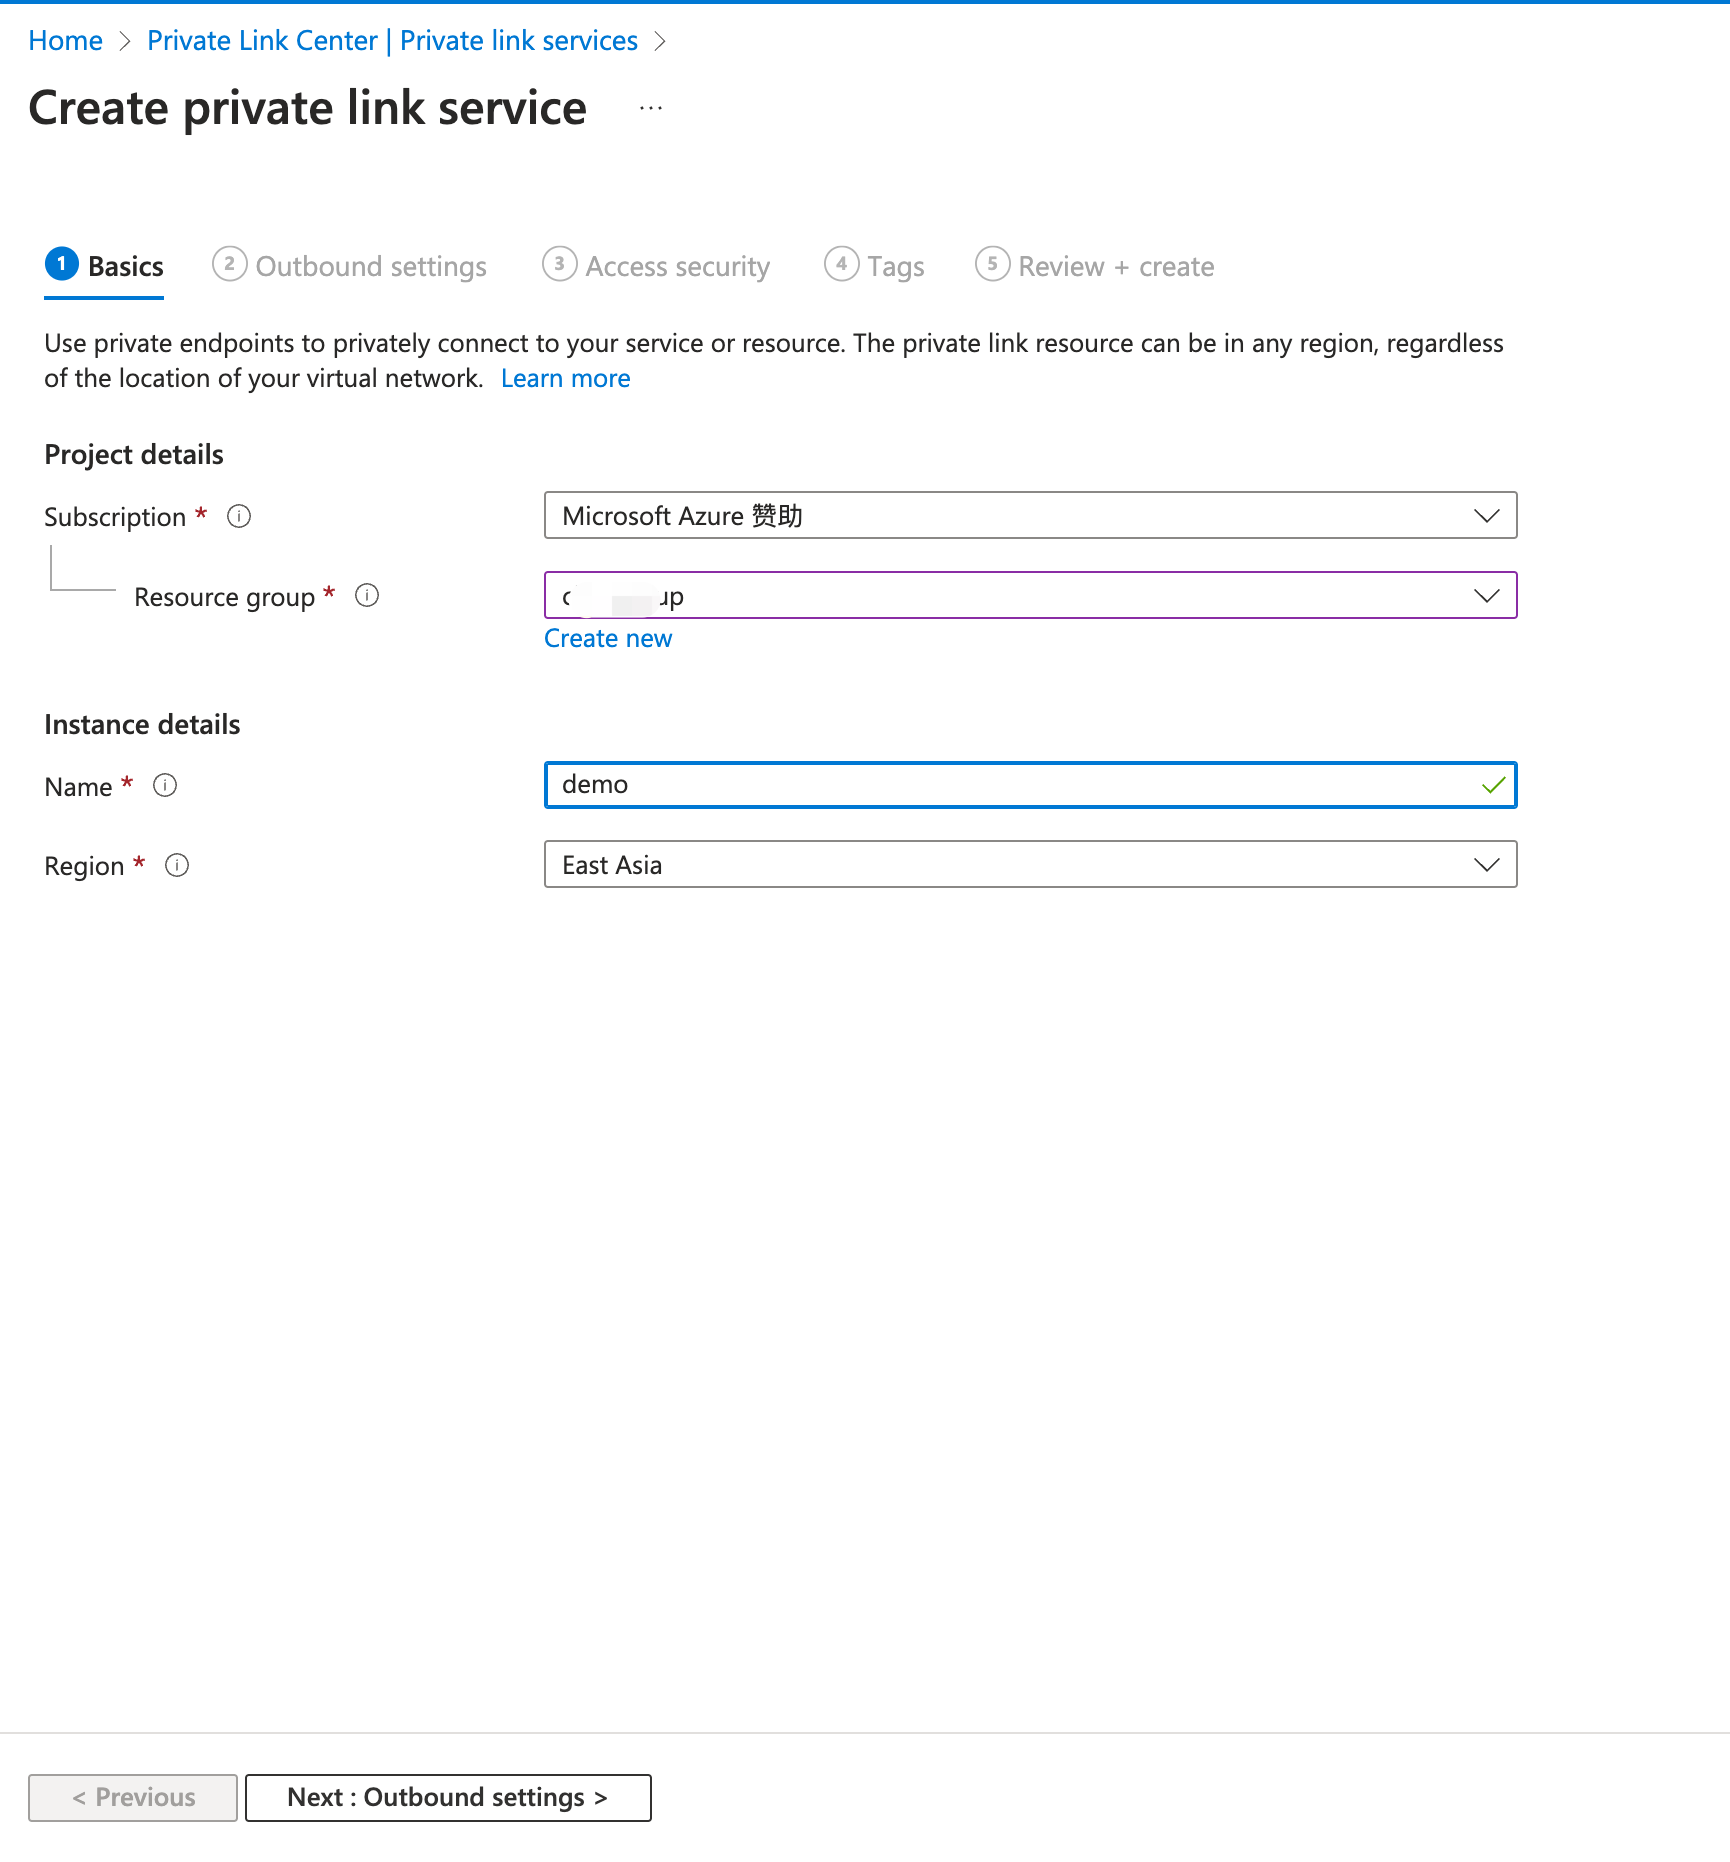
Select Next: Outbound settings.
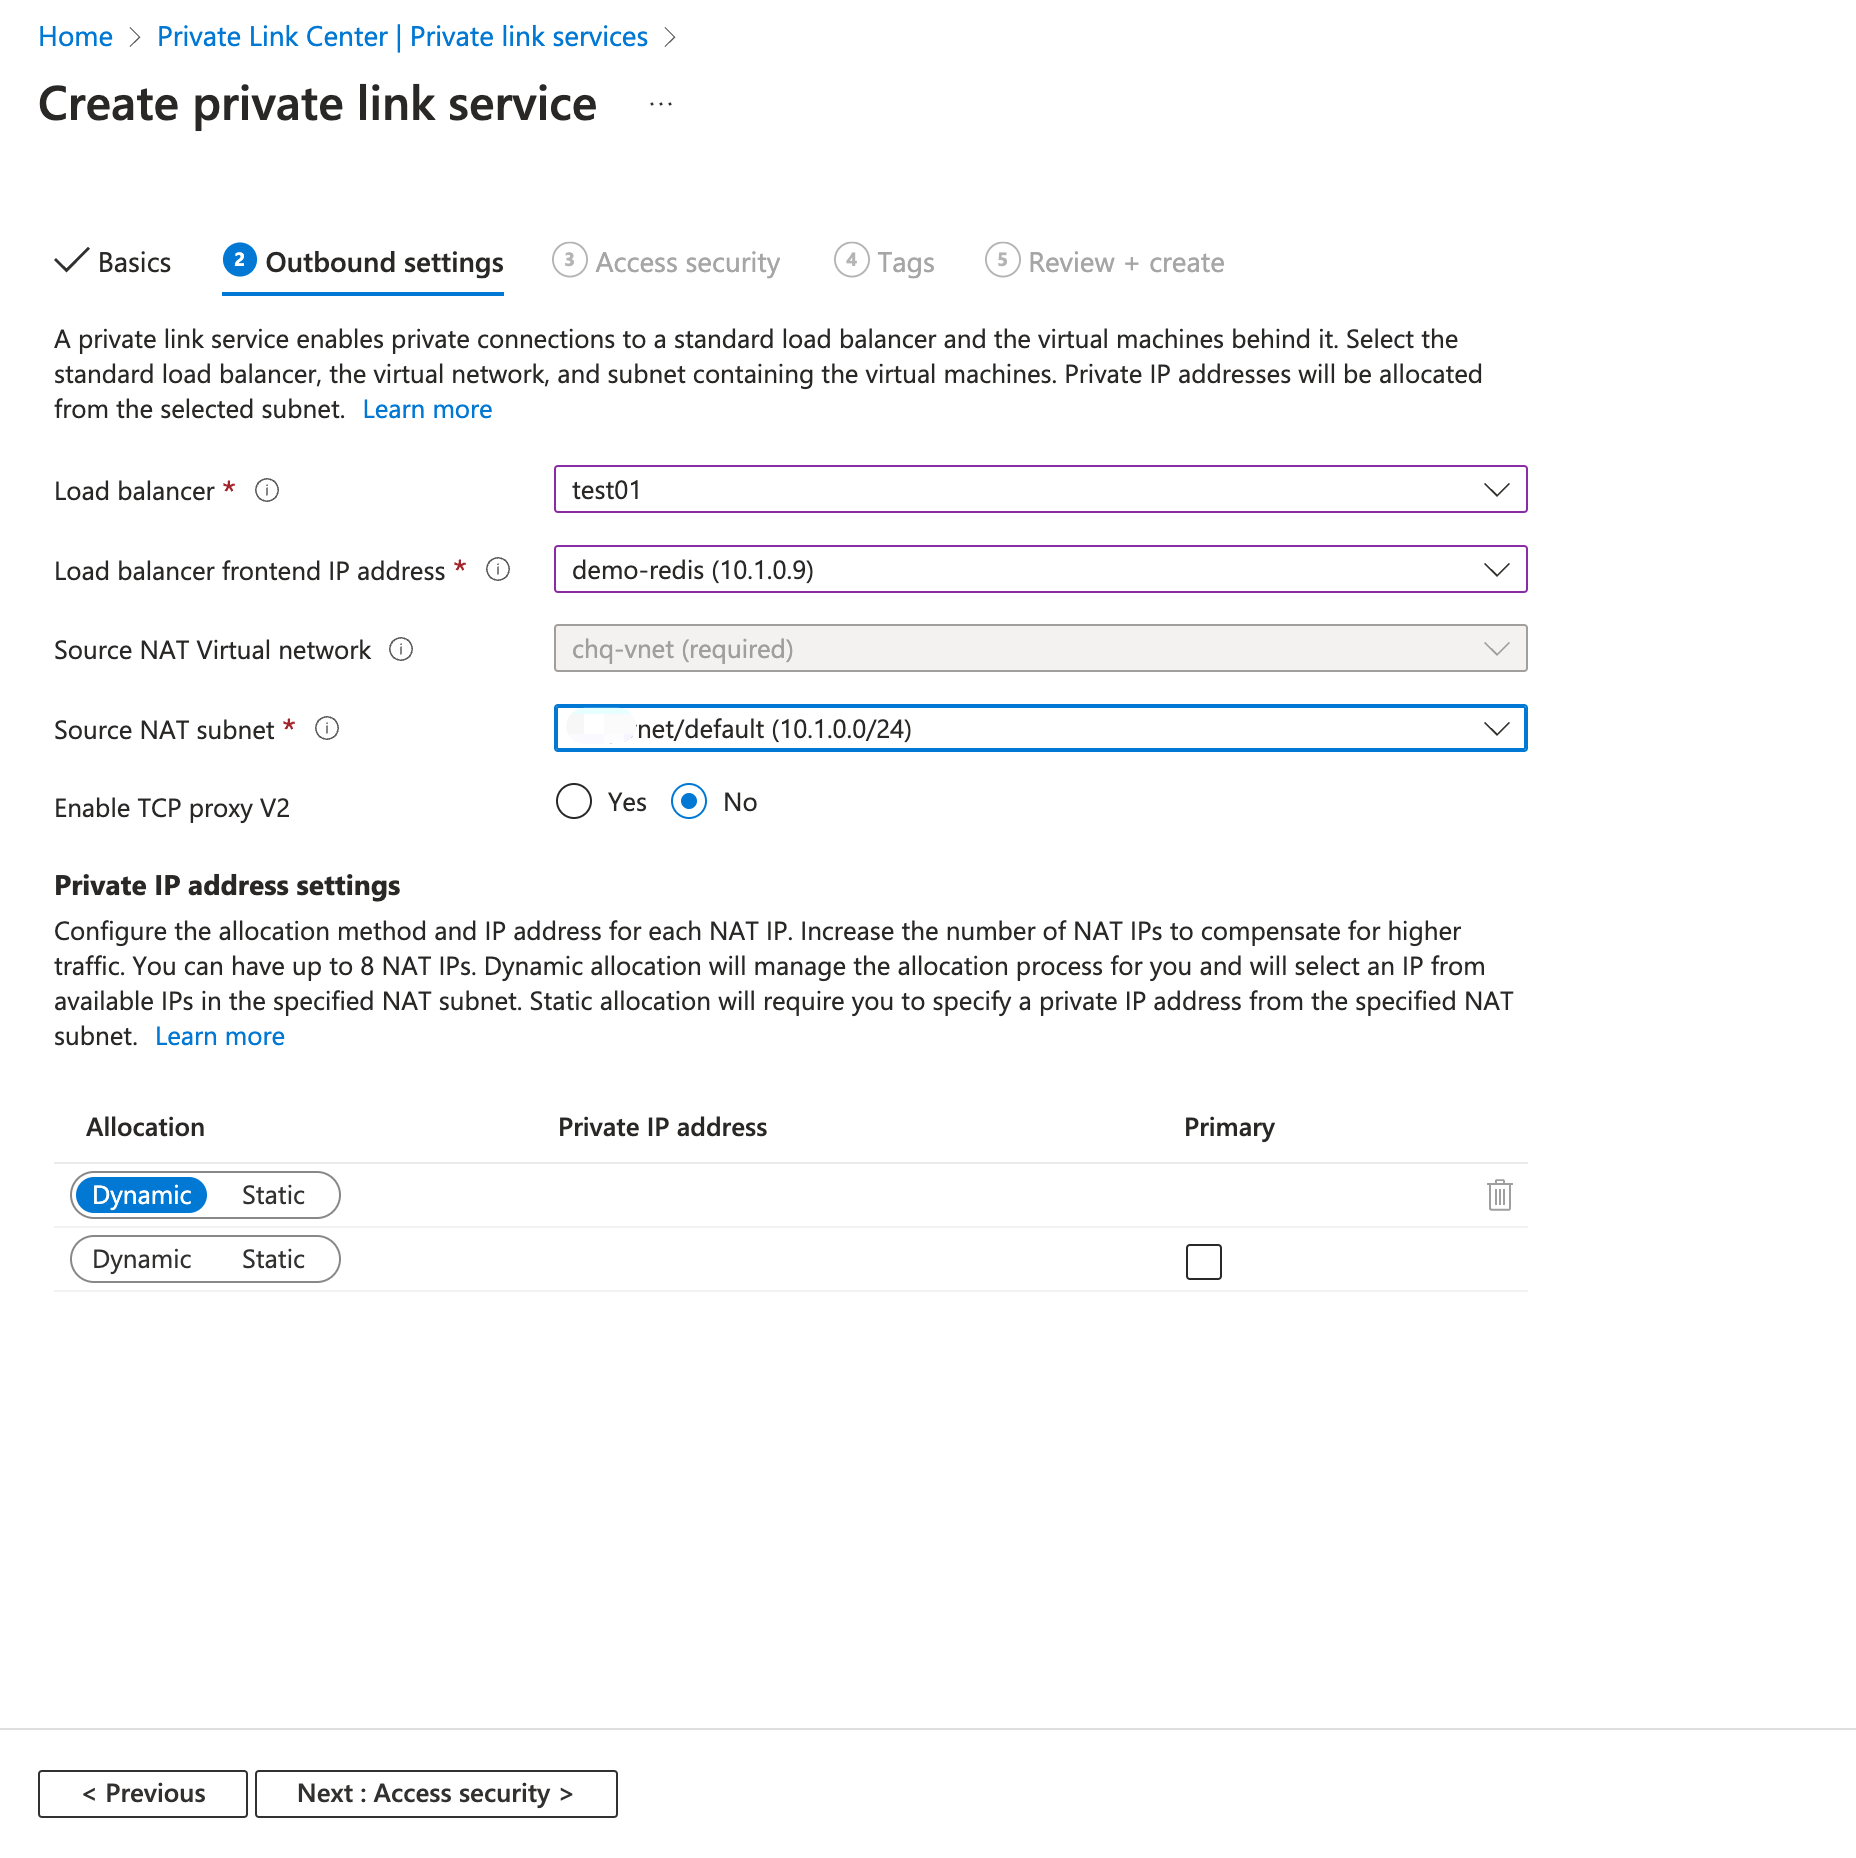
In the Outbound settings tab, enter or select the following information:
- Load balancer: Enter the load balancer name
test01you previously created. - Load balancer frontend IP address: Select the frontend IP address
demo-redis (10.1.0.9)you previously configured. - Source NAT subnet: Select the subnet you configured in Frontend IP configuration in Create Load Balancer.
- Enable TCP proxy V2: Leave the default of No. If your application expects a TCP proxy v2 header, select Yes.
- Private IP address settings: Leave the detault settings.
- Load balancer: Enter the load balancer name
- Select Next: Access security.
- Leave the default of Role-based access control only in the Access security tab.
- Select Next: Tags.
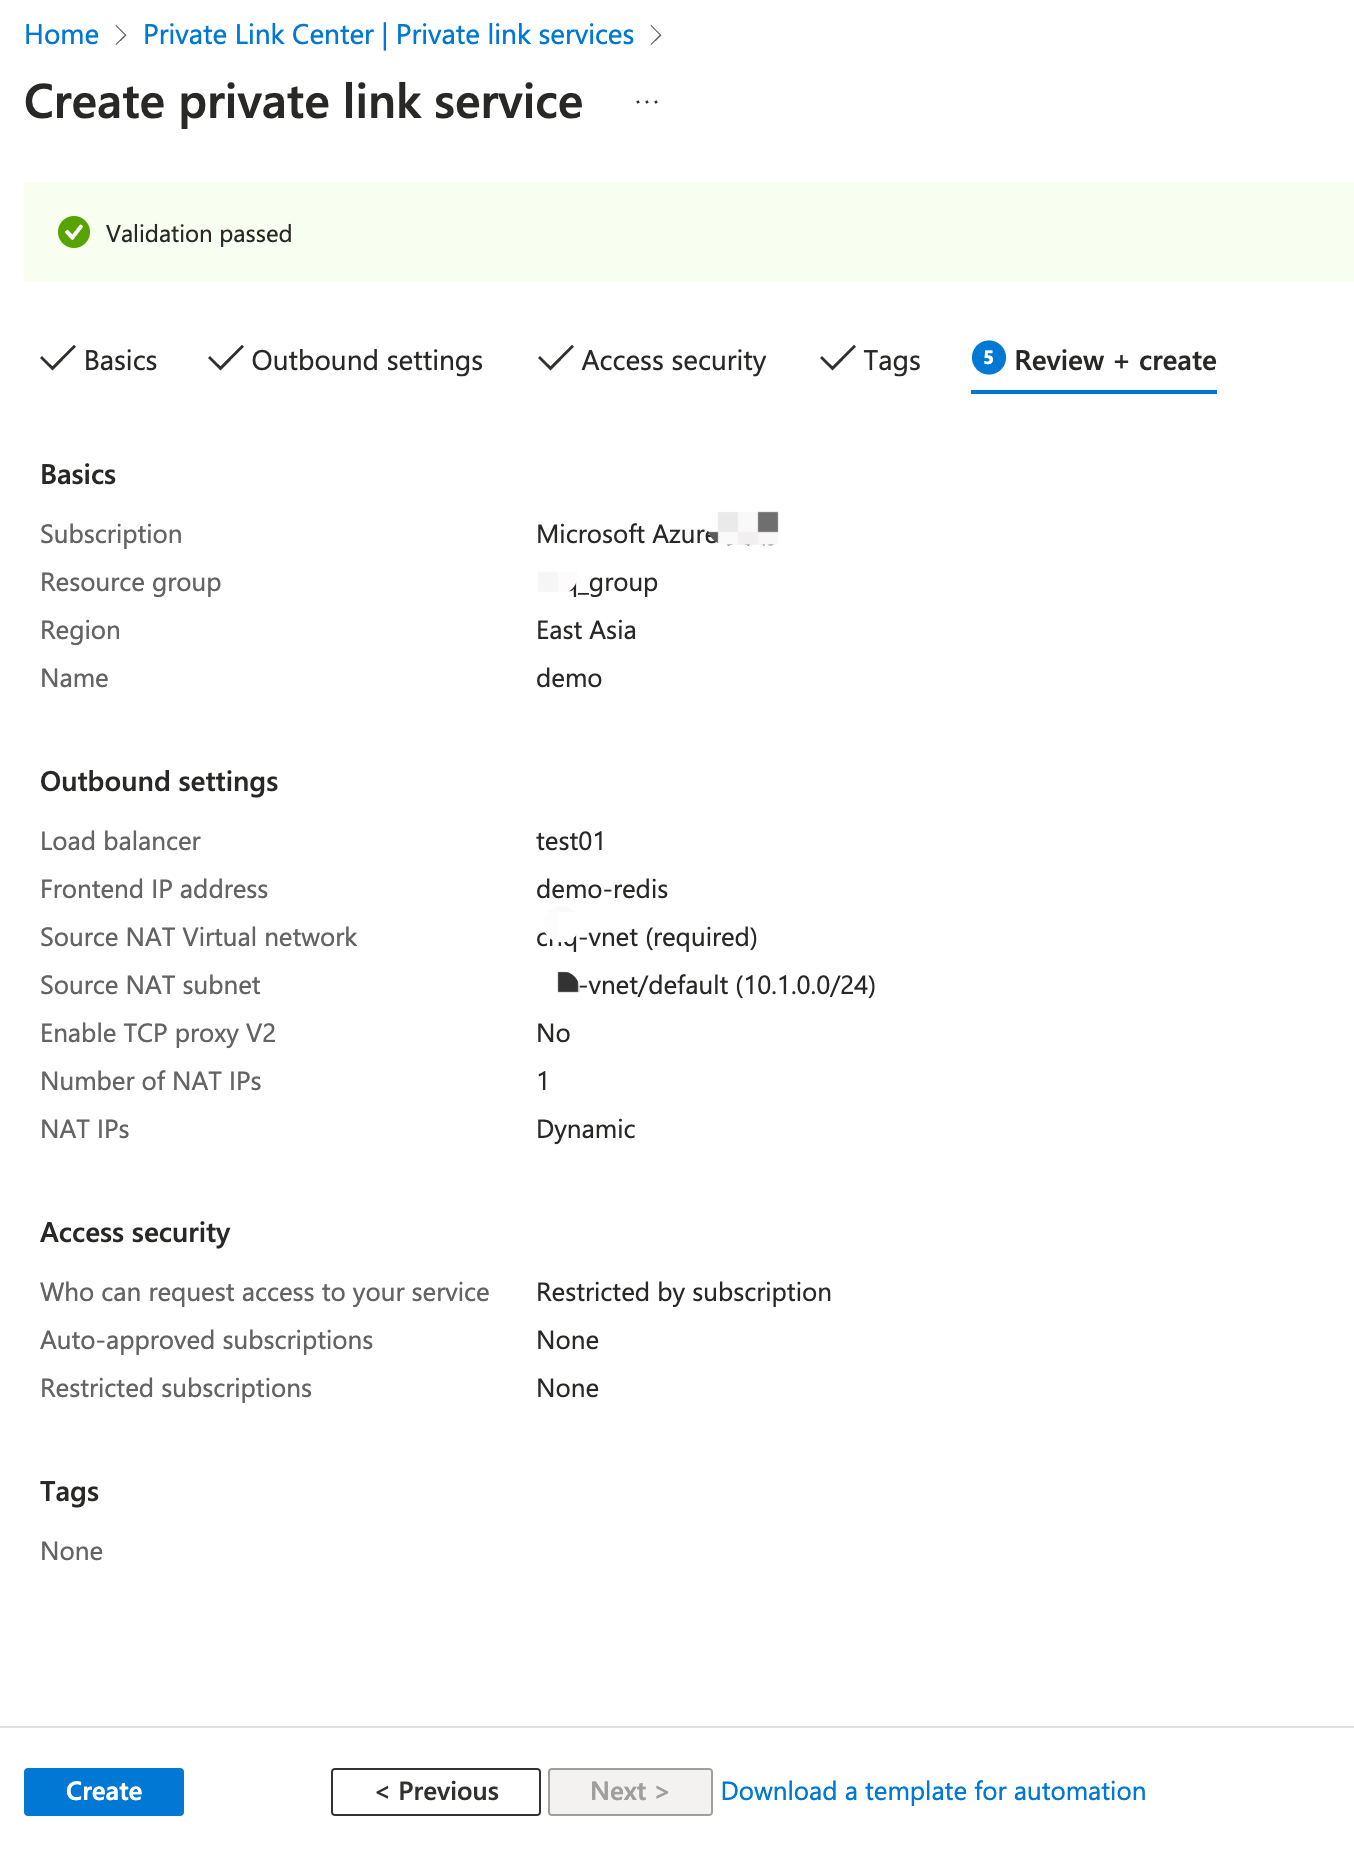
- Select Next: Review + create.
- Select Create.
Enable PrivateLink in Your Deployment
By creating a PrivateLink connection in your deployment, you enable the PrivateLink feature for your deployment.
Go to your deployment in EMQX Cloud Console.
Click Network Management from the deployment left menu.
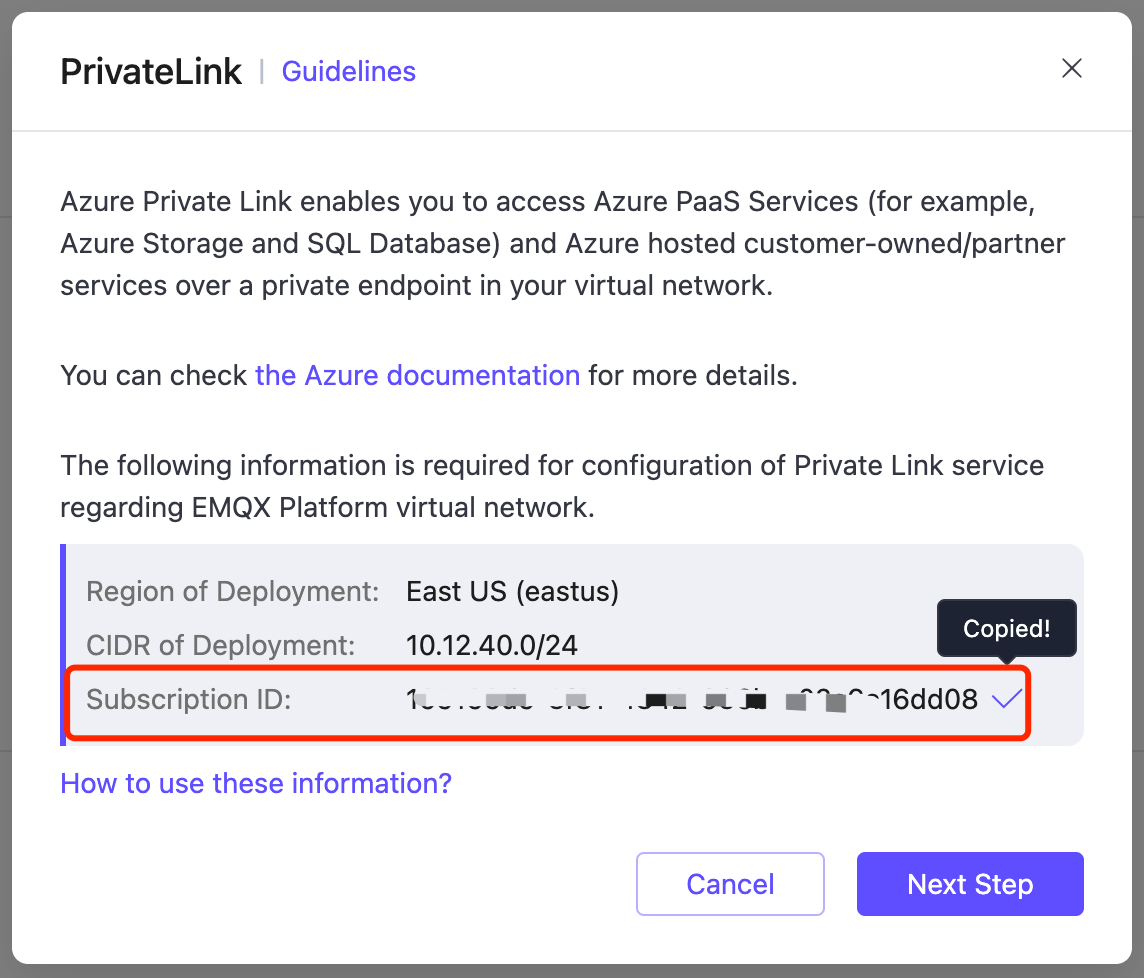
Navigate to the Privatelink area and click + PrivateLink. On the pop-up dialogue, copy the Azure subscription ID in the Subscription ID field
Go to the private link service
demoyou created in Azure Portal.Click Access security under Settings. Select Restricted by subscription and click Add subscription. Paste the Azure subscription ID copied from EMQX Cloud Console in the Subscription textbox.
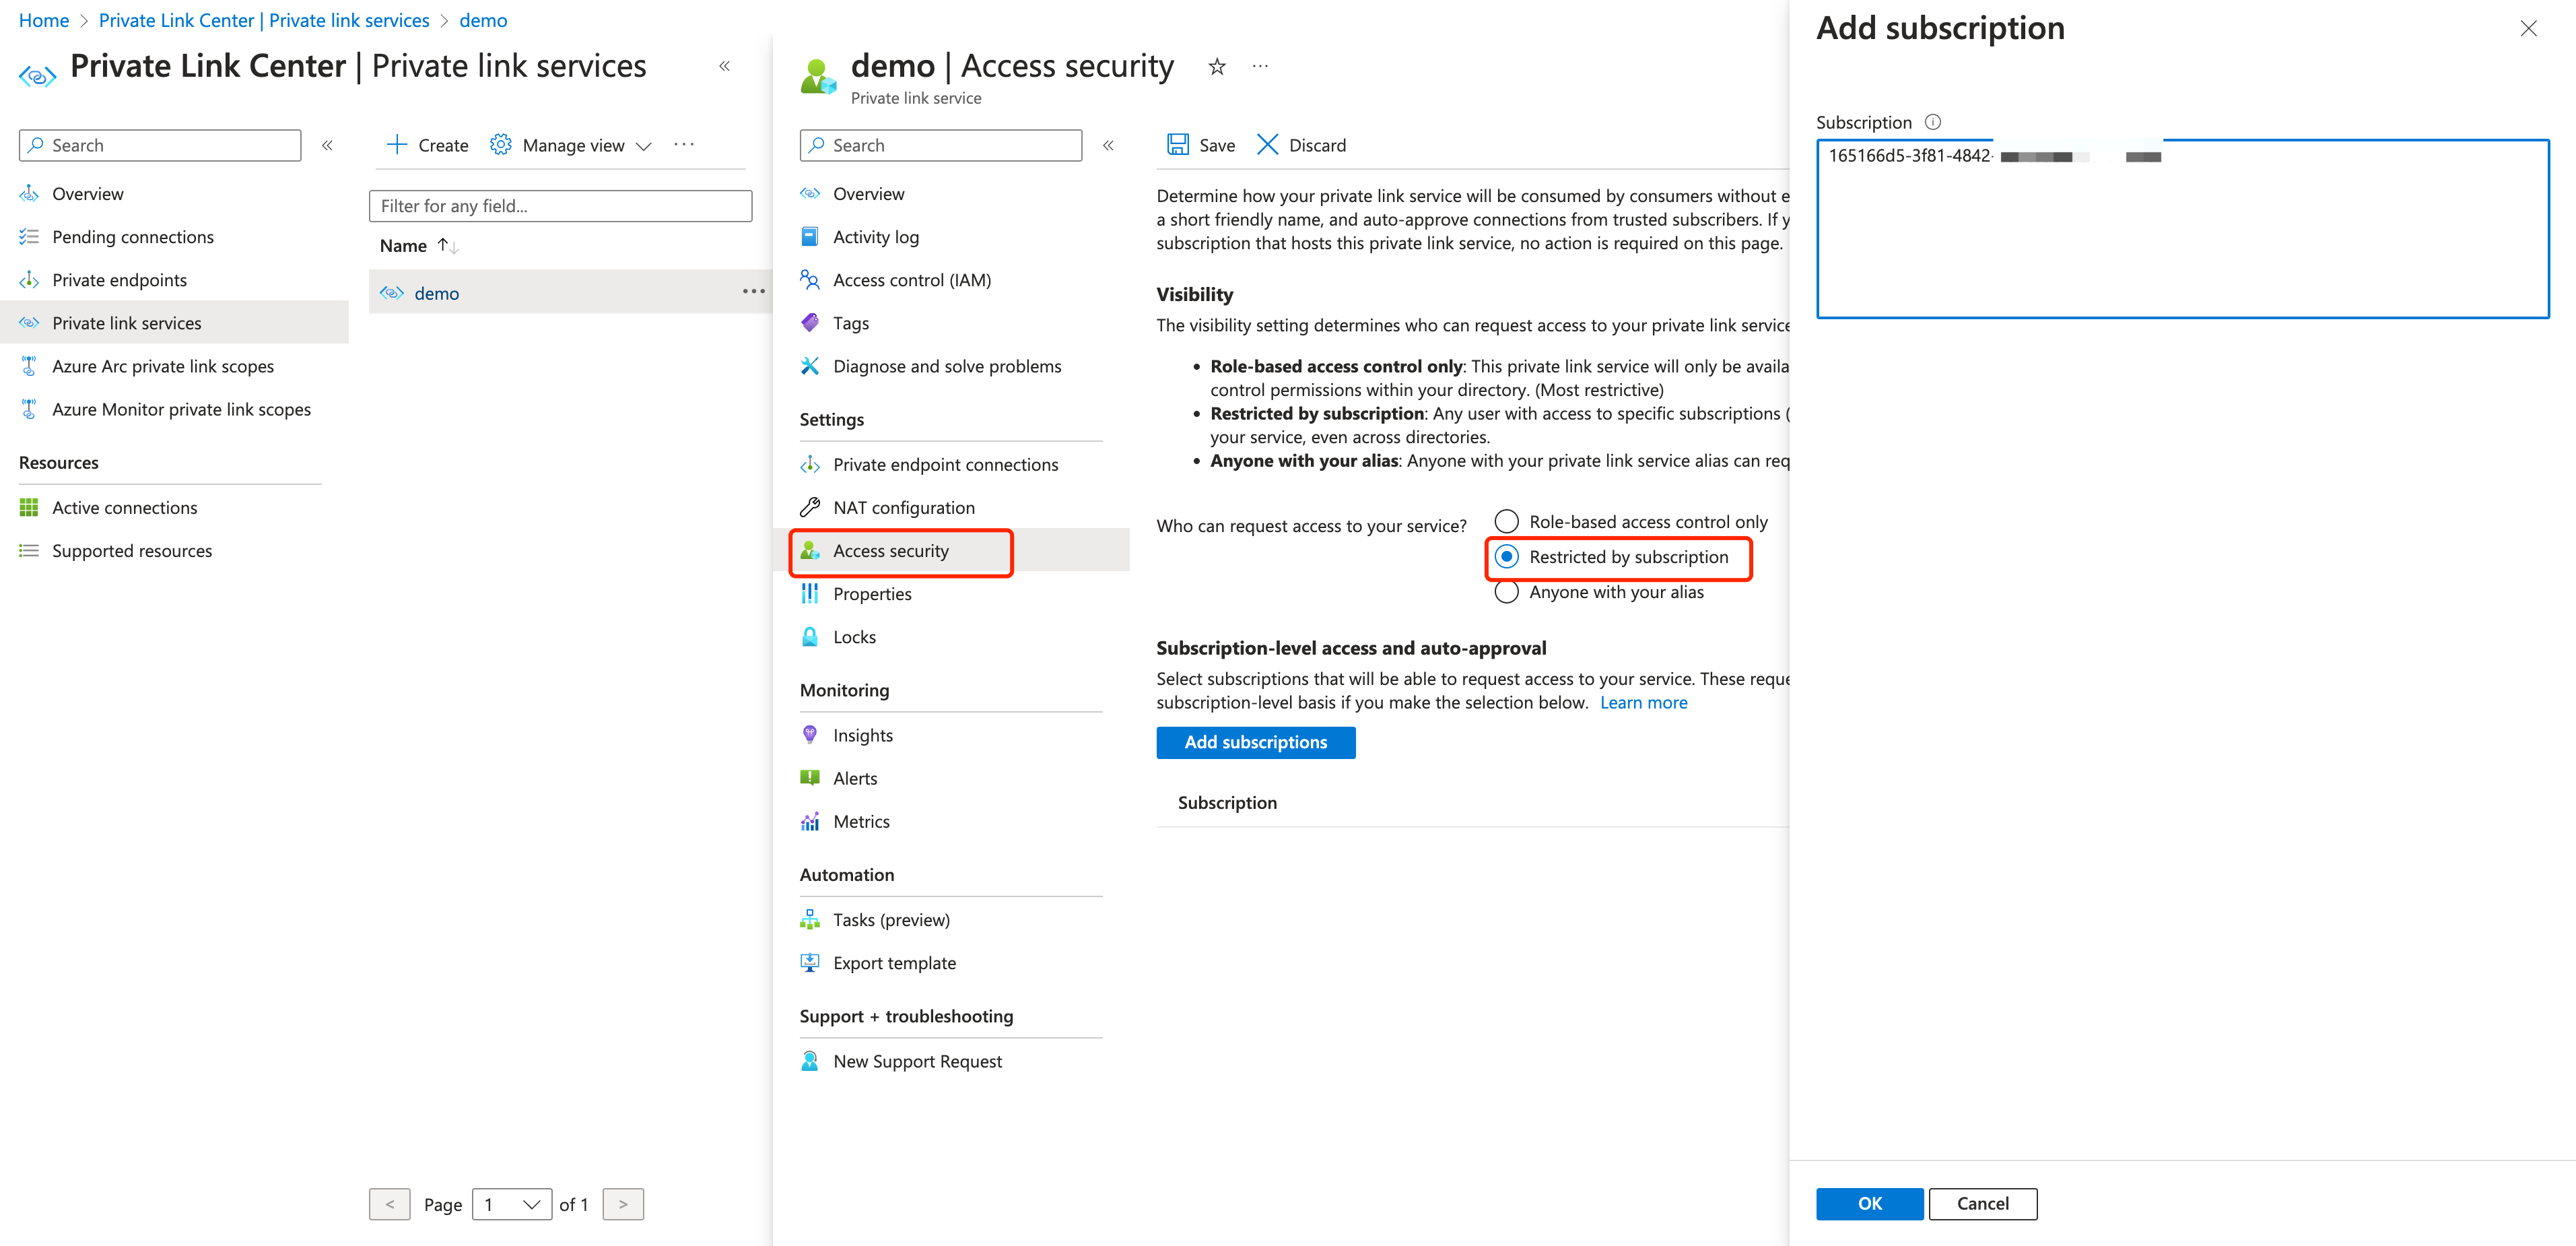
Click OK. Go to the Overview page and copy the alias for the private link service.
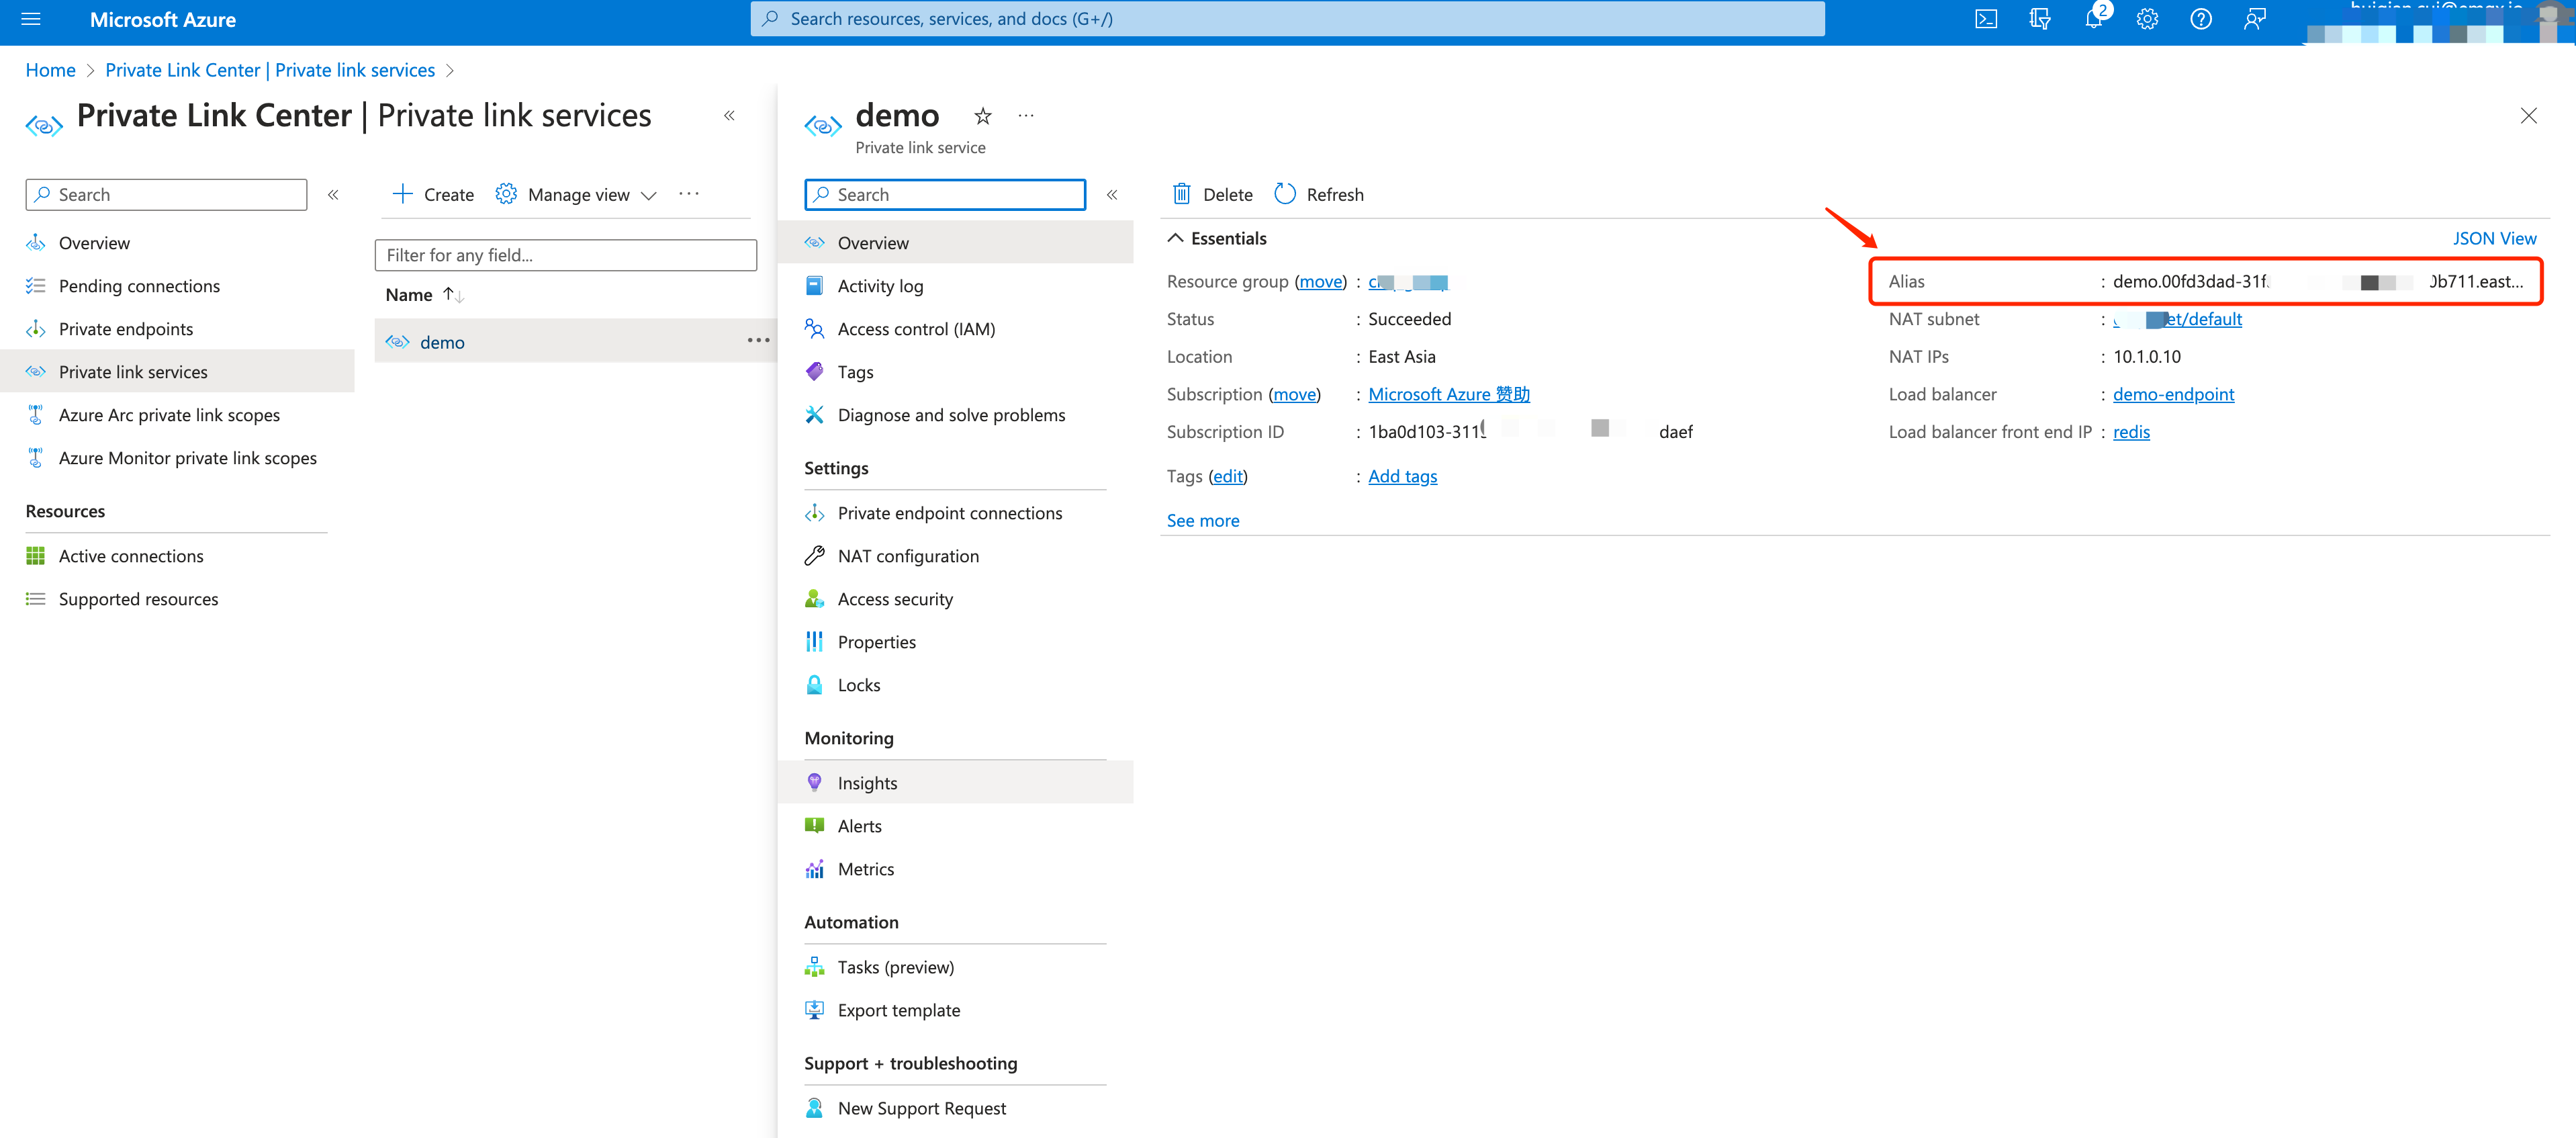
Go to the EMQX Cloud Console. Click Next Step, paste the alias you just copied in the Enter the ID of Private Link Service textbox. Click Create PrivateLink.
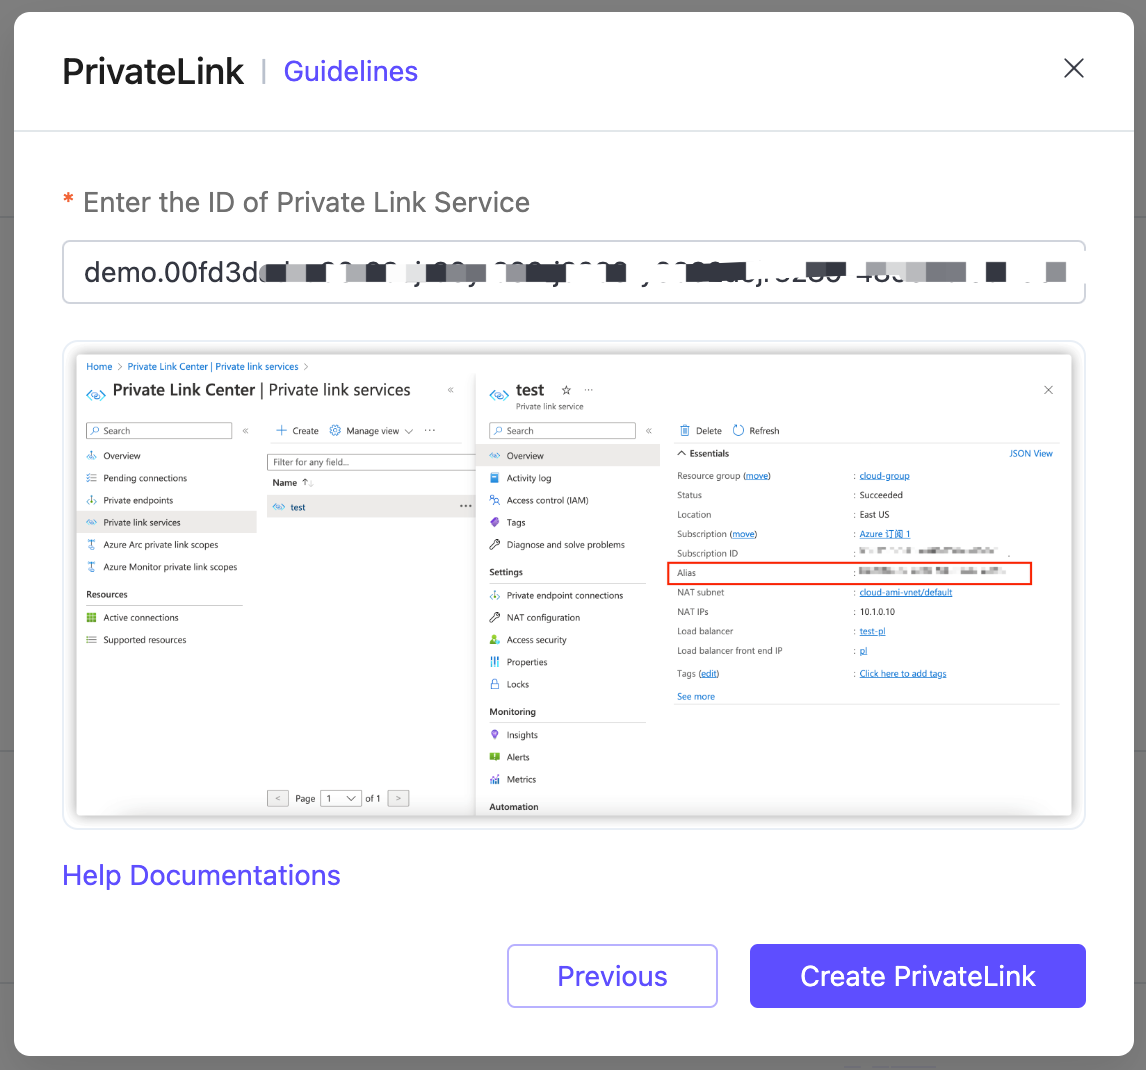
Once completed, go to the private link service
demoand click Private endpoint connections. Select the connection and click Approve.
Wait for a while and check the status of the PrivateLink in the deployment details. When the status turns to
running, it means the PrivateLink has been created successfully.Copy the PrivateLink IP address for later use in the configuration in Test PrivateLink Connection.

Remove PrivateLink
Before removing a PrivateLink connection, you need to check the following:
- Ensure that the PrivateLink status is running.
- Verify that there are no linked resources within the deployment, as neglecting this step could lead to unpredictable risks.
If you intend to remove the private link service from your Azure platform, it is important to first remove the PrivateLink from the EMQX Cloud Console. Failing to do so may result in a "Failed" PrivateLink status for the deployment.
Go to the Network Management page in your deployment.
In the PrivateLink area, click the remove icon in the Actions column of the PrivateLink and click Confirm to delete.
