Ingest MQTT Data into Redis
Redis is an open-source, in-memory data store used by millions of developers as a database, cache, streaming engine, and message broker. EMQX supports integration with Redis so you can save MQTT messages and client events to Redis. With Redis data integration, you can use Redis for message caching and statistics of client events.
This page provides a detailed overview of the data integration between EMQX Cloud and Redis with practical instructions on creating and validating the data integration.
How It Works
Redis data integration is an out-of-the-box feature in EMQX Cloud that combines the real-time data capturing and transmission capabilities of EMQX Cloud with Redis's rich data structures and powerful Key-Value read and write performance capabilities. With a built-in rule engine component, the integration simplifies the process of ingesting data from EMQX Cloud to Redis for data caching and operations., eliminating the need for complex coding.
The diagram below illustrates a typical architecture of data integration between EMQX Cloud and Redis:
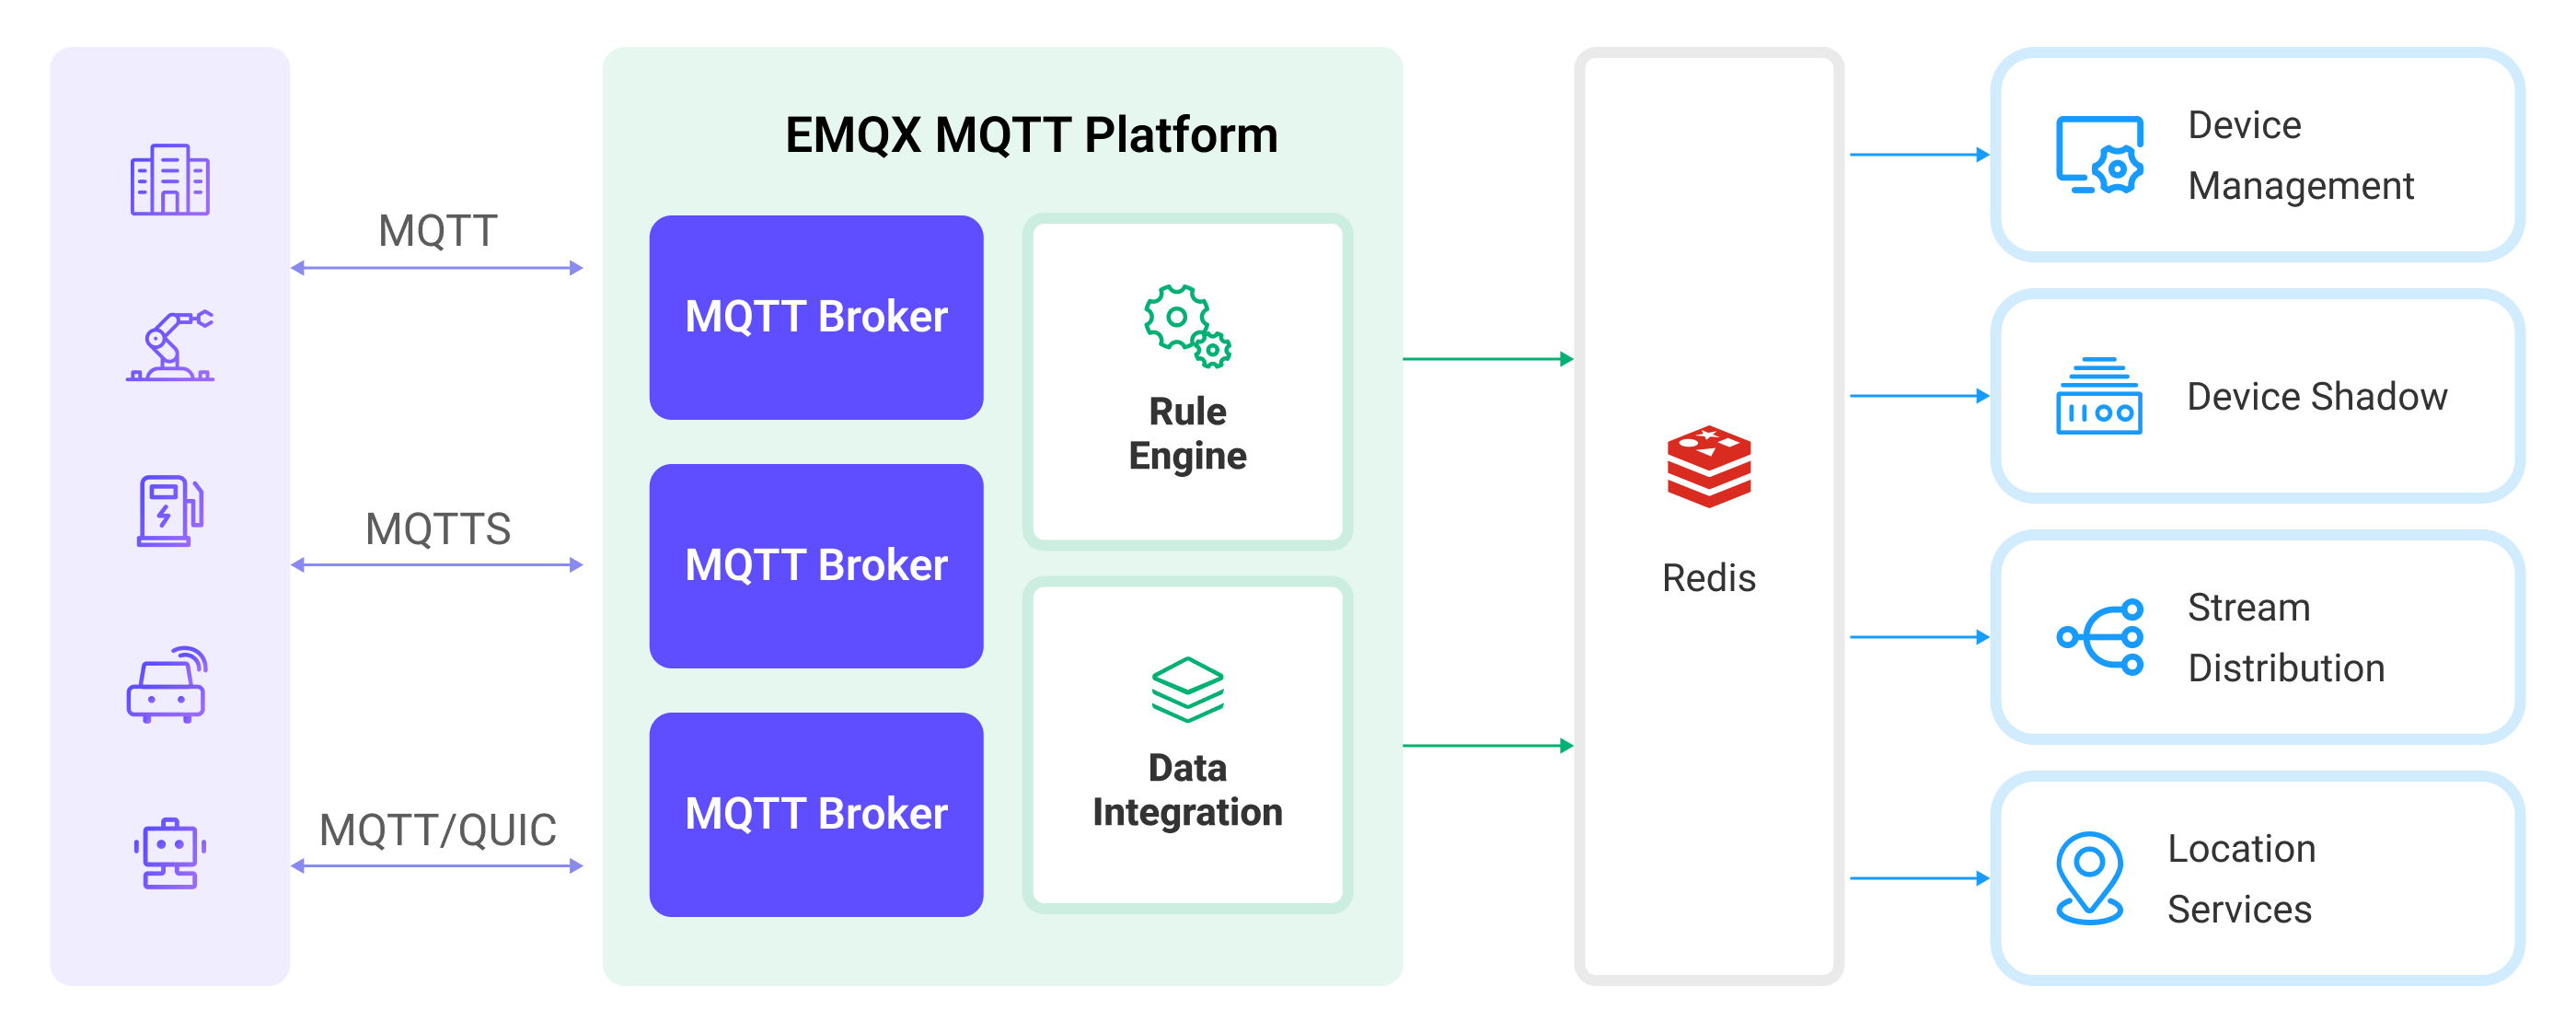
Ingesting MQTT data into Redis works as follows:
- Message publication and reception: Industrial IoT devices establish successful connections to EMQX Cloud deployment through the MQTT protocol and publish real-time MQTT data from machines, sensors, and product lines based on their operational states, readings, or triggered events to EMQX Cloud. When EMQX Cloud receives these messages, it initiates the matching process within its rules engine.
- Message data processing: When a message arrives, it passes through the rule engine and is then processed by the rule defined in EMQX Cloud. The rules, based on predefined criteria, determine which messages need to be routed to Redis. If any rules specify payload transformations, those transformations are applied, such as converting data formats, filtering out specific information, or enriching the payload with additional context.
- Data ingestion into Redis: Once the rules engine has processed the data, it triggers actions to execute preset Redis commands for caching, counting, and other operations on the data.
- Data storage and utilization: By reading data stored in Redis, enterprises can leverage its rich data operation capabilities to implement various use cases. For example, in the logistics field, it's possible to obtain the latest status of devices, as well as carry out GPS geographical location analysis based on data and perform operations like real-time data analysis and sorting. This facilitates functionalities like real-time tracking, route recommendations, and more.
Features and Benefits
The data integration with Redis offers a range of features and benefits tailored to ensure efficient data transmission, processing, and utilization:
- High Performance and Scalability: Supported by EMQX's distributed architecture and Redis's cluster mode, applications can seamlessly scale with increasing data volumes. Even for large datasets, consistent performance and responsiveness are ensured.
- Real-time Data Streams: EMQX Cloud is built specifically for handling real-time data streams, ensuring efficient and reliable data transmission from devices to Redis. Redis is capable of quickly executing data operations, meeting the needs for real-time data caching and making it an ideal data storage component for EMQX Cloud.
- Real-time Data Analysis: Redis can be used for real-time data analysis, capable of computing real-time metrics like device connections, message publishing, and specific business indicators. EMQX Cloud, on the other hand, can handle real-time message transmission and processing, providing real-time data inputs for data analysis.
- Geographic Location Analysis: Redis offers geospatial data structures and commands for storing and querying geographic location information. Combined with EMQX Cloud's powerful device connection capabilities, it can be widely applied in various IoT applications like logistics, connected vehicles, smart cities, and more.
Before You Start
This section describes the preparations you need to complete before you start to create the Redis data integration, including how to set up the Redis server.
Prerequisites
- Knowledge about data integration
- Knowledge about EMQX Cloud data integration rules
Set up Network
Before configuring data integration, you must create an EMQX Cloud deployment and ensure network connectivity between EMQX Cloud and the target service.
For Dedicated Flex deployments:
Create a VPC Peering Connection between the EMQX Cloud VPC and the target service VPC. After the peering connection is established, EMQX Cloud can access the target service through its private IP address.
If access through a public IP is required, configure a NAT Gateway to enable outbound connectivity.
For BYOC (Bring Your Own Cloud) deployments:
Create a VPC peering connection between the VPC where the BYOC deployment is running and the VPC hosting the target service. Once peering is in place, the target service can be accessed via its private IP address.
If the target service must be accessed through a public IP, configure a NAT Gateway in the BYOC VPC using your cloud provider’s console.
Install Redis Server
Install Redis via Docker
Install and run Redis via Docker:
# Start a Redis container
docker run --name redis -p 6379:6379 -d redis

# Access the container
docker exec -it redis bash

# Access the Redis server
redis-cli

# Verify the installation
127.0.0.1:6379> set emqx_cloud "Hello World"
OK
127.0.0.1:6379> get emqx_cloud
"Hello World"
Now you have successfully installed Redis and verified the installation with the SET and GET commands. For more Redis commands, see Redis Commands.
Create Redis Service using Redis Cloud
- Login to the Redis Cloud console and create a subscription. In this demo, you can select the Fixed Plan.
- Create a database.
- In the configuration page of the database, you can find the required connection details such as address, username, and password.
- You can click the connect button, select the Redis CLI option, copy the command, and use it in the command line to connect to the service for verification.
For more detailed information, please refer to the Redis Cloud Documentation
Create a Connector
Before creating data integration rules, you need to first create a Redis connector to access the Redis server.
Go to your deployment. Click Data Integration from the left-navigation menu.
If it is the first time for you to create a connector, select Redis under the Data Persistence category. If you have already created connectors, select New Connector and then select Redis under the Data Persistence category.
Connector Name: The system will automatically generate a connector name.
Set Redis Mode as the business needs, for example,
single.Enter the connection information:
- Server Host: IP address and port of the server.
- Database ID: Enter
0. - Username and Password: Redis services created with Redis Cloud require copying the username and password from the Configuration page of the database and entering them.
- Configure the other options according to your business needs.
- If you want to establish an encrypted connection, click the Enable TLS toggle switch.
Click the Test button. If the Redis service is accessible, a success prompt will be returned.
Click the New button to complete the creation.
Create a Rule
Next, you need to create a rule to specify the data to be written and add corresponding actions in the rule to forward the processed data to Redis.
Click New Rule in Rules area or click the New Rule icon in the Actions column of the connector you just created.
Set the rules in the SQL Editor based on the feature to use, Our goal is to trigger the engine when the client sends a temperature and humidity message to the
temp_hum/emqxtopic. Here you need a certain process of SQL:sqlSELECT timestamp div 1000 as up_timestamp, clientid as client_id, payload as temp_hum FROM "temp_hum/emqx"TIP
If you are a beginner user, click SQL Examples and Try It Out to learn and test the SQL rule.
Click Next to add an action.
Select the connector you just created from the Connector dropdown box.
Configure Redis Command Template. The "up_timestamp", "client ID", "temperature", and "humidity" data will be read from the topic and saved to Redis:
bashHMSET ${client_id} ${up_timestamp} ${temp_hum}Click the Confirm button to complete the rule creation.
In the Successful new rule pop-up, click Back to Rules, thus completing the entire data integration configuration chain.
Test the Rule
You are recommended to use MQTTX to simulate temperature and humidity data reporting, but you can also use any other client.
Use MQTTX to connect to the deployment and send messages to the following Topic.
topic:
temp_hum/emqxclient id:
test_clientpayload:
json{ "temp": "27.5", "hum": "41.8" }
View stored results.
- For Redis installed via Docker, you need to access the container first and then execute
redis-clito connect to the Redis service. - For services created via Redis Cloud, select the Redis CLI connection option, copy the command, and execute it in the command line to connect to the Redis service.
bash127.0.0.1:6379> HGETALL test_client 1) "1710921138" 2) "{\n \"temp\": 27.5,\n \"hum\": 41.8\n}"- For Redis installed via Docker, you need to access the container first and then execute
View operational data in the console. Click the rule ID in the rule list, and you can see the statistics of the rule and the statistics of all actions under this rule.