Ingest MQTT Data into Apache IoTDB
Apache IoTDB is a high-performance and scalable time series database designed to handle massive amounts of time series data generated by various IoT devices and systems.
EMQX Cloud provides seamless data integration with Apache IoTDB, enabling real-time MQTT messages ingested by EMQX Cloud to be forwarded to IoTDB through the REST API V2. This integration supports a one-way data flow, writing MQTT data into IoTDB for efficient time-series storage and analysis.
This page introduces how to integrate EMQX Cloud with Apache IoTDB and provides step-by-step instructions for creating and validating the integration.
How It Works
The Apache IoTDB data integration is a built-in feature of EMQX Cloud that enables MQTT-based time-series data to be ingested into Apache IoTDB without additional coding. By leveraging EMQX Cloud’s built-in rule engine, the integration simplifies data filtering, transformation, and forwarding for efficient storage and querying in IoTDB.
The following diagram illustrates a typical data integration architecture between EMQX Cloud and IoTDB.
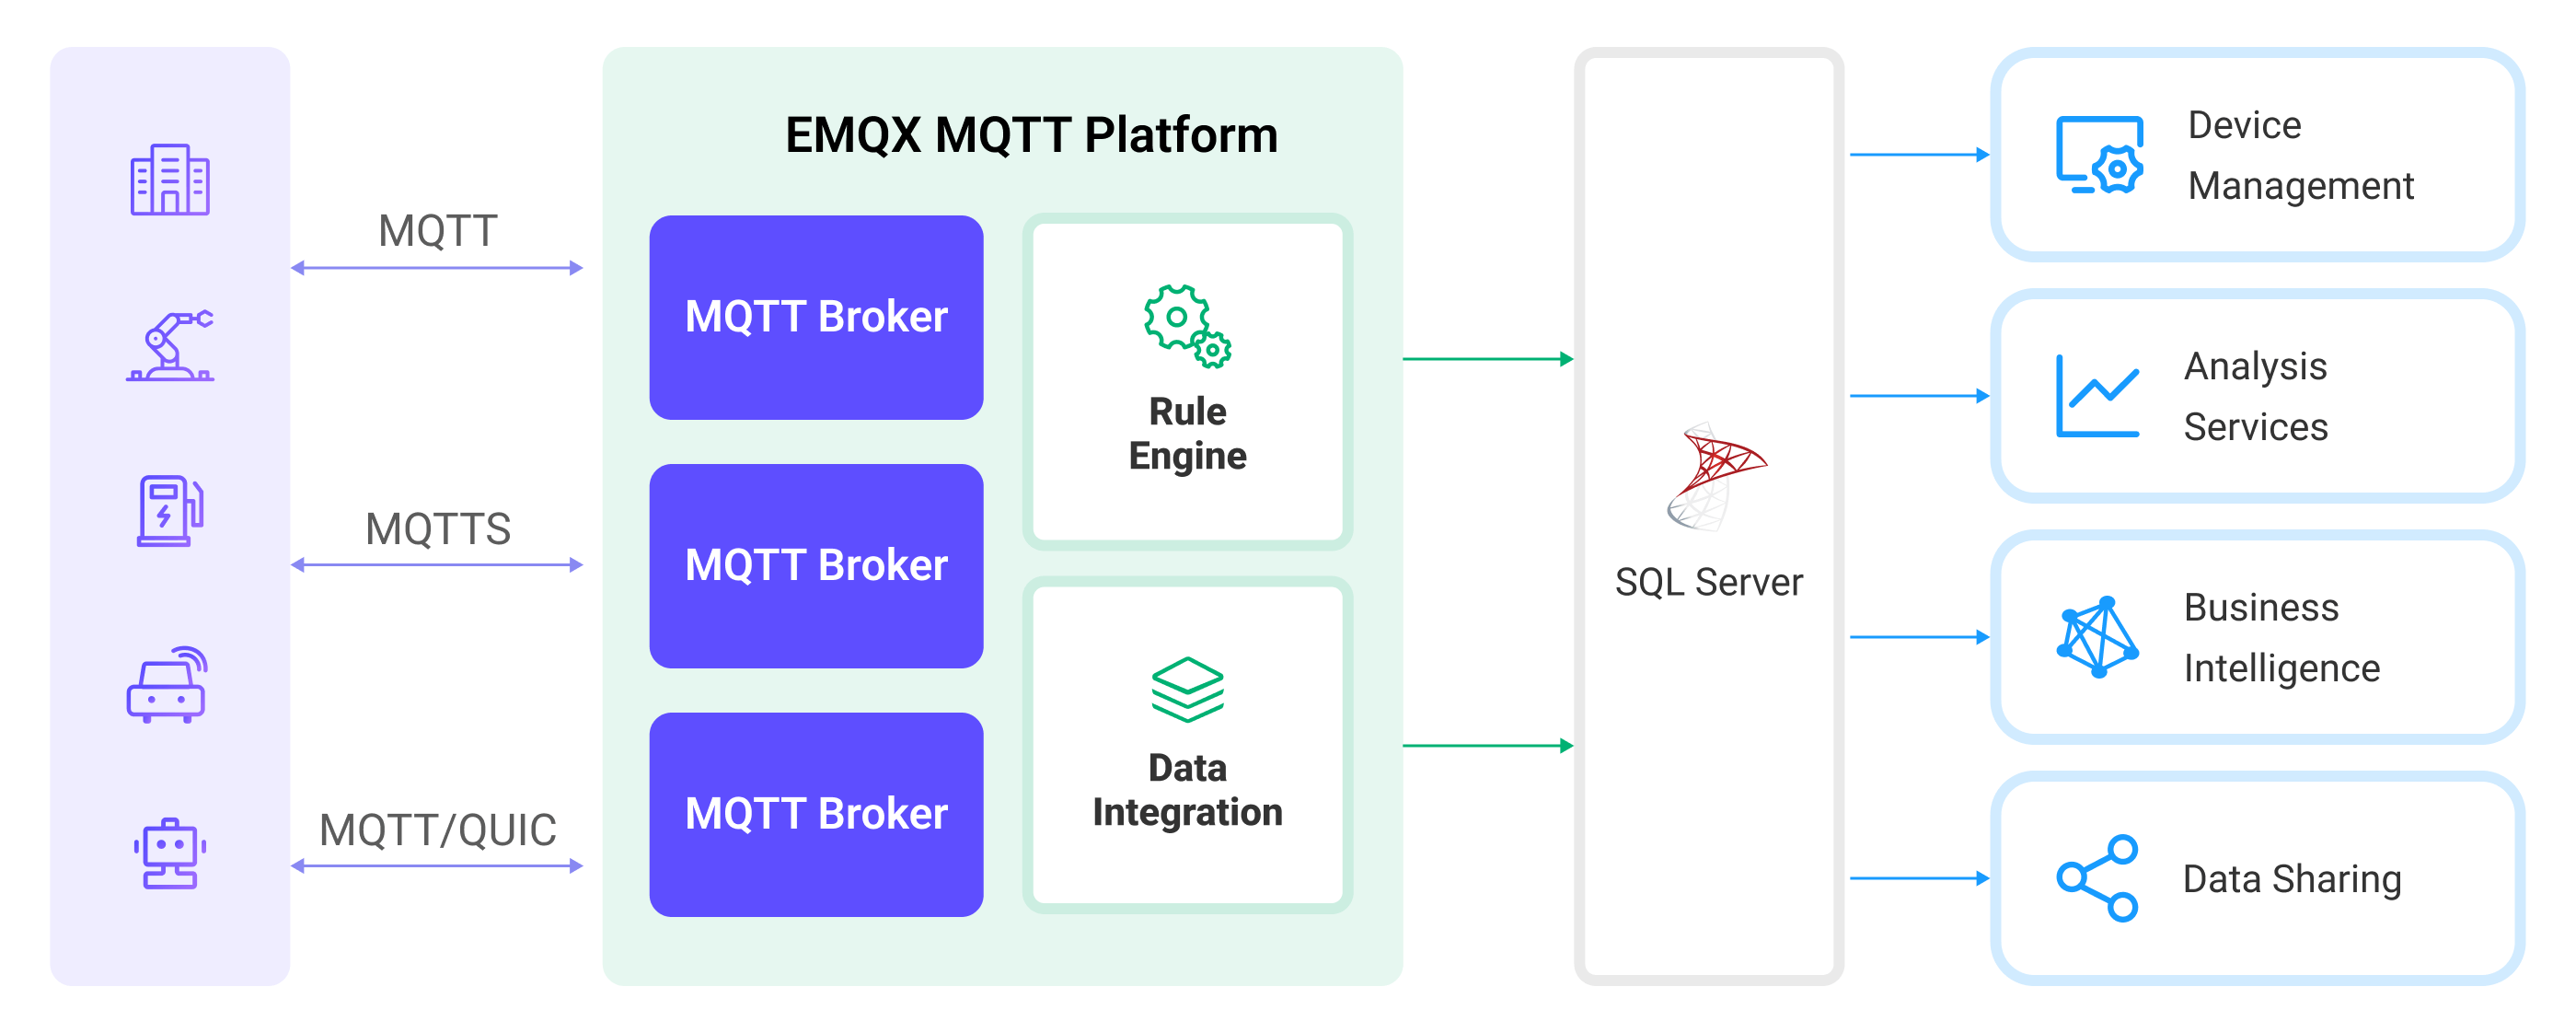
The workflow of the data integration is as follows:
- Message publication and reception: Devices connect to EMQX Cloud over MQTT and publish messages containing telemetry data, status updates, or event information. The rule engine evaluates incoming messages.
- Rule-based processing: Messages that match defined rules are selected for further processing. Optional transformations can be applied, such as filtering fields, converting data formats, or enriching payloads.
- Data buffering: To improve reliability, EMQX Cloud buffers messages in memory when IoTDB is temporarily unavailable. If necessary, buffered data can be offloaded to disk to avoid memory pressure. Buffered data is not retained if the integration or EMQX node restarts.
- Data ingestion into IoTDB: For matched rules, EMQX Cloud triggers the IoTDB action to forward processed data and write it into IoTDB as time-series data.
- Data Storage and Utilization: Once stored in IoTDB, the data can be queried and analyzed for downstream applications such as device monitoring, asset tracking, predictive maintenance, and operational optimization.
Features and Benefits
The data integration with IoTDB offers a range of features and benefits tailored to ensure effective data handling and storage:
No-Code IoT Data Pipeline
Build a complete MQTT-to-time-series data pipeline between EMQX and Apache IoTDB using built-in rules and sinks, without custom code or external services.
Flexible Mapping from MQTT to IoTDB Models
Support both Tree and Table data models, allowing MQTT data to be written to IoTDB in a structure that matches your device modeling and query requirements.
Decoupled Ingestion and Storage
EMQX absorbs bursty, high-frequency MQTT traffic while IoTDB focuses on durable time-series storage, improving system stability and resilience.
Production-Ready Scalability
The integration scales horizontally with device count and data volume, making it suitable for large-scale IoT, IIoT, and energy scenarios.
Analytics-Ready Time-Series Data
Data written to IoTDB can be directly queried, aggregated, and analyzed, or integrated with big data engines for advanced analytics and long-term insights.
Before You Start
This section introduces the preparatory work needed to create Apache IoTDB Data Integration in EMQX Cloud.
Prerequisites
- Understand rules.
- Understand data integration.
Set up Network
Before configuring data integration, you must create an EMQX Cloud deployment and ensure network connectivity between EMQX Cloud and the target service.
For Dedicated Flex deployments:
Create a VPC Peering Connection between the EMQX Cloud VPC and the target service VPC. After the peering connection is established, EMQX Cloud can access the target service through its private IP address.
If access through a public IP is required, configure a NAT Gateway to enable outbound connectivity.
For BYOC (Bring Your Own Cloud) deployments:
Create a VPC peering connection between the VPC where the BYOC deployment is running and the VPC hosting the target service. Once peering is in place, the target service can be accessed via its private IP address.
If the target service must be accessed through a public IP, configure a NAT Gateway in the BYOC VPC using your cloud provider’s console.
Start an Apache IoTDB Server
This section introduces how to start an Apache IoTDB server using Docker. Make sure to have enable_rest_service=true in your IoTDB's configuration.
Run the following command to start an Apache IoTDB server with its REST interface enabled:
docker run -d --name iotdb-service \
              --hostname iotdb-service \
              -p 6667:6667 \
              -p 18080:18080 \
              -e enable_rest_service=true \
              -e cn_internal_address=iotdb-service \
              -e cn_target_config_node_list=iotdb-service:10710 \
              -e cn_internal_port=10710 \
              -e cn_consensus_port=10720 \
              -e dn_rpc_address=iotdb-service \
              -e dn_internal_address=iotdb-service \
              -e dn_target_config_node_list=iotdb-service:10710 \
              -e dn_mpp_data_exchange_port=10740 \
              -e dn_schema_region_consensus_port=10750 \
              -e dn_data_region_consensus_port=10760 \
              -e dn_rpc_port=6667 \
              apache/iotdb:2.0.5-standalone
You can find more information about running IoTDB in Docker on Docker Hub.
Create a Database
IoTDB supports two data models: Tree Model and Table Model. Before creating a database, confirm the SQL Dialect (Tree or Table) to be used in the Connector and Sink, and create the corresponding database accordingly.
- For the Tree Model, only a database is required.
- For the Table Model, you must first create a database, then create tables for data ingestion.
For detailed steps, see the IoTDB User Guide:
- Create a database for the Tree Model
- Create a database for the Table Model
- Create tables for the Table Model
Create an IoTDB Connector
To create the Apache IoTDB data integration, you need to create a Connector to connect the Apache IoTDB Sink to the Apache IoTDB server.
Go to your deployment. Click Data Integration from the left-navigation menu.
Go to the Data Integration page of the deployment and select Apache IoTDB. If other connectors already exist, click New Connector and then select Apache IoTDB.
Configure the connector:
- Connector Name: Enter a unique name for the connector. Use a combination of uppercase/lowercase letters or numbers, for example,
my_iotdb. - Description: (Optional) A brief description of the connector.
- Driver: Select the protocol used to connect to IoTDB.
REST API: Enter the IoTDB REST service endpoint, for example,http://localhost:18080, as the IoTDB REST Service Base URL.Thrift Protocol: Enter the IoTDB Thrift server address in the Server Host field.
- SQL Dialect: Select the IoTDB data model that determines how EMQX writes device data into IoTDB.
Tree Model: Writes data as hierarchical time-series paths, suitable for path-based device and measurement management.Table Model: Writes data into relational tables, suitable for managing device data by device type or category.
- Database Name: When the SQL Dialect is set to
Table Model, you must specify the name of the database to connect to. - Username and Password: Enter credentials used by EMQX to authenticate with the Apache IoTDB server.
- IoTDB Version: Select the version of your Apache IoTDB deployment.
- Enable TLS: Enable this option to establish an encrypted connection to the Apache IoTDB server.
- For optional tuning, see Advanced Settings in Advanced Configurations.
- Connector Name: Enter a unique name for the connector. Use a combination of uppercase/lowercase letters or numbers, for example,
(Optional) Click Test Connectivity to verify that the connector can successfully connect to the Apache IoTDB server.
Click New to finish creating the connector.
In the dialog that appears, you can choose Back to Connector List or Create Rule to continue configuring a rule and an Apache IoTDB Sink. For detailed steps, see Create a Rule with Apache IoTDB Sink.
Create a Rule with Apache IoTDB Sink
This section demonstrates how to create a rule in EMQX Cloud to process messages from the source MQTT topic temp_hum/emqx and send the processed results through the configured Apache IoTDB Sink to store the time series data to Apache IoTDB.
Click New Rule in the Rules area or click the New Rule icon in the Actions column of the connector you just created.
Enter the rule matching SQL statement in the SQL editor. In the following rule, we read the time when the message was reported
up_timestamp, client ID, payload viatemp_hum/emqxtopic. Also, we can read temperature and humidity from this topic.sqlSELECT payload.temp as temp, payload.hum as hum, payload.device_id as device_id FROM "temp_hum/emqx"TIP
If you are a beginner user, click SQL Examples and Try It Out to learn and test the SQL rule.
Add an Apache IoTDB Sink to the rule to write the processed results into IoTDB. For detailed steps, see Add an Apache IoTDB Sink.
Click the Confirm button to complete the rule creation.
In the Successful new rule pop-up, click Back to Rules, thus completing the entire data integration configuration chain.
Add an Apache IoTDB Sink
On the New Rule page, click Next to add an action.
Select the
my_iotdbconnector you just created from the Connector dropdown box.Configure the following information for the Sink:
SQL Dialect: Select how the Apache IoTDB Sink writes data into IoTDB. This option must be consistent with the SQL dialect selected in the connector.
Tree Model: Writes data as time-series paths in IoTDB. Each Sink record is inserted into a device path, with measurements written as individual time series under that device. When selecting this model, you can specify the Device ID field.Table Model: Writes data into IoTDB relational tables. Each Sink record is inserted as a row in the specified table, with fields mapped to table columns. When selecting this model, you must specify the Table field.
Device ID (optional): Enter a specific device ID to be used as the device name for forwarding and inserting timeseries data into the IoTDB instance.
TIP
If left empty, the device ID can still be specified in the published message or configured within the rule. For example, if you publish a JSON-encoded message with a
device_idfield, the value of that field will determine the output device ID. To extract this information using the rule engine, you can use SQL similar to the following:sqlSELECT payload, `my_device` as payload.device_idHowever, the fixed device ID configured in this field takes precedence over any previously mentioned methods.
Table: The name of the IoTDB table to which the data will be written.
Align Timeseries: Disabled by default. Once enabled, the timestamp columns of a group of aligned timeseries are stored only once in IoTDB, rather than duplicating them for each individual timeseries within the group.
Configure the Write Data to specify the ways to generate IoTDB data from MQTT messages.
You can define a template in the Write Data section, including as many items as needed, each with the required contextual information per row. When this template is provided, the system will generate IoTDB data by applying it to the MQTT message. The template for writing data supports batch setting via CSV file. For details, refer to Batch Setting.
For example, consider this template:
Note
The Column Category only appears when you select
Table Modelas the SQL dialect.Column Category Timestamp Measurement Data Type Value field index INT32 ${index} temperature FLOAT ${temp} TimestampandValuesupport placeholder syntax to fill it with variables. If theTimestampis omitted, it will be automatically filled with the current system time in milliseconds.Then, your MQTT message can be structured as follows:
json{ "index": "42", "temp": "32.67" }
Advanced settings (optional): See Advanced Configurations.
(Optional) click Test Connectivity to test if the sink can be connected to the Apache IoTDB server.
Batch Setting
In Apache IoTDB, writing hundreds of data entries simultaneously can be challenging when configuring on the Cloud Console. To address this issue, EMQX Cloud offers a functionality for batch setting data writes.
When configuring Write Data, you can use the batch setting feature to import fields for insertion operations from a CSV file.
Click the Batch Setting button in the Write Data table to open the Import Batch Setting popup.
Follow the instructions to download the batch setting template file, then fill in the data writing configuration in the template file. The default template file content is as follows:
Note
Below is the default template for
Table Model. The Column Category column is not available inTree Model.Column Category Timestamp Measurement Data Type Value Remarks (Optional) tag now clientid text ${clientid} field now temp float ${payload.temp} Fields, values, and data types are mandatory. Available data type options include: boolean, int32, int64, float, double, text attribute now hum text ${payload.hum} attribute now status text ${payload.status} - Column Category: The data model of the column. Supported values are
tag,field, andattribute.tagmust be a string;fieldorattributeis recommended. - Timestamp: Supports placeholders in ${var} format, requiring timestamp format. You can also use the following special characters to insert system time:
- now: Current millisecond timestamp
- now_ms: Current millisecond timestamp
- now_us: Current microsecond timestamp
- now_ns: Current nanosecond timestamp
- Measurement: Field name, supports constants or placeholders in ${var} format.
- Data Type: Data type, with options including BOOLEAN, INT32, INT64, FLOAT, DOUBLE, TEXT.
- Value: The data value to be written, supports constants or placeholders in ${var} format, and must match the data type.
- Remarks: Used only for notes within the CSV file, cannot be imported into EMQX Cloud.
Note that only CSV files under 1M and with data not exceeding 2000 lines are supported.
- Column Category: The data model of the column. Supported values are
Save the filled template file and upload it to the Import Batch Setting popup, then click Import to complete the batch setting.
After importing, you can further adjust the data in the Write Data table.
Test the Rule
You are recommended to use MQTTX to simulate temperature and humidity data reporting, but you can also use any other client.
Use MQTTX to connect to the deployment and send messages to the following Topic.
topic:
temp_hum/emqxpayload:
json{ "temp": "27.5", "hum": "41.8", "device_id": "root.sg27" // Device ID }
Check if the message has been forwarded to Apache IoTDB.
Check the messages by using IoTDB's command line interface. If you're using it from docker as shown above, you can connect to the server by using the following command from your terminal:
bash$ docker exec -ti iotdb-service /iotdb/sbin/start-cli.sh -h iotdb-serviceQuery data:
bashIoTDB> select * from root.sg27 +------------------------+-------------+--------------+ | Time|root.sg27.hum|root.sg27.temp| +------------------------+-------------+--------------+ |2024-03-25T08:45:19.541Z| 41.8| 27.5| +------------------------+-------------+--------------+ Total line number = 1 It costs 0.166s
View operational data in the console. Click the rule ID in the rule list, and you can see the statistics of the rule and the statistics of all actions under this rule.