Bridge MQTT Data into RocketMQ
EMQX Cloud supports bridging data into RocketMQ, so you can forward MQTT messages and client events to RocketMQ. For example, you can use RocketMQ to collect sensor data from devices, log data, etc.
This page provides a detailed overview of the data integration between EMQX Cloud and RocketMQ with practical instructions on creating and validating the data integration.
How It Works
The RocketMQ data integration is an out-of-the-box feature in EMQX Cloud that combines the real-time data capturing and transmission capabilities of EMQX Cloud with RocketMQ's powerful message queue processing capabilities. With a built-in rule engine component, the integration simplifies the process of ingesting data from EMQX Cloud to RocketMQ for storage and management, eliminating the need for complex coding.
The diagram below illustrates a typical architecture of data integration between EMQX Cloud and RocketMQ:
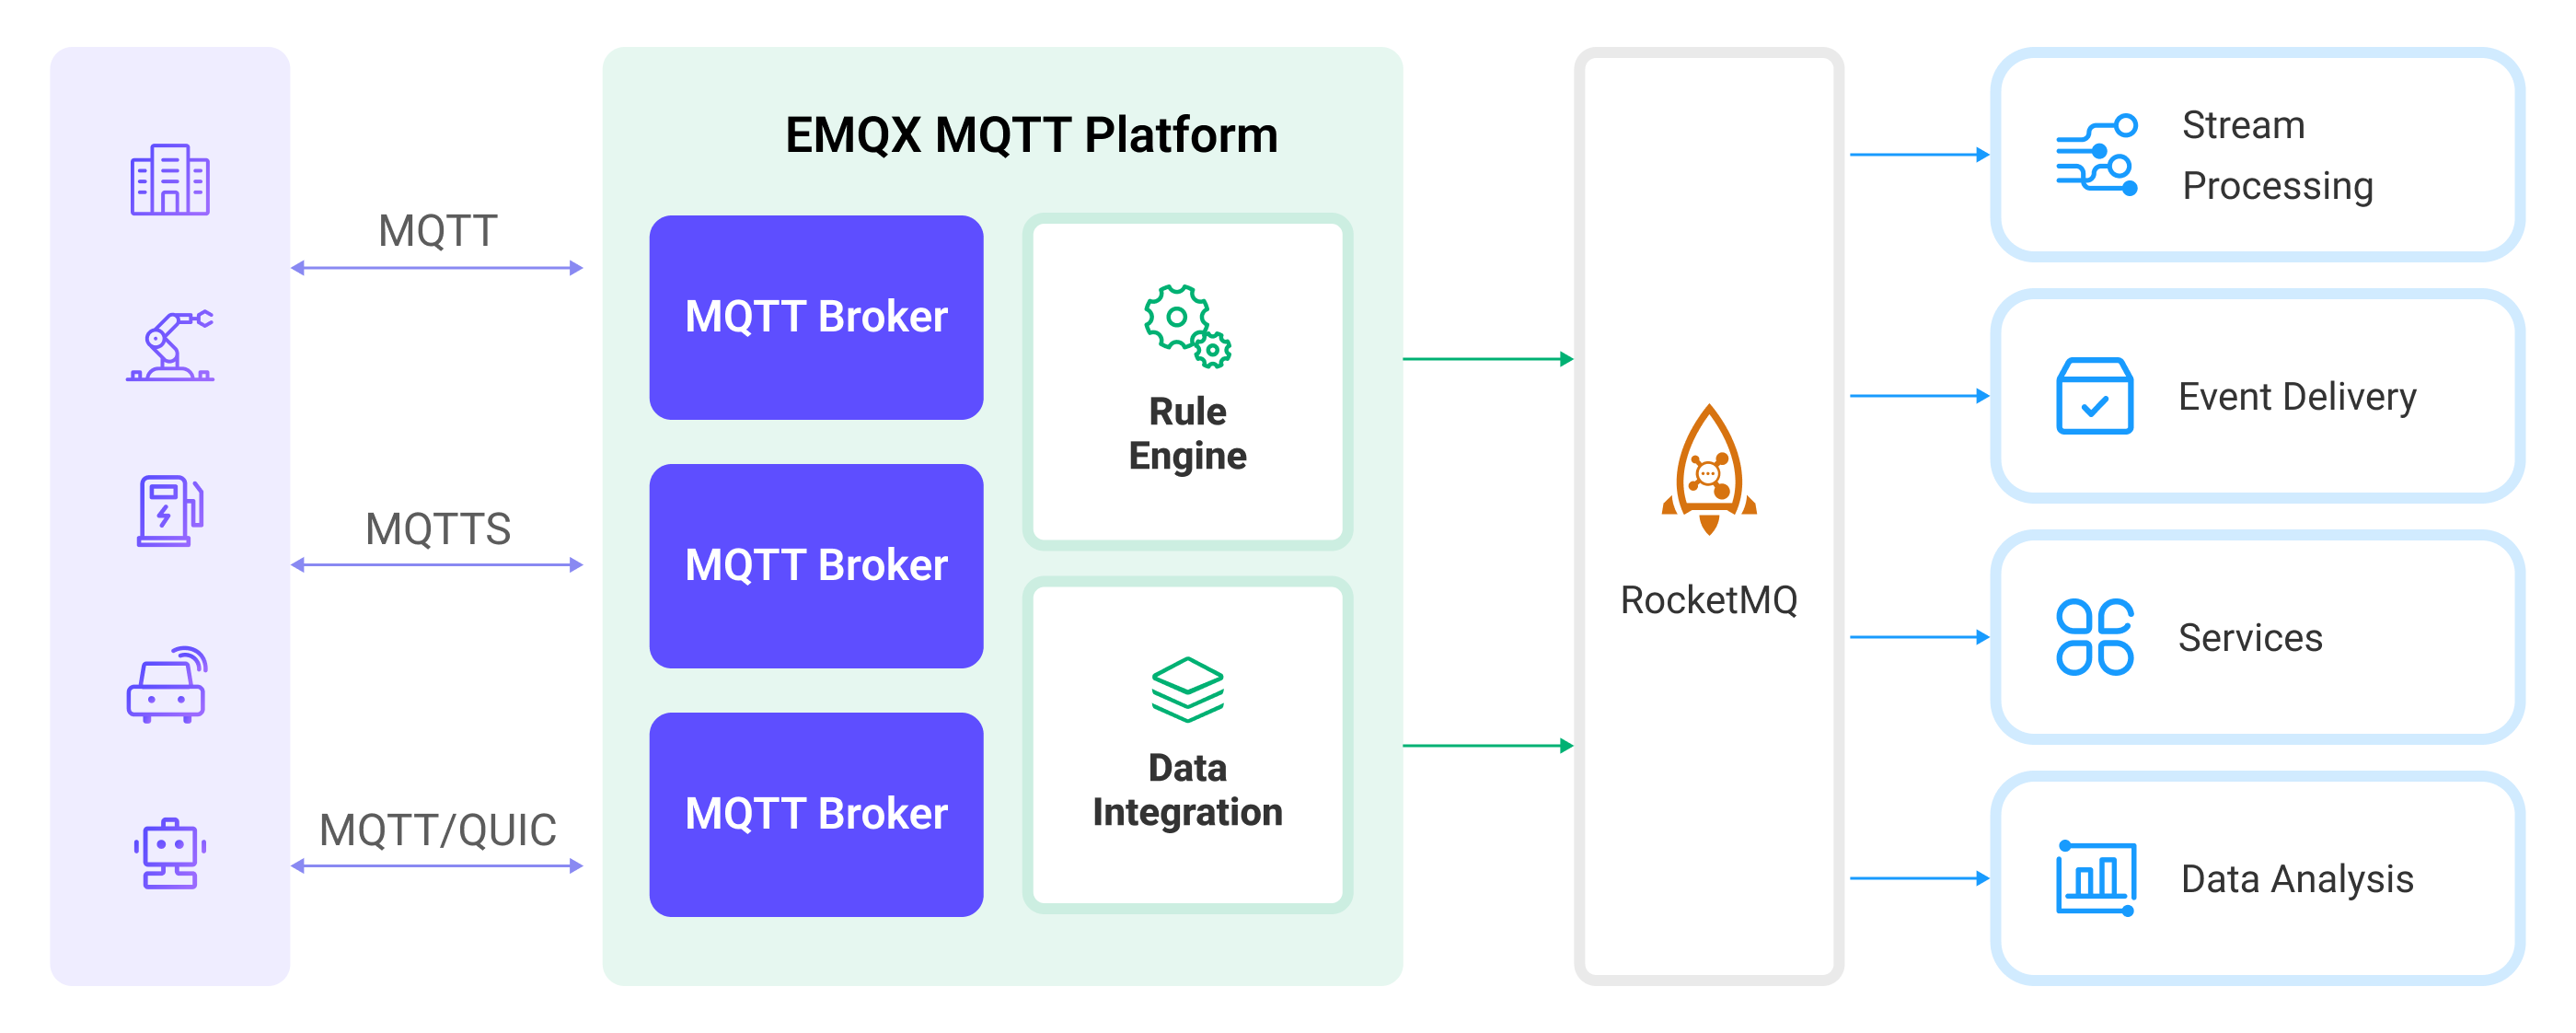
Ingesting MQTT data into RocketMQ works as follows:
- Message publication and reception: Industrial IoT devices establish successful connections to EMQX Cloud through the MQTT protocol and publish real-time MQTT data to EMQX Cloud. When EMQX Cloud receives these messages, it initiates the matching process within its rules engine.
- Message data processing: When a message arrives, it passes through the rule engine and is then processed by the rule defined in EMQX Cloud. The rules, based on predefined criteria, determine which messages need to be routed to RocketMQ. If any rules specify payload transformations, those transformations are applied, such as converting data formats, filtering out specific information, or enriching the payload with additional context.
- Data ingestion into RocketMQ: Once the rule has processed the message, it triggers an action of forwarding the messages to RocketMQ. Processed data will be seamlessly written into RocketMQ.
- Data Storage and Utilization: With the data now stored in RocketMQ, businesses can harness its querying power for various use cases. For example, in the financial industry, RocketMQ can be used as a reliable high-performance message queue to store and manage data from payment terminals and transaction systems. It can connect messages to data analysis and regulatory platforms, fulfilling requirements such as risk management, fraud detection and prevention, and regulatory compliance.
Features and Benefits
The data integration with RocketMQ brings the following features and advantages to your business:
- Reliable IoT Data Message Delivery: EMQX Cloud can reliably batch and send MQTT messages to RocketMQ, enabling the integration of IoT devices with RocketMQ and application systems.
- MQTT Message Transformation: Using the rule engine, the EMQX Cloud can filter and transform MQTT messages. Messages can undergo data extraction, filtering, enrichment, and transformation before being sent to RocketMQ.
- Cloud-Native Elastic Scaling: EMQX Cloud and RocketMQ are both applications built on cloud-native architecture, offering friendly Kubernetes (K8s) support and integration with the cloud-native ecosystem. They can infinitely and elastically scale to accommodate the rapid development of business needs.
- Flexible Topic Mapping: RocketMQ data integration supports flexible mapping of MQTT topics to RocketMQ topics, allowing easy configuration of keys (Key) and values (Value) for data in RocketMQ messages.
- Processing Capabilities in High-Throughput Scenarios: RocketMQ data integration supports both synchronous and asynchronous write modes, allowing for a flexible balance between latency and throughput according to different scenarios.
Before You Start
This section describes the preparations you need to complete before you start to create the RocketMQ data integration, including how to set up the RocketMQ server.
Prerequisites
- Knowledge about data integration
- Knowledge about data integration rules
Set up Network
Before configuring data integration, you must create an EMQX Cloud deployment and ensure network connectivity between EMQX Cloud and the target service.
For Dedicated Flex deployments:
Create a VPC Peering Connection between the EMQX Cloud VPC and the target service VPC. After the peering connection is established, EMQX Cloud can access the target service through its private IP address.
If access through a public IP is required, configure a NAT Gateway to enable outbound connectivity.
For BYOC (Bring Your Own Cloud) deployments:
Create a VPC peering connection between the VPC where the BYOC deployment is running and the VPC hosting the target service. Once peering is in place, the target service can be accessed via its private IP address.
If the target service must be accessed through a public IP, configure a NAT Gateway in the BYOC VPC using your cloud provider’s console.
Install RocketMQ
- Prepare a docker-compose file,
rocketmq.yaml, to set up the RocketMQ.
version: '3.3'

services:
  mqnamesrv:
    image: apache/rocketmq:4.9.4
    container_name: rocketmq_namesrv
    ports:
      - 9876:9876
    volumes:
      - ./rocketmq/logs:/opt/logs
      - ./rocketmq/store:/opt/store
    command: ./mqnamesrv

  mqbroker:
    image: apache/rocketmq:4.9.4
    container_name: rocketmq_broker
    ports:
      - 10909:10909
      - 10911:10911
    volumes:
      - ./rocketmq/logs:/opt/logs
      - ./rocketmq/store:/opt/store
      - ./rocketmq/conf/broker.conf:/etc/rocketmq/broker.conf
    environment:
      NAMESRV_ADDR: 'rocketmq_namesrv:9876'
      JAVA_OPTS: ' -Duser.home=/opt'
      JAVA_OPT_EXT: '-server -Xms1024m -Xmx1024m -Xmn1024m'
    command: ./mqbroker -c /etc/rocketmq/broker.conf
    depends_on:
- mqnamesrv- Prepare the folders and configurations required for running RocketMQ.
mkdir rocketmq
mkdir rocketmq/logs
mkdir rocketmq/store
mkdir rocketmq/conf- Save the below content into
rocketmq/conf/broker.conf.
brokerClusterName=DefaultCluster
brokerName=broker-a
brokerId=0

brokerIP1=change me to your real IP address

defaultTopicQueueNums=4
autoCreateTopicEnable=true
autoCreateSubscriptionGroup=true

listenPort=10911
deleteWhen=04

fileReservedTime=120
mapedFileSizeCommitLog=1073741824
mapedFileSizeConsumeQueue=300000
diskMaxUsedSpaceRatio=100
maxMessageSize=65536

brokerRole=ASYNC_MASTER

flushDiskType=ASYNC_FLUSH- Start the server.
docker-compose -f rocketmq.yaml up- Start a consumer.
docker run --rm -e NAMESRV_ADDR=host.docker.internal:9876 apache/rocketmq:4.9.4 ./tools.sh org.apache.rocketmq.example.quickstart.ConsumerTIP
In Linux, you should change the host.docker.internal to your real IP address.
Create a Connector
Before creating data integration rules, you need to first create a RocketMQ connector to access the RocketMQ server.
Go to your deployment. Click Data Integration from the left-navigation menu.If it is the first time for you to create a connector, select RocketMQ under the Data Forward category. If you have already created connectors, select New Connector and then select RocketMQ under the Data Forward category.
Connector Name: The system will automatically generate a connector name.
Enter the connection information:
- Servers:Enter the address of the RocketMQ server you want to connect to (e.g., localhost),A host entry has the following form: Host[:Port].The RocketMQ default port 9876 is used if [:Port] is not specified.
- AccessKey: RocketMQ server accessKey.
- SecretKey: RocketMQ server secretKey.
- Security Token: RocketMQ Server Security Token.
- Configure advanced settings according to your business needs (optional).
Click the Test button. If the RocketMQ service is accessible, a prompt indicating connector available will be returned.
Click the New button to complete the creation.
Next, you can create data bridge rules based on this Connector.
Create a Rule
This section demonstrates how to create a RocketMQ Rule and add action to the rule via the EMQX Cloud Console.
Click New Rule in Rules area or click the New Rule icon in the Actions column of the connector you just created.
Set the rules in the SQL Editor based on the feature to use, Our goal is to trigger the engine when the client sends a temperature and humidity message to the temp_hum/emqx topic. Here you need a certain process of SQL:
  SELECT

   timestamp as up_timestamp,
   clientid as client_id,
   payload.temp as temp,
   payload.hum as hum

  FROM

   "temp_hum/emqx"
TIP
If you are a beginner user, click SQL Examples and Try It Out to learn and test the SQL rule.
Click Next to add an action.
Select the connector you just created from the Connector dropdown box.
Configure the information for publishing messages from EMQX Cloud to the RocketMQ service:
- RocketMQ topic:
TopicTest - Message Template:Template, the default value is empty. When this value is empty the whole message will be stored in the RocketMQ.The template can be any valid string with placeholders, example:
{"up_timestamp": ${up_timestamp}, "client_id": ${client_id}, "temp": ${temp}, "hum": ${hum}}
- RocketMQ topic:
Expand Advanced Settings to configure Sync/Async mode, queue and batch, and other parameters as appropriate Advanced Settings Options (optional)
Click the Confirm button to complete the rule creation.
In the Successful new rule pop-up, click Back to Rules, thus completing the entire data integration configuration chain.
Test the Rule
You are recommended to use MQTTX to simulate temperature and humidity data reporting, but you can also use any other client.
Use MQTTX to connect to the deployment and send messages to the following Topic.
topic:
temp_hum/emqxclient id:
test_clientpayload:
json{ "temp": "27.5", "hum": "41.8" }
In the RocketMQ consumer window, we will see the following output.
bashConsumeMessageThread_please_rename_unique_group_name_4_1 Receive New Messages: [MessageExt [brokerName=broker-a, queueId=0, storeSize=208, queueOffset=0, sysFlag=0, bornTimestamp=1711354009076, bornHost=/121.43.165.169:48850, storeTimestamp=1711354009085, storeHost=/118.178.124.161:10911, msgId=76B27CA100002A9F000000000000058D, commitLogOffset=1421, bodyCRC=1137462344, reconsumeTimes=0, preparedTransactionOffset=0, toString()=Message{topic='TopicTest', flag=0, properties={MIN_OFFSET=0, MAX_OFFSET=1, CONSUME_START_TIME=1711354066863, CLUSTER=DefaultCluster}, body=[123, 34, 117, 112, 95, 116, 105, 109, 101, 115, 116, 97, 109, 112, 34, 58, 49, 55, 49, 49, 51, 53, 52, 48, 48, 57, 48, 53, 54, 44, 34, 116, 101, 109, 112, 34, 58, 34, 50, 55, 46, 53, 34, 44, 34, 104, 117, 109, 34, 58, 34, 52, 49, 46, 56, 34, 44, 34, 99, 108, 105, 101, 110, 116, 95, 105, 100, 34, 58, 34, 109, 113, 116, 116, 120, 95, 97, 50, 97, 99, 102, 100, 49, 57, 34, 125], transactionId='null'}]]